1
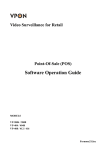
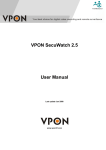
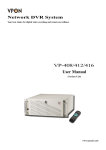
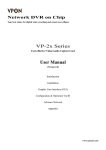
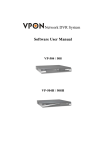
Network DVR on Chip
Your best choice for digital video recording and remote surveillance
IR Remote Control
Operation Manual
(Version:V2.0)
www.vpon21.com
Table of Contents
1. IR Remote Control Operation
1.1 How to use IR Remote Control ------------------------------------------------------------------------------ 1
1.2 How to playback recorded Video/Audio files-------------------------------------------------------------- 2
1.3 How to Back up recorded files ---------------------------------------------------------------------------- 4
1.3.1 How to Burn a CD/DVD -------------------------------------------------------------------------------- 4
1.4 Searching for a file ------------------------------------------------------------------------------------------- 4
1.5 Locking files --------------------------------------------------------------------------------------------------- 5
1. IrDA mode (IR Remote Control )
1.1 How to use IR Remote Control
Users can operate VPON via IR remote control or local keyboard. There will be an OSD screen on the
VGA monitor. Before operating VPON via IR remote control, please make sure that VPON has connected
to the VGA monitor via VGA Out connector.
A
N
B
M
C
L
D
K
J
E
F
I
G
H
A.
TV button
Exchange video monitoring from VGA to TV. Press the TV button until hear ” bee bee “sound after
few minutes DVR will auto-reboot to change to TV monitoring.
B.
Menu button
Displays the main menu.
C.
Cancel button
Closes the menu and returns to the previous screen.
D.
Up/Down/Left/Right button
Controls direction.
E.
Speed/Play/Pause/Stop/Rewind/Seek Backward/Seek Forward/Fast Forward
Used only for playing back video recorded by VPON.
F.
Number keys
Used to input number selections.
G. Contrast Setting button
Creates contrast colors on screen.
H. Color Setting button
Controls darkness and lightness of video images.
1
I.
Display button
Switches display status.
J.
Prev/Next Page button
Moves from current screen to the next or previous screens.
K. OK button
Sets the settings.
L.
Keypad button
Brings on screen the keypad function.
M. Mode Switch button
Remote, Playback, and Local buttons allow users to switch the display status. Remote is not used
on the VPON series. Playback plays back the recorded files. Local allows users to view the live
image immediately.
N.
Screen Display
Change display mode to single or quad. The In turns button is not used for the VPON series.
The IR remote control has four gray triangular buttons surrounding the OK button, resembling a baseball
diamond. These are the primary buttons that you will be using the majority of the time.
Gray “baseball diamond” button functions:
The Top and bottom gray triangular buttons highlight the selections.
The OK button is used to save information into the system.
The Right triangular button accesses the highlighted line.
The Left triangular button is usually used to move backwards.
1.2 How to playback recorded Video/Audio files
1. Press Menu key on remote controller and then use Up/Down move to playback and press “OK”
to bring up playback list as below: Access any of these files by pressing the right arrow button.
2. The alarm condition, which caused the file to be recorded, is indicated in the list. For instance, in the
screen shot shown here, the letter M next to a file indicates that the file was recorded after motion was
detected by the camera. “A” indicates that the file was recorded after a GPIO event. An asterisk (*)
before the date indicates that the file is locked.
3. To view video from a specific time, press menu (when you are already on the Playback list screen) to
search for video by time or event.
4. Press the Display button on the remote control to display various properties of the recorded file. The
date and time of recording are displayed in the upper right corner.
2
Progress - A one-hour time line is displayed at the bottom of the screen with the moving orange line
indicating the status of playback.
Recorded Data - The aqua colored line represents how much of the one hour time interval was recorded.
A full blue line means that the whole hour interval was recorded.
GPI - The screen shows where alarm triggers were generated. The red bar shows the triggers. To move to
the next motion detection or alarm trigger event, press the Right/Left arrow buttons.
3
Motion Detection - The yellow bars represent where motion detection was set off.
1.3 How to Back up recorded files
1.3.1 How to Burn a CD/DVD
If the system is equipped with a CD/RW or DVD+RW, or using a USB hard disk, then you can access the
CD/DVD burner functions through the playback menu.
1. Press the Menu button, highlight Playback, and press the right arrow button to access the recorded
files.
2. Once you have accessed the Playback list, press menu again.
3. Highlight Back-up and press the right arrow button.
4. Input the time segment you want to copy to CD and press OK.
1.4 Searching for a file
The DVR playback list can be searched for a specific file. You can conduct the search based on time,
event, or text.
To search for a recorded file:
1. While viewing the play list, press the Menu button to display the menu.
2. Select one of the following options using the Up or Down arrow buttons:
Search by Time - searches the list of recorded files for the specified recording timeline.
Search by Event - Searches the list of recorded files for the specified event such as a motion or a GPIO
trigger that occurred within the specified time interval.
Search by Text - searches the list of files recorded with POS information for specified text that was
recorded within the specified time interval.
3. Press the Right arrow button to view the submenu for the selected option.
4
4.
5.
Select each of the options such as Year, Month, Day, and so on using the Up or Down arrows.
Modify the settings as required using the Left and Right arrow buttons.
Note: If you select the Search by Event option, choose an event from GPI 1~16 and Motion 1~16. If
you choose the Select by Text option, enter the text using the Key Pad button.
6. Press OK when done to conduct the search.
1.5 Locking files
To prevent accidental deletion of recorded files, you can lock a file. This also prevents over-writing of the
file when the recording mode is set to Cyclic.
To lock a file:
1. While viewing the play list , use the Up/Down arrow buttons to select the desired file.
2. Press the Menu button to display the menu.
3. Select the Lock File! Option using the Up or Down arrow buttons:
4.Press the OK button to confirm.
The file is locked and cannot be deleted or over-written. The locked file is represented by an asterisk (*)
next to it. To unlock a file, follow the same procedure and select the Unlock File! option from the menu.
Note: Please refer CD user manual Chapter 4 OSD for more detail operation information.
5