1
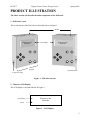
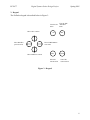
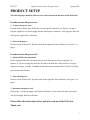
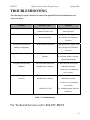
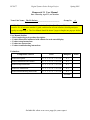
ECE 477 Digital Systems Senior Design Project Spring 2005 Homework 12: User Manual Due: Thursday, April 21, at Classtime Group No. __4__ Team Code Name: _The PicPockets_________________________ NOTE: This is one of the last sections needed to finish the Final Report. This homework will count for 4% of each team member’s grade, and therefore all team members should participate equally in completing it. The User Manual should be about 5 pages in length (one page per bullet). User Manual Outline: Brief (marketing-style) product description Product illustration annotated with callouts for each control/display Product setup instructions Product use instructions Product troubleshooting instructions Evaluation: Component/Criterion Score Multiplier Product description 0 1 2 3 4 5 6 7 8 9 10 X2 Product illustration with callouts 0 1 2 3 4 5 6 7 8 9 10 X2 Product setup instructions 0 1 2 3 4 5 6 7 8 9 10 X2 Product use instructions 0 1 2 3 4 5 6 7 8 9 10 X2 Product troubleshooting instructions 0 1 2 3 4 5 6 7 8 9 10 X2 Points TOTAL Include this sheet as a cover page for your report 1 ECE 477 Digital Systems Senior Design Project Spring 2005 The PicPocket USER’S MANUAL 2 ECE 477 Digital Systems Senior Design Project Spring 2005 TABLE OF CONTENTS Product Description………………………………………………………………… 4 Product Illustration……………………………………………………………….... 5 Product Setup……………………………………………………………………….. 7 Product Use…………………………………………………………………………. 8 Troubleshooting…………………………………………………………………….. 13 3 ECE 477 Digital Systems Senior Design Project Spring 2005 PRODUCT DESCRIPTION The PicPocket picture storage drive offers the functionality you look for in an image storage device, while incorporating the convenience of mobility required by digital photographers on the move. With the revolutionary combination of both card reader and storage drive into one compact device, you never have to worry about carrying around a laptop, clunky cords or external card reader. Everything you need is all included. Now you can archive all of your many photos, or simply give yourself more storage space. At any time, you can retrieve your files, or browse through a current archival listing. The PicPocket is also affordable. At a fraction of the cost of an equivalent amount of flash memory, it provides for all of your storage needs. We are confident that you will find no other mobile storage device which features the same storage allowance and convenience of use, along with an intuitive interface that even the electronic novice will find effortless to use. The PicPocket is your mobile image storage solution. Features Include: Stylish case Color: Clear or Black Simple interface Four-button navigation keypad Four functional buttons 20 GB internal drive Secure Digital (SD) card reader Digital LCD Display “Pocket sized” PicPocket width (inch/cm): 4.5 / 11.4 PicPocket height (inch/cm): 6.5 / 16.5 PicPocket depth (inch/cm): 2 / 5.1 Note: PicPocket internal battery will be added in later version 4 ECE 477 Digital Systems Senior Design Project Spring 2005 PRODUCT ILLUSTRATION The follow section will describe the main components of the PicPocket. 1. PicPocket Layout The overall layout of the PicPocket is described below in Figure 1: SD Slot Welcome to the PicPocket LCD Display Keypad Welcome to the PicPocket ON/OFF Switch 9 volt power input Figure 1 – PicPocket Layout 2. Character LCD Display The LCD display is described below in Figure 2: Welcome to the PicPocket Text Display Cursor ► Figure 2 – LCD Display 5 ECE 477 Digital Systems Senior Design Project Spring 2005 3. Keypad The PicPocket keypad is described below in Figure 3: View the SD menu Move UP in a menu Move BACK to previous menu SD View the IDE / hard drive menu IDE Move FORWARD to next menu SEL CANCEL Move DOWN in a menu Select the current action Cancel the current action Figure 3 - Keypad 6 ECE 477 Digital Systems Senior Design Project Spring 2005 PRODUCT SETUP The following steps should be followed every time you turn on and turn off the PicPocket. In order to turn the power on… 1. Connect the power cord. Located on the left side of the PicPocket is a round power connection, see Figure 1 on page 5. Plug the supplied 9 volt power supply into the round power connection. Next, plug the other end of the power supply into a wall outlet. 2. Turn on the power. In order to turn on the power, flip the switch on the right side of the PicPocket, see Figure 1 on page 5. In order to turn the power off… 1. Finish all PicPocket operations. Before turning off the PicPocket make sure no more functions are being completed. For instance, if you are copying files from the SD card to the hard drive make sure the “Copying…” display is no longer viewable. Finishing all functions before turning off the PicPocket will help prevent unwanted data loss. 2. Turn off the power. In order to turn off the power, flip the switch on the right side of the PicPocket, see Figure 1 on page 5. 3. Disconnect the power cord. Remove the 9 volt power supply cord from the PicPocket. Next, remove the other end of the 9 volt power supply from the wall outlet. Please follow these directions before and after each use of the PicPocket. Thank you! 7 ECE 477 Digital Systems Senior Design Project Spring 2005 PRODUCT USE The following steps should be completed after the completion of the PRODUCT SETUP. 1. Welcome message. After turning on the PicPocket you will be greeted with a message that looks like... Welcome to the PicPocket Figure 4 – Welcome Message 2. Image Message After five seconds the welcome message will disappear and the following message will be displayed… You have 0 images Figure 5 – Image Message If this is your first time using the PicPocket you will see a message, “You have 0 images”. Otherwise you will see the number of “images” on the internal hard drive. An image is a complete copy of an SD card that was written to the hard drive. 3. User’s Choice From here the display will wait for you to press either the SD button or the IDE button. If you wish to go to the SD menu insert the SD card into the appropriate slot (See Figure 1 for slot location; the SD card should be inserted with the labeling on the card facing up), press the SD button and proceed to step 4. If you wish to view the IDE menu press the IDE button and proceed to step 7. 8 ECE 477 Digital Systems Senior Design Project Spring 2005 4. SD Menu If you have inserted an SD card into the appropriate slot you will see a display like below... ►Copy to the drive Clean the drive Figure 6 – SD Menu You will now be able to “Copy to the drive” or “Clean the drive.” If an SD card is not inserted into the slot then you will see the following message… Insert SD Card Figure 7 – Insert SD Card message This message will be displayed until an SD Card is inserted or the Cancel button is pressed. 5. Copy to the Drive If you wish to copy ALL of the contents from the SD card to the hard drive make sure the cursor is on the “Copy to the drive” line and press Sel. You will see the following … Copying… [█ █ █ █ ] Figure 8 – Copying Message 9 ECE 477 Digital Systems Senior Design Project Spring 2005 While the contents of the SD card are being copied to the hard drive please do NOT turn off the PicPocket. Please wait patiently until the copying is complete. The boxes below the “Copying” message are an indication of how much time is remaining until the copy is complete. Once the copy is complete you will see the following message… Copy Finished! Figure 9 – Copy Complete After two seconds the “Copy Finished” message will disappear and the display will return to the SD Card Menu. 6. Clean the drive If you wish to delete ALL the contents of the SD card make sure the cursor is on “Clean the drive” and press the Sel button. If this is done correctly you will see the following message… Cleaning… [█ █ █ █ ] Figure 10 – Cleaning Drive While the contents of the SD card are being cleaned please do NOT turn off the PicPocket. Please wait patiently until the cleaning is complete. The boxes below the “Cleaning” message are an indication of how much time is remaining until the cleaning is complete. Once the cleaning is complete you will see the following message… Cleaning Finished! Figure 11 – Cleaning Complete 10 ECE 477 Digital Systems Senior Design Project Spring 2005 After two seconds the “Cleaning Finished” message will disappear and you will now be back to the SD Card Menu. 7. IDE Menu If you have pressed the IDE button you will see a display like below... ►Browse the images Clean all images Figure 12 – IDE Menu You will now be able to “Browse the images” or “Clean all images.” 8. Browse the images If you wish to browse the contents of the hard drive make sure the cursor is on the “Browse the images” line and press Sel. If this is done correctly you will see the following display depending on how many images are on your hard drive… ►Timestamp1 Timestamp2 Figure 13 – Browse images In order to browse the timestamps just use the UP/DOWN arrow keys on the keypad. When you wish to select a timestamp make sure the cursor is on the same line as the desired timestamp and press Sel. You will now come to another menu… ►Copy to SD Clean image Figure 14 – Hard Drive Options 11 ECE 477 Digital Systems Senior Design Project Spring 2005 From here you can either chose to copy the selected image to the SD card (In order to do this it is required that the SD card is empty. This can be done using Step 6) or clean the selected image. Use the Sel button to select either of these options. You will then either see a “Copying” message as in Step 5 or a “Cleaning” message as in Step 6. After completion of these options, the display will return to the IDE Menu (Step 7). 9. Clean all images From the IDE Menu you also have the option to clean all images from the hard drive. In order to do this move the cursor to the line that says “Clean all images” and press the Sel button. A message asking you to verify this command will be displayed… Delete ALL images on hard drive? Press Sel to continue or Cancel to go back. Figure 15 – Verify Clean If you wish to clean all images off the hard drive press the Sel button; otherwise if not press the Cancel button. 12 ECE 477 Digital Systems Senior Design Project Spring 2005 TROUBLESHOOTING The following is a quick reference for some of the possible PicPocket malfunctions and ways to fix them. Problem Possible Causes Solutions PicPocket will not turn on - Power supply may not be Follow the steps on Page 7 to connected to the wall turn on product PicPocket will not turn off - The power switch could have Unplug the power supply from shorted internally the wall and call Technical Services PicPocket has power but - Many different problems nothing is happening Unplug the power supply from the wall and call Technical Services Keypad buttons are sticking - A foreign substance is on the Remove power cord and then buttons use a damp clothes to gently clean off the buttons Copying/cleaning stops - SD card connection loose, Check that SD card is fully suddenly internal drive is shaken and firmly inserted/ set device on a stationary, level surface Copied files appear to be - SD card connection loose, Check that SD card is fully incorrect internal drive is shaken and firmly inserted/ set device on a stationary, level surface - Hard drive is full Try cleaning images from the hard drive Table 1 - Troubleshooting For Technical Services call 1-800-PIC-PKET 13