1
Opinio Documentation
http://www.objectplanet.com/Opinio/
Opinio Documentation
http://www.objectplanet.com/Opinio/
http://www.objectplanet.com/Opinio/
Table of Contents
1. Getting started ..........................................................................................................................
About ................................................................................................................................ 1
Survey quick start ................................................................................................................ 1
The user interface ................................................................................................................. 5
2. Organizing surveys and polls ......................................................................................................
Folders ............................................................................................................................... 13
Create new survey ................................................................................................................ 14
Create new poll .................................................................................................................... 15
Importing surveys and polls ................................................................................................... 16
Exporting surveys and polls ................................................................................................... 16
Copying surveys and polls ..................................................................................................... 17
Renaming surveys and polls ................................................................................................... 17
Deleting surveys and polls ..................................................................................................... 18
3. Design a survey ........................................................................................................................
Survey administration ........................................................................................................... 19
Questions ........................................................................................................................... 21
Creating questions ........................................................................................................ 21
Question types ..................................................................................................... 23
Rating ........................................................................................................ 24
Numeric ..................................................................................................... 25
Multiple Choice ........................................................................................... 27
Dropdown list .............................................................................................. 29
Matrix ........................................................................................................ 31
Creating new matrix ............................................................................. 31
Editing of matrix cells ........................................................................... 32
Big matrix navigation ........................................................................... 34
Quick editing of matrix cells .................................................................. 35
Cell groups ......................................................................................... 35
In-text elements ........................................................................................... 39
In-text element: text .............................................................................. 40
In-text element: numeric ........................................................................ 40
In-text element: dropdown ..................................................................... 40
In-text element: checkbox ...................................................................... 40
Open ended question ..................................................................................... 40
No type question .......................................................................................... 43
Navigation .......................................................................................................... 43
Plugin validators .................................................................................................. 44
Organizing questions .................................................................................................... 44
Question overview ............................................................................................... 44
Sections ............................................................................................................. 46
Text between questions ......................................................................................... 46
Add question to library .................................................................................................. 47
Copy question from library ............................................................................................ 47
Branching ................................................................................................................... 48
Branching overview .............................................................................................. 48
Branching types ................................................................................................... 51
Branching condition ............................................................................................. 51
Exclude questions ................................................................................................ 53
Piping ................................................................................................................................ 54
Piping overview ........................................................................................................... 56
Question response piping ............................................................................................... 57
Invitee data piping ........................................................................................................ 60
Fixed value piping ........................................................................................................ 60
iv
http://www.objectplanet.com/Opinio/
Survey URL parameter piping ........................................................................................ 61
Survey preview .................................................................................................................... 61
Survey look and feel ............................................................................................................. 61
Survey look and feel ..................................................................................................... 61
Survey texts ................................................................................................................ 63
Survey buttons ............................................................................................................. 65
Survey upload texts ...................................................................................................... 66
Save and return texts ..................................................................................................... 68
Login texts .................................................................................................................. 70
Quick question text edit ................................................................................................. 72
Custom question numbers .............................................................................................. 73
Survey setup ....................................................................................................................... 74
Security and privacy ..................................................................................................... 74
Survey behavior ........................................................................................................... 75
Start and stop dates ....................................................................................................... 79
Reload survey .............................................................................................................. 79
Translations ........................................................................................................................ 79
Add language .............................................................................................................. 81
Edit language settings ................................................................................................... 82
Translate survey ........................................................................................................... 82
Survey collaboration ............................................................................................................. 84
Survey comments ......................................................................................................... 84
Question comments ...................................................................................................... 85
4. Publish survey ..........................................................................................................................
Invitations .......................................................................................................................... 87
Add/Edit invitation ....................................................................................................... 87
Add invitees ................................................................................................................ 88
Export invitees ............................................................................................................ 90
Invitation list ............................................................................................................... 90
Invitee data format ....................................................................................................... 91
Manage Invitees ........................................................................................................... 92
Invitation details .......................................................................................................... 94
Phone interviews .................................................................................................................. 95
5. Design a poll ............................................................................................................................
Poll administration ............................................................................................................... 97
Questions ........................................................................................................................... 98
Creating questions ........................................................................................................ 98
Organizing questions .................................................................................................... 98
Add question to library .................................................................................................. 98
Copy question from library ............................................................................................ 98
Piping ................................................................................................................................ 98
Poll preview ........................................................................................................................ 98
Poll look and feel ................................................................................................................. 98
Poll look and feel ......................................................................................................... 98
Poll texts .................................................................................................................... 100
Poll buttons ................................................................................................................. 101
Quick question text edit for polls ..................................................................................... 102
Quick poll chart edit ..................................................................................................... 102
Custom question numbers .............................................................................................. 102
Poll setup ........................................................................................................................... 102
Poll behavior ............................................................................................................... 102
Start and stop dates ....................................................................................................... 104
Convert to survey ......................................................................................................... 105
Reload poll ................................................................................................................. 105
Translations ........................................................................................................................ 105
Poll collaboration ................................................................................................................. 105
6. Publish poll .............................................................................................................................
Publish poll ......................................................................................................................... 106
v
http://www.objectplanet.com/Opinio/
7. Reports and data analysis ...........................................................................................................
Manage responses ................................................................................................................ 107
Delete responses .................................................................................................................. 107
Reports .............................................................................................................................. 108
New report .................................................................................................................. 108
Copy report ................................................................................................................. 109
Rename report ............................................................................................................. 109
Report summary .......................................................................................................... 109
Report structure ........................................................................................................... 110
Elements ............................................................................................................ 111
Chart attributes ............................................................................................ 118
Invalid elements ........................................................................................... 123
Text and labels ............................................................................................................ 123
General report texts .............................................................................................. 124
General report labels ............................................................................................. 124
Response value labels ........................................................................................... 125
Statistics labels .................................................................................................... 129
Look and feel .............................................................................................................. 129
Report filters ............................................................................................................... 130
Invalid filters ....................................................................................................... 131
Report settings ............................................................................................................. 132
Raw data export settings ................................................................................................ 133
Auto-creating reports ............................................................................................................ 137
8. Publish your reports (portals) ......................................................................................................
Report portals ...................................................................................................................... 139
.......................................................................................................................................... 139
Portal zones ........................................................................................................................ 143
Portal security ..................................................................................................................... 144
Report portal list .................................................................................................................. 144
9. Panel Management ....................................................................................................................
Designing panel ................................................................................................................... 146
Panel categories ........................................................................................................... 146
Panel attributes ............................................................................................................ 147
Profile form ................................................................................................................ 150
Panelists ............................................................................................................................. 150
Panel portal ................................................................................................................. 150
Panel portal integration ......................................................................................... 151
Panelist administration .................................................................................................. 153
Sample definitions ................................................................................................................ 153
Edit sample definition ................................................................................................... 154
10. Reusable resources ..................................................................................................................
Dropdown lists .................................................................................................................... 156
Invitee lists ......................................................................................................................... 156
Question library ................................................................................................................... 157
Headers and footers .............................................................................................................. 158
CSS files ............................................................................................................................ 159
Images ............................................................................................................................... 160
HTML files ......................................................................................................................... 161
Files .................................................................................................................................. 163
11. My profile .............................................................................................................................
User preferences .................................................................................................................. 166
Permissions ......................................................................................................................... 166
12. Administrators guide ...............................................................................................................
Setup ................................................................................................................................. 168
Plugin setup ................................................................................................................ 171
License setup .............................................................................................................. 172
User management ................................................................................................................. 174
Create a new user ......................................................................................................... 174
vi
http://www.objectplanet.com/Opinio/
User list ..................................................................................................................... 174
User groups ................................................................................................................ 175
Permissions ................................................................................................................. 175
.................................................................................................................................. 176
Performance hints ................................................................................................................ 177
The Opinio log file ............................................................................................................... 179
Application maintenance ....................................................................................................... 179
System and data integration .................................................................................................... 179
Email report appender ........................................................................................................... 179
13. Appendix ...............................................................................................................................
Color codes ......................................................................................................................... 181
Html help ........................................................................................................................... 182
Language encoding .............................................................................................................. 183
Translate Opinio .................................................................................................................. 183
Create your own plugin ......................................................................................................... 184
Introduction to plugins .................................................................................................. 184
Plugin architecture ....................................................................................................... 185
The event bus .............................................................................................................. 186
Plugin setup ................................................................................................................ 187
Plugin functions ........................................................................................................... 188
Plugin interfaces .......................................................................................................... 191
Plugin screens look and feel ........................................................................................... 191
The plugin api ............................................................................................................. 192
The properties ............................................................................................................. 192
Compiling the plugin .................................................................................................... 192
vii
http://www.objectplanet.com/Opinio/
List of Examples
3.1. Rating question ...................................................................................................................... 25
3.2. Numeric question ................................................................................................................... 26
3.3. Dropdown question ................................................................................................................ 31
3.4. Matrix question ...................................................................................................................... 31
3.5. Cell group Rating ................................................................................................................... 37
3.6. Cell group Ranking ................................................................................................................. 37
3.7. Cell group Intersection ............................................................................................................ 38
3.8. Cell group Checkboxes ............................................................................................................ 38
3.9. Cell group Custom ................................................................................................................. 38
3.10. In-text elements .................................................................................................................... 39
3.11. Open-ended question ............................................................................................................. 42
3.12. Display numbers .................................................................................................................. 74
7.1. Raw data export output ............................................................................................................ 136
7.2. Auto created reports ................................................................................................................ 138
13.1. Plugin example .................................................................................................................... 186
viii
http://www.objectplanet.com/Opinio/
Chapter 1. Getting started
About
Opinio is a comprehensive system to create, publish, analyze and maintain surveys. With java/servlets at its base, it
is a platform independent, robust and scalable survey system.
Opinio is designed to be:
•
Platform/OS independent. The use of Java/servlets makes this possible.
•
Database independent. All database interaction are in compliance with the ANSI standard. This enables Opinio
to support databases like Oracle, Microsoft Sql Server, DB2, PostgreSQL, MySql and others.
•
Client independent. The administration module is designed as a web-based interface, but the survey module is
designed to handle any type of client. A web based survey module has been implemented, and new client types
will be added soon (WAP, PDAs, Email, phone, etc).
•
Language independent. New languages are very easy to add.
Opinio stores all its information in a central database; surveys, responses to surveys, admin users and access rights all stored in one single place. Opinio does not require a specific database engine. Apache Derby (default), Oracle,
MS Sql server, IBM DB2, MySql, and Postgres are supported.
The latest version of Opinio is available here: http://www.objectplanet.com/Opinio
Third party software
•
Struts [http://jakarta.apache.org/struts/index.html]. This product includes software developed by the Apache
Software Foundation (http://www.apache.org/).
•
Apache Derby [http://db.apache.org/derby/]. This product includes the Apache Derby database, a project of the
Apache Software Foundation (http://www.apache.org [http://www.apache.org/]).
•
OSCache [http://www.opensymphony.com/]. This product includes software developed by the OpenSymphony
Group (http://www.opensymphony.com/).
•
Proxool [http://proxool.sourceforge.net/]. This product includes software developed by the Proxool project (The
latest version is available at http://proxool.sourceforge.net/).
•
Log4J [http://jakarta.apache.org/log4j/docs/index.html]. This product includes software developed by the Apache
Software Foundation (http://www.apache.org [http://www.apache.org/]).
•
JGroups [http://www.jgroups.org/]. This product includes software developed by the JGroups project
(http://www.jgroups.org/).
•
JasperReports [http://jasperforge.org/]. This product includes software developed by JasperSoft.
Survey quick start
This quick start guide will outline the basic steps to create a survey. For more detailed documentation, see Design a
survey.
1
http://www.objectplanet.com/Opinio/
•
While in a folder, click on "New Survey" in the menu box on the left side of the screen.
•
Give the survey a name. The name is not visible to respondents, but is used to identify the survey in Opinio.
When the number of surveys in the system becomes large, it is useful with names that are descriptive and unique.
Click on "create".
•
The survey is now created. You will see it in the list of surveys in the folder you are currently located. Click on
the survey in the list.
•
This screen is the main survey screen. It will tell you the status of the survey, and give you access to all survey
functions. Let's create the questions. Click on "Questions" in the menu box on the left side.
2
http://www.objectplanet.com/Opinio/
•
This is the screen to design your question. The question text is entered in the big text box. The tabs below lets
you choose between the main question types:
•
Rating: Lets the respondent enter a value on a scale.
•
Multiple choice: Lets the respondent select one or more items among a set of choices.
•
Numeric: Lets the respondent enter a numeric value.
•
Dropdown: Lets the respondent select a value in a drop-down list (also called selection list).
•
Matrix: If none of the basic question types fit your needs, use the matrix. This allows for extreme flexibility.
•
No type: None of the other types. Use this if you do not want any input for your question, or if you want to
add a text-box. See the settings further down the screen for this. It is also possible to enter input fields and
buttons directly into the question text itself (see In-text elements.
Select the question type, then set the various options for this type. Click on "next" (top or bottom of the main
content box) to create the next question, or "finish" if you are done creating questions.
•
After finishing your questions, you will enter the question list screen. This screen will let you organize your
questions, by moving, deleting and editing them. This screen is also used to insert and manage survey sections
and pages.
3
http://www.objectplanet.com/Opinio/
Keep in mind that you can at any time click on "Preview Survey" in the menu box to see what the survey will
look like for your respondents.
•
Once the questions are made, you can go on to customize the survey settings. You can change the survey look &
feel, behavior, etc. In this quick guide, we will let all survey features stay at default settings.
•
You have now created your survey! Now let's look at how to publish it. Or in other words, how to make it
available to your respondents. Click on "Back to survey" in the menu box, then click on "Publish survey". You
will get this screen:
4
http://www.objectplanet.com/Opinio/
•
A survey can be published in several ways:
•
Send the survey URL (the address of the survey), as written in the screen above, to your respondents by
email.
•
Use the Opinio built-in invitation feature to send your survey invitations. This allow you to track your
invitees (who responded, who did not), send reminders automatically to those who did not respond, add
custom data etc.
•
Perform telephone interviews. This means that the telephone interviewer asks the questions, and enters the
responses as given by the respondent.
•
Post the survey URL on a web page. If you do not know how to do this, ask your webmaster to do it (the
person who is responsible for maintaining your web site).
•
Reports are available live while respondents are completing your survey. This allows you to monitor the
progress, and invite more people to take the survey if needed. See Chapter 7 for more information about
reporting.
•
This was the basic steps for building a survey. Opinio offers a wealth of possibilities for creating, designing,
publishing surveys and reporting the collected data. See other sections of this documentation for more details.
The user interface
The user interface contains common elements found on most screens in the application. It is of great advantage to
understand the basics of these elements.
5
http://www.objectplanet.com/Opinio/
•
My Profile: Edit your own profile. See My Profile for details.
•
Logout: Terminates your session. It is always a good idea to actively log out when you are finished using Opinio,
so that others can't access your account while you are away from your computer.
•
Main menu: The main menu is seen on all screens in the system. It contains links to main areas of the
application:
•
Surveys: Survey creation and management. See Design a survey for details.
•
Report Portals: Access this link to create or manage report portals. Use report portals to publish your survey
reports. See Chapter 8 for more details.
•
My Panel: Link to the panel management module, which allows building a database of panelists, with
attributes to make survey sampling and invitation easier. See Chapter 9 for more details.
•
Resources: To manage your reusable resources, like files, headers/footers, dropdown lists, invitation lists etc.
See Chapter 10 for more details.
•
Users: For managing Opinio users (authors/admins). Only users with access rights to manage users will see
6
http://www.objectplanet.com/Opinio/
this menu item. See the section called “User management” for more details.
•
Setup: The Opinio configuration module. Only users with super-user access can use this area. See the section
called “Setup” for more details.
•
Help: Link to the main page of the user documentation.
•
Page Icon: On each page in the system, there is a large icon on the left side below the main menu. This indicates
the function of the current page. For instance, if you are viewing the content of a folder, a folder-icon will be
displayed as the page icon. This icon exists to make the user interface more intuitive. It is often easier to
recognize the page when looking at this icon, instead of reading the text on the page.
•
Crumbs: This is the collection of links right below the main menu. It is a very useful indication of your current
location in the system. For example, it will tell you exactly which folder (or sub folder), the survey, and report
you are currently working with. You can then click directly on the crumbs items to access one or more levels up.
•
Menu: All pages in the system have a page-specific sub menus. When you are viewing folder contents, for
example, you will see that the menu contains links to create new folders, import to folder, and so on. The menu
may also contain other useful links, to shorten the number of clicks when working with various resources (link to
survey admin page when editing questions, for example).
7
http://www.objectplanet.com/Opinio/
•
Page title: Each page has a page title above the main content box, which will describe the purpose of that page.
•
Main page content: The main content box is displaying the actual page content. This could be a form for editing
a resource, or various other information.
8
http://www.objectplanet.com/Opinio/
•
Main page content help: The help-icon at the top right corner of the main content box will link directly to the
place in the user documentation describing the current page.
•
Guide: The guide-box on the left side of the screen (below the page menu) is meant to provide a short
description of the current page. For more complex resources, like surveys, the context guide will display a list of
steps recommended for creating the resource. The context guide will indicate what steps you have begun using
(blue overlay icon on the steps), and what steps are completed (green check-mark on steps). On the lower right
corner of the guide, there is a link to the guide details.
If you have limited access to the resource you are viewing, the guide items is either not shown or displayed as
text items (no links).
9
http://www.objectplanet.com/Opinio/
The guide details screen will display each step, and a history for each step, and which user has performed each
step. Each step must be set to completed-status manually if desired, or may be reset. Note that these steps are
simply a guide and a checklist, they do not have to be set to complete when you have finished creating your
surveys or other resources.
10
http://www.objectplanet.com/Opinio/
•
Recent items: The items at the lower left side of the screen contains the items you have recently accessed. This is
a very useful and quick way go back to items you have recently been working with.
11
http://www.objectplanet.com/Opinio/
12
http://www.objectplanet.com/Opinio/
Chapter 2. Organizing surveys and
polls
All surveys and polls are organized in folders. An unlimited number of sub-folders, and an unlimited number of
folder levels, makes it possible to create an hierarchical structure suitable to any organization.
The installation will create a main folder, which may contain surveys, polls and sub-folders. This folder is editable
but can not be deleted. When navigating through folders, the current folder is always shown at the top, below the
main menu.
From this screen you can access, copy, export or delete surveys and polls (if there are any).
Folders
Folder is a container for surveys, polls and sub folders.
To create a new folder press the “new sub-folder” link in the Menu box of the current folder. Then name it and add
an optional description. Select a sorting method for surveys, polls and sub-folders in the new folder. Click “Save”.
The folder will be created as a sub folder of the current folder.
13
http://www.objectplanet.com/Opinio/
To edit the current folder, click on the "Edit folder" link in the Menu box. Make the changes and save.
To delete a folder you need to go one level up, to the parent folder. Click on the Delete link in the Action column in
the Sub-folders table.
Note
Only empty folders can be deleted.
Create new survey
While in a folder, click on "New Survey" in the menu box on the left side of the screen.
14
http://www.objectplanet.com/Opinio/
Give the survey a name. The name is not visible to respondents, but is used to identify the survey in Opinio. When
the number of surveys in the system becomes large, it is useful with names that are descriptive and unique. Click on
"Create" button. The survey is now created. You will see it in the list of surveys in the folder you are currently
located. Click on this survey in the list to go to the survey main page.
Create new poll
While in a folder, click on "New Poll" in the menu box on the left side of the screen.
Give the poll a name. The name is not visible to respondents, but is used to identify the poll in Opinio. When the
number of surveys and polls in the system becomes large, it is useful with names that are descriptive and unique.
Click on "Create" button.
The poll is now created. You will see it in the list of poll in the folder you are currently located. Click on this poll in
the list to go to the poll main page.
15
http://www.objectplanet.com/Opinio/
Importing surveys and polls
Importing surveys is useful when moving surveys from one installation to another. The XML file for the survey
contains the structure and information about the survey itself, as well as reports and respondents (both optional,
depends on selections made when exporting).
Note
An imported survey will always be placed in the current folder.
To import a survey click the “Import survey” link in the Menu box for the folder you want to import the survey to. In
the next window, select either to browse your system for the XML file (or a zip file containing the XML file) or type
in the URL to where it is located.
Example of XML file link: http://www.yourserver.com/customer_survey.xml
Important
The file must be a valid XML file. The only way to ensure that the XML code is valid, is to produce the
XML file by the Opinio export function.
If you would like to give the imported survey a new name, click on the checkbox and enter the new survey name.
Please note that this option is optional, and if not selected the survey name from the XML file will be used.
When the “Import” button is clicked, the file will be uploaded to the server. Be aware of that this may take some
time, depends on how big the file is. We recommend ZIP files when importing surveys, a ZIP file is also what
Opinio produces when you export a survey. XML files bigger than 2 Mb will be refused. A survey XML file
compresses well - usually between 90 and 99 percent.
As soon as the file has been uploaded to the server, Opinio will read and store the elements in the XML file. XML
files uploaded from your system will be read and stored before returning to the survey list, while import of all ZIP
files and XML files from a URL will start a new import process. This import process may also take a while,
especially if the XML file contains many respondents.
When a survey is imported, the XML file is read, and all the database entries have been added in the database. The
XML file will not be stored on the server.
If the imported XML file contains 1 or more reports, standard reports will not be created for the survey (the summary
and comment reports).
Importing polls.
Importing of polls is similar to importing of surveys.
Exporting surveys and polls
16
http://www.objectplanet.com/Opinio/
Exports the survey, including the questions in XML format. Choose your respective language encoding (see
language encoding), select "Include reports" and "Include response data" if required and click “Export”.
Important
Style sheets (CSS) and images will not be included in the export, since these are simply links to files.
If there are no customized reports in your survey, there is no point in including the standard reports, because they
will be created if you import the survey. The import feature will always create the standard reports if the XML file
does not contain any reports. By including response data you can easily import the survey with all the responses in
another Opinio installation.
Exporting polls.
Exporting of polls is similar to exporting of surveys. The only difference is that report are always included in the
export, because poll result (chart) comes from the reports.
Copying surveys and polls
This functionality provides a way to copy a survey within a survey folder. The link is accessible from Action column
in the survey list table. Enter the in the name of the copy, and click the Copy button.
Copying polls.
Copying polls is similar to copying of surveys.
Renaming surveys and polls
Rename survey screen is accessible from Action column in the survey list table. Survey name is used in the
administration screens only. It should be descriptive, to make it easier to find your survey later among a list of other
surveys.
17
http://www.objectplanet.com/Opinio/
Renaming polls.
Renaming polls is similar to renaming surveys.
Deleting surveys and polls
Delete survey link is accessible from Action column in the survey list table. The survey must be empty (contain no
respondents). Delete the responses before you can delete the survey. This is a data security measure, added by
design.
Deleting polls.
Deleting polls is similar to deleting surveys.
18
http://www.objectplanet.com/Opinio/
Chapter 3. Design a survey
Once the survey is created, click on the survey name from the folder content screen. You will be redirected to the
main survey screen: survey administration screen. From here you can design the survey, invite people to participate
in the survey and monitor the data collected.
Designing a survey starts from the survey administration screen, since it gives you access to all survey features.
Design steps.
Here is the complete list of survey design steps. See the quick start chapter for a short description on how to create a
survey.
1.
Create questions
2.
Create conditional branching if needed.
3.
Customize look and feel
4.
Configure survey security
5.
Configure survey behavior
6.
Translate survey
7.
Test the survey to see that it looks and behaves as intended. See "Checklist before survey publishing."
8.
Publish the survey
survey.
Survey administration
Survey administration screen is the survey home page. It displays important survey details and give you access to the
main survey features.
19
http://www.objectplanet.com/Opinio/
Survey status. The traffic light icon on the right of the screen indicates the survey status. If the survey is open for
responses, the icon light is green. If the survey is not accessible, the light is red.
A survey can be closed for the following reasons:
•
Closed by date (current date is before start date or after stop date).
•
Locked by an administrator user (usually yourself). If the survey is locked, the survey designer has edited the
survey in some way. The survey cannot be open if it is being edited. To make the survey available immediately,
click on the “unlock survey” link under the status icon. You can only unlock the survey that has been locked by
you. If another survey designer has locked the survey you will have to wait until he/she is done.
•
Error in survey. If the system has detected an error in the survey, it will notify the survey designer by adding an
error message at the top of the survey administration screen and changing survey status to Error. Respondents
cannot answer the survey with errors because this might result in data inconsistency.
•
Number of allowed responses for the survey has been exceeded. See the section called “Survey behavior” [76].
Besides the survey status, you can also see the important survey details on the administration screen:
•
Survey link. Link for respondents to answer the survey.
Start date. The date when survey becomes available to respondents. Click on the link to edit the date.
Stop date. The date when survey becomes closed for respondents. Click on the link to edit the date.
Number of responses. Displays number of survey responses:
•
Stored responses - responses currently stored in the database. Includes both complete and incomplete
responses. Incomplete respondents include respondents who abandoned the survey and respondents who
saved the survey for later completion.
20
http://www.objectplanet.com/Opinio/
•
Ongoing responses - number of respondents currently responding to the survey.
•
Completed responses - number of respondents who have completed the survey and stored in the database.
•
Number of questions - number of questions the survey contains.
•
Number of translations - number of languages the survey is translated to. Does not include the default language.
See the section called “Translations”
•
Maximum number of responses - number of respondents that can answer the survey. When this number is
reached, the survey will be closed and no more respondents will answer the survey. See the section called
“Survey behavior”
•
Survey authentication - currently used authentication method for the survey. See the section called “Security and
privacy”
•
Allow multiple submissions - method used to prevent respondents from multiple survey submissions, if any. See
the section called “Survey behavior”
•
Anonymity of respondents in invitations - currently used level of anonymity for invitations. See the section called
“Security and privacy” and invitations
Questions
Creating questions
To access this feature, click on "questions" in the menu box.
Start creating question by entering question text. You can use Advanced edit mode if you need more control over
question look and feel. Question text is required.
21
http://www.objectplanet.com/Opinio/
Select question type by clicking on the tab with the desired type name. Enter all necessary details for that question
type.
Tip
You can preview question at any time by clicking on the "Preview question" in the Menu box. The preview
will save the question first and then display it in a popup. Note that if some of the required input is not
22
http://www.objectplanet.com/Opinio/
entered, the validation error will be reported.
Buttons under question text.
Under the question text you will find several buttons that allow you to enter and edit in-text elements, piping
elements and images.
IMPORTANT: Remember that all actions available from these buttons will place tags into the question text. It is
important that cursor is located at the position where you want to enter the element. For example, if you want to
place an image after text "Do you like this picture?", place the cursor after the "?" if you want picture to appear after
the text. Place The cursor at the beginning of the text if you want to place the picture before the text.
•
New in-text element. Allows you to define and insert a new in-text element to the question text at the cursor
position.
•
Edit in-text elements. Allows you to edit and delete existing in-text elements.
•
New piping element. Allows you to create and edit piping elements
•
Insert picture. Allows you to insert a picture at the cursor position. See the section called “Images”
Advanced settings.
Click on the Advanced settings to expand the section.
•
Answer rotation. Select this option if you want the options in a multiple choice question and dropdown lists be
displayed in a random order. Turning this option on will enable randomizations for all lists in the current
question. This means that items in a dropdown list inside a matrix cell will be randomized, for example.
•
Custom question id. This field is optional, but can be used to set a custom id in the question for easier identifying
the question. The custom question id will be stored in the OPS_QuestionAttribute database table and will also be
included in the XML export. It accepts any kind of input.
•
Question layout. Determines where your question text should be placed relative to the input fields, lists etc. You
can select "show text above input fields" or "show text to left of input fields".
Question types
There are five main question types:
•
Rating. Allows the respondent to select a rating level.
•
Numeric. Allows the respondent to enter a number. Prevents any other type of input.
•
Multiple choice. Allows the respondent to select one or more choices from a list. Same as Dropdown but choices
are displayed with selection button in front.
•
Dropdown. Allows the respondent to select one or more choices from a list. Same as multiple choice, but items
are displayed in a dropdown list.
•
Matrix. Allows respondent to respond to almost any question layout and type. Labels, input fields and lists are
organized in cells in a table. This is a very flexible question type and can be used for complex questions like for
example rating of several items in a single question or rating and importance question.
23
http://www.objectplanet.com/Opinio/
In addition to the main type, all questions can contains the following additional elements:
•
In-text elements. Allows respondent to select answer from a list and enter text and numbers directly in the
question text. Perfect for essay questions and fill in the blanks.
•
Open-ended question. Allows respondent to enter any text at the end of the question. Perfect for "Comment"
boxes.
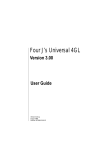
Rating
A rating/scale type question. The respondent must choose a value from 1 to N, where N is the number of levels in the
scale (2-20). This question type also allows for a non-selection answer (NA, don't know etc).
•
Minimum value label: Denotes the lowest value on the scale. E.g. "Bad"
•
Maximum value label: Denotes the highest value on the scale. E.g. "good"
24
http://www.objectplanet.com/Opinio/
•
No selection label: If the question does not apply to the respondent, an "N/A", or "don't know" is useful if an
answer is required to the question. If this field is left blank, no button for N/A will be displayed on the survey
form.
•
Scale: Here you set the number of levels for the rating. The scale can be from 1-2 to 1-20.
•
Required: Makes the response required. If selected, a validation message must also be entered.
Example 3.1. Rating question
Numeric
If the input for the question is strictly numeric, select this type. Although it is possible to use a free text input field
for this, it is recommended to use this question type for these reasons:
•
Numbers can be validated (select either integer or decimal, and min/max values). If anything other than a number
is typed into this field, the system will automatically tell the respondent about it.
•
More statistics can be computed with a numeric field in the reports.
•
Will occupy less space in the database than text-fields.
•
Improves database performance.
NOTE: Use numeric question type only for numbers you want statistic analysis for. For inputs like telephone
numbers, credit cards and country zip codes text input type is recommended.
25
http://www.objectplanet.com/Opinio/
•
Type. Choose integer or decimal depending on the type of question. This will also cause Opinio to restrict the
user to enter the correct type of number.
•
Prefix label. Optional. Placed in front of the field, like the text "I am" in the example under.
•
Postfix label. Optional. Placed after the field, like the text "years old" in the example under.
•
Field size. The visible size of the numeric field.
•
Validation. Set various restrictions on the user input, along with appropriate error messages if input by the
respondent is incorrect.
Example 3.2. Numeric question
26
http://www.objectplanet.com/Opinio/
Multiple Choice
For questions that require a selection between alternatives, you should select this option.
Choices. Set up all available choices. For each choice, you can set the following:
Use images: Enables the feature to display images with each or some of the choices.
•
The choice label. Type in the text to be displayed. In most cases this is the only thing you need to enter. Click
Tab to go to the next choice label.
•
Label position. Position of the option label relative to the selection button. The possibilities are:
•
button right
•
button left
•
button top
•
button bottom
Example:
•
Image. Each choice can include an image. If you want to use images you need to enable them first by turning on
the enable image checkbox. To add an image, click on the small image-button. You can either select an image, or
upload a new image from the dialog box that will appear. See the section called “Images”.
•
Image alignment. This will indicate the position of the image, relative to the text and button. The alignment
choices are:
•
image right
•
image left
•
image top
•
image bottom
Example of using images:
27
http://www.objectplanet.com/Opinio/
In this example, the button alignment was set to "bottom" (relative to image/text), and the image alignment is set
to "bottom" (relative to the text).
•
Edit-buttons. To make editing the multiple choice question easier, buttons are provided to move choices up and
down, and to insert and delete. When moving up, the current choice will be swapped with the preceding choice.
When moving down, the current choice will be swapped with the choice after it. When deleting, all choices after
it will be moved one position up. When inserting, all choices following the current choice will be moved down,
and a new empty choice will appear.
Allow multiple selections: If this feature is selected, the choices for this question will appear as "checkboxes",
meaning each option can be turned on or off. If this feature is not selected, the options for this question will appear as
"radio-buttons", meaning only one of the options can be selected at any time. Example:
Last choice has text field for other: Includes a text-field for entering "other", if none of the other choices apply. The
text field is of size 10, with 255 character maximum. Example:
28
http://www.objectplanet.com/Opinio/
Columns: The number of columns to display the choices. With many choices, more than one column will often look
better. If more than one column is used, the choices will be displayed in this order (this example has 20 choices,
displayed in 4 columns, alphabetically):
Selections required: This lets you control how many of the choices the respondent must answer (minimum
selections). Set this to 3, and the respondent must select 3 or more options in the multiple choice question.
Allowed selections: controls how many choices the respondent may select (max selections).
Validation messages: lets you define what messages is given to the respondent if the requirements of minimum/
maximum selections are not met.
Dropdown list
A dropdown list is useful if you need to ask a question that has many alternatives, like a selection of the countries in
the world.
If you have a predefined dropdown that you want to use, select the desired dropdown from the bank. the page will be
updating with value from the dropdown bank.
29
http://www.objectplanet.com/Opinio/
•
Multiple selections on: Allows for selecting more than one item in the list.
•
Sort alphabetically: Sorts all the items in the list alphabetically when storing in the database. NOTE: Sorting
alphabetically does not work well with numbers. To get numbers listed correctly, enter then in the correct
sequence and let this option be turned off.
•
Dropdown size: Number of displayed items. If the size is larger than one, it is actually not a "dropdown" list
anymore, but a vertically scrollable selection-list (as in the example above).
•
Dropdown label: The displayed label of the dropdown list when no items are selected. This will be part of the
list, but no value will be represented by this item, so the respondents can not select it. NOTE: It does not make
sense to use a label if the size of the list is larger than one. This means that the first item will be this label, and it
will look like it is part of the list.
30
http://www.objectplanet.com/Opinio/
•
Items: Type each item in the dropdown list on one single line. Items must be entered one by one, and only one
per line.
A dropdown list lets you distinguish between what is displayed in the list, and the values actually saved in the
database. This may be necessary, if you are integrating the data with an external system, for example.
Let's say you make a list of countries, and you want to display the countries as they are normally written. e.g.
Germany, France, Italy etc. But you want to save the codes, like DE, FR, IT. This is done by typing one item per
line as before, but include both the value to be displayed, and what is stored, separated by "#@". To enter the
countries above, type: Germany#@DE, France#@FR, Italy#@IT.
•
Validation: selections required: Enforces the respondent to select at least this many items.
•
Validation: selections allowed: Disallows the user to select more than this number of items from the list.
Example 3.3. Dropdown question
Matrix
The Matrix is useful if no other type can handle your question. The reason for this is that the matrix question gives
you extreme flexibility to construct your question.
A matrix question is essentially a table with columns, rows and cells. Each cell may contain a label, text field,
numeric field, drop down list, checkbox or radio-button. It can also be empty.
Example 3.4. Matrix question
Creating new matrix
Set the size of the matrix, and select type. From here, you can define how the cells in the matrix are going to relate to
31
http://www.objectplanet.com/Opinio/
each other by selecting the right type:
•
Rating scale. This means that each row in the cell group can be rated with a value horizontally. You should then
supply with a label for each row and each column.
•
Ranking. Makes it possible to enforce a response with one (and only one) selection per column and row.
•
Intersection. Allow for one selection for the entire cell group - an intersection between the columns and rows.
•
Checkboxes. A group with checkboxes in every cell. Checkboxes represent a true/false answer.
•
Dual scale. Creates two group. Makes it possible to do rating and importance for each item in the left column.
•
Custom. Allows for any type of input in each cell. This type of association does not impose a strong relation
between the cells, other than a common background color (if selected), and a heading.
Editing of matrix cells
Edit matrix screen look like this:
Changing matrix size
You can at any time increase/descrease number for columns and rows in the matrix.
•
Delete row by clicking on the red cross icon for that row.
•
Delete column by clicking on the red cross icon for that column.
•
Insert row by clicking on the green plus icon. The row will be inserted before the row where you clicked on the
icon.
•
Insert column by clicking on the green plus icon. The column will be inserted before the row where you clicked
on the icon.
•
User resize matrix feature. Set number of columns and rows you want and click on the Ok button. New rows/
32
http://www.objectplanet.com/Opinio/
columns will be added and existing columns and rows will be deleted from the end of the matrix to match the
requested size.
Moving a cell
You can move position of the cell by one cell. Hold the mouse over the cell a couple of seconds and a little move cell
window will appear. Click on the arrow to move the cell. NOTE: cells can be moved only within the same group
type. For example you can't move cell of type Radio to a group of Checkboxes.
Changing a cell.
Click on the cell you want to change. A new window will open allowing you to enter the cell details. You can name
the cell for better identification in the reports. The cell identifier is optional. You can also set the background of the
cell.
There can be 8 types of matrix cells:
1.
Empty cell Empty cell can be used when the cell does not need to carry any visible element. Most of the cells
are empty when you first create a matrix question. Click on the Empty cell-button and set the type from the
dialog window that appear. Empty cells do not have an identifier and background color.
2.
Text Cell of type text allows respondents to enter any text in the field. "Field size" is the visible length of the
fields, in characters.
33
http://www.objectplanet.com/Opinio/
Validation: Validate/check the answer from the respondent. It can be used to demand a specific type or length of
answer from the respondent and set the appropriate error message if these requirements are not met.
3.
Numeric Cell of type numeric restricting the answer to a number only. Select this type if you need calculations
on the report (type text will only produce a comment listing). Numeric types available are integer or decimal.
NOTE: Use numeric type only for numbers you want statistic analysis for. For input like telephone numbers,
credit cards and country zip codes, text type is recommended.
Validation: Use this to set restrictions for answers and error messages for invalid numbers, required input, and
min/max values.
4.
Dropdown Cell of type dropdown list are exactly the same as the usual dropdown list for the question types,
except it can only have a single selection. You can either create a dropdown list directly, or create and load from
the bank if you are to use it again later. See dropdown list question for more details.
5.
Checkbox. The checkbox simply inserts a checkbox for your respondents to check. This is a true/false type
answer.
6.
Radio button. Radio buttons can only be used/defined if it is grouped with other cells. See Cell groups below.
7.
Label. Text to be displayed in the cell.
8.
Image. Set image to be displayed in the cell. See the section called “Images”
Big matrix navigation
When you create a big matrix (more than 15 columns and/or more than 20 rows), only part of the matrix is displayed
at a time. This is done to spare the loading time and server resources.
Map navigation Matrix map will appear in the right top corner of the matrix screen.The green highlighted area is the
part of the matrix that is currently displayed. Click on any cell on the matrix map to move to that part of the matrix.
Arrow navigation Up/down/right/left arrows will appear around the matrix if there are more cells in the
corresponding direction. Click on the arrow to move one block up/down/right/left. By block we mean the current
number of visible columns/rows. For example, if you have a matrix with 40 rows and rows 1-20 are currently
displayed, the next block down will be rows from 20 to 40.
34
http://www.objectplanet.com/Opinio/
Quick editing of matrix cells
Changing cells one at a time is very time consuming. To save time and clicks you can edit en entire row or column in
one window.
Click on the little pen icon attached to matrix column/row and a new window will open. From this window you can
set some basic info about cells. Read the section called “Editing of matrix cells” for the description of the fields.
Time saving tips
•
Cells of type Label. Set cursor to the Label field of the first cell. The field might be gray, indicating that
the cell type is not of type Label yet. On this screen, it does not mean inactive. Start typing the label for
the cell and the cell type will automatically change to Label. Click on Tab to go down to the next cell
label field and repeat. The same technique applies to type Image and Dropdown. You might need to
confirm that you really want to change the cell type.
•
Changing cell types. In the type column, select the cell type from the list by entering the first letter of
the cell type. For example for type "Label" click on the "l". The list will jump to the "Label" type. Click
on the "Tab" to go to the next cell type field (move down) and repeat.
Cell groups
You often need to group matrix cells, to be able to do ratings, rankings or just to set the same background color. You
can only group the cells that are adjacent to each other.
NOTE: cell groups can not intersect.
35
http://www.objectplanet.com/Opinio/
Cell group list
List of the existing cell groups is displayed on the main matrix screen. From here you can delete groups, create new
groups and edit the existing ones.
NOTE: when you delete a cell group with rating cells, the rating cells are removed because this cell type is not
allowed outside the cell groups.
Creating cell group
The cell group screen look like this:
•
Name: Set the name of the new cell group used on the administration screens and reports.
•
Group type. Select the type of the cell group:
•
Rating scale. This means that each row in the cell group can be rated with a value horizontally. You should
then supply with a label for each row and each column. For Dual scale question create two cell groups, one
for rating and one for importance. See example below.
•
Ranking. Makes it possible to enforce a response with one (and only one) selection per column. See example
below.
•
Intersection. Allow for one selection for the entire cell association - an intersection between the columns and
rows. See example under.
•
Checkboxes. An association with checkboxes in every cell. Checkboxes represent a true/false answer. See
example below.
•
Custom. Allows for any type of input in each cell, except radio buttons. This type of group does not impose a
36
http://www.objectplanet.com/Opinio/
strong relation between the cells, other than a common background color (if selected), and a heading. See
example below.
•
Group position. Select cells you want to associate, from top-left cell to bottom-right cell. Note that group can not
intersect.
•
Heading. Set heading for your cell group(optional). The heading will be visible in the survey only if it is starts at
the first or second row in the matrix.
•
Background color. Set the background color of your cell group. Every cell in the cell group will get that color.
The color is shown both on the matrix setup page and on the survey form. NOTE: cell background color
overrides cell group color.
•
Validation: Depending on the type of group, validation may be possible. If you have chosen "select any cell", for
example, you can require the respondents to choose at least 3 but at most 5 selections.
•
Validation message: Enter the message shown to the respondent if the requirements are not met (the respondent
needs to correct the responses).
Important
When you create a new group or change the existing group type, some of the cell types in the group might
change to match the group type. For example if you change group type from Rating to Intersection, all
rating buttons will be replaced with checkboxes.
Tip
For better control of the space between the labels, you can use html code for "space" ->  . E.g. In a
label, write  TEXT . (nbsp = non breaking space). Repeat this code if you need more spaces:
   ... The reason you must use this code, is that browsers will ignore more than one space.
This space-code will force more spaces. For more tips on HTML, see HTML hints. Another way to control
this, is through CSS files. See the section called “Survey look and feel”.
Example 3.5. Cell group Rating
Example 3.6. Cell group Ranking
37
http://www.objectplanet.com/Opinio/
Example 3.7. Cell group Intersection
Example 3.8. Cell group Checkboxes
Example 3.9. Cell group Custom
38
http://www.objectplanet.com/Opinio/
In-text elements
In-text elements are a collection of input types that are possible to insert right into the question text.
The new in-text elements will be inserted at the location of your cursor. Select where in the question text you want to
insert a field, and click "New in-text element" button. After you have defined the element details and saved, a tag for
the newly created in-text element will be placed in the question text. The tag will look like <<#In-text name#>>. For
example if you created an in-text named "Email" the tag will look like <<#Email#>>. Do not change in-text elements
manually. Click on the edit-button to do this.
Example 3.10. In-text elements
The tags will be replaced by the actual input field before the question is displayed to the respondent:
With some HTML knowledge or advanced editor mode, there is no limit to how you can organize your question. See
HTML hints.
The following rules applies:
•
You can move in-text elements inside the question text as you like
•
All in-text elements in the current question must have a unique name.
39
http://www.objectplanet.com/Opinio/
•
All in-text elements defined for the question must be used (appear in the question text). Delete unused elements
from Edit in-text elements screen.
To edit existing in-text elements click on the "Edit in-text elements" button under the question text.
The in-text element table allows you to edit and delete existing in-text elements. Some of the basic in-text details are
displayed in the table. If some of the in-text elements are not yet used (not appearing in the question text), the
"Insert" link will appear in the Action column of the table. If you then click on the "Insert" link, the in-text element
will be inserted in the question text at the cursor position.
In-text element: text
In-text element of type text allows respondents to enter any text in the field. "Field size" is the visible length of the
fields, in characters.
Validation.
Validate/check the answer from the respondent. It can be used to demand a specific type or length of answer from the
respondent and set the appropriate error message if these requirements are not met.
In-text element: numeric
In-text element of type numeric restricting the answer to a number only. Select this type if you need calculations on
the report (type text will only produce a comment listing). Numeric types available are integer or decimal.
Note
Use numeric type only for numbers you want statistic analysis for. For inputs like telephone numbers, credit
cards and country zip codes text type is recommended.
Validation.
Use this to set restrictions for answers and error messages for invalid numbers, required input, and min/max values.
In-text element: dropdown
In-text element of type dropdown list is exactly the same as the usual dropdown list for the question types, except it
only allows single selection. You can either create a dropdown list directly, or create and load from the bank if you
are to use it again later. See dropdown list question.
In-text element: checkbox
The checkbox simply inserts a checkbox for your respondents to check. This is a true/false type answer.
Open ended question
40
http://www.objectplanet.com/Opinio/
Allows for a free-style answer to the question (open ended). Any text can be entered by the respondent. This question
type can be selected in addition to any other question type. If checked, the following options can be set:
•
Rows: The height of the text field. It is the number of text lines visible to the respondent, but not the limitation of
how many lines can be entered.
•
Columns: The width of the text field. "50 columns" means that 50 characters (approx) will be visible
horizontally.
•
Max chars: The max number of characters allowed.
•
Label: Label for text field. This will be shown to the left of the text field if the number of rows (height) is 1
(one). If the height is more than one, the label will be displayed above the text field. On a field with height 1, you
can force the label to be placed above it by inserting an HTML break tag after it:
This is my label<br>
•
Allow images: Enable this feature to allow respondents to upload images, and attach these to the survey response.
The respondents will see an image-button to the right of the free-text field. Clicking on this button will open the
image upload-window. When the image is uploaded, the link to the image will be inserted into the text-area. This
is the actual code for the web-link, and looks like this:
<img src="http://mydomain.com/opinio/upload/surveys/152/518506/logo.gif">
The max image size allowed can be set in the survey attributes. (see the section called “Survey behavior” [76])
The images will be stored on the server in this folder:
upload/surveys/[survey-id]/[respondent-id]
The survey-id and respondent-id is unique ids automatically assigned to the survey and respondent as they are
created.
Below is a sample survey with a simple rating question and a text-box with the image upload feature enabled.
The example shows the window as the file is being selected and uploaded.
41
http://www.objectplanet.com/Opinio/
Example 3.11. Open-ended question
42
http://www.objectplanet.com/Opinio/
No type question
Select this option if none of the question types are suitable. "No type" may be relevant if you need a text-field only,
or if you plan to use in-text elements.
Navigation
Makes handling of questions and moving around in the survey easier. These buttons are found at the bottom of the
question design screen. Basic navigation is found at the top of the screen.
•
"Jump to" stores the current question and takes you to the question selected.
•
"Move to" button stores the current question and moves it to any selected position in the survey, to easily edit the
order of your questions if needed.
•
"Next" button stores the current question and takes you the next one. If next question does not yet exist, it will be
created.
43
http://www.objectplanet.com/Opinio/
•
"Previous" button stores the current question and takes you to the previous one.
•
"Finish" button stores the current question and returns to the question list/overview page.
•
"Copy to next" - if checked and confirmed, the next/previous/jumped question will be overwritten with the same
values as the current question when you click on the Next/Previous/Jump-to button
Plugin validators
This section will only appear if there are any plugin validators installed. A plugin validator is a custom validator
"hooked" onto Opinio. From the list of available plugin validators you can, for each question in the survey, select the
validators you would like to make use of. You will find a simple setup in the Question edit screen (if provided by
plugin), and you will find an advanced setup popup screen when clicking on the link (if provided by plugin).
Organizing questions
Question overview
Click on the Questions link in Menu box from the survey administration screen. This screen will give you an
overview of all questions and sections:
Following Section actions are available from this screen:
•
Split section Click on "Split section" link to divide current section in two. When you split a section, it will start
from the question where the "Split section" link was clicked and include all questions down to the next section or
the end of the survey. Survey introduction can be separated from the questions by clicking on the "Split section"
link above the first question.
44
http://www.objectplanet.com/Opinio/
•
Edit section. Click on the "Edit" link in section table to edit section title, look and feel and settings.
•
Move section start position up. Click on Up arrow icon to move the start of the section one question up. Note that
Up icon appears only if previous section contains more than one question. First section can also contains only
survey introduction, and Up icon will appear for the second section if first section contains any questions at all.
•
Move section start position down. Click on Down arrow icon to move the start of the section one question down.
Note that Down icon appears only if the section contains more than one question. When you click on the Down
icon, the first question in the section will be moved to the previous section.
•
Delete section. Click on the "Delete" link in section table to delete the section. When you delete a section, all
questions from the section are moved to the previous section. You can not delete the first section.
The following Question actions are available from the screen:
•
New question. Click on the "New question" link to insert a new question at the desired position. You will be
forwarded to the Question screen where you can enter the question details. See the section called “Creating
questions”
•
Select new question from library. Click on the "New question from library" link in question table to select
question(s) from a library. A new window will open allowing you to navigate to the library and select the desired
questions. See the section called “Copy question from library”
•
Edit question. Click on the "Edit" link in question table to edit the question setting.
•
Add to library. Click on the Add to library link in question table to copy the question to a question library. A
popup window will open where you can select the question library. See the section called “Add question to
library”
•
Move question up. Click on the Up arrow icon to the right of the question table to move the question one position
up. If current question and previous question are in the same section, they will simply change place. If previous
question is in a separate section, the current question will be placed before the previous question in the previous
section. If you just want to move the first question in the section to the previous section, click in the Move down
icon for the section.
•
Move question down. Click on the Down arrow icon to the right of the question table to move the question one
position down. If current question and the next question are in the same section, they will simply change place. If
next question is in a separate section, the current question will be placed after the next question in the next
section. If you just want to move the last question in a section to the next section, click in the Move down icon
for the section.
•
Delete question. Click on the "Delete" link in question table to delete the question. Note that the deleted question
was the only question in a section, the section will be deleted as well. Empty sections are not allowed.
The following text actions are available from the screen:
•
New text. Click on the "New text" link to insert a new text at the desired position. You will be forwarded to the
Create section text screen where you can enter the text. See Text between questions
•
Edit text. Click on the "Edit" link to the right of the existing text. You will be forwarded to a screen where you
can edit the text. See Text between questions
•
Delete text. Click on the "Delete" link to the right of the existing text if you want to remove the text.
45
http://www.objectplanet.com/Opinio/
To use this feature go to:
Folder (main menu) > Survey (select from list) > Questions (menu box)
Sections
Sections can be used to create a group of related questions and to define the page layout, including page breaks and
random rotation of questions.
Originally, all questions are placed on a single survey page. Use "Split section" link to divide the section at the
desired position. You can specify section title and its look/feel for each section. Switch the Page break attribute to
"on" if you want to separate the section above the split to be the last section on the page. This attribute makes it
possible to place more than one logical question group (section) on a visible survey page.
You can also select to present the questions in a random order. By selecting this option all the questions within the
section will appear in a random order the first time the respondent is viewing them. In other words the questions will
not rotate while the respondent is moving back and forth between survey pages.
Questions cannot exist outside sections. When creating a new section, it will start from the question where the "Split
section" link was clicked and include all questions down to the next section or the end of the survey. Survey
introduction can be separated from the questions by clicking on the "Split section" link above the first question.
Note: Make sure you check the sections setup before you publish your survey, because the question layout may not
always be as you intended. For example, if you have inserted questions in the middle of your survey.
Text between questions
Text can be inserted anywhere in the survey; between questions, before and after section headings etc. and they can
be edited and deleted. When deleting questions or sections, adjacent texts are concatenated, because there can only
be one text between two questions, or between a question and a section heading. Text items stay in the same position
when a question is moved. If a question is moved to a different section, the text before and after is concatenated.
Texts cannot be moved around in the survey (must be deleted and inserted elsewhere).
46
http://www.objectplanet.com/Opinio/
Add question to library
This screen allows you to navigate to a question library and add the selected question to the library at the desired
position.
•
Add to new library. Use "Add to new library" button if you want to create a new library and add the question to
it. You will be asked to enter the new library name.
•
Add to existing library. Select one of the existing libraries form the list. Use "Add here" link to the right of the
library name to add question at the end of the library. Or click on the selected library and you will be forwarded
to a screen where you can select position in the library for the new question.
Copy question from library
This feature allow you retrieve a question from a library. Depending on where you come from to this screen, you will
either insert a new question or replace an existing question in the current question.
47
http://www.objectplanet.com/Opinio/
Select question library from the list. You will be forwarded to a screen where you can select questions that you want
to copy. If you want to copy multiple questions, click on the "Select link" to mark the desired questions. Click on the
"Copy selected" button to perform the copy to survey operation. If you want to copy only one question, click on the
"Copy this" link and the question will be copied immediately, and the window is closed.
Branching
The branching functionality is accessed by clicking on 'Branching' in the Menu box when looking at the question list
for the survey.
Branching overview
Depending on the branching type set for the survey branching can be used to filter out, or skip irrelevant questions,
but also include questions that initially have been excluded.
The branching overview page displays all questions in the survey with the corresponding branching conditions. It
gives the survey author an overview of which questions that are excluded/included by each conditions.
48
http://www.objectplanet.com/Opinio/
Important
It's recommend that you set up all your survey questions first, and then set up branching. This is because the
conditions are set up to filter out (or include) questions following the current question. If there are no
questions preceding the current, then you will not be able to filter out (or include) any questions.
Create condition
To create a new condition click on the plus (+) icon to the left of the question to which you want to add a condition.
For the condition setup see the section called “Branching condition”. Any number of conditions can be added per
question.
Edit condition
To edit a condition click on the condition name in the list. For the condition setup see the section called “Branching
condition”. Any number of conditions can be added per question.
Delete condition
To delete a condition click on the red cross (x) icon to the left of the condition that you want to delete.
49
http://www.objectplanet.com/Opinio/
Advice
Opinio lets the survey creator add several conditions per question. Each condition is handled completely
independent of each other. This means that if several conditions are added, especially for a single question,
it may cause a condition to always trigger for this question no matter what the respondent's input will be.
Setting up the conditions require some thought, and also some testing to see if the conditions behave as
expected. Test the survey, by responding a few times, to make sure the survey behaves the way you
expected. Also remember to check the responses/report to ensure that the correct values have been stored.
Using conditional branching is like "programming the survey", and requires verification.
Branching out of date
The branching can become out of date for various reasons. When the branching is out of date, there are conditions
with invalid filters. In this case the conditions need to be verified. See Invalid filters for more information.
Invalid filters are displayed in the branching overview with an error cross icon on the filter value.
The branching will also become out of date if 'Include branching' type is set and there exist excluded questions that
never will be included by any branching conditions. In this case please make sure that excluded questions are
included by at least one branching condition.
50
http://www.objectplanet.com/Opinio/
Branching types
There are two types of branching:
1.
Exclude branching
2.
Include branching
Exclude branching
Branching type where all questions are initially included in the survey, and where questions are filtered out
(excluded), depending on the conditions (true or false). This is the default branching type.
Include branching
Branching type where questions can be initially excluded from the survey, and where excluded questions are
included in the survey depending on the conditions (true or false).
Branching condition
The condition-screen is divided into 3 parts:
51
http://www.objectplanet.com/Opinio/
1.
The condition name: Give the condition a name. The name is not visible to respondents, but is used to identify
the condition in the branching overview screen.
2.
The condition: Based on the question type (rating, multiple choice etc.), the condition evaluates to true or false.
If the respondent selects the same values for this question, as defined in this condition, it will trigger, and the
filter is applied. For some of the question types, there are options on how to evaluate the input:
a.
Multiple choice: options are "all", "one" and "none". "all" means that the respondent must select at least all
the options selected in this condition. "one" means that the respondent must select at least one of the
options in the condition. "none" means that the condition will be true if the respondent selects none of the
options selected in the condition.
Important
Using the "all" option for multiple choice, requires some thought. If you select more than one choice, then
you must make sure the respondent has the possibility to select more than one choice in the question.
b.
Matrix: The options are exactly the same as for Multiple choice.
Important
Using the "all" option for matrix, you should not select more than one option per row, because the
respondent does not have the option of selecting more than one, unless the matrix question is of type "select
any cell".
c.
Rating: The options are "one" and "none". These options mean the same as for the respective multiple
choice condition options. "all" is not relevant, because it is not possible to select more than one value in a
52
http://www.objectplanet.com/Opinio/
rating question.
Note
For the current version of Opinio, conditions cannot be set for In-text elements, and Matrix questions.
Questions of this type can be filtered out by conditions set for other questions.
3.
The filter:
a.
If 'Exclude branching': Depending on the above condition (true or false), the questions selected in the filter
are not seen by the respondent.
Important
Only questions on following sections are displayed in the list. If no questions are listed in the filter list there
are no questions on the following sections. Please make sure that there are sections with questions after the
section with the current question, or delete the condition.
b.
If 'Include branching': Depending on the above condition (true or false), the questions selected in the filter
are included and visible to the respondent.
Important
Only questions on following sections that are initially excluded are displayed in the list. If no questions are
listed in the filter list there are no questions on the following sections that are initially excluded. Please
make sure that there are sections with excluded questions after the section with the current question, or
delete the condition. See the section called “Exclude questions” for more information.
Invalid filters
If the condition contains invalid filters the condition needs to be verified.
•
If 'Exclude branching': Filters are invalid if they filter out (exclude) questions before the current question, or
filter out questions on the same section as the current question.
•
If 'Include branching': Filters are invalid if they include questions before the current question, or include
questions on the same section as the current question.
The filters may become invalid due to a change of question order or questions/sections have been deleted in the
survey. The invalid filters will not be visible in the filter list, but the condition needs to be re-saved with valid filters,
or deleted from the branching overview page.
Exclude questions
To initially exclude questions click on the 'Exclude questions' link in the Menu box when viewing the branching
overview.
53
http://www.objectplanet.com/Opinio/
Select the questions that you want to be excluded from the survey initially.
Note
Since questions on the first section with questions never can be included by a branch condition, only
questions after the first page break can be excluded initially.
Piping
Piping feature allows to insert/replace texts in the survey dynamically, while respondent is answering the survey.
Here is a piping example:
54
http://www.objectplanet.com/Opinio/
In the example above, the response from question "What color do you like?" is carried out to the next question "Why
do you like Green?".
In the question design the question look like this: "Why do you like ${color}?". Then, when respondent answers to
the first question, the responded value is copied and entered instead of the ${color} tag.
In the example above only one type of piping (Question response) is demonstrated. Here is the full list of supported
piping types:
•
Question response. Inserts a response from one of the previous questions.
•
Invitee data. Inserts an invitee detail.
•
Fixed value. Inserts a fixed value. Can be used for company name, product name, etc.
•
Survey URL parameter. Inserts a parameter value from survey url. See the section called “Survey behavior” [78]
Piping is a way to make a survey dynamic and more personal.
Important
Piping will work only if piping source is set before the piping itself is used. For Question response type this
means that question where piping comes from MUST be on a separate page, before the piping tag.
When renaming an existing piping, the existing occurrences will not be updated. This must be done
manually.
Note
Most of the text elements in a survey supports piping. Small green dots at the top left corner of each field
indicates if the field supports piping or not.
Field that supports piping:
Field that does not support piping:
55
http://www.objectplanet.com/Opinio/
Piping list
You can put a piping tag in any fields that support piping. If you do not remember the name of the piping
element, you can request the list of existing piping definitions by entering the piping start-characters "${"
and wait 1 second. The piping list will appear and you can select the desired piping.
The described behavior applies to simple text fields and textareas. If you use advanced text editor, you need
to click on the piping button to get the list of piping elements:
Piping overview
The list of piping definitions defined for the survey can be accessed by clicking on the Piping link in the Menu box
from survey administration screen. From here you can create new piping elements and edit and delete the existing
piping definitions. Hold mouse over piping definition name to get piping definition details.
56
http://www.objectplanet.com/Opinio/
Important
When renaming an existing piping definition, the existing occurrences used in the survey texts will not be
updated with the new name. This must be done manually.
When deleting a piping element, the existing tag occurrences will not be removed from texts. This must be
done manually.
To create a new piping definition, click on the "New piping" link in the Menu box. When you create a new piping or
edit an existing one, the first thing to do is to determine where the piping value will come from. This is called the
piping source.
Question response piping
Use this piping source type when you want to bring the input from the respondent from one page to another. It's
important to note that piping is processed on the server and that piping element will not be replaced with the value
until the piping source has been saved. This means that the piping source (the question where the piping value comes
from) and the piping tag could not be located on the same visible survey page. Place the piping tag on a page after
the source question.
To create a piping definition of type Question response select "Question response" and click on the continue button.
You will see the list of all questions in the survey and can now select the piping source question.
57
http://www.objectplanet.com/Opinio/
If the selected question has more than one input (for example rating question and open-ended, or matrix question, or
question with many in-text elements) then you need to specify the response type as well.
58
http://www.objectplanet.com/Opinio/
The following response types may appear:
•
Rating response. Response to a rating question. The piping value will be a number from 1 to rating level.
Minimum and maximum levels will also include the corresponding labels.
•
Numeric question response. Response to a numeric question. The piping value will be a number entered by the
respondent.
•
Multiple choice response. Response to a multiple question. The piping value will be a label(s) of the choices
selected by the respondent.
•
Multiple choice other response. Response to a multiple question "Other" option. The piping value will be text
entered by the respondent on the last multiple choice if "Other" field is enabled.
•
Dropdown question response. Response to a dropdown question. The piping value will be the label of the item
59
http://www.objectplanet.com/Opinio/
(items) selected by the respondent.
•
Free text comment. Response to a open-ended question. The piping value will be the text entered by the
respondent in the open-ended field.
•
Matrix cell response. Response to a matrix cell. The piping value will be the text entered by the respondent for
the cell of type Text and Numeric or the value selected by the respondent for the cell of type dropdown,
checkbox and radio button.
The selected cell will be highlighted. When you move the mouse over matrix cells you can see which of the cells
can be selected as piping source (they will be highlighted). Only cell of type input may be selected. Cells of type
Empty, Label and Image are not input cells, and can not be a piping source. To select the cell where piping value
will come from, simply click on the cell.
•
Free text comment. Response to an open-ended question. The piping value will be the text entered by the
respondent in the open-ended field.
If source question allows more than one answer to the response type (for example dropdown/multiple question with
multiple selection allowed), then you can specify the delimiter for multiple selections. For example, if to question
"Which day of the week do you like the most?" respondent selects "Friday" and "Saturday" from multiple selection
question, the piping value will be "Friday, Saturday" if delimiter is set to ", ". And if delimiter is set to "and ", the
result would be "Friday and Saturday"
Invitee data piping
Use invitee data piping source type when you want to get name, email, id or custom attribute of the person who was
invited to participate in a survey via invitations module.
After you selected the invitee data piping source click on the "Continue" button to select what kind of invitee detail
you want to use.
The following invitee details are available for piping:
•
Invitee name. Name of the invitee
•
Invitee email. Email address of the invitee
•
Invitee id. Unique id of the invitee used in the system.
•
Invitee attribute. Name of the invitee attribute (attributes are custom data).
Fixed value piping
Fixed value piping is useful when you want to use a variable for all text occurrences through out a survey. It can be
60
http://www.objectplanet.com/Opinio/
used for company name, product name and any other value that is known to you. You can, for example, create a
survey with fixed value piping as product name and then use this survey as a template for other products. The only
thing you will need to change is the piping value.
Survey URL parameter piping
Survey can take parameters from the survey link. See the section called “Survey behavior” [78] The parameter values
will then be set as respondent attributes, and may optionally be saved. This piping type allows you to retrieve the
value from respondent attribute for the specified attribute (parameter) name. Note that respondent attributes can also
be set from plugins.
Important
Enter parameter name without "opdata_", but only the attribute name itself.
Survey preview
Survey preview is available from almost any screen during survey creation. Note that when you preview a survey
you bypass the survey security and open/close dates. You can see the survey as the respondent would and have
access to the same navigation features. Also note that if the current screen changes are not yet saved, they will not be
reflected on the survey preview.
Survey look and feel
Survey look and feel pages include survey layout, style, texts, labels and buttons (elements visible to the
respondents). Survey look and feel is available from the Menu box on survey administration page.
Survey look and feel
The survey look and feel is important for several reasons. It sends a message to the respondent that the survey is
"serious" or "professional" or simply for fun. It is sometimes important to match the design of your website.
61
http://www.objectplanet.com/Opinio/
The design of your survey can be controlled by two main methods. A survey template, or a CSS file (Cascading
Style Sheet). The simplest is to use a template, which is often more complete, with a set of images, to enhance the
look & feel.
•
Template: To use s template, click on the template-tab. A template is a predefined look and feel that you can
choose for your survey. Select a template, and click on save. Click on preview survey in the menu box to see how
your survey looks with this new design. Currently, a template can not be uploaded or changed through the Opinio
user interface.
•
CSS: To use s CSS file, click on the CSS-tab. A CSS file is a style sheet file that controls the look and feel of
your survey. CSS files are very helpful if you need to make your own customized look & feel, by editing the
settings in these files. Every element on the survey page can be customized by the CSS file. It requires some
basic CSS insight to be able to do this. The CSS files included with Opinio has many comments in it that
explains what areas of the survey page can be customized. There are plenty of guides on the internet. A couple of
examples:
•
http://www.htmlhelp.com/reference/css/
•
http://www.w3.org/MarkUp/Guide/Style
The CSS file can be edited directly in Opinio, or by any editor that supports CSS. The basic requirement of such
62
http://www.objectplanet.com/Opinio/
an editor is that it saves the content as plain text (do not use editors like MS Word). See Chapter 10 for details on
how to upload/download/update CSS files.
•
HTML file: It is optional to use an HTML file. This is needed when you need more control of the survey page, for
example if you need to add a left menu or other items to the page. An HTML file provides a way to insert all the
survey content inside an HTML document. A HTML file must include the tag <survey> where the survey will be
inserted. If you want to use the survey style sheet (CSS), you must include the CSS reference in the template file.
See an HTML guide for how to include a reference to a CSS file (beyond the scope of this guide).
•
Form width: The width of your survey in pixels.
•
Number of columns: Allows for displaying questions in more than one column. The default is one column
(question 2 below question 1, etc). More than one column saves screen area and vertical scrolling. Make sure
your questions aren't too wide, because that will push the columns to right of the question further to the right. The
maximum number of columns is 3. Example with 2 columns:
•
Question numbering: “default” uses standard numbering, e.g. 1-2-3-4 etc. For displaying other numbers that
1,2,3.., enable custom numbering by selecting it here. To configure what is actually displayed, see the section
called “Custom question numbers”
•
Progress bar: Shows the progress of the survey. The bar show the progress on the question it is located, before
you answer the question. E.g. If you are located on question one out of four, the progress bar will show 25%.
Progress bar label will be shown to the right of the bar.
•
select “percent label” to show percent completed (i.e. 25%).
•
select “count label” to show number of completed questions out of total (i.e. 1/4).
If you use Branch conditions in the survey, the progress bar will still count in the skipped questions. In a large
survey this will not really be noticeable, but if you only have a few questions we recommend not using the
progress bar. NOTE: The Progress bar is not useful if you have all the questions on one page.
Survey texts
63
http://www.objectplanet.com/Opinio/
This page allows to edit main survey texts that are visible to respondents. All of the texts are optional.
•
Survey heading is displayed at the top of the survey.
•
Survey window title will appear at the top of the survey window.
•
Introduction will also appear on the survey form, below the title. Use this to give general instructions to the
64
http://www.objectplanet.com/Opinio/
respondents.
•
Header is displayed above the survey and can be used for company logo, for example. Previously created and
stored headers can be selected from the list above the Header field. Name the created header if you want to save
it for later use.
•
Footer is displayed under the survey and can be used for company logo or contact information, for example, .
Previously created and stored footers can be selected from the list above the Footer field. Name the created footer
if you want to save it for later use.
•
"Thank you"-note will be displayed to the respondent when the survey is completed. Note that if survey is
configured to redirect to some web page after the last survey page is completed, the thank you note will be
skipped. See the section called “Survey behavior” [78] for details on redirect.
Survey buttons
These are the navigational buttons on the survey form.
•
Start button is the button on the first survey page, if there are more than one page in the survey. If there are only
one page, the finish-button will be used.
•
Next button used on an intermediate page. This is the button to go to the next page, if there are more pages after
the current page, and if the page is not the first page in the survey.
•
Finish button used on the last page of the survey. When respondent clicks on the finish button he/she will either
go to the redirect page or will see the "thank you" note.
•
Save button is an additional button for surveys with the "Save and return" feature turned on. Respondent can save
the unfinished survey and come back to continue later. Email with the return link will be sent to the respondent.
Texts used in the "Save and return" page can be customized in the section called “Save and return texts”.
•
Back button is an additional button for surveys with the "Back and forward" feature turned on. Respondent can
go back and forward in the survey and change the answers.
65
http://www.objectplanet.com/Opinio/
You can choose either text or an image for your navigation links.
•
Button label: Type in whatever you want to name the navigational buttons.
•
Image: Press the image link and select or upload for the image you want to use for the button. See the section
called “Images”.
Survey upload texts
This section contains buttons and texts that are used when respondents are uploading images as a part of their
response to a question. See Respondent upload.
Please note that these buttons and texts will only be in use if the survey contains questions that are allowing image
66
http://www.objectplanet.com/Opinio/
uploading.
•
Select image label - title used on the page where respondent selects image from the list of uploaded images.
•
Your images label - label of the list with uploaded images.
67
http://www.objectplanet.com/Opinio/
•
Select button text - label of the "Select" button.
•
Add button text - label of the button that goes to upload new image page.
•
Close button text - label of the "Close" window button.
•
Select help message - message that will help respondent with the image selection.
•
Upload image label - title used on the page where respondent uploads new images.
•
Add image label - label for the upload image file field.
•
Image name label - label for the new image name.
•
Back button text - label for the buttons to go back to the Select image page.
•
Upload button text - label for the buttons that starts uploading of the new image.
•
Upload denied message - message that will be displayed to the respondent if uploading of the new image has
failed or is denied.
•
Enter image name message - message that will be displayed to the respondent if new image name is missing.
•
File not found message - message that will be displayed to the respondent if new image file was not found.
•
Images only message - message that will be displayed to the respondent tries to upload and unsupported file
format.
•
File too big message - message that will be displayed to the respondent if new image size is bigger that the
allowed maximum.
•
Upload help message - message that will assist the respondent with the image upload feature.
Save and return texts
This section contains buttons and texts that are used when a respondent wants to save his responses to a survey, and
to come back and continue another time.
68
http://www.objectplanet.com/Opinio/
Please note that these buttons and texts will only be in use if the "Enable save and return" option is checked.
•
Save button label - label for survey save button.
•
Save button image - image to use instead of just button with label. See the section called “Images”
•
Email label - label of the email address field.
69
http://www.objectplanet.com/Opinio/
•
Send button label - label of the button that will send email with the return link to the email address specified.
•
Return link sent message - confirmation message to be displayed when email with the return link has been sent to
the respondent.
•
Invalid email message - message to be displayed if respondent entered invalid email address.
•
Email subject - subject to be used in the email message containing the survey return link.
•
Email body - message to be used as email message body in the email containing the survey return link. Note that
parameter {0} will be replaced with the return link and must not be removed.
•
Save/return help message - message to be displayed to the respondent on the Save and return page.
Login texts
This section contains buttons and texts that are used in the following situations:
•
When the survey is password protected
•
When the survey is restricted to invited people only and invalid invitee identification is entered.
•
When invalid respondent identification is entered.
70
http://www.objectplanet.com/Opinio/
•
Invitee id label - label of the invitee identification field. The label is used when survey authentication of type
"Password assigned by invitations" is turned on. See the section called “Security and privacy”.
•
Invitee key label - label of the invitee key field. The label is used when survey authentication of type "Password
assigned by invitations" is turned on. See the section called “Security and privacy”.
•
Password label - label of the survey password field. The label is used when survey authentication of type
"Password" is turned on. See the section called “Security and privacy”.
•
Respondent id label - label of the respondent identification field. The label is used when the respondent's
credentials are not correct and login screen is displayed.
•
Ticket label - label of the respondent key/ticket field. The label is used when the respondent's credentials are not
71
http://www.objectplanet.com/Opinio/
correct and login screen is displayed.
•
Login button text - label login button.
•
Return ticket help message - message to be displayed to the respondent if invalid respondent identification is
entered.
•
Password help message - message to be displayed to the respondent on the login page. The label is used when
survey authentication of type "Password" is used. See the section called “Security and privacy”.
•
Invitees only help message - message to be displayed to the respondent on the login page. The label is used when
survey authentication of type "Password assigned by invitations" is used. See the section called “Security and
privacy”.
Survey is password protected: Invalid invitee identification: Invalid respondent identification:
Survey is password protected: Invalid invitee identification: Invalid respondent identification:
Survey is password protected: Invalid invitee identification: Invalid respondent identification:
Survey is password protected: Invalid invitee identification: Invalid respondent identification:
Quick question text edit
This feature allows for text editing in running surveys even when respondents are present. It also provides for a nice
overview of all visible text in the survey, texts that are otherwise hidden as validators or texts within matrix cells and
in-text elements. This overview makes spelling mistakes and text ambiguities much easier to spot as well as allowing
72
http://www.objectplanet.com/Opinio/
for an easy and quick way of editing text only.
The screen lists all visible texts in the survey. Use Save and return button if you want to save the entered texts and
return back and continue editing. Use Save and exit if you want to save the changes and leave the screen. This feature
is meant for editing of existing texts only, hence no fields can be left empty. Use the Survey texts screen and
question editing features when setting attributes options or changing the structure of the survey.
Each survey section is listed with all its questions. The question area lists visible text within a question, such as the
question text, answer labels and validators. Click on the double arrow icon if you want to get the currently stored
value of the field (copy original).
When editing text, it is important to note:
•
Keep the Html tags from the original text in the edit field to achieve the same look.
•
Survey is not automatically locked when entering the edit texts only screen. This is convenient when a survey is
running and the user wants to avoid locking the survey for respondents while editing texts. But if the survey
becomes locked while editing is in progress, the user will not be able to save if survey is still locked at the time
of saving or if survey has changed.
Custom question numbers
On the "Survey look and feel" page you have the choice to use "Default" numbering on the questions, "None" or
"Custom". If you choose custom numbers you can set the numbering as you wish. For example, you can use letters in
stead of numbers, roman numbers etc. (E.g. 1a, 1b - A, B, C - I, II, III, IV)
73
http://www.objectplanet.com/Opinio/
Example 3.12. Display numbers
Survey setup
Survey setup is available in the Menu box on survey administration page.
Security and privacy
74
http://www.objectplanet.com/Opinio/
To make the survey available to a selected group of people, enable authentication through one of these methods:
•
Off: No password is required to enter the survey. Use this mode if the survey is open to the general public.
•
Password: a fixed password all users must enter to respond to the survey.
•
Password assigned by invitations: requires invitees to be added to the survey. When invitees are added, a unique
id and a key (password) will be generated for each. The link sent by email by the invitation feature will include
the id and key in the link. In other words, each invitee will receive a unique link to the survey. If these are not
included, the respondent will be asked to enter these values. For more information on invitations, see invitations
Depending on the survey, it may be required that the responses must be kept anonymous. The anonymity only
applies if the invitation feature is used in the survey. This is because the invitation being sent is linked to the
responses. This is necessary to enable tracking of invitees (whether they have responded to the survey or not). Also
the IP check for multiple responses should be disabled to improve anonymity.
Opinio allows three levels of anonymity:
•
No anonymity. Invitees are completely linked to the respondents.
•
Partly anonymous. This means that the link between invitees and respondents are not shown on the screen, but is
kept on the database level. Then the reminder feature will still work (it is dependent on a link between respondent
and invitee, to check if an invitee has responded to the survey).
•
Full anonymity. The link between the invitee is completely removed both on the screen and on the database level.
Note that the anonymity will only be enabled for the respondents answering a survey after the feature is activated. To
keep full anonymity for all respondents, this feature must be enabled before the survey is started.
Survey behavior
75
http://www.objectplanet.com/Opinio/
Navigation
•
Enable save and return: Select this option if you want respondents to be able to save the survey and come back to
finish it later.
•
Enable back button: Select this option if you want respondents to be able to go back and forward in the survey.
Navigation
Responses and data
•
Maximum number of responses: Survey will be shown as closed if it is accessed after the maximum numbers of
responses is reached. This feature is useful if only a limited number of responses is needed, and server/database
resources are limited. Set this to 0 for unlimited responses.
•
Maximum upload size: Set the max allowed size per image, for images uploaded by respondents. This is
applicable only if the upload feature is enabled in the question screen. See open-ended question.
76
http://www.objectplanet.com/Opinio/
•
•
Save responses on:
•
Completion. Saves the survey response when the respondent has finished the survey. This will often cause
less strain on the database server, because the system does not have to make a new database connection
between every survey page. The disadvantage is that the partially answered survey will not be saved if a
server crash occurs.
•
Every page. Ensures that the answers are stored as the respondent goes through the survey. This will cause
more traffic to the database server, but will keep partial responses after a server crash.
Validation:
•
Server side: The validity of response values will be checked/verified on the server side. If the values are
invalid in some way, the respondent will see the same survey page again, with warning messages included
above the question text.
Example with server side validation:
•
Client side: The validity of response values will be checked/verified on the client side (in the browser, by
JavaScript). It is always a good idea to turn this feature on, because it will cause less load on the server. Even
when it is turned on, and the browser is incapable of performing the validation, the server will still do the
validation, as a last resort. This has to be done, because incorrect values can not be stored in the database.
The error messages are shown in popup-windows, rather than embedded in the page.
Example with client side validation:
Multiple submissions
If you choose no, select the method to prevent multiple responses.
77
http://www.objectplanet.com/Opinio/
•
Yes: This means that the respondents may respond to the survey as many times as they want/need.
•
No: The respondent is restricted to respond only once. If this option is selected, also specify how you want
Opinio to enforce this restriction:
•
General check (start and completion): This is the standard checkpoints - Opinio will check if the respondent
has responded more than once at the start of the survey, and at the end.
•
Thorough check (every survey page): Opinio will check for multiple responses on every survey page. This
means that Opinio will contact the client for cookie data on every page, for example (if cookies are used).
This will reduce the chance that someone will be able to submit a response more than once, but will also
cause more server/client traffic. If you are using IP check as type of multiple-response check, this option may
cause more calls to the database.
You must also specify how to perform the restriction:
•
Check IP-address: The respondents IP address will be stored along with the response. When a response is
saved, the system will check if another response exists for this survey with the same IP address. If so, the user
will get an error message.
•
Cookies: are small data elements stored in the browser. When a survey has been responded to, the system will
store a value in a cookie, indicating this. Opinio will then be able to verify and give an error message if the
respondent has answered before.
•
Invitations: This method is useful only if you use invitations and will prevent one invitee from entering
multiple responses. If invitation anonymity is off or partly on, deleting an invitee's responses will allow him/
her to answer again.
Email
•
This is the email from-name and from-address used for sending email messages associated with the current
survey.
Multilingual
•
survey language: The default language of the survey.
•
Language switch type: (this will only appear if the survey supports more than one language)
•
URL only: The default language switch type. The language to be used in the survey is determined by a
parameter in the survey url only. If no language parameter exists the default language will be used.
•
In survey top: The language to be used in the survey can be changed by the respondent in the top of each
survey page.
Multilingual
Integration
78
http://www.objectplanet.com/Opinio/
•
Redirect to address: Set a web address to go to after last survey page or after the thank-you note. For example,
you can type in the address of a report, so that the respondent can view the results of the survey live. Respondents
must be given access to the report first. Note that you have to write the full address. E.g.
"http://www.objectplanet.com"
•
Custom survey id: The survey link contains an id that points to the survey. This is a number that is generated
from a sequence of numbers. For example, the survey link may look like this:
•
http://yourserver.com/opinio/s?s=54
It is easy to change the number 54 at the end link to access another survey. If your survey is confidential, you
might want to set the custom id, to “mySurveyId”, for example.
•
Save URL parameters: It is possible to specify URL parameters to save with each respondent. By setting this
survey attribute it is possible to turn the automatic saving of these URL parameters on/off. This is necessary,
because it should be possible to let a plugin handle this data (if it is not going to be saved automatically). The
default value is to save the parameters ("Yes")
The custom parameters must be specified in the survey URL like this:
•
http://www.mydomain.com/s?s=999&opdata_name1=XYZ&opdata_name2=ZYX
In this example, the parameter "s" is the survey id. The "name1" part of "opdata_name1" is customizable. I.e.
each custom parameter must start with "opdata_". Any number of custom parameters is available – the only
limitation is the length of URLs, usually 2083 characters (Internet Explorer). The custom data will be available in
the "single response" report, and raw data export. This, of course, only applies if the data is actually stored in the
database.
Start and stop dates
All surveys have start and stop dates. This is used to control and restrict responses within a specified time frame.
This feature can also be used to close the survey immediately, since it is possible to set the stop date while the survey
is running. Respondents trying to respond to the survey before the start date or after stop date, the message "This
survey is closed" will be shown.
Reload survey
To reload the survey from the storage, press the reload link. This is useful if you need to make a manual change in
the survey by running SQL calls on the database. This feature will remove the survey from cache and read all
information from the database.
Translations
A survey can be translated into different languages using the translation feature. This allows survey authors to
publish a survey in multiple languages, but still be able to create reports that includes all responses (no matter what
language was used when responding to the survey). Any number of translations may exist for a survey.
NOTE
To save and display other languages correctly Opinio must be set in Unicode mode. Both database and
character encoding might need changes. Read more about this in the installation guide.
79
http://www.objectplanet.com/Opinio/
IMPORTANT
It is important to note that a survey should be created first, including all questions, sections, labels, etc.
Once the survey is created and has the final question order and look/feel you want, it is the right time to
start translating it. It is possible to change the survey after you have translated it, but please note the
following:
•
Each translation is itself a sub-survey of your survey.
•
Editing your survey, will also require Opinio to do the same operations on the translations
•
Editing surveys containing translations will require more processing on your server. The more translations you
have for the survey, the more costly it will be to edit the survey.
•
Once you have changed your survey, all translations need to be verified/saved to make them up-to-date by the
translator.
Access this feature by clicking on the Translations link in the Menu box for the survey.
The translate screen lists all languages for the survey. The default language (the one you want to translate), is shown
at the top of the screen. It set in the "the section called “Survey behavior”" screen, section "Multilingual".
The first step in translating a survey is to add a new language to the list of translations. Click on the section called
“Add language” to set language and translator (optional). The language will then appear in the list with information
regarding the registered translator together with the survey link and the translator link.
Survey can be translated by:
•
Opinio user: log into Opinio and click on the translate link available in the Action column for all translations.
•
External translator: sent URL to the translation page by email when adding a new translation, or at any later time
from the edit screen. The translator URL is listed together with the other translated survey information and can
easily be copied and sent (using copy/paste) to the translator by other means. The translator will get access to a
restricted area, authenticated with a key (contained in the URL). The language code and key included in the
translator URL will be different for each language. This makes it impossible to guess the URL - it must be
assigned and given to the translators.
It is possible to change the language of a translation and the translator associated with it at any time.
80
http://www.objectplanet.com/Opinio/
A translation can be deleted by clicking on the delete link, located in the Action column on the translations list screen
The Set all up-to-date button is useful in situations where translations are completed and small changes are made to
the survey. A change in the survey will set the translations status to needs update, but in some cases you do not wish
to re-translate due to a small change. As long as all fields are non-empty, the translation is set to up-to-date.
Add language
The language settings screen appears when adding or editing a language.
A language must be set for each translation and there cannot be more than one translation with the same language.
The language is a combination of language and country/locale (if language differences are essential). The language
can be changed at any time, as long as it is changed into a language not already in use. A translator can be associated
with the language and name and email is added on this screen at any time (optional). If Send message checkbox is
selected, a message will ne sent to the translator when you click on the Save button. This allows the receiver to
access the restricted translate-page, authenticated by a key in the URL, where he/she can translate the survey. You
may customize the message to the translator before it is sent.
IMPORTANT: It is important to note that a survey should be created first, including all questions, sections, labels,
etc. before you send the translator link. It is possible to change the survey while translations are in progress, but note
the following:
•
The translator will not be allowed access to the translation screen if survey is locked.
•
If survey becomes locked while translation is in progress, the translator will not be able to save if survey is still
locked at the time of saving or if main survey has changed.
81
http://www.objectplanet.com/Opinio/
If you want to have an individual look and feel for the language, set the css file to use for this translation. It's
optional and if language CSS is not specified the survey CSS will be used.
Edit language settings
To edit translations settings click on the language from the section called “Translations”.
The translation language can be changed at any time, as long as it is changed into a language not already in use. If
Send message checkbox is selected, a message will be sent to the translator on when you click on the Save button.
This allows the receiver to access the restricted translate-page, authenticated by a key in the URL, where he/she can
translate the survey. You may customize the message to the translator before it is send.
If you want to have an individual look and feel for the translation set the css file to use for this translation. It's
optional and if language CSS is not specified the survey CSS will be used.
Translate survey
The translate screen can be accessed as a translator or as an Opinio user. If accessed by a translator, the navigation
links and menu are not visible. Essentially, he/she is not logged into Opinio as a user, only a translator, and should
not see the menus. The screen lists all visible text in the survey. Use Save and return button if you want to save the
filled texts and return back and continue translating. Use Save and exit if you want to save the changes and leave the
screen. If some of the texts are left empty, the text <@empty@> will displayed in the translated survey when
respondents access the translation.
82
http://www.objectplanet.com/Opinio/
When translating, it is important to note:
•
All texts to be translated are quoted. Copy button can be used to copy the original texts into the translation field.
•
Html tags from the original text should be left unchanged in the translation to achieve the same look in the
translation as in the default language.
•
In-text elements from the original question text MUST be left unchanged in the translated text to make the input
fields appear in the translated survey. Read more about in-text elements here: In-text elements
•
Survey texts and questions will have the status "needs update" as long as they are not fully translated.
•
Once all texts in the survey has been translated, the "up to date" flag will be set for the current language being
translated.
•
Also notice that the texts in parenthesis are labels to make translation easier (indicating what the texts represent),
and should not be translated.
The first part lists all the survey attributes that contain visible text. This includes heading, title, footer, header,
buttons and messages. Status text indicates whether or not all attributes are up to date. All attributes must be
translated before survey attributes are set to up to date. If the attributes in the survey are changed after translation,
the flag is again set to needs update.
83
http://www.objectplanet.com/Opinio/
Each section is listed with all its questions. Each section and each question has an up to date-flag associated with it.
The section flag is unrelated to the question flags and refers to texts that are linked with the section itself and not a
particular question, such as section title and section texts (listed before and after questions).
The question area lists visible text within a question, such as the question text, answer labels and validators.
It is important to remember that if the translate-screen is saved with text present in all fields, the flag is set to up to
date, even if it is currently showing needs update, and no text in the translation is modified. Also notice that the texts
in parenthesis are labels to make translation easier (indicating what the texts represent), and should not be translated.
Survey collaboration
The purpose of the survey collaboration features is to be able to share ideas and comments between survey authors or
author/managers, for example. To facilitate this, it is possible to add comments to the survey and to individual
questions. To add comments, click on the “Comments” link located in the Menu box on the survey administration
screen.
Survey comments
84
http://www.objectplanet.com/Opinio/
A general comment can be added to the survey in the survey comments screen. The available comments, if any, are
listed below the add field. The new comment will appear in the list as soon as the “add” button is clicked. It is also
possible to add comments to individual questions by clicking on the “Question comments” link in Menu box.
Question comments
All questions are listed in the question comments screen with the possibility of adding and viewing comments for
each individual question. Available comments are listed below the relevant question. Click on the “Add Comment”
link in right top corner of the question tables and a pop up window will appear where a comment can be made. The
new comment appears in the list of available comments when closing the window. To add a general comment to the
survey, click the “Survey comments” link located in the Menu box.
85
http://www.objectplanet.com/Opinio/
Chapter 4. Publish survey
When your survey is created and tested it's time to make it available to your respondents. You can do it in several
ways:
•
Publish link to the survey. The link to the survey is displayed on the Publish survey page and there is one link for
each survey translation. Here are some examples on how you can include the survey link to you web page
(replace SURVEY_LINK with the actual link to the survey):
•
Link that redirects to the survey:
<a href="SURVEY_LINK" >Click to start the survey</a>
Link that redirects to the survey:
•
Link that opens popup window with the survey:
<a href="SURVEY_LINK" target="blank" >Click to start the survey</a>
Link that opens popup window with the survey:
•
Button that opens popup window with the survey:
<input type="button" onclick="window.open('SURVEY_LINK')" value="Click to start the survey">
Button that opens popup window with the survey:
•
Use Opinio's invitation feature. If you know who your respondents will be, you can send them email with the
personal survey link. This way you can get track the responses and get a report on how many of the invitees have
responded. Response anonymity can be enabled for the invitation (see the section called “Security and privacy”)
so that you do not know who answered what, but just know if each invitee has responded or not.
•
Conduct telephone interviews. Register telephone interviewers and send them link to the survey.
Checklist before survey publishing.
There are some things that should be checked before publishing the survey:
•
Test the survey. All surveys should be tested before publishing. Use the actual survey link for testing and not the
Survey preview, because survey preview skips security checks and open dates. Go through all survey pages and
make sure that all questions are displayed as intended. Make sure that the redirect link works, if used. Make sure
that piping tags are replaced correctly.
•
Go to the branch conditions page (if used) and make sure that all branch conditions are valid. Try out all branch
conditions and make sure that the correct questions are displayed to the respondent.
•
Go to the translations page and make sure that all translations are up-to-date.
•
Set survey open dates. Make sure that survey open dates are set to the dates you want the survey to be open. Note
that by default the survey is open for one week only starting from the survey created date.
•
Unlock the survey. The last thing to check is that the traffic light icon on the survey admin screen lights green,
meaning that survey is now open for responses.
86
http://www.objectplanet.com/Opinio/
Invitations
Sending out invitations by email is one convenient way to publish your surveys. If you have a list of email addresses,
you can either import them to Opinio (file upload), or simply copy/paste to create your invitation. This module also
let you track your invitees; who has responded, who has not, who has received reminders etc.
Add/Edit invitation
To access invitations, locate the survey, then click on publish survey, then invitations in the menu box. Then click on
new invitation
•
Invitation name: The system label for the invitation. It will not show on the invitations you send out, but used as
an identifier when looking at the list of invitations you have created for your survey.
87
http://www.objectplanet.com/Opinio/
•
From name: Enter your name or company name. This will show in the from-field of the email message sent.
•
From email: Enter your email or company email address here. This will show in the invitation email.
•
Content type: If you want to include HTML code in your invitation email, you have to set this parameter to "text/
html". To include html code simply type/paste the code in the "message" field. If you do not need to use HTML
in the invitation, select "text/plain". The HTML code should be a valid and complete HTML document.
•
Send date: Set the date and time you want the invitations to be sent.
•
Subject: The subject in the email sent to invitees. A descriptive, but short subject is recommended.
•
Message: The content of the email sent to invitees. It is also possible to type in html code if you want the mail to
be shown as a web page. E.g. use graphics, colors, etc. Make sure you include the link to the survey here. You
can use variables [NAME] and [EMAIL] to add invitee name and email to the invitation message. If you are
using [NAME], make sure you include it when adding invitees.
•
Reminder dates (1-5): If an invitee has not responded, reminders can be sent on specified dates. Sending
reminders is optional, but it is sometimes helpful to send them in order to achieve a higher response rate for your
survey.
•
Reminder subject: Enter the subject of your reminder emails. This is required if you have specified 1 or more
reminder dates.
•
Reminder message: Enter the message of your reminder email. This is required if you have specified 1 or more
reminder dates.
•
Last reminder subject (optional): Enter the subject of the last reminder email to be sent. This will be used in the
last email sent to your invitees, but only if you have more than one reminder date set.
•
Last reminder message: Enter the message of the last reminder email to be sent. This will be used in the last
email sent to your invitees, but only if you have more than one reminder date set.
Click create, and the invitation is now stored. Its status will initially be "inactive". Before activating an invitation,
you must add your invitees. This is done by clicking on Add invitees in the left menu box.
Important:
Do not change the link to the survey in the invitation messages. The survey might be unreachable if it is
changed. The [ID] and [KEY] placeholders are used to track the invitees, to indicate who has responded,
and who has not. [REOPEN] is only used when an invitee already has completed the survey and the link has
been resent from the Opinio admin module. This is another key generated from the respondent id and
invitee key. When this reopen key is valid the multiple response restrictions (if any) will be reset, and the
invitee will be able to continue with the reopened survey. It is not used instead of, but in addition to the
invitee key.
Remember to set up your email server first. See the section called “Setup”
Edit invitation. : To edit an invitation, the screen looks the same screen as when adding invitations. After you have
edited the invitation settings, click save. The invitation will be set to inactive when saving, to prevent any
"accidents". It will let you check your settings in the detail screen before you activate the invitation again. See
invitations for more details on the settings on this screen.
Add invitees
There are four ways to add invitees to the invitation. When viewing an invitation, click add invitees.
88
http://www.objectplanet.com/Opinio/
•
Enter invitees manually: Enter the email addresses to whom you want to invite manually in the textarea. See the
section called “Invitee data format” for more information about how to enter this information.
Sort button will perform an alphabetic sort on the text area content.
•
Copy from reusable invitee list. Select one or more invitee list that you have created earlier. All invitees in the list
will be added including all attributes.
•
Select from panel. If you are using the Panel Management feature, you can draw a sample from it. But before you
can use this feature, you must have:
•
•
Panelists in your panel. If you do not have any, a sample can't be drawn.
•
A sample definition created for your panel. This describes the attributes of the sample you want to draw from
the panel. In other words, what type of panelists do you want to invite (age, gender, location, etc), and the
size of the sample. See Chapter 9 for more information.
Import invitees. It is possible to import invitees from an external source by file upload or by indicating a URL to
the file containing invitees. If you have a lot of invitees (thousands), it is usually more practical to upload a file,
rather than using the manual entry method, simply because of the size of the data. There is no theoretical limit of
how many invitees that can be entered through uploading a file. The file must be a simple text file conforming to
the format described in the section called “Invitee data format”. It is recommended that you zip the file if the size
is more than 1mb.
Additional invitee attributes passed along with the invitee can be viewed when clicking on the invitee in the
invitee list screen. The attributes will also be tied to the respondent if survey anonymity is off and can be viewed
in the "single response" screen.
89
http://www.objectplanet.com/Opinio/
When adding invitees to the invitation, duplicates are ignored. Duplicates are defined by having the same email
address within the same invitation.
Export invitees
It is sometimes useful to be able to export the invitees in your invitation. For example, if you want Opinio to track
who has responded, and who has not, and to restrict survey access to invitees only, you must use the invitation
features of Opinio. But you might want to use another application to send out the emails. Then you can export the
invitees, which will give you email, invitation url and other custom data that you can use when sending emails. The
exported invitees can also be used to copy invitees from one invitation to another within Opinio.
•
Export type:
•
All Invitees: Export all invitees in the current invitation.
•
Responded invitees: Export only those who responded (this will include incomplete responses, as well).
•
Not responded invitees: Export only the invitees who have not yet responded to the invitation.
•
Invitees with error: Export only the invitees with error. These error occur when Opinio attempts to send
invitations, but is unsuccessful. Exporting invitees with error might be useful, to get a list for further
followup.
•
Include survey links: Each invitee receives a unique URL to access the survey, so that Opinio can track the
invitees. If you need to know what these URLs are, select this option.
•
Delimiter: The delimiter to be used to separate data items for an invitee. The separator between each invitee will
always be new-line (one invitee per line).
•
Send exported file to: Once the export is complete, the exported invitees will be sent as a text file email
attachment to the specified email address. If your account has email configured, it will be used as the default for
this field.
Invitation list
From the invitation list screen you can see status for all invitations, number of invitees and the next run date. You
can also change status and resend invitation. General actions are also available: copy, rename and delete.
Each invitation can have one of the following statuses:
90
http://www.objectplanet.com/Opinio/
•
Active. The invitation status is “active” when it is scheduled for sending emails. This means that on the send date
(or after if activated past the send date), emails are sent to all registered invitees.
•
Inactive. The invitation is inactive when it is not scheduled. All new invitations get inactive status and must be
activated to send emails. No emails will be sent on the send date if the invitation is inactive at that time.
•
Sending. The invitation has “Sending” status if it is actually sending emails at the time you are viewing the
invitation status.
IMPORTANT: If you deactivate invitation now, it will immediately stop sending emails. However, current
execution will still be counted as finished. Thus, if you deactivate a running invitation which is supposed to send
email to 1000 invitees, the invitation status will be set to “Completed” even if it has only sent emails to 100
invitees.
•
Completed. The invitation gets the “Completed” status when then invitation email and all reminders are sent. If
an invitation is completed and there are still invitees who have not responded, you can send an additional
reminder to these invitees by clicking on the "Send reminder" link.
•
Error. This status is assigned if an error occurs in the invitation, and Opinio is unable to complete it.
You can change invitation status from this screen. Note that you can't activate invitation if an invitee import is in
progress.
Invitee data format
The data you supply when adding invitees must be in the format described below.
email, name, attribute-name1, attribute-name2, attribute-name3, ...
[email protected], Joe Smith, abc, def, xyz, ...
The following rules apply to the content:
•
The first line of the sets the label of the attributes and is optional.
•
If the line with labels is not included, the first column must be valid emails. The second column must be invitee
names. If names are not included in the data, an additional delimiter must be included to indicate that names are
absent (this is only required if there are extra attributes in addition to email and name). The attributes following
the names will be automatically labeled "attribute1", "attribute2", "attribute3" if included.
•
If a line with labels is included, the labels "email" and "name" are reserved. Label "email" must be included, and
"name" is optional. The position of the name/email can be anywhere on the line. The position of the data in each
line following the labels must match the order of the labels.
•
There are no limit to the number of attributes. The only limitation is that each data element cannot be longer that
255 characters.
•
The invitee data delimiter is comma, but can be changed before importing.
Examples without labels:
•
Email only:
[email protected],
91
http://www.objectplanet.com/Opinio/
[email protected],
[email protected],
•
Email and name:
[email protected],Joe Smith
[email protected],Mike Jones
[email protected],Mary Brown
•
Email, name and attributes:
[email protected],Joe Smith,sales,1251
[email protected],Mike Jones,human resources,2941
[email protected],Mary Brown,research,0381
Examples with labels:
•
Email only:
email
[email protected]
[email protected]
[email protected]
•
Email and name:
email,name
[email protected],Joe Smith
[email protected],Mike Jones
[email protected],Mary Brown
•
Email, name and attributes:
email,name,department,employee-number
[email protected],Joe Smith,sales,1251
[email protected],Mike Jones,human resources,2941
[email protected],Mary Brown,research,0381
•
Email and attributes (no names):
department,employee-number,email
sales,1251,[email protected]
human resources,2941,[email protected]
research,0381,[email protected]
Manage Invitees
All invitees registered in the invitation can be managed from the invitee screen. Click Manage invitees in the menu
box when viewing invitation details.
92
http://www.objectplanet.com/Opinio/
On the invitee screen you can find the following columns:
•
Invitee email. Email address associated with the invitee. By clicking on the invitee email link you can edit the
email address and additional custom invitee attributes.
•
Invitee name will be displayed if it exists. When adding invitees to your invitation, invitee names are optional.
•
Status. Invitee can have one of the following statuses:
•
pending. Invitee has not yet received the invitation.
•
ok. Invitation has been successfully sent to the invitee.
•
error, not sent. Error occurred and invitation could not be sent. See the log file for more details about the
error.
•
reminder error. Error occurred and reminder could not be sent. See the log file for more details about the
error.
•
invalid email. Invitation cannot be sent. Invitee email is invalid.
•
Date sent. The date and time when invitation was sent to this invitee.
•
Reminders. Number of reminders sent to the invitee.
•
Responded. Indicates if the invitee has responded to the survey. If the survey attribute “Anonymity of
respondents in invitations” is set to “No anonymity”, then “See response” link will be provided. If anonymity is
enabled, “Responded” will be shown for the invitees who completed the survey. See the section called “Security
and privacy” for more details on security/privacy settings.
•
Resend The invitation can be resent from this screen. Check "resend" checkbox in the resend column, and click
resend at the bottom of the list. You can optionally modify the messages before sending:
93
http://www.objectplanet.com/Opinio/
The invitation link will then be sent to the invitee's email address. If you need to send it to another email address,
click on the invitee's email address to update it.
•
Delete. Select the invitees you want to delete, and click the delete-button at the bottom of the table. If the invitee
has responded to the survey, deleting the invitee will not delete the response.
If you need to add new invitees to the existing invitation, click on the "Add invitees" link at the top right corner of
the screen. You add invitees to a completed invitation, but note that before you can activate this invitation again, you
must add another reminder date.
IMPORTANT: Newly added invitees will receive their first invitation email on the next invitation execution. Then
they will receive reminders (or last reminder message) in the next rounds of executions, as long as the invitation is
scheduled.
Here is an example: You've created an invitation with send date set to Monday and 2 reminders which will be sent on
Wednesday and Friday. This means that the invitation is scheduled for three executions: Monday, Wednesday and
Friday. All originally entered invitees will get invitation emails on Monday. If on Tuesday you add new invitees to
the invitation, they will not get the invitation email until the next scheduled execution, unless you chose the option
send immediately when adding new invitees. Thus, on Wednesday, all originally added invitees who have not yet
responded will get a reminder and all new invitees will get an invitation email. On Friday, everyone receive
reminders and the invitation is completed. The newly added invitees will not receive more reminders after the last
run, even if they have not received as many reminders as the reminder dates set for the invitation.
Invitation details
94
http://www.objectplanet.com/Opinio/
The invitation details screen indicates the status of the invitation, and key information such as number of invitees,
how many responded and possible errors, and the invitation schedule.
•
Status: The status of the invitation. See the section called “Invitation list” for invitation status details.
•
Invitees total: The number of invitees added to this invitation.
•
Invitees responded: The number of invitees who responded to the survey.
•
Import threads active: When importing large numbers of invitees, the import process will take some time. This
number indicates how many import threads are currently active. Click on invitation details in the left menu box
to refresh the screen.
•
Schedule: Lists all dates set for the invitation, and the dates that the invitations/reminders are sent. The sent date
indicates when the invitation or reminder was completed.
Phone interviews
You can register up to 10 telephone interviewers per survey. To add new interviewer, enter his/hers email in the New
interviewer field and click on the Add button. The interviewer will then appear in the list.
In the list of registered interviewers you can see a link to the survey, which is different for each interviewer. Copy
the link and give it to the interviewer. He/she MUST use this link when he/she conducts telephone interviews. With
this link, the interviewer can respond to the surveys multiple times and his/hers email will be stored along with the
respondent answers as a respondent attribute “Interviewer”.
95
http://www.objectplanet.com/Opinio/
Chapter 5. Design a poll
A poll is a simple survey, usually embedded as an integral part of a web page. It is normally one question, like a
multiple choice question, with a button to send the response. Then after answering this question, the respondent can
view an instant chart of the poll results, either in a popup-window, or a chart embedded in the page. Opinio provides
all this functionality, and more.
With Opinio, you can even create advanced polls, with any question type, like a rating, text-fields, matrix etc. All
question types available in a normal survey is also available in a poll. This is because a poll is actually a survey in
Opinio. Technically they are almost the same, the only difference is that a poll is displayed as an integral part of a
web page, while a Survey is a web page (or multiple pages) in its own right. The limitation for a poll is usually
screen space. Often the poll author is limited to a simple question type, to make it fit into another web page.
Note
If you are editing a poll, and the poll is already published on your web page, the result/chart will be
displayed on the web page, instead of the question form. This is because the poll will be locked while
edited.
Differences between Survey and Poll:
•
A survey can have multiple pages, and the questions in a poll can only be displayed on a single page.
•
Polls can not utilize Opinio's conditional branching functionality (only works on multiple-page surveys).
•
Progress bar can not be used with polls (only works on multiple-page surveys).
•
Surveys in Opinio supports user authentication - this is not available in a poll.
•
Redirects to other web pages are only available in surveys, not polls.
•
Invitation functionality does not work for polls. It is of course possible to invite people to your web page, but the
build-in Opinio invitation functionality is only meant for use with full-blown surveys.
•
Server-side validation of response data (answers) does not work in polls. Client-side validation is turned on by
default.
Design steps.
Designing a poll starts from the poll administration screen, since it gives you access to all poll features. Here is the
list of poll design steps:
1.
Create questions
2.
Customize look and feel
3.
Configure poll behavior
4.
Translate poll
5.
Test the poll to see that it looks and behaves as intended. See "Checklist before poll publishing."
6.
Publish the poll
96
http://www.objectplanet.com/Opinio/
Poll administration
Poll administration screen is the poll home page. It displays important poll details and give you access to the main
poll features.
Poll status. The traffic light icon on the right of the screen indicates the poll status. If poll is open for votes the icon
lights green. If poll is not accessible it lights red. When poll ia closed (lights red), the poll result is displayed to the
users accessing the web page including a poll.
A poll can be closed due to the following reasons:
•
Closed by date (current date is before start date or after stop date).
•
Locked by an administrator user (usually yourself). If the poll is locked, the poll designer has edited the poll in
some way. The poll cannot be open if it is being edited. To make the poll available immediately, click on
“Unlock poll” link under the status icon. You can only unlock the poll that has been locked by you. If another
poll designer has locked the poll, you must wait until he is done and the survey has become unlocked.
•
Error in poll. If the system has detected an error in the poll, it will notify the poll designer by adding an error
message at the top of the poll administration screen and change the poll status to Error. Respondents cannot vote
because this might result in data inconsistency.
•
Number of allowed votes has been exceeded. See the section called “Poll behavior” [104].
Beside poll status, you can also see the important poll details on the administration screen:
•
Start date. The date when poll becomes available for respondents. Click on the link to edit the date.
Stop date. The date when poll becomes closed for respondents. Click on the link to edit the date.
Number of votes. Displays number of poll responses.
•
Number of questions - number of questions the poll contains.
•
Maximum number of votes - number of respondents that can vote. When this number is reached, the poll will be
closed and no more respondents will be able to vote. See the section called “Poll behavior”
•
Allow multiple submissions - method used to prevent respondents from multiple votes, if any. See the section
called “Poll behavior”
97
http://www.objectplanet.com/Opinio/
Questions
Creating questions
Creating poll questions is similar to creating survey questions. Refer to section Creating survey questions.
Organizing questions
Organizing poll questions is similar to organizing survey questions with the following exception:
Only one visible poll page is allowed. This means that you can not enter page breaks for poll sections.
Refer to section Organizing survey questions.
Add question to library
Adding a poll question to the library is similar to adding a survey question. Refer to section “ Add survey question to
library ”.
Copy question from library
Copying a poll question from the library is similar to copying a survey question. Refer to section “ Copy survey
question from library ”.
Piping
Poll piping is similar to survey piping with the following exception:
Only Fixed value and Survey URL parameter piping source types are allowed. This means that you cannot
define other piping types.
Refer to section Survey piping.
Poll preview
Poll preview is available from almost any screen during poll creation. Note that when you preview a poll you bypass
the poll security and opened dates. You can see the poll as respondent would and can click on the Vote button to see
the result of the poll. Note that your vote from preview will not be counted as the actual vote. The poll preview chart
is populated with random data and DO NOT reflect the actual votes, if they already exist for the poll. Also note that
if the current screen changes are not yet saved, they will not reflected on the poll preview.
Poll look and feel
Poll look and feel pages include poll layout, style, texts, labels and buttons (elements visible to the respondents). Poll
look and feel is available in the Menu box on poll administration page.
Poll look and feel
The poll look and feel is important for several reasons. It sends a message to the respondent that the poll is "serious"
or "professional" or simply for fun. It is sometimes important to match the design of your website.
98
http://www.objectplanet.com/Opinio/
The design of your poll can be controlled by 2 main methods. A poll template, or a CSS style (Cascading Style
Sheet). The simplest is to use a template, which is often more complete, with a set of images, to enhance the look &
feel.
•
Simple: To use s template, click on the Simple-tab. A template is a predefined look and feel that you can choose
for your poll. Select a template, and click on save. Click on preview poll in the menu box to see how your poll
looks with this new design. Currently, a template can not be uploaded or changed through the Opinio user
interface.
•
Advanced To set you own style, click on the Advanced-tab. The input from poll style field will then controls the
look and feel of your poll.
Note
The Advanced poll style field will be populated with the style for the last saved template. This way you can
select the template that you like from Simple tab and then make some small changes to the css file to ensure
that the poll perfectly fits on your web page.
Every element in the poll can be customized by the CSS style. It requires some basic CSS insight to be able to do
this. The style field contains many comments in it that explains what areas of the poll elements can be
customized. There are plenty of guides on the internet. A couple of examples:
•
•
http://www.htmlhelp.com/reference/css/
•
http://www.w3.org/MarkUp/Guide/Style
Form width: The width of your poll form in pixels. NOTE: poll width will be used for both Question page and
Chart/result page. If poll chart is too big to fit the form width, the poll width will be increased.
If you configure the poll to open the poll results in a popup window, it's possible that respondents will see the
poll chart in the main poll window. This may happen if poll is unavailable (lights red on the poll administration
99
http://www.objectplanet.com/Opinio/
screen).
Make sure that form width you set is enough for both questions and the chart. You can also change poll chart
width to get the correct layout. See Quick poll chart edit
•
Number of columns: Allows for displaying questions in more than one column. The default is one column
(question 2 below question 1, etc). More than one column saves screen area and vertical scrolling. Make sure
your questions aren't too wide, because that will push the questions in the rightmost column further to the right.
The maximum number of columns is 3. Example with 2 columns:
•
Question numbering: “default” uses standard numbering, e.g. 1-2-3-4 etc. For displaying other numbers that
1,2,3,.. enable custom numbering by selecting it here. To configure what is actually displayed, see the section
called “Custom question numbers”
Poll texts
100
http://www.objectplanet.com/Opinio/
This screen provides editing of poll texts that are visible to respondents. All of the texts are optional.
•
Poll heading is displayed at the top of the poll.
•
Introduction will also appear on the poll form, below the title. Use this to give general instructions to the
respondents.
•
Header is displayed above the poll and can be used for company logo, for example. Previously created and stored
headers can be selected from the list above the Header field. Name the created header if you want to save it for
later use.
•
Footer is displayed under the poll and can be used for company logo or contact information, for example.
Previously created and stored footers can be selected from the list above the Footer field. Name the created footer
if you want to save it for later use.
•
"Thank you"-note will be displayed to the respondent when he/she has voted if poll result type is set to
“Thank-you note”. Read more about poll result types.
Poll buttons
101
http://www.objectplanet.com/Opinio/
You can choose either text or an image for your Vote button.
•
Button label: Type in whatever you want to name the Vote button.
•
Image: Press the image link and select or upload for the image you want to use for the button. See the section
called “Images”.
Quick question text edit for polls
This feature is similar to survey quick question text edit. Refer to section “ Survey quick question text edit ”.
Quick poll chart edit
This section gives you quick access to the poll chart design. NOTE that all of the attributes on this page can also be
edited from report screen (Poll report), see chart attributes and report texts.
•
Chart heading is the same as report heading. and is the title displayed over the poll chart.
•
Chart type. See Report chart types.
•
Chart width is the width, in pixels, of the produced chart image.
•
Chart height is the height, in pixels, of the produced chart image.
Custom question numbers
Poll custom question numbers are similar to survey question numbers. Refer to section Survey custom question
numbers.
Poll setup
Poll setup is available in the Menu box on poll administration page.
Poll behavior
102
http://www.objectplanet.com/Opinio/
Poll result
•
•
Result type. When the respondent has answered the question, and clicked on the vote-button, the value selected
determines what he/she will see next:
•
Chart with the poll summary. See Quick chart edit.
•
Thank you note, set on the poll texts page.
Result display method:. Configure how you want the poll result to be displayed:
•
Generate on vote. With this option, the poll result received from the server after the vote. Use this method for
Thank-you note if it contains piping elements. Use this method for poll the chart if you want up-to date vote
count.
•
Page reload. With this option, the page is submitted, the result chart is then calculated, and the same page is
displayed with the chart. Important to note that the result will ONLY be visible if multiple votes are turned
off. Otherwise the poll questions will be displayed again.
•
Pre-generate. This is perhaps the most elegant solution, where the result chart is calculated before the page
with the poll is displayed. When the vote button is clicked, the response data is sent to the Opinio server, and
the result chart is displayed immediately. What happens is actually a JavaScript function call that simply
switches the view from the poll form to the poll chart. IMPORTANT: The result is always one behind, i.e. the
vote for the current respondent is not included in the chart, because the chart is calculated on the initial page
visit. The method can be used on high load servers with large number of votes expected.
•
Popup window: This option will display the chart/thank-you note in a popup window, and leave the form
embedded in the page unchanged. The chart will be updated with the current respondent. NOTE that if
multiple votes are turned off, the respondent who have already voted will be see poll result in the main poll
window, because we/she has already voted.
103
http://www.objectplanet.com/Opinio/
Responses and data
•
Maximum number of votes: Poll will be closed for voting if this numbers is reached. Poll result will be displayed
instead the questions. This feature is useful if only a limited number of votes is needed, and server/database
resources are limited. Set this to 0 for unlimited votes.
•
Validation: Only Client side validation type is supported. The validity of response values will be checked/
verified on the client side (in the browser, by JavaScript). The error messages are displayed in a popup-window.
Responses and data
Multiple submissions
If you choose no, select the method to prevent multiple votes.
•
Yes: This means that the respondents may vote as many times as they want.
•
No: The respondent is restricted to vote only once. If this option is selected, also specify how you want Opinio to
perform the restriction:
•
Check IP-address: The respondents IP address will be stored along with the vote. When a response is saved,
the system will check if another response exists for this poll with the same IP address. If so, the respondent
will see the poll result instead of questions.
•
Cookies: are small data elements stored in the browser. When a poll has been responded to, the system will
store a value in a cookie, indicating this.
Multilingual
•
Poll language: The default language of the poll.
Multilingual
Integration
•
Custom poll id: The poll link contains an id that points to the poll. This is a number that is generated from a
sequence of numbers. For advanced HTML users it is easy to find the number used for the poll. In that case they
can try to set different numbers (increase or decrease the poll number) and access different polls. If your poll is
confidential, you might want to set the custom id to something that is difficult to guess. The poll will then be
unaccessible by the sequential number.
•
Save URL parameters: It is possible to specify URL parameters to save with each respondent. By setting this poll
attribute it is possible to turn the automatic saving of these URL parameters on/off. This is necessary, because it
should be possible to let a plugin handle this data (if it is not going to be saved automatically). The default value
is to save the parameters ("Yes")
Integration
Start and stop dates
All polls have start and stop dates. This is used to control and restrict responses to a specified time frame. This
feature can also be used to close the poll immediately, since it is possible to set the stop date while the poll is
104
http://www.objectplanet.com/Opinio/
running. Note that the poll displays the poll result (chart or thank you note) instead of questions before the start date
and after the stop date, and not a “closed poll” message.
Convert to survey
If you want to extend the poll and convert it to survey, click on "Convert button". The poll will then change type to
Survey and will open all the Survey features.
Important
You can NOT convert surveys to polls.
Reload poll
Reloading a poll is similar to reloading a survey. Refer to Reload survey.
Translations
Poll translations are similar to survey translations. Refer to Survey translations.
Poll collaboration
Poll collaboration is similar to survey collaboration. Refer to Survey collaboration.
105
http://www.objectplanet.com/Opinio/
Chapter 6. Publish poll
Publish poll
To publish a poll, copy and paste poll source to your web page source at the desired position. The poll source usually
includes the three lines:
<script src="http://www.mydomain.com:8080/opinio/include/survey.js"/>
<script src="http://www.mydomain.com:8080/opinio/ps?s=***&lang=en"/>
Note
If you place more that one poll on the same web page you do not have to include the first two lines for other
polls. Just make sure that they are included one time BEFORE the first poll. For second, third, etc. polls just
include the line
<script src="http://www.mydomain.com:8080/opinio/ps?s=***&lang=en"/>
Checklist before poll publishing.
There are some things that should be checked before publishing the poll:
•
Test the poll Make sure that poll looks and behaves as intended. Make sure that piping tags are replaced
correctly, if used.
•
Go to translations page and make sure that all translations are up to date if your poll is translated.
•
Set poll open dates. Make sure that poll open dates are set to the date you want the poll to be open. Note that by
default the poll is open for one week only starting from the created date.
•
Unlock the poll. The last thing to check is that the traffic light icon on the poll admin screen lights green,
meaning that poll is now open for votes.
106
http://www.objectplanet.com/Opinio/
Chapter 7. Reports and data analysis
Manage responses
View each response separately.
By clicking on the link "Manage responses" in the Menu box, you get a list of all the responses for the current
survey.
From this list there are links to each response (click on the respondent id), a column for reopening and sending the
survey link to one or more recipients, and checkboxes for deleting responses. To reopen and send the survey link
each respondent must have a valid email address. Some email fields have email address already set, this is because
the respondent has been invited to take the survey through an email invitation. The two buttons at the bottom of the
list will respectively reopen and resend, or delete the selected respondents.
Note
To make use of the reopen/resend functionality, the logged in user has to be registered with both user name
and email. Also, the email language will be the logged-in user's selected language.
Delete responses
There are two options:
107
http://www.objectplanet.com/Opinio/
•
Delete all responses.
•
Delete all incomplete responses.
The deleted responses will be deleted from the database, and is not recoverable. Respondents will not be able to
answer the survey during deletion as both these actions will temporary lock the survey. If you want to edit the
structure of the survey (e.g. add/edit questions) you must delete all responses first, if any. Another alternative is to
make a copy of the survey, make the changes, and then publish this one instead.
Reports
Reports are a very important part of Opinio. Opinio allows you to create views on the data material from the survey
in an infinite number of ways, using report elements, filters, and other settings.
All reports for a survey is listed when clicking on Reports and data in the Menu box (when accessing a survey). Two
reports are automatically generated at the moment when a survey is created:
•
Summary report. Summary of each question with charts.
•
Comment report. Listing of all free text comments (open ended) entered by respondents. This includes text fields
in matrix and in-text question types.
New report
The screen for "new report":
When creating a new report the user needs to type the report name.
Description is used in the admin module only and is useful to remember what is included in the report.
108
http://www.objectplanet.com/Opinio/
Copy report
The screen for "copy report":
This functionality provides a way to copy a report for a survey. Click on the "copy"-link in the report list, to display
the screen as seen above. Type in the name of the copy, and click the button. You will now be returned to the report
list. The copy is now listed here.
Rename report
Rename report screen is accessible from Action column in the report list table. Report name is used in the
administration screens only. It should be descriptive, to make it easier to find your report later among a list of other
reports.
Report summary
When viewing the report summary page you will see a list of report files. Opinio supports three kinds of report files:
•
Html report
•
Pdf report
•
Raw data report
Html/Pdf report.
The Html and Pdf report files have basically the same report layout, but are generated with two different formats.
109
http://www.objectplanet.com/Opinio/
The Html report file is useful when presenting the data analysis on the web, but when it comes to printing and saving
the report locally on disk, the Pdf report file is a better solution. PDF is now supported by most browsers, so the use
of PDF on the WEB also works very well. Both report files (based on the report elements) include various types of
charts, frequency tables with calculated data, different statistical details, and text lists.
Raw data report.
While the Html/Pdf report files include charts and calculated data, the raw data report file includes the unprocessed
data for all respondents in the report.
This report is still using the elements and filters created for the report, which is used to determine which questions
and respondents that should be included in the export file. When several report elements are including the same
question, the raw data report file (as opposed to the Html/Pdf report files) will include the question only once.
The output format of the raw data report file is based on the ‘Raw data settings’ set for the report. See the section
called “Raw data export settings”.
Add to portal.
All report files can be added to a report portal by using the ‘Add to portal’ link in the Action column. When clicking
on this link a small popup menu will appear, with all available report portals listed. Simply select the report portal
that you want the report file to be added to. Learn more about how to publish your reports by using report portals in
the section called “Report portals”
Report structure
Reports are composed of one or more report elements. Each element may contain report data for one or more
questions. This allows for a very flexible way to construct your report. The default summary report, for example,
contains a report with one element, and includes a summary report for each question in the survey. But you can, if
you wish, create a report for only one question, or a report with several different views/summaries for one single
question. This is done by creating several elements, and selecting the same question for each element. Then you can
vary with different chart-type for each element, for example.
The layout of the report:
110
http://www.objectplanet.com/Opinio/
Elements
To add an element, click "add element" from the report structure page.
111
http://www.objectplanet.com/Opinio/
Enter a name, heading and description for the report element and the survey questions you want to include. Select
continue to go to the next page.
On the next page you select the report types you want to apply to the questions you selected in this element. These
are
•
Summary report. Produces summary statistics for each question in the element. Example, with a chart:
112
http://www.objectplanet.com/Opinio/
•
Detailed statistics. Produces detailed/in depth statistics for each question in the element. There is a difference in
the frequency table when selecting this option. As you can see in the picture below the frequency table now
includes columns for cumulative values. In addition, a set of statistical variables is included below the table.
Example, without chart:
113
http://www.objectplanet.com/Opinio/
•
Cross tabulation. This is a comparison of two questions, including cross-calculation of frequencies of data for
each. This applies only to questions that allows selection between items, not including the matrix question type.
Take these multiple choice questions, for example: 1) Do you play an instrument? (with answer alternatives yes/
no) 2) Your gender? (with answer alternatives male/female). Then, the report may look like this:
114
http://www.objectplanet.com/Opinio/
•
Free text comments. If you have included "free text comment" boxes in your survey, this option will list the
comments for the questions selected in the report element. Each of the answers will be listed along with the
115
http://www.objectplanet.com/Opinio/
respondent id. That way you may also access individual results.
•
Text in multiple 'other' fields. If you have included a text field for "other" in multiple choice, this option will list
all the comments entered by the respondents for this field.
•
In-text field texts. Check this option to show comment listing for in-text fields of type text.
•
Text in matrix cells. Select option type if you want to list all the comments in the matrix cells of type text.
•
Chart types.
•
Piechart. Display summaries for each question (or in-text field, or matrix cell), if it applies, as a piechart. It
may look like this:
•
Horizontal barchart. Display summaries for each question (or in-text field, or matrix cell), if it applies, as a
horizontal barchart. It may look like this:
116
http://www.objectplanet.com/Opinio/
•
Vertical barchart. Display summaries for each question (or in-text field, or matrix cell), if it applies, as a
vertical barchart. It may look like this:
117
http://www.objectplanet.com/Opinio/
•
•
Vertical barchart with bars behind. Display summaries for each question (or in-text field, or matrix cell), if it
applies, as a vertical barchart with bars behind. It may look like this:
Other.
•
Show non-selected items. When selecting this option all items in a dropdown or a multiple option list will be
included for the element, even though some of the items haven't been selected by the respondents.
•
Numeric precision. The numeric precision of all numbers in the report element.
Chart attributes
The chart attributes within an element can be customized in great detail. Changes made to the report element, only
affects the current report element. The screen for editing the element's chart attributes (click on "Chart attributes"
from the report element list):
118
http://www.objectplanet.com/Opinio/
The reports can be made simpler or more detailed depending on which option you turn on or off:
•
Total width of the chart grid: The width, in pixels, of the produced chart image.
•
Total height of the chart grid: The height, in pixels, of the produced chart image.
•
Maximum label length: The number of characters in chart labels. The length of the chart labels should normally
be limited, because if they are too long, the labels will consume all the space allocated for the chart image (see
width/height above).
119
http://www.objectplanet.com/Opinio/
•
Use percent sample values instead of counts in barchart: Select this to show the ratios (percents) instead of the
actual counts for each value in a barchart.
The chart attributes for a report element is very flexible, but may seem complicated to inexperienced users. It is not
required to make any changes here, unless you have specific requirements for your charting.
To edit or add a chart attribute, select the attribute you want to edit/change in the attribute drop-down list. An
example value for this attribute is displayed to the right. Enter your desired value, and click the "add/update" button.
If the attribute does not already exist, it will be added to this report element, otherwise it will be changed to the new
value.
Available bar chart attributes:
•
Chart style
•
3D mode on: Values: true or false.
•
3D depth in pixels: The depth of the bar "shadow", in pixels. Example values are 5, 10, 20.
•
Value grid lines on: Shows value guide-lines on the chart, to make it easier to read the value of the bars.
•
Value grid lines color: Set the color of the grid lines. Values can be either colors like red, blue, or RGBvalues like #FF0000, #3399FE, #3300FF. See color codes for details.
•
Bar type for cross-tabulation: The bar chart for cross-tabulation reports can be shown as stacked, or sideby-side. Valid values: stacked, side
120
http://www.objectplanet.com/Opinio/
•
•
•
Outline around the bars off: true, false
•
Relative width of each bar: Sets the relative width of each bar. If the width is set to 1.0, there will be no space
between the bars. If the width is set to 0.5, the space between each bar will be the same as the width of the
bar.
Colors:
•
Background color around the chart grid: See color codes for details on how to specify colors.
•
Background: This is the background color of the chart itself. See color codes for details on how to specify
colors.
•
Grid outline color: The color of the chart grid outline, including the fonts. See color codes for details on how
to specify colors.
•
Display bars with different colors: Set value to either true or false
•
Colors of the bars: Set all bars to the same color. See color codes for details on how to specify colors.
Labels and fonts:
•
Title of the chart: The title shown at the top of the chart. Make sure there is room to display long titles.
•
Chart title font: Sets the title font. Make sure the font specified is available on the server Opinio is installed
on. Example values: “Arial, plain, 12”, “Verdana, bold, 10”
•
Default font for chart labels: Example values: “Arial, plain, 12”, “Verdana, bold, 10”
•
Bar labels on: Turns on the bar labels. The bar labels will be displayed below each bar in the chart. Values:
true or false
•
Bar labels clockwise angle: Angle of the bar labels. Sample value: 270
•
Bar labels font: Example values: “Arial, plain, 12”, “Verdana, bold, 10”
•
Legend on: Turns the legend on/off. Values: true or false
•
Legend position: If the legend is turned on, these are possible values: left, right, top or bottom
•
Legend labels font: Example values: “Arial, plain, 12”, “Verdana, bold, 10”
•
Bar value labels on: The labels on bars (usually counts or percents). Values: true or false
•
Value labels clockwise angle: The angle for labels on the bars. Sample value: 270
•
Value labels prefix: Sample value: $
•
Value labels postfix: Sample value: USD
•
Range labels off: Range labels are the labels along the axis, displaying the value range. Values: true or false
•
Upper value of the range axis: Specify the upper numeric value for the range axis.
•
Range axis label: Specify the label for the range axis.
121
http://www.objectplanet.com/Opinio/
•
Range axis label clockwise angle: Sample value: 270
•
Range axis label font: Example values: “Arial, plain, 12”, “Verdana, bold, 10”
•
Sample axis label: Specify the label of the sample axis.
•
Sample axis font: Example values: “Arial, plain, 12”, “Verdana, bold, 10”
•
Sample axis clockwise angle: Sample value: 270
•
Paint only labels there are room for: By default all the bar labels are painted even if there is not enough space
for them all (they will overlap). If this parameter is set to true, only labels there are room for will be painted.
Available pie chart attributes:
•
•
Chart style
•
3D mode on: Values: true or false.
•
3D angle from 10 to 90: Angle of the pie, if 3D mode is on. Example values are 20, 35.
•
Slice separator on: Displays a line between the slices in a pie.
•
Slice separator color: See color codes for details on how to specify colors.
Colors
•
•
Background color around the chart grid: See color codes for details on how to specify colors.
Labels and fonts
122
http://www.objectplanet.com/Opinio/
•
Title of the chart: The title shown at the top of the chart. Make sure there is room to display long titles.
•
Chart title font: Sets the title font. Make sure the font specified is available on the server Opinio is installed
on. Example values: “Arial, plain, 12”, “Verdana, bold, 10”
•
Default font for chart labels: Example values: “Arial, plain, 12”, “Verdana, bold, 10”
•
Legend on: Turns the legend on/off. Values: true or false
•
Legend position: If the legend is turned on, these are possible values: left, right, top or bottom
•
Legend labels font: Example values: “Arial, plain, 12”, “Verdana, bold, 10”
•
Percent labels on: Shows the percent of total for each slice. Values: true or false
•
Sample labels on: Specify if the sample labels should be displayed. Values: true or false
•
Value labels on: Specify if the value labels should be displayed. Values: true or false
•
Value labels prefix: Sample value: $
•
Value labels postfix: Sample value: USD
•
Font for sample / value / percent labels: Example values: “Arial, plain, 12”, “Verdana, bold, 10”
•
Color for sample / value / percent labels: See color codes for details on how to specify colors.
Invalid elements
Report elements might have an invalid state if the question order has been changed or questions have been deleted in
the survey after the report element was created. If any report elements are invalid the report can not be generated. A
"needs verification" message is displayed for all invalid report elements in the list.
To fix the invalid elements the user needs to verify and re-save the included questions.
Text and labels
The reports are generated with a set of standard texts and labels. Most of the texts in a report are taken from the
language files, which are part of the internal system files. A report is created with the same language as the survey
language. If language isn't supported by Opinio, the report is created with the default system language. When a
123
http://www.objectplanet.com/Opinio/
report is created, the user can change the texts by clicking on one of the links in the Menu box on the "Text and
labels" page for the report. Question related texts are taken from the questions included in the survey.
General report texts
The "General report texts" page contains general texts that are displayed in the report. All customizable texts are
optional.
•
Heading: The 'heading' is the report title displayed at the top of the report. A report should have a title that
identifies the focus of the research. This text is optional.
•
Header: The 'header' may contain html and is only applicable for the html report. Select a header from the bank,
or type it in manually. If a name for the header is set, the header will be added to the reusable resources This text
is optional.
•
Footer: The 'footer' may contain html and is only applicable for the html report. Select a footer from the bank, or
type it in manually. If a name for the footer is set the footer will be added to the reusable resources. This text is
optional.
•
Executive summary: The 'executive summary' may be used to give a short summary of the survey findings, and is
included at the beginning of the report. This text is optional.
•
Introduction: The 'introduction' can be used to provide the audience with some background of the study. The
'introduction' is placed at the beginning of the report, right after the 'executive summary'. The sub-title for this
section in the report can be changed on the 'General report labels' page. This text is optional.
•
Review of preliminary research: The 'review of preliminary research' can be used to give a short summary of the
initial processes undertaken by the researcher in identifying the research focus and helping to develop the actual
survey. The 'review of preliminary research' is placed at the beginning of the report, right after the 'introduction'.
The sub-title for this section in the report can be changed on the 'General report labels' page. This text is optional.
•
Method of research: The 'method of research' may be used to include an explanation of the methodology that was
employed to obtain and analyze the data. The 'method of research' is placed at the beginning of the report, right
after the 'review of preliminary research'. The sub-title for this section in the report can be changed on the
'General report labels' page. This text is optional.
•
Survey research findings: The 'survey research findings' may be used to give a written explanation of the tabular
and graphic results. The 'survey research findings' is placed at the end of the report, just before the 'conclusion'.
The sub-title for this section in the report can be changed on the 'General report labels' page. This text is optional.
•
Conclusion: The 'conclusion' may be used in the report to conclude with a strong section that draws implications
from the findings, indicates relationships and trends among the various tables and graphs. The 'conclusion' is
placed at the very end of the report. The sub-title for this section in the report can be changed on the 'General
report labels' page. This text is optional.
General report labels
These texts/labels are part of the system texts. The report is created with same language as the survey language. If
the survey language isn't supported by Opinio, the report is created with the default language set for the system.
The "General report labels" page contains general sub-titles and labels that are displayed in the report.
Sub-titles
•
Table of contents title (applicable for Pdf reports only)
124
http://www.objectplanet.com/Opinio/
•
Drilldown info title
•
Report info title
•
Report summary title
•
Executive summary title
•
Introduction title
•
Review of preliminary research title
•
Method of research title
•
Survey research findings title
•
Conclusion title
•
Question title
•
In-text element title
•
Numeric cell title
•
Dropdown cell title
•
Checkbox cell title
Labels
•
Row label
•
Column label
•
No data to report label
•
Report date label
•
Start date label
•
Stop date label
•
Stored responses label
•
Number of completed responses label
•
Number of invitees label
•
Invitees that responded label
•
Response rate label
Response value labels
The 'response value labels' are labels used in the report for each question. Some labels in the report, like the 'items'
column in the frequency table and the title for each frequency table/statistics pair, are based on the question type. For
numeric questions you can also specify the numeric intervals. See the figure below.
125
http://www.objectplanet.com/Opinio/
Click on a question in the list and you will be able to customize the 'response value labels'.
Rating question:
126
http://www.objectplanet.com/Opinio/
Multiple question:
Numeric question:
Dropdown question:
127
http://www.objectplanet.com/Opinio/
Matrix question:
Question with in-text fields:
128
http://www.objectplanet.com/Opinio/
Statistics labels
The 'statistical labels' are labels used in the frequency tables and statistics sections in the report. These labels can be
customized:
•
Frequency table label
•
Checkbox checked label
•
Checkbox not checked label
•
Weight label
•
Code label
•
Absolute frequency label
•
Cum. absolute frequency label
•
Relative frequency label
•
Cum. relative frequency label
•
Adjusted relative frequency label
•
Not answered label
•
Sum label
•
Text input label
•
Interval over label
•
Interval between label
•
Interval under label
•
Interval value included label
•
Interval value excluded label
Look and feel
The report look and feel is fully based on the template selected for the report. For the current version (Opinio 6.0)
there is only one template available. More templates will be added later.
129
http://www.objectplanet.com/Opinio/
Report filters
Filters provide a way to build powerful reports. It is a way to "zoom" in on a subset of the respondent data and get a
report based on this data set. For example, in question 2, you have a question that asks about gender (male/female).
You want a summary report (all questions) on all females (you want to exclude all males from the report). Then you
simply create a filter that filters out all males from this particular report.
Many filters can be created per report. If there are more than one, it is the sum of all filters that determines the dataset to report on. Thus filters should be created with care. For example, if you create 2 filters, one that filters out all
females, then another filter that filters out all males, then the resulting data-set to report on will be 0 (zero)
respondents.
If your survey has many respondents, several hundred or thousands, then it may take a long time to create filter. The
reason is that Opinio stores information about each respondent whether he is included in the filter or not. If you know
that the survey will have many respondents, it may be a good idea to create the filter before the survey is started.
To add a filter click on "Filters" in the Menu box when you are inside a report. Then click on "Add filter".
130
http://www.objectplanet.com/Opinio/
•
A filter name must be specified. Select to create the filter from an existing filter and select if the respondents
meeting the condition should be included in the report or excluded (filtered out)
•
Select one or more types of filter (date, response language and/or based on question responses) and click
'continue'.
•
If using 'date range' filter type, select start and stop dates for the filter. This is optional, but if included, all
respondents responding in this date range will be included or excluded from the report (depending on what was
selected above).
•
If using 'response language' filter type, select the languages to filter on. Respondents who completes the survey in
this language will match the condition.
•
If using 'question responses' filter type, define conditions on the questions by selecting the response values on 1
or more questions. Respondents who answered the same values in the survey will match the condition.
Invalid filters
Report filters can be turned into an invalid state if the question order has been changed or questions have been edited
or deleted in the survey after the report filter was created. If any report filters are invalid the report can not be
131
http://www.objectplanet.com/Opinio/
generated. A "needs verification" message is displayed for all invalid report filters in the list.
To fix the invalid filters the user needs to verify (view) and re-save the filter conditions.
Report settings
The report settings screen:
Response data
•
Include incomplete responses: Select this option if you want to include incomplete responses in your report.
Checked by default.
Security
132
http://www.objectplanet.com/Opinio/
•
Report results visibility: There are two options, public or private. If public is selected everybody will have access
to view the report (including respondents), if they know the url to the report. If private is selected only users with
access to the report are allowed to view the report. NOTE: A private report can be added to a public report portal.
That way the report will be public through the report portal. In other words, if the report is included on a portal,
the security settings of the portal will take precedence.
Behavior
•
Enable drilldowns:
•
Cache report results: For surveys with many responses, and with a report page at the end of the survey (if you
have set up the survey to forward to the report after respondent has completed), recalculating every time would
put an enormous load on the server. To avoid this you can choose to "cache report results". This means that
instead of recalculating statistics continuously, you set a "recalculating period". For example once an hour. This
way the report will be fairly updated at all times without bringing your server down. Even so, we recommend to
turn off reporting for respondents, if the number of respondents get very high. NOTE: Free-text comments are
never cached. This means that if the report is available to the respondents, you could face serious server problems
at high loads.
Other
•
Description: Description is used in the admin module only and is useful to remember what is included in the
report.
Raw data export settings
Each report may be exported to a file containing the raw response data. The raw data export will contain response
data for all questions included in the report elements. If several report elements exist, and they are including the same
question the response data for the question is included only once in the raw data export. All existing filters will be
applied to the raw data export, just as for the html/pdf reports.
Having exported the raw data, based on the raw data export settings, the exported file can again be imported into an
external statistical software package (e.g. SPSS).
133
http://www.objectplanet.com/Opinio/
General info.
•
Include attributes:
Includes respondent attributes, if any. Respondent attributes may be any data stored for each respondent in the
OPS_RespondentAttribute database table. Respondent attributes are only available if the survey attribute "Save
URL parameters" has been turned on. In that case any "opdata_someparametername" parameters are
automatically saved (see Saev URL parameters []), or if any respondent attribute have been set by a plugin or
imported via invitees. The default is not to include respondent attributes. If included, the respondent attributes
will appear in the exported data right after the respondent language column, with one column for each respondent
attribute.
134
http://www.objectplanet.com/Opinio/
•
Include invitee data:
When checked, the information about the invitee (id, email address and name) will be included for the
respondents that have been answered through an invitation. NOTE: The invitee data will only be included if no
type of anonymity is enabled for the survey.
•
Select encoding: Choose your respective language encoding (see language encoding).
Column headings.
•
Respondent id: The heading used for the respondent id column.
•
Start date: The heading used for the start date column.
•
Completed date: The heading used for the completed date column.
•
Language code: The heading used for the respondent language code column.
•
Invitee id: The heading used for the invitee id column.
•
Invitee email: The heading used for the invitee email column.
•
Invitee name: The heading used for the invitee name column.
•
Question:
For questions with only one possible answer, this question heading combined with the question number, is used
as the column heading. This is applicable for questions of type rating, numeric, single selection dropdown and
single selection multiple choice. For other question types, and for all in-text fields in a question, this question
heading is combined with the corresponding column heading on the 'raw data export settings' page.
•
In-text:
For each in-text field in a question there will be a column with the question column heading combined with this
in-text heading and the in-text name.
•
Multiple choice, multiple selections:
For a multiple choice question with multiple selections turned on, this attribute decide whether it is the value or
the index of the choice that should be used for the heading.
•
Multiple choice:
For a multiple question with multiple selections turned on, this column heading is combined with the question
heading and the choice index. The user may select to use the value of the choice as the heading (see the section
'Multiple choice, multiple selections'). If that's the case, changing this column heading has no effect on the raw
data export.
•
Multiple other:
For a multiple choice question with other-field as the last choice, this column heading is combined with the
multiple choice heading, or the multiple option value.
•
Matrix row:
For a matrix question, this column heading is combined with the question heading. Depending on the type of
matrix group this heading may also be combined with the matrix group name and/or the heading for a matrix
column.
135
http://www.objectplanet.com/Opinio/
•
Matrix col:
For a matrix question, this column heading is combined with the question heading. Depending on the type of
matrix group this heading can also be combined with the matrix group name and/or the heading for a matrix row.
•
Free text:
For a question with free text input (an open ended question) this column heading is combined with the question
heading.
•
Value heading max length:
For a multiple choice question with multiple selections turned on, and value of the multiple choice is selected to
be used for the heading, this attribute is used to set the max length of the value heading (if the original text value
of a multiple choice is too long to be used for the column heading).
Delimiters.
•
Data delimiter: The delimiter used to separate the different data columns.
•
Respondent delimiter: The delimiter (can be set to new line) used to separate the respondents.
Delimiters.
Texts.
•
Enclose text in:
If texts are included, this character(s) is used to enclose all texts.
•
If enclosing character(s) found in text:
If the character(s) used for enclosing texts is found in the text itself, use this character(s) instead.
Texts.
Example 7.1. Raw data export output
136
http://www.objectplanet.com/Opinio/
Auto-creating reports
For complex surveys it is sometimes desirable to have different reports for different groups of respondents. Let's say
that your survey contains the following question:
3. How long have you been using the product?
3. How long have you been using the product?
The default reports (Summary report and Comment report) will include all responses. That means that all customers
who used the product will be included in the same report regardless how long they have been using it.
To separate the responses and to get reports for each answer alternative, you can use the "Auto-create reports"
feature. The result will then be 6 new reports, one for each item in that selection. All of the auto generated reports
will have the same structure, but different report filters.
To use this feature, go to "Reports and data" from main survey screen and click on the "Auto create reports" in the
Menu box.
137
http://www.objectplanet.com/Opinio/
To generate reports you need to enter the following data:
•
Report to use as template. Select the report that you want to use for the report generation. The report structure
and filters will then be inherited from this report by all the auto generated reports. Select "None" if you want to
use the default structure. The generated reports will then contain all questions in the survey with summaries and
horizontal bar charts for each question.
•
Prefix. Enter the prefix for all generated report names. This can help to separate the auto created reports from the
manually created ones. For example, if you enter value "Auto", the generated reports will be named like this:
The prefix value is optional.
•
Questions. Select questions that answer alternatives will be used for report generation. It will be created one
report with one filter on each answer alternative for each selected questions.
Example 7.2. Auto created reports
138
http://www.objectplanet.com/Opinio/
Chapter
(portals)
8.
Publish
your
reports
Report portals
Report portals lets you publish your reports. It is a simple way to make your reports available to other users
(coworkers, partners, customers, etc). You can choose the level of security; portals can be public, password protected
or private.
The look and feel of your reports are controlled by professional-looking templates, that allows you to select the
layout and color scheme.
You can add any number of reports to your portal. You can also add heading, subtitles, icons and texts. A sample
report portal:
Steps to create a report portal:
1.
Click on "report portals" in the main menu.
2.
Click "Create Report Portal" in the menu box on the left side of the screen.
139
http://www.objectplanet.com/Opinio/
3.
Give the portal a name. This is the name used to identify the portal in your portal list. The name will not be
displayed in the portal. Then click "create".
4.
The portal is created, and appears in the portal list. To start working with this portal, click on the portal in the
list
5.
You will see the portal detail screen (below). This screen shows you the URL of the portal, that you give to the
people you want to have access to it. It also shows a preview of the portal template.
6.
Click "Edit report portal" in the menu box.
140
http://www.objectplanet.com/Opinio/
This screen allows you to set the portal heading (seen on the portal), and the template. Click "save" to make
your changes persistent.
7.
Now you can add content to your portal. Click on "Report portal items", which will show you the list of portal
items (no items yet).
8.
Click "Add portal item" in the left menu
141
http://www.objectplanet.com/Opinio/
Each report portal item can be either a text item or a link. The text can be a heading, label or description. This is
up to you, simply format the text in any way you like. The link can be a URL to an external resource, or an
Opinio report. For example, start by entering a title: "Customer reports". Click on "save".
When in the item list again, click on "Add portal item" in the left menu again, or click "insert" somewhere in the
item list if you want to add an item at a specific position in the portal. In the "add item" screen, select the "link"
tab.
For each link-item in the portal, you can set:
•
Link label (optional): Label of the link item.
•
Link icon (optional): To the left of the link or label, you can insert an icon.
•
Link title (optional): Title of the link. Will show as a tool tip when you move the mouse over the link item.
•
Report: This is the actual report URL (link).
All link attributes are optional, except the report url.
142
http://www.objectplanet.com/Opinio/
It does not have to be a link to an Opinio report. It could be a URL to an external resource. To add an Opinio
report, click on the report icon.
Navigate to the folder and survey where your report is located. Select the report, and then the report file you
want to include. The report URL will then be placed in the "Report" field. Click "save".
You now have a very simple report portal (one title and a link to one report). Once you have more items, you can use
the item list to organize your items, by moving them up and down, delete and insert new items.
Portal zones
Portal zones are simply areas of the portal page, which is determined by the portal template that you choose. The
simplest portal have one zone, which covers the entire portal page. Some portal templates have more than one zone.
The purpose of the zones is to break the portal page up, to better organize all the links. Kind of like a tiled layout, if
you will. If you select a template with more than one zone, you will clearly see this in the portal item list. When
adding new items, you can select which zone to put them in.
143
http://www.objectplanet.com/Opinio/
Portal security
Opinio report portals supports 3 levels of security. Set the security level appropriate to your intended use of the
portal. Click "Edit portal security" from the menu box on the left side of the screen.
•
Private: The report portal will only be accessible if the Opinio user has at least view-access to the report portal.
Usually, that will only be the creator of the portal.
•
Password protected: With this setting, a password is required to enter the portal. You will need to give your
audience the password and the URL to enter the portal.
•
Public: Public portals does not require any login of any kind. If you know the URL to the portal, you will have
access to it, including all reports on the portal.
Note
Portal security and access to protected reports Report portals give your audience access to all reports
included in the portal. This means that even if the individual reports are password protected (they usually
are), the portal users will still have access to them. This applies even if the portal is public. In other words,
you can make protected reports public by including them in a public report portal.
Report portal list
The report portals are available by clicking on the "Report portals" from the main menu. This page lists all portals
available to your account (currently, report portals cannot be shared between user accounts). You can copy, rename
and delete your portals from this list.
Copy portal: Makes an exact copy of the report portal, including report portal items and template.
144
http://www.objectplanet.com/Opinio/
Rename portal: Give the portal a new name. This is the name you see in your portal list. It is not displayed on the
portal itself.
Delete report portal: This will delete the entire report portal. It is an irreversible action.
145
http://www.objectplanet.com/Opinio/
Chapter 9. Panel Management
Panel management allows you to create a list of respondents that you can invite to participate in surveys over and
over again. These respondents are referred to as panelists. Each panelist subscribes to a panel and provides
information about himself/herself. This information can later be used to target a specific group of panelists for a
particular survey.
Designing panel
In Opinio, each user is assigned a panel. New panels contain some default attributes that can be changed or deleted.
Panel design consists of the following actions:
1.
Define what information you want to collect from the panelists (attributes).
2.
Define and create panel categories for panelist attributes.
3.
Create panel attributes, and add each of them to a panel category.
4.
Create Profile form
Important
It is important to know that you cannot edit existing panel attributes when panelists are registered. You can
however delete attributes and create new ones.
Note
After each change to the panel design the "Create profile form" button will appear on the bottom of the
screen. The profile form must be re-created to reflect the panel design changes. You do not need to click on
this button until you are finished with the panel design.
Panel categories
Panel category is a group of panel attributes. Panel categories can be used to gather related panel attributes.
Click on "Edit categories" link in the Menu box from the main panel screen. The list of existing categories will be
displayed.
146
http://www.objectplanet.com/Opinio/
The following actions are available from here:
•
Create new category. Click on the "Add category" link in the Menu box and name the new category.
•
Rename category. Click on the "Rename" link in the Action column of the categories table. Give the category
new name.
•
Move category. Click on the arrow up or arrow down icon in the Action column of the categories table. Note that
all attributes in the category will be moved as well. Here you define the order of the categories, which means that
in panelist profile form the categories will be displayed in the order they appear on this screen.
•
Delete category. Click on the "Delete" link in the Action column of the categories table. NOTE: You can only
delete empty categories.
Note
When panel categories are changed, the "Create profile form" button might appear at the bottom of the
screen. The profile form must be re-created to reflect the panel design changes. Click on this button when
you are finished updating the panel design.
Panel attributes
A panel attribute is a simple question about a panelist. Examples are date of birth, phone number and job title. Panel
attributes define what information panelists need to provide about themselves.
Click on "Edit attributes" link in the Menu box from main panel screen to go to edit attributes page. The list of
existing attributes will be displayed.
147
http://www.objectplanet.com/Opinio/
The following actions are available from here:
•
Create new attribute. Click on the "Add attribute" link in the Menu box. Description of panel attributes provided
below
•
Move attribute. Click on the arrow up or arrow down icon in the Action column of the attributes table. You can
only move attributes inside the same category. The order of the categories can be changes on "Edit categories"
page. The attributes will appear in the panelist profile form in the same order they are displayed here.
•
Delete attribute. Click on the "Delete" link in the Action column of the attributes table.
Note
After changes to the panel attributes the "Create profile form" button might appear at the bottom of the
screen. Profile form must be re-created to reflect the panel design changes. Click on this button when you
are finished updating the panel design.
Important
You can not change existing panel attributes if panelists are already registered. This is because panelist
answer format depends on the attribute definition. If you need to change the attribute, delete and recreate it
with the correct structure. The panelists will then need to answer the question again.
Panel attribute.
This section describes the panel attribute screen.
148
http://www.objectplanet.com/Opinio/
Following attribute details can be entered:
•
Attribute name - name of the attribute used to identify the attribute on the administration screens.
•
Attribute label - the visible text before the input field in the profile form.
•
Category - the panel category that current attribute belongs to.
•
Attribute type - the type of the input:
•
Short text - simple one line text field
•
Checkbox - checkbox for true/false input
•
Date - input field for date
•
Number - input field for integer number
•
Decimal number - input field for decimal number
•
Selection - multiple choices selection
•
Long text - multiple line text field for long texts
•
Date pattern - select the pattern for the date to enter. This field is enabled if attribute type Date is selected.
•
Selection items - enter choices that panelist will see in the selection question, one per line. This field is enabled if
attribute type Selection is selected.
•
Selection type - choose the type of the selection. This field is enabled if attribute type Selection is selected.
•
List - the selection items will appear as a dropdown list.
•
Buttons - the selection items will appear with a selection button in front of the each choice.
149
http://www.objectplanet.com/Opinio/
•
Selection mode - specify if one or many choices can be selected from the items. This field is enabled if attribute
type Selection is selected.
•
Single - only one item can be selected
•
Buttons - many items can be selected
Profile form
Profile form is the page where panelists enter information about themselves. The form is available to panelists as a
part of the "Edit profile" screen in the panelist portal.
The Profile form as created when the panel design is complete. Click on the "Create profile form" button on the
bottom of the "Edit attribute" or "Edit categories" screen. You can preview Profile form by clicking on the preview
link in the Menu box from panel screens.
Panelists
Panelists are people who agreed to provide information about themselves and to be invited to participate in multiple
surveys. Usually you find panelists by providing a link to the panelist registration page from your website. Panelist
registration consist of two stages:
1.
The panelist enters required information on the "New panelist" page in the panel portal. Panelist name, email
and password are required.
2.
The panelist receives verification email with the link to the panelist portal. When the panelist clicks on the link
included in the email, the email address is verified and panelist can proceed with the profile form. The panelist
is not required to fill out the form. Some or even all panel attributes may remain unanswered.
Panel portal
150
http://www.objectplanet.com/Opinio/
A Panel portal is a set of web pages where panelists can log in and see their status. They can:
•
Change account (email and password)
•
Change profile
•
See the surveys they are invites to
•
See the surveys they have completed
•
Unsubscribe from the panel. If unsubscribed, the panelist will not be invited to participate in new surveys.
•
Delete profile (all the information about themselves)
Panel portal integration
It is sometimes desirable to integrate the portal login screen into a web page. You will need some basic html
understanding to do this. Here you will find examples on how you can do this.
IMPORTANT: Replace [PANEL_PORTAL_URL] with Panel portal url displayed on the panel main screen.
Link to login screen.
This link opens panel portal in the same window: This link opens panel portal in a new window:
<a href="[PANEL_PORTAL_URL]">Login to panel</a>
This link opens panel portal in the same window: This link opens panel portal in a new window:
<a href="[PANEL_PORTAL_URL]" target="blank">Login to panel</a>
This link opens panel portal in the same window: This link opens panel portal in a new window:
Integrated login screen.
151
http://www.objectplanet.com/Opinio/
The existing login screen can not be extracted from the panel. However, the integration can be done with the custom
login form that sends the entered credentials to the panel portal: You can change the look and feel of the form as you
<form action="[PANEL_PORTAL_URL]&action=loginPanelist" method="POST">
<table>
<tr>
<td>Login name:</td>
<td><input type="text" name="login"></td>
</tr>
<tr>
<td>Password:</td>
<td><input type="password" name="password"></td>
</tr>
<tr>
<td></td>
<td><input type="submit" value="Login"></td>
</tr>
</table>
</form>
login form that sends the entered credentials to the panel portal: You can change the look and feel of the form as you
like, making it integrated into your web page. When a panelist enters the correct login info, he/she will be redirected
to the panel portal. If panelist enters incorrect values, he/she will still be redirected to the panel portal with "Login
failed" message over the portal's login page.
New panelist page.
This link opens the "New panelist" screen in the same window: This link opens the panel portal in a new window:
<a href="[PANEL_PORTAL_URL]&action=viewNewPanelist">Join the panel</a>
This link opens the "New panelist" screen in the same window: This link opens the panel portal in a new window:
<a href="[PANEL_PORTAL_URL]&action=viewNewPanelist" target="blank">Join the panel</a>
This link opens the "New panelist" screen in the same window: This link opens the panel portal in a new window:
Integrated new panelist screen.
The integration can be done with the custom "New panelist" form that sends the entered credentials to the panel
portal:
<form action="[PANEL_PORTAL_URL]&action=newPanelist" method="POST">
<table>
<tr>
<td>Your name:</td>
<td><input type="text" name="name"></td>
</tr>
<tr>
<td>Email:</td>
<td><input type="text" name="email"></td>
</tr>
<tr>
<td>Password:</td>
<td><input type="password" name="password"></td>
</tr>
<tr>
<td>Confirm password:</td>
<td><input type="password" name="confirmedPassword"></td>
</tr>
<tr>
<td></td>
152
http://www.objectplanet.com/Opinio/
<td><input type="submit" value="Ok"></td>
</tr>
</table>
</form>
You can change the look and feel of the form as you like, making it integrated to your web page. When panelist
enters the information he/she will be redirected to the panel portal.
Panelist administration
The list of all registered panelists can be accessed by clicking on the "Panelists" link in the Menu box from the main
panel screen.
Panelist email and current subscription status is displayed in the list.
To see the panelist profile click on the selected panelist.
The following action are available from Action column in the panelist table:
•
View surveys - see the list of surveys the panelist have been invited to and have already completed.
•
Change password - change the login password for the panelist.
•
Delete panelist - delete all information about the panelist.
Sample definitions
Sample definitions can be used to define selections from the population of panelists in a panel. A sample definition
describes the attributes of the sample that you want to draw from the panel. When creating invitations to surveys, a
sample definition can be used to invite the requested panelists based on the panelists profiles (age, gender, location,
etc.). See how to invite panelists using sample definitions in the section called “Add invitees”.
153
http://www.objectplanet.com/Opinio/
Recalculate
When new panelists sign up to a panel, or existing panelists change their profile, the number of panelists matching
the sample definition might change. By clicking on the 'Recalculate' link in the Action column you will get the
updated sample count.
Note
Sample count will be equal to the max sample size specified in the sample definition, if the number of
matching panelists is larger than the max sample size. To see exactly how many panelists are matching the
sample definition, you must set the max sample size to 0 (unlimited).
Edit sample definition
154
http://www.objectplanet.com/Opinio/
Sample criteria
•
Max sample size: The max size of panelists in the sample (0 = unlimited).
•
Sample type: The sample type specifies how the sample is drawn from the finite population of panelists.
Available types are: Random, Least recently invited, Least invited, and Least responded. Note that some of the
sample types can be disabled if database in use does not support features needed for sample extraction.
Sample conditions
For each attribute in the panel the sample definition can include a sample condition. A sample condition specifies the
value(s) for a panel attribute. Panelists with the same value(s) in his/her profile will match the condition. If all
conditions in the sample definition are fulfilled by the values in the panelist's profile the panelist can be included in
the sample, but might be left out if the number of panelists matching the conditions is bigger than the max sample
size.
155
http://www.objectplanet.com/Opinio/
Chapter 10. Reusable resources
Reusable resources are items, such as drop down lists, headers/footers etc., which can be created and stored for later
reuse by users with permission to the resource. Accessing 'Resources' from the main menu, gives you the reusable
resources listed above.
Dropdown lists
By clicking on the 'Dropdowns' item in the Menu box, or in the resources summary page, the user will see a list of all
reusable dropdown lists that the user has access to.
Create new dropdown list
To create a new reusable dropdown list the user can click on the 'New dropdown' item in the Menu box, it is also
possible to add dropdown lists to the reusable resources while editing a question in a survey.
Edit dropdown list
To edit a reusable dropdown list, click on the dropdown in the list. NOTE: The user needs permission to modify the
dropdown list.
See the section 'dropdown list question' for more details on this type of lists in general.
Important
The user needs permission to modify the dropdown list to be able to make changes.
Invitee lists
By clicking on the 'Invitee lists' item in the Menu box, or in the resources summary page, the user will see a list of all
reusable invitee lists that the user has access to.
Create new invitee list
To create a new reusable invitee list click on the 'New invitee list' item in the Menu box. Type in the name of the
invitee list and click 'Create'.
Add invitees
There are two ways to add invitees to the invitee list.
•
Enter invitees manually: Enter the email addresses to whom you want to invite manually in the textarea. See the
section called “Invitee data format” for more information about how to enter this information.
The sort button will perform an alphabetic sort on the text area content.
•
Import invitees. Import invitees from an external source by file upload or by indicating a URL to the file with
invitees. If you have a lot of invitees (thousands), it is usually more practical to upload a file, rather than using
the manual entry method, due to the size of the data. There is no theoretical limit on the number of invitees that
can be entered through uploading. The file must be a simple text file conforming to the format described in the
section called “Invitee data format”. It is recommended that you zip the file if it is very large (more than 1mb).
Additional invitee attributes attached to the invitee can be viewed when clicking on the invitee in the invitee list
screen. The attributes will also be tied to the respondent if survey anonymity is disabled. This data can be viewed
in the "Manage responses" screen, clicking and viewing a single response.
156
http://www.objectplanet.com/Opinio/
When adding invitees to the invitation, duplicates are ignored. Duplicates are defined by having the same email
address within the same invitation.
NOTE: The user needs permission to modify the invitee list to be able to add invitees.
Export invitees
All invitees in the invitee list can be exported to a text file. To export the invitees click on the 'Export' link in the
Action column in the invitee list table. Specify the email address to the person the exported file should be sent, and
what character(s) to be used as the delimiter for all invitee attributes.
NOTE: The user needs permission to modify the invitee list to be able to export the invitees.
Edit invitees
To edit the invitees included in invitee list click on the invitee list in the list.
NOTE: The user needs permission to modify the invitee list to be able to edit the invitees.
Question library
By clicking on the 'Question libraries' item in the Menu box, or in the resources summary page, the user will see a
list of all reusable question libraries that the user has access to.
A Question library is a collection of reusable questions. One question library may contain many questions. All
questions can be edited and deleted and new questions can be added either from within the 'Resources' section or by
clicking on the 'Add to library' link when viewing the question list of a survey.
Create new question library
To create a new question library, click on the 'New question library' item in the Menu box. Type in the name of the
question library and click 'Create'.
Edit question library
Editing the questions in a library is similar to editing questions in a survey; same question types, attributes and
export/import functions are available. See Questions for more information.
Import question library
Importing question libraries is useful when moving libraries from one installation to another.
To import a question library click on the 'Import question library' item in the Menu box. Then select either to browse
your system for the XML file (or a zip file containing the XML file) or type in the URL to where it is located.
example of XML file link:
157
http://www.objectplanet.com/Opinio/
http://www.yourserver.com/common_questions.xml
IMPORTANT: The file must be a valid XML file. The only way to ensure that the XML code is valid, is to produce
the XML file by the Opinio export function.
If you would like to give the imported question library a new name, click on the checkbox and enter the new
question library name. Please note that this option is optional, and if not selected the question library name from the
XML file will be used.
When the “Import” button is clicked, the file will be uploaded to the server. As soon as the file has been uploaded,
Opinio will read and store the elements in the XML file as a new question library.
Export question library
Exporting question libraries is useful when moving libraries from one installation to another, or to create a local copy
as a backup.
To export the question library, click on the 'Export' link in the Action column when viewing the question library list.
Choose your respective language encoding (see language encoding) and click 'Export'. This will export the question
library into XML format and the user will get a 'download file' notice when the export process is finished.
Important
All Opinio administrators can create question libraries. Other users need an administrator to grant them such
access, as they can not create question libraries by default. See the section called “User management” for
more information. Administrators can also grant and restrict access to existing question libraries.
Headers and footers
Headers/footers are used to display a text, image, or HTML based items at the top, or at the bottom, of the survey or
report pages.
Create new header/footer
To create a new reusable header/footer, click on the 'New header/footer' item in the Menu box. Type in the name in
the first field and the content in the second. You can use HTML code in the header/footer, but remember that the
header/footer is part of a web page, and must therefore not include any header tags (<html>, <body> etc). See HTML
hints for more info.
Edit header/footer
To edit a reusable header/footer click on the header/footer in the list.
Important
The user needs permission to modify the header/footer to be able to make changes.
158
http://www.objectplanet.com/Opinio/
CSS files
CSS files give the survey authors more control over how survey pages are displayed.
Upload a CSS file
To upload a reusable CSS file click on the 'Upload' tab when viewing the list of CSS files (either 'My css files' or
'Common css files'). Locate the css file that you want to upload by clicking on the 'Browse' button. Type in the new
name (optional) and select the list ('My css files' or 'Common css files') to which you want the css file to be uploaded
(applicable for 'super users' only). If a file with the same name already exists in the list you will need to either
specify another filename or check the 'Replace if exists' checkbox, in this case the existing file will be overwritten.
Note
The upload file must be a valid CSS file.
Important
Please note that existing surveys using the CSS files that is overwritten will be affected. Make sure your
modified CSS files is correct before replacing an existing CSS file. This is particularly true for CSS files in
the common-list.
159
http://www.objectplanet.com/Opinio/
Edit a CSS file
To edit a reusable CSS file click on the CSS file in the list (only 'super users' can edit files in the 'Common css files'
list).
Download a CSS file
A CSS file can be downloaded to disk by clicking on the 'download' link in the Action column. Downloading a CSS
file is useful if you want to use another CSS editor to edit your CSS files, or if you want to use the same CSS file
within another installation of Opinio.
Images
Images can be used in various places when designing a survey, i.e. for buttons in a survey and for images included in
a question.
160
http://www.objectplanet.com/Opinio/
Upload an image file
To upload a reusable image file click on the 'Upload' tab when viewing the list of images (either 'My images' or
'Common images'). Locate the image file that you want to upload by clicking on the 'Browse' button. Type in the
new name (optional) and select the list ('My images' or 'Common images') to which you want the image file to be
uploaded (applicable for 'super users' only). If a file with the same name already exists in the list you will need to
either specify another filename or check the 'Replace if exists' checkbox, in this case the existing file will be
overwritten.
Important
The upload file must be a valid image file. If not, Opinio will reject it as a security measure.
Download an image file
An image file can be downloaded to disk by clicking on the 'download' link in the Action column. Downloading an
image file is useful if you want to edit your image files, or if you want to use the same image file within another
installation of Opinio.
HTML files
161
http://www.objectplanet.com/Opinio/
HTML files, in this context, are html files used to embed the survey pages within an html page. This html file can be
used as a 'template' for surveys, which makes it easy to integrate surveys with the layout of your existing web portal,
for example.
Upload an HTML file
To upload a reusable HTML file, click on the 'Upload' tab when viewing the list of HTML files (either 'My HTML
files' or 'Common HTML files'). Locate the html file that you want to upload by clicking on the 'Browse' button.
Type in the new name (optional) and select the list ('My HTML files' or 'Common HTML files') to which you want
the css file to be uploaded (applicable for 'super users' only). If a file with the same name already exists in the list,
you must either specify another filename or check the 'Replace if exists' checkbox, in which case the existing file will
be overwritten.
Important
The upload file must be a valid HTML file and must include the survey tag <survey> at the position where
you want the survey to be displayed.
Edit an HTML file
To edit a reusable HTML file click on the HTML file in the list (only 'super users' can edit files in the 'Common
HTML files' list).
162
http://www.objectplanet.com/Opinio/
Download an HTML file
An HTML file can be downloaded to disk by clicking on the 'download' link in the Action column. Downloading a
HTML file is useful if you want to use another HTML editor to edit your HTML files, or if you want to use the same
HTML file within another installation of Opinio.
Files
Files, in this context, can be used to share any type of file with other Opinio users.
Upload a file
To upload a reusable file click on the 'Upload' tab when viewing the list of files (either 'My files' or 'Common files').
Locate the file that you want to upload by clicking on the 'Browse' button. Type in the new name (optional) and
select the list ('My file' or 'Common file') to which you want the file to be uploaded (applicable for 'super users'
163
http://www.objectplanet.com/Opinio/
only). If a file with the same name already exists in the list, you must either specify another filename or check the
'Replace if exists' checkbox.
Download a file
A file can be downloaded to disk by clicking on the 'download' link in the Action column.
164
http://www.objectplanet.com/Opinio/
Chapter 11. My profile
For changing your profile. Login name cannot be changed - it is assigned when the user is created. All other info can
be changed:
•
Login name: Login name is used as identification when logging in, along with the password.
•
Created date: Date when your account was created. It may not be set, because created date has been added in
version 6.
•
User name: The real name of the user, if known. Used only as helpful information in this screen.
•
Password/confirm password: Allows changing of the password. Type the password twice to confirm you want to
change it. If the password fields are left empty, the current password will not be changed. It is not possible to set
the password to empty/blank.
•
Email: Set the email address. This is optional, but recommended, to ease filling out some of the screens that
requires email address (invitations, for example). Also, it makes it easier for the administrator to contact you if
needed.
•
Language: Your preferred language. This refers to all the screen texts/labels in the entire system. More languages
will be added later.
•
Time zone: Your time zone. It is necessary to specify the timezone, so that dates are displayed correctly. If this is
not set according to your location, the server date/time will be used, and could be many hours different than the
timezone you are in.
•
Location of uploaded files: When uploading images, css files etc. they will be placed on the server in the location
indicated here. If you need to write your custom HTML-code to display images (in the question text, for
165
http://www.objectplanet.com/Opinio/
example), you can look in your profile to see where your uploaded files are.
User preferences
User preferences are settings to control the behavior of the user interface.
•
Show warning pop-ups: Many screens in the system shows a warning before an action is executed. It is not
recommended to turn this feature off unless you know the system really well. For instance, when you start to edit
a survey, a message is displayed to warn you that the survey will be locked and that respondents will not be able
to respond.
•
Show information pop-ups: Many screens in the system show a pop-up before an action is executed. For example,
when creating a filtered report, the system displays a warning that this might take some time due to the resources
needed. Sometimes it is very helpful to know this (especially for new users), but if you know them all you might
want to disable this to reduce the number of clicks needed while using the system.
•
Show changes saved confirmation:: When saving values in a form, you can set the behavior of confirmation
messages.
•
No: Do not show confirmation messages.
•
On confirmation page: Show the save confirmation on a separate page, with an OK-button to go to the next
screen.
•
In embedded confirmation box: Will show the confirmation in the next page that is being displayed, as a box
above the main content.
Permissions
This page displays all resources you have access to, and the type of access you have on these resources. You can not
change these permissions, they will have to be changed by a user with user-management access rights to your user
account. If you have super user access, another super-user must edit your permissions.
166
http://www.objectplanet.com/Opinio/
167
http://www.objectplanet.com/Opinio/
Chapter 12. Administrators guide
The administrators guide is for configuring global settings, top-level user management and plugin setup. Plugins are
optional modules, which provides specialized functionality.
It is important to understand the setup options/features, to make sure Opinio runs as intended. Some settings must be
set, others are optional. For some of the settings, default values will often work OK, but since Opinio runs in a wide
variety of environments, it is impossible to have a common setup scheme that fits all.
Setup
The setup screen displays the current settings, in addition to other system information.
168
http://www.objectplanet.com/Opinio/
•
Version and edition
•
Version: Lite, Corporate, Enterprise.
•
Edition: The edition is determined by the license installed: Lite, Corporate, Enterprise.
•
Internationalization
169
http://www.objectplanet.com/Opinio/
•
Default language: The default language for a new user. The user can then set the language by clicking on the
"my profile" link at the top of every screen.
•
Character encoding: The encoding used to display all admin- and author-screens in the system. Read more in
the installation guide.
•
Mail and cache
•
Main email server: This is the main email server to use when sending email. Only SMTP servers are
supported. Other server types will be added in later versions. Enter user name and password if your main
email server requires authentication for sending email.
•
Alternative email server (optional): The SMTP email server to use if the main server is down (cannot be
contacted). This ensures that the mail will be sent. Enter user name and password if your secondary email
server requires authentication for sending email.
•
Email from-nameFrom time to time, Opinio needs to send emails to users or the administrator. The email sent
will use name as the sender. For survey specific emails, it will be used if the from name/address is not set for
a particular survey.
•
Email from-address: Same as above, but this is the actual email address.
•
Cache size in MB: This is the survey cache. Each survey takes on average 64K memory. This is a very
uncertain number. If your surveys are very large, it may take 100kb-500kb (or more), or less than 50K if they
are small. The “average” size is set to 64K. This means that 16 surveys will fit in a 1MB cache, no matter
how big the actually are. If you have many surveys running, we recommend to set the survey cache even
higher (5-10MB).
•
Security
•
If a user doesn't have access to a survey/folder: Controls the visibility of surveys and folders. Select show
survey/folder name as text if you want users to see all surveys and sub-folders in a folder. Select hide survey/
folder name if you want users to see only surveys and folders they have access to.
•
Error handling
•
Error visibility in survey module: Controls the visibility of errors. If you want the survey respondents to see if
an error occurs while responding to the surveys, select show error messages (screen and log file). Otherwise,
select don't show error messages. If you are not monitoring the site regularly, you might want the
respondents to see the errors, so they can report to you about it. If errors are not shown, Opinio will let the
respondent continue to respond, despite the fact that it cannot store the responses in the database. It will then
keep trying to store the response at 1 hour intervals (see above). On very high loads, it is not recommended to
do this, because it requires more memory than normal operation.
•
Send errors to email: If errors occur while establishing connection to the database while respondents are
trying to complete the survey, the error is reported to the email recipient specified here. Any other error
occurring while saving a survey response to the database is also reported to this email address.
•
Maximum store attempts: If errors occur while storing a survey response, Opinio will keep trying to store it
with 1 hour intervals. This setting specifies how many times Opinio will try, until it will give up and discard
170
http://www.objectplanet.com/Opinio/
the respondent. This feature allows the database to be down for a short period, and still keep the responses, as
long as the web server (servlet container) is up during this period. When the database is back up, the
responses will be stored. Note that the responses will be kept in memory during this period, and if the site is
busy, it may require a large amount of memory to keep all the responses. They will be removed from memory
once the database is back up and the responses are stored, or Opinio has given up after the specified number
of retries. It is always recommended to check the log file periodically for errors.
•
Other
•
System base URL (optional): Opinio will by default create the URLs for entering the survey, reports URLs
etc. - all automatically. But sometimes you need to set the base URL manually, for example if you are
running in clustering mode (in that case, each cluster member will create a different URL). In clustering
mode, you must set the base URL to the load balancer. So, if your load balancer is
http://www.myaddress.com/opinio, and you have 2 cluster members at http://10.0.2.10/opinio and
http://10.0.2.11/opinio, the base address should be set to http://www.myaddress.com/opinio
•
Preferred IP address (optional): If the server has more than one Network Interface Cards (NIC), then you
should assign which card you prefer to use for your Opinio installation. Java returns a list of NICs installed
on your server. Opinio will by default use the first NIC in this list, and if this ip address isn’t your preferred
ip address for the Opinio installation you will need to set the preferred ip address. Also, if a new NIC is
added, the ip address for which you have registered your Opinio installation, will not necessary be the first
NIC found by Java, and the license will no longer be valid if you don’t set the preferred ip address.
•
Database information:
•
Database product name: Name of the database engine currently used by the system.
•
Database product version: Version of the database system used.
•
JDBC Driver name: Name of the JDBC driver. JDBC is the technology used as a bridge between the system
and a database. It facilitates the connection between Opinio and the database. See Sun's JDBC site
[http://java.sun.com/products/jdbc/] for more information.
•
JDBC driver version: Version of the JDBC driver.
•
Database URL: Used by the JDBC driver to find and connect to the database.
•
Java information:
•
Java version: The version of Java you are running.
•
Java vendor: The vendor of the Java version you are running.
To edit these settings, click on "edit system settings" in the left menu box.
Plugin setup
171
http://www.objectplanet.com/Opinio/
Plugins are used to extend the functionality of Opinio. To add a plugin to Opinio, simply place the plugin Jar file in
the Opinio/WEB-INF/plugins. To do this, you must have file system access to the application server. If the plugins
folder does not exist, then create it. Most likely it will exist, because a sample plugin is included with Opinio.
Free and commercial plugins are available here:
http://www.objectplanet.com/opinio/plugins.html
Plugin configuration will vary depending on the plugin. Some plugins require no configuration at all. Refer to the
documentation included with the plugin for more details.
See the appendix creating plugins for information on how to create your own plugin.
License setup
The license page lets you set up all the license keys for your Opinio installations, whether it is a single installation, or
if there are multiple cluster members.
Each Opinio installation will have a unique HostID. This is used to generate the license key. The host ID of the
current Opinio installation is shown at the upper part of the screen.
When entering this screen the first time, the HostID for the current Opinio installation will be shown at the top of the
form. Enter the IP-based URL and a valid license key in the other columns, and click 'save'.
•
Local Host id: The unique ID that identifies each Opinio installation. This is used to generate the license key
after purchase.
•
Ip-based system URL: This is the URLs Opinio uses for communication (mostly for transferring files) between
cluster members. It does not apply if you are running Opinio in single-server mode. It is very important that all
URLs are set correctly when running in clustered mode.
•
License Key: This is the license key that enables various features in Opinio. It is the license key that determines
the edition you are running.
•
Expiration: The number of days until a new license key must be obtained.
•
Users: The number of Survey authors/admins allowed in the system. This number indicates named users. This
means that the license determines the number of users you can register/create in the system. Once you reach this
number, you will no longer be able to add more users, unless existing users are deleted.
172
http://www.objectplanet.com/Opinio/
The number of survey respondents is unlimited, no matter what kind of license you have. Even without a license
key your surveys will still run, and Opinio will still accept responses.
•
Clustered: Shows if clustering is turned ON or OFF for this particular Opinio installation. This is determined by
the license key.
•
Status: Shows if the license key is OK or invalid.
If you enter a clustered license key in the screen above, and then click on license setup again, you will see the
following screen:
This allows for configuring the license key for all members in the cluster. The top part of the screen is the same as
when in single-server mode. The license key at the top part of the form is for the server you are currently connected
to. The lower table is for configuring other members in the cluster. Note that if you are connected to the cluster
member through the load balancer, you could be connected to any of the members.
To test if all cluster members have their IP-based system url set up correctly, click on Test IP-based system URL in
the left menu box while in license setup for clustering. Once the test is complete, you will receive a status screen that
will indicate if all cluster members are up and running and the IP addresses are configured correctly.
173
http://www.objectplanet.com/Opinio/
User management
Opinio offers a powerful set of features that enables administrators to perform detailed user administration.
Administrators (with super-user access), can create users, give them access to various resources in the system, and
even delegate user management.
The user management features are accessible by clicking "users" from the main menu.
There are two different user list views. "All users" lists all existing users with symbols indicating whether they are
online at the moment or not and the "online" view lists only the online users. Only users you have administration
access to are shown. It is also possible to make a search using login name, user name or a substring of these.
Create a new user
To create a new user, click the "new user" link in the left menu box. For more information about the elements on this
page, see My Profile. After the user is created, it will appear in the user list.
Creating users can only be done with a licensed edition of Opinio.
User list
Clicking on "Users" from the top menu will list the users you are allowed to manage.
While viewing the user list you can see which users are online. They will be indicated by a green icon. If you want to
see the online users only, click on the "Online users" link in the left menu box.
174
http://www.objectplanet.com/Opinio/
You can search the user list by using the search bar at the top of the list. Opinio will display all users whose login or
full name contains the search string. You can only search through the users you have admin-rights to.
From the user list, you can:
•
Edit user: Click on the user name to edit the user profile.
•
Membership: View and edit the user membership in user groups. See user groups for more details.
•
Permissions: To view the permissions of the user. See permissions for details.
•
New permission: To add permissions to one or more users. Select the users you want to give permissions to, and
click on "continue" at the bottom of the column. See “ new permission ” for details.
User groups
If you are going to manage a lot of users, it might be a good idea to organize them in separate groups (and perhaps
delegate the administration of each group). A user group is simply what the name implies - a set of users grouped
together with the intention of giving group administrators a way to manage these users. A user group manager can
add new users to the group, delete users, and give permissions to resources (but only to resources the group admin
already has access to). Click "new user group" in the left menu box.
Enter the user group name and, optionally, a description of the group. Then save the user group.
To add users to a group, edit a user group, and click on "add members". Select the users to be added to the group,
and click "Save". On the user group page you will see all the users listed.
Permissions
To add permissions to a user, select "new permission" for the users you want to add permissions for, then click
"continue". Now select the resource type you want to set the permission for:
•
Survey/folder: Survey or folder resource type. With this type, you must navigate to the correct folder or survey.
•
Question library: Question library resource type.
175
http://www.objectplanet.com/Opinio/
•
User group: User group resource type. A user group is a set of users that can be managed by a user group
administrator.
•
Dropdown: Dropdown list resource type.
•
Header: Header resource type.
•
Footer: Footer resource type.
•
Invitee list: Reusable invitee list resource type.
•
ALL (Superuser): Give full access to everything
Now that you have selected a resource type, click "next" to set the permission type per resource. The permissions are
as follows:
•
ADMIN - Permission to do everything with the resource. Giving this type of permission to a folder, gives the
user all access rights to the folder and all subfolders, including all surveys. This kind of "recursive" permission
applies only to this kind of permission. All the other permission-types must be set for all folders or sub-folders
and surveys separately.
•
R - Permission to read
•
M - Permission to modify
•
Sr - Permission to create reports in a survey
•
Srv - Permission to view responses in a survey
•
Sra - Permission to administrate responses in a survey
•
Si - Access to invitations in a survey
•
Mbl - Permission to modify a survey by using question libraries
•
Cf - Permission to create new folders in the specified folder
•
Cs - Permission to create new surveys in the specified folder
•
Cl - Permission to create new libraries in the question library folder
•
UGA - User group administrator
Permissions are additive. This means that when setting permissions for a user, it is added to existing permissions for
this user.
Adding permissions is done through a wizard of 2 or more screens.
176
http://www.objectplanet.com/Opinio/
The steps are:
1.
Select the user(s) to which you are adding the permission. If you are viewing details on a user, and click on "add
permission". If you are viewing the user list, you can select one or more users and click "continue".
2.
Select the resource type you want to apply the permission to. Click on "continue".
3.
Select the permission type(s) to add for the user(s)/resources. Click on save.
Performance hints
Many factors determines the scalability and performance of Opinio. Some of these issues requires understanding of
177
http://www.objectplanet.com/Opinio/
the underlying database structure.
Remember, that the performance of the application is not better than the weakest link. In other words, the weakest
item of one of the below:
•
The server hardware. This seems very obvious, but it cannot be stressed enough. If you have very high loads on
your surveys, you may need to upgrade your server. Opinio is disk-intensive, because it needs to store responses
constantly. This dictates a fast storage system. If you are running the database on a different server than the
application server, then it is most important with a fast disk for the database.
Opinio itself is mostly CPU intensive, so if the database resides on a separate server, you will be well off with a
fast CPU on the server running the application.
•
The network. Without a fast network connection, you may never be able to reach high loads for Opinio. This is
especially important if the database is on a separate server - then you will need a fast link between the application
server and the database. Also the network link between the application server and the users are important.
•
The database. A properly tuned database is important to get the most out of your current setup. We have tried to
identify all the needed database indexes for fast lookups. But it is difficult to guess at the usage pattern of all
users. So if you are using the product differently than how we predicted, then you may have to tune the database
in some way or another. Please refer to the tuning section in the documentation for your database.
•
The JDBC driver. This piece of software provides the connection between Opinio and the database, and is very
important. Choose a driver that is proven to work even at high loads. If you are using the built-in database
(Apache Derby), then you do not need to obtain a JDBC driver. For any other database, you will need to get one.
See installation instructions for how to use other databases systems. For an extensive list of available JDBC
drivers: http://industry.java.sun.com/products/jdbc/drivers
Other considerations: If you are concerned with network bandwidth, and you have lots of respondents in your
surveys, you should be careful with using images on your survey pages. Images consume bandwidth very quickly. A
normal survey page will vary from 20 to 100 kilobyte. A single image could be larger than this.
Memory usage is a key item to look out for. Generally, high loads and large surveys (many and complex questions)
will cause Opinio to use more memory. Often times, assigning 256 megabyte to Opinio is enough. But under heavy
load, 512mb or more is necessary. Especially if you have many questions in your survey. The reason this consumes
more memory is that the respondent session is cached to improve performance. This will take more memory the
more questions the survey has. The respondent is cleared from cache when all questions are completed, or if the
survey is abandoned (after 20 minutes).
To assign more memory to the application, the java virtual machine (the platform Opinio runs on) must be told to
allow more memory. The java process is started by the application server.
If you are using Tomcat, open up catalina.bat (or catalina.sh) in the tomcat bin folder, and put this line at the top of
the file:
Windows in the catalina.bat file:
set CATALINA_OPTS=%CATALINA_OPTS% -Xmx512m
On linux in the catalina.sh file:
JAVA_OPTS=" -Xmx512m -Djava.awt.headless=true "
This example sets the Java memory usage to 512mb. Set it to even more if you have enough memory on your server.
See the documentation for your application server if you are not running Tomcat on how to allocate more memory.
Logging may affect performance. If log-level is set to debugging, Opinio will write a large amount of log-statements
178
http://www.objectplanet.com/Opinio/
to the log file. This will slow the server down. The default log-level is info, which will log most user actions (usually
one per screen). This level does not cause much performance loss. If your server is operating under extreme
conditions (lots of authors and respondents using the server at the same time), there might be a little performance
gain by setting log-level to warning. Note that logging at info-level is usually very helpful for the Opinio support
staff when diagnosing problems, enabling them to see the history of actions leading to the problem. See Log file for
more information about the log file settings.
The Opinio log file
The log file is very helpful to diagnose problems. Opinio will log messages to the log file with information about
user actions and other events in the system. By configuring the log file properties, logging can be set to various
levels, for specific modules.
The log configuration file is [opinio-home]/WEB-INF/log4j.properties
The log files are located in the [opinio-home]/WEB-INF/log folder. There are up to 5 log files, called opinio.log,
opinio.log2, .., opinio.log5. The size, number, name and location of these files can be changed by editing the
properties in the log4j.properties file.
For further details about the log file, view the file with a text editor (Notepad, for example). It contains many
settings, with explanations for each setting.
A very useful feature of the logging module is error reporting by email. See Email report appender.
Application maintenance
To ensure smooth operation at all times, the application should be maintained properly. The maintenance required
for Opinio is in most cases very little. The following items are recommended to watch at regular intervals. The more
usage your application handles, the more important is the maintenance.
•
Monitor the log file. It is helpful to monitor this file for any signs of problems. See Log file for details.
•
Manage your database. A smooth operation of your database is of paramount importance for the stability of
Opinio. Opinio relies on a stable database. Make frequent backups of the database. Refer to the documentation of
the database you are running for more information.
•
Make frequent backups. Make backups of the entire Opinio folder structure. Preferably backups with history, so
that the state of the application can be rolled back in time to fix problems, look at log files etc.
•
Monitor your server. Monitor your server for potential problems, such as memory usage, disk usage, network
bandwidth usage, processor usage, etc. Needless to say, Opinio relies on a stable server.
System and data integration
Email report appender
It is possible to activate an email report handler if you want more advanced reporting than is provided by the
reporting feature accessible through the Opinio setup screen. When activated, the appender can report all types of
events, not just database connection errors. All events written to the log will trigger the appender to check if you
should be notified. The feature is configurable by setting the email report appender attributes in the log4j properties
file (opinio/WEB-INF/log4j.properties).
log4j.properties configuration:
179
http://www.objectplanet.com/Opinio/
1.
Invoke the email appender by adding it to the rootLogger attribute at the top of the file:
log4j.rootLogger=info, R, emailReport
2.
Uncomment the emailReport attributes. Only uncomment the username and password attributes if mail server
requires authentication.
3.
Set the options:
•
Set to and from address and mail server:
log4j.appender.emailReport.From=<from address>
log4j.appender.emailReport.To=<to address>
log4j.appender.emailReport.SMTPHost=<mail server>
•
Set triggering level. The default is ERROR which triggers on error and fatal events. Another recommended
level is FATAL which only triggers on the critical errors. When a triggering event occurs, the appender
checks if a report should be send by email. Whether an email is send or not is affected by the time interval
since last error mail and the interval attribute.
log4j.appender.emailReport.triggeringLevel=ERROR
•
Set minimum interval between mails in minutes. A mail will be sent on the first occurrence of a triggering
event. Then a new mail will not be sent before the interval time has elapsed. Events occurring during the
interval period are stored in a queue system. The first triggering event that happens after the interval has
elapsed includes the events from the queue. The queue contains the five first and five last events reported in
that period. If the interval is set to 60, the default, you will receive maximum one email per hour.
log4j.appender.emailReport.interval=60
•
Set layout: The layout can be configured according to the log4j manual, but it is recommended to keep the
defaults.
log4j.appender.emailReport.layout=org.apache.log4j.PatternLayout
log4j.appender.emailReport.layout.conversionPattern=%d %-5p [%-10t] %c{2} - %m%n
•
Set authentication details if your email servers requires authentication. Only uncomment these attributes if it
is needed.
log4j.appender.emailReport.UserName=<mail server username>
log4j.appender.emailReport.Password=<mail server password>
180
http://www.objectplanet.com/Opinio/
Chapter 13. Appendix
This chapter describes a few issues that are useful in various places in the system.
Color codes
It's pretty easy to understand the word color codes, but those hex codes are rather strange. Here's a quick explanation.
The three primary colors are red, blue, and yellow. They're called the primary colors because there are no two
"lesser" colors that make them up. Purple is not a primary color because it can be created through combining equal
parts of blue and red.
In the world of mechanical things that make color, like a television, or a computer screen, color is created through
the mixing of three basic colors to make other colors. It's a process known as "additive color".
You would think that the TVs and computer monitors of the world would simply use the three primary color to start
with, but nothing in life can just be that easy. The three colors used to start additive color mixing are red, green, and
blue. Why, you ask? Because by starting with one composite color, green, you can still create yellow because it's
contained in the green. In addition, now you are actually starting with four colors, red, green, blue, and yellow. Stay
with me here...
To go on, I need to explain a second process of working with colors, "subtractive color." Subtractive color is the
concept of combining colors to make another, like mixing red and blue paint to get purple. That may sounds like
additive color, but in reality, colors are made by subtracting a hue out of the color scheme by adding more of
another. Adding more white to black makes it more silver subtracting more black as more white is mixed in.
One other big difference between additive and subtractive color, and this is the key, is what you get when you add
them all together.
If you add all the colors together in a subtractive color method, you get black. Why? Because you added them all
together and all those colors subtracted from all the others leaving no set color...or black.
A computer, on the other hand, works with light, not paint or any other goofy stuff. Mix a computer's additive colors,
red, green, and blue, together, you get white.
No kidding, you really do. Shine a white light at a prism or a lead crystal glass. You'll get a rainbow of colors.
Actually, that's how a rainbow is created. White light is being shown through water in the air. That separates the
white light into the "rainbow" of colors.
Now on to the 6-digit representation of color known as the hex code.
Basic Hexadecimal Notation:
Hex numbers use 16 digits: 0 1 2 3 4 5 6 7 8 9 A B C D E F
Zero, "0", is the smallest representations of a color. It's almost the total absence of color. F is 15 times the intensity
of the color of 0. Combinations of these digits create different shades of a particular color. Double Zero, "00," is
equal to zero hue. FF is equal to a pure color.
This color representation is done three times, once for red, once for green, and once for blue, in that order. Put the
three, two-digit, codes together and you get a 6-digit hex code. The hex code is just a representation of the red, green,
and blue intensity, in that order. The computer creates the three intensities, mashes them together, and you get a
single shade of color.
For an example, here are the opposite ends of the color scale:
FFFFFF
181
http://www.objectplanet.com/Opinio/
The code above is equal to white. Why? Notice the three colors are all set to FF. That means the highest level of red,
green, and blue. As I said above, in a computer, or television, the combination of all three primary colors creates
white. Now here's black:
000000
This is just the opposite. All three settings of red, green, and blue are set to a total absence of color. Black.
Now, here are a few other codes and their breakdown:
FFFF00
Let's start with the concern from up above, yellow. The code above produces pure yellow. Notice the red and the
green are at full tilt. There is no blue. By mashing the red and green up against each other, the red cancels out the
blue and all that is left is the yellow. It's actually a subtractive color method being employed in an additive world.
DC143C
The code above creates a shade of red called "crimson." The red setting, DC, is pretty intense. There's not much
green. Blue is set a little less than halfway up.
EE82EE
That's violet. The Red and the Blue are at pretty high levels. The green is there, but at a lower level. Now, this is not
purple, but violet. Purple, as I said above, is a combination of red and blue alone. The code is 800080. Notice there's
no green at all. Just an equal amount of red and blue.
FFA500
That's orange. There's lots of red, not quite an equal level of green, and no blue.
That's how the hex codes work. This lesson probably won't make you an expert in color creation, but at least you'll
be able to understand the creation of color in a computer.
So, are there more hex code colors that what I show above? Oh, yes. There are thousands upon thousands covering
every color in the scale from pure black to pure white. Every time you change even one of the red, green, or blue
levels, you change the color.
Html help
You can customize the look of your surveys by adding your own HTML code to the question text, survey description
etc. Most HTML codes can be used, except the start and end tags of an HTML document. You code must not
include the following:
<HTML>
<HEAD>
<TITLE>A title</TITLE>
</HEAD>
<BODY>
... and ...
</BODY>
</HTML>
Examples:
182
http://www.objectplanet.com/Opinio/
<b>This text is emphasized (bold)</b>
<hr> (horizontal line)
<font color="red">This text will be red</font>
For more information on HTML, go to http://www.w3.org/MarkUp/Guide/
Language encoding
When exporting your survey or questions to XML files, the system needs to know what encoding is suitable for your
texts. Otherwise, Opinio will not be able to read the XML files.
Some XML encoding references:
•
Internationalization
Concepts
and
[http://java.sun.com/blueprints/guidelines/designing_enterprise_applications_2e/i18n/i18n2.html]
•
Unicode [http://www.unicode.org]
•
Unicode howto [http://sunsite.ui.ac.id/pub/linux/docs/HOWTO/Unicode-HOWTO.html]
•
8859 alphabet soup [http://www.worldsearch.com/dunioc.site/en/508225/sites/2/list/42470]
•
W3Schools.com: XML Encoding [http://www.w3schools.com/xml/xml_encoding.asp]
Terminology
Please contact us at http://www.objectplanet.com/support.html if any of these links become invalid.
Translate Opinio
Opinio support several languages for the administration screens. Users can select the preferred language on the My
Profile screen. Only supported languages will be shown in the list.
New languages can be easily added to the system. To add a new language you will need to create a resource file to
hold your localized texts.
The resource files are located in the OPINIO_HOME/WEB-INF/classes/i18n folder.
1.
Copy ApplicationResources.properties to a new resource file. Add your language code to a new file, for
example:
•
ApplicationResources_ru.properties - for russian resource file
•
ApplicationResources_it.properties - for italian resource file
If your language uses other than latin characters, add '_native' to the end of the file name. Example:
ApplicationResources_ru.properties_native
2.
Translate all messages in the file to your language. The resource file is a text file and can be edited in any plaintext editor. For non-Latin characters the editor must support UTF-8 and the file must be saved with UTF-8
encoding.
The file contains key-value pairs. Only values must be translated.
183
http://www.objectplanet.com/Opinio/
English version:
menu.surveys=Surveys
menu.userAdmin=Users
menu.systemInfo=Setup
Norwegian version:
menu.surveys=Spørrenundersøkelser
menu.userAdmin=Brukere
menu.systemInfo=Konfigurasjon
3.
Resulting resource files must be saved in ASCII. For non-Latin characters you will need to convert the file from
native encoding to ASCII. Use built-in native2ascii Java tool to do this (it must be in one line only, but due to
space limitations, it was broken up in two lines here):
native2ascii -encoding UTF-8 ApplicationResources_ru.properties_native ApplicationResourc
4.
Update file OPINIO_HOME/admin/include/supportedLanguages.jsp. Add a new line for your language:
languages.add(new OptionBean((new Locale("ru")).getDisplayName(userLocale), "ru"));
5.
Restart the application server.
Create your own plugin
Introduction to plugins
A plugin is a piece of software that can be "plugged into" a software system without any modification of this system.
Opinio provides the framework that makes this possible. Plugins was implemented to make Opinio more extensible
and customizable. No matter how much functionality is included in the product, there are always some special
features needed by various users.
The plugin framework imposes certain requirements that the plugin must meet, but no restrictions on the design on
what type of functionality this plugin can offer. This section describes what a plugin must do, in order to meet this
requirements.
To write a plugin, Java skills are required. Some time must also be spent to understand how Opinio works. This
knowledge is done by using the product, and looking through the plugin API (included in the Opinio distribution).
The plugin API is limited to the method calls that was regarded as useful to plugin developers. There is even more
functionality available in Opinio, but not yet offered through the Plugin API. ObjectPlanet welcomes any suggestions
to improve or extend this API, if the suggested change is reasonable. Please let us know, and we will gladly consider
your suggestions. Please go here to let us know: http://www.objectplanet.com/Opinio
Important
Writing a plugin puts great responsibility in the hands of the plugin author. A small and simple plugin can
potentially break the stability of the entire system. The Plugin API must be understood before using it. And
before you go live using the plugin, test it well. Then test it again.
184
http://www.objectplanet.com/Opinio/
Plugin architecture
Below is a UML diagram of the classes and Plugin API used by the plugins. The class "MyPlugin" is written by the
plugin developer (you).
As seen from this image, your plugin must inherit from the class Plugin:
public class MyPlugin extends Plugin implements IPBComponent {
•
If you want the plugin to act on some events in Opinio, then your plugin must implement the IPBComponent
(Plugin bus component). This is necessary for the plugin to receive Events from the PluginBus (more on that in
the next chapter).
•
If your plugin will have some other functionality, then it must implement the corresponding interface. For
example, to do your own login check you can write a LoginPlugin, which must implement ILogin interface.
Your plugin will inherit from the Plugin class, which is declared abstract. In the current version (6.0), there are no
abstract methods, so your plugin does not have to implement any methods. This may be changed in later versions.
For the plugin to do anything useful, you should override one or more of the plugin methods, like the start() and
stop() methods. The included example, the ResponseNotifierPlugin, shows how to do this.
185
http://www.objectplanet.com/Opinio/
The event bus
The event bus classes are important if you want your plugin to act on certain events in Opinio. For example, when a
respondent has completed a survey, you want to do something with the data (like sending an email). To know when
this respondent has completed, you need to receive an event notification.
To receive this notification, the plugin must register itself on the event bus. There are several bus types and many
event types in each bus. See om.objectplanet.survey.event.EventBusManager in the plugin documentation.
Examples of bus types:
•
BUS_TYPE_SURVEY - Survey response bus: handles the events in the Survey module. Examples of event types
are: DisplayQuestionEvent, NewRespondentEvent, RespondentCompleteEvent, ResponseEvent and so on.
•
BUS_TYPE_SURVEY_MANAGEMENT - Survey design bus: handles administration module events. When a new
survey is created, for example, a NewSurveyEvent is fired. Examples of event types are: NewSurveyEvent,
SurveyDeletedEvent, QuestionDeletedEvent and so on.
•
BUS_TYPE_USER - User event bus: handles user administration events. When a new Opinio user is created, for
example, a NewUserEvent is fired. Examples of event types are: NewUserEvent, PreUserDeleteEvent,
UserDeletedEvent and so on.
There are several addListener(**) methods in the EventBusManager. You can register to listen to:
•
all events in the system (every single one) - use addListener(IEventListener listener) method
•
all events on a specific bus type - use addListener(IEventListener listener, int busType)
•
specific event type sent on the specific bus - use addListener(IEventListener listener, int busType, int eventType)
•
specific event type sent on the specific bus for a particular resource - use addListener(IEventListener listener, int
busType, int eventType, long resourceId)
There are several addListener(**) methods in the EventBusManager. You can register to listen to:
IMPORTANT: Try to register events on as low level as possible to maximize the performance.
Example 13.1. Plugin example
Implement com.objectplanet.survey.event.IEventListener interface.
In the start() method of your plugin, you can register your plugin to listen to the administration events:
public void start() {
EventBusManager eventMgr = EventBusManager.instance();
eventMgr.addListener(this, EventBusManager.BUS_TYPE_SURVEY_MANAGEMENT, EventBusManage
}
Implement the handleEvent() method from IEventListener interface, so that the events received are handled
correctly. For example:
public void handleEvent(PluginBusEvent event) {
if (event instanceof NewSurveyEvent) {
NewSurveyEvent nsEvent = (NewSurveyEvent) event;
186
http://www.objectplanet.com/Opinio/
long surveyId = nsEvent.getSurveyId();
// Do something with the survey; send an email,
// call an external system etc.
....
}
}
Plugin setup
All plugins can have a setup screen accessible from the plugin list. The setup is available only for users with all
access rights (super users). To create a setup screen for your plugin, implement the two methods
•
getSetupHTML(HashMap resources) - the method is called by Opinio when displaying the setup screen for the
plugin.
•
processSetupHTML(HashMap resources) - the method is called when user clicks on the Save button. The values
from the setup screen are sent to the method.
Method getSetupHTML(HashMap resources).
Gets the HTML code for plugin setup screen. The code must include all HTML needed between the form tags. For
example, the code could be:
public String getSetupHTML(HashMap resources) {
StringBuffer html = new StringBuffer();
html.append("<table>");
html.append(" <tr>");
html.append("
<td class='form label'>Name:</td>");
html.append("
<td class='form value'><input type=text name=plugin_name class='widt
html.append(" </tr>");
html.append(" <tr>");
html.append("
<td class='form label'>Address:</td>");
html.append("
<td class='form value'><input type=password name=plugin_address clas
html.append(" </tr>");
html.append(" <tr>");
html.append("
<td class='form'></td>");
html.append("
<td class='form value'><input type=submit value='Save' name=plugin_s
html.append(" </tr>");
html.append("</table>");
return html.toString();
}
example, the code could be:
Important
All input field names must start with "plugin". This is to avoid any conflicts with any fields produced by
Opinio.
example, the code could be:
The example includes two fields: "plugin_name" and "plugin_address". When the user enters the values and clicks
the submit button (must also be provided in the code), Opinio will receive the form and return it through a call to the
processSetupHTML(HashMap resources) method. It is then up to the plugin to process the setup html. This method
is not required by the plugin. If not implemented, a standard no-op text is returned.
It is recommended that the look & feel of Opinio is used.
187
http://www.objectplanet.com/Opinio/
Method processSetupHTML(HashMap resources).
The processSetup() method is called by Opinio, and may look like this:
public ProcessResult processSetupHTML(HashMap resources) {
// retrieve request object from resources
HttpServletRequest request = (HttpServletRequest) resources.get(PluginConstants.RESOU
String nameValue = request.getParameter("plugin_name");
String addressValue = request.getParameter("plugin_address");
... // do something with the values
return new ProcessResult("The plugin configuration was saved successfully", false);
}
The processSetup() method is called by Opinio, and may look like this:
It is up to the implementor (developer) of this method to process the values appropriately. The method returns the
result object with message to show to the user. Let the user know what happened with the processing of the form
values. If null returned, the plugin list screen will be displayed. If result of type confirmation is returned,
confirmation message will be displayed, based on user preferences. If result of type error is returned, the error
message will be displayed over the setup screen html. Note that ProcessResult of type error is returned, the
getSetupHTML(HashMap) will be called again. Implement the logic that retrieves the values from the request and
put the values to the form fields, so that user can correct them.
Remember, it is up to the plugin author to make the setup values persistent. Functionality for making this easier will
be added in future versions. Look in the example plugin included with the distribution on how to make the
configuration persistent.
Plugin functions
Plugins can be appended to the Menu box by implementing one of the interfaces in package
com.objectplanet.survey.plugin.interfaces.menu
Plugins can be appended to the Menu box by implementing one of the interfaces in package
One plugin can have multiple functions. Each function will appear as a link in the Menu box.
188
http://www.objectplanet.com/Opinio/
Number of functions.
Number of functions provided bu the plugins is returned by getFunctionCount() method in the Plugin. If your plugin
provide 2 functions, just return the number 2.
Function label.
Method getFunctionLabel(int functionNo, HashMap resources) should return a descriptive name of the plugin
function. The name will appear in the Menu box as link label.
public String getFunctionLabel(int functionNo, HashMap resources) {
switch (functionNo) {
case 1:
return "Recognize address";
case 2:
return "Recognize name";
}
return "Unsupported function";
}
function. The name will appear in the Menu box as link label.
Function security.
Plugin is self responsible for permission checks. This can be done by implementing method hasFunctionAccess(long
189
http://www.objectplanet.com/Opinio/
userId, int functionNo, HashMap resources)
Function html.
Gets the HTML code for plugin function. The code must include all HTML needed between the form tags. Here is
example plugin with two function: When the user enters the values and clicks the submit button (must also be
public String getFunctionHTML(int functionNo, HashMap resources) {
StringBuffer pluginFunctionHTML = new StringBuffer();
switch (functionNo) {
case 1:
pluginFunctionHTML.append("<table>");
pluginFunctionHTML.append(" <tr><td class='form label'>Your mail address:</td
pluginFunctionHTML.append("
<td class='form value'>");
pluginFunctionHTML.append("
<INPUT TYPE='text' class=width200
pluginFunctionHTML.append("
</td>");
pluginFunctionHTML.append(" </tr>");
pluginFunctionHTML.append(" <tr><td></td><td class=buttons>");
pluginFunctionHTML.append("
<INPUT TYPE=submit class=button v
pluginFunctionHTML.append("
</td>");
pluginFunctionHTML.append(" </tr>");
pluginFunctionHTML.append("</table>");
break;
case 2:
pluginFunctionHTML.append("<table>");
pluginFunctionHTML.append(" <tr><td class='form label'>Your name:</td>");
pluginFunctionHTML.append("
<td class='form value'>");
pluginFunctionHTML.append("
<INPUT TYPE='text' class=width200
pluginFunctionHTML.append("
</td>");
pluginFunctionHTML.append(" </tr>");
pluginFunctionHTML.append(" <tr><td></td><td class=buttons>");
pluginFunctionHTML.append("
<INPUT TYPE=submit class=button v
pluginFunctionHTML.append("
</td>");
pluginFunctionHTML.append(" </tr>");
pluginFunctionHTML.append("</table>");
break;
}
return pluginFunctionHTML.toString();
example plugin with two function: When the user enters the values and clicks the submit button (must also be
provided in the code), Opinio will receive the form and return it through a call to the processFunctionHTML(int
functionNo, HashMap resources) method. It is then up to the plugin to process the html. It is recommended that the
look & feel of Opinio is used.
Processing function html.
The processFunctionHTML(int functionNo, HashMap resources) method is called by Opinio when user submits the
function page. Example of the method implementation:
public ProcessResult processFunctionHTML(int functionNo, HashMap resources) {
// retrieve request object
HttpServletRequest request = (HttpServletRequest) resources.get("HttpRequest");
// process the html based on function number
switch (functionNo) {
case 1:
String email = request.getParameter("plugin_email");
if (email == null || email.equals("")) {
return new ProcessResult("Email cannot be blank!", true);
}
return new ProcessResult("Entered email is " + email, false);
case 2:
String name = request.getParameter("plugin_name");
if (name == null || name.equals("")) {
return new ProcessResult("Name cannot be blank!", true);
190
http://www.objectplanet.com/Opinio/
}
return new ProcessResult("Entered name is " + name, false);
}
return super.processFunctionHTML(functionNo, resources);
}
The method returns ProcessResult object with message to show to the user. Let the user know what happened with
the processing of the form values. If null returned, the plugin function screen will be displayed again. If result of type
confirmation is returned, confirmation message will be displayed, based on user preferences. If result of type error is
returned, the error message will be displayed over the function html. Note that ProcessResult of type error is
returned, the processFunctionHTML(int, HashMap) will be called again. Implement the logic that retrieves the
values from the request and put the values to the form fields, so that user can correct them.
Plugin source. The source of this plugin example can be found in the distribution: SurveyFunctionExamplePlugin
Plugin interfaces
The previous chapter demonstrates how to add more functionality to Opinio. But sometimes functionality in the
administration module must be changed to best suit your needs. For this reason, the plugin interfaces have been
developed and added to the plugin architecture. Now a plugin can "overwrite" some parts of default Opinio code.
To do this the plugin must implement an interface defining the plugin behavior. All existing interfaces can be found
in the package com.objectplanet.survey.plugin.interfaces. More interfaces will be added in the upcoming versions.
For example, LoginPlugin implements login functionality, which will be used instead of default login procedure.
Then it must implement ILogin interface. This example is included in the distribution. Refer to the ILogin api for
more details.
public class LoginPlugin extends Plugin implements ILogin {
Attention: The plugin will be automatically registered in the system on web-server start-up. Only one plugin for each
interface can exist. If there are more than one plugin, it's impossible to say which of the existing plugins will be used.
Plugin screens look and feel
It's recommended to use the same look and feel as other Opinio screens. Here are some main classes used in html
forms:
•
tables - use "table" class "sectionTable" for the main form table
•
heading - use "td" class "sectionTitle" for the main heading
•
Label cell - use "td" class "form label" for text labels (label before the input fields)
•
Input field/value cell - use "td" class "value" for cells with inputs, like text field, textarea, checkbox, etc
•
Input field/Textarea - use "input" class "width100"/"width200"/"width300". To highlight the error field, add class
"error". For example "width200 error"
•
Checkbox - use "input" class "checkbox"
•
Radio - use "input" class "radio"
•
Buttons cell - use "td" class "buttons"
•
Button - use "input" class "button"
191
http://www.objectplanet.com/Opinio/
The plugin api
The plugin API provides access to the functionality of Opinio. To get access to the plugin API, add this import
statement at the top of your Plugin java class: To get an understanding of the API classes, and their methods, look
import com.objectplanet.survey.plugin.api.*;
statement at the top of your Plugin java class: To get an understanding of the API classes, and their methods, look
them up in the API (javadoc) documentation. A closer look at the included Plugin example will also help.
The properties
All plugins need a property file, so that Opinio can get certain basic information about the plugin. This includes the
plugin name (as displayed in the Opinio setup screen), author, version, build number, help file URL (not used yet).
The property file should be in the same folder as the java and class files when building/compiling the plugin.
The name of the plugin property file should be MyPlugin.props
These lines must be included in the properties file:
plugin.ResponseNotifierPlugin.name=My first plugin
plugin.ResponseNotifierPlugin.author=Peter Pluginson
plugin.ResponseNotifierPlugin.version=1.0
plugin.ResponseNotifierPlugin.build=beta 1
plugin.ResponseNotifierPlugin.docs=MyPluginHelp.html
plugin.ResponseNotifierPlugin.depend.java=1.4
plugin.ResponseNotifierPlugin.depend.Opinio.major=4
plugin.ResponseNotifierPlugin.depend.Opinio.minor=0
These lines must be included in the properties file:
Compiling the plugin
To compile and build the plugin, we recommend using the ANT build tool from Apache. It can be found here:
http://ant.apache.org. The sample plugin includes a build script for Ant (build.xml) that builds the entire plugin, and
creates a Jar file ready for use.
To compile, you need to specify the path to the opinio.jar file, which is located in the WEB-INF/lib folder after
installation (or you can simply unzip the opinio.war file). The following lines in the build.xml file needs to be
configured:
<property
<property
<property
<property
name="opinio.lib.dir" value="../lib"/>
name="jar.name" value="MyPlugin.jar"/>
name="jar.dir" value="."/>
name="deploy.dir" value="opinio/WEB-INF/plugins"/>
configured:
•
opinio.lib.dir: The location of the opinio.jar file.
•
jar.name: The name of the plugin. If your plugin is called MyPlugin, this file name must be MyPlugin.jar.
•
jar.dir: The folder where the newly compiled/packaged plugin should be placed.
•
opinio.lib.dir: If Opinio is installed on your system, then you can run the "dist_copy" target to copy the plugin jar
file directly into the Opinio plugins folder, to make it easier to develop the plugin. (an Ant target is a "step" in the
build script, and each target can be run independently, or in sequence, depending on how the script is written).
192
http://www.objectplanet.com/Opinio/
Once these lines in the build.xml script are correctly set up, the plugin should compile. Once compiled, all the files
for the plugin is packaged in a jar file. This should be inserted into the opinio/WEB-INF/plugins folder. Opinio will
try to load the plugin automatically when starting. If you don't see the plugin in the setup screen after restart, look in
the log files for the application server for any errors.
If the plugin is placed in a java package, there are a couple of things to remember. You must place the .java files in
folders that equals the package names, so that the compiled .class names are placed in these folders.
Also, in the properties file (.props), you must use the full name of the plugin, like this: There is sample plugin,
plugin.testpackage.MyPlugin.name=MyPlugin
plugin.testpackage.MyPlugin.author=Torgeir Lund
plugin.testpackage.MyPlugin.version=1.0
plugin.testpackage.MyPlugin.build=beta 1
plugin.testpackage.MyPlugin.docs=MyPlugin.html
plugin.testpackage.MyPlugin.depend.java=1.4
plugin.testpackage.MyPlugin.depend.Opinio.major=4
plugin.testpackage.MyPlugin.depend.Opinio.minor=0
Also, in the properties file (.props), you must use the full name of the plugin, like this: There is sample plugin,
NewSurveyLogger, included in the distribution file that is implemented this way.
193