1
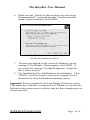
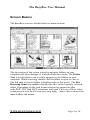
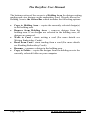
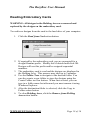
The BuzzBox
™
User Manual
Revised June 2006
The BuzzBox User Manual
FCC Regulations Compliance (for USA)
This equipment has been tested and found to comply with the limits for Class B digital
device pursuant to Part 15 of FCC Rules. These limits are designed to provide reasonable
protection against harmful interference in a residential installation. This equipment
generates, uses and may radiate radio frequency energy and, if not installed and used in
accordance with the instructions, may cause harmful interference to radio
communications. However there is there is no guarantee that interference will not occur
in a particular installation. If this equipment does cause interference to radio or television
reception, which can be determined by turning the equipment off and on, the user is
encouraged to try to correct the interference by one or more of the following measures: (1)
Reorient or relocate the receiving antenna (2) Increase the separation between the
equipment and receiver (3) Connect to an outlet on a different circuit.
This equipment has been certified to comply with FCC standards, which are applied to
the USA only. A shielded interface cable should be used according to FCC 15.27(C).
Changes or modifications not expressly approved by the manufacturer could void any
assurances of safety or performance and could result in violation of Part 15 of the FCC
Rules.
Canadian Department of Communications
Statement
This digital apparatus does not exceed the Class B limits for radio noise emissions from
digital apparatus set out in the Radio Interference Regulations of the Canadian
Department of Communications.
This Class B digital apparatus complies with Canadian ICES-003.
Radio Interference (210-240V)
This equipment Complies with EN55022 (CISPER Publication 22)/Class B.
Page 2 of 16
WWW.BUZZTOOLS.COM
The BuzzBox User Manual
Content:
·
·
·
·
·
·
·
·
·
·
Introduction
Package Contents
Minimum System Requirements
Hardware Installation
Software Installation
Software Configuration
Screen features and menu options.
Writing to Embroidery Cards
Reading Embroidery Cards
Troubleshooting
Introduction
The BuzzBox allows you to write to a blank embroidery card as many
designs as the card can hold. The best results are achieved by using The
BuzzBox™ with The BuzzCard™ that holds about 500,000 stitches total.
You can write designs in Brother, Baby Lock, Bernina Deco and
Simplicity formats (.PES, .PEC) or, in Viking/Husqvarna format (.HUS).
You can save designs to your computer by downloading them from the
Internet, CD’s, floppy disks, etc. Using the browsing software supplied,
you will browse to the Designs folder, select desired patterns and transfer
them to the card.
WWW.BUZZTOOLS.COM
Page 3 of 16
The BuzzBox User Manual
The BuzzBox writes to and reads from the following cards:
The BuzzCard
– 1 Megabyte (8Megabit) blank
memory card, the largest Brother
type embroidery machines can
read.
The Ultimate Card
– 1 Megabyte (8Megabit) blank
memory card, the largest Brother
type embroidery machines can
read.
Magic (Amazing) Card – 512 Kilobyte blank memory card
supplied with the Amazing
(Magic) Box. The BuzzBox
writes more then 6 designs to this
card.
Brother Blank card
– 512 Kilobyte (4Megabit) blank
card supplied for Brother PE
Design 4.0 read/write modules.
The BuzzBox reads and saves designs back to the hard drive of your
computer from cards mentioned above and pre-programmed design cards
(except copyrighted design cards).
Any Embroidery software available on the market to create or edit
designs can be used with The BuzzBox.
Page 4 of 16
WWW.BUZZTOOLS.COM
The BuzzBox User Manual
Package Contents
·
·
·
·
·
·
Embroidery Card Reader / Writer Box
Re-writable Embroidery Card
USB Cable
Manual
Installation CD
Warranty Registration Card
Minimum System Requirements
·
·
·
·
·
·
·
·
IBM PC Compatible*
Pentium 166 MHz
32 Mb Memory
4 Mb Available Hard Drive Space
USB Port
MS Windows 95/98/ME/2000/XP
Screen Resolution 800x600
CD ROM Drive
* MAC users must have “Virtual PC” installed to work with The
BuzzBox
Free Software Updates
The Help > Check for Update command automatically checks the Buzz
Tools web site for a BuzzBox™ program update and optionally applies it.
We recommend you check for an update monthly in order to be sure you
have applied the most current bug fixes and enhancements to the
program.
WWW.BUZZTOOLS.COM
Page 5 of 16
The BuzzBox User Manual
Hardware Installation
1. Verify Package Contents
2. Insert the BuzzBox Installation CD into the CD-ROM drive of
your computer.
3. Connect USB Cable to the Card Reader / Writer Box.
4. Attach the other side of the cable to a USB Port of your
Computer. You can also connect the card reader/writer box
to a USB Hub as long as the hub has its own power source.
Be sure both connections are on completely. The green light
on the box should be on.
5. After a short delay, Windows will display the Add New
Hardware dialog.
· If you are running Windows XP, choose “Install
from a list or specific location (Advanced)” on
the first wizard and click NEXT.
· Otherwise, click NEXT.
Windows XP Install Hardware Dialog
Page 6 of 16
WWW.BUZZTOOLS.COM
The BuzzBox User Manual
6. Make sure that “Search for the best driver for your device
(Recommended)” is selected and then “Search removable
media” option is checked. Click NEXT.
Allow Windows to search your CD
for the best hardware driver.
7. The next step depends on the version of Windows you are
running. If Card Reader / Writer appears, click NEXT. If
you receive the message “No digital signature”, accept the
driver choice anyway.
8. The final dialog of the Add Hardware wizard displays. Click
FINISH. You do not need to restart your computer even if
directed to do so by the Windows operating system.
Important! Power is supplied to the Card Reader/ Writer box via the
USB connection. If the box is connected to a USB hub, be sure that the
hub has its own power source or the box may not have enough power to
operate correctly.
WWW.BUZZTOOLS.COM
Page 7 of 16
The BuzzBox User Manual
Software Installation
The following procedure will install the BuzzBox software to your
computer and create a shortcut on your Windows desktop.
1. Insert Installation CD into the CD drive.
2. Go to the Windows “My Computer”, select and open the drive.
3. Double click on Setup.exe and follow the onscreen installation
instructions.
4. When installation is completed, double-click the BuzzBox icon
to start the program.
Page 8 of 16
WWW.BUZZTOOLS.COM
The BuzzBox User Manual
Screen Basics
The BuzzBox screen is divided into two main sections.
The top portion of the screen is used to navigate folders on your
computer and select designs. It is divided into three areas. The Folder
Tree (top left) allows you to easily navigate to the folders on your
computer. While browsing, double click on folder to open or close it.
The full path of current folder is displayed above this panel. The File
Browsing Panel (top middle) displays the files in the currently selected
folder. Depending on the card format chosen (top menu bar) files
with .PES, .PEC and .HUS extensions are listed. Click on a file to select
it and preview it in the Preview area (top right). Above this section is the
main toolbar and menus.
WWW.BUZZTOOLS.COM
Page 9 of 16
The BuzzBox User Manual
The bottom section of the screen is a Holding Area for designs writing,
reading and view designs on the embroidery card. Directly above the
Holding Area is the Action Bar which includes the following options:
·
·
·
·
·
·
Copy to Holding Area – copies the currently selected design(s)
to the holding area.
Remove from Holding Area – removes designs from the
holding area. If no designs are selected in the holding area, all
designs are removed.
Write to Card - starts writing a card (For more details see
Writing Embroidery Cards).
Read from Card - starts reading from a card (For more details
see Reading Embroidery Cards).
Rename – renames a design in the holding area.
Copy to Folder – copies the designs from the holding area to the
currently selected folder on your computer
Page 10 of 16
WWW.BUZZTOOLS.COM
The BuzzBox User Manual
Writing to Embroidery Cards
WARNING: All data on re-writable embroidery cards has to be
erased before any new information can be written to it. Make sure
that any valuable data is saved on the hard drive of your computer
or move it to the holding area before you write to the card.
To write designs to the card (make sure the card is in reader/writer box):
1. On the top menu bar, select the type of embroidery card you
want to write. Choose from Brother Card or Viking Card.
2. Use the Folder Tree to navigate to your embroidery designs
folder.
3. Select a design in the File Browsing Panel to preview it. To
add designs to the Holding Area, click on the Copy to
Holding Area action button. The bottom status bar shows
you the amount of space used on the embroidery card and
the amount remaining.
4. When you have finished adding designs to the holding area,
click the Write to Card action button.
5. As a last reminder, the software will ask you to confirm the
Write procedure. Select OK.
When WRITE operation is complete, take the card out of the
reader/writer box, insert it into your sewing machine and start
embroidering.
WWW.BUZZTOOLS.COM
Page 11 of 16
The BuzzBox User Manual
Write Card Error
If you have chosen more design files then will fit on the card, a warning
message will appear. You will need to remove some designs from the
holding area before you can write to the card.
1. Click OK.
2. Select a design in the Holding Area and click the Remove
action button. If you forget to select a design or designs, the
entire holding area will be cleared.
3. Try to write again.
Page 12 of 16
WWW.BUZZTOOLS.COM
The BuzzBox User Manual
Reading Embroidery Cards
WARNING: All designs in the Holding Area are removed and
replaced by the designs on the embroidery card.
To read/save designs from the card to the hard drive of your computer:
1. Click the Read from Card action button.
2. If required by the embroidery card, you are prompted for a
design filename prefix. Modify this if desired and click OK.
Designs will use this prefix and be assigned sequential
numbers.
3. The embroidery card is read and the designs are displayed in
the Holding Area. This process may take up to 5 minutes.
4. Use the Folder Tree to navigate to the desired folder. You
can also create a new folder to store the designs using the
Create Folder tool bar button. When first created, you can
type in a folder name but afterward you must rename it using
Windows Explorer.
5. After the destination folder is selected, click the Copy to
Folder action button.
6. To clear Holding Area, click the Remove from Holding
Area action button.
WWW.BUZZTOOLS.COM
Page 13 of 16
The BuzzBox User Manual
To rename files:
1. Exit out of the BuzzBox software.
2. From “My Computer” go to your hard drive and browse to
your Designs folder.
3. Select desired design, right click on it with the computer
mouse and select Rename.
4. At the prompt change the file name.
Troubleshooting
Card Reader / Writer Box is not found by Software:
·
Power is supplied to the Card Reader / Writer box via the
USB connection. If the box is connected to a USB hub,
be sure that the hub has its own power source or the box
may not have enough power to operate correctly. Replug the USB cables making sure they are firmly
attached then try again.
If during Read/Write procedure System Error message appears:
·
Close the Card Reader/ Writer software and restart the
Reader / Writer box by re-plugging the USB cables
making sure they are firmly attached then try again. If
the problem persists, contact your dealer or the
manufacturer.
Technical Support
Technical Support is provided by Buzz Tools, Inc. via their website.
Please visit www.buzztools.com/answers or write to us at Buzz Tools,
Inc - Ste 4 PMB 410 - 2415 San Ramon Valley Blvd, San Ramon, CA
94583
Page 14 of 16
WWW.BUZZTOOLS.COM
The BuzzBox User Manual
Limited Lifetime Warranty
Subject to the provisions described below, this Buzz Tools product is protected by a
limited warranty from defects in material and workmanship. Connector defects are not
covered by warranty
If a product fails to perform appropriately within the warranted period, it will be repaired
or replaced with the same or a functionally equivalent product by Buzz Tools, at its
discretion, free of charge, given that you: (1) have, within 30 days of the original date of
purchase completed and returned the owner registration cards which accompanied the
products when shipped, and (2) provide Buzz Tools, Inc. with proof of the original date
of purchase.
This warranty does not apply if, in the judgment of Buzz Tools, the product fails due to
damage from shipment, handling, storage, accident, abuse or misuse, or if it has been
used or maintained in a manner not conforming to product manual instructions, has been
modified in any way or has had any serial number removed or defaced. Repair by anyone
other than Buzz Tools or an approved agent will void this warranty. The maximum
liability of Buzz Tools under this warranty is limited to the purchase price of this product
covered by the warranty.
Before returning any defective product, the end customer or the reseller from whom the
end customer originally purchased the product must obtain a (RMA) Return Materials
Authorization number from Buzz Tools. Buzz Tools will not accept collect shipments.
Except as specifically stated in this agreement or as required by law, the warranties and
remedies stated above are exclusive and in lieu of all others, oral or written, express or
implied. Any and all other warranties, including merchantability, fitness for a particular
purpose and noninfringement of third party rights are expressly excluded. Buzz Tools
shall not under any circumstances be liable to any person for any special, incidental,
indirect or consequential damages, including without limitation, damages resulting from
use or malfunction of the products, loss of profits or revenues or costs of replacement
goods, even if Buzz Tools is informed in advance of the possibility of such damages.
WWW.BUZZTOOLS.COM
Page 15 of 16
www.buzztools.com
Buzz Tools, Inc.
Ste 4 PMB 410
2415 San Ramon Valley Blvd
San Ramon, CA 94583