
1
INSTRUCTION MANUAL
Version 1.0.
1
TABLE OF CONTENTS
1.
2.
3.
CAUTION AND WARNINGS ............................................................................................................................................. 3
1.1.
Standards and certificates of compliance ........................................................................................................ 3
1.2.
Non-liability clause.............................................................................................................................................. 3
1.3.
Safety instructions ................................................................................................................................................ 3
1.4.
Care and maintenance ...................................................................................................................................... 3
1.5.
Privacy .................................................................................................................................................................. 4
1.6.
The batteries......................................................................................................................................................... 4
INTRODUCTION TO YOUR ROBOT ................................................................................................................................... 4
2.1.
Functions .............................................................................................................................................................. 4
2.2.
Robot’s anatomy.................................................................................................................................................. 5
2.3.
View of robot chassis from above ...................................................................................................................... 5
2.4.
View of robot chassis from below....................................................................................................................... 6
PREREQUISITES ................................................................................................................................................................. 6
3.1.
Minimum configuration requirements ................................................................................................................ 6
3.2.
Information about Bluetooth® wireless technology .......................................................................................... 7
4.
BUILDING YOUR ROBOT .................................................................................................................................................. 7
5.
INSTALLING THE “SPYKEE CELL” APPLICATION ............................................................................................................... 7
6.
POWERING UP SPYKEE CELL............................................................................................................................................ 8
6.1.
Turn Spykee Cell on for the first time .................................................................................................................. 8
6.2.
Spykee Cell’s hibernation ................................................................................................................................... 8
7.
CONNECTING YOUR CELL PHONE TO SPYKEE CELL ....................................................................................................... 9
8.
PLAYING WITH SPYKEE CELL............................................................................................................................................ 9
8.1.
Available functions on compatible cell phones ............................................................................................... 9
8.2.
Main menu of the "Spykee Cell " application ................................................................................................. 10
8.3.
Start menu: controlling Spykee Cell ................................................................................................................. 11
8.3.1.
Moving Spykee Cell.............................................................................................................................................. 11
8.3.2.
Moving the head of Spykee Cell ....................................................................................................................... 11
8.3.3.
Taking a picture .................................................................................................................................................... 11
8.3.4.
Activating light and sound effects .................................................................................................................... 11
8.3.5.
Listening to music.................................................................................................................................................. 12
8.3.6.
Memo : control buttons and shortcuts .............................................................................................................. 12
8.4.
Music menu........................................................................................................................................................ 12
8.4.1.
Control your iPod® with your cell phone......................................................................................................... 12
8.4.2.
Use your Spykee Cell as stereo loudspeackers for your iPod®...................................................................... 13
8.4.3.
Use your Spykee Cell as stereo loudspeackers for your mp3 player............................................................ 13
8.5.
Voice FX menu: audio recording & voice transformation ............................................................................. 14
8.6.
Sound FX menu: choice of special effects ...................................................................................................... 14
8.7.
COMMUNICATE : “HANDS FREE” KIT.................................................................................................................. 14
8.8.
SMS ALERTS ......................................................................................................................................................... 15
8.9.
SETTINGS MENU: GENERAL PARAMETERS ........................................................................................................... 15
8.9.1.
Robot movement speed ..................................................................................................................................... 15
8.9.2.
Video size ............................................................................................................................................................... 15
8.9.3.
Volume ................................................................................................................................................................... 15
8.9.4.
Reset function ....................................................................................................................................................... 16
9.
MEMO............................................................................................................................................................................ 16
10.
TECHNICAL SPECIFICATIONS................................................................................................................................... 17
11.
HELP .......................................................................................................................................................................... 17
12.
After sales service ................................................................................................................................................... 17
2
1. CAUTION AND WARNINGS
1.1. Standards and certificates of compliance
1- MECCANO hereby declares that this product complies with all requisite standards and other relevant
regulations of directive 1999/EC. A copy of the original statement of compliance may be obtained at
the following address: MECCANO, 363 avenue de Saint Exupéry 62100 Calais, France.
2- This product must be used indoors.
1.2. Non-liability clause
Certain differences may appear between the description found in the user's manual and the behaviour
of the robot depending on your robot's software version.
1.3. Safety instructions
Choose a SAFE location to operate your Spykee Cell. Do not operate it in the street. Do not operate it in
sand or in puddles. This could deteriorate its performance. Check the surface conditions through which
the robot will move and be aware of obstacles.
Avoid all contact with water.
The robot cannot climb or go down stairs.
Spykee Cell’s audio receivers are sensitive instruments. Do not allow the robot to be near a heat source
or IN FULL SUN for any prolonged time.
Do not leave the robot in humid or damp areas.
Do not drop or throw it.
Do not paint it.
CAUTION
- Risk of injury - keep out of reach of children under 36 months of age.
- CHANGES OR MODIFICATIONS NOT EXPRESSLY APPROVED BY THE MANUFATURER MAY
VOID THE USER'S RIGHT TO OPERATE THIS DEVICE.
1.4. Care and maintenance
This robot requires periodic maintenance and cleaning.
Clean it with a slightly damp cloth.
Handle your Spykee Cell with care and keep it in a clean area, sheltered from dust.
Do not attempt to open it or repair your Spykee Cell yourself.
Its batteries must only be changed by specialists = please contact After Sales Service in this event.
The "barred trashcan" symbol found on your robot means that these products must, at the
end of their lifetime, be delivered to special waste collection points:
- Municipal waste dumps with specific bins for this kind of device
- Collection bins at the point-of-sale
They will be recycled there, thus avoiding the discharge of regulated substances into the environment,
and allowing the materials that make up your Spykee to be reused.
In member countries of the European Union
These selective collection points are accessible free of charge.
All products containing the "barred trashcan" symbol must be delivered to these collection points.
In countries that are not members of the European Union
Any equipment marked with the "barred trashcan" should not be disposed of in ordinary trash cans if
your country or region has special organizations in place for collection and recycling, and this
equipment should be brought to these collection points so that it may be recycled.
3
1.5. Privacy
You are reminded that you must abide by the rules and laws in force in your country on taking
picturegraphs and sound recording. In accordance with these rules and laws, it is sometimes strictly
forbidden to takes pictures and/or make recordings of the voice or any personal attribute and to
reproduce or distribute them, since it could be considered a breach of privacy.
It is the user's sole responsibility to ensure that if required he has prior permission to take a picture and/or
record the voice of another person. The manufacturer, distributor or seller of your Spykee Cell will not
be held liable for any inappropriate use of your robot.
1.6. The batteries
Do not recharge non-rechargeable batteries.
The batteries must be taken out of the toy before being charged if they can be removed.
The batteries must only be recharged under adult supervision (if they can be removed).
Different types of batteries or new and used batteries should not be used together.
Only batteries of the recommended or similar type should be used.
Take care to respect the polarity when installing batteries.
Used batteries must be removed from the toy.
Battery terminals must not be short circuited.
Used batteries must be disposed of at a recycling center.
Please use Saline or Alkaline batteries.
Lithium batteries should not be used in this robot.
For your information, using rechargeable batteries will reduce the robot's operating time.
2. INTRODUCTION TO YOUR ROBOT
Thank you for purchasing Spykee Cell.
2.1. Functions
Spykee Cell is a robot to build that can be controlled from your mobile phone via wireless Bluetooth®
technology! Spykee Cell is equipped with a Bluetooth® card, a webcam, a motorised head, a
microphone, 2 – stereo loudspeakers, 3 LEDs and 2 motors.
o
Spykee moves about and sees…he has a motorized head!
o
He takes pictures…and saves them on your cell phone!
o
He can control your iPod® from your cell phone so you can listen to songs in stereo! You can see
the list of songs on your cell phone screen. You can also listen the music of your mp3 player.
o
The robot is a hands-free kit which allows you to answer your cell phone through your robot.
o
He has several special effects! Sound and light effects, voice transformations….
The box contains:
•
Spykee Cell robot kit to build
•
Building instructions
•
Activation instructions
Easily and quickly build 2 different models / Compatible with all Meccano parts
Instructions and tools included / Requires 6 AA batteries (not included)
4
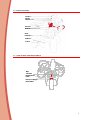
2.2. Robot’s anatomy
microphone
webcam
motorized head
fiber optics
Bluetooth® emittor/receiver
Stereo
loudspeackers
iPod® dock
2 motors
2.3. View of robot chassis from above
Mp3
connector
Sound volume
button
Pick up or Hang up
phone button
5
2.4. View of robot chassis from below
Switch button ON/OFF
Batteries compartment
3. PREREQUISITES
3.1. Minimum configuration requirements
•
A compatible Nokia, Samsung, Motorola, BlackBerry® or Sony Ericsson, Bluetooth® (HFP & SPP)
cell phone:
> please check the list of compatible cell phones on www.spykeecell.com for the updated list
> non exhaustive and non contractually binding list of compatible cell phones for the Spykee
Cell robot as of 1st July 2008 below:
MOTOROLA (Motorola is a registered trademark of Motorola Inc.)
MOTOROLA I870, MOTOROLA KRZR K1, MOTOROLA KRZRK1, MOTOROLA L6, MOTOROLA MOTOQ,
MOTOROLA PEBL U6, MOTOROLA RAZR V3, MOTOROLA RAZR V3I, MOTOROLA RAZR V3X, MOTOROLA
RAZRV3, MOTOROLA RAZRV3I, MOTOROLA RAZRV3R, MOTOROLA RAZRV3T, MOTOROLA RAZRV3XX,
MOTOROLA RIZR Z3, MOTOROLA RIZRZ3, MOTOROLA SLVR L7, MOTOROLA SLVRL7, MOTOROLA SLVRL7C,
MOTOROLA V195, MOTOROLA V360, MOTOROLA V365, MOTOROLA V551, MOTOROLA V557.
NOKIA (Nokia is a trademark or registered trademark of Nokia Corporation.)
NOKIA 2630, NOKIA 2760, NOKIA 5200, NOKIA 6085, NOKIA 6086, NOKIA 6103, NOKIA 6111, NOKIA 6125,
NOKIA 6126, NOKIA 6131, NOKIA 6133, NOKIA 6280, NOKIA 6300, NOKIA 6555, NOKIA 7373, NOKIA 3110
CLASSIC, NOKIA 3500 CLASSIC, NOKIA 5300 XPRESSMUSIC, NOKIA 5310 XPRESS MUSIC, NOKIA 6102I,
NOKIA 6500 CLASSIC, NOKIA 5500 SPORT, NOKIA 5700 XPRESS MUSIC, NOKIA 6110 NAVIGATOR, NOKIA
6120 CLASSIC, NOKIA E65, NOKIA E61, NOKIA N81, NOKIA N70, NOKIA N72, NOKIA N73, NOKIA N95.
BlackBerry© (The trademark BlackBerry© is own by Research In Motion Limited and is registered in the
United States and may be pending or registered in other countries. Meccano is not endorsed,
sponsored affiliated with or otherwise authorized by Research In Motion Limited.)
RIM 8800, RIM 8820, RIM Curve 8300.
SAMSUNG (Samsung is a trademark or registered trademark of Samsung Electronics Co. Ltd.)
SAMSUNG SGH Z360, SAMSUNG SGH-C 250, SAMSUNG SGH-D 830, SAMSUNG SGH-D 840, SAMSUNG SGHD 900, SAMSUNG SGH-D 900I, SAMSUNG SGHD407, SAMSUNG SGHD807, SAMSUNG SGH-E 250, SAMSUNG
SGH-E 390, SAMSUNG SGH-E 590, SAMSUNG SGH-E 740, SAMSUNG SGH-E 840, SAMSUNG SGH-E 900,
SAMSUNG SGH-E 950, SAMSUNG SGH-G 600, SAMSUNG SGH-G 800, SAMSUNG SGH-L 600, SAMSUNG
SGHT329, SAMSUNG SGHT509, SAMSUNG SGHT619, SAMSUNG SGHT629, SAMSUNG SGH-U600, SAMSUNG
SGH-Z 630.
SONY ERICSSON (Sony is a trademark or registered trademark of Sony Corporation. Ericsson is a
trademark or registered trademark of Telefonaktiebolaget LM Ericsson.)
6
SONY ERICSSON K320I, SONY ERICSSON K550I, SONY ERICSSON K610I, SONY ERICSSON K750I, SONY
ERICSSON K770I, SONY ERICSSON K800I, SONY ERICSSON K810I, SONY ERICSSON K850I, SONY ERICSSON
S500I, SONY ERICSSON V630I, SONY ERICSSON V640I, SONY ERICSSON W300I, SONY ERICSSON W580I,
SONY ERICSSON W610I, SONY ERICSSON W660I, SONY ERICSSON W810I, SONY ERICSSON W850I, SONY
ERICSSON W880I, SONY ERICSSON W910I, SONY ERICSSON Z 610I, SONY ERICSSON Z530I, SONY ERICSSON
Z710I, SONY ERICSSON W300I, SONY ERICSSON W600, SONY ERICSSON W810i, SONY ERICSSON Z525
•
•
Internet connection to download the software and user's manual.
Acrobat Reader to read the instructions manual. Acrobat Reader can be downloaded free of
charge at www.adobe.com/products/acrobat/readstep2.html.
3.2. Information about Bluetooth® wireless technology
Bluetooth® is a short range wireless technology, which allows several electronic devices equipped with
this technology to be connected together.
The theoretical range of Bluetooth® for a mobile phone is 10 meters. If you direct your robot beyond this
reception zone it will stop automatically.
Notes:
Bluetooth® wireless technology allows transmission of pictures and sound. However, it is important
to realise that the larger the size of the image, the more staccato or delayed the motion on your
cell phone screen will be.
For optimum connection between your cell phone and your Spykee Cell robot, we recommend
that you avoid obstacles between the two devices.
4. BUILDING YOUR ROBOT
You have just discovered your robot’s functions.
You have undoubtedly already built your Spykee Cell. If you haven’t, come on, get to work!
The assembly instructions, tools and parts are inside your box.
If you have lost your assembly instructions, you can also download them on www.spykeecell.com under
the “Installation” heading.
For those who are more creative, if you have other Meccano parts, you can build a unique new robot!
5. INSTALLING THE “SPYKEE CELL” APPLICATION
In order to install the Spykee Cell aplication on your cell phone, please go to the website
www.spykeecell.com under the “Installation” heading.
Depending of your cell phone’s model and the size of its screen :
1.
Save the installation files of the Spykee Cell application for your cell phone’s model on your
computer.
Note:
Screen width: below 240 pixels width, it is recommended to install the small screen Spykee Cell
application.
2.
Connect your computer to your cell phone with the connecting cable (generally supplied with
your cell phone), by infra-red or by using wireless Bluetooth® technology. The choice of
connection depends on your model of cell phone and computer.
7
3.
Install the “Spykee Cell” application on your cell phone following the instructions supplied by
your cell phone manufacturer.
During the installation procedure, several security warnings may appear. Please validate them to be
able to use the “Spykee Cell” application.
So that the Spykee Cell application works correctly, ensure your cell phone is kept up to date. To do
that, visit your cell phone manufacturer's website.
To control your iPod® from your cell phone, ensure your iPod®'s software is up to date. To do that:
1. Download the latest version of iTunes from the Apple website:
http://www.apple.com/fr/itunes/download/
2. Connect your iPod® to your computer, launch iTunes and update your iPod® following the
instructions supplied by Apple.
6. POWERING UP SPYKEE CELL
6.1. Turn Spykee Cell on for the first time
1.
Switch on Spykee Cell by moving the button under the chassis to the "ON" position.
2.
A red light on Spykee Cell comes on. Then the robot will search nearby for a telephone to
which it had been previously linked in hands free mode. If the phone is found, you will hear a
“beep”. If the phone is not detected, you will hear the sound of a bell. In both cases, the robot
has powered up correctly and will continue its initialisation. When this has finished, another
beep will sound. You robot is then ready.
3.
If the red lights on your Spykee Cell do not come on after several seconds, or you do not hear
the “beep” or the red optic fibers hardly light up : check the power button is definitely “ON”. If it
is, your robot's batteries may be discharged so replace them. To do that read the building
instructions.
When you turn Spykee Cell on, you can identify a problem thanks to a sound code :
Sound Effect
Issue
Solutions
1 long
whistle
Bluetooth® module issue
- Turn your cell phone OFF and then turn it ON again.
- Replace the batteries of your robot
2 whistles
Webcam issue : the
webcam does not work
- Unplug the webcam and then plug it again.
- Turn your cell phone OFF and then turn it ON again
- Replace the batteries of your robot
6.2. Spykee Cell’s hibernation
When Spykee Cell is turned ON and not connected to your cell phone, it goes to sleep within 10
minutes.
When Spykee Cell is in hibernation mode, his torso does not light up anymore.
To reactivate Spykee Cell, please switch Spykee Cell OFF and then switch him ON again.
When you listen to music with Spykee Cell as stereo loudspeaker (please see chapters 8.4.2. and 8.4.3),
the robot continues playing music but you cannot control the sound volume on the robot.
8
7. CONNECTING YOUR CELL PHONE TO SPYKEE CELL
1)
Check your cell phone is switched on.
2)
Activate your cell phone's Bluetooth® function.
3)
Once Bluetooth® has been switched on:
Access your telephone's Main Menu.
Look for the “Spykee Cell” application in your cell phone and open it.
During your first connection, please choose your language: English (other).
A picture of Spykee Cell appears on your screen:
- A Warning Message might appear asking if you want to allow the “Spykee Cell“
application to use the connectivity applications : say Yes.
- Wait a few seconds for connection to be established *
* The first connection takes the longest, it can take up to 45 seconds. Following ones are faster.
4)
You will come to the Spykee Cell application Main Menu and you can now control your robot.
If you have not activated Bluetooth® on your cell phone or it is disabled, when you try to connect a
warning message might appear saying “Bluetooth® Disabled”. Switch on Bluetooth®!
8. PLAYING WITH SPYKEE CELL
8.1. Available functions on compatible cell phones
All functions are not available for each compatible cell phone:
Functions
Robot moves
Motorized head
Robot sees (webcam)
iPod® control
Hands free
Light & sound effects
Pictures
Voice transformation
Nokia
BlackBerry®
Samsung
Sony Ericsson
Motorola
*
Available
* Available on most of compatible cell phones except on some cell phones with small screens.
The upper board is indicative, the characteristics of the cell phones of each brand may vary.
Screen width: below 240 pixels width, it is recommended to install the small screen Spykee Cell application.
BlackBerry®: In order to work with the Spykee Cell software, the operation system of the BlackBerry® cell phones must
be the 4.2.1 version or higher.
9
8.2. Main menu of the "Spykee Cell " application
Start
Robot Control:
•
•
•
•
•
•
Moving Spykee Cell
Moving the head of Spykee Cell
Taking a picture
Activating Sound and Light effects
Listening to Music
Memo: Control and shortcuts to the Music, Voice FX and Sound FX Menus
Music
Listening to Music:
•
•
•
Controlling your iPod® from your cell phone
Using Spykee Cell as stereo loud speakers for your iPod®
Using Spykee Cell as stereo loud speakers for your mp3 player
Voice FX
Audio Recording and Voice Transformation
Sound FX
Choice of Special Effects
Settings
Setting parameters for:
•
•
•
speed of robot movement
video size
sound volume
About
The company that owns Spykee Cell and the one that developed the Spykee Cell
application
Exit
Exit the application: disconnect Spykee Cell from your cell phone
10
8.3. Start menu: controlling Spykee Cell
Before making Spykee Cell move, ensure the robot is on the ground or away from the edge of a
table for instance, to avoid any risk of it falling and being damaged.
If you move Spykee Cell beyond the range of Bluetooth®, you will loose contact. If you stay out of
range too long you will not be able to re-establish connection.
In the Spykee Cell application Main Menu, select "Start", wait a few seconds, the picture seen by
Spykee Cell will appear on your cell phone and you can then take control of the robot.
8.3.1.
Moving Spykee Cell
Use the multidirectional navigation button on your cell phone to move Spykee Cell in the desired
direction.
By pressing the multidirectional button once, Spykee Cell will make a small movement in the desired
direction, a second pulse will give it a longer movement and keeping the button pressed produces
continuous movement while the button is held down.
You can move Spykee Cell more quickly with the "TURBO" function:
To activate the "TURBO" function, press once on your phone's "8" key. Once selected, the word
"TURBO" on your cell phone screen turns from grey to red.
If you press "8" a second time, the "TURBO" function is deactivated and the word is displayed in grey.
Make sure you only move Spykee Cell within a maximum radius of 10 metres. If your robot moves out of
range it will stop automatically, the picture will freeze and you will receive a warning message:
“Connection lost: Spykee is out of range or powered off”. Move closer to your Spykee Cell, if you do it
quickly (in under 10 seconds) the connection will be re-established automatically; otherwise you will
have to re-connect your cell phone to Spykee Cell manually.
8.3.2.
Moving the head of Spykee Cell
Spykee Cell has a motorised head which you can raise or lower :
Raise Spykee Cell's head by pressing the "2" key on your cell phone
Lower Spykee Cell's head by pressing the "5" key on your cell phone
8.3.3.
Taking a picture
This function is available on most of Nokia compatible cell phones only.
To take a picture, click once on your cell phone "OK" key.
Depending on your model of cell phone, you might see a warning message asking you if you are sure
you want to take a picture; confirm to take the picture.
You will hear a "Click Clack" sound from the robot to indicate a picture has been taken.
Your picture will be saved in your cell phone default picture directory.
Refer to your cell phone user manual to find the directory where the pictures are stored by default.
Warning - you must quit the application to access this directory.
8.3.4.
Activating light and sound effects
With Spykee Cell you can play the following different sound and light effects:
•
•
Laser
Robot
•
•
Explosion
Laugh
•
•
Machine-gun
Burp
11
You can activate these sound effects while controlling the robot by pressing the keys "1","3","4" and "6".
To select special effects and assign a key to them see chapter 8.6 of this manual.
8.3.5.
Listening to music
With Spykee Cell you can listen to music from your iPod® nano or iPod® touch only.
From the "Start" Menu you can only play the current piece of music or pause it with the number "7" key
which works like a play/pause button.
To learn about the other functions on the Music Menu, refer to the chapter 8.4 of this manual.
8.3.6.
Memo : control buttons and shortcuts
ROBOT CONTROL
Multidirectional Button
Button "8"
Button "OK"
Button "2"
Button "5"
Button "7"
Buttons "1", "3", "4" et "6"
Move the robot
Activate TURBO function
Take a Picture
Raise the head of Spykee Cell
Lower the head of Spykee Cell
Play or Pause music
Play sound and light effects
SHORTCUTS TO OTHER MENUS
Button corresponding to "Cancel"
Button "#"
Button "9"
Button "*"
Return to Main Menu
Access the Sound FX Menu
Access the Voice FX Menu
Access the Music Menu
8.4. Music menu
Spykee Cell is a Made for iPod® product. It is compatible with iPod® nano and iPod® touch only.
8.4.1.
Control your iPod® with your cell phone
With Spykee Cell you can control your iPod® nano or iPod® touch with your cell phone. Your iPod®
interface will be shown on the cell phone. You will not be able to control your iPod® manually while you
are connected to the robot.
To control your iPod® with your cell phone, make sure your iPod software is up to date. To do that:
1. Download the latest version of iTunes from the Apple website:
http://www.apple.com/fr/itunes/download/
2. Connect your iPod® to your computer, launch iTunes and update your iPod® following the
instructions supplied by Apple.
Before inserting your iPod® into its dock connector, ensure you have installed the correct socket for
your model.
1)
Insert your iPod® into its dock, it will automatically pause.
12
2)
Select the " Music " Menu on your cell phone Spykee Cell interface.
From the main menu select " Music "
From the robot control menu ("Start" Menu) press the “*” key.
3)
You can then navigate your iPod® from your cell phone and choose the music you want. To
navigate, there are several modes:
Playlists: allows you to choose the play list you want to listen to: "on-the-go" lists, a playlist of all the
tracks on your iPod® as well as all your personalised playlists.
Artists : display and listen to music sorted by artist
Albums: display and listen to music sorted by album
Songs : display and listen to music sorted alphabetically
Genres : display and listen to music sorted by genre
Composers : display and listen to music sorted by composer
Now playing.. : display information on the music being played (length, artist, genre..)
MUSIC CONTROL
Play or Pause Music
Button "7"
Navigate the Play List
"Left" and "Right" directional buttons
Increase the Volume
"High" directional button
Lower the Volume
"Low"directional button
SHORTCUTS TO OTHER MENUS
Access the Sound FX Menu
Button "#"
Access the Start Menu
Button "*"
When you are listening to music, you can continue to play with Spykee Cell, move his head, move
the robot and take pictures by returning to the "Start" Menu.
8.4.2.
Use your Spykee Cell as stereo loudspeackers for your iPod®
You can use your Spykee Cell as a speaker for your iPod® nano or iPod® touch.
To do this, you do not have to connect to your cell phone.
1)
Power up your Spykee Cell if you have not already done so.
2)
Put it into its dock, your iPod® will automatically go into "Pause".
3)
You can then control your iPod® manually to listen to your music. You can use the volume
button on the robot chassis to amplify the sound (your iPod® volume control will not work).
8.4.3.
Use your Spykee Cell as stereo loudspeackers for your mp3 player
You can use your Spykee Cell as a speaker for your mp3 player.
To do this, you do not have to connect to your cell phone.
1)
Power up your Spykee Cell if you have not already done so.
2)
Put an audio cable between your mp3 and the robot.
3)
You can then control your mp3 player manually to listen to your music. You can use the volume
button on the robot chassis to amplify the sound (your mp3 player volume control will not work).
13
8.5. Voice FX menu: audio recording & voice transformation
Apart from the light and sound special effects pre-recorded in your Spykee Cell, you can also
personalise your robot by recording your voice and processing or morphing it if desired. You can then
play this recording from your robot.
To record a sound, follow the following procedure:
1)
From the main menu, select the "Voice FX" menu
From the "Start" menu, press the "9" key.
2)
Select "Record"
once and speak.
3)
Select "Record"
a second time to end recording.
4)
Then select the voice modification you want - "Robot Voice", "Dark Voice" or “None”.
5)
To listen to the recording, select « Play »
.
For a better recording, please be close to your cell phone microphone (<10 cm).
To go back to Start menu, please press « 9 » key.
8.6. Sound FX menu: choice of special effects
By default Spykee Cell comes with 6 special effects:
•
Laser
•
Robot
•
Explosion
•
Laugh
•
Machine-gun
•
Burp
To choose the four desired sound and light effects from the six selections:
1)
Access the special effects selection menu :
Select "Sound FX" from the main menu
Press the "#" key to access it directly when you are playing with Spykee.
2)
To listen to and see a special effect press the "OK" key on your cell phone
3)
Choose the 4 effects you want by pressing a number key: "1","3","4" or "6".
You can use 4 different special effects when you are controlling Spykee Cell.
You can select and modify your selection at any time from the "Sound FX" menu in the Spykee
application.
To return to "Start" mode: press the "#" key.
If your iPod® is playing and you want to listen to the sound effects undisturbed you can press the "7" key
to pause it and then press "7" again to restart play.
8.7. COMMUNICATE : “HANDS FREE” KIT
Spykee Cell is a hands-free kit.
When someone calls you, you can answer your cell phone through the robot. Your robot is your
loudspeaker and microphone.
Foreword: you need to connect your cell phone and your robot.
14
1)
2)
3)
4)
5)
Access Bluetooth® menu.
Search for new Bluetooth® device and select « SpykeeCellXXXXXX».
Please connect you to this new device.
A password or code can be asked : please enter “0000”.
Once connected, you can receive phone calls through your robot.
When someone calls you:
To answer, press quickly the white round button on the upper surface of the robot chassis1. You
can talk normally in front of your robot.
To hang up, hold down the same button for more than two seconds.
8.8. SMS ALERTS
This function is available only on some Sony Ericsson compatible cell phones.
When you receive an SMS, Spykee Cell tells you: « You’ve got a message ».
It is an automatic function. You do not need to configure your robot or your cell phone.
8.9. SETTINGS MENU: GENERAL PARAMETERS
8.9.1.
1)
2)
3)
4)
Robot movement speed
Select the “Settings" Menu
Select the "Robot Parameters” Menu
Select your robot speed from the following: Slow, Medium and High.
You can then return to the "Start" Menu and move your robot at the new speed.
To return to "Start" Mode:
Press the key corresponding to “Previous Menu” twice in succession (see your cell phone user
guide: the Main Menu is displayed.
Select the "Start" Menu from the list and press "OK".
8.9.2.
1)
2)
3)
Video size
From the Main Menu, select "Settings"
Then select "Video Parameters“
From the 5 pre-defined picture sizes, choose the one you want.
The smaller the picture size, the more fluid will be the picture on your cell phone.
To return to "Start" mode:
Press the key corresponding to "Previous Menu" twice in succession (see your cell phone user
guide): the Main Menu is displayed.
Select the "Start" Menu from the list and press "OK".
8.9.3.
Volume
You can set the volume on your Spykee Cell in the following way:
1
1) With your cell phone
Select the "Settings” Menu
Select "Volume"
Press the multidirectional key, Up to increase volume, Down to lower the volume.
2) Directly on Spykee Cell
Press the "Volume" button on the robot chassis
- towards the outside of the robot to increase volume
- towards the inside of the robot to lower volume
Please refer to the view of the chassis from above.
15
8.9.4.
Reset function
If you need to go back to the defult parameters or to change the language of the application:
1)
2)
From the Main Menu, select "Settings"
Then select "Reset Config“
The default parameters will appear the next time you launch the application.
9. MEMO
“START” MENU
Multidirectional Button
Moves the Robot
Button “8”
Activates the TURBO Function
Button “OK”
Takes a Picture
Button “2"
Raise the head of Spykee Cell
Button “5”
Lower the head of Spykee Cell
Button “7"
Play or Pause music
Buttons "1", "3", "4" and "6"
Activate Sound and Light Effects
Button corresponding to "Cancel"
Return to Main Menu
Button "# "
Access Sound FX menu
Button "9 "
Access Voice FX menu
Button "* "
Access Music menu
“Music -iPod®” MENU
Button "7"
Play or Pause music
Directional buttons "Left" and "Right"
Navigate the Play List
Directional button "High”
Raise the Volume
Directional button "Low”
Lower the Volume
Button "# "
Access Sound FX Menu
Button "* "
Access Start Menu
“SOUND FX” MENU
Button "# "
Access Start Menu
“VOICE FX” MENU
Button "7 "
Play or Pause iPod® music
Button "9 "
Access Start menu
16
10. TECHNICAL SPECIFICATIONS
o
o
o
o
o
o
o
o
o
o
o
o
o
o
Bluetooth® module class 2 (V2.0 EDR compliant) / HSP HFP SPP
Bluetooth® compatible cell phones: MIDP 2.0
HFP / HSP profiles support for hands free feature
32-Bit RISC architecture Microcontroller
3 motors (2 for driven wheels + 1 for camera tilt)
Speed: 15cm/s – Turbo speed: 30cm/s
3 led
CMOS Webcam (176x144 pixels array)
Stereo loudspeakers (8kHz sampled sound)
Microphone
Buttons or software volume setting
Line in for 3.5mm jack
Made for iPod® dock (compatible with iPod® nano & iPod® touch, not included)
Works with 6 AA batteries (not included)
11. HELP
I can't connect to my Spykee Cell
Check the Bluetooth® connectivity on your cell phone is activated. To do that, refer to the user
guide supplied by your cell phone manufacturer.
If your cell phone connected automatically to your Spykee Cell, switch off Bluetooth®
connectivity and reactivate it manually.
Check you are close enough to your Spykee Cell (distance < 10 metres).
Check there are no solid objects between you and your Spykee Cell.
In robot control mode (Start), I do not have a picture or the picture is frozen
Check the batteries on your robot.
The Spykee Cell robot might be beyond Bluetooth® range. Move closer to your Spykee robot
(one or more steps): if connection does not happen automatically, reconnect manually.
I can't hear the music
Check your iPod® nano or iPod® touch is correctly seated on the iPod® dock connector.
Check your iPod® nano or iPod® touch is charged up.
The lights do not come on
Check the batteries
One or more leds might be damaged
12. After sales service
If you have any question, please contact us:
Meccano S.A.
363 avenue de Saint Exupéry
62100 Calais - France
17
Many models and parts are original creations; they are the property of MECCANO and are protected
by national legislation on designs and models, trademarks and/or copyright. Please contact MECCANO
for information. MECCANO shall in no way be held liable in the case of an accident occurring
subsequent to (I) the noncompliance with the instructions for assembly and use of the robot and
software (II) use of parts other than those offered in the guide (III) alteration and modification of parts.
The MECCANO company respects children safety: its models have been tested by children.
Please retain user's manual and packaging.
Products and product colors may vary.
MECCANO
363 avenue de Saint Exupéry 62100 Calais – France.
© 06/2008 MECCANO
® MECCANO & ERECTOR are exclusive trademarks of MECCANO
All rights reserved.
Document non binding.
Made in China.
Made for iPod nano & iPod touch only.
Apple is not responsible for the operation of this device or its compliance with safety and regulatory
standards. Apple & iPod are registered trademarks of Apple Inc., registered in the US and other
countries.
The Bluetooth® word mark and logos are registered trademarks of Bluetooth SIG, Inc., and any use of
such marks by Meccano is under license.
Other trade marks and trade names are those of their respective owners.
18


![Valsi [Generadores]](http://vs1.manualzilla.com/store/data/006204806_1-cfddcb8eeea6329e185e063b4efb7ee1-150x150.png)