1
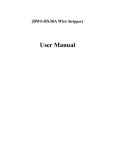
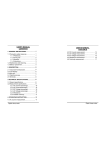
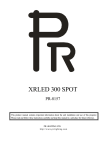
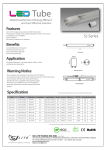
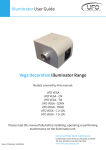
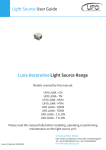
LEI SERIES LIGHT ENGINE
LEI SERIES LIGHT ENGINE
INSTRUCTION MENU
Welcome to use LEI series professional DMX intelligent light engine.Please read carefully the instruction menu before
using light engine.If you have any questions concerning the operation or maintains, please contact your wholesaler.
A. Safety Instruction
1. Make sure the Light Engine and Power Source have the same voltage;
2. Keep out of rain or moist area to avoid shock hazards;
3. Avoid to use at high temperature(≤40℃);
4.There is overtemperature protection inside the light engine,when the ambient temperature is too high or insufficient
ventilation, LED will reduce brightness itself to improve life of itself.
B. Technical Data
Model:
LEI-4001DMX
LEI-8001DMX
Voltage:
110V
220V
Power:
50W
100W
Color:
6colors
Light Source:
1-40W LED
1-80W LED
Luminous Flux:
1900Lm
4300Lm(700mA,white light)
Life of LED:
50000H
Standard aperture:Φ28mm/Φ24mm/Φ20mm(Optional:Φ30mm)
Size:
Gross Weight:
270 264
6.9Kg
135mm3
C. Installation
1. Installation of the fiber optic:
*
*
*
*
*
*
*
(1) Solid Core fiber optic(See Fig. 1):
Cut the fiber to the specified length. The cutting face should be vertical to the fiber and keep clean on the cutting side.
Peel off 50-60mm of the PVC protection cover of the fiber optic (if no PVC protection cover, no need to peel off any
fiber optic), be careful not to hurt the fiber optic itself.
Unscrew PG Connector, insert the fiber optic into the Fixing Flange and Fiber Connector, until it closely adherence to
the Fiber Connector then screw tight PG Connector.
Push gently the Fixing Flange and the Fiber into the Fixing- Ring, then screw down the screw.
(2) Multi-string fiber optic(See Fig. 1):
Cut 100mm PVC protection cover before connecting the fiber with Light Engine. Please take care not to hurt the fiber optic.
Collect all fibers in one bundle, enlace all the fiber at the 10cm from fiber end with 130℃ heat-resistant tape. insert the
fiber optic into the PG connector and Fiber Connector, until it closely adherence to the Fiber Connector,cut the surface
neatly with hot knife .
Push gently the Fixing Flange and the Fiber into the Fixing Ring, screw down the screw.
Screw
Front Case
Fixing Ring
PG Connector
Fixing Flange
Fiber Connector
Fiber
Fig. 1
NOTE: Please make sure that the fiber’s diameter is compatible to the fiber connetor ,it will fuse fiber if the
diameter of fiber connector is too big.Assure the surface is vertical to the fiber, clean, smooth, to avoid
decrease of the brightness or melt of the fiber string.
1
LEI SERIES LIGHT ENGINE
2. Installation dimension of light engine(see Fig.2):
264
110
LED LIGHT ENGINE
LEI-DMX
MENU
UP
DOWN
DMX IN
FUSE
135
SWITCH
270
254
MIC
DMX OUT
POWER
AERIAL
D. Light Engine Setting
There are three control system for LEI-Series MASTER/SLAVE Light Engine:
Fig.2
* DMX 512 signal control Mode: Signal comes out from DMX 512 Controller.
* Master/Slave Mode: One Light Engine set as Master , while all the others set as Slave. Signal comes out from the
Master machine to control all other slave machines running synchronously.
* Audio Control Mode: Light engines are controlled by sound.
1.DMX 512 signal control mode:
(1) Address Setting:
Press button “UP” and “DOWN” at the same time(maybe many times),until the digital display shows “001”-“508”,
then press button “UP or “DOWN to select address.
(2) DMX Channels: Total 5 Channels
CH1:Color
CH2:Speed
CH3:Blank
CH4:Dimmer (256 level)
CH5:Strobe
Notice: CH2 control the switching speed of color, CH3 is spare channel.
2. Master/Slave mode:The setting of Master/Slave
STATUS
MASTER
Slave
DMXReceiver
No.
MENU
DESCRIPTION OF FUNCTIONS
1
P.00-P.11
12 preset programs(see attached list,when it
display “PS.X”,please use UP/DOWN to get into
this menu)
2
PS.1 - PS.2
PS.1-PS.2 are audio control programs (when it
display “P.XX”,please use UP/DOWN to get into
this menu)
3
S.00-S.07
4
d.00-d.99.
5
r.on-r.oF
r.on=remote controllable,
r.oF=not remote controllable
6
001-508
DMX address, “001”-“508” are available
REMARKS
1. Press two buttons at the same
time to switch among menus.
2. If you haven ' t pressed the
buttons for long time,the digital
display will be turnoff, and the
setting of color wheel speed,total 8 levels:1/2RPM,1RPM,
buttons will be locked, press
2RPM,3RPM,4RPM,5RPM,8RPM,12RPM
“UP” or “DOWN” to restart
buttons operation (when power
it on, you also need to do like
Adjusting of brightness,total 8 levels:d.00,d.10,d.20,
d.35,d.50,d.70,d.85,d.99.(d.99.means100% brightness) this),it will display the last
operation menu.
3.If slaves have received the
DMX signal,then the 3rd digital
number of the digital screen
will be flickering.
Notice:
① If you need Master/Slaves change color synchronously, please set all of slaves into”001”;
② If you need Master/Slaves chase to change color, please set slaves into “006”,”011” and so on
(add “5” one after another) .
2
LEI SERIES LIGHT ENGINE
3.The connection of DMX Signal Control Mode(See Fig. 3):
DMX IN
DMX IN
DMX IN
FUSE
FUSE
SWITCH
SWITCH
DMX OUT
DMX OUT
POWER
POWER
AERIAL
DMX512 Controller
FUSE
SWITCH
DMX OUT
POWER
AERIAL
AERIAL
Slave 2
Slave 1
Slave 3
Fig.3
4.The connection of Master/Slave Control Mode(See Fig. 4):
DMX IN
DMX IN
DMX IN
FUSE
FUSE
SWITCH
FUSE
SWITCH
DMX OUT
SWITCH
DMX OUT
DMX OUT
POWER
POWER
AERIAL
POWER
AERIAL
AERIAL
Slave 1
Master
Slave 2
Fig.4
5.Signal wire and connector link(See Fig.5):
Signal wire should be 2
2
0.5mm audio wire
3
1
1
2
2
3
PIN1: GND
PIN2: SIGNALPIN3: SIGNAL+
Fig.5
1
2
3
4
5
6
7
8
9
6.Wireless remote controller using(See Fig.6):
DIM
Press two buttons at the same time, when it display “r.on”or “r.oF”,please
0
use “UP”/“DOWN” to set the master into “r.on”(status of remote controllable),
PRO SP
then you can use remote controller.
(1) Select of program: Press“PRO”,then use “00”-“13” to select the suitable
program,or you can use “ ”,“ ” to select.
(2) Adjusting of brightness: Press “DIM”, then press “0”-“7” to select the suitable
brightness,or you can use “ ”,“ ” to adjust.
RC-03
(3) Adjusting of speed: Press”SP”,then press “0”-”7” to adjust the speed,
Wireless Remote Controller
or you can use “ ”,“ ” to adjust.
Notice: ① Address code of slaves are not adjustable under remote control status.
Fig.6
② When you are selecting program, only double-digit numbers are recognizable (e.g. 00, 01, 02...)
Attached List :
Pro. No. Function
Pro. No.
Function
Pro. No.
Function
P.00
No Light
P.06
Red
PS.1
6 colors skip & audio control
P.01
White
P.07
6 colors skip
PS.2
5 colors skip & audio control
P.02
Sky-B
P.08
5 colors skip
P.03
Green
P.09
6 colors fade
P.04
Yellow
P.10
6 colors skip & chase
P.05
Blue
P.11
6 colors fade & chase
3