1
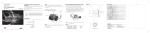
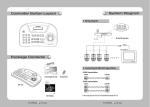
NETWORK VIDEO RECORDER
Quick Manual
SRN-4000
English
Features
The product records video and audio from network cameras to a hard disk, and enables playback from the hard disk.
It also provides remote monitoring environment for video and audio over the network using a remote computer.
•• User-friendly UI
•• VGA, 4CIF, record in a max of 2592X1944 (5M pixel) supported
•• Record and play video
•• Record and play audio
•• Supports ONVIF Pofile S standard and RTP / RTSP protocols
•• Play high-definition video using the HDMI cable
•• Display the HDD operation status by HDD SMART
•• HDD overwrite enabled
•• Backup using USB 2.0 protocols and external HDD
•• Simultaneous play of 16 channels
•• Various Search Modes (Search by Time, Event, Backup and Heatmap)
•• Various Recording Modes (Normal, Event, Scheduled Recording)
•• Alarm Input / Output
•• Remote Monitoring function by Windows Network Viewer
•• Live monitoring of the network camera
•• Advanced Motion Detection (AMD)/Heat Map (Car/Person Detection) Function
•• Installation Wizard Function (Easy Setup, Quick Setup)
Samsung Techwin cares for the environment at all product manufacturing stages, and is taking measures to provide
customers with more environmentally friendly products.
The Eco mark represents Samsung Techwin's devotion to creating environmentally friendly products, and indicates
that the product satisfies the EU RoHS Directive.
Correct Disposal of This Product (Waste Electrical & Electronic Equipment)
(Applicable in the European Union and other European countries with separate collection systems)
This marking on the product, accessories or literature indicates that the product and its electronic accessories (e.g. charger, headset, USB
cable) should not be disposed of with other household waste at the end of their working life. To prevent possible harm to the environment
or human health from uncontrolled waste disposal, please separate these items from other types of waste and recycle them responsibly
to promote the sustainable reuse of material resources.
Household users should contact either the retailer where they purchased this product, or their local government office, for details of
where and how they can take these items for environmentally safe recycling.
Business users should contact their supplier and check the terms and conditions of the purchase contract. This product and its electronic
accessories should not be mixed with other commercial wastes for disposal.
Correct disposal of batteries in this product
(Applicable in the European Union and other European countries with separate battery return systems.)
This marking on the battery, manual or packaging indicates that the batteries in this product should not be disposed of with other household waste at the end of their
working life. Where marked, the chemical symbols Hg, Cd or Pb indicate that the battery contains mercury, cadmium or lead above the reference levels in EC Directive
2006/66. If batteries are not properly disposed of, these substances can cause harm to human health or the environment.
To protect natural resources and to promote material reuse, please separate batteries from other types of waste and recycle them through your local, free battery
return system.
2_ Features
Package Contents
Please unwrap the product, and place the product on a flat place or in the place to be installed.
Please check the following contents are included in addition to the main unit.
REC
ALARM
POWER
BACKUP
NETWORK
RAID
HDD
1
2
5
6
9
10
3
4
7
8
11
12
USB
NVR
Mouse
Power Cable
Network Viewer Software /
User Manual CD
User Manual or Quick Manual
HDD mounting screw
Terminal block
Rack mount
Rack mounting screw
HDD door lock key
English _3
Getting Started
To perform the Easy Setup procedure, register your camera, and configure the recording settings, follow these steps
when you start the product for the first time.
1. Easy Setup ; 2. Register the Camera ; 3. Configure the Recording
The <Easy Setup> screen appears after the initial screen when you start the product.
you start the product, you must connect the product to a hard disk drive, NVR, and network camera. (see pages
MM `` Before
12-20 of the User Manual)
1. Easy Setup
Easy Setup allows you to set the language, ID/password, network, and date/time of the product.
To perform the Easy Setup process, follow these steps.
1. Choose your language, and then click <Next> to go to the next step.
2. Enter a <Password>, and then click <Next> to go to the next step.
MM `` Your password must be more than 8 characters and include numbers and letters.
3. Configure the network connection
You must specify the network connection method and environment. To use a simple intranet, click <Next>.
•• Network 1 (Camera), Network 2 (Camera) : Connects to the camera and receives the video feed from the
camera
•• Network 3 (Viewer) : Transmits the video feed to a web viewer.
•• Network 4 (iSCSI) : Connects to an external iSCSI.
•• Network 1 (Camera) / Network 2 (Camera) / Network 3 (Viewer) / Network 4 (iSCSI) Setup
-- IP Type : Choose the network connection method.
-- IP Address, Subnet Mask, Gateway, DNS
•• Transfer Bandwidth (Network3) : Specifies the maximum data size when transmitting to a web viewer.
MM `` For more information on the network connection settings, see the User Manual.
4. Configure the date and time, and then click <Next> to open the camera registration pop-up window.
4_ Getting Started
2. Registering the Camera
This section outlines how to register and connect the cameras for each channel.
d
a
b c
e
To register a camera, follow these steps:
a Select the camera to register (you can select multiple cameras).
bClick <ID/PW> to register your ID and password. (If you do not register a new ID/PW, then the default
ID/PW combination is used.)
c Click <Connection Test>.
d Check the connection results.
e If the channel connected successfully, click <OK> to end the camera registration process.
MM `` Click an item on the table to see a preview (you must change the ID/PW in step b if the camera account changes).
`` Click the table headers to sort the content.
`` Click <
> to check if a new IP address was allocated to the camera when you rescan the network or when an IP
address was not assigned by the DHCP server (e.g., 192.168.1.100). If the IP still stays the same, then select Assign IP to
assign the IP manually.
3. Configuring the Recording
This section outlines how to configure and view the recording settings for each channel.
a
b
c
a Shows the standard and event recording method for each channel.
•• FULL : Records all the frames received from the camera.
•• KEY : Records only the key frames received from the camera. In general, one or two frames per second
are recorded, but you can adjust this in the camera settings.
•• OFF : Turns off recording.
b Shows the transmission size of the recording data for each channel.
c Shows the data size limit for each channel.
colored in orange shows the input data in b exceeds the size limit in c. This means that you cannot record all
MM `` Athechannel
frames for this channel. Instead, you can record only the key frames (one or two frames per second). To record all of the
frames, you must increase the size limit in c so that it exceeds the input data in b.
English _5
Configuring Miscellaneous Settings
This section outlines how to configure the camera settings, camera title (video name), and split mode.
Opening the Setup Menu
In live mode, right-click the screen to open the live mode context menu. Click <Menu> to open the setup
screen.
Scene Mode
Channel Info
►
Live Status
Record Status
Layout
Audio Off
►
Freeze
Stop Alarm
Record
Play
Search
Backup
Menu
Quick Setup
Shutdown
►
Hide Launcher
Logout
Setting Up the Camera
From the setup menu, you can configure the camera settings (resolution, frame rate, and quality) and other
functional settings.
Menu ; Device ; Camera ; Camera setup
Camera function settings: You can configure the camera
settings or the live movie format to change the settings in the
camera itself.
•Add : Adds a camera profile.
•Delete : Deletes the selected profile from the list.
•Profile : Specifies the movie profile of the connected camera in the camera settings.
•Codec : You cannot change the codec of the selected profile.
•Resolution : Specifies the resolution of the selected profile.
•Frame Rate : Specifies the frame rate of the selected profile.
•Quality : Specifies the transmission quality of the selected profile.
•Bitrate Control : Specifies the bitrate of the video transmitted for the selected profile.
6_ Configuring Miscellaneous Settings
Setting Up a Channel
From the channel setup menu, you can change the camera name shown in live mode.
Menu ; Device ; Camera ; Channel setup
Setting Up the Live Layout
This section outlines how to select a series of channels based on their purpose/accessibility and monitor them
in a single layout.
Example) Layout "Lobby" - Lobby camera 1, Lobby camera 2, Front entrance camera 2
Layout "VIP" - Directors' meeting room 1, Directors' meeting room 2, Directors' lounge 1, Corridor camera on
the 7th floor
c
e
a
d b
To create a new layout, follow these steps:
a Open the channel layout setup menu.
b Select the channels that you want to add to the layout (e.g., 2, 7, 10, 15).
c Enter a name for the selected channels (e.g., ELEVATOR).
d Choose a split mode to apply (e.g., 4-way split).
e Choose a layout to view it on the screen (e.g., change to ELEVATOR).
English _7
SALES NETWORK
SAMSUNG TECHWIN CO., LTD.
Samsungtechwin R&D Center, 701, Sampyeong-dong, Bundang-gu, Seongnam-si, Gyeonggi-do, Korea, 463-400
TEL : +82-70-7147-8740~60 FAX : +82-31-8018-3745
SAMSUNG TECHWIN AMERICA Inc.
100 Challenger Rd. Suite 700 Ridgefield Park, NJ 07660
Toll Free : +1-877-213-1222 Direct : +1-201-325-6920
Fax : +1-201-373-0124
www.samsungcctvusa.com
www.samsungtechwin.com
www.samsungsecurity.com
www.samsungipolis.com
SAMSUNG TECHWIN EUROPE LTD.
Samsung House, 1000 Hillswood Drive, Hillswood Business Park
Chertsey, Surrey, UNITED KINGDOM KT16 OPS
TEL : +44-1932-45-5300 FAX : +44-1932-45-5325