1
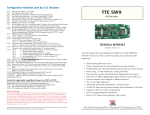
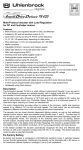
CONTAINER
TERMINAL
MANUAL
89001
IMPORTANT!
Please read this manual carefully before unpacking the crane and using
it for the first time. You will see the crane has many features, but there
are a few things you should be aware of in order to obtain correct
operation of the crane and to avoid damage.
FOLLOWING THE INSTRUCTIONS WILL ENSURE YOU GET
MAXIMUM ENJOYMENT FROM YOUR PURCHASE!
THE CONTAINER TERMINAL CONTAINS:
1 x Gantry with trolley and hoist
1 x Control unit
2 x Containers
1 x Base element (33 x 57 cm) with fitted crane rails
2 x OO scale tracks (22.6 cm)
8 x rail connectors, 16 screws for mounting the base element to a plate, 4 fittings
2
INTRODUCTION
Thank you for purchasing the HELJAN Container Terminal. The crane is digitally controlled, but
don’t be frightened as the operation is simple and no specific experience with digital systems is
needed to achieve full enjoyment of the crane. The basic model consists of the complete crane,
control unit and two containers. One control unit can control up to three cranes. The basic model
measures 33 x 57 cm, but it can be extended with further base elements limited only by power loss
and your space! Additional containers can be purchased seperately.
BEFORE YOU START!
Please be careful when unpacking. Start with the base elements that are placed in the special
packaging at the bottom of the box. Do not unpack the crane until you have assembled the base
element and installed the tracks where you want to place them.
ASSEMBLING THE BASE ELEMENT
The base element consists of eight parts, 2 x 2 end sections and 2 x 2 central sections. The lower
parts are assembled with the supplied fittings. Mount the base element on to your baseboard. Use a
1.5 mm drill to make the holes in your baseboard, the holes have been drilled in the lower parts and
screws are supplied. This is shown on photo 1 where you can also see how to connect the railway
track to your layout.
INSTALLING THE TRACKS
Two OO scale tracks are included but you can install up to five tracks, four beneath the crane and
one next to it (additional tracks can be purchased as accessories). When you have decided where
you wish to place the tracks offer them to the two central lower parts. Take the upper part to one of
the lower parts where you want to install the track, and turn it over. On this side there are grooves
that enable you to cut out the piece that fits the track (see Photo 2). Don’t forget to connect the rails
with the rail connectors as supplied, which can also be used to connect the tracks with lines to the
power pack. Having done this the upper parts can be fitted to the lower parts of the base. You can
also install wires for the FALLER Car-system, please refer to FALLER’s instructions.
FITTING THE GANTRY AND TROLLEY
Carefully remove the trolley and the gantry from the packaging. Place the gantry on its base rails
and the trolley on the gantry rails. All that remains prior to commencing container terminal
operation is to connect it to the control unit and the power supply.
Cut here
Photo 1
Photo 2
3
ASSEMBLING THE BASE ELEMENT
4
INSTALLING THE TRACKS
5
POWER SUPPLY
You can use either AC or DC power packs. The voltage should be 14-16 V, 2,5 A. Connect the control
unit to your power pack and the crane tracks (see below). Do not turn on the power until you have
read the next paragraph!
THE CONTROL UNIT
Power pack
q
Trafo
Crane
p
0°
180°
Crane
N
S
G
M
E
W
u Joystick
PC u
F
S
Containerterminal
The control unit is the core or the brain of the container terminal. Apart from controlling all
functions of the crane, you can also adjust the speed with this unit. There are four connections: one
for the power pack, one to the crane, one to a joystick and one for a PC. In the next section the use of
the crane with the control unit will be explained. For use of Joystick and PC-connection please see
our home page (www.heljan.dk). Prior to turning on the power please note these important points:
! All connections must be made before turning on the power.
! If operating with a joystick do not move the joystick during the start up phase, as this may cause a
malfunction.
! If you unplug the joystick while still in use it will cause interruption to the signal.
As soon as the power is turned on and the display shows ‘HELJAN’ the control unit is ready for use.
If you connect a joystick it will be identified and calibrated during the start up phase.The joystick
cannot be identified in the display during use.
YOU ARE NOW READY FOR OPERATION!
Trafo
0°
180°
OPERATING THE GANTRY
Crane
N
S
G
M
E
W
F
S
6
Containerterminal
! Press button ‘E’ (East) to drive right or ‘W’ (West)
to drive left.
Trafo
0°
180°
DRIVING THE TROLLEY
Crane
N
S
! Press button ‘N’ (North) to drive forwards or ‘S’
(South) to drive backwards.
G
M
E
W
F
Containerterminal
S
Trafo
0°
180°
Crane
N
S
G
M
DRIVING THE GANTRY AND
THE TROLLEY AT THE SAME
TIME
! Press buttons ‘N’ and ‘E’ or ‘N’ and ‘W’ ‘S’ and ‘E’
or ‘S’ and ‘W’.
E
W
F
Containerterminal
S
Trafo
0°
180°
Crane
N
S
G
M
RAISING OR LOWERING THE
HOIST
! Hold button ‘F’ (Function) and then press button
‘N’ (to raise the trolley) or ‘S’ (to lower the trolley).
E
W
F
S
Containerterminal
IMPORTANT!
To prevent the strings that connect the hoist with the trolley from
getting tangled avoid obstructions when you lower the hoist.
If the hoist comes to rest at an angle raise it until it reaches the
trolley and hold the buttons for a short while. When you lower the
hoist after having done so it will then be in a horizontal position.
7
Trafo
0°
180°
S
TURNING THE HOIST
AROUND
G
! Hold button ‘F’ and then press button ‘E’ or ‘W’.
Crane
N
M
E
W
F
Containerterminal
S
Trafo
0°
180°
TURNING ON THE MAGNET
Crane
! Press button ‘M’ (Magnet).
N
S
G
M
E
W
F
Containerterminal
S
Trafo
0°
180°
TURNING OFF THE MAGNET
Crane
! Press button ‘M’.
N
S
G
M
E
W
F
Containerterminal
S
Trafo
0°
180°
S
TURNING THE SPOTLIGHT
ON AND OFF
G
! Press the grey button ‘S’ (Searchlight).
Crane
N
M
E
W
F
S
8
Containerterminal
Trafo
0°
180°
S
TURNING THE GANTRY
LIGHT ON AND OFF
G
! Press button ‘G’ (Gantry Light).
Crane
N
M
E
W
F
Containerterminal
S
Trafo
0°
180°
S
CHANGING FROM CRANE 1
ÆCRANE 2 ÆCRANE 3
G
! Hold button ‘F’ and then press button ‘M’.
Crane
N
M
This function is not possible when using a joystick
or PC.
E
W
F
Containerterminal
S
Trafo
0°
q
180°
Crane
N
S
G
M
E
W
CHANGING DRIVING
DIRECTION
Depending on how the control unit is placed in
relation to the Container Terminal the driving
direction of the gantry and the trolley can be
changed by switching the switch. This influences
both the control unit, the joystick and the PCsystem.
F
Containerterminal
S
Trafo
0°
180°
SHORT CIRCUIT
Crane
N
S
q
G
M
In the case of a short circuit a flashing “OFF”
appears in the display and the power supply to the
crane will be turned off. When the reason for the
short circuit has been determined and cleared
press button ‘F’.
E
W
F
S
Containerterminal
9
Containerterminal
SETTING THE SPEED
Choose the address of the crane whose speed you want to change.
Hold ‘F’.
Press ‘S’ or ‘G’.
‘SP:Gt’ appears in the display.
By pressing ‘S’ or ‘G’ you can choose the speed to be changed.
These are the meanings of the specifications shown in the display:
SP:Gt = Gantry decoder
SP:to = Trolley decoder
SP:Hu = Hoist decoder Up
SP:Hd = Hoist decoder Down
SP:tr = Turn right
SP:tl = Turn left
When the desired speed has been reached press the button ‘M’.
‘SP:4’ appears in the display.
‘4’ means the speed and may be varied after setting.
With the buttons ‘S’and ‘G’ the speed can be increased or reduced.
When the ‘F’ button is released the ‘new’ speed has been fixed.
With the exception of the Gantry and Trolley decoders ‘Pro’ appears shortly in the display.
REPROGRAMMING THE CRANE ADDRESSES
The Gantry and trolley decoders can be reprogrammed as follows:
A) Choose a new crane address as described ‘CHANGE FROM CRANE 1 Æ CRANE 2
Æ CRANE 3’. Hold the buttons.
B) Then press ‘S’.
C) ‘Pro’ appears in the display.
D) The Crane now reacts to its new address.
Note: The Cv1 of the Crane decoder is programmed according to the Configuration Variables.
10
CONFIGURATION VARIABLES:
Trolley / Hoist Decoder
Config. Variables
Function
Range
CV1
CV1
CV1
CV5
CV2
CV3
CV4
CV55
CV56
CV57
CV58
CV61
CV60
CV59
CV120
Local address, Crane 1
Local address, Crane 2
Local address, Crane 3
Trolley Motor, maximum speed
Trolley Motor, start voltage
Trolley Motor, acceleration time
Trolley Motor, deceleration time
Hoisting machine, Down Speed
Hoisting machine, Up Speed
Turn Mechanism, Turn right speed
Turn Mechanism, Turn left speed
Magnet on
Magnet function mapping
Search Light function mapping
Address Change CV (write only)
1-99
1-99
1-99
1-255
1-255
1-255
1-255
1-255
1-255
1-255
1-255
1-255
1-255
1-255
1-3
Default Setting
4
6
8
255
48
0
0
100
100
80
80
255
1
2
-
Value
4
6
8
255
48
0
0
8.0 V
8.0 V
6.5 V
6.5 V
16.0 V
1
2
-
Gantry Decoder
Config. Values
Function
Range
CV1
CV1
CV1
CV5
CV2
CV3
CV4
CV58
CV60
CV120
Local address, Crane 1
Local address, Crane 2
Local address, Crane 3
Gantry Motor, maximum speed
Gantry Motor, start voltage
Gantry Motor, acceleration time
Gantry Motor, deceleration time
Gantry Light function mapping
Flash Light config
Address Change CV (write only)
1-99
1-99
1-99
1-255
1-255
1-255
1-255
1-255
0-44
1-3
Defaut Setting
5
7
9
255
48
0
0
4
33
-
Value
5
7
9
255
48
0
0
4 (F2)
33
-
11
FEATURES
! Each movement can be adjusted by the user in 9 individual speedsteps.
! Gantry floodlight for the whole working area under the crane.
! Operator crane spotlights.
! 1 control unit can control up to 3 container cranes.
! 3 containers can be stacked.
! Extra add-on base elements for longer movements.
(No practical track length limitation, except power loss)
! The crane base is extremely flexible to allow endless combinations of railway
tracks, roadbeds and storage.
! Additional containers can be purchased.
! You can use all your favourite containers by adding a metal adapter
(available as optional accessory) inside.
! The crane can be controlled by an existing DCC-system.
! Unique control system makes it possible to move the gantry and the trolley
at the same time.
! Change of digital address: treat the crane as an ordinary locomotive.
! The crane is designed with asymmetrical gantry boom to allow harbour
operation with container ships.
! The crane may be powered and controlled via the nearest available powered
track (which means less wiring) if you operate via DCC.
! This system offers true ‘turn key’ operation: no wiring between track and
gantry as well as between gantry and trolley.
! User friendly operation also with several cranes on the layout: just twin-key
toggle on the control unit.
KEEP TRACKS AND WHEELS CLEAN!
12
ACCESSORIES
Containerterminal
BASE ELEMENT EXTENSION SET
#19858904
Base Element Extension Set
2 central sections (33 x 22,6 cm)
4 rail connectors, 16 screws, 4 fittings
This set will extend your basic Container Terminal
Set.
#19858905
Track Extension Set
2 OO Scale tracks (each 22.6 cm long)
8 rail connectors
For the installation of additional tracks in your
Container Terminal.
#19858903
HELJAN Containers
4 Containers with metal adapter installed
#19858906
Metal adapters for containers
5 metal adapters
After installing a metal adapter in an existing
container, this can be used in the Container
Terminal
13
14
ELECTRONIC TURNTABLE
Detailed bridge with arch
Weathered one-piece pit
n Motorized gear drive
n Holds engines up to 315 mm long
n Programmable indexing for 60 positions
n
n
OO
ACCESSORIES
#89011 (DC)
#89012 (AC)
#858902
4 connecting tracks for
Märklin C-tracks
#858901
4 connecting tracks for
Märklin K-tracks
15
The container revolutionized global transportation. It is
efficient and flexible: once the cargo is placed in the container it
can be carried by train, by truck or on a ship. Whenever the
container is to be moved from a train onto a truck or a ship this is
done by the container crane which is the key to the whole
operation.
The HELJAN digital Container Terminal opens up an exiting
new world of entertainment and model reality.
REBSLAGERVEJ 6
DK-5472 SØNDERSØ
TLF. + 45 64 89 11 88
[email protected]