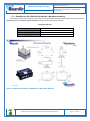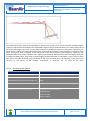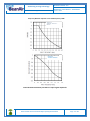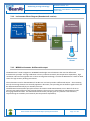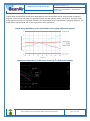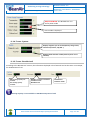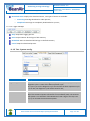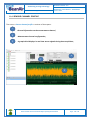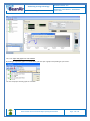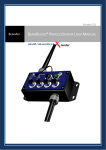
1
“Rethinking sensing technology” Document type : User Manual Document version : 2.6 BeanDevice® User Manual – SmartSensor product lines Version 2.5 SMARTSENSOR USER MANUAL AX-3D/AX-3DS/HI-INC/AX-3D XRange/HI-INC XRange Please consider the environnement before printing this document. Page : 1 / 152 “Rethinking sensing technology” Document type : User Manual Document version : 2.6 BeanDevice® User Manual – SmartSensor product lines DOCUMENT Document number Version External Reference Last Publication date Author 2.6 29/11/2014 Maxime Obr. Document code Document Name Project Code BeanDevice® User Manual – SmartSensor product lines VALIDATION Function Recipients Writer Maxime Obr. Reader Mohamed-Yosri Jaou. Approbation Christophe Dont. Validation Information X X DIFFUSION Function Recipients Reader 1 Mohamed-Yosri Jaou., Software Architect Reader 2 Christophe DONTEGREUIL, Technical support engineer Please consider the environnement before printing this document. Validation Action X X Page : 2 / 152 “Rethinking sensing technology” Document type : User Manual Document version : 2.6 BeanDevice® User Manual – SmartSensor product lines Updates Version Date Author 1.6 25/11/2010 Christophe Dontegreuil 1.7 16/02/2011 Christophe Dontegreuil 1.8 28/08/2011 Christophe Dontegreuil 1.9 08/12/2011 Christophe Dontegreuil Evolution & Status OTAC parameters description added New Hardware Version added Datalogger feature added BeanDevice® mounting process added Sensor position inside the casing picture added SDD (Smart Shock Detection) Added 2.0 03/02/2012 Christophe Dontegreuil 2.1 26/06/2012 Christophe Dontegreuil 2.2 15/11/2012 Christophe Dontegreuil 2.3 10/03/2013 2.4 BeanDevice® HI-INC accuracy considerations BeanDevice® mounting New version of the streaming mode Primary Cell replacement instructions and Calibration added Christophe Dontegreuil XRange version added 22/05/2014 Christophe Dontegreuil Detailed informations about log files creation & management 2.5 29/11/2014 Maxime Obr. TimeSync function description Log folder organization added 2.6 29/10/2015 Maxime Obr. Sensor calibration section added Please consider the environnement before printing this document. Page : 3 / 152 “Rethinking sensing technology” Document type : User Manual Document version : 2.6 BeanDevice® User Manual – SmartSensor product lines Contents 1. TECHNICAL SUPPORT .................................................................................................................................. 10 2. VISUAL SYMBOLS DEFINITION .................................................................................................................... 11 3. ACRONYMS AND ABBREVIATIONS ............................................................................................................. 12 4. RELATED DOCUMENTS & VIDEOS .............................................................................................................. 13 4.1 Applications Notes ................................................................................................................................... 13 4.2 Technical Notes ....................................................................................................................................... 14 4.3 Related videos ......................................................................................................................................... 15 5. BEANDEVICE® VERSIONS ........................................................................................................................... 16 6. DOCUMENT ORGANISATION ....................................................................................................................... 17 7. BEANDEVICE® PRODUCT DESCRIPTION .................................................................................................. 18 7.1 BeanDevice® AX-3D ............................................................................................................................... 19 7.1.1 Featured video ............................................................................................................................... 19 7.1.2 Main features ................................................................................................................................. 19 7.1.3 Applications ................................................................................................................................... 19 7.2 BeanDevice® HI-INC (Wireless Inclinometer) ........................................................................................ 21 7.2.1 Featured video ............................................................................................................................... 21 7.2.2 Main features ................................................................................................................................. 21 7.2.3 Applications ................................................................................................................................... 22 7.3 BeanDevice® AX-3DS (Wireless shock sensor) ..................................................................................... 23 7.3.1 Featured video ............................................................................................................................... 23 7.3.1 Main features ................................................................................................................................. 23 7.3.2 Applications ................................................................................................................................... 23 7.4 BeanDevice® AX-3D XRange (High Performance Wireless Accelerometer) ......................................... 24 7.4.1 Featured video ............................................................................................................................... 24 7.4.2 Main features ................................................................................................................................. 24 7.5 BeanDevice® HI-INC Xrange (High performance wireless inclinometer) ............................................... 25 7.5.1 Main features ................................................................................................................................. 25 7.6 Technical specifications........................................................................................................................... 26 7.6.1 Beandevice® AX-3D ...................................................................................................................... 26 7.6.2 Beandevice® AX-3DS ................................................................................................................... 29 7.6.3 Beandevice® HI-INC ..................................................................................................................... 32 7.6.4 Beandevice® AX-3D XRange ........................................................................................................ 35 Please consider the environnement before printing this document. Page : 4 / 152 “Rethinking sensing technology” Document type : User Manual Document version : 2.6 BeanDevice® User Manual – SmartSensor product lines 7.6.5 Beandevice® HI-INC XRange ....................................................................................................... 38 7.7 Product focus ........................................................................................................................................... 40 7.7.1 Casing description ......................................................................................................................... 40 7.7.2 Leds description ............................................................................................................................. 42 7.7.3 BeanDevice® AX-3DS/AX-3D/HI-INC/INC - Mechanical drawing ................................................ 43 7.7.1 BeanDevice® AX-3D/HI-INC/INC Xrange - Mechanical drawing .................................................. 44 7.7.2 Antenna diversity ........................................................................................................................... 44 7.7.3 Radome antenna ........................................................................................................................... 45 7.8 BeanDevice® AX-3D & AX-3D Xrange: Sensor Characteristics ............................................................. 47 7.8.1 Sensor architecture ........................................................................................................................ 47 7.8.2 MEMS Accelerometer .................................................................................................................... 48 7.8.3 5th order Anti-aliasing filter ............................................................................................................. 48 7.8.3.1 Why using an anti-aliasing filter ? ................................................................................ 48 7.8.3.2 Anti-aliasing filter features ........................................................................................... 49 7.8.1 Analog Digital Converter ................................................................................................................ 51 7.9 BeanDevice® HI-INC & HI-INC Xrange : Sensor Characteristics ........................................................... 52 7.9.1 Inclinometer Block Diagram (Beandevice® HI-INC ±30° and ±15° versions) ............................... 52 7.9.2 Inclinometer Block Diagram (Beandevice® version) ..................................................................... 53 7.9.3 MEMS Inclinometer & differential output ....................................................................................... 53 7.9.4 5th order Anti-aliasing filter ............................................................................................................. 54 7.9.5 Analog to digital converter ............................................................................................................. 54 7.9.6 Accuracy considerations ................................................................................................................ 54 7.9.7 Offset & temperature dependencies .............................................................................................. 54 7.10 Beandevice® AX-3DS: Sensor Characteristics ....................................................................................... 56 7.10.1 Mems Sensor architecture ............................................................................................................. 56 7.10.2 Shock detection interrupt ............................................................................................................... 56 7.10.3 Beandevice® current consumption in sleeping mode with SSD activated (Smart shock detection)57 7.11 Sensor position inside the casing ............................................................................................................ 58 7.11.1 BeanDevice® AX-3D ..................................................................................................................... 58 7.12 Mounting Guidelines ................................................................................................................................ 60 7.12.1 Adhesive mounting instructions (BeanDevice® INC, HI-INC, AX-3D, AX-3DS) ........................... 60 7.12.1.1 Components needed for a non-permanent mounting .................................................. 60 7.12.1.2 Reference edge ........................................................................................................... 61 7.12.1.3 Mounting instructions for non-permanent mounting .................................................... 62 7.12.2 Screw Mounting (Beandevice® AX-3D Xrange & Beandevice® HI-INC Xrange) ......................... 66 7.12.3 Wireless inclinometer special instructions (BeanDevice® HI-INC, INC & HI-INC Xrange) ........... 67 7.13 BeanDevice® Power Supply ................................................................................................................... 67 7.13.1 Integrated Lithium-ion Rechargeable battery ................................................................................ 67 7.13.2 External Primary cell (option) ........................................................................................................ 68 7.13.2.1 Primary cell specifications ........................................................................................... 68 7.13.2.2 Main advantages of primary cell .................................................................................. 69 7.13.3 AC-To-DC power adapter (option) ................................................................................................. 70 7.13.4 External Power supply wiring code ................................................................................................ 71 8. SENSOR CALIBRATION ................................................................................................................................. 72 Please consider the environnement before printing this document. Page : 5 / 152 “Rethinking sensing technology” Document type : User Manual 9. Document version : 2.6 BeanDevice® User Manual – SmartSensor product lines DATA ACQUISITION MODE DESCRIPTION ................................................................................................. 73 10. BEANDEVICE® DEPLOYMENT GUIDELINE ................................................................................................. 74 10.1 Power Mode Management ...................................................................................................................... 74 10.2 BeanDevice® Network Association ......................................................................................................... 74 10.3 DataLogger function ................................................................................................................................ 74 10.4 OTAC (Over-the-air-Configuration) process ........................................................................................... 74 10.5 Factory settings ....................................................................................................................................... 75 10.6 How to change and calibrate the Primary cell on the Beandevice® ....................................................... 76 11. BEANDEVICE® SUPERVISION FROM THE BEANSCAPE®........................................................................ 84 11.1 Starting the BeanScape® ........................................................................................................................ 84 11.2 Displaying the BeanDevice® Informations .............................................................................................. 85 11.2.1 Frame: Identity ............................................................................................................................... 86 11.2.2 Frame : Wireless Network Diagnostic ........................................................................................... 86 11.2.3 Frame : Internal diagnostic ............................................................................................................ 87 11.2.4 Frame : System ............................................................................................................................. 89 11.2.5 Frame : BeanDevice® ................................................................................................................... 89 11.2.6 Frame : Product Version ................................................................................................................ 90 11.2.7 Frame : Current Data Acquisition mode ........................................................................................ 90 11.2.8 Frame : Battery/Primary Cell status ............................................................................................... 90 11.3 BeanDevice® configuration ..................................................................................................................... 92 11.3.1 Tab: Custom Display ..................................................................................................................... 93 11.3.2 Tab: Notes ..................................................................................................................................... 94 11.3.3 Tab : Data Acquisition configuration .............................................................................................. 95 11.3.4 Tab: DataLogger ............................................................................................................................ 98 11.3.4.1 Logger status ............................................................................................................... 98 11.3.4.2 Logger manager .......................................................................................................... 99 11.3.5 Tab : System config. ...................................................................................................................... 99 11.3.6 Tab : Power mode management ................................................................................................. 102 11.3.7 Tab : AllGraph .............................................................................................................................. 104 11.4 Sensor channel profile ........................................................................................................................... 105 11.4.1 Sensor channel status ................................................................................................................. 106 11.4.1.1 Frame : General informations .................................................................................... 106 11.4.1.2 Frame: Measurement data ........................................................................................ 106 11.4.1.3 Frame : Alarm threshold ............................................................................................ 107 11.4.2 Sensor channel configuration ...................................................................................................... 108 11.4.2.1 Tab: Custom display .................................................................................................. 109 11.4.2.2 Tab : Notes ................................................................................................................ 111 11.4.2.3 Tab: Configuration - BeanDevice® AX-3D and BeanDevice® HI-INC ...................... 112 11.4.2.4 Tab: Configuration - BeanDevice® AX-3DS .............................................................. 113 11.4.2.5 Tab : Sensor calibration ............................................................................................. 118 11.4.2.6 Tab: Log configuration ............................................................................................... 119 11.4.3 Graphical display ......................................................................................................................... 120 11.4.3.1 Frame: Marks ............................................................................................................ 123 Please consider the environnement before printing this document. Page : 6 / 152 “Rethinking sensing technology” Document type : User Manual Document version : 2.6 BeanDevice® User Manual – SmartSensor product lines 11.4.3.2 Frame: Symbols ........................................................................................................ 123 11.4.3.3 Frame : Scale............................................................................................................. 125 11.5 Datalogger configuration ....................................................................................................................... 126 11.6 Log file & folder organization (for experienced user user) .................................................................... 126 11.6.1 Log file system overview.............................................................................................................. 126 11.6.2 Log file directory .......................................................................................................................... 126 11.6.3 Log folder ..................................................................................................................................... 128 11.6.4 Log file size configuration ............................................................................................................ 129 11.6.5 Log file generation ....................................................................................................................... 130 11.6.6 Cache Data configuration (for Graph) ......................................................................................... 130 11.6.7 Log file related to data acquisition ............................................................................................... 131 11.6.7.1 Log filename root ....................................................................................................... 131 11.6.7.2 Specific case: log filename creation in “Streaming”/”Streaming Packet” mode ........ 132 11.6.7.3 Log file analysis ......................................................................................................... 133 11.6.8 Log file related to Wireless Network diagnostic ........................................................................... 133 11.6.8.1 Log filename organization .......................................................................................... 133 11.6.8.2 Log file analysis ......................................................................................................... 133 12. BEANDEVICE® MAINTENANCE & SUPERVISION (FOR EXPERIENCED USER) ................................... 135 12.1 Extending battery life ............................................................................................................................. 135 12.2 Over-the-air Configuration (OTAC) parameters backed up on Flash ................................................... 136 12.2.1 Level 1: End-user OTAC parameters .......................................................................................... 138 12.2.2 Level 2: Sensor calibration parameters ....................................................................................... 139 12.2.3 Level 3: Network maintenance (only for expert in wireless sensor networks) ............................. 140 12.2.4 Level 4: Primary cell/Rechargeable battery calibration ............................................................... 140 12.3 Network diagnostic from your BeanScape® software ........................................................................... 141 12.3.1 Displaying Network information ................................................................................................... 141 12.3.1.1 Packet Error Rate ...................................................................................................... 142 12.3.1.2 LQI (Link Quality Indicator ) ....................................................................................... 142 12.3.1.3 Internal temperature monitoring ................................................................................. 143 12.3.1.4 Battery charge monitoring .......................................................................................... 143 12.3.1 System maintenance ................................................................................................................... 143 12.3.1 Scrolling menu « BeanSensor » .................................................................................................. 145 12.3.1.1 Disable/Enable log ..................................................................................................... 146 12.3.1.2 Buffer reset ................................................................................................................ 146 12.3.1.3 Open the graph in a new window .............................................................................. 147 13. TROUBLESHOOTING ................................................................................................................................... 149 14. INSTALLATION PROCEDURES ................................................................................................................... 151 14.1 Sealing ................................................................................................................................................... 151 14.2 Coexistence With others Frequencies at 2.4 GHz ................................................................................ 151 14.3 TempErature & Humidity ....................................................................................................................... 151 14.4 Reflections, Obstructions and Multipath ................................................................................................ 152 14.5 shock & Vibration resistance ................................................................................................................. 152 Please consider the environnement before printing this document. Page : 7 / 152 “Rethinking sensing technology” Document type : User Manual Document version : 2.6 BeanDevice® User Manual – SmartSensor product lines 14.6 Antenna ................................................................................................................................................. 152 Please consider the environnement before printing this document. Page : 8 / 152 “Rethinking sensing technology” Document type : User Manual Document version : 2.6 BeanDevice® User Manual – SmartSensor product lines Disclaimer The information contained in this document is the proprietary information of BeanAir. The contents are confidential and any disclosure to persons other than the officers, employees, agents or subcontractors of the owner or licensee of this document, without the prior written consent of BeanAir Ltd, is strictly prohibited. BeanAir makes every effort to ensure the quality of the information it makes available. Notwithstanding the foregoing, BeanAir does not make any warranty as to the information contained herein, and does not accept any liability for any injury, loss or damage of any kind incurred by use of or reliance upon the information. BeanAir disclaims any and all responsibility for the application of the devices characterized in this document, and notes that the application of the device must comply with the safety standards of the applicable country, and where applicable, with the relevant wiring rules. BeanAir reserves the right to make modifications, additions and deletions to this document due to typographical errors, inaccurate information, or improvements to programs and/or equipment at any time and without notice. Such changes will, nevertheless be incorporated into new editions of this document. Copyright: Transmittal, reproduction, dissemination and/or editing of this document as well as utilization of its contents and communication thereof to others without express authorization are prohibited. Offenders will be held liable for payment of damages. All rights are reserved. Copyright © BeanAir GmBh 2015 Please consider the environnement before printing this document. Page : 9 / 152 “Rethinking sensing technology” Document type : User Manual Document version : 2.6 BeanDevice® User Manual – SmartSensor product lines 1. TECHNICAL SUPPORT For general contact, technical support, to report documentation errors and to order manuals, contact BeanAir Technical Support Center (BTSC) at: [email protected] For detailed information about where you can buy the BeanAir equipment/software or for recommendations on accessories and components visit: www.beanair.com To register for product news and announcements or for product questions contact BeanAir’s Technical Support Center (BTSC). Our aim is to make this user manual as helpful as possible. Please keep us informed of your comments and suggestions for improvements. BeanAir appreciates feedback from the users. Please consider the environnement before printing this document. Page : 10 / 152 “Rethinking sensing technology” Document type : User Manual Document version : 2.6 BeanDevice® User Manual – SmartSensor product lines 2. VISUAL SYMBOLS DEFINITION Symbols Definition Caution or Warning – Alerts the user with important information about BeanAir wireless sensor networks (WSN), if this information is not followed, the equipment /software may fail or malfunction. Danger – This information MUST be followed if not you may damage the equipment permanently or bodily injury may occur. Tip or Information – Provides advice and suggestions that may be useful when installing BeanAir Wireless Sensor Networks. Please consider the environnement before printing this document. Page : 11 / 152 “Rethinking sensing technology” Document type : User Manual Document version : 2.6 BeanDevice® User Manual – SmartSensor product lines 3. ACRONYMS AND ABBREVIATIONS AES Advanced Encryption Standard CCA Clear Channel Assessment CSMA/CA Carrier Sense Multiple Access/Collision Avoidance GTS Guaranteed Time-Slot kSps Kilo samples per second LLC Logical Link Control LQI Link quality indicator LDCDA Low duty cycle data acquisition MAC Media Access Control PAN Personal Area Network PER Packet error rate RF Radio Frequency SD Secure Digital WSN Wireless sensor Network Please consider the environnement before printing this document. Page : 12 / 152 “Rethinking sensing technology” Document type : User Manual Document version : 2.6 BeanDevice® User Manual – SmartSensor product lines 4. RELATED DOCUMENTS & VIDEOS In addition to this User manual, please consult the related application notes, technical notes and videos: 4.1 APPLICATIONS NOTES Document name (Click on the weblink) Related product AN_RF_007 :“ Beanair_WSN_Deployment“ All BeanAir products Wireless sensor guidelines AN_RF_006 – „How to extend your wireless range“ All BeanAir products A guideline very useful for extending your wireless range AN_RF_005 – BeanGateway® & Data Terminal Equipment Interface BeanGateway® Description DTE interface BeanGateway® networks Architecture deployment on the All BeanAir products Coexistence & interferences of different RF technologies in the 2.4 GHz frequencies band. AN_RF_003 - “IEEE 802.15.4 2.4 GHz Vs 868 MHz” All BeanAir products Comparison between 868 MHz frequency band and a 2.4 GHz frequency band. AN_RF_002 – “Structural Health monitoring on bridges” All BeanAir products The aim of this document is to overview Beanair® products suited for bridge monitoring, their deployment, as well as their capacity and limits by overviewing various data acquisition modes available on each BeanDevice®. AN_RF_004 – “Coexistence And [email protected]” Please consider the environnement before printing this document. Page : 13 / 152 “Rethinking sensing technology” BeanDevice® User Manual – SmartSensor product lines Document type : User Manual 4.2 Document version : 2.6 TECHNICAL NOTES Document name (Click on the weblink) Related product Description TN_RF_010 – « BeanDevice® Power Management » All the BeanDevice® This technical note describes the sleeping & active power mode on the BeanDevice®. TN_RF_009 – « BeanGateway® management on LAN infrastructure » BeanGateway® BeanGateway® integration on a LAN infrastructure TN_RF_008 – “Data acquisition modes available on the BeanDevice®” All the BeanDevice® Data acquisition modes available on the BeanDevice® TN_RF_007 – “BeanDevice® DataLogger User Guide ” All the BeanDevice® This document presents the DataLogger feature on the BeanDevice® TN_RF_006 – “WSN Association process” All the BeanDevice® Description of the BeanDevice® network association TN_RF_005 – “Pulse counter & binary data acquisition on the BeanDevice® SUN-BN” BeanDevice® SUN-BN This document presents Pulse counter (ex: energy metering application) and binary data acquisition features on the BeanDevice® SUN-BN. Technical description of the Ambient light sensor available on the BeanDevice® SUNSUN-XX XX products TN_RF_004 - Ambient Light sensor technical specifications BeanDevice® (Ecosensor) RF_TN_003- “Aggregation capacity of wireless sensor networks” All the products Network capacity characterization Beanair Wireless Sensor Networks RF_TN_002 V1.0 - Current consumption in active & sleeping mode BeanDevice® Current consumption estimation of the BeanDevice in active and sleeping mode RF_TN_001 V1.0- Wireless range benchmarking BeanDevice® Wireless range benchmarking of the BeanDevice® Please consider the environnement before printing this document. Page : 14 / 152 of “Rethinking sensing technology” Document type : User Manual 4.3 Document version : 2.6 BeanDevice® User Manual – SmartSensor product lines RELATED VIDEOS All the videos are available on our Youtube channel Beanair video link (Youtube) Company Presentation Related products All BeanGateway® - Ethernet Outdoor version introduction BeanGateway® - Ethernet Outdoor version introduction BeanGateway® – Ethernet Indoor version presentation BeanGateway® Ethernet Indoor version Beandevice® AN-XX wireless range demonstration BeanDevice® AN-XX & Beandevice® AN-XX Extender BeanDevice® AN-XX presentation BeanDevice® AN-XX & Beandevice® AN-XX Extender BeanDevice® AX-3D presentation BeanDevice® AX-3D BeanDevice® HI-INC presentation BeanDevice® HI-INC BeanDevice® AX-3DS presentation BeanDevice® AX-3DS BeanScape® – WSN supervision software BeanScape® BeanGateway® Ethernet/LAN Configuration, directly connected to the Laptop/PC BeanGateway® Performing an energy scan on your BeanGateway® BeanGateway® Automatic RF Channel selection BeanGateway® Wireless sensors profile deletion from the BeanGateway® Database All Network Diagnostic configuration on the BeanGateway® BeanGateway® RF Power configuration on the BeanGateway® BeanGateway® Please consider the environnement before printing this document. Page : 15 / 152 “Rethinking sensing technology” Document type : User Manual Document version : 2.6 BeanDevice® User Manual – SmartSensor product lines 5. BEANDEVICE® VERSIONS V (version) related to a major modification of the embedded software. R (Release) related to a minor modification of the embedded software Hardware BeanDevice® AX-3D Embedded Software V4R0 – Time Sync function added Wireless Stack IEEE 802.15.4 R0 BeanDevice® HI-INC BeanDevice® AX-3DS V1R2 : Push button ON/OFF activation V1R3: reed sensor ON/OFF activation These ID versions should be transmitted to our technical support center when you encountered a material or software dysfunction. Please consider the environnement before printing this document. Page : 16 / 152 “Rethinking sensing technology” Document type : User Manual Document version : 2.6 BeanDevice® User Manual – SmartSensor product lines 6. DOCUMENT ORGANISATION This manual is organized in 7 chapters, as follows: BeanDevice® product overview Data acquisition mode description BeanDevice® installation guidelines BeanDevice® supervision from the Beanscape® BeanDevice® maintenance & supervision (for experienced user) Troubleshooting Installation procedures •Details the BeanDevice® product presentation •Details the data acquisition mode available on the BeanDevice® • Related Technical Note: TN_RF_008 - "Data acquisition mode available on the BeanDevice®" •Details the installation guidelines of the BeanDevice® •Related Technical Note: TN_RF_010 - "Beandevice® Power Management " •Related Technical Note: TN_RF_007- "Beandevice® DataLogger user Guide" •Related Technical Note: TN_RF_006- "Beandevice® wireless network association" •Details the BeanDevice® supervision from the BeanScape® •Details the BeanDevice® maintenance (for experienced user) •Frequently asked questions •Details the installation procedures Please consider the environnement before printing this document. Page : 17 / 152 “Rethinking sensing technology” Document type : User Manual Document version : 2.6 BeanDevice® User Manual – SmartSensor product lines 7. BEANDEVICE® PRODUCT DESCRIPTION It is highly recommended to read all the user manual related to BeanAir software & equipment (BeanScape ®, BeanGateway®, BeanDevice®) before getting start your BeanDevice®. Use only accessories supplied by BeanAir (batteries, power supply unit, and antenna). Use of other materials may damage the BeanDevice®; Only BeanAir is qualified to make changes on the BeanDevice®; Don’t try to remove the adhesive label on the product; it contains important information such as the MAC address or sensor measurement range BeanDevice® Smart sensor product lines were designed by our R&D team in order to be adapted for shock, acceleration, vibration, oscillation measurement in harsh industrial environment. Please consider the environnement before printing this document. Page : 18 / 152 “Rethinking sensing technology” Document type : User Manual 7.1 7.1.1 Document version : 2.6 BeanDevice® User Manual – SmartSensor product lines BEANDEVICE® AX-3D Featured video Click here 7.1.2 Main features Main Features Wireless Tri-axis accelerometer based on MEMS Technology Measurement range: ±2g, ±10g Very Low noise Density: 45 µg/√Hz (±2g version), 100 µg/√Hz (±10g version), Excellent radio link thanks to the radio antenna diversity developed by BeanAir® Maximum sampling rate: 3 KSPS TimeSync function : Time Synchronization through wireless sensor network Maximum Radio Range : 500 m (L.O.S) Ultra-Power Radio Technology IEEE 802.15.4 Current consumption in idle mode : < 30 uA Embedded logger : up to 1 million data points (with events dating) Entirely autonomous system with an integrated Lithium-Ion battery charger Anti-aliasing Butterworth filter (5th order) with a cut-off frequency of 1 Hz to 2 KHz (remotely programmable from the BeanScape®) Watertight aluminum enclosure IP66 (dimensions Lxlxh : 80x55x21 mm - weight 145g rechargeable battery included) - suitable for Harsh Industrial Environment 7.1.3 Applications Dynamic measurement on embedded equipment Vibration analysis Inertial measurement Please consider the environnement before printing this document. Page : 19 / 152 “Rethinking sensing technology” Document type : User Manual Document version : 2.6 BeanDevice® User Manual – SmartSensor product lines Movement and Shock detection Structural health monitoring Please consider the environnement before printing this document. Page : 20 / 152 “Rethinking sensing technology” Document type : User Manual 7.2 Document version : 2.6 BeanDevice® User Manual – SmartSensor product lines BEANDEVICE® HI-INC (WIRELESS INCLINOMETER) 7.2.1 Featured video Click here 7.2.2 Main features Main Features BeanDevice® HI-INC:Wireless Inclinometer Wireless Inclinometer based on MEMS Technology Measurement range: o mono-axis or bi-axis ±15° o mono-axial or bi-axis ±30° o bi-axis +/-90° Excellent resolution: o 0,001° for ±15° & ±30° version o 0,0025° for ±90° version TimeSync function : Time Synchronization through wireless sensor network Excellent radio link thanks to the antenna diversity developed by BeanAir® Streaming mode: 200 SPS on each channel Maximum Radio Range : 500 m (L.O.S) Ultra-Power Radio Technology IEEE 802.15.4 Current consumption in idle mode : < 30 uA Embedded logger : up to 1 000 000 data acquisition records (with events dating) Entirely autonomous system with an integrated Lithium-Ion battery charger Anti-aliasing Butterworth filter (5th order) with a cut-off frequency of 1 Hz to 2 KHz (remotely programmable from the BeanScape®) Watertight Aluminium enclosure IP66 Dimensions LxWxH : 80x55x21 mm—weight 145g (rechargeable battery included) -suitable for Harsh Industrial Environment Please consider the environnement before printing this document. Page : 21 / 152 “Rethinking sensing technology” Document type : User Manual 7.2.3 Document version : 2.6 BeanDevice® User Manual – SmartSensor product lines Applications Platform Leveling and stabilization Laser level rotation Slope measurement (Building, infrastructure & construction) Oil drilling Axial rotor measurement Please consider the environnement before printing this document. Page : 22 / 152 “Rethinking sensing technology” Document type : User Manual 7.3 7.3.1 Document version : 2.6 BeanDevice® User Manual – SmartSensor product lines BEANDEVICE® AX-3DS (WIRELESS SHOCK SENSOR) Featured video Click here to see our featured video 7.3.1 Main features Main Features Wireless tri-axis accelerometer Scalable measurement range (two versions) : ±6g/±12g/±24g or ±2g/±4g/±8g Excellent radio link thanks to the antenna diversity developed by Beanair® Advanced and smart shock detection Non contact actuation for faster installation Maximum sampling rate: 3 KSPS (maximum) Maximum radio range : 500 m (L.O.S) Ultra-Low Power Radio Technology IEEE 802.15.4 Current consumption during deep sleeping mode : < 28 uA Embedded Data Logger : up to 1 million data points Entirely autonomous system with an integrated Lithium-Ion battery charger Watertight aluminium enclosure IP66 (dimensions LxWxH : 80x55x21mm)—weight 135g (rechargeable battery included) -suitable for Harsh Industrial Environment 7.3.2 Applications Health and usage monitoring systems (HUMS) Shock measurement on vehicles & trains Transportation Monitoring Drop testing Crash and impact testing Ride Quality Measurement Please consider the environnement before printing this document. Page : 23 / 152 “Rethinking sensing technology” Document type : User Manual 7.4 BEANDEVICE® AX-3D ACCELEROMETER) 7.4.1 XRANGE Document version : 2.6 BeanDevice® User Manual – SmartSensor product lines (HIGH PERFORMANCE WIRELESS Featured video Watch our fetaured video 7.4.2 Main features Main Features Wireless Tri-axis accelerometer based on MEMS Technology Measurement range (2 versions): ±2g & ±10g Very Low noise Density: o 45 µg/√Hz (± 2g version) o 100 µg/√Hz (± 10g version) TimeSync function : Time Synchronization through wireless sensor network Watertight IP67 aluminum enclosure coming with a rugged base plate and three-point-mounting Excellent radio link relying on the radio antenna diversity developed by Beanair® Non contact actuation for quick mounting Maximum sampling rate: 4 KSPS Maximum Radio Range : 650 m (L.O.S) Ultra-Power radio technology IEEE 802.15.4 Current consumption in sleeping mode : < 30 µA Embedded data logger : up to 8 millions data points OPC server allowing real time access from your IT system to the BeanScape® (available on BeanScape® Premium+ ) Entirely autonomous system with an integrated Lithium-Ion battery charger Anti-aliasing Butterworth filter (5th order) with a cut-off frequency of 1 Hz to 2 KHz (remotely programmable from the BeanScape®) Free Scilab scripts for FFT and PPV filtering Fully calibrated sensor Please consider the environnement before printing this document. Page : 24 / 152 “Rethinking sensing technology” Document type : User Manual 7.5 BEANDEVICE® HI-INC INCLINOMETER) 7.5.1 XRANGE Document version : 2.6 BeanDevice® User Manual – SmartSensor product lines (HIGH PERFORMANCE WIRELESS Main features Main Features Wireless Inclinometer based on MEMS Technology Measurement range: ±15° & ±30° (mono-axis & bi-axis) Excellent resolution (0.001°) & accuracy (±0.05°) Temperature compensated sensor Excellent radio link thanks to the antenna diversity developed by Beanair® Non contact actuation for quick mounting Maximum sampling rate: 200 SPS Maximum radio range : 650m (L.O.S) Ultra-Power Radio Technology IEEE 802.15.4 Current consumption in sleeping mode : < 30 µA Embedded data Logger : up to 8 millions data points OPC server allowing real time access from your IT system to the BeanScape® (available on BeanScape® Premium+) Entirely autonomous system with an integrated Lithium-Ion battery charger Watertight IP67 aluminum enclosure coming with a rugged base plate and three-point-mounting Anti-aliasing Butterworth filter (5th order) with a cut-off frequency of 1 Hz to 100Hz (remotely programmable from the BeanScape®) Fully calibrated sensor Please consider the environnement before printing this document. Page : 25 / 152 “Rethinking sensing technology” Document type : User Manual 7.6 Document version : 2.6 BeanDevice® User Manual – SmartSensor product lines TECHNICAL SPECIFICATIONS 7.6.1 Beandevice® AX-3D Product reference MR – Measurement Range: 2 : ±2g measurement range 10 : ±10g measurement range 13: ±13g measurement range BND-AX3D -MRG –WP WP– Wireless Technology - IEEE : IEEE 802.15.4 (2006) Example: BND-AX3D-10G-IEEE—Wireless Accelerometer with 10g measurement range , IEEE 802.15.4 Wireless Technology Accelerometer Specifications Accelerometer technology MEMS technology triaxial accelerometer Sensitivity ±2g Version : 16384 counts/g ±10g version: 3277 counts/g ±13g version: 2521 counts/g Typical non-linearity ±0.1% FS Analog to Digital converter 16-bits, SAR architecture (Successive Approximation Register) with temperature compensation Sensor frequency response (-3 dB) 0 to 800 Hz Noise spectral density ±2g Version : 45 µg/√Hz ±10g version: 100 µg/√Hz ±13g version: 100 µg/√Hz Zero-g Offset Variation from RT over Temp ±2g Version : ±0.2 mg/°C ±10g version: ±0.1 mg/°C ±13g version: ±0.1 mg/°C Sensitivity Variation from RT over Temp ±2g Version : ±0.01 %/°C (XY) , ±0.02 %/°C (Z) ±10g version: ±0.01 %/°C ±13g version: ±0.01 %/°C Offset Ratiometric Error ±2g Version : 4mg ±10g version: ±0.2% (XY) , ±0.1% (Z) ±13g version: ±0.5% Sensitivity Ratiometric Error ±2g Version : ±1.25 % (X-Y) , ±0.2 % (Z) ±10g Version : ±1.6% (X-Y) , ±0.2 % (Z) ±13g Version : ±1.6% (X-Y) , ±0.2 % (Z) Cross Axis Sensitivity 2% Please consider the environnement before printing this document. Page : 26 / 152 “Rethinking sensing technology” Document version : 2.6 BeanDevice® User Manual – SmartSensor product lines Document type : User Manual Butterworth 5th order filter – cut-off frequency : 1 Hz to 2000 Hz remotely programmable (BeanScape®) Anti-aliasing filter Over-the-air configuration (OTAC) parameters Data Acquisition mode sample per second) (SPS = Low Duty Cycle Data Acquisition (LDCDA) Mode: 1s to 24 hour Alarm & Survey mode: 1s to 24 hour Streaming Packet Mode Streaming Mode Minimum: 1 SPS Sampling Rate (in streaming packet mode) Maximum: 3 kSPS per axis (one axis activated) 1,5 kSPS per axis (2-axis activated) 1 kSPS per axis (3-axis activated) Alarm Threshold 2 high levels alarms & 2 low levels alarms Programmable Cut-off frequency (Anti-aliasing filter) 1– 2000 Hz Power Mode Sleeping, Sleeping with Network Listening & Active TX Power -7 dBm / -1 dBm / 5 dBm / 11 dBm / 15 dBm / 18 dBm RF Specifications Wireless Protocol Stack IEEE 802.15.4 (2006 version) WSN Topology Point-to-Point / Star Encryption AES 128 bits (AES integrated coprocessor) Data rate 250 Kbits/s RF Characteristics ISM 2.4GHz – 16 Channels. Antenna diversity architecture designed by Beanair® TX Power +0 dBm to +18 dBm Receiver Sensitivity -95.5 dBm to -104 dBm Maximum Radio Range 300m (L.O.S) Antenna Antenna diversity : 2 omnidirectional antenna with a gain of 2,2 dBi Embedded Data logger Storage capacity up to 1 000 000 data acquisition Write/read cycle 400 000 Wireless data downloading 3 minutes to download the full memory (average time) Real Time clock and crystal Real Time Clock Extremely Accurate Real Time Clock for measurement time stamping in Low duty cycle mode (±10ppm) Please consider the environnement before printing this document. Page : 27 / 152 “Rethinking sensing technology” Document type : User Manual Document version : 2.6 BeanDevice® User Manual – SmartSensor product lines Extremely accurate crystal for measurement time stamping in streaming & streaming packet mode Crystal Tolerance ±10ppm, stability ±10ppm Environmental and Mechanical Aluminium & Watertight (IP66) enclosure Dimensions in mm (LxWxH): 80x55x21 mm, Weight (battery included) : 145g 100g during 50 ms Enclosure Shock resistance Operating Temperature Norms -20 °C to +65 °C CE Labelling Directive R&TTE (Radio) ETSI EN 300 328 ROHS - Directive 2002/95/EC Power supply Integrated Lithium-ion battery charger with high precision battery monitoring : Integrated battery charger Current consumption @ 3,3V · Overvoltage Protection, Overcurrent/Short-Circuit Protection, Undervoltage Protection · Battery Temperature monitoring · Current accumulation measurement · During data acquisition : 20 to 30 mA · During Radio transmission : 40 mA @ 0dBm , 80 mA @ 18 dBm · During sleeping : < 30 µA External power supply External power supply : +8v to +28v Rechargeable battery High density Lithium-Ion rechargeable battery with a capacity of 1.3 Ah (referenced as BAT1.3DMG) Option(s) Power-supply bloc Wall plug-in, Switchmode power Supply 12V @ 1,25A with sealed M8 Plug (IP67) Calibration certificate Calibration certificate provided by Beanair A static calibration method is used on a granite surface plate DIN876 Please consider the environnement before printing this document. Page : 28 / 152 Document version : 2.6 “Rethinking sensing technology” BeanDevice® User Manual – SmartSensor product lines Document type : User Manual 7.6.2 Beandevice® AX-3DS Product reference BND-AX3DS -MRG-PS-WP MR – Measurement Range: 24 : ±6/12/24g measurement range 8 : ±2/4/8g measurement range PS - Power supply : RB : Rechargeable battery XT : External Primary cell WP– Wireless Technology : IEEE : IEEE 802.15.4 (2006) Example: BND-AX3DS-24G-RB-IEEE—Wireless Accelerometer with ±6/12/24g measurement range , rechargeable battery, IEEE 802.15.4 Wireless Technology Sensor specifications Accelerometer Technology Scalable measurement range MEMS Technology BND-AX3DS –24G-RB-IEEE Version : ±6g / ±12g/ ±24g BND-AX3DS –8G-RB-IEEE Version ±2g / ±4g/ ±8g The measurement range is remotely programmable (BeanScape®) Measurement resolution BND-AX3DS –24G-IEEE Version : 3 mg/digit @±6g , 6 mg/digit @±12g , 12 mg/digit @±24g BND-AX3DS –8G-IEEE Version : 1mg/digit @±2g , 2 mg/digit @±4g , 3.9 mg/digit @±8g Typical non-linearity ±0,15% Sensitivity change Vs temperature ±0,01% /°C Zero-g level change vs temperature (max delta from 25°C) BND-AX3DS –24G-IEEE Version: ±0,4 mg/°C Typical zero-g level offset accuracy BND-AX3DS –24G-IEEE Version: ±70 mg BND-AX3DS –8G-IEEE Version: ±20 mg Analog to Digital converter Noise spectral density @ BW 10Hz 12-bits with temperature compensation BND-AX3DS –24G-IEEE Version : 650 µg/ √Hz BND-AX3DS –8G-IEEE Version : 218 µg/ √Hz Anti-aliasing filter Butterworth 2th order filter BND-AX3DS –8G-IEEE Version : ±0,1 mg/°C Please consider the environnement before printing this document. Page : 29 / 152 “Rethinking sensing technology” Document version : 2.6 BeanDevice® User Manual – SmartSensor product lines Document type : User Manual Over-the-air configuration (OTAC) parameters Data Acquisition mode (SPS = sample per second) Shock detection function Low Duty Cycle Data Acquisition (LDCDA) Mode: 1s to 24 hour Alarm & Survey mode: 1s to 24 hour Streaming Packet Mode Streaming Mode Shock detection · Shock threshold in mg · Data acquisition sample rate in sleeping mode · Data acquisition sample rate after the shock detection · Shock detection hysteresis Minimum: 1 SPS Sampling Rate (in streaming packet mode) Maximum: 3 kSPS per axis (one axis activated) 1,5 kSPS per axis (2-axis activated) 1 kSPS per axis (3-axis activated) Alarm Threshold 2 high levels alarms & 2 low levels alarms Power Mode Sleeping, Sleeping with Network Listening & Active TX Power -7 dBm / -1 dBm / 5 dBm / 11 dBm / 15 dBm / 18 dBm RF Specifications Wireless Protocol Stack IEEE 802.15.4 (2006 version) WSN Topology Point-to-Point / Star Encryption AES 128 bits (AES integrated coprocessor) Data rate 250 Kbits/s RF Characteristics ISM 2.4GHz – 16 Channels. Antenna diversity architecture designed by Beanair® TX Power +0 dBm to +18 dBm Receiver Sensitivity -95.5 dBm to -104 dBm Maximum Radio Range 300m (L.O.S) Antenna Antenna diversity : 2 omnidirectional antenna with a gain of 2,2 dBi Embedded Data logger Storage capacity up to 1 000 000 data acquisition Write/read cycle 400000 Wireless data downloading 3 minutes to download the full memory (average time) Please consider the environnement before printing this document. Page : 30 / 152 “Rethinking sensing technology” Document type : User Manual Document version : 2.6 BeanDevice® User Manual – SmartSensor product lines Real Time clock and crystal Extremely Accurate Real Time Clock for measurement time stamping in Low duty cycle mode (±10ppm) Real Time Clock Extremely accurate crystal for measurement time stamping in streaming & streaming packet mode Crystal Tolerance ±10ppm, stability ±10ppm Environmental and Mechanical Aluminium & Watertight (IP66) enclosure Dimensions in mm (LxWxH): 80x55x21 mm, Weight (battery included) : 145g 100g during 50 ms Enclosure Shock resistance Operating Temperature Norms -20 °C to +65 °C CE Labelling Directive R&TTE (Radio) ETSI EN 300 328 ROHS - Directive 2002/95/EC Power supply Integrated Lithium-ion battery charger with high precision battery monitoring : Integrated battery charger · Overvoltage Protection, Overcurrent/Short-Circuit Protection, Undervoltage Protection · Battery Temperature monitoring · Current accumulation measurement Current consumption @3,3V · During data acquisition : 20 to 30 mA · During Radio transmission : 40 mA @ 5dBm , 70 mA @ 18 dBm · During sleeping mode: 68uA · During deep sleeping mode : 28 uA External power supply External power supply : +8v to +28v Rechargeable battery High density Lithium-Ion rechargeable battery with a capacity of 1.3 Ah (referenced as BAT1.3DMG) Option(s) Power-supply bloc Wall plug-in, Switchmode power Supply 12V @ 1,25A with sealed M8 Plug (IP67) Please consider the environnement before printing this document. Page : 31 / 152 Document version : 2.6 “Rethinking sensing technology” BeanDevice® User Manual – SmartSensor product lines Document type : User Manual 7.6.3 Beandevice® HI-INC Product reference BND-HI-INC-MR-PS-WP MR– Measurement Range: 15M : mono-axial ±15° 15B : bi-axial ±15° 30M : mono-axial ±30° 30B : bi-axial ±30° PS - Power supply : RB : Internal rechargeable battery XT : External Primary cell WP– Wireless Technology : IEEE : IEEE 802.15.4 (2006) Example 1: BND-HI-INC-15B-RB-IEEE-wireless bi-axial inclinometer with ±15° measurement range, internal rechargeable battery, IEEE 802.15.4 wireless Technology Example 2: BND-HI-INC-30M-XT-IEEE-wireless mono-axial inclinometer with ±30° measurement range, external primary cell, IEEE 802.15.4 wireless Technology Sensor specifications Inclinometer Technology Inclinometer based on MEMS Technology Measurement resolution (Bandwidth 10 Hz) 0.001° Noise density 0.0004 °/√Hz Accuracy (Full scale) ±0.05° Offset temperature dependency (temperature range –25°C to +85°C) ±0.002 °/°C Sensitivity temperature dependency (temperature range –25°C to +85°C) ±0.005 %/°C with temperature compensation Long term stability (@23°C) < 0.004 ° Analog to Digital converter 16-bits, SAR architecture (Successive Approximation Register) with temperature compensation Sensor frequency Response (-3 dB) DC to 28 Hz Noise spectral density DC to 100 Hz 0.0004 °/ √Hz Anti-aliasing filter Butterworth 5th order filter – cut-off frequency : 1 Hz to 100 Hz remotely programmable (BeanScape®) ±0.013 %/°C without temperature compensation Please consider the environnement before printing this document. Page : 32 / 152 Document version : 2.6 “Rethinking sensing technology” BeanDevice® User Manual – SmartSensor product lines Document type : User Manual Over-the-air configuration (OTAC) parameters Low Duty Cycle Data Acquisition (LDCDA) Mode: 1s to 24 hour Data Acquisition mode (SPS = sample per second) Alarm & Survey mode: 1s to 24 hour Streaming Packet Mode Sampling Rate (in streaming packet mode) Streaming Mode Minimum: 1 SPS Maximum: 60 SPS on each axis Alarm Threshold 2 high levels alarms & 2 low levels alarms Programmable cut-off frequency (Anti-aliasing filter) 1– 100 Hz Power Mode Sleeping, Sleeping with Network Listening & Active TX Power -7 dBm / -1 dBm / 5 dBm / 11 dBm / 15 dBm / 18 dBm RF Specifications Wireless Protocol Stack IEEE 802.15.4 (2006 version) WSN Topology Point-to-Point / Star Encryption AES 128 bits (AES integrated coprocessor) Data rate 250 Kbits/s RF Characteristics ISM 2.4GHz – 16 Channels. Antenna diversity architecture designed by Beanair® TX Power +0 dBm to +18 dBm Receiver Sensitivity -95.5 dBm to -104 dBm Maximum Radio Range 300m (L.O.S) Antenna Antenna diversity : 2 omnidirectional antenna with a gain of 2,2 dBi Embedded Data logger Storage capacity up to 1 000 000 data acquisition Write/read cycle 400000 Wireless data downloading 3 minutes to download the full memory (average time) Real Time clock and crystal Real Time Clock Crystal Extremely Accurate Real Time Clock for measurement time stamping in Low duty cycle mode (±10ppm) Extremely accurate crystal for measurement time stamping in streaming & streaming packet mode Tolerance ±10ppm, stability ±10ppm Please consider the environnement before printing this document. Page : 33 / 152 “Rethinking sensing technology” Document type : User Manual Document version : 2.6 BeanDevice® User Manual – SmartSensor product lines Environmental and Mechanical Aluminium & Watertight (IP66) enclosure Dimensions in mm (LxWxH): 80x55x21 mm, Weight (battery included) : 145g 100g during 50 ms Enclosure Shock resistance Operating Temperature Norms -20 °C to +65 °C CE Labelling Directive R&TTE (Radio) ETSI EN 300 328 ROHS - Directive 2002/95/EC Power supply Integrated Lithium-ion battery charger with high precision battery monitoring : Integrated battery charger Current consumption @3,3V · Overvoltage Protection, Overcurrent/Short-Circuit Protection, Undervoltage Protection · Battery Temperature monitoring · Current accumulation measurement · During data acquisition : 20 to 30 mA · During Radio transmission : 40 mA @ 0dBm , 80 mA @ 18 dBm · During sleeping : < 30 µA External power supply External power supply : +8v to +28v Rechargeable battery High density Lithium-Ion rechargeable battery with a capacity of 950 mAh (referenced as BAT0.95DMG) Option(s) Power-supply bloc Wall plug-in, Switchmode power Supply 12V @ 1,25A with sealed M8 Plug (IP67) Calibration certificate Calibration certificate provided by Beanair A static calibration method is used on a granite surface plate DIN876 Please consider the environnement before printing this document. Page : 34 / 152 “Rethinking sensing technology” Document type : User Manual 7.6.4 Document version : 2.6 BeanDevice® User Manual – SmartSensor product lines Beandevice® AX-3D XRange Product reference MR – Measurement Range: 2 : ±2g measurement range 10 : ±10g measurement range 13: ±13g measurement range BND-AX3D -MRG-XR-WP WP– Wireless Technology - IEEE : IEEE 802.15.4 (2006) Example: BND-AX3D-10G-XR-IEEE—High performance wireless accelerometer with 10g measurement range , IEEE 802.15.4 Wireless Technology Accelerometer Specifications Accelerometer technology MEMS technology triaxial accelerometer Sensitivity ±2g Version : 16384 counts/g ±10g version: 3277 counts/g ±13g version: 2521 counts/g Typical non-linearity ±0.1% FS Analog to Digital converter 16-bits, SAR architecture (Successive Approximation Register) with temperature compensation Sensor frequency response (-3 dB) 0 to 800 Hz Noise spectral density ±2g Version : 45 µg/√Hz ±10g version: 100 µg/√Hz ±13g version: 100 µg/√Hz Zero-g Offset Variation from RT over Temp ±2g Version : ±0.2 mg/°C ±10g version: ±0.1 mg/°C ±13g version: ±0.1 mg/°C Sensitivity Variation from RT over Temp ±2g Version : ±0.01 %/°C (XY) , ±0.02 %/°C (Z) ±10g version: ±0.01 %/°C ±13g version: ±0.01 %/°C Offset Ratiometric Error ±2g Version : 4mg ±10g version: ±0.2% (XY) , ±0.1% (Z) ±13g version: ±0.5% Sensitivity Ratiometric Error ±2g Version : ±1.25 % (X-Y) , ±0.2 % (Z) ±10g Version : ±1.6% (X-Y) , ±0.2 % (Z) ±13g Version : ±1.6% (X-Y) , ±0.2 % (Z) Cross Axis Sensitivity 2% Anti-aliasing filter Butterworth 5th order filter – cut-off frequency : 1 Hz to 2000 Hz remotely programmable (BeanScape®) Please consider the environnement before printing this document. Page : 35 / 152 “Rethinking sensing technology” Document version : 2.6 BeanDevice® User Manual – SmartSensor product lines Document type : User Manual Over-the-air configuration (OTAC) parameters Data Acquisition mode sample per second) (SPS = Sampling Rate (in streaming packet mode) Sampling Rate (in streaming packet mode with data logger only) Low Duty Cycle Data Acquisition (LDCDA) Mode: 1s to 24 hour Alarm & Survey mode: 1s to 24 hour Streaming Packet Mode Streaming Mode Minimum: 1 SPS Maximum: 3 kSPS per axis (one axis activated) 1,5 kSPS per axis (2-axis activated) 1 kSPS per axis (3-axis activated) Minimum: 1 SPS Maximum: 4 kSPS maximum per axis (one or two axis activated) 3,5 kSPS per axis (3-axis activated) Alarm Threshold 2 high levels alarms & 2 low levels alarms Programmable Cut-off frequency (Anti-aliasing filter) 1– 2000 Hz Power Mode Sleeping, Sleeping with Network Listening & Active TX Power -7 dBm / -1 dBm / 5 dBm / 11 dBm / 15 dBm / 18 dBm RF Specifications Wireless Protocol Stack IEEE 802.15.4 (2006 version) WSN Topology Point-to-Point / Star Encryption AES 128 bits (AES integrated coprocessor) Data rate 250 Kbits/s RF Characteristics ISM 2.4GHz – 16 Channels. Antenna diversity architecture designed by Beanair® TX Power +0 dBm to +18 dBm Receiver Sensitivity -95.5 dBm to -104 dBm Maximum Radio Range 390m (L.O.S) Antenna Antenna diversity : 2 omnidirectional antenna with a gain of 3dBi Embedded data logger Storage capacity up to 8 000 000 data acquisition Write/read cycle 400 000 Wireless data downloading 5 minutes to download the full memory (average time) Real Time clock and crystal Real Time Clock Extremely Accurate Real Time Clock for measurement time stamping in Low duty cycle mode (±10ppm) Please consider the environnement before printing this document. Page : 36 / 152 “Rethinking sensing technology” Document type : User Manual Document version : 2.6 BeanDevice® User Manual – SmartSensor product lines Extremely accurate crystal for measurement time stamping in streaming & streaming packet mode Crystal Tolerance ±10ppm, stability ±10ppm Environmental and Mechanical · Aluminum & Watertight (IP66) enclosure Enclosure · Dimensions in mm (LxWxH): 100 x 71 x 30 (135 x 71 x 30 with antennas), Weight (battery included) : 165g Base plate · Aluminum black anodized AL 7075 with rugged three-point-mounting · The sensor module is to be mounted on a flat and smooth surface with 3 screws, dimension M5. Mounting torque 5 ±1Nm Shock resistance 200g during 50 ms Operating Temperature -20 °C to +65 °C CE Labelling Directive R&TTE (Radio) ETSI EN 300 328 ROHS - Directive 2002/95/EC Norms Power supply Integrated Lithium-ion battery charger with high precision battery monitoring : Integrated battery charger Current consumption @ 3,3V · Overvoltage Protection, Overcurrent/Short-Circuit Protection, Undervoltage Protection · Battery Temperature monitoring · Current accumulation measurement · During data acquisition : 20 to 30 mA · During Radio transmission : 40 mA @ 0dBm , 80 mA @ 18 dBm · During sleeping : < 30 µA External power supply External power supply : +8v to +28v Rechargeable battery High density Lithium-Ion rechargeable battery with a capacity of 1550 mAh (referenced as BAT1.55DMG) Option(s) Power-supply bloc Wall plug-in, Switchmode power Supply 12V @ 1,25A with sealed M8 Plug (IP67) Calibration certificate Calibration certificate provided by Beanair A static calibration method is used on a granite surface plate DIN876 Please consider the environnement before printing this document. Page : 37 / 152 Document version : 2.6 “Rethinking sensing technology” BeanDevice® User Manual – SmartSensor product lines Document type : User Manual 7.6.5 Beandevice® HI-INC XRange Product reference BND-HI-INC-MR-XR-PS-WP MR– Measurement Range: 15M : mono-axial ±15° 15B : bi-axial ±15° 30M : mono-axial ±30° 30B : bi-axial ±30° PS - Power supply : RB : Internal rechargeable battery XT : External Primary cell WP– Wireless Technology : IEEE : IEEE 802.15.4 (2006) Example 1: BND-HI-INC-15B-XR-RB-IEEE, High performance wireless bi-axial inclinometer with ±15° measurement range, internal rechargeable battery, IEEE 802.15.4 wireless Technology Example 2: BND-HI-INC-30M-XR-XT-IEEE, High performance wireless mono-axial inclinometer with ±30° measurement range, external primary cell, IEEE 802.15.4 wireless Technology Sensor specifications Inclinometer Technology Inclinometer based on MEMS Technology Measurement resolution (Bandwidth 10 Hz) 0,001° Noise density 0.0004 °/√Hz Accuracy (Full scale) ±0.05° Offset temperature dependency (temperature range –25°C to +85°C) ±0.002 °/°C Sensitivity temperature dependency (temperature range –25°C to +85°C) ±0.005 %/°C with temperature compensation Long term stability (@23°C) < 0.004 ° Analog to Digital converter 16-bits, SAR architecture (Successive Approximation Register) with temperature compensation Sensor frequency Response (-3 dB) DC to 28 Hz Noise spectral density DC to 100 Hz 0.0004 °/ √Hz Anti-aliasing filter Butterworth 5th order filter – cut-off frequency : 1 Hz to 100 Hz remotely programmable (BeanScape®) ±0.013 %/°C without temperature compensation Please consider the environnement before printing this document. Page : 38 / 152 “Rethinking sensing technology” Document type : User Manual Document version : 2.6 BeanDevice® User Manual – SmartSensor product lines Environmental and Mechanical · Aluminum & Watertight (IP66) enclosure Enclosure · Dimensions in mm (LxWxH): 100 x 71 x 30 (135 x 71 x 30 with antennas), Weight (battery included) : 165g Base plate · Aluminum black anodized AL 7075 with rugged three-point-mounting · The sensor module is to be mounted on a flat and smooth surface with 3 screws, dimension M5. Mounting torque 5 ±1Nm Shock resistance 200g during 50 ms Operating Temperature -20 °C to +65 °C CE Labelling Directive R&TTE (Radio) ETSI EN 300 328 Norms ROHS - Directive 2002/95/EC Power supply Integrated Lithium-ion battery charger with high precision battery monitoring : Integrated battery charger Current consumption @3,3V · Overvoltage Protection, Overcurrent/Short-Circuit Protection, Undervoltage Protection · Battery Temperature monitoring · Current accumulation measurement · During data acquisition : 20 to 30 mA · During Radio transmission : 40 mA @ 0dBm , 80 mA @ 18 dBm · During sleeping : < 30 µA External power supply External power supply : +8v to +28v Rechargeable battery High density Lithium-Ion rechargeable battery with a capacity of 1.35 Ah (referenced as BAT1.35DMG) Option(s) Power-supply bloc Wall plug-in, Switchmode power Supply 12V @ 1,25A with sealed M8 Plug (IP67) Calibration certificate Calibration certificate provided by Beanair A static calibration method is used on a granite surface plate DIN876 Please consider the environnement before printing this document. Page : 39 / 152 “Rethinking sensing technology” BeanDevice® User Manual – SmartSensor product lines Document type : User Manual 7.7 Document version : 2.6 PRODUCT FOCUS 7.7.1 Casing description 4 5 2 1 7 6 6 7 8 8 3 9 9 1 Please consider the environnement before printing this document. Page : 40 / 152 “Rethinking sensing technology” Document type : User Manual Number 1 Function Document version : 2.6 BeanDevice® User Manual – SmartSensor product lines Description M8-3 Contacts Socket for DC 8-28 volts power supply. The socket sealing is assured with a power supply input screw cap. If you don’t use the external power supply, don’t forget to protect the M8-3 pins socket with a M8 protection cap. 2 Radome antenna Waterproof IP67 Radome antenna MAC ID Label Unique identifier assigned to the BeanDevice® (64-bytes) 3 Every wireless network product which is based on the IEEE 802.15.4 standard must have a 64-bit MAC address that allows unique identification of the device within a global network. Three label version are available : 4 BeanDevice® product version label Indicates acceleration/inclination on X/Y/Z axis 5 Acceleration/inclination axis 6 BeanDevice® AX-3D: measurement range and the three axis are indicated on the Label BeanDevice® HI-INC: measurement range and the three axis are indicated on the Label BeanDevice® AX-3DS: measurement range and the three axis are indicated on the Label “ Network “ non-contact “Network context” non-contact button restores the factory button settings on the BeanDevice®. Point the pole of the Neodymium magnet that was provided with your BeanDevice® towards the “Network” label circle. Hold the magnet for approximately 2s Please read the following section for more information “click here” 7 8 “Network LED” This bi-color GREEN / RED Led represents the BeanDevice® : Cf. table below for led description ON/OFF Non- contact button Allows to power up/power off the BeanDevice®. Point the pole of the Neodymium magnet that was provided with your BeanDevice towards the “ON/OFF” label circle (refer fig. 3) ( V1R2 only).Hold the magnet for approximately 2s Please consider the environnement before printing this document. Page : 41 / 152 “Rethinking sensing technology” Document type : User Manual 9 7.7.2 Battery charge indicator LED Document version : 2.6 BeanDevice® User Manual – SmartSensor product lines This bi-color GREEN / RED Led indicates battery charge status: Cf. table below for led description Leds description Operating status Network LED The BeanDevice® is power down with no external power supply connected LED OFF The BeanDevice® is power off & external power supply is connected. LED OFF The BeanDevice® is power on with wireless TX/RX activity Green Led: Wireless Network Activity Red Led : Wireless transmission failure The BeanDevice® is power on Green led toggling The BeanDevice® is power off (was power on before) Battery Charge LED Green Led ON : battery charged Red Led ON : battery not charged RED LED ON during 2s Please consider the environnement before printing this document. Page : 42 / 152 “Rethinking sensing technology” BeanDevice® User Manual – SmartSensor product lines Document type : User Manual 7.7.3 Document version : 2.6 BeanDevice® AX-3DS/AX-3D/HI-INC/INC - Mechanical drawing The BeanDevice® AX-3DS/AX-3D/HI-INC/INC products use the same sensor housing. Enclosure Features Material Protection Dimensions Weight Aluminum IP66 (L/l/h : 80x55x21 mm) 135g battery included Figure 1: Mechanical drawing - Beandevice® AX-3D/HI-INC/INC Please consider the environnement before printing this document. Page : 43 / 152 “Rethinking sensing technology” Document type : User Manual 7.7.1 Document version : 2.6 BeanDevice® User Manual – SmartSensor product lines BeanDevice® AX-3D/HI-INC/INC Xrange - Mechanical drawing The BeanDevice® AX-3D/HI-INC Xrange products use the same sensor housing. Enclosure Features Material Protection Dimensions Weight Aluminum IP67 (L/l/h : 100x71x30 mm) 165g battery included Table 1 : BeanDevice AX-3D/HI-INC/INC enclosure feature 7.7.2 Antenna diversity Antenna diversity is a technique that maximizes the performance of an antenna system. It allows the radio to switch between two antennas that have very low correlation between their received signals. Typically, this is achieved by spacing two antennas around 0.25 wavelengths apart or by using two orthogonal polarizations. So, if a packet is transmitted and no acknowledgement is received, the radio system can switch to the other antenna for the retry, with a different probability of success. The diagram below provides information on the radome antenna performance: Figure 2 : Radome antenna performances The radome antenna radio used on BeanDevice® product is a tamper resistant and unobtrusive. Please consider the environnement before printing this document. Page : 44 / 152 “Rethinking sensing technology” Document type : User Manual 7.7.3 Document version : 2.6 BeanDevice® User Manual – SmartSensor product lines Radome antenna Electrical specifications Picture Center Frequency 2,45 GHz Gain 2,5 dBi Wavelength ¼ -wave VSWR <1.9 typ. At center Impedance 50 Ω Size Diameter: 27mm Height: 11 mm Please consider the environnement before printing this document. Page : 45 / 152 “Rethinking sensing technology” Document type : User Manual Document version : 2.6 BeanDevice® User Manual – SmartSensor product lines Antenna 1 Antenna 2 Figure 3: Antenna position on the BeanDevice AX-3D Never try to change the antenna integrated on the BeanDevice®. This action may void the product warranty. Please consider the environnement before printing this document. Page : 46 / 152 Document version : 2.6 “Rethinking sensing technology” BeanDevice® User Manual – SmartSensor product lines Document type : User Manual 7.8 BEANDEVICE® AX-3D & AX-3D XRANGE: SENSOR CHARACTERISTICS 7.8.1 Sensor architecture 5th order Anti-aliasing filter Accelerometer MEMS Sensor X-Axis Z-Axis Y-Axis Wireless Microcontroller 5th order Anti-aliasing filter 5th order Anti-aliasing filter 16-bits ADC Figure 4: Sensor design Please consider the environnement before printing this document. Page : 47 / 152 “Rethinking sensing technology” Document type : User Manual 7.8.2 Document version : 2.6 BeanDevice® User Manual – SmartSensor product lines MEMS Accelerometer The BeanDevice® AX-3D integrates a tri-axis, silicon micromachined accelerometer with a full-scale output range of ±2g, ±10g. Acceleration sensing is based on the principle of a differential capacitance arising from acceleration-induced motion of the sense element, which further utilizes common mode cancellation to decrease errors from process variation, temperature, and environmental stress. The sense element is hermetically sealed at the wafer level by bonding a second silicon lid wafer to the device using a glass frit. 7.8.3 5th order Anti-aliasing filter BeanDevice® AX-3D & HI-INC products integrates a high-performance 5th order Butterworth filter. 7.8.3.1 Why using an anti-aliasing filter ? When selecting an analog filter, the goal is to provide a cutoff frequency that removes unwanted signals from the ADC input or at least attenuates them to the point that they will not adversely affect the circuit. An anti-aliasing filter is a low-pass filter that accomplishes this. How does one select the right filter? The key parameters that need observation are the amount of attenuation (or ripple) in the passband, the desired filter rolloff in the stopband, the steepness in the transition region and the phase relationship of the different frequencies as they pass through the filter. Once the signal frequencies of interest are known, use a simple filter program to determine the filter topology needed to meet the passband, stopband, and transition region requirements. Of the four basic filter types, each has its own advantages Please consider the environnement before printing this document. Page : 48 / 152 “Rethinking sensing technology” Document type : User Manual Document version : 2.6 BeanDevice® User Manual – SmartSensor product lines The Butterworth filter used on the BeanDevice® Smartsensor product lines, has the flattest passband region, meaning it has the least attenuation over the desired frequency range. The Bessel filter has a more gradual roll-off but its key advantage is that it has a linear phase response, meaning each frequency component is delayed by an equal amount of time as it passes through the filter. A linear phase response is often specified as a constant group delay, since group delay is defined as the derivative of the phase response with respect to frequency. The Chebyshev filter has a steeper rolloff but more ripple in the passband. The Elliptic filter has the steepest rolloff. For a simple anti-aliasing filter, often times a simple single-pole passive RC filter is acceptable. In other cases an active filter works well. One advantage of an active filter is that for multi-order filters, the operation of the filter is less sensitive to the values of the external components, in particular, the 'Q' value of the filter. 7.8.3.2 Anti-aliasing filter features specifications Type of Lowpass filter Typical 5-th Butterworth response Total harmonic distortion plus Noise (THD + N) -81 dB Typical Harmonic Distortion -86,4 dB Cutoff frequency (or corner frequency) Configurable from the BeanScape® : AX-3D : 0 à 2 KHz AX-HD : 0 à 2 KHz HI-INC : 0 à 60 Hz Please consider the environnement before printing this document. Page : 49 / 152 “Rethinking sensing technology” Document type : User Manual Document version : 2.6 BeanDevice® User Manual – SmartSensor product lines Frequency & Phase response curve cutoff frequency 1 KHz BeanDevice TestBench 06/01/2010 WillTech BeanDevice TestBench 06/01/2010 Total Harmonic Distortion plus Noise vs Input signal amplitude Please consider the environnement before printing this document. Page : 50 / 152 “Rethinking sensing technology” Document type : User Manual Document version : 2.6 BeanDevice® User Manual – SmartSensor product lines BeanDevice TestBench 06/01/2010 5th-order Ladder Filter network 7.8.1 Analog Digital Converter The Analog-to-Digital (16-bits) converter is based on a true SAR (Successive Approximation Register) architecture with no missing codes. The ADC integrates an internal temperature sensor, which is useful for performing a system calibration. The internal reference is temperature-compensated to within 10 mV. The reference is trimmed to provide a typical drift of ±10 ppm/°C. Please consider the environnement before printing this document. Page : 51 / 152 “Rethinking sensing technology” Document type : User Manual BeanDevice® User Manual – SmartSensor product lines BEANDEVICE® HI-INC & HI-INC XRANGE : SENSOR CHARACTERISTICS Y-Axis Inclinometer MEMS Sensor X-Axis OUT2 Inclinometer MEMS Sensor OUT1 Inclinometer Block Diagram (Beandevice® HI-INC ±30° and ±15° versions) OUT1 7.9.1 OUT2 7.9 Document version : 2.6 5th order Anti-aliasing filter Wireless Microcontroller 5th order Anti-aliasing filter 5th order Anti-aliasing filter 16-bits ADC 5th order Anti-aliasing filter Please consider the environnement before printing this document. Temperature sensor Page : 52 / 152 “Rethinking sensing technology” Document type : User Manual BeanDevice® User Manual – SmartSensor product lines Inclinometer Block Diagram (Beandevice® version) Inclinometer MEMS Sensor OUT1 7.9.2 Document version : 2.6 5th order Anti-aliasing filter Wireless Microcontroller X-Axis OUT2 Y-Axis 5th order Anti-aliasing filter 16-bits ADC Temperature sensor 7.9.3 MEMS Inclinometer & differential output The BeanDevice® HI-INC integrates a 3D-MEMS-based single axis inclinometer that uses the differential measurement principle. The high calibration accuracy combines extremely low temperature dependency, high resolution and low noise together with a robust sensing element design, to make the BeanDevice® HI-INC an ideal choice for high accuracy leveling instruments. The inclinometer used on the BeanDevice® HI-INC ±15° and ±30° provides a differential output: the measuring axes of the sensing elements are mutually opposite in direction, thus providing two inclination signals which can be differentiated externally by our wireless processor. The differential measurement principle removes all common mode measurement errors. Most of the error sources have similar effects on both sensing elements. These errors are removed from measurement result during signal differentiation. The differential measurement principle gives very efficient noise reduction, improved long term stability and extremely low temperature dependency. Please consider the environnement before printing this document. Page : 53 / 152 “Rethinking sensing technology” Document type : User Manual 7.9.4 Document version : 2.6 BeanDevice® User Manual – SmartSensor product lines 5th order Anti-aliasing filter Same specifications as BeanDevice® AX-3D 7.9.5 Analog to digital converter Same specifications as BeanDevice® AX-3D 7.9.6 Accuracy considerations Main error components are: Zero Point Error In most cases the most significant error component is the zero point error. In the range -25 … +85°C it is ±0.057° (6δ limit) and the temperature dependence is typically ±0.002°/°C. The room temperature variation can be reduced by calibration at the instrument level and the effects of the temperature dependence dealt with by using temperature compensation. Error Caused by the SIN Function: When used as an inclinometer, the output of the accelerometer is proportional to 1g * SIN (Phi + Phi0), where Phi is the inclination angle and Phi0 the internal mounting error. The internal mounting error is a maximum of ±2.9°, corresponding to ±50mg. This error is of importance when using large inclination angle amplitudes and is seen as an addendum to the non-linearity (Typically ±5mg in ±0.5g and ±10mg in ±1g). Cross-axis Sensitivity The cross-axis sensitivity (4%) shows how much perpendicular acceleration or inclination is coupled to the signal. Rectification of Vibration The effect of high frequency vibration is strongly suppressed by the over-damped sensing element (upper cutoff freq. f-3dB = 0 … 10Hz). In an extreme case, high amplitude vibrations (>5g) may cause a measurable zero point shift. 7.9.7 Offset & temperature dependencies To achieve the best possible accuracy, an internal temperature sensor is used for sensitivity temperature dependency compensation. By using an additional 3rd order polynome compensation curve based on average sensitivity temperature dependency curve and temperature measurement information, it is possible to reduce sensitivity temperature dependency from: 0.013%/°C down to 0.005%/°C for the BeanDevice® HI-INC ±15°and ±30° versions 0.014%/°C down to 0.008%/°C for the BeanDevice® HI-INC ±90° Please consider the environnement before printing this document. Page : 54 / 152 “Rethinking sensing technology” Document type : User Manual Document version : 2.6 BeanDevice® User Manual – SmartSensor product lines Typical offset and sensitivity temperature dependencies of the inclinometer sensor are presented in following diagrams. These results represent the typical performance of inclinometer sensor components. The mean value and 3 sigma limit (mean ± 3× standard deviation) and specification limits are presented in following diagrams. The 3 sigma limits represents 99.73% of the inclinometer sensor population. Temperature dependency of the inclinometer sensor offset (differential output) Temperature dependency of the sensor sensitivity [%] (differential output) Please consider the environnement before printing this document. Page : 55 / 152 “Rethinking sensing technology” Document type : User Manual Document version : 2.6 BeanDevice® User Manual – SmartSensor product lines 7.10 BEANDEVICE® AX-3DS: SENSOR CHARACTERISTICS 7.10.1 Mems Sensor architecture Tri-axis accelerometer X-Axis Z-Axis Self-Test Wireless Microcontroller Y-Axis Shock Detection Interrupt A/D Converter 7.10.2 Shock detection interrupt The shock detection interrupt allows the Beandevice® AX-3DS to wake up when a threshold is reached. The threshold value can be modified from the BeanScape®. This feature is used for “Smart shock detection” data acquisition mode. Please consider the environnement before printing this document. Page : 56 / 152 “Rethinking sensing technology” Document type : User Manual Document version : 2.6 BeanDevice® User Manual – SmartSensor product lines 7.10.3 Beandevice® current consumption in sleeping mode with SSD activated (Smart shock detection) When SSD is activated, the BeanDevice will wake up if a shock is detected. During the sleeping mode of the BeanDevice®, the sensor will continu to track a shock event. Depending on the sampling rate of the accelerometer during sleeping, the BeanDevice® current consumption can change: Accelerometer sampling rate during sleeping BeanDevice® AX3DS Current consumption 0,5 Hz 21 µA 1 Hz 31 µA 2 Hz 50 µA 5 Hz 78 µA 10 Hz 130 µA 50 Hz 302 µA 100 Hz 308 µA 400 Hz 343µA 1000 Hz 413 µA Table 2 : Beandevice® AX-3DS power consumptio for a given sampling rate For further information about the SSD (Smart Shock Detection) measurement mode, read the technical note TN_RF_008 – “Data acquisition modes available on the BeanDevice®” Please consider the environnement before printing this document. Page : 57 / 152 “Rethinking sensing technology” Document type : User Manual Document version : 2.6 BeanDevice® User Manual – SmartSensor product lines 7.11 SENSOR POSITION INSIDE THE CASING 7.11.1 BeanDevice® AX-3D 30-35mm 15-16mm MEMS Accelerometer Please consider the environnement before printing this document. Page : 58 / 152 “Rethinking sensing technology” Document type : User Manual Document version : 2.6 BeanDevice® User Manual – SmartSensor product lines Position of the MEMS Accelerometer Please consider the environnement before printing this document. Page : 59 / 152 “Rethinking sensing technology” Document version : 2.6 BeanDevice® User Manual – SmartSensor product lines Document type : User Manual 7.12 MOUNTING GUIDELINES 7.12.1 Adhesive mounting instructions (BeanDevice® INC, HI-INC, AX-3D, AX-3DS) Characteristics SmartSensor Mounting techniques Ashesive mounting Flatness Surface Roughness 0,1 mm 0,1 mm Surface treatment Satin black textured polyester powder paint Material AL 6061 7.12.1.1 Components needed for a non-permanent mounting Aluminium Tape Foil Use an aluminium foil offering a good breaking load & water resistant for outdoor use. Example: Advance Tapes – Ref: 196074 - Thickness 0,09mm - Breaking load: 35 N/cm - Adhesion : 4 N/cm - Water resistant High strength High Strength Epoxy Adhesive – Resin Epoxy Glue Example: Radiospares 159-3957 Please consider the environnement before printing this document. Page : 60 / 152 “Rethinking sensing technology” Document type : User Manual Document version : 2.6 BeanDevice® User Manual – SmartSensor product lines 7.12.1.2 Reference edge The Beandevice® has a mounting reference angle (red line) for an optimal mounting of the product, which is parallel to the Y-axis. This reference edge must be placed exactly parallel to the object to be measured to prevent or minimize any mechanical offset/cross sensitivity. Reference edge, base plate side Please consider the environnement before printing this document. Page : 61 / 152 “Rethinking sensing technology” Document type : User Manual Document version : 2.6 BeanDevice® User Manual – SmartSensor product lines 7.12.1.3 Mounting instructions for non-permanent mounting For a non-permanent mounting we recommend to use the following process: Step 1: Fix the aluminum foil tape on the back side of your BeanDevice® casing. Surface should be clean, dry and free from Grease. Please consider the environnement before printing this document. Page : 62 / 152 “Rethinking sensing technology” Document type : User Manual Document version : 2.6 BeanDevice® User Manual – SmartSensor product lines Step 2: Mount the aluminium foil tape on the equipment where you wanted to mount the BeanDevice®. Surface should be clean, dry and free from Grease. Step 3: Mix equal amount s of resin and hardener for 1 minute. Mixture should be used within 15-20 minutes. Apply the mixture on your BeanDevice® Please consider the environnement before printing this document. Page : 63 / 152 “Rethinking sensing technology” Document type : User Manual Document version : 2.6 BeanDevice® User Manual – SmartSensor product lines Step 4: Clamp the two surface together until adhesive has cured (depending of the type of epoxy glue that you use, it can take 1 hour to 1 day). Your BeanDevice® is ready to be used for indoor and outdoor application. Please consider the environnement before printing this document. Page : 64 / 152 “Rethinking sensing technology” Document type : User Manual Document version : 2.6 BeanDevice® User Manual – SmartSensor product lines Step 5: You can unmount the BeanDevice® very easily. Use a knife or a sharp object to unmount the Beandevice®. Your BeanDevice® is clean and ready to be used on another application. Please consider the environnement before printing this document. Page : 65 / 152 “Rethinking sensing technology” Document type : User Manual Document version : 2.6 BeanDevice® User Manual – SmartSensor product lines 7.12.2 Screw Mounting (Beandevice® AX-3D Xrange & Beandevice® HI-INC Xrange) SmartSensor Xrange Characteristics Mounting techniques Flatness Surface Roughness Surface treatment Material Screw mounting Three M5 drilled flanges 38,1 µm RA 1.6 (µm) Black anodized (Corrosionproof) AL 7075 (twice harder than AL6061) Figure 7-5 : Xrange base plate overview For vibration measurement, the mass of the wireless accelerometer must be <1/10 of the mass of the object under study. Mounting surfaces need to be clean, free of any residue from epoxies, waxes, paint or other foreign materials. Mounting surface should be flat. Please consider the environnement before printing this document. Page : 66 / 152 “Rethinking sensing technology” Document version : 2.6 BeanDevice® User Manual – SmartSensor product lines Document type : User Manual The mounting hole must be checked to ensure it is longer than the mounting screw so as to prevent "bottoming out". Use a torque wrench for tightening screws to the manufacturer’s specifications. Do not use electric tools as their frequencies may damage the accelerometer. Spread mating surface with a light coating of silicone grease, heavy machine oil or bees wax to ensure contact issecure thereby maximizing the usable frequency range. Secure the cable using clamps, o-rings, tape or other materials most suited to the application. Ensure that you have sufficient slack to allow for free movement of the sensor. Inspect mounting holes and remove any debris, burrs or other foreign materials. 7.12.3 Wireless inclinometer special instructions (BeanDevice® HI-INC, INC & HI-INC Xrange) The BeanDevice® HI-INC is designed for a horizontal mounting, i.e. the base plate of the inclinometer needs to be placed on the horizontal plane of the object to be measured. Avoid shock and vibration during measurement, as these could corrupt the measurement results. Inclination sensors that base on a fluidic measurement principle are optimal for static measurements and suitable to only a limited extent of dynamic measurement. 7.13 BEANDEVICE® POWER SUPPLY 7.13.1 Integrated Lithium-ion Rechargeable battery The BeanDevice® from Smartsensor product lines integrates a Lithium-Ion rechargeable battery: BeanDevice® version Battery Capacity @25°C Nominal Voltage @25°C Charge/Discharge cycle @25°C BeanDevice® AX-3DS 1250 mAh 4,2V 370 BeanDevice® HI-INC 950 mAh Beandevice® AX-3D The rechargeable battery can be used as an UPS (uninterruptible power supply) battery on your BeanDevice®. It provides an emergency power when the external power source, typically the utility mains, fails. Do not try to change the integrated battery. This action may void the product warranty. Please consider the environnement before printing this document. Page : 67 / 152 “Rethinking sensing technology” Document type : User Manual Document version : 2.6 BeanDevice® User Manual – SmartSensor product lines 7.13.2 External Primary cell (option) The battery autonomy of the BeanDevice® can be increased by using an external primary cell with a capacity of 6500 mAh. The primary cell is integrated in a watertight (IP65) enclosure. If external primary cell option is selected, the Beandevice® will be provided without an internal rechargeable battery. 7.13.2.1 Primary cell specifications The Primary lithium-thionyl chloride cell (Li-SoCl2) provides the following features: Primary Cell Capacity Size Nominal Voltage Operating temperature range Maximum recommended continuous current Pulse Capability 6500 mAh C-size spiral cell 3,6 V - 40°C/+ 85°C 1A 1.5 to 2A during 0.1s Please consider the environnement before printing this document. Page : 68 / 152 Document version : 2.6 “Rethinking sensing technology” BeanDevice® User Manual – SmartSensor product lines Document type : User Manual A Prirmary Cell is not a rechargeable battery; do not try to recharge it. You will damage your primary cell and your Beandevice® We recommend you the following primary cell provider: Provider Model SAFT LSH14 Europa Batteries ER26500M EVE Able Battery 7.13.2.2 Main advantages of primary cell These are the main advantages of using a primary cell: The operating temperature of your Beandevice® is extended : -40°C to +85°C instead of -20°C to +75°C; The self-discharge of a primary cell is 2%/year instead of 12%/year for a rechargeable battery; The capacity of a primary cell is 6500 mAh instead of 1250 mAh, Please read the following section for more information about the primary cell replacement and calibration: “click here” Please consider the environnement before printing this document. Page : 69 / 152 “Rethinking sensing technology” Document type : User Manual Document version : 2.6 BeanDevice® User Manual – SmartSensor product lines 7.13.3 AC-To-DC power adapter (option) The BeanDevice® can also be powered by an AC-to-DC adapter 8-28Volts. The power adapter can be used for recharging Lithium-Ion battery or to power supply continuously the BeanDevice®. A M8-3Pins standard plug is used for connecting the power adapter to the BeanDevice®. If battery charge is very low, connect the power adapter in order to recharge your internal battery. M8-3P plug (IP67) Power adapter Only the M8 plug is fully sealed, the power adapter is not sealed. Please consider the environnement before printing this document. Page : 70 / 152 “Rethinking sensing technology” Document type : User Manual Document version : 2.6 BeanDevice® User Manual – SmartSensor product lines 7.13.4 External Power supply wiring code Caption: Pwr+ : Power supply 8-28V DC Gnd : Ground External power supply wiring code 1 : Gnd 3 : Pwr+ 1 2 2 : Not used M8 - 3 pins socket Figure 6: M8 socket Power supply wiring code (BeanDevice side) External power supply wiring code 3 : Pwr+ 1 : Gnd M8-3Pins plug 2 : Not used Caption: Pwr+ : Power supply 8-28V DC Gnd : Ground Figure 7: M8 plug - Power supply wiring code Please consider the environnement before printing this document. Page : 71 / 152 “Rethinking sensing technology” Document type : User Manual Document version : 2.6 BeanDevice® User Manual – SmartSensor product lines 8. SENSOR CALIBRATION Depending on the operating temperature , it’s highly recommend BeanDevice® version Operating temperature < 40°C Operating temperature > 40°C BeanDevice® AX-3D & Beandevice® AX-3D Xrange 6 years 3 years BeanDevice AX-3DS 4 years 2 years BeanDevice HI-INC, Beandevice® HI-INC Xrange and BeanDevice® INC 6 years 3 years Go to this section for more information about sensor calibration Please consider the environnement before printing this document. Page : 72 / 152 “Rethinking sensing technology” Document type : User Manual Document version : 2.6 BeanDevice® User Manual – SmartSensor product lines 9. DATA ACQUISITION MODE DESCRIPTION Please read the technical note TN_RF_008 – “Data acquisition modes available on the BeanDevice®” Please consider the environnement before printing this document. Page : 73 / 152 “Rethinking sensing technology” Document type : User Manual Document version : 2.6 BeanDevice® User Manual – SmartSensor product lines 10. BEANDEVICE® DEPLOYMENT GUIDELINE 10.1 POWER MODE MANAGEMENT Please read the technical note TN_RF_010 – « BeanDevice® Power Management » 10.2 BEANDEVICE® NETWORK ASSOCIATION Please read the technical note TN_RF_006 – “WSN Association process” 10.3 DATALOGGER FUNCTION Please read the technical note TN_RF_007 – “BeanDevice® DataLogger User Guide ” 10.4 OTAC (OVER-THE-AIR-CONFIGURATION) PROCESS Please read the technical note TN_RF_010 – « BeanDevice® Power Management » Please consider the environnement before printing this document. Page : 74 / 152 “Rethinking sensing technology” Document type : User Manual Document version : 2.6 BeanDevice® User Manual – SmartSensor product lines 10.5 FACTORY SETTINGS If desired, the user can perform a Network context deletion. It allows to restore default parameters on the BeanDevice® : BeanDevice® version AX3D AX3DS HIINC Parameter Power Mode Active Active Active Data Acquisition duty cycle 10s 10s 10s Acquisition duration time OK OK OK Sampling rate OK OK OK Data Acquisition mode LowDutyCycle LowDutyCycle LowDutyCycle TX Power +18dBm +18dBm +18dBm Alarms Threshold H1 :2, 10, 13 H1 :20 H1 :20 H1 :2, 10, 13 H2 :20 H2 :20 S2 : -2, -10, -13 S2 :0 S2 :0 S1 : -2, -10, -13 S1 :0 S1 :0 100 Hz / 100 Hz Anti-aliasing Filter cut-off frequency To restore these defaults parameters, you must perform a Network context deletion. The “Network” noncontact button is outside the product. Hold the magnet on the button network ("Network") for more than 2 seconds. “Network” Reed noncontact button Please consider the environnement before printing this document. Page : 75 / 152 “Rethinking sensing technology” Document type : User Manual Document version : 2.6 BeanDevice® User Manual – SmartSensor product lines 10.6 HOW TO CHANGE AND CALIBRATE THE PRIMARY CELL ON THE BEANDEVICE® This section concerns the BeanDevice® provided with an external primary cell power supply. All the BeanDevice® HI-INC/AX-3D/AX-3DS provided with an internal rechargeable battery are not concerned by this section. •Open the screw cap on the battery holder Step 1 : Open •The primary cell (C Size) is inside the battery holder the screw cap Watertight enclosure Battery holder Primary cell (C-size) Screw cap Please consider the environnement before printing this document. Page : 76 / 152 “Rethinking sensing technology” Document type : User Manual Step 2 : Change the primary Cell Document version : 2.6 BeanDevice® User Manual – SmartSensor product lines •Change the primary cell •Check the battery polarity: pole + is on the screw cap side; Pole+ Please consider the environnement before printing this document. Page : 77 / 152 “Rethinking sensing technology” Document type : User Manual Step 3 : Close the screw cap Document version : 2.6 BeanDevice® User Manual – SmartSensor product lines •Close properly the screw cap •Don't forget the Gasket, it's very important to maintain a watertight seal on your device Do not invert the battery polarity; your BeanDevice® will not work. The primary cell is inverted Please consider the environnement before printing this document. Page : 78 / 152 “Rethinking sensing technology” Document type : User Manual Step 4: Connect your primary cell enclosure to your BeanDevice® Step 5: Open the System maintenance window on your BeanScape® Document version : 2.6 BeanDevice® User Manual – SmartSensor product lines •Screw the M8 Plug on the M8 socket of your BeanDevice® •Make sure that your M8 plug is correctly connected to your M8 socket, otherwise the sealing between the enclosures is not maintained; •Launch your BeanScape® software application ; •Select your BeanDevice® profile, a new tab “BeanDevice®" will appear on your BeanScape® toolbar; •Click on this tab, and then click on "System Maintenance" Please consider the environnement before printing this document. Page : 79 / 152 “Rethinking sensing technology” Document type : User Manual Document version : 2.6 BeanDevice® User Manual – SmartSensor product lines 2/ Click on the BeanDevice® tab 1/ Click on your BeanDevice® profile 3/ Click on « System Maintenance » Step 6: Calibrate your primary cell from the BeanScape® • Select the label PP6_5DMG in your scroll list. This label corresponds to a battery capacity of 6500 mAh. • Click on "Validate" • Wait for an Acknoledgment from the BeanDevice® • To be sure that your Beandevice® is calibrated with the right capacity value, click on "Display" Please consider the environnement before printing this document. Page : 80 / 152 “Rethinking sensing technology” Document type : User Manual Document version : 2.6 BeanDevice® User Manual – SmartSensor product lines Make sure that your primary cell is a new one. Don’t try to re-calibrate a primary cell which was already used, a false battery level will be displayed. Select PP6_5DMG in your scroll list Click on validate You will receive an Acknowledgement from the Beandevice® Please consider the environnement before printing this document. Page : 81 / 152 “Rethinking sensing technology” Document type : User Manual Document version : 2.6 BeanDevice® User Manual – SmartSensor product lines Click on Display Your primary cell profile was correctly loaded on your BeanDevice® Check the Power mode of you Beandevice® before trying to configure your Beandevice®. Example: If your BeanDevice® is operating in “Sleeping” power mode. You should Power off then power on your Beandevice®, the new configuration parameter is loaded during the coldstart of your BeanDevice®. For further information about Power mode management, please read the technical note TN_RF_010 – « BeanDevice® Power Management » • Check the battery charge level which is dsplayed in the "Power Supply Diagnostic frame" , battery charge level should be 100% Step 7: Check your battery charge level Please consider the environnement before printing this document. Page : 82 / 152 “Rethinking sensing technology” Document type : User Manual Document version : 2.6 BeanDevice® User Manual – SmartSensor product lines Power Supply Diagnostic frame Battery Level The nominal voltage of a primary cell is 3,6 Volts instead of 4,2 volts for a rechargeable battery. This value is correct. Make sure that the power mode configured on your Beandevice® is in “sleep” or “sleep with network listening”. If the power mode is configured in active, the battery autonomy of your Beandevice® will be dramatically reduced. Please consider the environnement before printing this document. Page : 83 / 152 “Rethinking sensing technology” Document type : User Manual Document version : 2.6 BeanDevice® User Manual – SmartSensor product lines 11. BEANDEVICE® SUPERVISION FROM THE BEANSCAPE® For more information about the BeanScape®, please read the BeanScape® User Manual. 11.1 STARTING THE BEANSCAPE® The BeanScape® is a supervision software monitor fully dedicated to BeanAir WSN (Wireless Sensor Networks): 1. Start the BeanScape® by double-clicking on the BeanScape® icon 2. Click on the button « start » 3. All the BeanDevice® connected to the WSN will appear on your left window 4. Select the BeanDevice® you want to configure. You can configure your BeanDevice® and its attached sensors. BeanDevice® profile Sensor channel profile The user interface is organized as follow: Green on black background are displaying information Black on white background are customizable field; Please consider the environnement before printing this document. Page : 84 / 152 “Rethinking sensing technology” Document type : User Manual Document version : 2.6 BeanDevice® User Manual – SmartSensor product lines You can configure your BeanDevice® from the page "BeanDevice® System Profile”. This page is composed of two parts: BeanDevice® information display; BeanDevice® configuration; BeanDevice® System Profile This part consists of a set of frames, with visualization field BeanDevice® configuration frame is composed of several tabs 11.2 DISPLAYING THE BEANDEVICE® INFORMATIONS You will find below a description of the data information fields making up for each frame. Please consider the environnement before printing this document. Page : 85 / 152 “Rethinking sensing technology” Document type : User Manual Document version : 2.6 BeanDevice® User Manual – SmartSensor product lines 11.2.1 Frame: Identity MAC Address (encoded on 64-bits): The Media Access Control address is an unique identifier assigned to the BeanDevice® by the manufacturer for identification. PAN Address (encoded on 16-bits): Personal Area Network address. Network Address on 16-bits: This address is allocated by the BeanGateway® when you start the network. BeanDevice® Label: By default the MAC address is registered as a Label. This label can be changed by the user. How the PAN ID is assigned ? The BeanGateway® starts the WSN, assigning a PAN ID (Personal Area Network identifier) to the network. The PAN ID is pre-determined and cannot be modified. If you use several WSN, before deploying your BeanDevice® check to which WSN is assigned your BeanDevice®. 11.2.2 Frame : Wireless Network Diagnostic Link quality indicator of the BeanDevice® (0 to 255) 255=> Excellent 0 => bad Global Packet error rate (PER): represents the PER on a wireless path. Not available on IEEE 802.15.4 network. Local Packet error rate (PER): represents the PER between parent and child nodes. PER = Number of lost packet/Total of packet transmitted Please consider the environnement before printing this document. Page : 86 / 152 “Rethinking sensing technology” Document type : User Manual Document version : 2.6 BeanDevice® User Manual – SmartSensor product lines Number of bars Color Link quality indicator 5 to 6 bars Green Very good 4 bars Green Good 3 bars Orange medium 1 to 2 bars Red bad 11.2.3 Frame : Internal diagnostic Internal temperature of the BeanDevice® with a resolution of 0,125°C Power supply Status: Main or Battery This colored led indicates the BeanDevice power mode status. See below for more informations. Battery voltage in Volts Battery charge level: 0 to 100% with a resolution of 0, 01% The BeanDevice® incorporates an internal temperature sensor dedicated to the following tasks: Battery temperature monitoring during charging ; Temperature compensation of the analog conditioning chain ; An alarm notification is send to the BeanGaeway® if the internal temperature is anormally high ; When you plug the BeanDevice® on an external power supply, the power supply status is automatically detected. If your primary cell charge level is under 5%, it is highly recommended to recharge your battery. Your BeanDevice® from SmartSensor product lines integrates a battery charger. Please consider the environnement before printing this document. Page : 87 / 152 “Rethinking sensing technology” Document type : User Manual Document version : 2.6 BeanDevice® User Manual – SmartSensor product lines For further information about Power mode management, please read the technical note TN_RF_010 – « BeanDevice® Power Management » BLUE LED: The BeanDevice® is power off GREEN LED: The BeanDevice® is in sleeping with network Listening power mode Sleeping with network listening power mode is displayed GREEN LED: The BeanDevice® is in active sleeping power mode Sleeping power mode is displayed Please consider the environnement before printing this document. Page : 88 / 152 “Rethinking sensing technology” Document type : User Manual Document version : 2.6 BeanDevice® User Manual – SmartSensor product lines RED/YELLOW LED: The BeanDevice® is in active power mode Active mode is displayed 11.2.4 Frame : System Displays diagostic cycle in seconds (battery charge status, internal temperature, LQI, PER…). Displays Radio TX Power in dBm (antenna power is not included) 11.2.5 Frame : BeanDevice® According to the BeanDevice® version, the information displayed in the frame will not be the same. For example, for the BeanDevice® TSI: NOK : Routing capacity not available OK : Routing capacity available Number of sensors channels available on the BeanDevice®. BeanDevice® Platform model Routing capacity is not available on IEEE 802.15.4 protocol stack Please consider the environnement before printing this document. Page : 89 / 152 “Rethinking sensing technology” Document type : User Manual Document version : 2.6 BeanDevice® User Manual – SmartSensor product lines 11.2.6 Frame : Product Version Hardware version: BeanDevice® hardware selected) version Software version: BeanDevice® embedded software version V (version) related to a major modification of the embedded software. R (Release) related to a minor modification of the embedded software These ID versions should be transmitted to our technical support center when you encountered a material or software dysfunction. 11.2.7 Frame : Current Data Acquisition mode This frame displays all the informations returned by the BeanDevice® on its actual data acquisition mode: Data acquisition mode available on the BeanDevice® Data acquisition cycle in Day, hour, minute and second Data acquisition duration (available only for streaming mode and streaming packet mode) BeanDevice® sampling rate in Hz (available only for streaming mode and streaming packet mode only) streaming mode and streaming packet mode)Math mode, 11.2.8 Frame : Battery/Primary Cell status This frame displays information on battery/primary cell status. mode) Please consider the environnement before printing this document. Page : 90 / 152 “Rethinking sensing technology” Document type : User Manual Document version : 2.6 BeanDevice® User Manual – SmartSensor product lines The BeanDevice® performs frequently a battery diagnostic on the BeanDevice®. An alarm notification is transmitted automatically to the BeanScape® if a battery failure is detected on the BeanDevice®. If any battery status information is displayed (ex: the BeanDevice® is not connected), status led is white. When LEDS are green a normal state is indicated. During a malfunction, the LEDS turns red. Here are the details: Led definition Green Led signification Red led signification Disable Discharge Battery discharge activated Battery discharge deactivated Disable Charge Battery charge activated Battery charge deactivated Over current during battery discharge No over current during battery discharge Over current during battery discharge detected Over current during battery charge No over current during battery charge Over current during battery charge detected Overvoltage Any presence of battery overvoltage Battery over voltage detected on the battery Under voltage Any presence of battery under voltage Battery under voltage detected on the battery Please consider the environnement before printing this document. Page : 91 / 152 “Rethinking sensing technology” Document type : User Manual Document version : 2.6 BeanDevice® User Manual – SmartSensor product lines 11.3 BEANDEVICE® CONFIGURATION Select the BeanDevice® which must be configured BeanDevice® Configuration frame This frame is composed of several Tabs and includes BeanDevice® OTAC (Over the Air Configuration) Parameters: Tab Description Custom Display Notes Customize the BeanDevice® label This area contains the notes related to the BeanDevice®. Data Acquisition configuration Datalogger Configure the Data acquisition mode on your BeanDevice®, set the acquisition cycle or the sampling rate, enable/disable the datalogger function . Manage the Datalogger function on the BeanDevice® System configuration Power Mode Management Configure the diagnostic cycle and the TX Power Configure the Power mode on your BeanDevice® (Active mode, Sleep, Sleep with network listening) Please consider the environnement before printing this document. Page : 92 / 152 “Rethinking sensing technology” Document type : User Manual Document version : 2.6 BeanDevice® User Manual – SmartSensor product lines 11.3.1 Tab: Custom Display Parameter Type Reference Label Description You can enter here the type of BeanDevice® you want to use You can assign an internal reference to the BeanDevice® you have purchased. You can assign any sort of Label to your BeanDevice®. Therefore, the user can easily associate the BeanDevice® with its equipment (example: Room_N521_Second_Floor) Click on “Validate” if you want to validate your configuration. Please consider the environnement before printing this document. Page : 93 / 152 “Rethinking sensing technology” Document type : User Manual Document version : 2.6 BeanDevice® User Manual – SmartSensor product lines 11.3.2 Tab: Notes This field contains your notes concerning the BeanDevice®. To change this field, enter your text and click on « Validate » button. To backup your text, press the icon Example: Machine failure n°XX, requested intervention. Please consider the environnement before printing this document. Page : 94 / 152 Document version : 2.6 “Rethinking sensing technology” BeanDevice® User Manual – SmartSensor product lines Document type : User Manual 11.3.3 Tab : Data Acquisition configuration Data acquisition mode configuration DataLogger options Parameter Data acquisition Cycle Data Acquisition mode Low duty cycle Data Acquisition (LDCDA) Description Low duty cycle data acquisition is adapted for static measurement (tilt, pressure, temperature) requiring a low power consumption on your BeanDevice®. The duty cycle can be configured between 1 data acquisition & transmission per second to 1 data acquisition & transmission per day. Alarm Data acquisitions are transmitted by radio whenever an alarm threshold (fixed by the user) is reached (4 alarms threshold levels High/Low). Survey Survey mode is a mix between the LDCDA mode and Alarm mode. A data acquisition is transmitted Whenever an alarm threshold (fixed by the user) is reached (4 alarm threshold levels High/Low). A transmission cycle is reached, the transmission cycle is configurable through the BeanScape® 1s to 24h ; Streaming Packet Streaming packet is more suitable for users requiring a high data sampling rate (maximum 5 KHz). In order to achieve these performances, data sampling are transmitted by packet; Streaming Streaming mode is more suitable for users requiring a real-time data transmission (with time latency under 10ms). Select the Data acquisition cycle between 1s and 24hours. The format is: Day : Hour : Minute :Second Please consider the environnement before printing this document. Page : 95 / 152 “Rethinking sensing technology” Document type : User Manual Document version : 2.6 BeanDevice® User Manual – SmartSensor product lines Select the sampling rate of your BeanDevice® between 1 sample per second and 5000 Samples per second maximum. The resolution is 1 sample per second. Sampling rate If DataLogger is selected, the maximum sampling rate is 2000 samples per second. This field is available in streaming, streaming packet: Choose carefully the Sampling rate value: The PER (Packet Error Rate) can increase if the Sampling rate is high on your BeanDevice®. For further information read the technical note RF_TN_003 V1.0- “Wireless Network capacity” Data acquisition duration Power consumption increases with the sampling rate of your BeanDevice® Data acquisition duration in streaming, streaming packet modes. The format is Day : Hour : Minute :Second The Data acquisition duration value can be higher than Data acquisition cycle. Tx only: The BeanDevice® transmits the data acquisition without Datalogging Options Log only: The Beandevice® logs the data acquisition without wireless transmission Tx & Log: The BeanDevice® transmits and logs the data acquisition; For further information about the DataLogger feature, read the technical note TN_RF_007 – “BeanDevice® DataLogger User Guide ” For further information about the Datalogger, please read the technical note TN_RF_007 – “BeanDevice® DataLogger User Guide ” Please consider the environnement before printing this document. Page : 96 / 152 “Rethinking sensing technology” Document type : User Manual Document version : 2.6 BeanDevice® User Manual – SmartSensor product lines All the modifications are displayed on “Current data acquisition mode” frame: For further information, please read the technical note TN_RF_008 – “Data acquisition modes available on the BeanDevice®” Please consider the environnement before printing this document. Page : 97 / 152 “Rethinking sensing technology” Document type : User Manual Document version : 2.6 BeanDevice® User Manual – SmartSensor product lines 11.3.4 Tab: DataLogger For further information about the Datalogger, please read the technical note TN_RF_007 – “BeanDevice® DataLogger User Guide ” The Logger tag is composed of five different fields: Logger Status Logger manager Acquisition information Logger memory configuration Logger status 11.3.4.1 Logger status Logger status: Displays loggers status, four status are available: o Ready: the Datalogger is ready to register data o NotInit: the Datalogger is not initialized; o Active logs only: Data acquisition is logged only; o Active Tx and Log: Data acquisition is logged & transmitted by Radio; o Stopped: Datalogger is stopped; Download process: Displays the download process 0 to 100%. If 100%, all the data logs are successfully downloaded on your PC. Please consider the environnement before printing this document. Page : 98 / 152 “Rethinking sensing technology” Document type : User Manual Document version : 2.6 BeanDevice® User Manual – SmartSensor product lines Donwload status: Displays the download status , two types of status are available: o Processing: Data logs download is under process; o Completed: Data Logs are completely downloaded on your PC; 11.3.4.2 Logger manager Stop: Stops Data Logging process Erase: Stops & Erases all the logs on flash memory Download: Starts to download all the logs on the flash memory Cancel: Stops the download process 11.3.5 Tab : System config. Parameter Description Diagnostic cycle You can set the BeanDevice® diagnostic cycle (Battery status, LQI, PER ...). The Diagnostic cycle is a ratio of the data acquisition cycle. Ex: If you try to set the diagnostic cycle at 10s while the data acquisition cycle is set at 20s, the diagnostic cycle will be setted to 10s ; TX Power BeanDevice® TX Power unit is in dBm, it represents the power ratio in decibels (dB) of the measured power referenced to one milliwatt (mW). The antenna radio power is not included. If the BeanDevice® PER is high or the LQI is too low, try to increase the transmission power. Please consider the environnement before printing this document. Page : 99 / 152 “Rethinking sensing technology” Document type : User Manual Document version : 2.6 BeanDevice® User Manual – SmartSensor product lines The following flow chart shows the effect of a higher TX power: • Tx Power Increases TX Power Wireless Range Pwr consumption • Wireless range will increase • BeanDevice® Power consumption will increase Recommendations: If you fix the TX power at its minimum value (-7dBm): you will lose the radio link between your BeanGateway® and the BeanDevice®, if the wireless range is more than 5m, By pressing the Network push button for more than 2s, you can reset to factory settings (default RF power is fixed at its maximum: 18 dBm). How to convert dBm to mW Zero dBm equals one milliwatt. A 3dB increase represents roughly doubling the power, which means that 3 dBm equals roughly 2 mW. For a 3 dB decrease, the power is reduced by about one half, making −3 dBm equal to about 0.5 milliwatt. To express an arbitrary power P as x dBm, or go in the other direction, the following equations may be used: or, and Please consider the environnement before printing this document. Page : 100 / 152 “Rethinking sensing technology” Document type : User Manual Document version : 2.6 BeanDevice® User Manual – SmartSensor product lines or, where P is the power in W and x is the power ratio in dBm. Inside a building, the maximum authorized power is +12 dBm (antenna power included). It is highly recommended to follow the R&TTE guidelines. For more information please visit http://www.etsi.org. It is your responsibility to carefully observe the R&TTE guidelines. Please consider the environnement before printing this document. Page : 101 / 152 “Rethinking sensing technology” Document type : User Manual Document version : 2.6 BeanDevice® User Manual – SmartSensor product lines 11.3.6 Tab : Power mode management For further information about Power mode management, please read the technical note TN_RF_010 – « BeanDevice® Power Management » This Tab is composed of three frames: Power mode configuration: Configure the Power mode on your BeanDevice® Listening Mode Status : Describes the status of an OTAC (Over-the-air-Configuration) Sleep with listening config. : Configuration settings for Sleep with network listening Please consider the environnement before printing this document. Page : 102 / 152 “Rethinking sensing technology” Document type : User Manual Document version : 2.6 BeanDevice® User Manual – SmartSensor product lines Parameter Description Power mode configuration Active: Sleeping mode is disabled. The BeanDevice® operates in Active power mode. Sleep: Sleeping mode is enabled Sleep with nwk listening: Sleep with network listening mode is enabled. Ratio: Fix the Ratio of the listening cycle. This ratio depends on the data acquisition low duty cycle. Listening mode status Ratio: displays the latest Ratio value Waiting: This led is green if an OTAC (Over-the-Air configuration) frame is pending for a transmission to the BeanDevice® Sent: This led is green if an OTAC (Over-the-Air configuration) frame is transmitted to the BeanDevice®. Deleted: This led is red if a pending OTAC (Over-the-Air configuration) is deleted Sleep with network listening By clicking on “validate”, the pending OTAC frame is deleted config Please consider the environnement before printing this document. Page : 103 / 152 “Rethinking sensing technology” Document type : User Manual Document version : 2.6 BeanDevice® User Manual – SmartSensor product lines 11.3.7 Tab : AllGraph Allgraph mode allows displaying all the sensors curves of a BeanDevice® on the same graph. Please consider the environnement before printing this document. Page : 104 / 152 “Rethinking sensing technology” Document type : User Manual Document version : 2.6 BeanDevice® User Manual – SmartSensor product lines 11.4 SENSOR CHANNEL PROFILE The screen « Sensor channel profile » consists of three parts: 1 2 3 General information on the measurement channel; Measurement channel configuration; A graph which displays in real-time sensor signals during data acquisition; 2 1 3 Please consider the environnement before printing this document. Page : 105 / 152 “Rethinking sensing technology” Document type : User Manual Document version : 2.6 BeanDevice® User Manual – SmartSensor product lines 11.4.1 Sensor channel status 11.4.1.1 Frame : General informations Sensor Type Sensor range Sensor Reference Sensor label displayed on the BeanScape® Fc : Cut-off frequency in Hz BeanDevice® technology Sensor ON/OFF Button: enable/disable the sensor channel 11.4.1.2 Frame: Measurement data Date and time of the latest measurement Measurement data value By default, sensor unit format is o g for the BeanDevice AX-3D & AX-3DS o ° for the BeanDevice HI-INC Please consider the environnement before printing this document. Page : 106 / 152 “Rethinking sensing technology” Document type : User Manual Document version : 2.6 BeanDevice® User Manual – SmartSensor product lines 11.4.1.3 Frame : Alarm threshold Alarm threshold frame Alarm threshold are displayed in this frame: H1 : High value threshold alarm H2 : High value threshold alarm L1: Low value threshold alarm L2: Low value threshold alarm Depending on your sensor resolution, the displayed threshold value can differ from the reference value. Please consider the environnement before printing this document. Page : 107 / 152 “Rethinking sensing technology” Document version : 2.6 BeanDevice® User Manual – SmartSensor product lines Document type : User Manual 11.4.2 Sensor channel configuration This frame contains a set of 5 tabs: Custom Display Notes Configuration • Allows the end user to customzie the sensor • Contains notes relating to the BeanDevice® sensor • Sensor configuration interface. The user can configure the alarm thresholds related to the sensor • Depending on the BeanDevice® version which is used, other configuration parameters are available Sensor calibration • Sensor channel calibration Log configuration • Logs configuration on the BeanScape® Please consider the environnement before printing this document. Page : 108 / 152 “Rethinking sensing technology” Document type : User Manual Document version : 2.6 BeanDevice® User Manual – SmartSensor product lines 11.4.2.1 Tab: Custom display These parameters allow the user to customize his sensor: Type: Describe the sensor type (ex: load cell, pressure, Strain gage +/- 2 Mv/v, LVDT,…. ) Unit: customer sensor unit (bar, °C, l/h….) Ratio : Sensor Ratio coefficient (RAT ); Offset : Sensor Offset coefficient (OFF); Label: Give a name to your sensor. (ex : Sensor on StatorMachine 1, sensor in Room 2 Floor 3) Measurement conversion formula: Converted Measurement = Measurement x RAT + OFF Example with a temperature sensor: By default the temperature unit is in degree Celsius. The user wants to convert the unit in degree Fahrenheit. Converted Measurement [°F] = Measurement[°C] x RAT + OFF With RAT = 1.8 and OFF = 32 Please consider the environnement before printing this document. Page : 109 / 152 “Rethinking sensing technology” Document type : User Manual Document version : 2.6 BeanDevice® User Manual – SmartSensor product lines Conversion assistant To avoid conversion error, a conversion assistant is available to help you to setup quickly your measurement channel of your BeanDevice®. Click on conversion assistant from the tab “Custom display”, a window will open allowing you to do a linear conversion. On the left column, the user can enter the non-converted measurement data. On the right column, the user can enter the converted measurement values with the desired unit. The ratio and offset values are calculated automatically by the conversion assistant. Please consider the environnement before printing this document. Page : 110 / 152 “Rethinking sensing technology” Document type : User Manual Document version : 2.6 BeanDevice® User Manual – SmartSensor product lines 11.4.2.2 Tab : Notes This field contains notes relating to the BeanDevice® sensor. To change this field, enter a value or free text and click the “Validate” button. A new window opens; accept your modifications by clicking on “OK”. To backup your text click on the icon “Backup your Database” Please consider the environnement before printing this document. Page : 111 / 152 “Rethinking sensing technology” Document type : User Manual Document version : 2.6 BeanDevice® User Manual – SmartSensor product lines 11.4.2.3 Tab: Configuration - BeanDevice® AX-3D and BeanDevice® HI-INC For further information about the alarms threshold configuration, please read the technical note TN_RF_008 – “Data acquisition modes available on the BeanDevice®” Parameter Alarm threshold Description You can configure threshold high values (H1, H2) and low values (L1, L2) . In alarm mode, when a higher low threshold value is reached, an alarm notification is transmitted to the BeanGateway ; If the sensor value is higher than H1/H2, an alarm notification is send to the BeanGateway/BeanScape; If the sensor value is lower than L1/L2, an alarm notification is send to the BeanGateway/BeanScape;. Threshold values must be organized in this manner: H2>= H1 > L1>=L2 Cutoff Frequency Cutoff frequency : Configure the anti-aliasing filter cutoff frequency The range of cutoff frequency which can be configured is: 0 Hz to 2 KHz if the product is a BeanDevice AX-3D 0 Hz to 2 KHz if the product is a BeanDevice AX-HD 0 Hz to 60 Hz if the product is a BeanDevice HI-INC Please consider the environnement before printing this document. Page : 112 / 152 “Rethinking sensing technology” Document type : User Manual Document version : 2.6 BeanDevice® User Manual – SmartSensor product lines 11.4.2.4 Tab: Configuration - BeanDevice® AX-3DS For further information about the SSD (Smart Shock Detection) measurement mode, read the technical note TN_RF_008 – “Data acquisition modes available on the BeanDevice®” Parameter Alarm threshold Description You can configure threshold high values (H1, H2) and low values (L1,L2) . In alarm mode, when a higher low threshold value is reached, an alarm notification is transmitted to the BeanGateway ; If the sensor value is higher than H1/H2, an alarm notification is send to the BeanGateway/BeanScape; If the sensor value is lower than L1/L2, an alarm notification is send to the BeanGateway/BeanScape;. Threshold values must be organized in this manner: H2>= H1 > L1>=L2 Alarm thresholds are not available for SSD (Smart shock detection mode) Accelerometer The user can change the measurement range of the accelerometer: range configuration BeanDevice® AX-3DS 24G: ±6g or ±12g or ±24g Shock detection configuration BeanDevice® AX-3DS 8G : ±2g or ±4g or ±8g Click on modify, a new window will open. Please consider the environnement before printing this document. Page : 113 / 152 Document version : 2.6 “Rethinking sensing technology” BeanDevice® User Manual – SmartSensor product lines Document type : User Manual 1 2 2 3 3 4 4 5 5 6 6 7 8 8 9 9 Shock detection configuration 1 Shock detection configuration 2 Please consider the environnement before printing this document. Page : 114 / 152 “Rethinking sensing technology” Document type : User Manual Document version : 2.6 BeanDevice® User Manual – SmartSensor product lines Changes the accelerometer bandwidth during the sleeping of the Beandevice®: 1 2 The user can select two events profile Event 1 and Event 2. 2 2 Event combination 3 2 The user can use two logical combinations: AND and OR combination on the axis event selection. Fix the shock detection threshold 4 2 Unit value: g The resolution of the threshold value depends on the acceleration range of the accelerometer. On the axis event selection frame, if the High Axis is selected, the value of the threshold will be positive. If the Low axis is selected, the value of the threshold will be negative. Example: For a threshold value fixed at 2g, if X High Axis OR X Low Axis is selected. For all the values upper than 2g on the X Axis, a shock event is detected For all the values less than -2g on the X Axis, a shock event is detected. Please consider the environnement before printing this document. Page : 115 / 152 “Rethinking sensing technology” Document type : User Manual Document version : 2.6 BeanDevice® User Manual – SmartSensor product lines Axis event selection 5 2 The user can choose on which axis the shock event is affected: X Axis High, X Axis Low, Y Axis High, Y axis Low, Z Axis High, Z Axis Low. The combination AND/OR is not available for two events on the same axis, i.e. these combinations are not possible: X High and/or X Low, Y High and/or Y Low, Z High and/or Z Low. Several configuration of shock detection are possible on the same axis: The user selects XX Axis Low, all the shocks are detected on the following acceleration range [-TH_VALUE ;+TH_VALUE ]; + Range_MAX +TH_VAL Measurement is OK Shock Detection Area - TH_VAL Measurement is OK - Range_MIN The user selects XX Axis High , all the shocks are detected on the following acceleration range [Range_MIN ; -TH_VAL] and [+TH_VALUE; Range_MAX]; Please consider the environnement before printing this document. Page : 116 / 152 “Rethinking sensing technology” Document type : User Manual Document version : 2.6 BeanDevice® User Manual – SmartSensor product lines + Range_MAX Shock Detection Area +TH_VAL Measurement is OK - TH_VAL Shock Detection Area - Range_MIN The user selects a high event on the axis (+TH_VALUE), a shock is detected if the threshold value +TH_VALUE is reached: Hysteresis 6 6 The user can fix an hysteresis on threshold value Choose closely the value of the hysteresis. The resolution depends on the accelerometer bandwith during sleep or deep sleep. VALIDATE 7 Click here to validate your new configuration RESET 8 2 Click to restore a default configuration CANCEL 9 2 Click here to cancel your configuration Please consider the environnement before printing this document. Page : 117 / 152 “Rethinking sensing technology” Document type : User Manual Document version : 2.6 BeanDevice® User Manual – SmartSensor product lines 11.4.2.5 Tab : Sensor calibration These coefficients are used to calibrate the internal accelerometer/inclinometer sensors: The BeanScape® provides a calibration interface for each measurement channel: Ratio : multiplier coefficient Offset: adder/subtracted coefficient. its unit is the sensor unit Calibrated_value = (Ratio x Non_Calibrated_Value) + Offset Enter the calibration coefficients and then click on validate. The calibrations coefficients are backed up on the BeanDevice® flash memory and are preserved during the lifetime of your product. WARNING: These calibration coefficients should be accessible to an advanced user. A wrong calibration will result in false measurements. Please consider the environnement before printing this document. Page : 118 / 152 “Rethinking sensing technology” Document type : User Manual Document version : 2.6 BeanDevice® User Manual – SmartSensor product lines 11.4.2.6 Tab: Log configuration This tab should not be confused with the DataLogger feature available on the Beandevice®: By default, Log file name is built with the measurement channel & BeanDevice® MAC Address: < Sensor Channel Number > < MAC_ID > Log enabled: If checked, Log is enabled on the BeanScape® Log filename auto.: If checked, Log file name is named automatically Add label: If checked, the log file is renamed with the sensor label Click on validate in order to validate all your modifications. For users who want to rename the log file, two solutions are provided: Solution 1 Add automatically the channel “Label” in your log file name: <Label><Sensor channel Number> <MAC_ID> Solution 2 The log file name can be fully customized: Uncheck the case « Log filename auto” and add your own label Please consider the environnement before printing this document. Page : 119 / 152 “Rethinking sensing technology” Document type : User Manual Document version : 2.6 BeanDevice® User Manual – SmartSensor product lines 11.4.3 Graphical display The chart is composed of two parts: Part 1: This is a preview window, allowing you to observe sensors acquisitions: Part 2: A strip on the side composed of different frames allows customizing the graph; The graph has two axes: Axe-X: Timeline Axes-Y: received sensor acquisitions Please consider the environnement before printing this document. Page : 120 / 152 “Rethinking sensing technology” Document type : User Manual Document version : 2.6 BeanDevice® User Manual – SmartSensor product lines We can visualize the BeanDevice® data acquisition mode, and the last data acquisition obtained directly from the graph: Last data acquisition received BeanDevice® data acquisition mode A right click on the graph allows a set of actions: Menu obtained when you right click on the graph The meaning of each field of the menu is: Copy: Copies the graph to the clipboard Save Image As …: Save your graph The application offers a wide choice of type, for recording your graphs Page Setup…: Use page setup to fine-tune pages before printing Please consider the environnement before printing this document. Page : 121 / 152 “Rethinking sensing technology” Document type : User Manual Document version : 2.6 BeanDevice® User Manual – SmartSensor product lines Print …: Select your printer and start printing Show Point Values: Enabling this option allows you to see the detail of each measurement plot A zoom of the graph is possible using the mouse. This is possible only if one or both boxes "Zoom X and Y Zoom" is checked. Indeed, in this case the passage of the mouse cursor over the figure changes its shape. The form taken by the cursor is . Two options available to you to zoom the graph: 1) You use the mouse wheel 2) Or holding down the left mouse button, you select a chart area. Release the left mouse button causes a zoom selection. Please consider the environnement before printing this document. Page : 122 / 152 “Rethinking sensing technology” Document type : User Manual Document version : 2.6 BeanDevice® User Manual – SmartSensor product lines 11.4.3.1 Frame: Marks This frame consists of two check boxes that are "grid and alarm." If this check box is ticked, a grid is displayed on the graph. Grid displayed on the graph If this check box is ticked, all the alarms threshold H1/H2/L1/L2 are displayed on the graph Alarms threshold H1/H2/L1/L2 are displayed on the graph 11.4.3.2 Frame: Symbols From this frame you can select the display mode of action of the chart. Three types of symbols are available: Circle: Brings up a point on each bar graph Square: brings up a square on each measure of the graph None: No logo is displayed on the graph Please consider the environnement before printing this document. Page : 123 / 152 “Rethinking sensing technology” Document type : User Manual Document version : 2.6 BeanDevice® User Manual – SmartSensor product lines No symbol activated Square activated symbol Circle symbol activated Please consider the environnement before printing this document. Page : 124 / 152 “Rethinking sensing technology” Document type : User Manual Document version : 2.6 BeanDevice® User Manual – SmartSensor product lines 11.4.3.3 Frame : Scale From this frame, you can customize the scaling of your graphics to suit your needs. Lift Y Lift X Check box "Auto Y" and "Auto X Select “Auto X” scales the X-axis automatically on the graph Select “Auto Y” scales Y-axis automatically on the graph Lifts Y and X Where the "Auto Y" box is unchecked, you can set the limits for the graph from the field “X-lift” Where the "Auto X" box is unchecked, you can set the limits for the graph from the field “Y-lift” Checkbox "Zoom X and Y Zoom" These boxes are useful for performing a graph zoom from the mouse wheel, there are four cases: Case 1: Case "Zoom X checked" and "Zoom Y unchecked." The graph zoom will only affect the X axis. Case 2: Case "Zoom X unchecked" and "Zoom Y ticked." The graph zoom will only affect the Y axis. Case 3: Case "Zoom X checked" and "Zoom Y ticked." Zoom will affect both X and Y axes Case 4: Case "Zoom X unchecked" and "Zoom Y unchecked." The zoom function from the mouse wheel is disabled. Please consider the environnement before printing this document. Page : 125 / 152 “Rethinking sensing technology” Document type : User Manual Document version : 2.6 BeanDevice® User Manual – SmartSensor product lines 11.5 DATALOGGER CONFIGURATION Please read the technical note TN_RF_007 – “BeanDevice® dataLogger User Guide ” 11.6 LOG FILE & FOLDER ORGANIZATION (FOR EXPERIENCED USER USER) 11.6.1 Log file system overview • • Default log directory is C:/log_beanscape Each Beandevice® comes with a dedicated log folder containing: log files linked to data acquisition Log file linked to diagnostic 11.6.2 Log file directory By default the Log file directory is: C:\log_beanscape Click on the tab Tools then Options to configure advanced settings in BeanScape®: Please consider the environnement before printing this document. Page : 126 / 152 “Rethinking sensing technology” Document type : User Manual Document version : 2.6 BeanDevice® User Manual – SmartSensor product lines This window lets you configure the logs, and the data cache. A second window is displayed: o Clicking the button reverts back to its original configuration. Please consider the environnement before printing this document. Page : 127 / 152 “Rethinking sensing technology” Document type : User Manual Document version : 2.6 BeanDevice® User Manual – SmartSensor product lines 11.6.3 Log folder By Default log files linked to the Beandevice® are stored in the log folder (located in C:/log_beanscape directory): “Folder MAC_ID” Only the last 4 Char of BeanDevice® MAC ID are displayed. User can change log folder name by clicking on “Custom display” tab located on the BeanDevice® profile: Please consider the environnement before printing this document. Page : 128 / 152 “Rethinking sensing technology” Document type : User Manual Document version : 2.6 BeanDevice® User Manual – SmartSensor product lines Enter your own log folder name, then click on validate. The following example shows the log folder changed to “Factory2”: 11.6.4 Log file size configuration LOG directory: Enter here the path/folder where you would want to save the LOG files. Main log filename: Here you may enter the desired name in order to save the LOG file. Main log max. size (KB): Maximum file size in Kilobytes (KB) for your principal LOG file Sensor Log Enabled: Check this box if you want to enable the sensor(s) data acquisition in your LOG file Sensor log max. size (KB) : Maximum size in Kilobytes (KB) of sensor log files (except for streaming & streaming packet data acquisition mode) Network log info. enabled : Check this box if you want to enable network information in your LOG file Network info log max. size (KB) : Maximum size in Kilobytes for your network information LOG file Log level : Display priority LOGS Streaming log max. size : Maximum size in Kilobytes (KB) of sensor log files (only for streaming & streaming packet data acquisition mode) Please consider the environnement before printing this document. Page : 129 / 152 “Rethinking sensing technology” Document type : User Manual Document version : 2.6 BeanDevice® User Manual – SmartSensor product lines 11.6.5 Log file generation By default, 1 log file is linked to 1 sensor channel. The user can select a log file linked to all the sensor channels present on the Beandevice®. 11.6.6 Cache Data configuration (for Graph) Maximum number of points: Set here the maximum number of points displayed on the BeanScape® graph Maximum number of packets: Set here the maximum number of packets displayed on the BeanScape® graph Max number of diagnostics: Set here the maximum number of diagnostics displayed on the BeanScape® graph Max number of alarms: Set here the maximum number of alarms displayed on the BeanScape® graph Maximum number of GPS coordinates: Set here the maximum number of GPS informations; Maximum streaming points: Set here the maximum number of points displayed in Streaming/Streaming Packet on the BeanScape® graph File size may affect memory capacity of your computer. Please consider the environnement before printing this document. Page : 130 / 152 “Rethinking sensing technology” Document type : User Manual Document version : 2.6 BeanDevice® User Manual – SmartSensor product lines 11.6.7 Log file related to data acquisition 11.6.7.1 Log filename root For each sensor channel a log file is automatically created by the BeanScape®. The user can easily change the log file root: Select the sensor channel Click on « Log. Config » Tab This tab should not be confused with the DataLogger feature available on the Beandevice®. By default, Log file name is built with the measurement channel & BeanDevice® MAC Address: < Sensor Channel Number > <MAC_ID> Log enabled: If checked, Log is enabled on the BeanScape® Please consider the environnement before printing this document. Page : 131 / 152 “Rethinking sensing technology” Document type : User Manual Document version : 2.6 BeanDevice® User Manual – SmartSensor product lines Log filename auto.: If checked, Log file name is named automatically Add label: If checked, the log file is renamed with the sensor label Click on validate in order to validate all your modifications. For users who want to rename the log file, two solutions are provided: Solution 1 Add automatically the channel “Label” in your log file name: <Label><Sensor channel Number> <MAC_ID> Solution 2 The log file name can be fully customized: Uncheck the case « Log filename auto” and add your own label 11.6.7.2 Specific case: log filename creation in “Streaming”/”Streaming Packet” mode In streaming or Streaming packet mode, log filename is built as follow: Stream_Sensor_channel_MAC_ID_DATE_partXXX Sensor channel = Sensor channel MAC_ID: BeanDevice® MAC ID DATE: date when the streaming mode starts partXXX : Log file sequence number, part000 corresponds to the first log file Example: Stream_0 x 0_0 x 00158D000004C79F_02-11-2011_17.55.05_part000 Stream_0 x 2_0 x 00158D000004C79F_02-11-2011_17.55.05_part001 Stream_0 x 1_0 x 00158D000004C79F_02-11-2011_17.55.05_part001 Please consider the environnement before printing this document. Page : 132 / 152 “Rethinking sensing technology” Document type : User Manual Document version : 2.6 BeanDevice® User Manual – SmartSensor product lines 11.6.7.3 Log file analysis The date which is displayed in the log file corresponds to the date when the streaming mode starts. Measure index allows the user to use a timestamp, the time value between the Index N and N+1 corresponds to the period rate. Example: Data acquisition starts at 17h55min05s A data acquisition with a measurement index of 30 (value -0,0035) corresponds to a time 17h55min05s30ms. 11.6.8 Log file related to Wireless Network diagnostic 11.6.8.1 Log filename organization Wireless Diagnostic log filename is built as follow: MAC_ID_WirelessNetwkInfo MAC_ID: BeanDevice® MAC ID DATE: date when the streaming mode starts 11.6.8.2 Log file analysis Log file related to wireless network diagnostic provides the following informations: Date : diagnostic date LQI TX: Link quality indicator on the BeanDevice® side LQI RX: Link quality indicator on the BeanGateway® side Please consider the environnement before printing this document. Page : 133 / 152 “Rethinking sensing technology” Document type : User Manual Document version : 2.6 BeanDevice® User Manual – SmartSensor product lines Local PER Tx: Local Packet Error Rate on the BeanDevice® side Local PER Rx: Local Packet Error Rate on the BeanGateway® side Global PER: N.A. Battery voltage: internal battery voltage Battery level: battery level of charge Internal temperature: Local temperature of the BeanDevice® If the BeanDevice® is configured with the streaming & streaming packet data acquisition mode, the following diagnostic informations are not refreshed: Battery voltage Battery level Internal temperature Please consider the environnement before printing this document. Page : 134 / 152 “Rethinking sensing technology” Document type : User Manual Document version : 2.6 BeanDevice® User Manual – SmartSensor product lines 12. BEANDEVICE® MAINTENANCE & SUPERVISION (FOR EXPERIENCED USER) This section allows to an experienced user to configure correctly the Wireless Sensor Networks. 12.1 EXTENDING BATTERY LIFE The battery autonomy depends on several parameters: The environment where the BeanDevice® is deployed Data acquisition mode which is configured The table below presents the BeanDevice® current consumption during radio TX or during sleep phase: BeanDevice® version BeanDevice® AX-3D & BeanDevice® AX-3D XRange BeanDevice® HI-INC Current consumption during radio TX at 25°C, powered by a battery of 3.6V 60-61 mA Current consumption in sleep phase at 25°C, powered by a battery of 3.6V < 30 uA 70-73 mA <30uA 50-55 mA <30uA BeanDevice® HI-INC XRange BeanDevice® INC BeanDevice® AX-3DS BeanDevice® AX-3DS XRange For further information, please read the technical note “RF_TN_002 V1.0 - Current consumption in active & sleeping mode” Please consider the environnement before printing this document. Page : 135 / 152 “Rethinking sensing technology” Document type : User Manual Document version : 2.6 BeanDevice® User Manual – SmartSensor product lines The following table gives you a list of recommendations in order to extend the battery autonomy of your BeanDevice®: Influence factors on battery lifetime Sleeping power mode on your BeanDevice® Observations Recommendations Sleeping power mode can be configured By activating this power mode on your on the BeanDevice® from the BeanDevice®, you will increase the BeanScape® battery autonomy of your BeanDevice®. By activating sleeping power mode, the BeanDevice® current consumption can decrease from 30 mA to 10-45 microamperes. For further information, please read the technical note TN_RF_010 – « BeanDevice® Power Management » Sampling rate in streaming mode Power consumption will grow with the sampling rate. Choose the right sampling rate on your BeanScape® interface. TX Power Power consumption will grow with the TX Power If your wireless range is low, try to use a lower TX Power. Packet Error Rate (PER) A high packet error rate can cause a higher retransmission data and this increase the current consumption. Try to replace your BeanDevice® in an area where the radio link is much better (see Link Quality Indicator value). 12.2 OVER-THE-AIR CONFIGURATION (OTAC) PARAMETERS BACKED UP ON FLASH The BeanDevice® integrates an internal flash memory used for backing up OTAC (Over-the-air configuration) parameters. This memory is organized into several levels: Level 1 • End-user parameters Level 2 • Sensor calibration coefficients Level 3 • Network maintenance (only fo experts) Level 4 • Battery/Primary cell calibration Please consider the environnement before printing this document. Page : 136 / 152 “Rethinking sensing technology” Document type : User Manual Document version : 2.6 BeanDevice® User Manual – SmartSensor product lines Please consider the environnement before printing this document. Page : 137 / 152 “Rethinking sensing technology” Document type : User Manual Document version : 2.6 BeanDevice® User Manual – SmartSensor product lines 12.2.1 Level 1: End-user OTAC parameters The following table presents all the defaults configuration parameters: BeanDevice® version Parameter AX3D & AX-3D Xrange Power Mode Active Active Active Data Acquisition duty cycle 10s 10s 10s Acquisition duration time OK OK OK Sampling rate OK OK OK Data Acquisition mode LowDutyCycle LowDutyCycle LowDutyCycle TX Power +18dBm +18dBm +18dBm Alarms Threshold H1 :2 ou10 H1 :20 H1 :20 H2 :2 ou 10 H2 :20 H2 :20 S2 :-2 ou -10 S2 :0 S2 :0 S1 :-2 ou -10 S1 :0 S1 :0 100 Hz 10 Hz 10 Hz Anti-aliasing Filter cut-off frequency HI-INC & HI-INC XRange AX-3DS & AX-3DS XRange Table 3: End-user OTAC parameters To restore these defaults parameters, you must perform a Network context deletion. The “Network” non-contact button is outside the product. Hold the magnet on the button network ("Network") for more than 2 seconds. Please consider the environnement before printing this document. Page : 138 / 152 “Rethinking sensing technology” Document type : User Manual Document version : 2.6 BeanDevice® User Manual – SmartSensor product lines “Network” Reed button Level 2, 3 & 4 of Configuration parameters are not affected by network context deletion (by hardware or software) 12.2.2 Level 2: Sensor calibration parameters The table below presents the sensor calibration parameters depending on BeanDevice® version: BeanDevice® Version Parameter AX3D & AX-3D Xrange HI-INC & HI-INC XRange AX-3DS & AX-3DS XRange Sensor gain OK OK OK Sensor offset OK OK OK Please consider the environnement before printing this document. Page : 139 / 152 “Rethinking sensing technology” Document type : User Manual Document version : 2.6 BeanDevice® User Manual – SmartSensor product lines 12.2.3 Level 3: Network maintenance (only for expert in wireless sensor networks) The table below presents the network maintenance parameters depending on your BeanDevice® version: BeanDevice® version Parameter AX3D & AX-3D Xrange HI-INC & HI-INC XRange AX-3DS & AX-3DS XRange Software reset counter OK OK OK Physical reset counter OK OK OK Threshold value OK on software reset OK OK 12.2.4 Level 4: Primary cell/Rechargeable battery calibration The table below presents Primary cell/rechargeable battery calibration depending on BeanDevice® version: BeanDevice® version Parameter AX3D & AX-3D Xrange HI-INC & HI-INC XRange AX-3DS & AX-3DS XRange Battery, primary cell ID OK OK OK Battery, primary cell calibration OK OK OK Please consider the environnement before printing this document. Page : 140 / 152 “Rethinking sensing technology” Document type : User Manual Document version : 2.6 BeanDevice® User Manual – SmartSensor product lines 12.3 NETWORK DIAGNOSTIC FROM YOUR BEANSCAPE® SOFTWARE The BeanScape® provides network diagnostic information which is described in this chapter. 12.3.1 Displaying Network information 1. Launch your BeanScape® application 2. Select your BeanDevice® profile, a new tab “BeanDevice" will appear in your BeanScape® toolbar; 3. Click on this tab, and then click on "View History Network”. Click on the BeanDevice® tab Click on your BeanDevice ® profile Click on « Display wireless network Information » Please consider the environnement before printing this document. Page : 141 / 152 “Rethinking sensing technology” Document type : User Manual Document version : 2.6 BeanDevice® User Manual – SmartSensor product lines A new window occurs: PER : Packet error rate LQI : Link quality Indicator BeanDevice® internal temperature Battery voltage & charge 12.3.1.1 Packet Error Rate Packet error rate (PER) is the number packet errors divided by the total number of transferred packet during a studied time interval. PER is a unit less performance measure, often expressed as a percentage number. PER is only available with IEEE 802.15.4 Network, it represents the ratio of “lost data/data send” between the BeanDevice® and the BeanGateway®. 12.3.1.2 LQI (Link Quality Indicator ) LQI (Link Quality Indicator) represents the radio signal quality in your Environment. It is possible that LQI is low due to EMC interference or metal presence in the environment. If you encounter such problems, several solutions are proposed to increase your LQI: Use the Maximum TX Power on your BeanDevice. The maximum TX Power authorized in Europe for indoor application is 12 dBm. For Outdoor application, you are authorized to extend the TX Power to 18 dBm. You can easily configure the TX Power on your BeanDevice from your BeanScape WSN software supervision. Please consider the environnement before printing this document. Page : 142 / 152 “Rethinking sensing technology” Document type : User Manual Document version : 2.6 BeanDevice® User Manual – SmartSensor product lines Try to configure your receiver antenna and your transmitter antenna on the same antenna pattern (cf. the Beam with of your antenna) Use a high gain antenna ( in outdoor use only) for a better RF Link Budget Fix your BeanDevice & BeanGateway on a top of a mast or a building. For further information, read the application note on “How to extend your wireless range?” 12.3.1.3 Internal temperature monitoring An internal temperature sensor is used for onboard & battery temperature monitoring 12.3.1.4 Battery charge monitoring Battery charge is based on current accumulation. The BeanDevice® integrates a current accumulator circuit which facilitates remaining capacity estimation by tracking the net current flow into and out of the battery. Current flow into the battery increments the current accumulator while current flow out of the battery decrements it. Voltage measurement corresponds to battery voltage. 12.3.1 System maintenance Warning: This area is reserved for persons with extensive experience in Wireless sensor networks. Configuring wrongly on such an interface may cause malfunction your BeanDevice®. Please consider the environnement before printing this document. Page : 143 / 152 “Rethinking sensing technology” Document type : User Manual Document version : 2.6 BeanDevice® User Manual – SmartSensor product lines TX Fault Threshold: Not available Clear Network context (software) : This option may be substituted for the push button “Network”. However, when the BeanDevice ® is not available (not powered or in sleeping mode) this option is not usable. Delete measurement data: Delete stored measurements. Restore default parameters: This function restores all the default parameters stored on the BeanDevice flash memory Primary Cell/Battery profile modifications : You can change your primary cell / battery profile here; Reset the « Reset counter » : resets the reset counter which is used for BeanDevice reboot ; Please consider the environnement before printing this document. Page : 144 / 152 “Rethinking sensing technology” Document type : User Manual Document version : 2.6 BeanDevice® User Manual – SmartSensor product lines 12.3.1 Scrolling menu « BeanSensor » The BeanSensor® scrolling menu provides access to additional features: like the multi-graph mode (display of multiple windows on a graph measuring the same screen), deleting graphs displayed and the activation / deactivation of logging measurements. To access to this scrolling menu, click on the sensor attached to your BeanDevice®. You will then see the BeanSensor® scrolling menu appearing. By clicking on the scrolling menu « BeanSensor », you can access to the following features : Please consider the environnement before printing this document. Page : 145 / 152 “Rethinking sensing technology” Document type : User Manual Document version : 2.6 BeanDevice® User Manual – SmartSensor product lines 12.3.1.1 Disable/Enable log All the data received on the BeanScape® are stored in a log file in CSV format. This feature allows you to enable / disable data logging on your log file. For further information about CSV log file, please read the BeanScape® user manual. 12.3.1.2 Buffer reset This function clears the graphical display concerning recorded measurements of your sensor. The data stored in a log are not affected by this function. By clicking on « Buffer reset », a second window appears asking you to confirm your choice: Yes, you accept to delete the whole measure data of this BeanSensor; No, don’t delete the whole measure data of this BeanSensor; Please consider the environnement before printing this document. Page : 146 / 152 “Rethinking sensing technology” Document type : User Manual Document version : 2.6 BeanDevice® User Manual – SmartSensor product lines 12.3.1.3 Open the graph in a new window By clicking on “Open the graph in a new window”, you can open a graph corresponding to your sensor. You can easily open several graphs in a window. Please consider the environnement before printing this document. Page : 147 / 152 “Rethinking sensing technology” Document type : User Manual Document version : 2.6 BeanDevice® User Manual – SmartSensor product lines The multi-graph mode requires a lot of resources on your computer, it is recommended to install the BeanScape® software on a powerful computer. Please consider the environnement before printing this document. Page : 148 / 152 “Rethinking sensing technology” Document type : User Manual Document version : 2.6 BeanDevice® User Manual – SmartSensor product lines 13. TROUBLESHOOTING Why the Red LED is flashing? Each time a packet is lost by the BeanDevice®, Nwk/Activity led will blink in red. Try to decrease the wireless range between the BeanGateway® and the BeanDevice®. Why the BeanDevice® LEDS are not activated? If there is no wireless network activity, the led will be inactive. Make sure you have powered your BeanDevice® with a charged battery. What should I do if interference is present on the radio channel? Please turn off your BeanDevice ®, and then choose an appropriate channel. The channel selection is done from the BeanGateway ®. For further information, please Read BeanGateway User's Manual BeanGateway ®. Why the BeanDevice® does not provide the right measurement value? Check if your sensor channel is activated on your BeanScape® interface (ON Position)?; Check if your BeanDevice® is powered up; Check your LQI quality, if your LQI is under 50-60. You must change your antenna position, or your product position; Check your data acquisition mode, maybe you have specified a data acquisition which is too long ; If you use a BeanDevice® AN-XX : Check your sensor power supply, maybe you need to increase/decrease your power supply; Check your sensor preprocess time. Maybe your sensor preprocess time is too short ? Check the wiring code of your sensor plug ; Why the BeanDevice® doesn’t respond when I try to configure it (Over-the-air-configuration)? If your BeanDevice® operates with sleep phase, the RF Hardware operates also with a sleep phase. Therefore an Over-the-air-configuration will not be possible. Check the LQI (Link Quality Indicator) value, if this value is under 80, the over-the-air configuration will not be easy. Try to decrease the wireless range between the BeanDevice® and the BeanGateway®. If your BeanDevice® works in streaming mode, in order to keep a full synchronization of the data acquisition, any over-the-air-configuration is authorized. Why do I have too much noise on my sensor signal ? Please consider the environnement before printing this document. Page : 149 / 152 “Rethinking sensing technology” Document type : User Manual Document version : 2.6 BeanDevice® User Manual – SmartSensor product lines If you use a BeanDevice® AX3D/HI-INC/AX-3DS : don’t forget to configure the cutoff frequency of your anti-aliasing filter If you use a BeanDevice® AN-mV: use a shielded cable. Please consider the environnement before printing this document. Page : 150 / 152 “Rethinking sensing technology” Document type : User Manual Document version : 2.6 BeanDevice® User Manual – SmartSensor product lines 14. INSTALLATION PROCEDURES 14.1 SEALING The product BeanDevice® comes with an IP66 rating. So, do not install the BeanDevice® in a marine environment with high turbulence. If you use the BeanDevice® AN-XX/TSI/TH, do not install the BeanDevice® up front to prevent the accumulation and infiltration of water from the front of the case. 14.2 COEXISTENCE WITH OTHERS FREQUENCIES AT 2.4 GHZ The BeanDevice® is sensitive to noise 2.4GHz (Wi-Fi as a source for example), but many protections are already in place, particularly in the IEEE 802.15.4®. It should however be careful when installing the product, check all the possibilities of radio channels on the frequency range 2.4-2.5GHz. The operation of the product will be improved. For further information, read the application note: AN_RF_004 – “Coexistence And [email protected]” 14.3 TEMPERATURE & HUMIDITY The BeanDevice® smartsensor series comes with an operating temperature of -20°C to +65°C. BeanDevice® products can operate in an area with 90% humidity. However, the wireless range can be reduced in the presence of water. Avoid mounting the BeanDevice® in an enclosure surrounded by water, or near bushy plants (plants are composed of 90% water), ... Please consider the environnement before printing this document. Page : 151 / 152 “Rethinking sensing technology” Document version : 2.6 BeanDevice® User Manual – SmartSensor product lines Document type : User Manual 14.4 REFLECTIONS, OBSTRUCTIONS AND MULTIPATH For further information, read the application note: AN_RF_007 :“ Beanair_WSN_Deployment“ 14.5 SHOCK & VIBRATION RESISTANCE Shock resistance on BeanDevice® products are: BeanDevice® Type Shock resistance BeanDevice® AX-3D 50g during 50 ms BeanDevice® AX-3DS 50g during 50 ms BeanDevice® HI-INC 50g during 50 ms Do not force connections. 14.6 ANTENNA Check the LQI (Link Quality Indicator) of your BeanDevice® for being sure that your antenna is right oriented. For further information, read the application note: AN_RF_007 :“ Beanair_WSN_Deployment“ Please consider the environnement before printing this document. Page : 152 / 152