Download US-428 - Tascam

Transcript
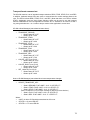
<<LOCATE
LOCATE>>
SET + <<LOCATE
time
SET + LOCATE>>
time
Go to beginning of song
Go to end of song
Set Memory Start to current
Set Memory End to current
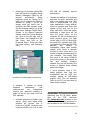
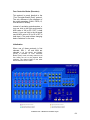
Channel Controls:
The US-428 has 8 channel strips and a
master fader. The master fader controls
the volume for any and all tracks that
contain master faders. Regular channel
strip faders never affect a master fader
track.
Each channel strip contains a fader, a
SELECT button, a SELECT LED, a
RECORD LED, a MUTE button, and a
MUTE LED. The eight channel strips
affect a bank of eight contiguous tracks
within Digital Performer’s Mixing Board
window.
The set of tracks being
controlled may be changed as described
in the “Bank Selection” section below.
The channel fader directly controls the
volume of a track (unless it’s a master
fader track). Select a track by pressing
the SELECT button. The corresponding
SELECT LED will light. Pressing a SELECT
button will deselect any previously
selected track(s).
With the TRACK
window active, the currently selected
track is highlighted.
Pressing SET + SELECT will toggle the
select state of a track. This may be
used to select or deselect multiple
tracks, or to change the set of selected
tracks.
The PAN knob will control the panning
for the selected track(s). Holding SET
while panning gives you finer control.
record enable state for that track. SET +
REC clears all record-enabled tracks.
The MUTE buttons control both mute and
solo status of a track. When the SOLO
LED is unlit, pressing a MUTE button
toggles the mute status of a track, and
the MUTE LED’s reflect the mute status of
the track. Pressing the SOLO button
toggles the Global Solo State, indicated
by the lit SOLO LED. When the SOLO led
is lit, pressing a MUTE button toggles the
solo state of the track, and the MUTE LED
reflects the solo status of the track.
(When the last track’s SOLO is cleared,
the Global Solo Status is automatically
cleared by Digital Performer, and the
tracks’ mute status is once again
shown.) SET + SOLO clears all mutes
when the SOLO led is not lit, or clears all
solos when the SOLO LED is lit.
Aux Send Controls:
Audio tracks have four aux send levels
and aux send mutes. (To see them,
display the send field in the track
window.) To change these controls,
select a track(s) and press the AUX1,
AUX2, AUX3 or AUX4 button. Its LED will
light, indicating that the DATA WHEEL
now controls that function. Moving the
DATA WHEEL will now control the
selected Aux Send level for the selected
track(s). Holding SET while moving the
DATA WHEEL allows for finer control.
Pressing the currently selected AUX
button will turn off the AUX LED and the
DATA WHEEL will resume normal
operation. Pressing a different AUX
button will select a different Aux Send to
be controlled. Pressing SET + an AUX
button will toggle the corresponding
send mute status for the selected
track(s).
The REC button acts like a shift key with
the SELECT buttons. Holding REC and
pressing a SELECT button toggles the
49