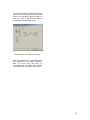
1
TASCAM
D000640100A
TEAC Professional Division
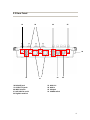
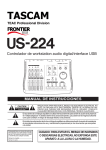
US-224
Universal Serial Bus
Digital Audio Workstation Controller
OWNER’S MANUAL
1
Important Safety Precautions
CAUTION: TO REDUCE THE RISK OF ELECTRIC SHOCK, DO NOT REMOVE COVER (OR BACK). NO
USER-SERVICEABLE PARTS INSIDE. REFER SERVICING TO QUALIFIED SERVICE PERSONNEL.
The exclamation point within an equilateral triangle is intended to alert the user to the presence of important
operating and maintenance (servicing) instructions in the literature accompanying the appliance.
The lightning flash with arrowhead symbol, within equilateral triangle, is intended to alert the user to the
presence of uninsulated “dangerous voltage” within the product’s enclosure that may be of sufficient magnitude
to constitute a risk of electric shock to persons
For U.S.A
This appliance has a serial number located on the
rear panel. Please record the model number and
serial number and retain them for your records.
Model number ______________________
Serial number
WARNING: TO PREVENT FIRE OR
SHOCK HAZARD, DO NOT EXPOSE THIS
APPLIANCE TO RAIN OR MOISTURE.
IMPORTANT (for U.K. Customers)
For U.S.A
DO NOT cut off the mains plug from this equipment.
TO THE USER
If the plug fitted is not suitable for the power points in your home or
the cable is too short to reach a power point, then obtain an
appropriate safety approved extension lead or consult your dealer.
If nonetheless the mains plug is cut off, remove the fuse and dispose
of the plug immediately, to avoid a possible shock hazard by
inadvertent connection to the mains supply.
If this product is not provided with a mains plug, or one has to be
fitted, then follow the instructions given below:
IMPORTANT: The wires in this mains lead are coloured in
accordance with the following code:
GREEN-AND-YELLOW
: EARTH
BLUE
: NEUTRAL
BROWN
: LIVE
This equipment has been tested and found to comply with
the limits for a Class A digital device, pursuant to Part 15 of
the FCC Rules. These limits are designed to provide
reasonable protection against harmful interference when
the equipment is operated in a commercial environment.
This equipment generates, uses, and can radiate radio
frequency energy and, if not installed and used in
accordance with the instruction manual, may cause
harmful interference to radio communications. Operation of
this equipment in a residential area is likely to cause
harmful interference in which case the user will be required
to correct the interference at his own expense.
CAUTION
Changes or modifications to this equipment not expressly
approved by TEAC CORPORATION for compliance could
void the user's authority to operate this equipment.
WARNING: This apparatus must be earthed.
As the colours of the wires in the mains lead of this apparatus may
not correspond with the coloured markings identifying the terminals in
your plug proceed as follows:
For the consumers in Europe
The wire which is coloured GREEN-and-YELLOW must be
connected to the terminal in the plug which is marked by the letter E
or by the safety earth symbol ç or coloured GREEN or GREEN-andYELLOW.
WARNING
This is a Class A product. In a domestic environment, this
product may cause radio interference in which case the
user may be required to take adequate measures.
The wire which is coloured BLUE must be connected to the terminal
which is marked with the letter N or coloured BLACK.
Pour les utilisateurs en Europe
AVERTISSEMENT
Il s'agit d'un produit de Classe A. Dans un environnement
domes-tique, cet appareil peut provoquer des interférences
radio, dans ce cas l'utilisateur peut être amené à prendre
des mesures appro-priées.
The wire which is coloured BROWN must be connected to the
terminal which is marked with the letter L or coloured RED.
When replacing the fuse only a correctly rated approved type
should be used and be sure to refit the fuse cover.
IF IN DOUBT — CONSULT A COMPETENT ELECTRICIAN.
Für Kunden in Europa
Warnung
Dies is eine Einrichtung, welche die Funk-Entstörung nach
Klasse A besitzt. Diese Einrichtung kann im Wohnbereich
Funkstörungen versursachen ; in diesem Fall kann vom
Betrieber verlang werden, angemessene Maßnahmen
durchzuführen und dafür aufzukommen.
2
SAFETY INSTRUCTIONS
Read all of these Instructions.
Save these Instructions for later use.
Follow all Warnings and Instructions marked on the audio equipment.
1) Read instructions — All the safety and operating instructions
should be read before the product is operated.
2) Retain instructions — The safety and operating instructions
should be retained for future reference.
3) Heed Warnings — All warnings on the product and in the
operating instructions should be adhered to.
4) Follow instructions — All operating and use instructions should
be followed.
5) Cleaning — Unplug this product from the wall outlet before
cleaning. Do not use liquid cleaners or aerosol cleaners. Use a
damp cloth for cleaning.
6) Attachments — Do not use attachments not recommended by
the product manufacturer as they may cause hazards.
7) Water and Moisture — Do not use this product near water _ for
example, near a bath tub, wash bowl, kitchen sink, or laundry tub; in
a wet basement; or near a swimming pool; and the like.
8) Accessories — Do not place this product on an unstable cart,
stand, tripod, bracket, or table. The product may fall, causing
serious injury to a child or adult, and serious damage to the product.
Use only with a cart, stand, tripod, bracket, or table recommended
by the manufacturer, or sold with the product. Any mounting of the
product should follow the manufacturer’s instructions, and should
use a mounting accessory recommended by the manufacturer.
9) A product and cart combination should be moved with care.
Quick stops, excessive force, and uneven surfaces may cause the
product and cart combination overturn.
10) Ventilation — Slots and openings in the cabinet are provided for
ventilation and to ensure reliable operation of the product and to
protect it from overheating, and these openings must not be blocked
or covered. The openings should never be blocked by placing the
product on a bed, sofa, rug, or other similar surface. This product
should not be placed in a built-in installation such as a bookcase or
rack unless proper ventilation is provided or the manufacturer’s
instructions have been adhered to.
11) Power Sources — This product should be operated only from
the type of power source indicated on the marking label. If you are
not sure of the type of power supply to your home, consult your
product dealer or local power company. For products intended to
operate from battery power, or other sources, refer to the operating
instructions.
12) Grounding or Polarization — This product may be equipped
with a polarized alternating-current line plug (a plug having one
blade wider than the other). This plug will fit into the power outlet
only one way. This is a safety feature. If you are unable to insert the
plug fully into the outlet, try reversing the plug. If the plug should
still fail to fit, contact your electrician to replace your obsolete outlet.
Do not defeat the safety purpose of the polarized plug.
13) Power-Cord Protection — Power-supply cords should be
routed so that they are not likely to be walked on or pinched by
items placed upon or against them, paying particular attention to
cords at plugs, convenience receptacles, and the point where they
exit from the product.
14) Outdoor Antenna Grounding — If an outside antenna or cable
system is connected to the product, be sure the antenna or cable
system is grounded so as to provide some protection against voltage
surges and built-up static charges. Article 810 of the National
Electrical Code, ANSI/NFPA 70, provides information with regard to
proper grounding of the mast and supporting structure, grounding of
the lead-in wire to an antenna discharge unit, size of grounding
conductors,
location of antenna-discharge unit, connection to
grounding electrodes, and requirements for the
grounding
electrode.
"Note to CATV system installer:
This reminder is provided to call the CATV system installer’s
attention to
Section 820-40 of the NEC which provides guidelines for proper
grounding
and, in particular, specifies that the cable ground shall be connected
to the
grounding system of the building, as close to the point of cable entry
as practical.
15) Lightning – For added protection for this product during a
lightning storm, or when it is left unattended and unused for long
periods of time, unplug it from the wall outlet and disconnect the
antenna or cable system. This will prevent damage to the product
due to lightning and power line surges.
16) Power Lines – An outside antenna system should not be
located in the vicinity of overhead power lines or other electric light
or power circuits, or where it can fall into such power lines or circuits.
When installing an outside antenna system, extreme care should be
taken to keep from touching such power lines or circuits as contact
with them might be fatal.
17) Overloading – Do not overload wall outlets, extension cords, or
integral convenience receptacles as this can result in fire or electric
shock. Never spill liquid of any kind on the product..
18) Object and Liquid Entry – Never push objects of any kind into
this product through openings as they may touch dangerous voltage
points or short out parts that could result in a fire or electric shock.
Never spill liquid of any kind on the product.
19) Servicing – Do not attempt to service this product yourself as
opening or removing covers may expose you to dangerous voltage
or other hazards. Refer all servicing to qualified service personnel.
20) Damage Requiring Service – Unplug this product from the wall
outlet and refer servicing to qualified service personnel under the
following conditions:
a) when the power supply cord or plug is damaged
b) if liquid has been spilled or objects have fallen into the product
c) if the product has been exposed to rain or water
d) if the product does not operate normally by following the
operating instructions. Adjust only those controls that are covered
by the operating instructions as an improper adjustment of other
controls may result in damage and will often require extensive work
by a qualified technician to restore the product to its normal
operation
e) if the product has been dropped or damaged in any way
f) when the product exhibits a distinct change in performance – this
indicates a need for service.
21) Replacement Parts – When replacement parts are required, be
sure the service technician has used replacement parts specified by
the manufacturer or have the same characteristics as the original
part. Unauthorized substitutions may result in fire, electric shock or
other hazards.
22) Safety Check – Upon completion of any service or repairs to this
product, ask the service technician to perform safety checks to
determine that the product is in proper operating condition.
23) Wall or Ceiling Mounting – the product should be mounted to a
wall or ceiling only as recommended by the manufacturer.
24) Heat – The product should be situated away from heat sources
such as radiators, heat registers, stoves or other product (including
amplifiers ) that produce heat.
3
This product is designed to help you record and
reproduce sound works to which you own the
copyright, or where you have obtained permission
from the copyright holder or the rightful licensor.
Unless you own the copyright, or have obtained
the appropriate permission from the copyright
holder or rightful licensor, your unauthorized
recording, reproduction or distribution thereof may
result in severe criminal penalties under copyright
laws and international copyright treaties. If you
are uncertain about your rights contact your legal
advisor. Under no circumstances will TEAC
Corporation be responsible for the consequences
of any illegal copying performed using the US224.
TEAC Corporation can take no responsibility for
any loss of data stored on hard disk, or any other
media, or on MIDI equipment such as
sequencers, etc. In case of such loss, TEAC
Corporation will in no way be liable for any
damages, consequential or otherwise, caused by
such loss of data.
Declaration of Conformity
Model Number :
Trade Name
:
Responsible Party :
US-224
TASCAM
TEAC America, Inc
7733 Telegraph Road
Montebello, CA 90640
Telephone Number:
1-323-726-0303
This device complies with Part 15 of the FCC rules.
Operation is subject to the following two conditions:
1. This device may not cause harmful
interference, and
2. This device must accept any interference
received, including interference that may cause
undesired operation.
Microsoft, Windows, Windows NT and
Windows XP are all registered trademarks
or trademarks of Microsoft in the US
and/or other countries.
The full name of the product referred to as
“Windows 98” is “Microsoft® Windows®
98 operating system.”
Pentium is a registered trademark of Intel
Corporation
MIDI is a registered trademark of the
Association of Manufacturers of Electronic
Instruments (AMEI)
All other brands or product names are
trademarks of their respective companies
or organizations.
4
Table of Contents
Table of Contents........................................ 5
Introduction ................................................. 6
1.1 Overview............................................ 6
1.2 Features ............................................ 6
1.3 What’s in the package ....................... 6
1.4 Nomenclature used in this manual.... 6
2. Controls and Indicators ........................... 7
2.1 Front Panel ........................................ 7
2.2 Rear Panel ........................................ 8
2.3 Front Panel Descriptions ................... 9
2.4 Rear Panel Descriptions.................. 10
3. Installation ............................................. 11
3.1 System Requirements ..................... 11
3.2 Installation ....................................... 12
3.2.1 Windows ................................... 12
3.2.2 Macintosh ................................. 14
3.3 Setting Up OMS (MacOS Only) ...... 14
3.4 Tuning Your PC............................... 14
3.5 Notes on USB interfacing ................ 16
4. Hooking up Audio and MIDI to the US-224
.................................................................. 17
4.1 Hooking up audio ............................ 17
4.2 Hooking up MIDI.............................. 18
4.3 Using the Input Monitoring .............. 18
4.4 Monitor vs. Master Level ................. 19
5. The US-224 Control Panel.................... 20
5.1 Main Page ...................................... 20
5.2 Buffer Size Adjustment................... 21
5.3 The Chromatic Tuner ..................... 21
6. Interfacing with your Audio Software .... 23
6.1 Selecting the US-224 as your Audio
Device.................................................... 23
6.1.1 Audio Control Panel.................. 23
6.1.2. ASIO Control Panel ................. 23
6.1.3 VST Remote ............................. 23
6.2 Setting the Sample Rate and Bit
Depth ..................................................... 24
6.3 Input Enabling ................................. 24
6.4 Transport Controls and Locate Points
............................................................... 25
6.5 Mute/Solo ........................................ 26
6.6 Data Wheel...................................... 26
6.7 BANK Controls and FADER NULL.. 26
6.8 ASIO2 Direct Monitoring................. 26
7. A Sample Recording Session in Cubasis
.................................................................. 28
7.1 Setting Up........................................ 28
7.2 Recording Your Tracks.................... 29
7.3 Overdubbing .................................... 29
7.4 Mixdown .......................................... 30
8. Other Applications and US-428 Emulation
Mode ......................................................... 31
8.1 Setting up Sound Manager Support
(for use with ProTools Free and Other
MacOS Applications) ............................. 32
9. Technical Support ................................. 34
9.1 Troubleshooting............................... 34
9.2 Tech Support Contacts.................... 34
9.3 Troubleshooting FAQs..................... 35
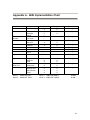
Appendix A - MIDI Implementation Chart . 36
Appendix B – Control Protocol .................. 37
Appendix C - US-224 Technical
Specifications ............................................ 42
5
Introduction
1.1 Overview
The US-224 is a USB controller designed for
Cubasis and other Digital Audio Workstation
(DAW) software applications. Its design
incorporates a two-input, two-output 24-bit
audio interface, a 16-channel MIDI interface,
and a control surface for your most-used
mouse functions.
Our goal was to create a device to make
your DAW software as easy to use as a
Portastudio. The transport and other
controls are designed and laid out to look
and function just like a Portastudio – if
you’ve ever used a tape recorder, you know
how to use the US-224.
Because the US-224 is USB based, it’s the
ideal companion to any desktop- or laptopbased digital recording setup. And since it’s
as compact as a laptop, it can be combined
with one to create a complete portable
digital audio workstation solution.
1.2 Features
The input section comprises a 24-bit audio
interface, capable of streaming two
simultaneous tracks of audio into your
computer. Inputs include two balanced XLR
mic inputs, two 1/4” unbalanced line inputs
(switchable to high-impedance, for direct
input of a guitar, bass or other hi-Z source),
and an S/PDIF digital input. Outputs include
a pair of unbalanced line outputs on RCA
connectors, S/PDIF output, and separate
headphone output.
The US-224 also features MIDI Input and
Output ports, allowing you to send and
receive data and MIDI Time Code (MTC)
from your MIDI-based keyboards and other
devices.
The US-224’s control surface includes a
variety of controls which make working with
audio software faster and easier. The
channel section of the control surface
consists of four channel faders (plus one
master fader), four MUTE/SOLO buttons, a
switch to toggle Solo and Mute functions,
and individual record-ready and select
switches. The master section features a
DATA wheel, PAN control (assigned by
pressing the channel SELect key) and
dedicated transport and locate controls,
offering one-button access to these oftenused functions.
1.3 What’s in the package
The US-224 package contains the following
items. When opening the package, please
make certain that all the included items are
present. If anything is missing, contact the
dealer where you purchased it.
US-224 Controller
USB Cable
CD-ROM containing driver software and
Cubasis VST
1.4 Nomenclature used in
this manual
The following conventions will be used in
this manual:
ALL CAPS will be used to designate
physical buttons, faders, controllers and
LED indicators on the US-224.
BOLD CAPS will be used to designate
physical connectors on the US-224
Italics will be used to designate software
dialog messages
Underlined Italics will be used to
designate software menu functions and
on-screen controllers.
6
2. Controls and Indicators
2.1 Front Panel
5
6
1
2
3
7
4
17
16
8
15
9
10
11
14
12
13
1.
2.
3.
4.
5.
6.
7.
Power LED
USB LED
MIDI In & Out LEDs
Mic/Line – Gtr Switches
Signal and OL LEDs
A and B Input Trims
Line Out and Phones Output
Levels
8. DATA Wheel
9. NULL Switch and LED
10.
11.
12.
13.
14.
15.
Input Monitor Switch and LED
Bank Switches and LEDs
Transport Controls
Locate and Set Switches
Channel and Master Faders
SELect
Switches and LEDs,
RECord Ready Switch
16. RECord LEDs
17. MUTE Switches and LEDs, SOLO
switch and LED
7
2.2 Rear Panel
20
18
25
22
26
19
18. PHONES jack
19. OUTPUT L/R jacks
20. INPUT A and B
21. MIC INPUT A and B
22. Digital In and Out
21
23
24
23. MIDI Out
24. MIDI In
25. USB jack
26. POWER switch
8
2.3 Front Panel Descriptions
1. Power LED
Indicates that the unit is powered on when
lit.
2. USB LED
Indicates a valid USB connection to the host
computer when lit.
3. MIDI In LED
indicates presence of incoming MIDI data at
MIDI input.
MIDI Out LED
indicates transmission of MIDI data from
MIDI output.
4. Mic/Line / Gtr Switches
switches inputs between Mic/Line level and
Hi-Z Level.
5. SIGNAL LED
indicates the presence of audio signal on the
respective channel. (Specifically, when input
level exceeds –42 dBFS.) Only functions on
analog input.
9. Fader NULL Switch and LED
when pressed, disengages physical faders
from the application. Used to match US224’s faders with those of the software
application’s internal mixer. When using
FADER NULL, the selected channel’s REC
and SEL LED’s indicate the US-224’s fader
position relative to the associated channel in
Cubasis’ mixer.
10. Input Monitor Switch and LED
toggles Input Monitor adjust mode. When
the associated LED is on, the FADER and
MUTE switches for channel strips 1 and 2
control the level of Inputs A and B to the US224’s stereo output.
11. Bank Switches and LEDs
pages between successive banks of four
faders.
12. Transport Controls:
REW
transport rewind.
OL LED
indicates an overload on the input level to
the respective channel. (Specifically, a level
of –2.5dBFS.) Only functions on analog
input.
FFWD
transport fast forward.
6. A and B Input Trims
input level adjustment. Rotate clockwise to
increase input level of analog sources.
PLAY
transport play.
7. Line Out Level
controls the level to the RCA (analog)
outputs.
Headphone Out Level
controls the level to the headphone outputs.
8. DATA Wheel
sends continuous controller information
to application. In Cubasis, functions as
a shuttle wheel if no SELECT switch is held
STOP
transport stop.
RECORD
transport record.
13. LOCATE << and >>
moves transport to L and R locate points.
SET
holding SET and pressing << and >>
buttons sets L or R locate points, either on
the fly or while stopped
down, or as PAN control if a channel
SELECT switch is pressed and held.)
9
2.4 Rear Panel Descriptions
14. Channel Faders
send continuous controller information for
banks of four faders, as selected by the
BANK switch
Master Fader
controls level to the stereo bus output,
and/or sends MIDI controller information to
the host.
15. SELECT Switches
selects channel for editing, recording, etc.
SELECT LEDs
indicates selected status of channel.
RECord Ready Switch
when held, pressing the SELECT button
toggles the selected channel(s)’ recordready status.
18. PHONES jack
standard 1/4” stereo headphone output.
19. OUTPUT L/R jacks
unbalanced (RCA) analog audio output of
stereo bus.
20. INPUT A and B
Analog inputs A and B. Balanced when
MIC/LINE-GUITAR switch is set to
MIC/LINE; unbalanced when set to GUITAR
21. MIC INPUT A and B
Balanced XLR Inputs A and B.
22. Digital In and Out
S/PDIF digital input and output.
23. MIDI Out
MIDI output
16. RECord LEDs
indicates record status of selected channel.
24. MIDI In
MIDI input
17. MUTE Switches
toggles mute or solo status for selected
channel.
25. USB jack
input for USB connection to host computer.
MUTE LEDs
when illuminated, indicates mute status of
selected channel. (When SOLO LED is on,
the associated channel’s MUTE LED’s
indicate solo status when lit)
26. POWER switch
push on/push off power switch.
SOLO switch
toggles between mute and solo status.
SOLO LED
when illuminated, indicates MUTE buttons
and LEDs are toggled to solo status.
.
10
3. Installation
3.1 System Requirements
PC: Minimum requirements: Pentium II - 266
MHz (or equivalent) processor running
Windows 98 (Second or Millennium Edition),
Windows 2000 or Windows XP, 96MB RAM.
Recommended:
Pentium
II
300MHz
processor with 128MB RAM or better.
(These requirements are for use with
Cubasis VST. Other applications will have
different
requirements.
Consult
your
application's manufacturer for further
information.)
NOTE: The US-224 is not supported under
Windows 95. We also do not recommend
Windows98 First Edition, due to its limited
USB implementation. A fast EIDE hard disk
is required for throughput of multiple audio
tracks. 96MB RAM is the minimum
recommended, but with all digital audio
programs, you’ll have better results with
more RAM. An SVGA graphics card is
suggested (min. 256 colors, 800x600
resolution or better).
Although this product has been checked for
use with standard configuration computers
which meet the specifications above, we
cannot guarantee the operation of the
product, even with computers meeting the
specifications, due to differences in
architecture and implementation between
computers.
Chipsets are also a concern with USB audio.
We’ve found that the most dependable
motherboards are ones which utilize Intelbased chipsets. You can determine your
chipset by going into the Device Manager.
On the Windows 98 desktop, right click on
My Computer, and select Properties. Click
on the Device Manager tab, and then click
on the plus (+) sign next to Universal Serial
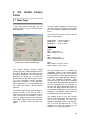
Bus Controllers. (see illustration 3.01)
Illustration 3.01 - Determining your USB Controller
The
following
chipsets
have
successfully run with the US-224:
been
Intel 82371 AB/EB PCI to USB Universal
Host Controller
Intel 82371 SB PCI to USB Universal Host
Controller
Intel 82801 AA PCI to USB Universal Host
Controller
ALi PCI to USB Open Host Controller
Some other chipsets, notably those
specifying Open Host Controllers or OHCI
(rather than Universal Host Controllers or
UHCI), have been subject to occasional
incompatibilities. While most OHCI systems
have no problems with the US-224,
occasionally some older OHCI systems will
exhibit problems. We have found that, in the
majority of these rare cases, a PCI-based
USB card utilizing an Opti-chip controller will
work dependably. These cards (also
available in PCMCIA format for laptops) are
available
through
a
number
of
manufacturers. Please consult the TASCAM
website for further information.
11
MacOS: PowerPC running MacOS 8.6 or
better, and a USB port. Any Macintosh
computer with one or more USB ports
running Mac O/S 8.6 or later (the US-224
has not been tested with Mac O/S X as of
this writing. Please check the website for
updates).
Very early iMac computers may need one
(or more) firmware updates to use the US224. Which firmware update(s) is (are)
needed depends on which Mac O/S version
is installed in the early iMac. Apple provides
details in its Apple Support Article #58174.
PowerBook G3 Series (or later) with built in
USB (or using a 3rd party PCMCIA USB
Card) have been tested and work fine.
Additionally, older PowerMac computers
using 3rd party PCI-based USB cards also
have been tested and work fine. Any iMac,
G3 or G4 will work fine as well. A MacOS
version earlier than 8.6 will not implement
full USB support, and is not recommended.
Again, plenty of RAM and fast drives are
suggested.
3.2 Installation
Because the US-224 is a USB device,
connection is pretty straightforward. Simply
plug the USB cable into the US-224, and the
other end into your computer.
Make certain that your computer’s USB host
port is enabled. (Normally, most standard
PC BIOS settings default to enabled, but
make certain that it hasn’t been turned off in
the BIOS).
NOTE: Handle the enclosed CD-ROM with
care. If it becomes dirty or scratched, it will
be impossible for a computer to read it, and
the software cannot be installed. If the disc
becomes unreadable, a charge will be made
for its replacement.
Do not attempt to play the enclosed CDROM using an audio CD player, as this may
cause damage to hearing, as well as to
speakers, etc.
Use only the enclosed USB cable to connect
the US-224 and the computer. Do not use
other types of cable for this purpose, as
some cables contain resistors. If you attempt
to use such a cable, the audio input and
output will not work properly, and the sound
level will be inaudible or very faint.
3.2.1 Windows
The US-224 drivers are available on the CD
as executable installers. You’ll find two
executable installer files on the disk, labeled
as:
“US224_Win98_Install_1_10.exe”
(for Windows 98 Second Edition and
Millennium Edition) and
“US224_Win2k_Install_1_10.exe”
(for Windows 2000 and Windows XP).
Note that we have also included the
individual driver files as a ZIP file, for users
wishing to install via Windows Hardware
Manager. However, we recommend using
the installers, as they will also locate and
uninstall any files pertaining to older
versions of the US-224 drivers.
To install under Win98SE or ME:
Note: The US-224 will run under Win98 SE
(Second Edition) or ME (Millennium Edition).
Due to its limited USB capabilities, First
Edition Win98 is not recommended.
Note: Run the Installer with US-224
turned OFF.
Double click on the executable file
“US224_Win98_Install_1_10.exe”.
(The
blue US-224 icon). The installer will run.
Click the "Setup" button. The Welcome
dialog box will appear.
Click the "Next" button. The driver files will
be installed to your hard drive.
12
wizard, which will find the three needed
files on its own. This will take about 3060 seconds.
In some cases, Add Hardware Wizard may
ask for the file "US224WDM.SYS". Should
this occur, click Browse and direct it to the
path Windows/System32/Drivers.
In some cases, Add Hardware Wizard may
ask for your Win98 CD-ROM if it is unable to
find all the needed system files. We suggest
you have it handy.
The Setup Complete dialog will appear.
Click "Yes, I want to restart my computer",
followed by the Finish button. The computer
will reboot.
Connect the US-224 to the computer, plug it
in, and turn it on. The Windows plug-n-play
will notice a new USB device and start the
Add New Hardware wizard, which will find
the needed files on its own. This will take
about 30-60 seconds.
The drivers are now installed and the US224 is ready to operate.
The drivers are now installed and the US224 is ready to operate.
To install using Windows New Hardware
Wizard:
Unzip the driver files into a new (empty)
folder on the hard disk.
Connect the US-224 to the computer,
plug it in and turn it on
The Windows plug-n-play will notice a
new USB device and start the Add New
Hardware wizard.
Choose "Search for a suitable driver for
my device" and press Next
Enter the path where the drivers are
stored and press OK
After Windows finds the
download" driver, click Next
Click "Finish" · The
components will be
discovered and loaded
Click "Finish" if prompted, and reboot if
prompted
To install under Win2K or Windows XP:
Note: Run the Installer with US-224 turned
OFF.
Double click on the executable file
“US224_Win2k_Install_1_10.exe”.
(The
US-224 Setup icon). The installer will run.
Click the "Setup" button. The Welcome
dialog box will appear.
Click the "Next" button. The driver files
will be installed to your hard drive.
"firmware
other driver
automatically
NOTE:
You may be prompted by a
message informing you that the software
you are about to install does not have a
digital certificate. Simply click “Continue the
installation anyway” and proceed.
If you are prompted to restart your
computer, do so.
Connect the US-224 to
plug it in, and turn it on.
plug-n-play will notice
device and start the Add
the computer,
The Windows
a new USB
New Hardware
Illustration 3.02 - Windows 98 New Hardware Wizard
13
3.2.2 Macintosh
Select “New Studio Setup” from the File
menu. When prompted to select a serial
(modem or printer) port, leave both
selections unchecked. Click yes and
continue. OMS will assess all the MIDI
ports attached to your computer and
build OMS instruments for the ones it
recognizes.
When the setup is complete you should
see a list of all your connected MIDI
ports. At the least you should see three
icons pertaining to the US-224
specifically: the US-224 icon, US-224
MIDI port and US-224 Control port.
Insert the CD-ROM into the computer,
double-click on the US-224 installer, and
follow its instructions.
Connect the US-224 to the computer, and
connect power to the unit. When the US-224
is connected and powered up, the Mac will
find the drivers itself.
3.3 Setting Up OMS (MacOS
Only)
(US-224 Control is the “virtual” MIDI port
with which the US-224 and its control
surface communicate with your host
application.)
Cubasis, ProTools and several other
applications rely on OMS for MIDI
implementation. OMS (Open Music System)
is a standard for MIDI management on the
Macintosh. Since the US-224 relies on MIDI
controller commands for its communication
with the host computer, you will need to
install OMS.
(The exception is Digital
Performer, which utilizes FreeMIDI. The v3
drivers support OMS and FreeMIDI
independently.)
Once OMS setup is successfully completed,
you can proceed with setting up the US-224
with your chosen application. Please refer
to the specific documentation for your
application for more details.
To set up OMS to work with the US-224:
A few words about computers and audio.
Much has been written about the best ways
to optimize your PC for handling audio
applications, and generally speaking, it’s a
much deeper topic than we’ve got space for
in this manual. But here are a few basic
points to help you get the best out of your
audio programs:
First, run the OMS installer. If you do
not have the current version of OMS, it
may
be
freely
downloaded
at
www.opcode.com.
Locate the “US-224 Drivers” folder,
which was placed on your desktop when
you ran the US-224 installer. In this
folder, locate the US-224 OMS driver.
Drag the US-224 OMS driver into the
OMS folder inside your System folder.
Do not drag this file into the Opcode
folder on your hard drive – it will not
work correctly.
Restart your computer. Then turn on
the US-224 and start the OMS Setup
application (located in the Opcode folder
on your hard drive).
3.4 Tuning Your PC
Don’t run extraneous applications. While
it’s likely you’ll sometimes use your
computer for applications other than
audio, it’s strongly recommended that
you avoid running other applications at
the same time you’re running audio
programs. Processing digital audio
requires considerable overhead from
your computer, so don’t overtax the
system by running other applications
(especially graphics or internet tools)
that can steal those resources.
14
Certain devices, such as network cards
and WinModems, can cause conflicts
with the native handling of USB. Should
you experience such conflicts, the
offending device can usually be
temporarily disabled in the Device
Manager. Refer to your Windows
manual for detailed instructions on how
to resolve conflicts.
Increase the amount of RAM in your
system. While most digital audio
software will function with a minimum of
32 MB, increasing your computer’s RAM
to 96, 128 or even 256 MB will markedly
improve performance.
Consider the addition of a dedicated
hard disk for audio; preferably one with
a high spindle rate (over 7200 RPM is
recommended
for
most
audio
applications). Using different drives for
program and audio data speeds up the
seek time for the audio track data. (Note
that simply partitioning a large drive will
not have the same effect, as the
computer will still be accessing the
same physical drive.) For best results,
add a SCSI or Wide-SCSI drive and
SCSI controller card. SCSI (and
particularly
Wide
and
UW-SCSI
protocol) are capable of considerably
higher data transfer speeds; you’ll notice
a dramatic increase in track count and in
the amount of signal processing plug-ins
your computer can handle. Note that
some of the recent UDMA-66 drives
have proven to be almost as fast (and
certainly cheaper); however, they are
still limited in the amount of physical
drives allowed and the bus length.
If you’re presently using a PCI-based
graphics card, and your motherboard
has an AGP slot, consider getting an
AGP-based graphics card. This will
decrease traffic on the PCI bus and
allow for faster screen redraws.
Assuming your computer has an IDE
hard disk (most do), enabling Direct
Memory Addressing (DMA) on will
improve performance. Some programs
(such as Cubase VST) allow you to
configure the DMA as enabled on install.
If you’ve not already done this, here’s
how to configure the DMA transfer
mode: On the Windows desktop, go to
the Start menu, Settings, Control Panel,
System. In the System Properties
window, select the Device Manager tab.
Click on the plus sign next to Disk
Drives, and highlight the IDE disk listing,
then click on the Properties button.
Check the DMA box under options. (see
illustration 3.03)
Illustration 3.03 - Enabling DMA on your IDE drives
In addition, a number of simple hardware
modifications and enhancements can
substantially improve your computer’s
handling of audio, as well as your track
count and DSP capability:
Special Note: For even more detail on
optimizing your PC for audio, please refer to
the PDF document PC_Optimization.pdf
included on the US-224 CD-ROM. This
document is also available on the TASCAM
website.
15
3.5 Notes on USB interfacing
The USB protocol is an extremely versatile
one, and much has been made of the
possibility of
using multiple (over 100)
devices on a single bus. While this is
certainly a possibility, we recommend using
as few other USB devices as possible in a
system equipped with the US-224. The
demands placed on the USB bus by passing
multiple tracks of audio through it are
considerable, and adding additional devices
will risk reducing that bandwidth.
NOTE: The drivers of many other USB
devices, especially CD burners, scanners,
printers, and cameras, are written to poll the
USB buss on a regular basis (usually once
every millisecond).
This can lead to
dropouts, clicks, pops and other artifacts in
your audio. We strongly suggest unplugging
any non-essential USB devices while
recording with the US-224. (USB keyboards
and mice are the notable exceptions – in
most cases they are passive devices with
very minor bandwidth requirements.)
Another well-documented advantage of USB
is the ability to “hot-plug” devices (that is,
plug them in and out without powering the
computer down). While this applies to the
US-224 as well, we recommend against
plugging or unplugging, or powering the unit
on or off, while running your audio
application. Doing so can result in audible
pops, or even hanging or crashing the
program.
You’ll find a listing of web links and
resources on hard disk recording on our
website at www.tascam.com.
16
4. Hooking up Audio and
MIDI to the US-224
4.1 Hooking up audio
To monitor output from your computer,
connect the analog outputs of the US-224 to
your mixer, amplifier or powered monitors.
Output volume is controlled by the LINE
OUT level pot. If you’ve got a digital mixer,
external D/A converter, or other device with
S/PDIF input, you may prefer to monitor via
the US-224’s S/PDIF output.
To record audio from the US-224 into your
computer, simply connect a device to the
appropriate input. Microphones should be
plugged into the INPUT A or B XLR inputs.
Note that the US-224 does not supply
phantom power, so if you’re using
condenser mics, you’ll need an external
preamp or power supply. You can connect
line-level sources (e.g., keyboards and
sound modules) into one of the two LINE
INPUTS (A or B). If you wish to plug in a
guitar, bass, or other high-impedance
source, simply move the sliding switch
below the Input Trim control to the “Guitar”
position. Finally, digital sources (e.g., CD
players, DAT’s etc) may be connected to the
S/PDIF INPUT.
The inputs of channels A and B are
available as either balanced XLR mic-level
inputs, unbalanced (1/4”) line-level inputs,
or S/PDIF digital inputs. Digital output is
taken directly from the stereo output of your
digital audio application. Digital input is
chosen in the US-224’s Control Panel, as
detailed in Section 5.1.
While it’s possible to use both mic and line
level analog inputs simultaneously on either
input, in actual practice this is not
recommended, as the signal level of the
inputs will be summed and very likely
interfere with each other.
Illustration 4.01 - Connecting audio to the US-224
Inputs A and B are also switchable between
the analog inputs and the S/PDIF digital
input. The input source is selected in the
US-224 Control Panel main page. (See
section 5.1 for details).
Input level for analog sources is regulated
by the TRIM level pots. NOTE: The INPUT
A and B TRIM controls do not affect digital
input. Sampled audio from the S/PDIF digital
17
input is passed directly to the application
without modification. To reduce the level of
the digital audio signal at inputs A and B,
you will need to reduce the output level of
your digital source.
Note about levels and gain structure here.
The TRIM controls directly affect the input
level at the A/D converters on the US-224,
so it’s advisable to use the SIGNAL and
OVER LEDs to help set your levels. Unlike
analog tape, when recording digital audio,
it’s important to keep your input level close
to 0dB, but never to exceed it. If the input
level is too high, the audio signal will clip not a desirable sound. If the input level is too
low, then the dynamic range that the US224’s A/D’s are capable of is not being used,
and the signal will be closer to the noise
floor than it needs to be. In either case, this
can not be fixed after the tracks have been
recorded, so it’s important to make this
adjustment carefully.
can use the MIDI I/O’s to send and receive
MTC (MIDI Time Code). This allows you to
sync tracks from your MTC-capable
Portastudio, DTRS multitrack, or any other
machine that accepts time code with your
digital audio software, for transferring tracks
back and forth for editing and processing.
4.3
Using
Monitoring
the
Input
In digital audio, the amount of time it takes
for the input signal to pass through the
circuitry of the unit and the software
processing and arrive at the outputs will
sometimes result in an audible delay. (This
is commonly referred to as “audio latency”.)
This added delay can be confusing when,
for example, you’re trying to overdub to
previously recorded tracks.
The INPUT MONITOR mixer built into the
US-224 eliminates this problem by providing
a way to listen to the signals you’re
recording directly, without any computer
processing delay. When the INPUT
MONITOR button is depressed, the first two
channel faders control the input levels of
inputs A and B to the US-224’s internal
mixer. Changes in these levels affect the
monitor and headphones outputs, but have
no effect on the audio levels seen by the
audio software application. The first two
MUTE buttons also affect the inputs, and
PAN is also available in this mode; the
inputs come up panned to center, but can be
SELected and PANned anywhere within the
stereo field.
Illustration 4.02 - Input trims and level indicator LED’s
4.2 Hooking up MIDI
NOTE: In INPUT MONITOR mode faders 34 are inactive.
NOTE: All the controls mentioned here are
also accessible via the ASIO control panel,
which displays the current status of the
INPUT MONITOR section.
The MIDI in and out jacks give you 16
channels of MIDI I/O. Simply connect the
MIDI out of your keyboard or other device to
a MIDI in jack on the US-224, and vice
versa. If you’ve got a MIDI sync box, you
18
4.4 Monitor vs. Master Level
It’s important to make a distinction between
MONITOR LEVEL control and level of the
stereo bus output, as controlled by the
MASTER FADER.
When using the US-224’s analog inputs,
only the TRIM controls actually affect the
input level to the audio software application.
When using the US-224’s Digital inputs, the
digital audio data received at the US-224’s
digital input is passed directly to the audio
application without any gain or other
modifications.
When monitoring audio playback from the
application via the US-224, the level is
controlled by that track’s software gain
control (which, in turn, is controlled by the
US- 428’s channel FADERs), the MASTER
FADER, and the LINE OUT or PHONES
OUT level controls.
The LINE OUT and PHONES level controls
directly affect the audio levels that appear
on the LINE OUTPUT and PHONES jacks,
respectively. The audio level produced at
the DIGITAL OUTPUT is not affected by
either control.
The MASTER FADER is the final level
control affecting the digital stereo output to
the application, consequently changes made
to the MASTER FADER level will also affect
the output level to the speakers.
Thus, if you want to simply reduce the
volume of your listening environment, you’ll
want to use the MONITOR LEVEL control
to do this without affecting the level of your
stereo mix.
19
5. The
Panel
US-224
Control
5.1 Main Page
In the Control Panel’s main page, you can
specify a number of options of the US-224’s
ASIO handling.
The Input selector toggles the source of the
US-224’s inputs from analog (via any of the
mic or line inputs) to digital (via the S/PDIF
input).
The Status area provides a view of the US224’s current settings:
Clock source:
Sample rate:
Resolution:
Internal or Digital In
44100 or 48000
24 Bit or 16 Bit
Digital input:
Signal:
Red - no digital input
Green - digital input active
Fmt:
Red - improper format
Green - proper S/PDIF format
Illustration 5.01 - Control Panel Main Page
The Control Surface Protocol setting
governs the type of MIDI messages used to
send fader and button information from the
US-224 to applications. The corresponding
drop-down box allows you to select from
US-224 Native or US-428 emulation modes.
For more information US-428 emulation
mode, refer to chapter 8. For use with most
DAW applications, it’s recommended that
you leave the default “US-224 Native”
selection.
The Master Fader always sends changes in
position via MIDI. It can also be used to
make the US-224 itself change the output
level coming from an application. (This is
useful for programs that do not have their
own master volume control, such as Sound
Forge.) In Cubasis, select the MIDI only
option.
Lock:
Red - digital in not ready to record,
Green - digital in ready to record
The Input Monitor area is a viewable and
controllable version of the US-224 INPUT
MONITOR mixer. Here you can control the
level and position of each US-224 input as it
will appear on the LINE OUTPUT, DIGITAL
OUT, and PHONES connectors. Three
controls (level, pan and mute) are available
for both inputs. Note that these controls can
also be changed from the US-224 by
pressing the INPUT MONITOR switch on
the unit, and using channel strips 1and 2. If
you make the changes this way, the controls
displayed in the US-224 Control Panel will
be updated to reflect the new values.
Any settings shown in the input monitor
section of this control panel can be saved as
one of four Snapshots. To save your
settings as snapshot number 1, for example.
click on “Save” and then click on “1”. Any
snapshot can then be recalled by just
clicking on its corresponding button.
20
You can also control the input monitor
settings that will be used when the US-224
first starts up. You can choose either the last
settings in effect at the previous system
shutdown, or any one of the four snapshots.
5.2 Buffer Size Adjustment
The US-224 Control Panel contains a
second page, tabbed “System”. On this
page the buffer size can be adjusted.
Smaller buffer sizes will result in lower
latency, but requires a faster system.
Illustration 5.02 – System Tab
About Buffer Sizing:
The US-224 driver temporarily stores input
and output audio samples in buffers. Larger
buffers provide more safety against other
system activities interrupting the audio and
producing clicks, pops or other audible
artifacts.
Smaller buffers provide lower
latency when using the computer to send
input audio to output channels in order to
monitor the input. The driver lets users
select which buffer size works best for their
computer and audio application. Note: This
adjustment does not affect the latency of the
US-224’s hardware input monitor, which is
always less than an ultra-low 1.5 ms.
To adjust the buffer size, run the US-224
Control Panel and go to the System tab.
The Audio Latency slider lets you change
the buffer size from a minimum of 256
samples (128 samples on the Mac) to a
maximum of 2048 samples.
All audio
programs that use the US-224 must quit
before a new audio latency setting takes
effect. Using Cubase VST at 44.1 kHz
sampling rate, a 256 sample buffer size
gives appx. 12 ms of monitoring latency,
while a 2048 sample buffer gives appx 43
ms latency.
5.3 The Chromatic Tuner
Open the US-224’s control panel and select
the “Tuner” tab.
In the “Input” section, select the US-224
input channel that you want to tune (A or B).
Play a note and adjust the trim knob for that
input until the signal is strong, but not
clipping.
The “Level” meter on the screen should
display bright green segments without
lighting the top red segment.
If desired, you can change the Tuning
Standard in the “Reference” section.
Normally, the Tuning Standard is set to 440
cycles per second for a middle “A” note, but
you can use the up/down arrows to change
it to a number between 430 and 450 cycles
per second.
As you play, the detected note will be
displayed below the Tuning lights (A# or E,
for example). If the note is sharp, the
“Sharp” arrow and a Tuning light to the right
of ‘0’ are bright red; if the note is flat, the
“Flat” arrow and a Tuning light to the left of
‘0’ are bright red.
21
The numbers below the tuning lights indicate
how far out of tune the note is, in cents (100
cents is one semitone). When the note is in
tune, the center ‘0’ light and both the Flat
and Sharp arrows are bright green.
Illustration 5.03 – The Chromatic Tuner Page
Note: The chromatic tuner consumes some
CPU bandwidth in your system. Therefore,
when you finish using the tuner, we
recommend that you either select another
control panel tab or close the control panel.
22
6. Interfacing with your
Audio Software
This section is intended to present the basic
concepts needed to interface the US-224
with the bundled Cubasis VST application.
This discussion, however, is not intended to
replace your software’s users’ manual. If
you’ve got questions specific to Cubasis,
please refer to the Cubasis User Manual for
the program for further detail.
Note: While the US-224 will function with
many of the same applications as the US428 when in US-428 emulation mode, the
full operational details of each individual
program are beyond the scope of this
manual. Details on using the US-224 in US428 emulation mode may be found in
chapter eight. More specific information on
how the US-428 interacts with a number of
other applications may be found in section
eight of the US-428 manual, which may be
downloaded in PDF format from the
TASCAM website. You should also refer to
the manual for your particular audio
application for further details.
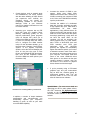
Illustration 6.01 - Cubasis Audio Control Panel.
In the Audio Control Panel, you can select
the number of audio channels you wish to
use, as well as the sampling rate, Disk
Cache settings, and MIDI to Audio offset.
See the Cubasis manual for more
information on these settings.
6.1.2. ASIO Control Panel
6.1 Selecting the US-224 as
your Audio Device
6.1.1 Audio Control Panel
In Cubasis, open the Audio Control Panel
(see illustration 6.01). It’s located in the
Audio pulldown menu, under System. Select
the ASIO Device pull-down menu, and
select ASIO US-224 Driver. If your software
only supports 16 bit recording, a 16 bit driver
has also been included.
In the Audio Control Panel, click on the
button marked ASIO Control Panel. The US224 Control Panel will appear. In Cubasis,
make certain the protocol is set to US-428
Emulation Mode. Refer to chapter five, US224 Control Panel for information on these
settings.
6.1.3 VST Remote
In Cubasis, the program will automatically
recognize the US-224 as a remote controller
unit. In most other applications, you will
need to select the US-224 as the program’s
remote control. In the case of applications
which do not directly support the US-224,
you will need to select US-428 as your
control device, and select US-428 emulation
mode in the US-224's Control Panel.
23
To do this in Cubase (full versions), for
example, select the VST Remote option
from the Audio menu, and choose the US428 option (See illustration 6.03). You will
also need to set the Input and Output
devices to “US-224 Control Port” and the
“Remote” setting should match the setting
chosen in the US-224 Control Panel (see
illustration 6.03).
Illustration 6.04 - VST/24 Audio Control Panel
6.3 Input Enabling
Illustration 6.03 - Cubase VST Remote Panel
You will need to enable the inputs on
Cubasis. Open the Audio Input window (see
Illustration 6.05) and select one mono track
or a stereo pair.
6.2 Setting the Sample Rate
and Bit Depth
The US-224 supports sample rates of
44.1kHz and 48kHz. In the Audio Control
Panel, select the pull-down menu for
Sample Rate and select either 44.1 kHz or
48 kHz.
The US-224 control protocol includes two
separate drivers for 16-bit or 24-bit
operation. This selection is made in the
Audio Control Panel (see illustration 6.04).
NOTE: The bundled Cubasis VST supports
only 16-bit audio. If you want to record in
24-bit mode you will need to upgrade to
Cubase VST or another application that
supports 24-bit audio.
Illustration 6.05 - Input window
Note that Cubasis supports only one input
for recording (though this can be a mono or
stereo track).
Then select the inputs on Cubasis’ internal
mixer. If you’re recording a mono input, left
click on the input selector above the channel
strip and select the desired input L or R. If
you’re recording a stereo track, the inputs
will both be selected automatically Verify
that the designated channels' inputs ("IN")
are selected, and the associated channels
are receiving signal. (see illustration 6.06)
24
6.4 Transport Controls and
Locate Points
Illustration 6.06 - Input selection window,
showing Mutes and Solos
Highlight a track in the arrange window, and
that track will automatically be RecordEnabled. (see illustration 6.07)
Verify that the drop-in and drop-out features
in Cubasis (on the transport bar) are not
enabled (or if so, that they are enabled at
the desired locate points). Press the
RECORD button on the US-224. Cubasis
will issue a one or two bar countoff
(depending on what’s set in Cubasis’
Metronome preferences menu), then
commence recording.
The transport controls on the US-224 are
set up to directly correspond to the onscreen transport controls in Cubasis. So, for
example, pressing PLAY on the US-224 will
activate the PLAY mode in Cubasis.
Pressing STOP will halt playback on
Cubasis. Pressing REW or FFWD will
activate Cubasis’ transports to Rewind or
Fast Forward, respectively. The DATA
Wheel will also act as a shuttle wheel for the
transport. (See section 6.6 for details)
Cubasis will record audio or MIDI into the
track that is highlighted on the Arrange
screen (see above). Pressing RECORD will
start Cubasis into a count-off, after which it
will begin recording audio or MIDI data into
the selected track.
Illustration 6.08 - Transport Bar
The locate points function much like the left
and right mouse buttons in Cubasis. To
jump to the Left locate point, press the
LOCATE << button, and to jump to the right
point, press the LOCATE >> button.
To set locate points, hold the SET button
and press the << or >> button to set the
corresponding locate point. This will work
when the transport is stopped or when
moving, allowing you to set locate points on
the fly.
Illustration 6.07 - Record Enable
25
6.5 Mute/Solo
The MUTE buttons toggle the Mute function
in Cubasis’ VST Channel Mixer for the
selected channel. When a channel is muted,
there are two indications: the Mute button in
the Cubasis VST Channel Mixer’s display
will be activated, and the MUTE LED on the
US-224 corresponding to the muted track(s)
will be illuminated.
The SOLO switch works by toggling the
status of the MUTE switches to SOLO
mode. When the SOLO button is pressed
and the SOLO LED is lit, the MUTE buttons
act as SOLO buttons, soloing the selected
channel(s). (See illustration 6.06)
6.6 Data Wheel
The DATA WHEEL acts as a continuous
controller, and is capable of a variety of
functions. In Cubasis, its default function is
as a transport shuttle. Rotating the wheel
clockwise will advance the song position
forward, and rotating it counter-clockwise
will move the transport backward. (Note:
Use of the transport shuttle will cause a
momentary drop-out in the audio as the
application re-syncs.
This is normal
operation in Cubasis.)
If a channel SELect switch is held down, the
DATA Wheel will function as a PAN control
for the SELected channel.
In other applications, the shuttle wheel can
perform a number of other functions in US428 emulation mode. Please refer to the
US-428 manual for more details.
6.7 BANK Controls and FADER
NULL
The BANK SELECT keys page between
successive banks of four faders. Selecting
any of the four faders will control the
corresponding channel in the software’s
internal mixer.
The US-224 will support an unlimited
number of channels. It is only limited to the
maximum amount of channels your audio
software will support.
When changing to a different bank of
faders, you may find that the fader on the
US-224 is now out of position with the
associated
channel’s fader in Cubasis.
Pressing the FADER NULL button will
disengage the US-224’s faders from the
program, allowing you to move the US-224’s
fader to match the fader in the software’s
internal mixer. The REC and SEL LED’s
function as up/down indicators, guiding you
to the correct fader position. For best
results, it is recommended that FADER
NULL function be utilized with the transport
stopped.
6.8 ASIO2 Direct Monitoring
Some audio programs that can use ASIO 2
for audio input and output, such as
Steinberg’s Cubase VST, support a feature
called “Direct Monitoring.” This lets the
program’s user interface control hardware
input-to-output monitoring paths. Without
Direct Monitoring enabled, the latency is
controlled by your buffer size setting (see
section 5.2) and your program can add
effects such as reverb and EQ in both the
monitor and record paths. With Direct
Monitoring enabled the latency is ultra-low
(less than 1.5ms), but you can’t hear effects
in the monitor path (although they will be
recorded if enabled).
26
To enable Direct Monitoring in Cubase VST,
open the Audio Control Panel. In the
“Monitoring” section of the window, check
“ASIO Direct Monitor.” (You also need either
“Record Enable Type” or “Tape Type”
monitoring enabled.)
27
7. A Sample Recording
Session in Cubasis
Okay. You’ve got your US-224 connected to
your computer, and you’ve loaded the
drivers. Your audio software is loaded, and
you’re ready to cut some tracks. Let’s walk
through a typical recording session with the
US-224 and Cubasis.
NOTE: This chapter is intended as a quick
start guide toward recording and mixing with
Steinberg Cubasis and the US-224. It is in
no way meant to be a comprehensive guide
to Cubasis. For full details on the Cubasis
application, please refer to the Steinberg
Cubasis manual on the US-224 CD. You’ll
find Windows and MacOS versions.
7.1 Setting Up
Before starting Cubasis, make sure that the
US-224 is turned ON, that its USB cable is
connected to your computer’s USB port,
and that the device has been initialized.
NOTE: When turning the US-224 on or off,
or launching or closing the application (e.g.
Cubasis VST), turn down the LINE OUT and
PHONES LEVEL controls.
When Cubasis VST is running, do not turn
off the US-224. Also, you should not
disconnect or connect the cables of the US224 or any other USB equipment while
Cubasis VST is running.
If you launch Cubasis or another audio
program before the US-224 has been
initialized, the software will not “see” the
US-224 and you will not be able to operate
the software’s controls, perform MIDI I/O, or
record or play back audio. Likewise, many
software applications don’t expect that
devices will be removed while the program
is running. So make sure to exit your audio
application programs before disconnecting
or turning off the power to the US-224.
It is also advisable, as with all audio devices,
that you turn your amplifier or powered
monitors off until the program is up and
running, to avoid audio spikes.
Once you are certain that the US-224 is up
and running, start the Cubasis application by
double- clicking on its icon on the screen.
Open the Audio Control Panel and select the
US-224 as your audio device (see “Selecting
the US-224 as your audio device” in
previous chapter.) If you don’t see the US224 listed in your Audio Control Panel, make
sure it’s been installed correctly by referring
to the section on Troubleshooting.
Select the ASIO Control Panel, and choose
a sample Rate (44.1kHz or 48 kHz). Your
Audio Clock Source should be set to
internal, unless you’re using S/PDIF digital
input or otherwise slaving Cubasis to an
external source.
Select the Disk Caching Scheme. Option 1
is “Virtual Tape Recorder”, used primarily
when your tracks are linear and of longer
duration. Option 2 corresponds to “Audio
Sequencer”, and is more applicable when
using loops and shorter segments of audio.
Option 3, “Tape Recorder/Sequencer”, is
your best choice when working with a
combination of short audio clips and longer
linear tracks. (For further information on Disk
Caching, please refer to the Cubasis VST
manual.)
If you’re using Cubasis, the program
automatically connects to the US-224
control surface and LEDs, but if you’re
using another program, you will probably
need to select the “US-224 Control Port”
MIDI In and Out devices in that program’s
MIDI Setup menu.
If you’re using the US-224’s internal MIDI
interface, you’ll need to enable it in the
Options/MIDI Setup menu. For more
information on setting up VST’s very
sophisticated MIDI functions, please refer to
the VST manual.
28
Connect your audio sources to the US-224.
Connect an analog source via the XLR or
1/4” inputs, or a digital source via the
S/PDIF input.
7.2 Recording Your Tracks
In Cubasis, choose the input(s) you wish to
enable on the US-224. In the Audio menu,
select Input, and click on the input pair on
the US-224. The green Input icons will light
in VST’s Input window for active inputs.
Select the Audio track(s) to record to by
highlighting that track in the Arrange
window.
NOTE: If this is the first track recorded in a
given project, Cubasis will probably respond
with a dialog box asking you for a path to
save the audio files. It is highly
recommended that you create a unique
folder for each song or project, as audio
.WAV files can accumulate very quickly on
your hard disk, and keeping them organized
can get pretty complicated.
Once you’ve enabled your tracks, you’ll want
to monitor audio through them to set your
levels.
Open Cubasis’ Monitor Mixer
(Audio/Monitor menu), and make certain
you’ve assigned your channel inputs and
enabled them. You should see audio signal
on those channels’ meters (assuming you’re
sending signal from your source).
If your input signal is too high, the OL LED
will glow steadily red. If the signal level is too
low, you might only see a flicker, or nothing
at all, on the SIGNAL LED.
You can regulate the input level of the input
source in several ways. First, make sure that
the signal you’re sending to the US-224 is
within a reasonable range – it should
illuminate the green SIGNAL LED, but the
red OL LED should only flicker occasionally.
You can then fine adjust the level with the
TRIM knobs for the selected channel(s).
NOTE: The SIGNAL and OL LED’s do not
function with digital input.
In the case of digital input, input level is
regulated by the output level of the source,
and passed directly to the software
application without modification.
On Cubasis’ Transport Bar, you can enable
the recording to drop in or out of Record
based on the locate points you’ve set. If you
do not wish to enable this function, make
certain the buttons for drop in and drop out
are not enabled.
Press the RECORD button on the US-224. If
you’ve got the metronome’s Count-off
function enabled, you’ll hear a one or two
bar countoff, and then the program will enter
Record mode. It will stop recording when it
reaches the drop out point, or if none is
enabled, when you hit the STOP button.
Cubasis will now create a display of the
track(s) you’ve just recorded. This can take
a few seconds to a few minutes, depending
on how long the recorded tracks are and
how many there are. You’ll then see the
tracks appear in your arrange window.
7.3 Overdubbing
To overdub more tracks, simply select and
enable additional tracks as you did the
previous ones, and repeat the procedure.
You can monitor the tracks you’ve already
recorded via the US-224’s outputs, while
recording additional tracks into Cubasis via
the US-224’s inputs. Be sure to assign each
track to its own channel in the program’s
internal mixer. For more information on
Cubasis’ mixer functions, including groups
and output assigns, please refer to the
Cubasis manual.
When overdubbing, you can also select the
INPUT MONITOR mode by pressing the
INPUT MONITOR button on the US-224.
29
When the corresponding LED is illuminated,
channel strips 1 and 2 can be used to adjust
the level, pan and mute status of inputs A
and B, respectively. This will enable the first
two faders as Input level monitors, allowing
you to hear the inputs at the source, in sync
with the previously recorded tracks.
selecting Write on the mixer panel in
Cubasis, your fader moves panning, etc.,
(as well as EQ, FX settings and other
changes) can all be recorded into Cubasis’
automated mixer settings. To play back the
automated mix, select Read on the mixer
panel. (You can play back existing mix
moves while continuing to update your mix
by selecting both Read and Write.)
7.4 Mixdown
For more detail on Cubasis’ mixdown
procedure, refer to the Cubasis manual.
You can control the mix of the channels
you’ve recorded via the US-224. Make
certain you’ve got the correct bank selected
- the small on-screen window that indicates
“VST Mixer 1-8”, or “CTM Mixer 1-8” or “GM
Mixer 9-16” is your best indication of the
currently selected bank. The LEDs next to
the BANK buttons on the US-224 also
indicate the selected bank:
VST Mixer 1-4 =
VST Mixer 5-8 =
CTM Mixer 1-4 =
CTM Mixer 5-8 =
CTM Mixer 9-12 =
CTM Mixer 13-16 =
only
only
only
only
only
only
You can change the level of a track by
adjusting its corresponding fader on the US224 control surface.
To adjust other
parameters on a particular channel, first
press the SELECT key for that channel on
the US-224. The selected channel will be
highlighted below that channel’s fader on
the screen.
Moving the channel fader on the US-224 will
adjust the relative volume of the selected
channel in Cubasis. The corresponding
fader on screen will update as you move the
US-224’s fader.
The PAN function on the US-224 will pan
the selected channel from Left to Right on
the stereo buss. To activate the PAN
control, press and hold the SELect switch for
the desired channel and then turn the DATA
Wheel in the desired direction.
Once your tracks are recorded, mixing can
be automated on Cubasis’ internal mixer. By
30
8. Other Applications and
US-428 Emulation Mode
As we’ve mentioned throughout this manual,
the US-224 is an extremely versatile device.
Its capabilities as a controller go well beyond
those we’ve described thus far with the
bundled Cubasis program.
Since the US-224 is based on TASCAM’s
very popular US-428, it is capable of
providing basic functionality in most of the
applications supported by the US-428
(subject to its hardware limitations).
Clearly it would be impossible to fully
document the US-224’s operational details
with each application. If you want to operate
the US-224 with a US-428 supported
application in US-428 emulation mode,
please refer to the specific chapter in the
US-428 manual for details on setup and
operation with that application.
It’s also important to note that the US-224 is
fully functional as a 16- and 24-bit audio
interface and 16 channel MIDI interface with
virtually all Windows and MacOS compatible
applications. Even those applications which
do not support the US-224 as a controller
can still use the US-224 as an audio and
MIDI interface.
Since the US-428’s release, TASCAM has
been working together with developers
throughout the professional audio industry
and beyond to create support for new
applications; much of this research will also
benefit users of the US-224. Since the
development of new support for the US-428
and US-224 is ongoing and expanding, we
recommend you visit the Computer
Recording area of www.tascam.com for
current news and information, and check out
the online users’ forum as well.
These individual documents are also
available on the CD-ROM, as well as on our
website.
As new application support
becomes available, we will be posting the
information for free download.
31
8.1 Setting up Sound
Manager Support (for use with
ProTools Free and Other MacOS
Applications)
The Macintosh Sound Manager is a
standard 2-channel software interface for
playing and recording sound on a Mac. The
audio inputs and outputs (speakers) that are
built into any Macintosh use the Sound
Manager interface, and essentially every
Mac application that uses sound supports it.
This includes not only audio recording and
editing programs, but also games, video
editors, web browsers, MP3 players, and
even Macintosh beeps and system sounds.
Even some audio-oriented program only
support Sound Manager I/O, such as
Digidesign’s Pro Tools Free. The Sound
Manager input and output sources are
selected by control panels. The control
panels used are different in MacOS 8.6 and
9.0, and are explained separately below.
MacOS 9.0
The “Sound” control panel in MacOS 9.0 is
used to select Sound Manager inputs and
outputs. With this control panel active, click
on the left of the window where it says
“Output” to display the possible Sound
Manager output devices. On the right, click
on “US-224” to select it as the Sound
Manager output. The US-224 has its own
output volume controls, so the output
volume slider can only be able to mute or
enable sound output. Moving the volume
slider to the right or clicking on it will send a
system beep out the US-224 outputs.
When you click “Input” on the left, the
available input devices appear on the right.
Click on “US-224” to select it as the Sound
Manager input device. Below it is “Input
Source”: select A:B.
When an application is using the Sound
Manager inputs, this “Input Source” field is
grayed out, displaying the current inputs but
preventing you from changing them here.
You can still change the input pair without
quitting your program, however. To do this,
bring up the US-224 control panel and go to
the System tab. You will find a selection
there labeled “Sound Manager Input.” Here
you can change the input pair at any time,
even when an audio program is active. The
grayed out “Input Source” field in the
“Sound” control panel “Input” section will
display any input changes you make.
MacOS 8.6
The “Monitors and Sound” control panel in
MacOS 8.6 has a “Sound” section. It
displays the currently selected Sound
Manager output and lets you select among
several “Built In” input sources. It cannot be
used to select the US-224 as the Sound
Manger input or output.
The “Sound” control panel has a selection
line at the top to let you choose among
“Alert Sound,” “Sound In,” “Sound Out,” and
“Volume” windows. (Note: If your “Sound”
control panel does not have all these
options, you should use the alternate
“Sound” control panel found in Apple
Extras/Sound Control Panel.) With “Output”
selected, you can choose “US-224” as the
Sound Manager output. Since the US-224
has its own output volume control, its slider
32
under “Volume” in this control panel is only
used to enable or mute the US-224 output.
Under “Sound In” you can select the “US224” instead of the Mac’s Built-in sources.
You can also do this under the “US-224”
control panel’s “System” tab. There you will
find a field labeled “Sound Manager Input”.
You can change this setting at any time,
even while a program is using the Sound
Manager I/O.
33
9. Technical Support
9.1 Troubleshooting
When installing the US-224 for the first time,
if you experience any unusual behavior,
here are some things to check:
Under Midi Devices And Instruments you
should see:
Audio Drivers
Expand by clicking on the plus (+) sign and
you should see:
In Control Panel / System / Device
Manager (Win98SE/ME) or Control Panel
/ System / Hardware / Device Manager
(Win2000/XP), find the Audio control panel.
It's called Sound, Video And Game
Controllers in Win98SE, or Sound &
Multimedia in W98ME and Win2K. You
should see two entries for the US-224:
MIDI for US-224.
US-224 Port 1
US-224 Control
(Port 1 corresponds to the US-224's
physical MIDI I/O ports. US-224 Control is
the "virtual" USB MIDI port with which the
US-224 and its control surface communicate
with your application.)
TASCAM US-224
US-224 WDM Interface
In Control Panel / Multimedia, select the
Audio tab.
9.2 Tech Support Contacts
Under Playback, US-224 Out
appear in the drop down menu
Under Recording, US-224 A:B
appear in the drop down menu
If you're unable to solve an installation
problem, you've got several options for help.
should
should
MIDI Drivers:
In Control Panel / Multimedia, select the
MIDI tab. When Single Instrument is
selected, you should see:
US-224 Port 1
US-224 Control
In Control Panel / Multimedia, select the
Devices tab. Under Audio Devices, you
should see:
First, we recommend you visit our website at
www.tascam.com, and check for any
updates, FAQ or support news.
Also on our website, you'll find our always
lively Online User Forums. TASCAM
Product Specialists are on line to field
questions, but don’t be surprised if your
question is answered by another user. The
BBS is also a forum for discussion,
comments and ideas on the US-224 and
US-428. You’ll find users of a variety of
software platforms, so someone’s likely to
be familiar with your program of choice.
Audio for US-224
34
9.3 Troubleshooting FAQs
Also, since many of the situations you’re
likely to encounter will be related to the
software you’re using, it’s a good idea to
check not only our website, but the websites
and resources of the software program’s
manufacturer as well.
You
can
also
email
us
at
[email protected], or contact our
telephone support. Outside the US, please
see the Contact page of our website for
worldwide contact information.
Before Contacting Us
Before contacting us with your query, please
have the following information available:
Type of Computer (PC or Mac),
processor type and speed, and (if
possible) motherboard
Type of USB Host controller (see the
US-224 manual for details)
Installed RAM, type of hard drive(s)
Type of graphic card
What OS are you running?
If running Windows98SE, have you
installed the HotFix?
What other hardware is installed in this
computer? SoundBlaster or other audio
cards? Other USB devices/hubs?
Scanner, CD burners, WinModem, etc?
What application(s) are you running?
If running the bundled Cubasis
application, is/was another version of
Cubase or Cubasis installed?
What plugins to you have installed?
Please provide us with full details of your
problem, including:
Any errors or oddities encountered
during setup and installation Items listed
above that do not appear
Any error messages encountered.
Please try to copy or quote them in full.
Any behavior that may cause errors,
especially repeatable ones.
NOTE: While this manual contains some
basic FAQ’s, you will find a much more
detailed FAQ document on the US-224 CDROM. The FAQ is also updated on a
regular basis, so we suggest you check the
TASCAM website for the current version.
Q. I don’t see the US-224 in Cubasis’
Audio Control Panel.
A. Check to see if the US-224 is installed
correctly within your OS. In Windows, go to
the Device Manager (My Computer/Control
Panel/Setup), and click on the Sound, video
and Game controllers tab to make sure the
US-224 is installed and operating correctly.
Also check to see that your USB cable is
connected securely, and that the unit is
powered up before booting Cubasis.
Q. I’ve connected audio to the US-224,
but can’t hear anything.
A. Make sure your input levels are sufficient.
The green INPUT LED’s should light to
indicate the presence of analog audio signal
at the inputs. Make sure your monitor or
headphone levels are turned up, and
connected correctly.
Q. My audio is distorted.
A. Check to see if the signal is overloading.
The red OL LED’s should only occasionally
flicker. In the case of a digital input, try
reducing the output level of the source.
Q. I can see a response on screen from
Cubasis to the US-224, but I don’t hear
any audio.
A. Make sure your audio signal path is
correctly routed. Make sure the channels
you’re trying to monitor are not in Input
mode. Make sure your output level is turned
up. Make sure that the US-224 ASIO driver
(16 or 24 bit) is selected.
Q. I can hear audio, but I see no response
to the US-224 on screen.
A. Make sure you’ve got the US-224
selected in the VST Remote menu. Make
sure you’re looking at the correct BANK of
faders on screen.
35
Appendix A - MIDI Implementation Chart
Function
Basic Channel
Mode
Note
Number
Velocity
After Touch
Default Changed
Default
Messages
Altered
True Voice
Note ON
Note OFF
Keys
Channels
Pitch Bender
Control Change
Program Change
True #
System Exclusive
System Common
System
Real Time
Aux Messages
:Song Pos
:Song Sel
:Tune
:Clock
:Commands
:Local ON/OFF
:All Notes OFF
:Active Sense
:Reset
Mode 1 : OMNI ON, POLY
Mode 3 : OMNI OFF, POLY
Transmitted
X
X
X
X
……
X
……
X
X
X
X
X
X
X
……
X
Recognized
X
X
X
X
Remarks
Through
X
Through
X
X
X
X
X
X
X
Through
Through
Through
Through
X
Through
X
X
X
X
X
X
X
X
X
X
X
X
X
X
X
X
X
X
Through
Mode 2 : OMNI ON, MONO
Mode 4 : OMNI OFF, MONO
Through
Through
Through
Through
O:Yes
X: No
36
Appendix B – Control Protocol
Purpose
Provide simple, effective integration between the US-224 and host software applications.
Introduction
The US-224 provides digital audio I/O, MIDI, and control surface functions in a single affordable
USB-based product. While the audio and MIDI I/O follow established which are easily interfaced
with host applications, full integration of the control surface aspects of the US-224 requires a set
of messages to be defined which permits two-way communication of control information between
the host application and US-224.
Functional Groups
The US-224's control surface are divided into several major functional groups:
Transport and Locate switches and status LED's
Per-channel controls (faders, switches, and LED's)
Bank switching buttons and LED's
Function switches, LED's and continuous "data wheel"
Communication model
Standard MIDI controller and sysex messages will be used to communicate between the host and
US-224. In many cases, the commands transmitted by the US-224 are identical to those
generated by the JL Cooper CS-10 controller. In general, it is desired that overall system "state
information" be maintained by the host application, rather than in the US-224. As an example,
here is how a change in transport state from STOP to PLAY might be communicated:
User presses PLAY button on US-224.
Play-button command is sent via USB to host application as MIDI .
Application receives Play message from the "US-224 Control" Midi input device.
Application switches to PLAY mode, just as if user had performed the operation with a
mouse-click.
Application sends Transport Update message to "US-224 Control" Midi output device, which
is sent via USB to the US-224.
US-224 interprets transport-update command, and responds by activating the PLAY LED.
In this example, the US-224 doesn't "know" the state of the transport. It has simply sent
command indicating the button-press, and responded to the transport-update command from the
host by lighting the appropriate transport LED.
37
Transport/Locate command set
The US-224 contains a set of standard transport switches: REW, FFWD, STOP, PLAY, and REC.
In addition, dedicated status LED's are used to communicate the current transport state to the
user. The LED's indicate REW, FFWD, PLAY, and REC. (Note that there is no LED to indicate
STOP.) Additionally, there are three locate switches, which can be used to set and locate to
markers established on the host application's timeline. SET is intended to be used as a SHIFT
key, along with either the < or > button to drop a marker at the application's current time.
US-224 to Host Messages (transmitted at button-down):
•
•
•
•
•
•
•
•
TRANSPORT_REWIND
o Button-down: BF 13 7F
o Button-up: BF 13 00
TRANSPORT_FFWD
o Button-down: BF 14 7F
o Button-up: BF 14 00
TRANSPORT_STOP
o Button-down: BF 15 7F
o Button-up: BF 15 00
TRANSPORT_PLAY
o Button-down: BF 16 7F
o Button-up: BF 16 00
TRANSPORT_REC
o Button-down: BF 17 7F
o Button-up: BF 17 00
LOCATE_LEFT (non CS-10)
o Button-down: BF 18 7F
o Button-up: BF 18 00 7.
LOCATE_RIGHT (non CS-10)
o Button-down: BF 19 7F
o Button-up: BF 19 00
SET_LOCATE (non CS-10)
o Button-down: BF 1A 7F
o Button-up: BF 1A 00
Host to US-224 Messages (transmitted when host transport-state changes:
•
UPDATE_TRANSPORT_LED:
o State is REWIND: F0 4E <UNIT> 12 01 13 <STATE> F7
o State is FFWD: F0 4E <UNIT> 12 01 14 <STATE> F7
o State is STOP: F0 4E <UNIT> 12 01 15 <STATE> F7
(Note: US-224 has no STOP LED: message is defined for future devices)
o State is PLAY: F0 4E <UNIT> 12 01 16 <STATE> F7
o State is REC: F0 4E <UNIT> 12 01 17 <STATE> F7
Where:
• <UNIT> is device ID. Should be transmitted as 0 for now.
• <STATE> == 0 turns LED OFF
• <STATE> == 7F turns LED ON
38
Per-channel Control command set
The US-224 includes a set of 4 channel-strip controls and LED's. Each channel-strip includes the
following controls:
a.
b.
c.
d.
linear fader for gain control
Mute/Solo switch and LED
Record-enable LED
Select switch and LED
Three modifier switches affect the channel strip indicators:
a. A momentary NULL switch and LED (to aid the user in matching the fader sliders with the
"virtual" value maintained by the application software). When the application receives a
NULL button-down message, it compares its internal fader values with the most recentlyreceived physical fader positions for the currently- active bank of eight channels, and
sends out messages which light the REC and SELECT LED's to indicate the direction the
user needs to move each of the faders to agree with the application's virtual fader levels.
When the user releases NULL, the application sends REC and SELECT LED update
messages which will cause them to revert to their "native" function (indicating record and
channel-select status).
b. A REC (record) button which acts as a "shift" key, enabling the track select switches to
affect the record-enable status of the corresponding track in the application software.
c.
A MUTE/SOLO mode button, which toggles the function of the mute buttons and
indicators, making them activate a SOLO function on their associated track.
US-224 to Host Commands:
1. FADER_POSITION: BF 4x vv x = [0..3], vv = [0..3F]
2. MUTE_SWITCH:
a. Button-down: BF 0x 7F
b. Button-up: BF 0x 0 x=[0..3]
3. SELECT_SWITCH:
a. Button-down: BF 2x 7F
b. Button-up: BF 2x 00 x=[0..3]
4. NULL_SWITCH
a. Button-down: BF 28 7F
b. Button-up: BF 28 00
5. REC_EN_SWITCH:
a. Button-down: BF 29 7F
b. Button-up: BF 29 00
6. SOLO_SWITCH:
a. Button-down: BF 2A 7F
b. Button-up: BF 2A 00
39
Host to US-224 Messages:
Note: In these messages, <STRIP #>is a number in the range [0..3], corresponding to the
channel-strip #, and <STATE>is either 0x00 (LED OFF) or 0x7F (LED ON) . Transmit<UNIT> as
0 for now.
1.
2.
3.
4.
5.
UPDATE_MUTE_LED: F0 4E<UNIT>12 02<STRIP #> <STATE> F7
UPDATE_SEL_LED: F0 4E<UNIT> 12 03<STRIP #> <STATE> F7
UPDATE_REC_LED: F0 4E<UNIT> 12 04<STRIP #> <STATE>F7
UPDATE_NULL_LED: F0 4E<UNIT> 12 05 <STATE> F7
UPDATE_SOLOMODE_LED: F0 4E<UNIT> 12 06 <STATE> F7
Note: following message forces US-224 to send current fader position messages to host via the
US-224 Control Port
6. DUMP_FADER_POS: F0 4E<UNIT>12 10 <STRIP #> <STATE>F7
Bank-Switching Command Set
The US-224 has two switches that allow the user to select the bank of application channels that is
addressed by the four channel-strips. For example, an application with 32 virtual tracks would
define eight banks of four channel strips each. The Bank-L and Bank-R switches let the user
quickly shift the control surface to address any bank of four channels. There are two LED's
adjacent to the Bank-L and Bank-R switches, which indicate that pressing the button will cause
the application software to switch to the next lower or higher bank, respectively. It is OFF when
there are no further virtual fader banks available in that direction.
US-224 to Host Commands
•
•
BANK_LEFT:
o Button-down: BF 10 7F
o Button-up: BF 10 00
BANK_RIGHT:
o Button-down: BF 11 7F
o Button-up: BF 11 00
Host to US-224 Messages:
1. UPDATE_BANK_LEFT_LED: F0 4E<UNIT> 12 07<STATE> F7
2. UPDATE_BANK_RIGHT_LED: F0 4E<UNIT> 12 08<STATE> F7
where<STATE> is either 0x00 (LED OFF) or 0x7F (LED ON) <UNIT>is device ID. Should be
transmitted as 0 for now.
Continuous data wheel
A data wheel is provided for general-purpose parameter modification. In addition to the pan level
setting described above, the data could be used for scrubbing, locating, or any other purpose the
application programmer desires.
40
US-224 to Host Commands:
DATA_WHEEL (identical to JL Cooper CS-10)
a. BF 60 vv, vv = 2's complement using 7 data bits
Host to US-224 Messages:
UPDATE_ASN_LED: F0 4E<UNIT> 12 0F<STATE> F7
where
<UNIT> Transmit as 0 for now.
<STATE> is either 0x00 (LED OFF) or 0x7F (LED ON)
.
41
Appendix C - US-224 Technical Specifications
General
Frequency Response
20 Hz - 20KHz 1.0 dB / -3.0 dB
LINE INPUT A/B to LINE OUTPUT
TRIM min., +4 dBu input
LINE OUTPUT level max.
MIC INPUT A/B (Analog)
Connector: XLR-3-31
( 1:= GND, 2:= Hot, 3:= Cold ) : Balanced
Input Impedance: 2.2k ohm
Nominal Input Level (TRIM max.): -54 dBu
Nominal Input Level (TRIM min.): -16 dBu
Noise Level
Maximum Input Level: 0 dBu (TRIM min.)
Better than 92 dB A Weight
MIC INPUT A/B to LINE OUTPUT
TRIM min., 150 ohm terminated
LINE OUTPUT level max.
LINE/GUITAR INPUT A/B (Analog)
Connector: 1/4"
Signal Processing Delay
Less than 2 ms
MIC/LINE to LINE OUT Input Monitor
Fs = 44.1KHz
(Tip:Hot; Ring:Cold; Sleeve:GND)
(Balanced at LINE, Unbalanced at GUITAR)
Input Impedance 22k ohm at LINE
680k ohm at GUITAR
Nominal Input Level (Trim max.):
-34 dBu at LINE
-48 dBV (-36.8 dBu) at GUITAR
THD
Nominal Input Level (TRIM min.):
Better than 0.01%
MIC INPUT A/B to LINE OUTPUT
0 dBu input TRIM min.
LINE OUTPUT level max.
LINE INPUT A/B to LINE OUTPUT
TRIM min., +20 dBu input
LINE OUTPUT level max.
+4 dBu at LINE
- 10 dBV (-7.8 dBu) at GUITAR
Crosstalk
Better than 85 dB at 1KHz
LINE INPUT A/B to LINE OUTPUT
TRIM min., +4 dBu input
LINE OUTPUT level max.
Maximum Input Level (TRIM min):
+20 dBu at LINE
+6 dBV (+8.2 dBu) at GUITAR
LINE OUTPUT (Analog)
Connector: RCA pin jack, Unbalanced
Output Impedance: 100ohm
Nominal Output Level: -10 dBV (-7.8 dBu)
(LINE LEVEL -10dB)
Maximum Output Level: +6 dBV (+8.2 dBu)
(LINE LEVEL max)
Click: Less than -35 dBu
Fader Attenuation: Better than -90 dB at 1
KHz
Mute Level: Better than -90 dB at 1 KHz
Dimensions:
12" x 8.3" x 2.4" (30.4 x 21.1 x 6.2 cm)
Weight (unit itself): 0.85 Kg (1.9 lbs)
PHONES output (Analog)
Connector: 1/4" TRS Stereo
(Tip:L, Ring:R, Sleeve:GND)
(when nominal impedance 40 Ohms loaded)
Maximum Output Power: 10m W + 10m W
Maximum Output Level: +6 dBV (+8.2 dBu)
Power Consumption: 2W
42
DIGITAL IN
Connector: RCA pin jack
Format: IEC60958 Type2
Input impedance: 75 ohm
Input Level: 0.5Vp-p
DIGITAL OUT
Connector: RCA pin jack
Format: IEC60958 Type 2
Output Impedance: 75 ohm
Output Level: 0.5Vp-p
MIDI IN
Connector: 5P DIN
Format: Standard MIDI Format
MIDI Out
Connector: 5P DIN
Format: Standard MIDI Format
USB
Connector: USB Down stream connector
Format: USB Version 1.1
LINE OUTPUT (DIGITAL IN to LINE OUTPUT)
Nominal Output: +6dBV
0 dBFs input, LINE OUTPUT max.
Frequency Response:
20 Hz - 20KHz, +0.5 dB / -1.0 dB
–16 dBFs input, LINE OUTPUT max.
S/N:
Better than 97 dB A Weight, 0 dBFs input,
LINE OUTPUT max.
T.H.D.
Better than 0.007% at 1KHz
TRIM min., 0 dBFS input
LINE OUTPUT max.
PHONES Output
Maximum Output: More then 10m W + 10m
W at 1KHz, 40 ohm loaded
Frequency Response:
100 Hz - 20KHz, +1.0 dB / -3.0 dB
Nominal level, 40 ohm loaded
T.H.D.: Better than 1 %
1KHz, Output 10m W + 10m W, 40 ohm loaded
ADC / DAC
AD/DA Converter
24Bit, 64 times oversampling
Delay: 17 samples (ADC), 15.4 samples (DAC)
Audio Performance
MIC INPUT (A, B XLR Analog INPUT to
DIGITAL OUT)
Frequency Response
20 Hz - 20KHz + 0.5dB / -1.0 dB
TRIM min., -16 dBu input
S/N
Better than 93 dB A Weight
TRIM min., 150 ohm terminated
LINE OUTPUT max.
T.H.D.
Better than 0.007% at 1kHz
TRIM min., 0 dBu input
LINE INPUT (A, B 1/4" Analog INPUT to DIGITAL
OUT)
Frequency Response
20 Hz - 20KHz, +0 .5 dB / -1.0 dB
TRIM min., +4 dBu input
S/N
Better than 93 dB A Weight
TRIM min., 150 ohm terminated
LINE OUTPUT max.
T.H.D
Better than 0.007% at 1KHz
TRIM min., +20 dBu input
43
Ž
US-224
Printed In Taiwan MA-0631
44