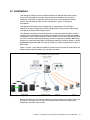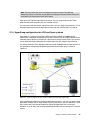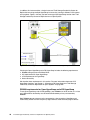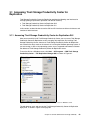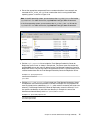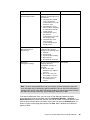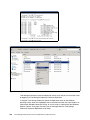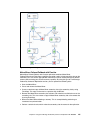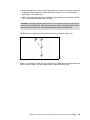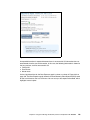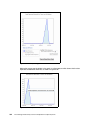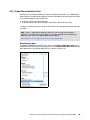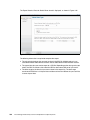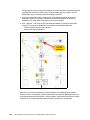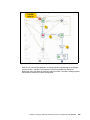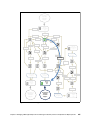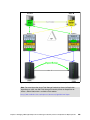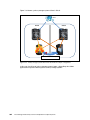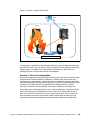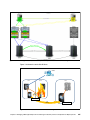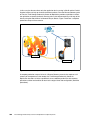
1
Front cover Tivoli Storage Productivity Center for Replication for Open Systems Master Tivoli Storage Productivity Center for Replication in open systems Manage replication services from one interface Use all of the latest copy services features Karen Orlando Otavio Rocha Filho Danijel Paulin Antonio Rainero Deborah Sparks ibm.com/redbooks International Technical Support Organization Tivoli Storage Productivity Center for Replication for Open Systems January 2014 SG24-8149-00 Note: Before using this information and the product it supports, read the information in “Notices” on page ix. First Edition (Janury 2014) This edition applies to Tivoli Storage Productivity Center for replication Version 5, Release 2 © Copyright International Business Machines Corporation 2014. All rights reserved. Note to U.S. Government Users Restricted Rights -- Use, duplication or disclosure restricted by GSA ADP Schedule Contract with IBM Corp. Contents Notices . . . . . . . . . . . . . . . . . . . . . . . . . . . . . . . . . . . . . . . . . . . . . . . . . . . . . . . . . . . . . . . . . ix Trademarks . . . . . . . . . . . . . . . . . . . . . . . . . . . . . . . . . . . . . . . . . . . . . . . . . . . . . . . . . . . . . . .x Preface . . . . . . . . . . . . . . . . . . . . . . . . . . . . . . . . . . . . . . . . . . . . . . . . . . . . . . . . . . . . . . . . . xi Authors . . . . . . . . . . . . . . . . . . . . . . . . . . . . . . . . . . . . . . . . . . . . . . . . . . . . . . . . . . . . . . . . . . xii Now you can become a published author, too! . . . . . . . . . . . . . . . . . . . . . . . . . . . . . . . . . . xiv Comments welcome. . . . . . . . . . . . . . . . . . . . . . . . . . . . . . . . . . . . . . . . . . . . . . . . . . . . . . . xiv Stay connected to IBM Redbooks . . . . . . . . . . . . . . . . . . . . . . . . . . . . . . . . . . . . . . . . . . . . xiv Chapter 1. Introduction to Tivoli Storage Productivity Center for Replication . . . . . . . 1 1.1 Tivoli Storage Productivity Center for Replication overview . . . . . . . . . . . . . . . . . . . . . . 2 1.2 Terminology . . . . . . . . . . . . . . . . . . . . . . . . . . . . . . . . . . . . . . . . . . . . . . . . . . . . . . . . . . 3 1.3 Architecture . . . . . . . . . . . . . . . . . . . . . . . . . . . . . . . . . . . . . . . . . . . . . . . . . . . . . . . . . . . 7 1.4 Copy services overview . . . . . . . . . . . . . . . . . . . . . . . . . . . . . . . . . . . . . . . . . . . . . . . . 10 1.5 Session types and usage . . . . . . . . . . . . . . . . . . . . . . . . . . . . . . . . . . . . . . . . . . . . . . . 11 1.5.1 Practice sessions . . . . . . . . . . . . . . . . . . . . . . . . . . . . . . . . . . . . . . . . . . . . . . . . . 12 1.5.2 Data copying symbols . . . . . . . . . . . . . . . . . . . . . . . . . . . . . . . . . . . . . . . . . . . . . . 13 1.5.3 FlashCopy sessions . . . . . . . . . . . . . . . . . . . . . . . . . . . . . . . . . . . . . . . . . . . . . . . 13 1.5.4 Snapshot sessions . . . . . . . . . . . . . . . . . . . . . . . . . . . . . . . . . . . . . . . . . . . . . . . . 14 1.5.5 Metro Mirror Single Direction sessions . . . . . . . . . . . . . . . . . . . . . . . . . . . . . . . . . 14 1.5.6 Metro Mirror Failover/Failback sessions . . . . . . . . . . . . . . . . . . . . . . . . . . . . . . . . 14 1.5.7 Metro Mirror Failover/Failback with Practice sessions . . . . . . . . . . . . . . . . . . . . . 14 1.5.8 Global Mirror Single Direction sessions . . . . . . . . . . . . . . . . . . . . . . . . . . . . . . . . 15 1.5.9 Global Mirror Failover/Failback . . . . . . . . . . . . . . . . . . . . . . . . . . . . . . . . . . . . . . . 15 1.5.10 Global Mirror Failover/Failback with Change Volumes sessions . . . . . . . . . . . . 16 1.5.11 Global Mirror Failover/Failback with Practice sessions. . . . . . . . . . . . . . . . . . . . 16 1.5.12 Global Mirror Either Direction with Two-Site Practice sessions . . . . . . . . . . . . . 17 1.5.13 Metro Global Mirror sessions . . . . . . . . . . . . . . . . . . . . . . . . . . . . . . . . . . . . . . . 17 1.5.14 Metro Global Mirror with Practice sessions. . . . . . . . . . . . . . . . . . . . . . . . . . . . . 18 1.5.15 Session states. . . . . . . . . . . . . . . . . . . . . . . . . . . . . . . . . . . . . . . . . . . . . . . . . . . 19 1.5.16 Session commands. . . . . . . . . . . . . . . . . . . . . . . . . . . . . . . . . . . . . . . . . . . . . . . 22 1.6 New features and enhancements in Tivoli Storage Replication Center for Replication by release . . . . . . . . . . . . . . . . . . . . . . . . . . . . . . . . . . . . . . . . . . . . . . . . . . . . . . . . . . . . . 30 1.6.1 New in V5.1. . . . . . . . . . . . . . . . . . . . . . . . . . . . . . . . . . . . . . . . . . . . . . . . . . . . . . 30 1.6.2 New in V5.1.1 . . . . . . . . . . . . . . . . . . . . . . . . . . . . . . . . . . . . . . . . . . . . . . . . . . . . 31 1.6.3 New in V5.1.1.1. . . . . . . . . . . . . . . . . . . . . . . . . . . . . . . . . . . . . . . . . . . . . . . . . . . 32 1.6.4 New in V5.2. . . . . . . . . . . . . . . . . . . . . . . . . . . . . . . . . . . . . . . . . . . . . . . . . . . . . . 32 1.7 Introduction to Storage Systems . . . . . . . . . . . . . . . . . . . . . . . . . . . . . . . . . . . . . . . . . . 33 1.7.1 IBM System Storage DS8000 . . . . . . . . . . . . . . . . . . . . . . . . . . . . . . . . . . . . . . . . 33 1.7.2 IBM Storwize Family . . . . . . . . . . . . . . . . . . . . . . . . . . . . . . . . . . . . . . . . . . . . . . . 34 1.7.3 IBM XIV Storage System . . . . . . . . . . . . . . . . . . . . . . . . . . . . . . . . . . . . . . . . . . . 35 Chapter 2. Planning and installation . . . . . . . . . . . . . . . . . . . . . . . . . . . . . . . . . . . . . . . . 2.1 Tivoli Storage Productivity Center for Replication installation planning . . . . . . . . . . . . 2.1.1 Pre-installation steps. . . . . . . . . . . . . . . . . . . . . . . . . . . . . . . . . . . . . . . . . . . . . . . 2.1.2 Licensing . . . . . . . . . . . . . . . . . . . . . . . . . . . . . . . . . . . . . . . . . . . . . . . . . . . . . . . . 2.1.3 Hardware and software requirements . . . . . . . . . . . . . . . . . . . . . . . . . . . . . . . . . . 2.1.4 Configuration planning . . . . . . . . . . . . . . . . . . . . . . . . . . . . . . . . . . . . . . . . . . . . . 2.1.5 User accounts . . . . . . . . . . . . . . . . . . . . . . . . . . . . . . . . . . . . . . . . . . . . . . . . . . . . © Copyright IBM Corp. 2014. All rights reserved. 37 38 38 38 39 41 43 iii 2.1.6 HyperSwap configuration for z/OS and Open systems. . . . . . . . . . . . . . . . . . . . . 2.2 Installing Tivoli Storage Productivity Center for Replication . . . . . . . . . . . . . . . . . . . . . 2.2.1 Overview . . . . . . . . . . . . . . . . . . . . . . . . . . . . . . . . . . . . . . . . . . . . . . . . . . . . . . . . 2.2.2 Tivoli Storage Productivity Center installation packages . . . . . . . . . . . . . . . . . . . 2.2.3 Tivoli Storage Productivity Center installation. . . . . . . . . . . . . . . . . . . . . . . . . . . . 45 47 48 48 49 Chapter 3. General administration and high availability . . . . . . . . . . . . . . . . . . . . . . . . 61 3.1 Accessing Tivoli Storage Productivity Center for Replication . . . . . . . . . . . . . . . . . . . . 63 3.1.1 Accessing Tivoli Storage Productivity Center for Replication GUI . . . . . . . . . . . . 63 3.1.2 Accessing Tivoli Storage Productivity Center for Replication CLI. . . . . . . . . . . . . 65 3.2 GUI overview. . . . . . . . . . . . . . . . . . . . . . . . . . . . . . . . . . . . . . . . . . . . . . . . . . . . . . . . . 65 3.2.1 GUI panels . . . . . . . . . . . . . . . . . . . . . . . . . . . . . . . . . . . . . . . . . . . . . . . . . . . . . . 66 3.3 CLI Overview. . . . . . . . . . . . . . . . . . . . . . . . . . . . . . . . . . . . . . . . . . . . . . . . . . . . . . . . . 73 3.3.1 Configuring the CLI . . . . . . . . . . . . . . . . . . . . . . . . . . . . . . . . . . . . . . . . . . . . . . . . 74 3.3.2 Setting up automatic login to the CLI . . . . . . . . . . . . . . . . . . . . . . . . . . . . . . . . . . 75 3.3.3 Remote CLI installation . . . . . . . . . . . . . . . . . . . . . . . . . . . . . . . . . . . . . . . . . . . . . 75 3.3.4 CLI automation . . . . . . . . . . . . . . . . . . . . . . . . . . . . . . . . . . . . . . . . . . . . . . . . . . . 82 3.4 Tivoli Storage Productivity Center for Replication interaction with Tivoli Storage Productivity Center . . . . . . . . . . . . . . . . . . . . . . . . . . . . . . . . . . . . . . . . . . . . . . . . . . . . 88 3.5 Tivoli Storage Productivity Center for Replication security and user administration . . . 93 3.5.1 Adding Tivoli Storage Productivity Center users and groups to Tivoli Storage Productivity Center for Replication . . . . . . . . . . . . . . . . . . . . . . . . . . . . . . . . . . . . 94 3.5.2 Tivoli Storage Productivity Center for Replication role-based access control. . . . 94 3.5.3 Managing user access . . . . . . . . . . . . . . . . . . . . . . . . . . . . . . . . . . . . . . . . . . . . . 95 3.5.4 Modifying access to a user role. . . . . . . . . . . . . . . . . . . . . . . . . . . . . . . . . . . . . . . 98 3.5.5 Removing access to a user role . . . . . . . . . . . . . . . . . . . . . . . . . . . . . . . . . . . . . 100 3.6 Tivoli Storage Productivity Center for Replication advanced tools . . . . . . . . . . . . . . . 100 3.6.1 Packaging log files . . . . . . . . . . . . . . . . . . . . . . . . . . . . . . . . . . . . . . . . . . . . . . . 101 3.6.2 Setting the auto refresh rate for the browser. . . . . . . . . . . . . . . . . . . . . . . . . . . . 102 3.6.3 Managing the Metro Mirror heartbeat . . . . . . . . . . . . . . . . . . . . . . . . . . . . . . . . . 102 3.7 Tivoli Storage Productivity Center for Replication Console. . . . . . . . . . . . . . . . . . . . . 103 3.8 Tivoli Storage Productivity Center for Replication High Availability. . . . . . . . . . . . . . . 106 3.8.1 Setting up a Tivoli Storage Productivity Center for Replication standby server . 107 3.8.2 Takeover . . . . . . . . . . . . . . . . . . . . . . . . . . . . . . . . . . . . . . . . . . . . . . . . . . . . . . . 116 3.8.3 Best practices . . . . . . . . . . . . . . . . . . . . . . . . . . . . . . . . . . . . . . . . . . . . . . . . . . . 122 3.9 Starting and stopping the Tivoli Storage Productivity Center for Replication server . . 123 3.9.1 Verifying the status of components . . . . . . . . . . . . . . . . . . . . . . . . . . . . . . . . . . . 124 3.9.2 Starting and stopping Tivoli Storage Productivity Center for Replication . . . . . . 127 3.10 Using CSV files for importing and exporting sessions. . . . . . . . . . . . . . . . . . . . . . . . 129 3.10.1 Exporting CSV files . . . . . . . . . . . . . . . . . . . . . . . . . . . . . . . . . . . . . . . . . . . . . . 129 3.10.2 Importing CSV files . . . . . . . . . . . . . . . . . . . . . . . . . . . . . . . . . . . . . . . . . . . . . . 132 3.10.3 Working with CSV files under Microsoft Excel . . . . . . . . . . . . . . . . . . . . . . . . . 139 3.11 Backing up and restoring a repository. . . . . . . . . . . . . . . . . . . . . . . . . . . . . . . . . . . . 140 3.12 Tivoli Storage Productivity Center for Replication SNMP management . . . . . . . . . . 144 3.12.1 SNMP Alerts . . . . . . . . . . . . . . . . . . . . . . . . . . . . . . . . . . . . . . . . . . . . . . . . . . . 144 3.12.2 SNMP setup . . . . . . . . . . . . . . . . . . . . . . . . . . . . . . . . . . . . . . . . . . . . . . . . . . . 148 3.13 Adding and connecting to storage systems . . . . . . . . . . . . . . . . . . . . . . . . . . . . . . . 149 3.13.1 DS8000 Connection page . . . . . . . . . . . . . . . . . . . . . . . . . . . . . . . . . . . . . . . . . 151 3.13.2 XIV System Storage Connection window . . . . . . . . . . . . . . . . . . . . . . . . . . . . . 155 3.14 Adding and connecting host systems . . . . . . . . . . . . . . . . . . . . . . . . . . . . . . . . . . . . 155 3.14.1 AIX Host System . . . . . . . . . . . . . . . . . . . . . . . . . . . . . . . . . . . . . . . . . . . . . . . . 157 3.14.2 z/OS Host System. . . . . . . . . . . . . . . . . . . . . . . . . . . . . . . . . . . . . . . . . . . . . . . 157 iv Tivoli Storage Productivity Center for Replication for Open Systems Chapter 4. Using Tivoli Storage Productivity Center for Replication with DS8000. . 159 4.1 Capabilities overview . . . . . . . . . . . . . . . . . . . . . . . . . . . . . . . . . . . . . . . . . . . . . . . . . 160 4.1.1 FlashCopy . . . . . . . . . . . . . . . . . . . . . . . . . . . . . . . . . . . . . . . . . . . . . . . . . . . . . . 161 4.1.2 Metro Mirror . . . . . . . . . . . . . . . . . . . . . . . . . . . . . . . . . . . . . . . . . . . . . . . . . . . . 162 4.1.3 Global Mirror . . . . . . . . . . . . . . . . . . . . . . . . . . . . . . . . . . . . . . . . . . . . . . . . . . . . 167 4.1.4 Metro Global Mirror . . . . . . . . . . . . . . . . . . . . . . . . . . . . . . . . . . . . . . . . . . . . . . . 174 4.2 New functions for DS8000 . . . . . . . . . . . . . . . . . . . . . . . . . . . . . . . . . . . . . . . . . . . . . 182 4.2.1 FlashCopy consistency groups for FlashCopy sessions. . . . . . . . . . . . . . . . . . . 182 4.2.2 Global Mirror pause with consistency . . . . . . . . . . . . . . . . . . . . . . . . . . . . . . . . . 183 4.2.3 Easy Tier Heat Map Transfer . . . . . . . . . . . . . . . . . . . . . . . . . . . . . . . . . . . . . . . 185 4.2.4 Global Mirror Info Tab for DS8000 sessions . . . . . . . . . . . . . . . . . . . . . . . . . . . . 191 4.2.5 Global Mirror Historical Data . . . . . . . . . . . . . . . . . . . . . . . . . . . . . . . . . . . . . . . . 195 4.2.6 Managing z/OS HyperSwap from Tivoli Storage Productivity Center for Replication for Open Systems . . . . . . . . . . . . . . . . . . . . . . . . . . . . . . . . . . . . . . . . . . . . . . . . 201 4.3 Managing DS8000 sessions . . . . . . . . . . . . . . . . . . . . . . . . . . . . . . . . . . . . . . . . . . . . 201 4.3.1 DS8000 Path management. . . . . . . . . . . . . . . . . . . . . . . . . . . . . . . . . . . . . . . . . 201 4.3.2 Setting up a session . . . . . . . . . . . . . . . . . . . . . . . . . . . . . . . . . . . . . . . . . . . . . . 209 4.3.3 Session tunable parameters . . . . . . . . . . . . . . . . . . . . . . . . . . . . . . . . . . . . . . . . 230 4.3.4 Scenarios requiring a full copy . . . . . . . . . . . . . . . . . . . . . . . . . . . . . . . . . . . . . . 241 4.4 Use cases . . . . . . . . . . . . . . . . . . . . . . . . . . . . . . . . . . . . . . . . . . . . . . . . . . . . . . . . . . 250 4.4.1 Practicing disaster recovery by using FlashCopy sessions . . . . . . . . . . . . . . . . 251 4.4.2 Two-site planned outages scenarios. . . . . . . . . . . . . . . . . . . . . . . . . . . . . . . . . . 254 4.4.3 Three-site planned outages scenarios . . . . . . . . . . . . . . . . . . . . . . . . . . . . . . . . 259 4.5 Troubleshooting . . . . . . . . . . . . . . . . . . . . . . . . . . . . . . . . . . . . . . . . . . . . . . . . . . . . . 270 4.5.1 Managing loss of connection to storage system . . . . . . . . . . . . . . . . . . . . . . . . . 270 4.5.2 Managing suspending events . . . . . . . . . . . . . . . . . . . . . . . . . . . . . . . . . . . . . . . 273 Chapter 5. Tivoli Storage Productivity Center for Replication with SAN Volume Controller and Storwize family . . . . . . . . . . . . . . . . . . . . . . . . . . . . . . . . . . 279 5.1 Introduction . . . . . . . . . . . . . . . . . . . . . . . . . . . . . . . . . . . . . . . . . . . . . . . . . . . . . . . . . 281 5.1.1 The Storwize family of Storage Products . . . . . . . . . . . . . . . . . . . . . . . . . . . . . . 281 5.1.2 Tivoli Storage Productivity Center for Replication and the Storwize family. . . . . 281 5.2 SAN Volume Controller . . . . . . . . . . . . . . . . . . . . . . . . . . . . . . . . . . . . . . . . . . . . . . . . 283 5.3 Storwize Products . . . . . . . . . . . . . . . . . . . . . . . . . . . . . . . . . . . . . . . . . . . . . . . . . . . . 284 5.3.1 Storwize V7000 . . . . . . . . . . . . . . . . . . . . . . . . . . . . . . . . . . . . . . . . . . . . . . . . . . 284 5.3.2 Storwize V7000 Unified. . . . . . . . . . . . . . . . . . . . . . . . . . . . . . . . . . . . . . . . . . . . 286 5.3.3 Storwize V3700 and V3500 . . . . . . . . . . . . . . . . . . . . . . . . . . . . . . . . . . . . . . . . 286 5.4 New Functions . . . . . . . . . . . . . . . . . . . . . . . . . . . . . . . . . . . . . . . . . . . . . . . . . . . . . . 287 5.4.1 Global Mirror Failover/Failback with Change Volumes session . . . . . . . . . . . . . 287 5.4.2 Support for the SAN Volume Controller 6.4 option to move volumes between I/O groups. . . . . . . . . . . . . . . . . . . . . . . . . . . . . . . . . . . . . . . . . . . . . . . . . . . . . . . . . 287 5.5 Session Types and Setup . . . . . . . . . . . . . . . . . . . . . . . . . . . . . . . . . . . . . . . . . . . . . . 288 5.5.1 FlashCopy sessions . . . . . . . . . . . . . . . . . . . . . . . . . . . . . . . . . . . . . . . . . . . . . . 289 5.5.2 Metro Mirror sessions . . . . . . . . . . . . . . . . . . . . . . . . . . . . . . . . . . . . . . . . . . . . . 294 5.5.3 Global Mirror sessions . . . . . . . . . . . . . . . . . . . . . . . . . . . . . . . . . . . . . . . . . . . . 298 5.6 Why and when to use certain session types . . . . . . . . . . . . . . . . . . . . . . . . . . . . . . . . 301 5.6.1 When to use FlashCopy . . . . . . . . . . . . . . . . . . . . . . . . . . . . . . . . . . . . . . . . . . . 301 5.6.2 When to use Metro Mirror . . . . . . . . . . . . . . . . . . . . . . . . . . . . . . . . . . . . . . . . . . 301 5.6.3 When to use Global Mirror . . . . . . . . . . . . . . . . . . . . . . . . . . . . . . . . . . . . . . . . . 301 5.7 Disaster Recovery use cases . . . . . . . . . . . . . . . . . . . . . . . . . . . . . . . . . . . . . . . . . . . 302 5.7.1 SAN Volume Controller Stretched Cluster . . . . . . . . . . . . . . . . . . . . . . . . . . . . . 302 5.7.2 Global Mirror Forwarding I/O Group . . . . . . . . . . . . . . . . . . . . . . . . . . . . . . . . . . 306 5.8 Troubleshooting . . . . . . . . . . . . . . . . . . . . . . . . . . . . . . . . . . . . . . . . . . . . . . . . . . . . . 307 Contents v 5.8.1 Storwize family replication error codes . . . . . . . . . . . . . . . . . . . . . . . . . . . . . . . . 307 5.8.2 Troubleshooting replication links. . . . . . . . . . . . . . . . . . . . . . . . . . . . . . . . . . . . . 308 Chapter 6. Using Tivoli Storage Productivity Center for Replication with XIV . . . . . 6.1 Overview . . . . . . . . . . . . . . . . . . . . . . . . . . . . . . . . . . . . . . . . . . . . . . . . . . . . . . . . . . . 6.1.1 XIV consistency groups . . . . . . . . . . . . . . . . . . . . . . . . . . . . . . . . . . . . . . . . . . . 6.1.2 XIV connections . . . . . . . . . . . . . . . . . . . . . . . . . . . . . . . . . . . . . . . . . . . . . . . . . 6.2 XIV session types . . . . . . . . . . . . . . . . . . . . . . . . . . . . . . . . . . . . . . . . . . . . . . . . . . . . 6.2.1 Snapshot sessions . . . . . . . . . . . . . . . . . . . . . . . . . . . . . . . . . . . . . . . . . . . . . . . 6.2.2 Metro Mirror Failover/Failback sessions . . . . . . . . . . . . . . . . . . . . . . . . . . . . . . . 6.2.3 Global Mirror Failover/Failback sessions . . . . . . . . . . . . . . . . . . . . . . . . . . . . . . 6.3 Adding XIV volume protection . . . . . . . . . . . . . . . . . . . . . . . . . . . . . . . . . . . . . . . . . . . 6.4 Disaster Recovery use cases . . . . . . . . . . . . . . . . . . . . . . . . . . . . . . . . . . . . . . . . . . . 6.5 Troubleshooting . . . . . . . . . . . . . . . . . . . . . . . . . . . . . . . . . . . . . . . . . . . . . . . . . . . . . vi 311 312 312 313 316 316 325 339 343 345 349 Chapter 7. Managing z/OS HyperSwap from Tivoli Storage Productivity Center for Replication for Open Systems. . . . . . . . . . . . . . . . . . . . . . . . . . . . . . . . . . . 7.1 Overview of z/OS HyperSwap. . . . . . . . . . . . . . . . . . . . . . . . . . . . . . . . . . . . . . . . . . . 7.2 Prerequisites . . . . . . . . . . . . . . . . . . . . . . . . . . . . . . . . . . . . . . . . . . . . . . . . . . . . . . . . 7.2.1 Hardware . . . . . . . . . . . . . . . . . . . . . . . . . . . . . . . . . . . . . . . . . . . . . . . . . . . . . . 7.2.2 Software . . . . . . . . . . . . . . . . . . . . . . . . . . . . . . . . . . . . . . . . . . . . . . . . . . . . . . . 7.2.3 Connectivity . . . . . . . . . . . . . . . . . . . . . . . . . . . . . . . . . . . . . . . . . . . . . . . . . . . . 7.2.4 Enabling a host name or IP address connection to a z/OS host system . . . . . . 7.2.5 Enabling z/OS HyperSwap and adding a Tivoli Storage Productivity Center for Replication user to z/OS host . . . . . . . . . . . . . . . . . . . . . . . . . . . . . . . . . . . . . . . 7.3 z/OS HyperSwap sessions . . . . . . . . . . . . . . . . . . . . . . . . . . . . . . . . . . . . . . . . . . . . . 7.3.1 Basic HyperSwap sessions. . . . . . . . . . . . . . . . . . . . . . . . . . . . . . . . . . . . . . . . . 7.3.2 HyperSwap enabled Metro Mirror Failover/Failback sessions . . . . . . . . . . . . . . 7.3.3 HyperSwap enabled Metro Global Mirror sessions. . . . . . . . . . . . . . . . . . . . . . . 7.3.4 HyperSwap enabled Metro Global Mirror with Practice sessions . . . . . . . . . . . . 7.3.5 Hardened Freeze . . . . . . . . . . . . . . . . . . . . . . . . . . . . . . . . . . . . . . . . . . . . . . . . 7.4 Description and usage of HyperSwap enabled sessions . . . . . . . . . . . . . . . . . . . . . . 7.4.1 Setting up a HyperSwap enabled session . . . . . . . . . . . . . . . . . . . . . . . . . . . . . 7.5 Use cases . . . . . . . . . . . . . . . . . . . . . . . . . . . . . . . . . . . . . . . . . . . . . . . . . . . . . . . . . . 359 360 360 361 362 366 369 369 369 381 Chapter 8. Hints and tips . . . . . . . . . . . . . . . . . . . . . . . . . . . . . . . . . . . . . . . . . . . . . . . . 8.1 Introduction . . . . . . . . . . . . . . . . . . . . . . . . . . . . . . . . . . . . . . . . . . . . . . . . . . . . . . . . . 8.2 VMware, DS8000, and Tivoli Storage Productivity Center for Replication . . . . . . . . . 8.2.1 Hosting by using virtual servers . . . . . . . . . . . . . . . . . . . . . . . . . . . . . . . . . . . . . 8.2.2 VAAI and DS8000 . . . . . . . . . . . . . . . . . . . . . . . . . . . . . . . . . . . . . . . . . . . . . . . . 8.3 DS8000 LSS symmetry . . . . . . . . . . . . . . . . . . . . . . . . . . . . . . . . . . . . . . . . . . . . . . . . 8.4 HyperSwap enabled sessions troubleshooting . . . . . . . . . . . . . . . . . . . . . . . . . . . . . . 8.5 Stuck in a particular state . . . . . . . . . . . . . . . . . . . . . . . . . . . . . . . . . . . . . . . . . . . . . . 8.6 High availability server platforms . . . . . . . . . . . . . . . . . . . . . . . . . . . . . . . . . . . . . . . . 8.7 Simple Network Management Protocol setup . . . . . . . . . . . . . . . . . . . . . . . . . . . . . . . 8.8 Tivoli Storage Productivity Center for Replication logging . . . . . . . . . . . . . . . . . . . . . 8.8.1 Collecting logs by using GUI . . . . . . . . . . . . . . . . . . . . . . . . . . . . . . . . . . . . . . . . 8.8.2 Collecting logs by using CLI . . . . . . . . . . . . . . . . . . . . . . . . . . . . . . . . . . . . . . . . 8.8.3 Collecting logs manually . . . . . . . . . . . . . . . . . . . . . . . . . . . . . . . . . . . . . . . . . . . 8.9 Auto refresh rate . . . . . . . . . . . . . . . . . . . . . . . . . . . . . . . . . . . . . . . . . . . . . . . . . . . . . 8.10 User authentication issues . . . . . . . . . . . . . . . . . . . . . . . . . . . . . . . . . . . . . . . . . . . . 8.10.1 An error is displayed when you try to log on . . . . . . . . . . . . . . . . . . . . . . . . . . . 8.10.2 An error occurs when you try to add a user . . . . . . . . . . . . . . . . . . . . . . . . . . . 8.11 IBM Software Support Lifecycle . . . . . . . . . . . . . . . . . . . . . . . . . . . . . . . . . . . . . . . . 389 390 390 390 390 391 391 393 394 394 395 395 395 395 396 396 396 397 397 Tivoli Storage Productivity Center for Replication for Open Systems 355 356 358 358 358 358 359 8.12 Tivoli Storage Productivity Center support matrix . . . . . . . . . . . . . . . . . . . . . . . . . . . 398 Appendix A. Tivoli Storage Productivity Center for Replication and Advanced Copy Services . . . . . . . . . . . . . . . . . . . . . . . . . . . . . . . . . . . . . . . . . . . . . . . . . . . 399 A.1 Integration with Tivoli Storage Productivity Center for Replication . . . . . . . . . . . . . . . 400 Appendix B. Tivoli Storage Productivity Center for Replication integration. . . . . . . 403 B.1 Integration with Tivoli Storage Productivity Center for Replication . . . . . . . . . . . . . . . 404 Related publications . . . . . . . . . . . . . . . . . . . . . . . . . . . . . . . . . . . . . . . . . . . . . . . . . . . . IBM Redbooks . . . . . . . . . . . . . . . . . . . . . . . . . . . . . . . . . . . . . . . . . . . . . . . . . . . . . . . . . . Other publications . . . . . . . . . . . . . . . . . . . . . . . . . . . . . . . . . . . . . . . . . . . . . . . . . . . . . . . Online resources . . . . . . . . . . . . . . . . . . . . . . . . . . . . . . . . . . . . . . . . . . . . . . . . . . . . . . . . Help from IBM . . . . . . . . . . . . . . . . . . . . . . . . . . . . . . . . . . . . . . . . . . . . . . . . . . . . . . . . . . Contents 407 407 407 408 408 vii viii Tivoli Storage Productivity Center for Replication for Open Systems Notices This information was developed for products and services offered in the U.S.A. IBM may not offer the products, services, or features discussed in this document in other countries. Consult your local IBM representative for information on the products and services currently available in your area. Any reference to an IBM product, program, or service is not intended to state or imply that only that IBM product, program, or service may be used. Any functionally equivalent product, program, or service that does not infringe any IBM intellectual property right may be used instead. However, it is the user's responsibility to evaluate and verify the operation of any non-IBM product, program, or service. IBM may have patents or pending patent applications covering subject matter described in this document. The furnishing of this document does not grant you any license to these patents. You can send license inquiries, in writing, to: IBM Director of Licensing, IBM Corporation, North Castle Drive, Armonk, NY 10504-1785 U.S.A. The following paragraph does not apply to the United Kingdom or any other country where such provisions are inconsistent with local law: INTERNATIONAL BUSINESS MACHINES CORPORATION PROVIDES THIS PUBLICATION “AS IS” WITHOUT WARRANTY OF ANY KIND, EITHER EXPRESS OR IMPLIED, INCLUDING, BUT NOT LIMITED TO, THE IMPLIED WARRANTIES OF NON-INFRINGEMENT, MERCHANTABILITY OR FITNESS FOR A PARTICULAR PURPOSE. Some states do not allow disclaimer of express or implied warranties in certain transactions, therefore, this statement may not apply to you. This information could include technical inaccuracies or typographical errors. Changes are periodically made to the information herein; these changes will be incorporated in new editions of the publication. IBM may make improvements and/or changes in the product(s) and/or the program(s) described in this publication at any time without notice. Any references in this information to non-IBM websites are provided for convenience only and do not in any manner serve as an endorsement of those websites. The materials at those websites are not part of the materials for this IBM product and use of those websites is at your own risk. IBM may use or distribute any of the information you supply in any way it believes appropriate without incurring any obligation to you. Any performance data contained herein was determined in a controlled environment. Therefore, the results obtained in other operating environments may vary significantly. Some measurements may have been made on development-level systems and there is no guarantee that these measurements will be the same on generally available systems. Furthermore, some measurements may have been estimated through extrapolation. Actual results may vary. Users of this document should verify the applicable data for their specific environment. Information concerning non-IBM products was obtained from the suppliers of those products, their published announcements or other publicly available sources. IBM has not tested those products and cannot confirm the accuracy of performance, compatibility or any other claims related to non-IBM products. Questions on the capabilities of non-IBM products should be addressed to the suppliers of those products. This information contains examples of data and reports used in daily business operations. To illustrate them as completely as possible, the examples include the names of individuals, companies, brands, and products. All of these names are fictitious and any similarity to the names and addresses used by an actual business enterprise is entirely coincidental. COPYRIGHT LICENSE: This information contains sample application programs in source language, which illustrate programming techniques on various operating platforms. You may copy, modify, and distribute these sample programs in any form without payment to IBM, for the purposes of developing, using, marketing or distributing application programs conforming to the application programming interface for the operating platform for which the sample programs are written. These examples have not been thoroughly tested under all conditions. IBM, therefore, cannot guarantee or imply reliability, serviceability, or function of these programs. © Copyright IBM Corp. 2014. All rights reserved. ix Trademarks IBM, the IBM logo, and ibm.com are trademarks or registered trademarks of International Business Machines Corporation in the United States, other countries, or both. These and other IBM trademarked terms are marked on their first occurrence in this information with the appropriate symbol (® or ™), indicating US registered or common law trademarks owned by IBM at the time this information was published. Such trademarks may also be registered or common law trademarks in other countries. A current list of IBM trademarks is available on the Web at http://www.ibm.com/legal/copytrade.shtml The following terms are trademarks of the International Business Machines Corporation in the United States, other countries, or both: AIX® Cognos® DB2® DS6000™ DS8000® Easy Tier® Enterprise Storage Server® FICON® FlashCopy® HyperSwap® IBM® IBM Flex System™ IBM SmartCloud® Jazz™ MVS™ Parallel Sysplex® POWER7® PowerHA® PureFlex™ RACF® Real-time Compression™ Redbooks® Redbooks (logo) Storwize® System Storage® System z® Tivoli® WebSphere® XIV® xSeries® z/OS® ® The following terms are trademarks of other companies: Intel, Intel Xeon, Intel logo, Intel Inside logo, and Intel Centrino logo are trademarks or registered trademarks of Intel Corporation or its subsidiaries in the United States and other countries. ITIL is a registered trademark, and a registered community trademark of The Minister for the Cabinet Office, and is registered in the U.S. Patent and Trademark Office. Linux is a trademark of Linus Torvalds in the United States, other countries, or both. Microsoft, Windows, and the Windows logo are trademarks of Microsoft Corporation in the United States, other countries, or both. UNIX is a registered trademark of The Open Group in the United States and other countries. Other company, product, or service names may be trademarks or service marks of others. x Tivoli Storage Productivity Center for Replication for Open Systems Preface This IBM® Redbooks® publication for the Tivoli® Storage Productivity Center for Replication for the Open environment walks you through the process of establishing sessions, and managing and monitoring copy services through Tivoli Storage Productivity Center for Replication. The book introduces enhanced copy services and new session types that are used by the latest IBM storage systems. Tips and guidance for session usage, tunable parameters, troubleshooting, and for implementing and managing Tivoli Storage Productivity Center for Replication’s latest functionality up to v5.2 also are provided. Tivoli Storage Productivity Center for Replication’s integration and latest functionality includes Global Mirror Pause with Consistency, Easy Tier® Heat Map Transfer, and IBM System Storage® SAN Volume Controller Change Volumes. As of v5.2, you can now manage z/OS® Hyperswap function from an Open System. IBM Tivoli Storage Productivity Center for Replication for Open Systems manages copy services in storage environments. Copy services are used by storage systems, such as IBM System Storage DS8000®, SAN Volume Controller, IBM Storwize® V3700, V3500, V7000, V7000 Unified, and IBM XIV® Storage systems to configure, manage, and monitor data-copy functions. Copy services include IBM FlashCopy®, Metro Mirror, Global Mirror, and Metro Global Mirror. This IBM Redbooks publication is the companion to the draft of the IBM Redbooks publication Tivoli Storage Productivity Center V5.2 Release Guide, SG24-8204. It is intended for storage administrators who ordered and installed Tivoli Storage Productivity Center version 5.2 and are ready to customize Tivoli Storage Productivity Center for Replication and connected storage. This publication also is for anyone that wants to learn more about Tivoli Storage Productivity Center for Replication in an open systems environment. © Copyright IBM Corp. 2014. All rights reserved. xi Authors This book was produced by a team of specialists from around the world working at the International Technical Support Organization, Poughkeepsie Center. Karen Orlando is a Project Leader at the International Technical Support Organization, Tucson Arizona Center. Karen has over 25 years in the IT industry with extensive experience in open systems management, and Information and Software development of IBM hardware and software storage. She holds a degree in Business Information Systems from the University of Phoenix and is Project Management Professional (PMP), certified since 2005. Otavio Rocha Filho is a SAN Storage IT Specialist for Strategic Outsourcing, IBM Brazil Global Delivery Center in Hortolandia. He has over 25 years of experience in IT, with the last 15 years dedicated to Data Storage solutions. He holds a bachelors degree in Electrical Engineering from the University of Sao Paulo, an MBA from Insper, and professional certifications including IBM Level 2 IT Specialist, Brocade SAN Manager, and ITIL Foundations. He has written extensively about IBM SAN Volume Controller, the Storwize family, and SAN Storage Best Practices. His areas of expertise also include Systems Performance and IT Services Delivery. Danijel Paulin is a Systems Architect in IBM Croatia, working for the Systems Architect team in IBM South East Europe region. He has 15 years of experience in IT. Before joining IBM Croatia in 2003, he worked for two financial companies in Croatia and he was responsible for IBM mainframe and storage administration. He has experience with various IBM storage products and storage software. His areas of expertise include architecture and design of various HA/DR/BC solutions for mainframe and open systems. Antonio Rainero is a Certified IT Specialist working for the Integrated Technology Services organization in IBM Italy. He joined IBM in 1998 and has more than 10 years of experience in the delivery of storage services for z/OS and Open Systems clients. His areas of expertise include storage subsystems implementation, performance analysis, SANs, storage virtualization, disaster recovery, and high availability solutions. He co-authored several IBM Redbooks publications. Antonio holds a degree in Computer Science from University of Udine, Italy. xii Tivoli Storage Productivity Center for Replication for Open Systems Deborah Sparks is a technical writer for IBM in the United States. She has 20 years experience in the field. She holds a degree in Communications and Journalism from California State University, Sacramento, and a credential in technical writing from San Jose State University. Her areas of expertise include writing, editing, and documentation management. She has been with IBM for seven years, during which time she has written extensively on Tivoli Storage Productivity Center and Tivoli Storage Productivity Center for Replication. Thanks to the following people for their contributions to this project: Mary Lovelace International Technical Support Organization, Poughkeepsie Center Randy Blea Jay Calder Steven Kern Khang N. Nguyen Pam Schull Damian Trujilo Wayne Sun IBM Tucson Bill Rooney IBM Poughkeepsie Selwyn Dickey IBM Rochester Todd Gerlach IBM Austin Sudhir Koka IBM San Jose Preface xiii Now you can become a published author, too! Here’s an opportunity to spotlight your skills, grow your career, and become a published author—all at the same time! Join an ITSO residency project and help write a book in your area of expertise, while honing your experience using leading-edge technologies. Your efforts will help to increase product acceptance and customer satisfaction, as you expand your network of technical contacts and relationships. Residencies run from two to six weeks in length, and you can participate either in person or as a remote resident working from your home base. Find out more about the residency program, browse the residency index, and apply online at this website: http://www.ibm.com/redbooks/residencies.html Comments welcome Your comments are important to us! We want our books to be as helpful as possible. Send us your comments about this book or other IBM Redbooks publications in one of the following ways: Use the online Contact us review Redbooks form that is found at: http://www.ibm.com/redbooks Send your comments in an email to: [email protected] Mail your comments to: IBM Corporation, International Technical Support Organization Dept. HYTD Mail Station P099 2455 South Road Poughkeepsie, NY 12601-5400 Stay connected to IBM Redbooks Find us on Facebook: http://www.facebook.com/IBMRedbooks Follow us on Twitter: http://twitter.com/ibmredbooks Look for us on LinkedIn: http://www.linkedin.com/groups?home=&gid=2130806 Explore new Redbooks publications, residencies, and workshops with the IBM Redbooks weekly newsletter: https://www.redbooks.ibm.com/Redbooks.nsf/subscribe?OpenForm Stay current on recent Redbooks publications with RSS Feeds: http://www.redbooks.ibm.com/rss.html xiv Tivoli Storage Productivity Center for Replication for Open Systems 1 Chapter 1. Introduction to Tivoli Storage Productivity Center for Replication This chapter provides an overview of IBM Tivoli Storage Productivity Center for Replication for open systems. It reviews copy services functions and then describes how they are implemented in Tivoli Storage Productivity Center for Replication. We introduce Tivoli Storage Productivity Center for Replication key concepts, architecture, session types and usage, and new functionality as of IBM Tivoli Storage Productivity Center version 5.1. We also introduce storage systems that are supported by Tivoli Storage Productivity Center for Replication. This chapter includes the following topics: Tivoli Storage Productivity Center for Replication overview Terminology Architecture Copy services overview Session types and usage New features and enhancements in Tivoli Storage Replication Center for Replication by release Introduction to Storage Systems © Copyright IBM Corp. 2014. All rights reserved. 1 1.1 Tivoli Storage Productivity Center for Replication overview IBM Tivoli Storage Productivity Center for Replication is a component of IBM Tivoli Storage Productivity Center and IBM SmartCloud® Virtual Storage Center that manages copy services in storage environments. Copy services are features that are used by storage systems to configure, manage, and monitor data replication functions. These copy services include IBM FlashCopy, Metro Mirror, Global Mirror, and Metro Global Mirror data replication. Tivoli Storage Productivity Center for Replication manages copy services for the following storage systems: IBM System Storage D6000 IBM System Storage DS8000 IBM TotalStorage Enterprise Storage Server® Model 800 IBM SAN Volume Controller IBM Storwize V3500 IBM Storwize V3700 IBM Storwize V7000 IBM Storwize V7000 Unified IBM XIV System Storage Tivoli Storage Productivity Center for Replication automates key replication management tasks to help you improve the efficiency of your storage replication. You can use a simple GUI to configure, automate, manage, and monitor all key data replication tasks in your environment, including the following tasks: Manage and monitor multi-site environments to meet disaster recovery requirements Automate the administration and configuration of data replication features Keep data on multiple related volumes consistent across storage systems in a planned or unplanned outage Recover to a remote site to reduce downtime of critical applications Provide high availability for applications by using IBM HyperSwap® technology Practice recovery processes while disaster recovery capabilities are maintained Figure 1-1 on page 3 shows the Tivoli Storage Productivity Center for Replication environment. 2 Tivoli Storage Productivity Center for Replication for Open Systems Figure 1-1 Tivoli Storage Productivity Center for Replication environment 1.2 Terminology In this section, we describe the following key terms to help you understand and effectively use Tivoli Storage Productivity Center for Replication: Management server The management server is a system that has Tivoli Storage Productivity Center for Replication installed. The management server provides a central point of control for managing data replication. You can create a high availability environment by setting up a standby management server. A standby management server is a second instance of Tivoli Storage Productivity Center for Replication that runs on a different physical system, but is continuously synchronized with the primary (or active) Tivoli Storage Productivity Center for Replication server. Chapter 1. Introduction to Tivoli Storage Productivity Center for Replication 3 The active management server issues commands and processes events, while the standby management server records the changes to the active server. As a result, the standby management server contains identical data to the active management server and can take over and run the environment without any loss of data. Storage system A storage system is a hardware device that contains data storage. Tivoli Storage Productivity Center for Replication can control data replication within and between various storage systems. To replicate data among storage systems by using Tivoli Storage Productivity Center for Replication, you must manually add a connection to each storage system. Host system A host system is an AIX® or IBM z/OS system that connects to storage systems to enable certain replication features for those systems. A connection to a z/OS host system is required if you want to enable z/OS features, such as HyperSwap and hardened freeze in Tivoli Storage Productivity Center for Replication sessions. A connection to an AIX host system is required if you want to use the Open HyperSwap feature. This feature enables the automatic swap of input/output (I/O) to the volumes on a secondary site when a failure occurs when I/O iswritten to the primary site. Users and groups Tivoli Storage Productivity Center for Replication does not maintain a directory of user names and passwords. Instead, the application uses the operating system repository that is created during the installation of Tivoli Storage Productivity Center or a Lightweight Directory Access Protocol (LDAP) repository for user authentication. You can use the Tivoli Storage Productivity Center for Replication graphical user interface (GUI) or command-line interface (CLI) to assign the users and groups that are defined in the user repository to a user role. User roles A user role determines the tasks and sessions that a user or group can manage. There are three roles that are defined in Tivoli Storage Productivity Center for Replication: Administrator, Operator, and Monitor. Administrators have unrestricted access to all features and functions in Tivoli Storage Productivity Center for Replication. Operators can manage specific sessions. Monitors can view information in the Tivoli Storage Productivity Center for Replication; however, they cannot modify or perform any commands or actions. Global Copy For ESS800, DS6000™, and DS8000 storage systems, Global Copy is an asynchronous long-distance copy option for data migration and backup. Session A session completes a specific type of data replication for a specific set of volumes. During data replication, data is copied from a source volume to one or more target volumes, depending on the session type. The source volume and target volumes that contain copies of the same data are collectively referred to as a copy set. A session can contain one or more copy sets. The type of data replication that is associated with the session determines the actions that you can perform against all copy sets in the session, the number of volumes that a copy set can contain, and the role that each volume plays. 4 Tivoli Storage Productivity Center for Replication for Open Systems Copy set A copy set is a set of volumes that represent copies of the same data. During data replication, data is copied from a source volume to one or more target volumes, depending on the session type. The source volume and target volumes that contain copies of the same data are collectively referred to as a copy set. Each volume in a copy set must be of the same size and volume type. For example, SAN Volume Controller volumes must be used with other SAN Volume Controller volumes. The number of volumes in the copy set and the role that each volume plays is determined by the session type that is associated with the session to which the copy set belongs. Volume roles Volume roles are given to every volume in the copy set. The volume role types are host volume, journal volume, intermediate volume, target volume, and change volume (SAN Volume Controller or Storwize storage systems only). The role defines how the volume is used in the copy set and the site location of the volume. For example, a host volume at the primary site has the role of Host1, while a journal volume at the secondary site has the role of Journal2. Role pair A role pair is the association of two roles in a session that take part in a copy relationship. For example, in a Metro Mirror session, the role pair can be the association between the volume roles of Host1 and Host2. Site The site determines the location of the volumes. The number of sites in a copy set is determined by the session type. Tivoli Storage Productivity Center for Replication supports up to the following three sites: – Site 1: The location of the primary storage system that contains the source data. Upon initial configuration, this site contains the host volumes with updates that are copied to the target volumes. – Site 2: The location of the secondary storage system that receives the copy updates from the primary storage system. – Site 3: The location of the tertiary storage system that receives the copy updates from the secondary storage system. Host volume A host volume is a volume that is connected to a server that reads and writes input/output (I/O). A host volume can be the source of updated tracks when the server that is connected to the host volume is actively issuing read and write I/O. A host volume can also be the target of the replication. When the host volume is the target, writes are inhibited. Host volumes are abbreviated as Hx, where x identifies the site. Journal volume A journal volume stores data that changed since the last consistent copy was created. This volume functions like a journal and holds the required data to reconstruct consistent data at the Global Mirror remote site. When a session must be recovered at the remote site, the journal volume is used to restore data to the last consistency point. A FlashCopy replication session can be created between the host or intermediate volume and the corresponding journal volume after a recover request is started to create another consistent version of the data. Journal volumes are abbreviated as Jx, where x identifies the site. Chapter 1. Introduction to Tivoli Storage Productivity Center for Replication 5 Intermediate volume An intermediate volume receives data from the primary host volume during a replication with practice session. During a practice, data on the intermediate volumes is flash copied to the practice host volumes. Depending on the replication method that is used, data on intermediate volumes might not be consistent. Intermediate volumes are abbreviated as Ix, where x identifies the site. Target volume A target volume receives data from a host or intermediate volume. Depending on the replication type, that data might or might not be consistent. A target volume can also function as a source volume. For example, a common use of the target volume is as a source volume to allow practicing for a disaster, such as data mining at the recovery site while still maintaining disaster recovery capability at the production site. Change volume A change volume contains point-in-time images that are copied from the host or target volume. Change volumes are abbreviated as Cx, where x identifies the site. Figure 1-2 shows how the preceding session-related terms relate to each other. Note: In Figure 1-2, the following terms are abbreviated; Fibre Channel (FC), Metro Mirror (MM), Global Mirror (GM), and Metro Global Mirror (MGM). Figure 1-2 Tivoli Storage Productivity Center for Replication session-related terminology 6 Tivoli Storage Productivity Center for Replication for Open Systems 1.3 Architecture Tivoli Storage Productivity Center and SmartCloud Virtual Storage Center offer storage infrastructure management that helps optimize storage management by centralizing, simplifying, automating, and optimizing storage tasks that are associated with storage systems, storage networks, copy services management, capacity, and reporting management. Tivoli Storage Productivity Center for Replication is a component of Tivoli Storage Productivity Center and SmartCloud Virtual Storage Center, which provides copy services management of different IBM storage systems. Tivoli Storage Productivity Center for System z® is a separate product that offers all of the functions that are provided by the Tivoli Storage Productivity Center for Replication product. The difference is that it is packaged to run only on System z and it uses a mixture of FICON® and TCP/IP communications to provide copy services management of different IBM Storage Systems. For more information about Tivoli Storage Productivity Center for System z, see the IBM Redbooks publication IBM Tivoli Storage Productivity Center for Replication for Series z, SG24-7563. Figure 1-3 shows a Tivoli Storage Productivity Center overview and the key components that provide simplified administration of your storage environment. I Figure 1-3 Tivoli Storage Productivity Center overview Detailed architecture of Tivoli Storage Productivity Center components is shown in Figure 1-4 on page 8. In this figure, you can see Tivoli Storage Productivity Center for Replication components and how are they related. Chapter 1. Introduction to Tivoli Storage Productivity Center for Replication 7 Figure 1-4 Tivoli Storage Productivity Center components The Tivoli Storage Productivity Center features the following components: GUI The following GUIs are available: – Tivoli Storage Productivity Center provides two GUIs for managing the storage infrastructure in an enterprise environment: the stand-alone GUI and the web-based GUI. Each GUI provides different functions for working with monitored resources. For more information about each Tivoli Storage Productivity Center GUI, see the draft of the Tivoli Storage Productivity Center V5.2 Release Guide, SG24-8204. – Tivoli Storage Productivity Center for Replication provides a GUI that is used to manage all Tivoli Storage Productivity Center for Replication functions. These functions include administration and configuration of the copy services, and managing and monitoring the status of copy services. For more information about the Tivoli Storage Productivity Center for Replication GUI, see Chapter 3, “General administration and high availability” on page 61. – Tivoli Common Reporting provides the reporting service for Tivoli Storage Productivity Center reports. Tivoli Common Reporting includes Cognos® reporting software. CLI The CLI is used to issue commands for key Tivoli Storage Productivity Center and Tivoli Storage Productivity Center for Replication functions. It is also used to enable scripts for automating functions. 8 Tivoli Storage Productivity Center for Replication for Open Systems Data server The Data server is a Tivoli Storage Productivity Center component that is the control point for product scheduling functions, configuration, event information, reporting, and GUI support. It coordinates communication with and data collection from agents that scan file systems and databases to gather storage demographics and populate the database with results. Automated actions can be defined to perform file system extension, data deletion, and Tivoli Storage Productivity Center backup or archiving, or event reporting when defined thresholds are encountered. The Data server is the primary contact point for GUI functions. It also includes functions that schedule data collection and discovery for the Device server. Device server The Device server is a Tivoli Storage Productivity Center component that discovers, gathers information from, analyzes performance of, and controls storage systems and SAN fabrics. It coordinates communication with and data collection from agents that scan SAN fabrics and storage devices. Jazz™ for Service Management Jazz for Service Management is used by Tivoli Common Reporting to provide the reporting service for Tivoli Storage Productivity Center reports. Replication server The Replication server is a Tivoli Storage Productivity for Replication component that coordinates communication and processes tasks that are related to copy services and replication. Database Tivoli Storage Productivity uses a DB2® single database instance that serves as the repository for all Tivoli Storage Productivity Center components. Tivoli Storage Productivity for Replication uses an embedded database, which is created automatically during Tivoli Storage Productivity Center installation. High availability architecture The recommended architecture of the Tivoli Storage Productivity for Replication environment is based on a high availability configuration where the primary Tivoli Storage Productivity Center for Replication management server is installed in the primary site and the standby Tivoli Storage Productivity Center for Replication management server is installed in the disaster recovery site. Synchronization is established between the primary and standby management server. If a failure of the primary management server occurs, the standby management server takes over and continues the replication management. Typical high availability architecture of the Tivoli Storage Productivity for Replication solution is shown in Figure 1-5 on page 10. Chapter 1. Introduction to Tivoli Storage Productivity Center for Replication 9 Figure 1-5 Tivoli Storage Productivity Center for Replication high availability architecture 1.4 Copy services overview This section describes the FlashCopy, Metro Mirror, Global Mirror, and Metro Global Mirror copy services. Copy Services include a set of disaster recovery, data migration, and data duplication functions that protect your data. The copy service determines whether you can replicate data within a single site or replicate to a second or third site. The copy service that you should use depends on your data replication requirements and your environment. FlashCopy FlashCopy replication creates a point-in-time copy in which the target volume contains the same data as the source volume at the point in time when the copy was established. Any subsequent write operations to the source volume are not reflected on the target volume. With FlashCopy replication, the source volume is in one logical subsystem (LSS) or I/O group (depending on the storage system type) and the target volume is in the same or another LSS or I/O group. FlashCopy replication occurs on a single site. 10 Tivoli Storage Productivity Center for Replication for Open Systems Metro Mirror Metro Mirror is a form of synchronous remote replication that operates between two sites that are within 300 km of each other. Synchronous mirroring means that a target volume on the remote site is constantly updated to match changes that are made to a source volume on the local site. Because the data is the same on the source and target volumes, no data is lost if you must use data from the target site for recovery. Global Mirror Global Mirror is a form of asynchronous remote replication that operates between two sites that are over 300 km from each other. Asynchronous mirroring means that a target volume on the remote site is updated a few seconds after the changes are made to a source volume on the local site. With Global Mirror, the distance between sites is limited only by your network capabilities and channel extension technology. The unlimited distance enables you to better choose your remote site location that is based on business needs and enables greater site separation to add protection from local disasters. Metro Global Mirror Metro Global Mirror combines the capabilities of Metro Mirror and Global Mirror for greater protection against planned and unplanned outages. Metro Global Mirror is a three-site, high availability disaster recovery solution. Metro Global Mirror uses synchronous replication to mirror data between a local site and an intermediate site, and asynchronous replication to mirror data from an intermediate site to a remote site. By using the two-site synchronous replication, you can recover data in the event of a local disaster, while the longer distance asynchronous copy to a third site protects data in the event of larger scale regional disasters. Snapshot Snapshot sessions create a point-in-time copy of a volume or set of volumes on the same site (Site 1) without having to define a specific target volume. The target volumes of a Snapshot session are automatically created when the snapshot is created. Note: Snapshot sessions are available only for IBM XIV Storage System. 1.5 Session types and usage A session is used to complete a specific type of data replication against a specific set of volumes. The type of copy service that is associated with the session determines the replication actions that are available for the session. For example, the options for FlashCopy sessions are different from the options for Metro Mirror sessions. Table 1-1 on page 12 shows the session types that are available in Tivoli Storage Productivity Center for Replication and the storage systems that are supported. The Multidirectional column indicates whether you can copy data in multiple directions. Chapter 1. Introduction to Tivoli Storage Productivity Center for Replication 11 Table 1-1 Session types and supported storage systems Session type Number of supported sites Supported storage systems FlashCopy 1 All, except IBM XIV Storage System Snapshot 1 IBM XIV Storage System Metro Mirror Single Direction 2 (data replication is only one direction) All, except IBM XIV Storage System Metro Mirror Failover/Failback 2 (data replication can be bidirectional) All Metro Mirror Failover/Failback with Practice 2 (data replication can be bidirectional) All, except IBM XIV Storage System Global Mirror Single Direction 2 (data replication is only one direction) All, except IBM XIV Storage System Global Mirror Failover/Failback 2 (data replication can be bidirectional) All Global Mirror Failover/Failback with Change Volumes 2 (data replication can be bidirectional) SAN Volume Controller, Storwize V3500, Storwize V3700, Storwize V7000, and Storwize V7000 Unified Global Mirror Failover/ Failback with Practice 2 (data replication can be bidirectional) All, except IBM XIV Storage System Global Mirror Either Direction with Two Site Practice 2 (data replication can be bidirectional) ESS, DS6000, and DS8000 Metro Global Mirror 3 (data replication can be multidirectional) ESS and DS8000 Metro Global Mirror with Practice 3 (data replication can be multidirectional) ESS and DS8000 For session types that support multiple sites and are not single direction only, you can start data replication in multiple directions for recovery purposes. For example, you can start data replication from the target volume to the source volume for a bidirectional session type. 1.5.1 Practice sessions By using practice sessions, you can test disaster-recovery actions while maintaining disaster-recovery capability. Practice sessions include intermediate volumes on the remote site that contains the target volumes. A FlashCopy operation is completed from the intermediate volumes to the target volumes. The target volumes contain point-in-time data that you can use to test data-recovery actions. For example, you can run scripts that attach your host systems to the target volumes on the remote site or complete an initial program load (IPL) on the site. Because data replication continues from the source volume to the intermediate volume in a normal manner, your data is recoverable while you are testing the practice volume. To use practice volumes, the session must be in the Prepared state. 12 Tivoli Storage Productivity Center for Replication for Open Systems Note: When practice sessions are used, Tivoli Storage Productivity Center for Replications assumes that the set of volumes that are used for practicing is also used in case of actual recovery. For this reason, the Tivoli Storage Productivity Center for Replication operations and storage resources that are used for practicing are the same in the case of a real recovery or site switch. This approach relieves the unpredictably of untested procedures during the real recovery operations. Note: You can test disaster-recovery actions without the use of practice volumes. However, if you do not use practice volumes, data replication between sites is interrupted while you are recovering data to the remote site. 1.5.2 Data copying symbols The following sections include symbols that represent the type of copying that is occurring between volumes. The symbols are shown in Table 1-2. Table 1-2 Copy type symbols Type of copy Symbol FlashCopy Synchronous Asynchronous 1.5.3 FlashCopy sessions FlashCopy sessions copy the data that is on the source volume to the target volume on the same site (Site 1). The target volume contains the same data as the source volume at the point in time when the copy was established. Any subsequent write operations to the source volume are not reflected on the target volume. Figure 1-6 shows the volumes and data flow for the session. Figure 1-6 FlashCopy session Chapter 1. Introduction to Tivoli Storage Productivity Center for Replication 13 1.5.4 Snapshot sessions Note: Snapshot sessions are available only for IBM XIV Storage System. Snapshot sessions create a point-in-time copy of a volume or set of volumes on the same site (Site 1) without having to define a specific target volume. The target volumes of a Snapshot session are automatically created when the snapshot is created. Figure 1-7 shows the volumes for the session. Figure 1-7 Snapshot session 1.5.5 Metro Mirror Single Direction sessions Metro Mirror Single Direction sessions copy data in a single direction from the source volume on the local site (Site 1) to the target volume on the remote site (Site 2). Figure 1-8 shows the volumes and data flow for the session. Figure 1-8 Metro Mirror Single Direction session 1.5.6 Metro Mirror Failover/Failback sessions Metro Mirror Failover/Failback sessions provide the same capabilities as Metro Mirror Single Directions sessions. The difference is that data replication for Metro Mirror Failover/Failback sessions is bidirectional. Figure 1-9 shows the volumes and data flow for the session when data is copied from Site 1 to Site 2. Figure 1-9 Metro Mirror Failover/Failback session 1.5.7 Metro Mirror Failover/Failback with Practice sessions Metro Mirror Failover/Failback with Practice sessions combine Metro Mirror and FlashCopy replication to provide a point-in-time copy of the data on the remote site. 14 Tivoli Storage Productivity Center for Replication for Open Systems For this session type, a synchronous copy occurs from a source volume on the local site (Site 1) to an intermediate volume on the remote site (Site 2). A FlashCopy then occurs from the intermediate volume to a target volume on the remote site. Figure 1-10 shows the volumes and data flow for the session when data is copied from Site 1 to Site 2. Figure 1-10 Metro Mirror Failover/Failback with Practice session 1.5.8 Global Mirror Single Direction sessions Global Mirror Single Direction sessions copy data in a single direction from a source volume on the local site (Site 1) to a target volume on the remote site (Site 2). ESS800, DS6000, and DS8000 storage systems For ESS800, DS6000, and DS8000 storage systems, an asynchronous copy occurs from the source volume to the target volume. A FlashCopy then occurs from the target volume to a journal volume on the remote site. Figure 1-11 shows the volumes and data flow for an ESS, DS6000, or DS8000 Global Mirror Single Direction session when data is copied from Site 1 to Site 2. Figure 1-11 Global Mirror Single Direction session for ESS800, DS6000, and DS8000 storage systems All other storage systems For all other storage system sessions, the data flow is the same. However, there is no FlashCopy to a journal volume. 1.5.9 Global Mirror Failover/Failback Global Mirror Failover/Failback sessions provide the same capabilities as Global Mirror Single Direction sessions. The difference is that data replication for Global Mirror Failover/Failback sessions is bidirectional. Chapter 1. Introduction to Tivoli Storage Productivity Center for Replication 15 ESS800, DS6000, and DS8000 storage systems Figure 1-12 represents the volumes and data flow for an ESS, DS6000, or DS8000 Global Mirror Failover/Failback session when data is copied from Site 1 to Site 2. Figure 1-12 Global Mirror Failover/Failback session for ESS800, DS6000, and DS8000 storage systems All other storage systems For all other storage system sessions, the data flow is the same. However, there is no FlashCopy to a journal volume. 1.5.10 Global Mirror Failover/Failback with Change Volumes sessions Global Mirror Failover/Failback with Change Volumes sessions provide the same capabilities as Global Mirror Failover/Failback sessions. The difference is that Global Mirror Failover/Failback with Change Volumes sessions also provides the option of enabling or disabling the use of change volumes. Note: Snapshot sessions are available only for SAN Volume Controller and Storwize storage systems. Figure 1-13 shows the volumes and data flow for the session when data is copied from Site 1 to Site 2. Figure 1-13 Global Mirror Failover/Failback with Change Volumes session 1.5.11 Global Mirror Failover/Failback with Practice sessions Global Mirror Failover/Failback with Practice sessions combine Global Mirror and FlashCopy replication to provide a point-in-time copy of the data on the remote site (Site 2). ESS800, DS6000, and DS8000 storage systems For ESS800, DS6000, and DS8000 storage systems, an asynchronous copy occurs from the source volume on the local site (Site 1) to the intermediate volume on the remote site (Site 2). A FlashCopy then occurs from the intermediate volume to the target volume and the journal volume on the remote site. 16 Tivoli Storage Productivity Center for Replication for Open Systems Figure 1-14 represents the volumes and data flow for an ESS, DS6000, or DS8000 Global Mirror Failover/Failback with Practice session when data is copied from Site 1 to Site 2. Figure 1-14 Global Mirror Failover/Failback with Practice session for ESS800, DS6000, and DS8000 All other storage systems For all other storage system sessions, the data flow is the same. However, there is no FlashCopy to a journal volume. 1.5.12 Global Mirror Either Direction with Two-Site Practice sessions Global Mirror Either Direction with Two-Site Practice sessions combine Global Mirror and FlashCopy replication to provide a point-in-time copy of the data on the local (Site 1) and remote site (Site 2). This session type includes intermediate and journal volumes on the local and remote site so that you can practice disaster recovery from either site. Figure 1-15 shows the volumes and data flow for the session when data is copied from Site 1 to Site 2. Figure 1-15 Global Mirror Either Direction with Two Site Practice session 1.5.13 Metro Global Mirror sessions Note: Metro Global Mirror sessions are available only for ESS800 and DS8000 storage systems. Chapter 1. Introduction to Tivoli Storage Productivity Center for Replication 17 Metro Global Mirror sessions combine Metro Mirror, Global Mirror, and FlashCopy replication into a single session. Metro Global Mirror sessions support three sites that are varying distances apart. For this session type, a synchronous copy occurs from the source volume on the local site (Site 1) to the target volume on the second site (Site 2). An asynchronous copy then occurs from the second site to the target volume on the third site (Site 3) and a FlashCopy occurs from the target to the journal volume on Site 3. Figure 1-16 shows the volumes and data flow for the session when data is copied from Site 1 to Site 3. Figure 1-16 Metro Global Mirror session 1.5.14 Metro Global Mirror with Practice sessions Note: Metro Global Mirror with Practice sessions are available only for ESS800 and DS8000 storage systems. Metro Global Mirror with Practice sessions combine Metro Mirror, Global Mirror, and FlashCopy replication across three sites to provide a point-in-time copy of the data on the third site. For this session type, a synchronous copy occurs from the source volume on the local site (Site 1) to the target volume on the second site (Site 2). An asynchronous copy then occurs from the second site to the intermediate volume on the third site (Site 3). A FlashCopy occurs from the intermediate volume to the target and journal volumes on Site 3. Figure 1-17 on page 19 shows the volumes and data flow for the session when data is copied from Site 1 to Site 3. 18 Tivoli Storage Productivity Center for Replication for Open Systems Figure 1-17 Metro Global Mirror with Practice session 1.5.15 Session states Sessions can exist in different states. The following sections describe the states for FlashCopy sessions and remote copy sessions. FlashCopy session states Table 1-3 shows the states for FlashCopy sessions. Table 1-3 FlashCopy session states Session state Description Storage systems Defined The session exists, but is not started and is not managing any relationships on the hardware. All Preparing The volumes in the session are initializing, synchronizing, or resynchronizing. SAN Volume Controller, Storwize V3500, Storwize V3700, Storwize V7000, and Storwize V7000 Unified storage systems Prepared All volumes in the session are initialized. SAN Volume Controller, Storwize V3500, Storwize V3700, Storwize V7000, and Storwize V7000 Unified storage systems Suspended Replication is stopped on all role pairs. Another recoverable flag indicates whether data is consistent and recoverable. All Target Available The target volumes are write-enabled. Another recoverable flag indicates whether data is consistent and recoverable. All Chapter 1. Introduction to Tivoli Storage Productivity Center for Replication 19 Session state Description Storage systems Terminating The session is terminating because a Terminate command was issued under the following conditions: The target volume is permitted to be Metro Mirror or Global Copy. The Require or Attempt to Preserve Mirror option is set. All Figure 1-18 shows the relationship of these states. If an error occurs when the Start or Flash command is issued, the session state becomes Suspended. Not Defined Create Session Delete Session Defined flash start Preparing Preparing flash terminate terminate start Prepared Prepared flash start Target Available Figure 1-18 FlashCopy session states Remote copy session states Table 1-4 shows the states for remote copy sessions (Metro Mirror, Global Mirror, and Metro Global Mirror). Table 1-4 Remote copy session states 20 Session state Description Session types Defined The session exists, but is not started and is not managing any relationships on the hardware. All Flashing The session is creating the practice FlashCopy. All sessions with practice Tivoli Storage Productivity Center for Replication for Open Systems Session state Description Session types Preparing The volumes in the session are initializing, synchronizing, or resynchronizing. All (excluding sessions for IBM XIV Storage System) Prepared All volumes in the session are initialized. The session is consistent and is actively copying data. All (excluding sessions for IBM XIV Storage System) Recovering The session is recovering. Global Mirror and Metro Global Mirror Suspending The session is in a transitory state that is caused by the Suspend command or suspending event. Copy operations are suspended. Global Mirror and Metro Global Mirror (only for ESS800, DS6000, and DS8000 storage systems) Suspended Replication is stopped on all role pairs. Another recoverable flag indicates whether data is consistent and recoverable. Metro Mirror, Global Mirror, and Metro Global Mirror SuspendedH1H2 MGM Data copying between site 1 and site 2 is stopped for the session. Metro Global Mirror SuspendedH1H3 MGM Data copying between site 1 and site 3 is stopped for the session. Metro Global Mirror Target Available The target volumes are write-enabled. Another recoverable flag indicates whether data is consistent and recoverable. All Terminating The session is terminating because a Terminate command was issued under the following conditions: The target volume is permitted to be Metro Mirror or Global Copy. The Require or Attempt to Preserve Mirror option is set. All Chapter 1. Introduction to Tivoli Storage Productivity Center for Replication 21 Figure 1-19 shows the relationship of these states for sessions that do not include practice volumes. Not Defined Create Session Delete Session Defined terminate start Prepared Event suspend/pause Suspending start Suspended Event suspend/pause Preparing Add Copy Set terminate recover Recovering start Target Available terminate Figure 1-19 Remote copy session states 1.5.16 Session commands The commands that are available for a session depend on the session type. Commands are issued synchronously to Tivoli Storage Productivity Center for Replication sessions. Any subsequent command that is issued to an individual session is not processed until the first command completes. Some commands, such as the Start command, can take an extended amount of time to complete. By using the GUI, you can still issue commands to other sessions and not hold up functionality. When a command completes, the GUI console displays the results of the command. The tables in the following sections show the commands that are available by session type. These commands represent the GUI and not the CLI command, which might require specific syntax to be valid. 22 Tivoli Storage Productivity Center for Replication for Open Systems FlashCopy Commands Table 1-5 shows the commands for FlashCopy sessions. Table 1-5 FlashCopy commands Command Meaning Start Places the session in the Prepared state. This command is available only for sessions for SAN Volume Controller, Storwize V3500, Storwize V3700, Storwize V7000, and Storwize V7000 Unified storage systems. Flash Completes the FlashCopy operation. Initiate Background Copy Copies all tracks from the source to the target immediately instead of waiting until the source track is written to. This command is valid only when the background copy is not running. Terminate Removes all active physical copies and relationships from the hardware during an active session. If you want the targets to be data consistent before you remove their relationship, you must issue the Initiate Background Copy command if NOCOPY was specified, and then wait for the background copy to complete by checking the copying status of the pairs. Snapshot commands Table 1-6 shows the commands for Snapshot sessions. Note: Snapshot sessions are available only for IBM XIV Storage System. Table 1-6 Snapshot commands Command Meaning Create Snapshot Creates a snapshot of the volumes in the session. Restore Restores the H1 volumes in the session from a set of snapshot volumes. You must have at least one snapshot group to restore from. When you issue this command in the Tivoli Storage Productivity Center for Replication GUI, you are prompted to select the snapshot group. Chapter 1. Introduction to Tivoli Storage Productivity Center for Replication 23 Table 1-7 shows the commands for Snapshot groups. A snapshot group is a grouping of snapshots of individual volumes in a consistency group at a specific point in time. Table 1-7 Snapshot group commands 24 Command Meaning Delete Deletes the snapshot group and all the individual snapshots that are in the group from the session and from IBM XIV Storage System. If the deleted snapshot group is the last snapshot group that is associated with the session, the session returns to the Defined state. Disband Disbands the snapshot group. When a snapshot group is disbanded, the snapshot group no longer exists. All snapshots in the snapshot group become individual snapshots that are no longer associated to the consistency group or the session. After a snapshot group is disbanded, it is no longer displayed in or managed by Tivoli Storage Productivity Center for Replication. If the disbanded snapshot group is the last snapshot group that is associated with the session, the session returns to the Defined state. Duplicate Duplicates the snapshot group. When a snapshot group is duplicated, a snapshot group is created with new snapshots for all volumes that are in the duplicated group. The name of the duplicated snapshot group is generated automatically by IBM XIV Storage System. Lock Locks a snapshot group. If the snapshot group is locked, write operations to the snapshots that are in the snapshot group are prevented. By default, a snapshot group is locked when it is created. This action is valid only if the snapshot group is unlocked. Overwrite Overwrites the snapshot group to reflect the data that is on the H1 volume. Rename Renames the snapshot group to a name that you provide. The name can be a maximum of 64 alphanumeric characters. Restore Restores the contents of a snapshot group by using another snapshot group in the session. Both of the snapshot groups must contain the same subset of volumes. Set Priority Sets the priority in which a snapshot group is deleted. The value can be the number 1 - 4. A value of 1 specifies that the snapshot group is deleted last. A value of 4 specifies that the snapshot group is deleted first. Unlock Unlocks a snapshot group. If the snapshot group is unlocked, write operations to the snapshots that are in the snapshot group are enabled and the snapshot group is displayed as modified. This action is valid only if the snapshot group is locked. Tivoli Storage Productivity Center for Replication for Open Systems Metro Mirror commands Table 1-8 shows the commands for Metro Mirror sessions. The applicable commands depend on the Metro Mirror session type and the storage system. Table 1-8 Metro Mirror commands Command Meaning Enable Copy to Site 1 Confirms that you want to reverse the direction of replication before you reverse the direction of copying in a failover and failback session. After you issue this command, the H2 H1 command becomes available. Enable Copy to Site 2 Confirms that you want to reverse the direction of replication before you reverse the direction of copying in a failover and failback session. After you issue this command, the Start H1 H2 command becomes available. Flash Creates a FlashCopy image from I2 volumes to H2 volumes. The amount of time for this to occur varies depending on the number of copy sets in the session. HyperSwap Triggers a HyperSwap where I/O is redirected from the source volume to the target volume without affecting the application that is using those volumes. Recover Completes the steps necessary to make the target available as the new primary site. Upon completion of this command, the session becomes Target Available. Start Establishes a single-direction session with the hardware and begins the synchronization process between the source and target volumes. Start H1 H2 Applies only to failover/failback sessions. Indicates the direction between two hosts in a Metro Mirror failover/fallback session. Start H2 H1 Indicates direction of a failover/failback between two hosts in a Metro Mirror session. If the session was recovered with the failover/failback function such that the production site is now H2, you can issue the Start H2 H1 command to start production on H2 and provide protection. StartGC Establishes Global Copy relationships between the H1 volumes and the H2 volumes, and begins asynchronous data replication from H1 to H2. While in the Preparing state, it does not change to the Prepared state unless you switch to Metro Mirror. Stop Suspends updates to all the targets of pairs in a session. This command can be issued at any point during an active session. However, updates are not considered to be consistent. Suspend Causes all target volumes to remain at a data-consistent point and stops all data that is moving to the target volumes. This command can be issued at any point during a session when the data is actively copied. Terminate Removes all physical copies from the hardware during an active session. If you want the targets to be data consistent before you remove their relationship, you must issue the Suspend command, the Recover command, and then the Terminate command. Chapter 1. Introduction to Tivoli Storage Productivity Center for Replication 25 Global Mirror commands Table 1-9 shows the commands for Global Mirror sessions. The applicable commands depend on the Global Mirror session type and the storage system. Table 1-9 Global Mirror commands 26 Command Meaning Enable Copy to Site 1 Confirms that you want to reverse the direction of replication before you reverse the direction of copying in a failover and failback session. After you issue this command, the H2 H1 command becomes available. Enable Copy to Site 2 Confirms that you want to reverse the direction of replication before you reverse the direction of copying in a failover and failback session. After you issue this command, the Start H1 H2 command becomes available Flash Ensures that all I2s are consistent, and then flashes the data from I2 to the H2 volumes. After the flash is complete, the Global Mirror session is automatically restarted, and the session begins forming consistency groups on I2. You can then use the H2 volumes to practice your disaster recovery procedures. Recover Completes the steps necessary to make the target available as the new primary site. Upon completion of this command, the session becomes Target Available. Start Sets up all relationships in a single-direction session and begins the process that is necessary to start forming consistency groups on the hardware. Start H1 H2 Indicates direction between two hosts in a Global Mirror failover/fallback session. This command can be issued at any point during a session when the data is actively copied. Start H2 H1 Indicates direction of a failover/failback session. If a recover was performed on a session such that the production site is now H2, you can issue Start H2 H1 to start moving data back to Site 1. However, this start does not provide consistent protection as it copies only asynchronously back because of the long distance. An extended distance (XD) relationship is used. When you are ready to move production back to Site 1, issue a suspend to the session. This puts the relationships into a synchronized state and suspends them consistently. StartGC H1 H2 Establishes Global Copy relationships between site 1 and site 2 and begins asynchronous data replication from H1 to H2. To change the session state from Preparing to Prepared, you must issue the Start H1 H2 command and the session must begin to form consistency groups. Suspend Stops all consistency group information when the data is actively copied. This command can be issued at any point during a session when the data is actively copied. Terminate Removes all physical copies from the hardware. This command can be issued at any point in an active session. If you want the targets to be data consistent before you remove their relationship, you must issue the Suspend command, the Recover command, and then the Terminate command. Tivoli Storage Productivity Center for Replication for Open Systems Metro Global Mirror commands Table 1-10 shows the commands for Metro Global Mirror sessions. The applicable commands depend on the Metro Global Mirror session type and the storage system. Table 1-10 Metro Global Mirror commands Command Meaning Enable Copy to Site 1 Confirms that you want to reverse the direction of replication before you reverse the direction of copying in a failover and failback session. After you issue this command, the Start H2 H1 H3 command becomes available. Enable Copy to Site 2 Confirms that you want to reverse the direction of replication before you reverse the direction of copying in a failover and failback session. After you issue this command, the Start H1 H2 H3 command becomes available. HyperSwap Triggers a HyperSwap where I/O is redirected from the source volume to the target volume, without affecting the application that uses those volumes. Flash Ensures that all I3s are consistent, and then flashes the data from I3 to the H3 volumes. This command is available in the following states: Target Available state when the active host is H3. Use this command if the FlashCopy portion of the Recover command from I3 to H3 fails for any reason. The problem can be addressed, and a Flash command can be issued to complete the flash of the consistent data from I3 to H3. Prepared state when the active host is H1 and data is copying H1 to H2 to I3, or the active host is H2 and data is copying H2 to H1 to H3. Prepared state when the active host is H2 and data is copying H2 to I3. Prepared state when the active host is H1 and data is copying H1 to I3. Recover H1 Specifying H1 makes the H1 volume Target Available. Metro Global Mirror (when H2 H1 H3 is run) can move production to the H1 or H3 set of volumes. Tivoli Storage Productivity Center for Replication processing is different, depending on the recovery site. Therefore, the site designation is added to the recover command so Tivoli Storage Productivity Center for Replication can set up for the failback. Recover H2 Specifying H2 makes the H2 volume Target Available. Metro Global Mirror (when H1 H2 H3 is run) can move production to the H2 or H3 set of volumes. Tivoli Storage Productivity Center for Replication processing is different, depending on the recovery site. Therefore, the site designation is added to the recover command so Tivoli Storage Productivity Center for Replication can set up for the failback. Recover H3 Specifying H3 makes the H3 volume Target Available. Metro Global Mirror (when H1 H2 H3 is run) can then move production to the H3 set of volumes. Because Tivoli Storage Productivity Center for Replication processing is different depending on the recovery site, the site designation is added to the recover command so that Tivoli Storage Productivity Center for Replication can set up for the failback. This command sets up H3 so that you can start the application on H3. H3 becomes the active host, and you then can start H3 H1 H2 to perform a Global Copy copy back. Chapter 1. Introduction to Tivoli Storage Productivity Center for Replication 27 Command Meaning Re-enable Copy to Site 1 After you issue a Recover H1 command, you can run this command to restart the copy to the original the direction of replication in a failover and failback session. Re-enable Copy to Site 2 After you issue a Recover H2 command, you can run this command to restart the copy to the original the direction of replication in a failover and failback session. Re-enable Copy to Site 3 After you issue a Recover H3 command, you can run this command to restart the copy to the original the direction of replication in a failover and failback session. Start H1 H2 H3 Metro Global Mirror initial start command. This command creates Metro Mirror relationships between H1 and H2, and Global Mirror relationships between H2 and H3. For Metro Global Mirror, this includes the J3 volume to complete the Global Mirror configuration. (The J3 volume role is the journal volume at Site 3). Start H1 H2 H3 can be used from some Metro Global Mirror configurations to return to the starting H1 H2 H3 configuration. Start H1 H3 From the H1 H2 H3 configuration, this command changes the session configuration to a Global Mirror-only session between H1 and H3, with H1 as the source. Use this command in case of an H2 failure with transition bitmap support provided by incremental resynchronization. It can be used when a session is in the Preparing, Prepared, and Suspended states because no source host change is involved. By using this command, you can bypass the H2 volume in case of an H2 failure and copy only the changed tracks and tracks in flight from H1 to H3. After the incremental resynchronization is performed, the session is running Global Mirror from H1 to H3 and thus loses the near-zero data loss protection that was achieved with Metro Mirror when H1 H2 H3 is run. However, data consistency is still maintained at the remote site with the Global Mirror solution. From H2 H1 H3 configuration, this command changes the session configuration to a Global Mirror-only session configuration between H1 and H3, with H1 as the source. Use this command when the source site has a failure and production is moved to the H1 site. This can be done for unplanned HyperSwap. The Global Mirror session is continued. This is a host-volume change so this command is valid only when you are restarting the H1 H3 configuration or from the Target Available H2 H1 H3 state. Start H2 H1 H3 28 Metro Global Mirror start command. This is the configuration that completes the HyperSwap processing. This command creates Metro Mirror relationships between H2 and H1 and Global Mirror relationships between H1 and H3. For Metro Global Mirror, this includes the J3 volume to complete the Global Mirror configuration. Tivoli Storage Productivity Center for Replication for Open Systems Command Meaning Start H2 H3 From the H1 H2 H3 configuration, this command moves the session configuration to a Global Mirror-only session configuration between H2 and H3, with H2 as the source. Use this command when the source site has a failure and production is moved to the H1 site. This can be done for unplanned HyperSwap. The Global Mirror session is continued. This is a host-volume change so this command is valid only when you are restarting the H1 H3 configuration or from the Target Available H2 H1 H3 state. From the H2 H1 H3 configuration, this command returns the session configuration to a Global Mirror only session configuration between H2 and H3 with H2 as the source. Use this command in case of an H1 failure with transition bitmap support that is provided by incremental resynchronization. It can be used when the session is in the Preparing, Prepared, and Suspended states because there is not a source-host change involved. Start H2 H1 H3 can be used from some Metro Global Mirror configurations to return to the starting H2 H1 H3 configuration. Start H3 H1 H2 After recovering to H3, this command sets up the hardware to allow the application to begin writing to H3, and the data is copied back to H1 and H2. However, issuing this command does not ensure consistency in the case of a disaster because only Global Copy relationships are established to cover the long-distance copy back to Site 1. To move the application back to H1, you can issue a suspend while in this state to drive all the relationships to a consistent state and then issue a freeze to make the session consistent. You can then issue a recover followed by a start H1 H2 H3 to return to the original configuration. Start H3 H2 Metro Global Mirror command to start Global Copy from the disaster recovery site back to the H2 volumes. This is a host-volume change, so this command is valid only when you are restarting the H3 H2 configuration or from the Target Available H1 H2 H3 state. Suspend H1 H3 When H2 H1 H3 is run, this command issues a pause to the Global Mirror master and causes the Global Mirror master to stop forming consistency groups. This command is valid only when the session is in the Prepared state. Suspend H2 H3 When H1 H2 H3 is run, this command issues a pause to the Global Mirror master and causes the Global Mirror master to stop forming consistency groups. This command is valid only when the session is in the Prepared state. Terminate Removes all physical copies from the hardware. This command can be issued at any point in an active session. Chapter 1. Introduction to Tivoli Storage Productivity Center for Replication 29 1.6 New features and enhancements in Tivoli Storage Replication Center for Replication by release This section describes new features and enhancements in Tivoli Storage Productivity Center for Replication by release. For more information about a feature or enhancement, see the New for Tivoli Storage Productivity Center Version 5.x topic in the Tivoli Storage Productivity Center Version 5.1.1.1 information center and the New for Tivoli Storage Productivity Center Version 5.2 topic in the Tivoli Storage Productivity Center Version 5.2 information center. You can find the Tivoli Storage Productivity Center information center by version at Tivoli Documentation Central, which is available at this website: https://www.ibm.com/developerworks/community/wikis/home?lang=en#!/wiki/Tivoli%20Do cumentation%20Central/page/Tivoli%20Storage%20Productivity%20Center 1.6.1 New in V5.1 The following features and enhancements are new in Tivoli Storage Productivity Center for Replication V5.1. Failover operations that are managed by other applications Applications, such as the IBM Series i Toolkit, VMware Site Recovery Manager, and Veritas Cluster Server, manage failover operations for certain session types and storage systems. If an application completes a failover operation for a session, the Severe status is displayed for the session. An error message is also generated for the role pairs for which the failover occurred. Additional support for space-efficient volumes in remote copy You can use extent space-efficient volumes as copy set volumes for the following IBM System DS8000 session types: FlashCopy (System Storage DS8000 v6.2 or later) Metro Mirror (System Storage DS8000 v6.3 or later) Global Mirror or Metro Global Mirror (System Storage DS8000 v6.3 or later) Reflash After Recover for Global Mirror Failover/Failback with Practice sessions You can use the Reflash After Recover option with System Storage DS8000 version 4.2 or later. Use this option to create a FlashCopy replication between the I2 and J2 volumes after the recovery of a Global Mirror Failover/Failback with Practice session. If you do not use this option, a FlashCopy replication is created only between the I2 and H2 volumes. No Copy option for Global Mirror with Practice and MGM with Practice sessions You can use the No Copy option with System Storage DS8000 version 4.2 or later. Use this option if you do not want the hardware to write the background copy until the source track is written to. 30 Tivoli Storage Productivity Center for Replication for Open Systems Recovery Point Objective Alerts option for Global Mirror sessions You can use the Recovery Point Objective Alerts option with ESS800, DS6000, and DS8000 storage systems. Use this option to specify the length of time that you want to set for the recovery point objective (RPO) thresholds. The values determine whether a Warning or Severe alert is generated when the RPO threshold is exceeded for a role pair. The RPO represents the length of time (in seconds) of data exposure that is acceptable in the event of a disaster. StartGC H1 H2 command for Global Mirror sessions You can use the StartGC H1 H2 command with ESS800, DS6000, and DS8000 storage systems. This command establishes Global Copy relationships between Site 1 and Site 2, and begins asynchronous data replication from H1 to H2. This command is available only for Global Mirror Failover/Failback and Global Mirror Failover/Failback with Practice sessions. Export Global Mirror Data command for Global Mirror role pairs You can use this option to export data for a Global Mirror role pair that is in a session to a comma-separated value (.csv) file. You can then use the data in the .csv file to analyze trends in your storage environment that affect your RPO. 1.6.2 New in V5.1.1 The following features and enhancements are new in Tivoli Storage Productivity Center for Replication V5.1.1. SAN Volume Controller 6.4 option to move volumes between I/O groups To support this SAN Volume Controller feature, Tivoli Storage Productivity Center for Replication includes the following changes: The I/O group was removed from the volume ID. The volume ID or the volume name can be used as a CLI command volume parameter for SAN Volume Controller, Storwize V3500, Storwize V3700, Storwize V7000, and Storwize V7000 Unified storage systems. The following CLI commands were updated to reflect this change: – – – – – – – – chvollspair lscpset lsvol mkcpset (where applicable for the specific volume parameter) importcsv exportcsv rmcpset showcpset DS8000 consistency groups that are created for FlashCopy sessions For FlashCopy sessions, Tivoli Storage Productivity Center for Replication creates FlashCopy consistency groups in DS8000 storage systems. The consistency groups are created automatically during the creation of the FlashCopy session. You are no longer required to quiesce an application before you issue the Flash command for FlashCopy sessions. Chapter 1. Introduction to Tivoli Storage Productivity Center for Replication 31 HyperSwap options available for Metro Global Mirror with Practice sessions The session properties for Metro Global Mirror with Practice sessions include the same HyperSwap options that are available for Metro Global Mirror sessions. 1.6.3 New in V5.1.1.1 The following features and enhancements are new in Tivoli Storage Productivity Center for Replication V5.1.1.1. DS8000 pause with consistency available for Global Mirror and Metro Global Mirror sessions The Tivoli Storage Productivity Center for Replication Suspend command starts a pause or pause with secondary consistency command for DS8000 storage systems. The command that is started is the equivalent of the DS8000 pausegmir or pausegmir -withsecondary command, depending on the DS8000 microcode level. Both pause commands temporarily pause the formation of consistency groups after the current consistency group is formed. However, the command for a pause with secondary consistency creates a consistent data set on the secondary volumes. Easy Tier Heat Map transfer for DS8000 The DS8000 Easy Tier heat map transfer function transfers heat map information from a source storage system to one or more target storage systems. You can enable heat map transfers for DS8000 storage systems that are connected to Tivoli Storage Productivity Center for Replication from the Tivoli Storage Productivity Center for Replication GUI. The Easy Tier heat map transfer function is available in System Storage DS8000 Release 7.1 and later. 1.6.4 New in V5.2 The following features and enhancements are new in Tivoli Storage Productivity Center for Replication V5.2. New session type for SAN Volume Controller and Storwize The Global Mirror Failover/Failback with Change Volumes session is available for SAN Volume Controller and Storwize storage systems that use change volumes. Global Mirror Failover/Failback with Change Volumes sessions provide the same capabilities as Global Mirror Failover/Failback sessions. The difference is that Global Mirror Failover/Failback with Change Volumes sessions also provide the option of enabling or disabling the use of change volumes. Change volumes contain point-in-time images that are copied from the host and target volumes. Connect to z/OS from open systems and manage HyperSwap You can use a host name or IP address to connect to z/OS host systems in Tivoli Storage Productivity Center for Replication, regardless of the operating system on which the application is installed. 32 Tivoli Storage Productivity Center for Replication for Open Systems By using this feature, you can connect to a z/OS host system from Tivoli Storage Productivity Center for Replication that is running on Windows, Linux, AIX, or z/OS. After you are connected to a host system, you can fully manage HyperSwap sessions that are running on the system. In addition, this feature enables a single instance of Tivoli Storage Productivity Center for Replication to manage multiple HyperSwap instances that are running in different z/OS systems and sysplexes. 1.7 Introduction to Storage Systems This section provides a brief description of the storage systems that are supported by Tivoli Storage Productivity Center for Replication. The following older storage systems are not described in this section: ESS800 DS6000 DS8800 DS8700 1.7.1 IBM System Storage DS8000 IBM System Storage DS8000 series is a high-performance, high-capacity series of disk storage that supports continuous operations. The latest and most advanced disk enterprise storage system in the DS8000 series is the IBM System Storage DS8870. It represents the latest in the series of high-performance and high-capacity disk storage systems. The DS8870 supports IBM POWER7® processor technology to help support higher performance. The DS8000 series DS8870 supports functions such as point-in-time copy functions with IBM FlashCopy, FlashCopy Space Efficient, and Remote Mirror and Copy functions with Metro Mirror, Global Copy, Global Mirror, Metro Global Mirror, IBM z/OS Global Mirror, and z/OS Metro/Global Mirror. Easy Tier functions are supported on DS8870 storage units. I/O Priority Manager is also supported on the DS8870 units. All DS8000 series models consist of a storage unit and one or two management consoles (two is the recommended configuration). The GUI or the CLI can logically partition storage and use the built-in Copy Services functions. For high availability, the hardware components are redundant. For more information about the latest functionality of IBM System Storage DS8000 products, see this website: http://www-03.ibm.com/systems/storage/disk/ds8000/index.html Chapter 1. Introduction to Tivoli Storage Productivity Center for Replication 33 1.7.2 IBM Storwize Family The following products are members of the IBM Storwize family of virtualized storage systems. IBM System Storage SAN Volume Controller IBM System Storage SAN Volume Controller is a storage virtualization system with a single point of control for storage resources. SAN Volume Controller improves business application availability and greater resource usage so you can get the most from your storage resources and achieve a simpler, more scalable and cost-efficient IT infrastructure. The newly enhanced SAN Volume Controller with IBM Real-time Compression™ offers up to three times the throughput for applications. For more information about the IBM SAN Volume Controller, see this website: http://www-03.ibm.com/systems/storage/software/virtualization/svc/index.html IBM Storwize V7000 and V7000 Unified IBM Storwize V7000 and Storwize V7000 Unified are virtualized storage systems that consolidate workloads into a single storage system for simplicity of management, reduced cost, highly scalable capacity, performance, and high availability. These systems offer improved efficiency and flexibility through built-in flash memory optimization, thin provisioning, and nondisruptive migration from existing storage. Storwize V7000 supports block workloads whereas Storwize V7000 Unified consolidates block and file workloads into a single system. For more information about IBM Storwize V7000 and Storwize V7000 Unified Disk Systems, see this website: http://www-03.ibm.com/systems/storage/disk/storwize_v7000/ IBM Storwize V3500 and V3700 Storwize V3500 and Storwize V3700 are entry-level disk storage systems that are designed with sophisticated capabilities that are unusual for a system of this class. These storage systems offer efficiency and flexibility through built-in thin provisioning and nondisruptive migration of data from existing storage. Built upon the innovative technology in the Storwize family, Storwize V3500 and Storwize V3700 address block storage requirements of small and midsize organizations. For more information about this product, see website: http://www-03.ibm.com/systems/storage/disk/storwize_v3700/index.html 34 Tivoli Storage Productivity Center for Replication for Open Systems 1.7.3 IBM XIV Storage System IBM XIV Storage System is high-end disk storage that supports the need for high performance, reliability, and flexibility while helping keep costs and complexity to a minimum. IBM XIV Storage System exemplifies IBM Smarter Storage for Smarter Computing, empowering thousands of organizations worldwide to take control of their storage and gain business insights from their data. Designed for consistent Tier 1 performance and five-nines availability, XIV storage offers low total cost of ownership and addresses even the most demanding and diverse workloads. The IBM XIV Storage System grid architecture delivers massive parallelism, which results in uniform allocation of system resources always. IBM XIV Storage System automates tasks and provides an extraordinarily intuitive user interface. This interface is accompanied by an equally rich and comprehensive CLI for tailoring the system to user requirements. For more information about IBM XIV Storage System, see this website: http://www-03.ibm.com/systems/storage/disk/xiv/index.html Chapter 1. Introduction to Tivoli Storage Productivity Center for Replication 35 36 Tivoli Storage Productivity Center for Replication for Open Systems 2 Chapter 2. Planning and installation In this chapter, we provide an overview of the tasks that are necessary to successfully deploy Tivoli Storage Productivity Center for Replication within your environment. This chapter includes the following topics: Tivoli Storage Productivity Center for Replication installation planning Installing Tivoli Storage Productivity Center for Replication © Copyright IBM Corp. 2014. All rights reserved. 37 2.1 Tivoli Storage Productivity Center for Replication installation planning As of Tivoli Storage Productivity Center version 5.1, Tivoli Storage Productivity Center for Replication is a part of the IBM Tivoli Storage Productivity Center and is installed with the Tivoli Storage Productivity Center installation. Installation planning for Tivoli Storage Productivity Center for Replication is part of the planning for Tivoli Storage Productivity Center, but some specific information regarding Tivoli Storage Productivity Center for Replication must be determined. That information is described in the following sections. 2.1.1 Pre-installation steps It is important to plan pre-installation steps to correctly set up the Tivoli Storage Productivity Center for Replication environment. The pre-installation steps consider some specifics regarding Tivoli Storage Productivity Center for Replication, which are also important in a presales phase if you are planning to buy Tivoli Storage Productivity Center. The following specifics must be considered: Licensing (Tivoli Storage Productivity Center for Replication, storage systems) Operating systems platform High availability configuration versus non-high availability configuration Management server connectivity Storage systems connectivity User accounts Managing HyperSwap functionality (z/OS, open systems) Host connectivity For more information about the pre-installation steps and other Tivoli Storage Productivity Center installation details, see the draft of the Tivoli Storage Productivity Center V5.2 Release Guide, SG24-8204, and the Tivoli Storage Productivity Center 5.2 Installation and Configuration Guide, SC27-4058. 2.1.2 Licensing With the convergence of Tivoli Storage Productivity Center for Replication function into the Tivoli Storage Productivity Center license, there is no longer a separate license for Tivoli Storage Productivity Center for Replication as it was in the previous Tivoli Storage Productivity Center versions (4.x and before). The Tivoli Storage Productivity Center license enables all Tivoli Storage Productivity Center for Replication functions, which were in the Tivoli Storage Productivity Center for Replication Two Site and Three Site Business Continuity. It also enables all Tivoli Storage Productivity Center functions, such as storage resource management and reporting and performance monitoring. Tivoli Storage Productivity Center is licensed per Terabyte (a terabyte is 2 to the 40th power bytes) and it must cover all of your storage that is managed by Tivoli Storage Productivity Center. The storage that is managed is the total allocated size of all volumes that are managed by Tivoli Storage Productivity Center, whether they are replicated or not. It means if you are using Tivoli Storage Productivity Center for Replication, the license must cover the total allocated size of all volumes on primary and disaster recovery site. Licenses are also concerned with storage systems where you installed copy services licenses. 38 Tivoli Storage Productivity Center for Replication for Open Systems 2.1.3 Hardware and software requirements In this section, we describe the hardware and software requirements for the Tivoli Storage Productivity Center and for the Tivoli Storage Productivity Center for Replication. Because the Tivoli Storage Productivity Center server can require a large amount of memory, disk space, network bandwidth, and processor resources, it is recommended to use a dedicated server that is not running other applications. Dedicated servers improve performance and make it easier to troubleshoot errors. Note: If you are planning to use only Tivoli Storage Productivity Center for Replication functions, disk space requirements might be less than what is specified in the requirements. Tivoli Storage Productivity Center for Replication does not use the DB2 database repository where all the Tivoli Storage Productivity Center history data is collected and stored. For more information about product lists and platform support for Tivoli Storage Productivity Center, see the following resources: IBM Support web page: http://www-01.ibm.com/support/docview.wss?uid=swg21386446 IBM Tivoli Storage Productivity Center Information Center link: http://pic.dhe.ibm.com/infocenter/tivihelp/v59r1/index.jsp Hardware requirements Tivoli Storage Productivity Center for Replication version 5.2 has the following hardware requirements: Windows and Linux: – Processor: Intel Xeon or greater; at least four processors at 2.5 GHz CPUs each – Memory: 8 GB of RAM – Disk space: 15 GB of free disk space AIX: – Processor: IBM POWER5 or later; at least four processors at 2.3 GHz CPUs each – Memory: 8 GB of RAM – Disk space: 22 GB of free disk space Software requirements for operating systems Tivoli Storage Productivity Center for Replication version 5.2 supports the following operating systems: Windows and Linux: – – – – Windows 2012 (x86, x86-64): Standard Edition, Enterprise Edition Windows 2008 R2 (x86-64): Standard Edition, Enterprise Edition Red Hat Enterprise Linux Base Server and Advanced Platform 5 (x86-64) Red Hat Linux Base Server and Advanced Platform 6 (x86-64) AIX: – AIX V6.1 (64-bit) – AIX V7.1 (64-bit) Chapter 2. Planning and installation 39 VM on VMWare: VMware ESX and ESXi 3.0.x, 3.5.x, 4.0.x, 4.1.x, and 5.x: – – – – – Red Hat Enterprise Linux 5 Red Hat Enterprise Linux 6 Windows 2008 Windows 2008 R2 Windows 2012 Note: The hardware and software requirements for the Tivoli Storage Productivity Center for Replication are the same for the active and standby management servers for a high availability environment. The hardware and software requirements for the Tivoli Storage Productivity Center for Replication for System Z are documented in the IBM Redbooks publication Tivoli Storage Productivity Center for Replication for Series z, SG24-7563, which is available at this website: http://pic.dhe.ibm.com/infocenter/tivihelp/v59r1/index.jsp Storage system requirements Tivoli Storage Productivity Center for Replication supports the following storage systems: DS8000 SAN Volume Controller Storwize family Storwize Unified XIV DS6000 ESS800 To provide replication management tasks, the storage systems must include supported firmware and network connectivity to Tivoli Storage Productivity Center for Replication management servers. For more information about the storage systems and corresponding supported firmware, see this website: http://www-01.ibm.com/support/docview.wss?uid=swg27027303#vendorstorage The storage systems must also feature activated copy services licenses, which are used. Some of the licenses are provided by default with storage systems, and some must be bought separately. Web browser requirements Tivoli Storage Productivity Center for Replication uses the GUI to provide a single point of control to configure, manage, and monitor copy services. Whether you start it on the server where the Tivoli Storage Productivity Center for Replication is installed or on a remote system, the GUI is web-based and displayed in a browser. For more information about the certified versions of supported web browsers for the Tivoli Storage Productivity Center for Replication, see this website: http://www-01.ibm.com/support/docview.wss?rs=40&context=SSBSEX&context=SSMN28&cont ext=SSMMUP&context=SS8JB5&context=SS8JFM&uid=swg21386446&loc=en_US&cs=utf-8&lang=e n 40 Tivoli Storage Productivity Center for Replication for Open Systems Note: The browser levels that are listed in Table 2-1 on page 42 were tested and certified by Tivoli Storage Productivity Center. Tivoli Storage Productivity Center supports later versions of the browsers if the vendors do not remove or disable functionality that Tivoli Storage Productivity Center relies on. For browser levels that are higher than the levels that were certified with Tivoli Storage Productivity Center, customer support accepts usage-related and defect-related service requests. For the operating system and virtualization environments, if IBM support cannot re-create the issue in our lab, we might ask the client to re-create the problem on a certified browser version to determine whether a product defect exists. Defects are not accepted for cosmetic differences between browsers or browser versions that do not affect the functional behavior of the product. If a problem is identified in Tivoli Storage Productivity Center, defects are accepted. If a problem is identified with the browser, IBM might investigate potential solutions or workarounds that the client can implement until a permanent solution becomes available. A minimum screen resolution of 1280 x 1024 is suggested for the web browsers. Repository requirements Tivoli Storage Productivity Center for Replication uses an embedded repository where all information about storage systems and copy services configuration are stored. As the Tivoli Storage Productivity Center for Replication is installed with Tivoli Storage Productivity Center installation, the embedded repository is automatically created. There are no other requirements for the repository and the repository also does not require more setup. Before you install Tivoli Storage Productivity Center, you must install DB2 database because DB2 database is required for the Tivoli Storage Productivity Center database repository. DB2 license key must also be registered. 2.1.4 Configuration planning This section describes physical planning and TCP/IP ports that are used for configuring Tivoli Storage Productivity Center and Tivoli Storage Productivity Center for Replication. Also provided is high availability configuration planning when you have Tivoli Storage Productivity Center for Replication installed on two servers with one server running in active mode and the second server running in standby mode. Physical planning and TCP/IP ports used Tivoli Storage Productivity Center for Replication uses an Internet Protocol network to communicate with storage systems. Therefore, you must ensure that your Tivoli Storage Productivity Center for Replication server has the necessary access to all required storage systems. When you install Tivoli Storage Productivity Center and Tivoli Storage Productivity Center for Replication, default ports must be opened through the firewall. You must also disable the firewall program or open the ports to allow incoming requests to the Tivoli Storage Productivity Center and Tivoli Storage Productivity Center for Replication ports. The Table 2-1 on page 42 shows the ports that are used by Tivoli Storage Productivity Center for Replication for incoming and outgoing communication. Review these ports before you install the Tivoli Storage Productivity Center and Tivoli Storage Productivity Center for Replication to establish communication to storage systems. Chapter 2. Planning and installation 41 The TCP/IP ports that are used only by Tivoli Storage Productivity Center are documented in the draft of the Tivoli Storage Productivity Center V5.2 Release Guide, SG24-8204 and in the IBM Tivoli Storage Productivity Center 5.2 Installation and Configuration Guide, SC27-4058. Note: Table 2-1 lists default ports that are used by Tivoli Storage Productivity Center for Replication for incoming and outgoing communication. The installer automatically detects conflicts and might choose other ports. Table 2-1 TCP/IP ports that are used by Tivoli Storage Productivity Center for Replication 42 Port Description Communication 9558 and 9559 A web browser typically communicates with the Tivoli Storage Productivity Center for Replication GUI by using HTTP ports 9558 and 9559. Incoming 9560 The Tivoli Storage Productivity Center for Replication command line and GUI typically communicate with the Tivoli Storage Productivity Center for Replication server by using port 9560. Incoming 9561 Tivoli Storage Productivity Center for Replication uses port 9561 for communication with other Tivoli Storage Productivity Center for Replication servers for high-availability purposes. Incoming 2433 For communication with ESS/DS (direct connection). Outgoing 1750 For communication with DS8000 (HMC connection). Outgoing 443 and 22 For communication with SAN Volume Controller or Storwize V7000 clusters. Outgoing 9930 For communication with the AIX host for the Open HyperSwap. Outgoing A number 1 - 65535 (the port number must be the same as the port number that is specified for the HyperSwap management address space IOSHMCTL SOCKPORT parameter on the z/OS system) For communication with the z/OS host for the HyperSwap and enabling hardened freeze. Outgoing Tivoli Storage Productivity Center for Replication for Open Systems Note: The following recommendations should be considered when you are planning TCP/IP ports for Tivoli Storage Productivity Center for Replication: If you changed ports 9558 or 9559 during the installation or changed other port settings, make a note of the values to which these settings were changed. If you changed the port configuration of your storage controller, the ports are different. Your network configuration must allow for Tivoli Storage Productivity Center for Replication to send outgoing TCP/IP packets to the storage controllers. It is possible to set a specific port number for your storage controller when you are adding the storage controllers to Tivoli Storage Productivity Center for Replication. Because there often are multiple applications that are running on a server, it is possible that port conflicts might arise if other applications attempt to use the same ports that Tivoli Storage Productivity Center for Replication is using. You can find the port numbers that are used on your system by running the netstat -an command. If firewalls are used in your configuration, make sure that none of these ports are blocked. Ensure that not only is the Tivoli Storage Productivity Center for Replication server granted access to reach the other components, but that the other components are granted access to reach the Tivoli Storage Productivity Center for Replication server. If you are running Windows Server 2008, you must configure the inbound and outbound rules for Tivoli Storage Productivity Center for Replication. To create an outbound rule, start the New Outbound Rule wizard from the Windows Firewall with Advanced Security menu. High availability configuration planning If you are running in a high availability configuration in which you have Tivoli Storage Productivity Center for Replication installed on two servers with one server running in active mode and the second server running in standby mode, ensure that both servers can communicate with each other and that they are authenticated through all firewalls. If the firewall times out on either server, it requires reauthentication to open the communication between the servers. The port that is used for high availability communication is specified in Table 2-1 on page 42. If you have a two- or three-site environment, your active management server can be placed in primary or disaster recovery site. Where you place the active management server depends on the type of sessions you are managing and the type of LAN/SAN infrastructure you have, but we recommend placing the active server in primary site. For more information about the high availability configuration, see Chapter 3, “General administration and high availability” on page 61. 2.1.5 User accounts The user name that you use to install Tivoli Storage Productivity Center must belong to the operating system groups that are mapped to administrator role. The user that you specify as the common user (which can be the same user that is used for installation) during the Tivoli Storage Productivity Center installation must also belong to these groups. If you specify a user that is not in an administrator role, your installation fails with the error that is shown in Figure 2-1 on page 44. Chapter 2. Planning and installation 43 Figure 2-1 Common Username and Password The Tivoli Storage Productivity Center installation program automatically maps the following groups to the Tivoli Storage Productivity Center Administrator role: Administrators (Windows) System (AIX) Root (Linux) The user name that is used to install the Tivoli Storage Productivity Center database repository must belong to DB2 administrator groups. That user name depends on your installation configuration. If you use the same common user that is used for the Tivoli Storage Productivity Center installation, this common user must have DB2 privileges. The following DB2 administrator groups are available: DB2ADMNS (Windows) db2iadm1 (AIX and Linux) Note: The Tivoli Storage Productivity Center database repository must be installed before you start Tivoli Storage Productivity Center installation. You can also use a Windows domain common user account for Tivoli Storage Productivity Center installation. This user must also belong to the operating system groups that are mapped to administrator role and to DB2 administrator groups. 44 Tivoli Storage Productivity Center for Replication for Open Systems Note: For more information about installation instructions to install Tivoli Storage Productivity Center in a domain, see the IBM Tivoli Storage Productivity Center Version 5.2 Installation and Configuration Guide, SC27-4058. After you install Tivoli Storage Productivity Center, you can assign roles to users. Roles determine the product functions that are available to users. For more information about roles and how to assign a role to a group, see section 3.5, “Tivoli Storage Productivity Center for Replication security and user administration” on page 93. 2.1.6 HyperSwap configuration for z/OS and Open systems HyperSwap is a function with the Metro Mirror replication method on DS8000 storage systems that is designed to automatically fail over I/O from the primary logical devices to the secondary logical devices in the event of a primary disk storage system failure. This function can be done with minimal disruption to the applications that are using the logical devices. In previous versions of Tivoli Storage Productivity Center for Replication for Open Systems, it was possible to manage Open HyperSwap replication for AIX hosts only, as shown in Figure 2-2. Figure 2-2 Tivoli Storage Productivity Center for Replication and Open HyperSwap With Tivoli Storage Productivity Center for Replication version 5.2, you can manage the z/OS HyperSwap function from an Open System. By using this feature, you can connect to a z/OS host system from Tivoli Storage Productivity Center for Replication that is running on Windows, Linux, or AIX to fully manage HyperSwap sessions that are running on a z/OS host system. Chapter 2. Planning and installation 45 In addition, this feature enables a single instance of Tivoli Storage Productivity Center for Replication to manage multiple HyperSwap instances that running in different z/OS systems and sysplexes. Figure 2-3 shows you how to manage z/OS HyperSwap function from Tivoli Storage Productivity Center for Replication on an Open System. Figure 2-3 Tivoli Storage Productivity Center for Replication and z/OS HyperSwap Planning for Open HyperSwap and z/OS HyperSwap includes the following requirements: DS8000 storage system with Metro Mirror AIX requirements for Open HyperSwap z/OS requirements for HyperSwap Hosts connectivity We describe these requirements in this section. For more information about new z/OS HyperSwap functions, see Chapter 7, “Managing z/OS HyperSwap from Tivoli Storage Productivity Center for Replication for Open Systems” on page 355. DS8000 requirements for Open HyperSwap and z/OS HyperSwap To use Open HyperSwap and z/OS HyperSwap, your DS8000 must be on version 5.1 or later and a Metro Mirror relationship must be established between primary and secondary DS8000. Both DS8000 storage systems must be connected to a host to perform HyperSwap and automatically failover I/O from the primary logical devices to the secondary logical devices. 46 Tivoli Storage Productivity Center for Replication for Open Systems Open HyperSwap requirements Open HyperSwap support requires AIX version 5.3 or 6.1. You must have the following AIX modules installed: Subsystem Device Driver Path Control Module (SDDPCM) version 3.0.0.0 or later Multi-Path Input/Output (MPIO) module (the version that is provided with AIX version 5.3 or 6.1) Note: For more information about the supported AIX version for each Tivoli Storage Productivity Center for Replication release, see the support matrix at this website: http://www.ibm.com/support/docview.wss?rs=40&context=SSBSEX&context=SSMN28&cont ext=SSMMUP&context=SS8JB5&context=SS8JFM&uid=swg21386446&loc=en_US&cs=utf-8&lan g=en Clustering environments, such as VIO and PowerHA, are not supported by Open HyperSwap. z/OS HyperSwap requirements z/OS HyperSwap support requires z/OS 1.12 or later and it requires that HyperSwap address spaces, the HyperSwap Management address space, and the HyperSwap API address space are started and running. These address spaces must be running in z/OS systems and sysplexes that use HyperSwap function. For more information about how to set up z/OS HyperSwap, see Chapter 7, “Managing z/OS HyperSwap from Tivoli Storage Productivity Center for Replication for Open Systems” on page 355. Hosts connectivity Tivoli Storage Productivity Center for Replication uses the Internet Protocol network to communicate with hosts to use HyperSwap. You must ensure that your Tivoli Storage Productivity Center for Replication server has the necessary access to all required hosts that are involved in HyperSwap (AIX or z/OS). Table 2-1 on page 42 shows you the ports that are used by Tivoli Storage Productivity Center for Replication for communication with AIX and z/OS host. 2.2 Installing Tivoli Storage Productivity Center for Replication In this section, we provide an overview of the latest Tivoli Storage Productivity Center installer and Tivoli Storage Productivity Center installation packages. We also provide a high-level overview of the Tivoli Storage Productivity Center installation steps. Note: For more information about steps and requirements for installing Tivoli Storage Productivity Center, see the draft of the Tivoli Storage Productivity Center V5.2 Release Guide, SG24-8204. Chapter 2. Planning and installation 47 2.2.1 Overview As of Tivoli Storage Productivity Center 5.1, a new installer provides a more unified installation experience across Tivoli Storage Productivity Center and Tivoli Storage Productivity Center for Replication. The entire Tivoli Storage Productivity Center installer is rearchitected and rewritten to simplify installation and postinstallation configuration tasks. It is based on Install Anywhere Software and all unnecessary steps are masked. With the new Tivoli Storage Productivity Center installer, Tivoli Storage Productivity Center for Replication is installed without starting Tivoli Storage Productivity Center for Replication installer as it was in the previous Tivoli Storage Productivity Center 4.x versions. By installing Tivoli Storage Productivity Center 5.2, Tivoli Storage Productivity Center for Replication is installed with the same user ID, which ran the installer. If you are upgrading from the previous versions, all Tivoli Storage Productivity Center for Replication configurations remain unchanged. Because all Tivoli Storage Productivity Center for Replication functions and features converged into Tivoli Storage Productivity Center 5.1/5.2 license, the installer installs Tivoli Storage Productivity Center for Replication with all the features and functions that were available in Tivoli Storage Productivity Center for Replication Two Site and Tivoli Storage Productivity Center for Replication Three Site Business Continuity. This means that you do not need to have separate Tivoli Storage Productivity Center for Replication products to run two or three sites solutions (for example, Metro Mirror, Global Mirror, and Metro/Global Mirror). These features and functions are integrated and installed with Tivoli Storage Productivity Center 5.1/5.2. 2.2.2 Tivoli Storage Productivity Center installation packages Before Tivoli Storage Productivity Center 5.2 is installed, you must install DB2 database because DB2 database is required for the Tivoli Storage Productivity Center database repository. Tivoli Storage Productivity Center installation packages include the following DB2 installation images: DB2 10.1 Fix Pack 2 for Windows (64-bit) DB2 10.1 Fix Pack 2 for Linux (64-bit) DB2 10.1 Fix Pack 2 for AIX (64-bit) Apart from the DB2 installation images, Tivoli Storage Productivity Center includes the following images: Tivoli Storage Productivity Center for AIX Tivoli Storage Productivity Center for Linux Tivoli Storage Productivity Center for Windows Each of the Tivoli Storage Productivity Center installation image includes the following files: Part 1: – – – – – – 48 Tivoli Storage Productivity Center installation program Base Tivoli Storage Productivity Center components Database repository Data server Storage Resource agent Stand-alone GUI and command-line interface Tivoli Storage Productivity Center for Replication for Open Systems Part 2: – Device server – Embedded IBM WebSphere® Application Server Part 3: – Web server (the web-based GUI and TPC_VMWareVSpherePlugin folder) – Replication server – WebSphere Application Server Liberty Profile JazzSM 1.1 WebSphere Application Server 8.5.0.1(used by replication and device servers) Tivoli Common Reporting 3.1.1 and Cognos 10.2 Tivoli Common Reporting Prerequisite checker Each of these images must be concatenated into one installation directory, the name of which cannot include any special blanks. The best way to perform this process is to create an installation directory, for example tpcinstall, and then extract or copy images into it. When the extract or copy is complete, you are ready to install Tivoli Storage Productivity Center. For more information about the installation packages, see Tivoli Storage Productivity Center 5.2 Installation and Configuration Guide, SC27-4058. 2.2.3 Tivoli Storage Productivity Center installation After you successfully extract the images, you can start with Tivoli Storage Productivity Center installation. The installation includes the following steps: 1. 2. 3. 4. DB2 installation. JazzSM 1.1 installation (optional). Tivoli Common Reporting 3.1.1 and Cognos 10.2 installation (optional). Tivoli Storage Productivity Center installation. If you are not planning to use Tivoli Storage Productivity Center reports, the installation of JazzSM 1.1, Tivoli Common Reporting 3.1.1, and Cognos 10.2 can be done later. Tivoli Storage Productivity Center is installed without reporting capabilities and the Tivoli Storage Productivity Center web-based GUI shows you that reporting is unavailable (see Figure 2-4 on page 50). Tivoli Storage Productivity Center for Replication does not use Tivoli Storage Productivity Center reporting, but some reports might be useful for monitoring replication; for example, ports performance. Chapter 2. Planning and installation 49 Figure 2-4 Web-based GUI reporting Before DB2 is installed, review the prerequisites and follow the steps that are described in the draft of Tivoli Storage Productivity Center V5.2 Release Guide, SG24-8204, and Tivoli Storage Productivity Center 5.2 Installation and Configuration Guide, SC27-4058. After you successfully install DB2, you can install JazzSM 1.1, Tivoli Common Reporting 3.1.1, and Cognos 10.2, or you can install it later. For more information about the steps and requirements, see the draft of Tivoli Storage Productivity Center V5.2 Release Guide, SG24-8204, and Tivoli Storage Productivity Center 5.2 Installation and Configuration Guide, SC27-4058. After you install DB2, you can start your Tivoli Storage Productivity Center installation by using the installation wizard or the command line in silent mode. In silent mode, a command is provided with the values in a response file. We recommend the use of the installation wizard to install Tivoli Storage Productivity Center because it requires minimal user interaction. If the system where you want to install Tivoli Storage Productivity Center is running from a terminal that cannot display graphics, use silent mode installation. Note: Before you start the Tivoli Storage Productivity Center installation wizard on AIX or Linux servers, you must source the user profile (db2profile) for the instance owner of the DB2 database, as shown in the following example: . /home/db2inst1/sqllib/db2profile You also must have X Window System support to display the installation wizard GUI. Start the Tivoli Storage Productivity Center installation program from your installation directory by running the setup.bat program, which starts InstallAnywhere wizard, as shown in Figure 2-5 on page 51. 50 Tivoli Storage Productivity Center for Replication for Open Systems Note: On AIX and Linux servers, you start the installation program by running the ./setup.bin command from the installation directory where you extracted Tivoli Storage Productivity Center images. Figure 2-5 Starting Tivoli Storage Productivity Center installation In the window that is shown in Figure 2-6, you select the installation language and click OK. Figure 2-6 Tivoli Storage Productivity Center language window Chapter 2. Planning and installation 51 After you accept license agreement (as shown in Figure 2-7), you see Tivoli Storage Productivity Center prerequisites, as shown in Figure 2-8 on page 53. Figure 2-7 Tivoli Storage Productivity Center License Agreement window 52 Tivoli Storage Productivity Center for Replication for Open Systems Figure 2-8 Tivoli Storage Productivity Center Prerequisites window If JazzSM is installed on your computer, the page displays a green check mark; otherwise, the Install Now button is shown. If you do not want to install JazzSM on your computer, click Next to proceed to the next page in the Tivoli Storage Productivity Center installation program and install Tivoli Storage Productivity Center without reports. In our case, we do not install reporting. Click Next. The window that is shown in Figure 2-9 on page 54 shows your installation location and type. We select single server as installing Tivoli Storage Productivity Center in a single-server environment. This is a simple process and can be completed successfully by most Tivoli Storage Productivity Center customers. Chapter 2. Planning and installation 53 Figure 2-9 Tivoli Storage Productivity Center Installation Location and Type window A multiple-server environment is ideal if you are monitoring large storage environments, where one server is not sufficient to manage the Tivoli Storage Productivity Center components. In this environment, JazzSM and Tivoli Common Reporting can run on a separate server. This environment facilitates the integration with other Tivoli products that are using JazzSM and Tivoli Common Reporting components and allows the sharing of components that are installed on a separate server. If you have different administrators for DB2 and Tivoli Storage Productivity Center, this environment allows the database repository and DB2 to be installed and managed on a separate server. Tivoli Storage Productivity Center for Replication is installed together with Tivoli Storage Productivity Center server. Click Next. In the window that is shown in Figure 2-10 on page 55, specify the host name and ports that are used by Tivoli Storage Productivity Center. Also, specify the user name and password of the common user to configure all Tivoli Storage Productivity Center components. This user name must have the correct DB2 and operating system privileges. Tip: Some systems might be configured to return a short host name, such as server22, instead of a fully qualified host name, such as server22.myorg.mycompany.com. Tivoli Storage Productivity Center requires fully qualified host names, so you must install the software on a computer that has a fully qualified host name. 54 Tivoli Storage Productivity Center for Replication for Open Systems Figure 2-10 Tivoli Storage Productivity Center Server Installation Information window If the default ports are unavailable, you can specify a different range that is used by Tivoli Storage Productivity Center. To check whether the ports are available, click Verify port availability. You can also change details about database repository by clicking Configure Database Repository. If all the information is correct, you see the pre-installation summary page that is shown in Figure 2-11 on page 56. Chapter 2. Planning and installation 55 Figure 2-11 Tivoli Storage Productivity Center Pre installation Summary If you click Additional Installation Information, you see all of the components that are installed, including Tivoli Storage Productivity Center for Replication (Replication server), as shown in Figure 2-12. Figure 2-12 Tivoli Storage Productivity Center components 56 Tivoli Storage Productivity Center for Replication for Open Systems Click Install to start the installation. You see the progress of the installation and that Tivoli Storage Productivity Center for Replication is being installed, as shown in Figure 2-13. Figure 2-13 Tivoli Storage Productivity Center installation window Chapter 2. Planning and installation 57 The window that is shown in Figure 2-14 shows that you successfully completed Tivoli Storage Productivity Center installation. Figure 2-14 Tivoli Storage Productivity Center Installation completed window The links that are shown in the window in Figure 2-14 are used to start Tivoli Storage Productivity Center Web GUI and Tivoli Storage Productivity Center for Replication GUI. You can find the shortcuts to these links by clicking Start All Programs IBM Tivoli Storage Productivity Center, as shown in Figure 2-15 on page 59. Click Done to finish the installation. 58 Tivoli Storage Productivity Center for Replication for Open Systems Figure 2-15 Start Tivoli Storage Productivity Center After you install Tivoli Storage Productivity Center, you can verify whether the installation was successful. We describe here how to check whether the Tivoli Storage Productivity Center for Replication is successfully installed and running. For more information about how to check other Tivoli Storage Productivity Center components, see Tivoli Storage Productivity Center 5.2 Installation and Configuration Guide, SC27-4058. In a command prompt on the Windows operating system, go to the directory TPC_installation_directory\wlp\bin\ where TPC_installation_directory is the top-level directory where you installed Tivoli Storage Productivity Center (for example, C:\Program Files\IBM\TPC\). Run the server.bat status replicationServer command and you see whether the replication server is running, as shown in Figure 2-16. Figure 2-16 Verify Tivoli Storage Productivity Center for Replication Server In a command-line window on the AIX or Linux operating system, go to the TPC_installation_directory/wlp/bin/ where TPC_installation_directory is the top-level directory where you installed Tivoli Storage Productivity Center (for example, /opt/IBM/TPC/). Run the ./server status replicationServer command and you see whether the replication server is running. Chapter 2. Planning and installation 59 60 Tivoli Storage Productivity Center for Replication for Open Systems 3 Chapter 3. General administration and high availability In this chapter, we show you how to perform general administration tasks in Tivoli Storage Productivity Center for Replication. We provide an overview of the graphical user interface (GUI) and the command-line interface (CLI), describe the Tivoli Storage Productivity Center for Replication user administration, and show how to configure some basic settings of Tivoli Storage Productivity Center for Replication. We also describe the steps that are used for adding and connecting supported storage systems, and adding and connecting hosts to Tivoli Storage Productivity Center for Replication. We also show you how to set up Tivoli Storage Productivity Center for Replication servers for high availability and the process of performing a takeover from the active Tivoli Storage Productivity Center for Replication server to the standby server. Administration and configuration tasks that are related to Tivoli Storage Productivity Center for Replication sessions for specific storage subsystems, Copy Sets, Paths, and Storage Subsystems are not covered in this chapter, but are described in other chapters in this book. This chapter includes the following topics: Accessing Tivoli Storage Productivity Center for Replication GUI overview CLI Overview Tivoli Storage Productivity Center for Replication interaction with Tivoli Storage Productivity Center Tivoli Storage Productivity Center for Replication security and user administration Tivoli Storage Productivity Center for Replication advanced tools Tivoli Storage Productivity Center for Replication Console Tivoli Storage Productivity Center for Replication High Availability Starting and stopping the Tivoli Storage Productivity Center for Replication server © Copyright IBM Corp. 2014. All rights reserved. 61 Using CSV files for importing and exporting sessions Backing up and restoring a repository Tivoli Storage Productivity Center for Replication SNMP management Adding and connecting to storage systems Adding and connecting host systems 62 Tivoli Storage Productivity Center for Replication for Open Systems 3.1 Accessing Tivoli Storage Productivity Center for Replication Tivoli Storage Productivity Center for Replication provides the following user interfaces for managing storage system data replication and disaster recovery: Tivoli Storage Productivity Center for Replication GUI Tivoli Storage Productivity Center for Replication CLI In this section, we describe how to use the GUI and CLI interfaces and the main features and functions of both interfaces. 3.1.1 Accessing Tivoli Storage Productivity Center for Replication GUI After you successfully install Tivoli Storage Productivity Center, you can access Tivoli Storage Productivity Center for Replication to start managing data replication. By installing Tivoli Storage Productivity Center, shortcuts to Tivoli Storage Productivity Center for Replication are created in the Start menu on the server that is running the Windows operating system. If you are running an AIX or Linux operating system, start a supported web browser and enter the address of Tivoli Storage Productivity Center for Replication server. To start the GUI on a Windows server, click Start All Programs IBM Tivoli Storage Productivity Center TPC Replication Manager GUI, as shown in Figure 3-1. Figure 3-1 Starting Tivoli Storage Productivity Center for Replication on Windows server The web browser starts and you see the Tivoli Storage Productivity Center for Replication login panel, as shown in Figure 3-2 on page 64. Chapter 3. General administration and high availability 63 Figure 3-2 Tivoli Storage Productivity Center for Replication login panel Enter your user name and password and the Tivoli Storage Productivity Center for Replication Overview panel opens, as shown in Figure 3-3. Figure 3-3 Tivoli Storage Productivity Center for Replication Health Overview panel You can also start Tivoli Storage Productivity Center for Replication in a supported web browser by entering the address of Tivoli Storage Productivity Center for Replication server. This method is also used to start Tivoli Storage Productivity Center for Replication on servers that are running AIX or Linux operating system. 64 Tivoli Storage Productivity Center for Replication for Open Systems To start Tivoli Storage Productivity Center for Replication enter the following address in a browser: https://hostname:port/CSM Hostname in the address is the Tivoli Storage Productivity Center for Replication server. You can also specify the host name as an IP address or a Domain Name System (DNS) name. Port is the port number for Tivoli Storage Productivity Center for Replication. The default port number for connecting to Tivoli Storage Productivity Center for Replication by using the HTTPS protocol is 9559. However, this port number might be different for your site, so enter the port that you specified during the installation. 3.1.2 Accessing Tivoli Storage Productivity Center for Replication CLI To start Tivoli Storage Productivity Center for Replication CLI on a Windows server, you must run the csmcli.bat command from your default Tivoli Storage Productivity Center installation directory TPC_Install\Program Files\IBM\TPC\cli. This command opens the CLI window, as shown in Figure 3-4. If you did not set up the CLI properties file, the CLI prompts you to enter a user name and password to log on to the server. Figure 3-4 Tivoli Storage Productivity Center for Replication CLI window On AIX and Linux servers, you must run the csmcli.sh command script from the default Tivoli Storage Productivity Center for Replication installation directory /opt/IBM/TPC. You can run CLI commands locally from the Tivoli Storage Productivity Center for Replication management server or remotely by accessing the management server by using a remote-access utility (SSH or telnet). 3.2 GUI overview The Tivoli Storage Productivity Center for Replication GUI is a web-based interface that presents the user a single point of control to configure, manage, and monitor the copy services of the attached storage subsystems. The GUI reports the state of availability of the administration components and information for the established copy operations in real time. It also reports the state of Tivoli Storage Productivity Center for Replication standby server if you set up the high availability configuration. The GUI contains the following features and functions, as shown in the panel that opens when you log in to the GUI, as shown in Figure 3-5 on page 66: 1. Navigation tree: Provides categories of tasks that you can complete in Tivoli Storage Productivity Center for Replication. Clicking a task opens a main page in the content pane. Chapter 3. General administration and high availability 65 2. Health Overview: Shows a status summary for all sessions, storage systems, host systems, and management servers that Tivoli Storage Productivity Center for Replication is managing. 3. Content area: Displays content that is based on the item that you selected in the navigation tree. Figure 3-5 Tivoli Storage Productivity Center for Replication GUI Health Overview 3.2.1 GUI panels In this section, we describe the Tivoli Storage Productivity Center for Replication GUI and its associated panels. Health Overview panel As shown in Figure 3-5, the Health Overview panel is the first panel that you see after you log in. This panel provides the following information: Overall session status: Indicates the sessions statuses, which can be normal, warning, or severe. Overall storage systems status: Indicates the connection status of the storage systems. Overall host systems status: Indicates the connection status of host systems. This status applies to AIX and z/OS system hosts. Management server status: Indicates the status of the standby server if you are logged on to the local server. If you are logged on to the standby server, this status indicates the status of the local server. 66 Tivoli Storage Productivity Center for Replication for Open Systems Tivoli Storage Productivity Center for Replication uses the following color-based status indicators to provide a quick overview of the overall state of specific Tivoli Storage Productivity Center for Replication components. Green: Tivoli Storage Productivity Center Copy Services is in “normal” mode. The session is in prepared state for all defined volumes and maintaining a current consistent copy of the data. Green also is used if the session successfully processed a Recover command and is in Target Available state with all volumes consistent and no exceptions. Yellow: Tivoli Storage Productivity Center Copy Services is not maintaining a current consistent copy now but is working toward that goal. That is, sessions might have volumes that are actively copied or pending to be copied, there are no suspended volumes, and copy services is temporarily inconsistent but actions are in place to move into duplex state. No action is required to make this status Green because states automatically change. Red: Tivoli Storage Productivity Center Copy Services has one or more exceptions that must be dealt with immediately. In addition, various icons are used to represent a more detailed status of different objects, as shown in Table 3-1. Table 3-1 Symbol Tivoli Storage Productivity Center Symbols Meaning The sessions are in a normal state. The sessions are in the warning state. The sessions are in an error state. The storage systems are connected to the management server. At least one storage system cannot communicate with the management servers. At least one storage subsystem cannot communicate with the management servers. No storage subsystems are defined. The session is in an inactive state. The standby server is defined and synchronized. The standby server is in warning status (disconnected, synchronizing). Chapter 3. General administration and high availability 67 Symbol Meaning No standby server is defined. The standby server cannot communicate with the local server. Sessions panel The Session panel (as shown in Figure 3-6) provides you information about all sessions, including statistics. From this panel, you can complete all actions for the sessions you defined, or you can create a session. The actions depend on the type of session. Figure 3-6 Sessions panel Storage Systems panel As shown in Figure 3-7 on page 69, the Storage Systems panel shows you defined storage systems and their connection status to local and remote management servers. It also shows you locations, types, and vendors. From this panel, you can add or remove storage system and their connections, view volumes, paths, and storage details. You can also enable or disable Easy Tier Heat Map Transfer. 68 Tivoli Storage Productivity Center for Replication for Open Systems Figure 3-7 Storage Systems panel Host Systems panel The Host Systems panel shows you the connected host systems and information about these systems, as shown in Figure 3-8. From this panel, you can add or remove hosts and modify the host connection. There are two types of host systems to which you can connect: an AIX host system or an z/OS host system. Host Systems connections are used when you want to use Open HyperSwap feature for AIX and z/OS HyperSwap. Figure 3-8 Host Systems Volumes panel The Volumes panel that is shown in Figure 3-9 on page 70 shows you details about the volumes that are associated with a storage system; for example, the type and capacity of the volume and connection to host. Chapter 3. General administration and high availability 69 Figure 3-9 Volumes panel ESS/DS Paths panel The ESS/DS Paths panel shows you the defined paths for storage systems. You can view and manage the paths for DS8000, DS6000, and ESS800 storage systems. By using this panel, you start the Path Management wizard to add a path between a source and target storage system. After you add the paths, you can view them in this panel, as shown in Figure 3-10. Figure 3-10 ESS/DS Paths panel For more information about how to define paths, see 4.3.1, “DS8000 Path management” on page 201. Management Servers panel Use the Management Servers panel to define a standby server and view the status of the management servers configuration. If you defined the standby server, the list shows you both management servers in operation. This panel has two variations, depending on which management server you are logged in. Actions are also different and they are related to each management server. The actions can be Reconnect, Takeover, Define standby, Remove standby, and Set this Server as Standby. Figure 3-11 on page 71 shows the Management Servers panel. 70 Tivoli Storage Productivity Center for Replication for Open Systems Figure 3-11 Management Servers panel Administration panel As shown in Figure 3-12, the Administration panel is used to view a list of Tivoli Storage Productivity Center for Replication users and groups and their access privileges. You can also give users and groups different access privileges. Figure 3-12 Administration panel Advanced Tools panel Use the Advanced Tools panel that is shown in Figure 3-13 on page 72 to create a diagnostic package in case you have a problem with Tivoli Storage Productivity Center for Replication. You can change the automatic browser refresh rate (in seconds) to refresh the content in the GUI. Advanced tools also give you the option to enable or disable the Metro Mirror heartbeat, which, is used to ensure data consistency across multiple storage systems if the Tivoli Storage Productivity Center for Replication management server cannot communicate with one or more storage systems. Chapter 3. General administration and high availability 71 Figure 3-13 Advanced Tools panel Console panel As shown in Figure 3-14, the Console panel provides you detailed information about actions that were taken by Tivoli Storage Productivity Center for Replication users, errors that occurred during normal operation, and hardware error indications. You can click each message in the console panel to get more information about the message. For more information about Console options, see 3.7, “Tivoli Storage Productivity Center for Replication Console” on page 103. Figure 3-14 Console panel 72 Tivoli Storage Productivity Center for Replication for Open Systems 3.3 CLI Overview The Tivoli Storage Productivity Center for Replication CLI gives you an option to interact with Tivoli Storage Productivity Center for Replication and to automate Tivoli Storage Productivity Center for Replication functions by using scripts. It is installed by default with Tivoli Storage Productivity Center installation, and it can be installed on a remote workstation by using the procedure that is described in “3.3.3, “Remote CLI installation” on page 75. The Tivoli Storage Productivity Center for Replication CLI uses commands that can be used on their own by using the associated options and arguments, or interactively by starting the csmcli.bat program with no parameters or arguments to start an interactive session. The commands that you can use are related to the following components: Sessions and copy sets Storage systems and connections Management servers Security The command consists of one to four types of components, arranged in the following order: Command name One or more flags Each flag is followed by any flag parameters it might require Command parameter Example 3-1 shows the CLI structure. Example 3-1 CLI structure csmcli command name -flag parameter -command parameter The command name specifies the task that the CLI must perform. For example, lssess tells the CLI to list sessions (as shown in Example 3-2), and mksess tells the CLI to create a session. Example 3-2 List sessions csmcli> lssess Name Status State Copy Type ============================================================================ SVC2-SVC8 GM Normal Prepared Global Mirror Failover/Failback SVC8-SVC2 GMwP Inactive Defined Global Mirror Failover/Failback w/ Practice SVC2-SVC8 GMwP Normal Prepared Global Mirror Failover/Failback w/ Practice V7KR7-V7KR1 GM Inactive Defined Global Mirror Failover/Failback SVC8 FC Warning Prepared FlashCopy Flags modify the command. They provide more information that directs the CLI to perform the command task in a specific way. For example, the -v flag tells the CLI to display the command results in verbose mode. Some flags can be used with every CLI command, others are specific to a command and are invalid when they are used with other commands. Flags are preceded by a hyphen (-), and can be followed immediately by a space and a flag parameter. Flag parameters provide information that is required to implement the command modification that is specified by a flag. If you do not provide a parameter, a default value is assumed. For example, you can specify -v on, or -v off to turn verbose mode on or off; however, if you specify -v only, the flag parameter is assumed to be on. Chapter 3. General administration and high availability 73 The command parameter provides basic information that is necessary to perform the command task. When a command parameter is required, it is always the last component of the command and it is not preceded by a flag. Some commands permit multiple command parameters with each parameter separated by a blank space and not a comma (unlike flag parameters, which allow multiple values). For more information about the CLI, see IBM Tivoli Storage Productivity Center for Replication Command-Line Interface Reference, SC27-4089. 3.3.1 Configuring the CLI The following properties files are used to configure the CLI: repcli.properties This file contains the server and port information that us used to communicate with the IBM Tivoli Storage Productivity Center for Replication server and the CLI. You can find it in the directory where the CLI was installed; the default directory is \TPC_install_directory\IBM\TPC\cli. Example 3-3 shows the contents of this file in our system. In this example, server points to the server where Tivoli Storage Productivity Center for Replication is running. Port is the port to be used for communication between Tivoli Storage Productivity Center for Replication and the CLI. It must point to the same port as specified in communications.port in the rmserver.properties file. Otherwise, you cannot log in to the CLI. Example 3-3 repcli.properties example server=WTSC64.itso.ibm.com port=9560 rmserver.properties This file contains configuration information about logging, as shown in Example 3-4. It is in the default directory \TPC_install_directory\IBM\TPC\cli. Example 3-4 rmserver.properties example # -------------------# Logging and Tracing # -------------------log.file=cliTrace.log log.file.maxFiles=5 log.file.maxFileSize=10240 log.file.level=ALL tpcrcli-auth.properties This file contains authorization information for signing on to the CLI automatically without entering your user name and password, as shown in Example 3-5. It is in the default directory \TPC_install_directory\IBM\TPC\cli. Example 3-5 tpcrcli-auth.properties password=myPassword username=myUsername 74 Tivoli Storage Productivity Center for Replication for Open Systems 3.3.2 Setting up automatic login to the CLI You can set up the CLI to automatically log you in without specifying your user name or password each time you run a csmcli command or enter the csmcli shell. Use the tpcrcli-auth.properties file to create a persistent copy of the user name and encrypted password to be used for automatic authentication and authorization. The password is encrypted after you start csmcli.bat, as shown in Example 3-6. Example 3-6 Encrypted password in tpcrcli-auth.properties file password=2808592b3f4a4331~encrypted username=tpcadmin Complete the following steps to set up automatic login authentication: 1. Locate the tpcrcli-auth.properties template file in the TPC_install_directory\IBM\TPC\cli directory. 2. Create a tpcr-cli directory in your home directory and copy the template to that directory. 3. Edit the file and change the password and user name values to your password and user ID. 4. Start csmcli.bat or csmcli.sh or run a csmcli command to encrypt the password in the tpcrcli-auth.properties file. You are automatically logged in to the CLI, as shown in Example 3-7. Example 3-7 Starting csmcli.bat procedure Created new properties file with encrypted password: C:\Users\tpcadmin\tpcr-cli\tpcrcli-auth.properties Tivoli Storage Productivity Center for Replication Command Line Interface (CLI) Copyright 2007, 2012 IBM Corporation Version: 5.2.0 Build: 20130719-0641 Server: SSCTCP42-T.windows.ssclab-lj-si.net Port: 9560 Authentication file: C:\Users\tpcadmin\tpcr-cli\tpcrcli-auth.properties csmcli> 3.3.3 Remote CLI installation Tivoli Storage Productivity Center for Replication supports installation of the CLI on a remote workstation other than the Tivoli Storage Productivity Center for Replication server. The following options are available for the remote CLI installation: Copying and extracting the CLI package from Tivoli Storage Productivity Center for Replication server Copying CLI program folder from Tivoli Storage Productivity Center for Replication server Chapter 3. General administration and high availability 75 Complete the following steps to install the CLI by using the CLI package from Tivoli Storage Productivity Center for Replication server: 1. On the Tivoli Storage Productivity Center for Replication server, browse to the installation directory where the client images are stored. For example, the Windows operating system uses the path C:\Program Files\IBM\TPC\client_images, as shown in Figure 3-15. Figure 3-15 Tivoli Storage Productivity Center for Replication client images 2. Locate the appropriate compressed file for the operating system of your computer where you want to install the CLI, as shown in the following examples: – TPC_CLIENT_AIX.tar – TPC_CLIENT_LINUX.zip – TPC_CLIENT_WIN.zip Note: You must use the client images from the Tivoli Storage Productivity Center installation directory only. The client images in the Tivoli Storage Productivity Center image or download directory must not be used because they are updated by the installation program. 76 Tivoli Storage Productivity Center for Replication for Open Systems 3. Extract the appropriate compressed file on a remote workstation. In our example, we extracted the TPC_CLIENT_WIN.zip file on a workstation that is running the Windows operating system, as shown in Figure 3-16. Note: In the AIX operating system, you must extract the TPC_CLIENT_AIX.tar file into the /opt/IBM/TPCClient folder and run the /opt/IBM/TPCClient/gui/TPCD.sh command. In the Linux operating system, you must extract the TPC_CLIENT_LINUX.zip file into the /opt/IBM/TPCClient folder and run the /opt/IBM/TPCClient/gui/TPCD.sh command. Figure 3-16 Tivoli Storage Productivity Center for Replication client folder 4. Edit the repcli.properties file to include the Tivoli Storage Productivity Center for Replication server name, as shown in Example 3-8. The server name must be the fully qualified DNS entry or the actual IP address of the Tivoli Storage Productivity Center for Replication server. The port must not be changed because this is a system setting and is used to communicate with the Tivoli Storage Productivity Center for Replication server. Example 3-8 repcli.properties file server=172.31.83.171 port=9560 5. Edit the tpcrcli-auth.properties file to include your Tivoli Storage Productivity Center for Replication user name and password, as shown in Example 3-9. This properties file must be placed into the subdirectory tpcr-cli, which must be created in your home user directory. Tivoli Storage Productivity Center for Replication access this file only if it is in that specific subdirectory of your home user directory. In Example 3-9, we use the Administrator home directory, which is C:\Users\Administrator. Example 3-9 tpcrcli-auth.properties file password=myPassword username=myUsername Chapter 3. General administration and high availability 77 Important: The repcli.properties file in the client images includes the Tivoli Storage Productivity Center for Replication server host name and port number. You do not need to modify or edit this information. It is recommended that you configure the DNS on the system (this can be done by editing the hosts file) instead of modifying these files. In our example, we modify the properties file because the DNS is not configured. 6. After you change the properties files, verify that CLI works by starting it through a command prompt or click the csmcli.bat file from the directory where it is extracted. The CLI window opens and you can start by using CLI commands, as shown in Figure 3-17. Figure 3-17 Tivoli Storage Productivity Center for Replication CLI Complete the following steps to install the CLI by copying the CLI folder from Tivoli Storage Productivity Center for Replication server on a workstation that is running the Windows operating system: 1. Create a CLI folder on your workstation. In our example, we created the CSMCLI folder. 2. Copy the entire CLI program subfolder from your Tivoli Storage Productivity Center for Replication server, as shown in Figure 3-18 on page 79, including all subdirectories, into your local CSMCLI directory. The CLI folder is in default installation directory under \Program Files\IBM\TPC\cli. 78 Tivoli Storage Productivity Center for Replication for Open Systems Figure 3-18 CLI folder 3. Edit the CSMJDK and CSMCLI location lines in csmcli.bat to meet your local directory structure, as shown in Example 3-10. Example 3-10 csmcli.bat @echo off TITLE IBM Replication Manager CLI @setlocal REM *************************************************************************** REM Set up the environment for this specific configuration. Both REM JAVA_HOME and CSMCLI_HOME must be defined in environment variables. REM *************************************************************************** set CSMJDK=C:\Program Files\IBM\TPC\jre if "%CSMJDK%"=="" GOTO ERROR_JAVA set CSMCLI=C:\CSMCLI if "%CSMCLI%"=="" GOTO ERROR_CLI set PATH=%CSMCLI%\lib;%PATH% set CSMCP=.;lib\csmcli.jar;lib\clicommon.jar;lib\csmclient.jar;lib\essClientApi.jar ; set CSMCP=%CSMCP%;lib\ibmCIMClient.jar;lib\jlog.jar;lib\jsse.jar;lib\xerces.jar;lib \JSON4J.jar; set CSMCP=%CSMCP%;lib\rmmessages.jar;lib\snmp.jar;lib\ssgclihelp.jar;lib\ssgfrmwk.j ar; set JAVA_ARGS= cd /d "%CSMCLI%" Chapter 3. General administration and high availability 79 REM *************************************************************************** REM Find the current code page REM *************************************************************************** chcp > %TEMP%\chcp.txt "%CSMJDK%\bin\java" -classpath %CSMCP% com.ibm.storage.mdm.cli.rm.CodePageExtractor "%TEMP%\chcp.txt" "%TEMP%\codepage.txt" SET /P CODEPAGEVALUE= < %TEMP%\codePage.txt if "%CODEPAGEVALUE%"=="" GOTO RUNPROG SET JAVA_ARGS=%JAVA_ARGS% -Dfile.encoding=%CODEPAGEVALUE% REM *************************************************************************** REM Execute the CSMCLI program. REM *************************************************************************** :RUNPROG "%CSMJDK%\bin\java" %JAVA_ARGS% -Xmx512m -Djava.net.preferIPv4Stack=false -classpath %CSMCP% com.ibm.storage.mdm.cli.rm.RmCli %* GOTO END REM *************************************************************************** REM The Java interpreter home environment variable, JAVA_HOME, is not set REM *************************************************************************** :ERROR_JAVA echo The JAVA_HOME environment variable is not set. Please see documentation. GOTO END REM *************************************************************************** REM The CSM CLI home environment variable, CSMCLI_HOME, is not set REM *************************************************************************** :ERROR_CLI echo The CSMCLI_HOME environment variable is not set. Please see documentation. :END if not %ERRORLEVEL% == 0 pause @endlocal 4. Edit the repcli.properties file to include the Tivoli Storage Productivity Center for Replication server name, as shown in Example 3-11. The server name must be the fully qualified DNS entry or the actual IP address of the Tivoli Storage Productivity Center for Replication server. The port must not be changed because this is a system setting and is used to communicate with the Tivoli Storage Productivity Center for Replication server. Example 3-11 repcli.properties server=SSCTCP42-T.windows.ssclab-lj-si.net port=9560 80 Tivoli Storage Productivity Center for Replication for Open Systems Important: The repcli.properties file in the client images includes the Tivoli Storage Productivity Center for Replication server host name and port number. You do not need to modify or edit this information. It is recommended that you configure the DNS on the system (this can be done by editing the hosts file) instead of modifying these files. In our example, we modify the properties file because the DNS is not configured. 5. Edit the tpcrcli-auth.properties file to include your Tivoli Storage Productivity Center for Replication user name and password, as shown in Example 3-12. This properties file must be placed into the tpcr-cli subdirectory, which must be created in your home user directory, as shown in Figure 3-19. Tivoli Storage Productivity Center for Replication accesses this file only if it is in that specific subdirectory of your home user directory. In Example 3-12, we use Administrator home directory, which is C:\Users\Administrator. Example 3-12 tpcrcli-auth.properties password=myPassword username=myUsername Figure 3-19 tpcr-cli folder in home directory 6. After you change the properties files, verify that CSMCLI works by starting it through a command prompt or by clicking csmcli.bat from the directory where it is copied, as shown in Figure 3-20 on page 82. Chapter 3. General administration and high availability 81 Figure 3-20 Start csmcli.bat 7. The CLI window opens and you can start using CLI commands, as shown in Figure 3-21. Figure 3-21 Tivoli Storage Productivity Center for Replication CLI 3.3.4 CLI automation By using Tivoli Storage Productivity Center for Replication CLI, scripting is the most common way to automate copy services management. As described in 3.3, “CLI Overview” on page 73, you can automate the following related tasks: Sessions and copy sets Storage systems and connections Management servers Security In the following examples, we show you how to start the CLI commands with the -script parameter, which points to a script file that contains the actual CLI commands. We start the script by starting csmcli.bat procedure from command prompt where we specify the name of the script file. If the script file is in the same directory that the csmcli.bat file is in, you specify the script file name. 82 Tivoli Storage Productivity Center for Replication for Open Systems If you use a different directory structure for the script file from the directory where the csmcli.bat file is in, you must specify the fully qualified directory structure where the script file is in. Example 3-13 shows the invocation of a script file where the script file is in the same directory that the csmcli.bat file is in. We also set up the tpcrcli-auth.properties file to include Tivoli Storage Productivity Center for Replication user name and password, as shown in Example 3-12 on page 81. This properties file must be placed into the tpcr-cli subdirectory, which must be created in your home user directory (as shown in Figure 3-19 on page 81). Tivoli Storage Productivity Center for Replication access this file only if it is in that specific subdirectory of your home user directory. In our example, we use user tpcadmin and home directory, which is C:\Users\tpcadmin. Note: We recommend the use of the setoutput command to modify the script output. The CLI setoutput command formats the output with a delimiter, which can be a comma by default, .xml format, or tabular format that uses commas as delimiters between columns and stanza, which specifies that the output is displayed as one keyword-value pair per line. The format options that are specified by using the setoutput command apply to all commands in the script. You can use any format that meets your requirements. If you do not run the setoutput command, the output displays in the default output format. Example 3-13 shows you the invocation of a script file for the lsdevice command to display a list of storage systems. Example 3-13 Starting CLI script C:\Program Files\IBM\TPC\cli>csmcli -script lsdevice.txt Tivoli Storage Productivity Center for Replication Command Line Interface (CLI) Copyright 2007, 2012 IBM Corporation Version: 5.2.0 Build: 20130719-0641 Server: SSCTCP42-T.windows.ssclab-lj-si.net Port: 9560 Authentication file: C:\Users\tpcadmin\tpcr-cli\tpcrcli-auth.properties Device ID Connection Type Device Type Local Server Connection ======================================================================== SVC:CLUSTER:SVC2PROD Direct SVC Connected SVC:CLUSTER:SVC8 Direct SVC Connected If you must start FlashCopy, for example, the script that is shown in Example 3-14 creates FlashCopy relationships for all FlashCopy volume pairs that are included in the session. Example 3-14 FlashCopy script # Create FlashCopy relation ship # -----------------------------lssess -l -fmt stanza 'SVC8 FC' cmdsess -quiet -action flash 'SVC8 FC' lssess -l -fmt stanza 'SVC8 FC' # -------- end of script -------------- Chapter 3. General administration and high availability 83 The output of the script is shown in Example 3-15. Example 3-15 FlashCopy script output C:\Program Files\IBM\TPC\cli>csmcli -script flashcopy.txt Tivoli Storage Productivity Center for Replication Command Line Interface (CLI) Copyright 2007, 2012 IBM Corporation Version: 5.2.0 Build: 20130719-0641 Server: SSCTCP42-T.windows.ssclab-lj-si.net Port: 9560 Authentication file: C:\Users\tpcadmin\tpcr-cli\tpcrcli-auth.properties Name SVC8 FC Status Warning State Prepared Copy Type FlashCopy Recoverable No Copying No Copy Sets 1 Error No IWNR1026I [Aug 8, 2013 8:08:52 AM] The Flash command in the SVC8 FC session completed. Name SVC8 FC Status Normal State Target Available Copy Type FlashCopy Recoverable Yes Copying Yes Copy Sets 1 Error No C:\Program Files\IBM\TPC\cli> After the Flash command finishes, the FlashCopy target is available and the session status changes to Normal. FlashCopy is created by using the CLI script and you can check the status in Tivoli Storage Productivity Center for Replication GUI, as shown in Figure 3-22. Figure 3-22 FlashCopy status in Tivoli Storage Productivity Center for Replication GUI If you intend to add a certain set of copy sets to a session, it is more convenient to use the CLI instead going through all the GUI panels. With two Copy Sets, a script can look as shown in Example 3-16 on page 85. 84 Tivoli Storage Productivity Center for Replication for Open Systems Example 3-16 CLI - Adding copy sets # # Add copy sets to Metro Mirror session # ----------------------------------------setoutput -fmt stanza lssess -l mkcpset -h1 SVC:vol:SVC8:37 -h2 SVC:vol:SVC2PROD:223 SVC8-SVC2_MM mkcpset -h1 SVC:vol:SVC8:38 -h2 SVC:vol:SVC2PROD:224 SVC8-SVC2_MM lspair -l -cpset SVC:vol:TPC51_SVC8_1000 SVC8-SVC2_MM lssess -l # ----------------------------- end of script ------------------------------The result of the script in Example 3-16 is shown in Example 3-17. Example 3-17 Adding Copy Sets in CLI C:\Program Files\IBM\TPC\cli>csmcli -script addcopyset1.txt Tivoli Storage Productivity Center for Replication Command Line Interface (CLI) Copyright 2007, 2012 IBM Corporation Version: 5.2.0 Build: 20130719-0641 Server: SSCTCP42-T.windows.ssclab-lj-si.net Port: 9560 Authentication file: C:\Users\tpcadmin\tpcr-cli\tpcrcli-auth.properties Name Status State Copy Type Recoverable Copying Copy Sets Error SVC8-SVC2_MM Inactive Defined Metro Mirror Failover/Failback No No 0 No IWNR2001I [Aug 8, 2013 9:17:16 AM] The pair was created in session SVC8-SVC2_MM for copy set with a copy set ID of SVC:VOL:SVC8:37 , with a source volume ID of SVC:VOL:SVC8:37(TPC51_SVC8_1000), and a target volume ID of SVC:VOL:SVC2PROD:223(TPC51_SVC2_1000). IWNR2001I [Aug 8, 2013 9:17:18 AM] The pair was created in session SVC8-SVC2_MM for copy set with a copy set ID of SVC:VOL:SVC8:38 , with a source volume ID of SVC:VOL:SVC8:38(TPC51_SVC8_2000), and a target volume ID of SVC:VOL:SVC2PROD:224(TPC51_SVC2_2000). Name Status State Copy Type Recoverable Copying Copy Sets Error SVC8-SVC2_MM Inactive Defined Metro Mirror Failover/Failback No No 2 No C:\Program Files\IBM\TPC\cli> Chapter 3. General administration and high availability 85 Note: For more information about and the complete list and description of CLI commands, see IBM Tivoli Storage Productivity Center Version 5.2 Command-Line Interface Reference, SC27-4089. Example 3-18 shows you how you can make a general-purpose script run an action on the selected session. This script helps you to automate actions on your defined sessions. Example 3-18 Tivoli Storage Productivity Center for Replication action run script @ECHO @echo @echo @echo OFF ******************************************************** ** TPC-R: ACTION EXECUTION SCRIPT ** ******************************************************** set Sess=%1 set CMD=%2 IF "%~1" == "" GOTO syntax IF "%~2" == "" GOTO syntax SET /P yesno=Do you want to issue %CMD% for the session %Sess%? [Y/N]: IF "%yesno%"=="y" GOTO start IF "%yesno%"=="Y" (GOTO inizio) ELSE (GOTO Cancel) :start @echo. FOR /F "tokens=1-30 delims=," %%i in ('csmcli -noinfo lssess -fmt delim -hdr off %Sess%') do ( set sn=%%i set st=%%j set ss=%%k) IF "%sn%"=="%Sess%" GOTO startaction GOTO error :startaction @echo -----------INITIAL STATUS-----------echo Session name: %sn% echo Status: %st% echo State: %ss% @echo ------------------------------------FOR /F "tokens=1-30 delims=," %%i in ('csmcli -noinfo lssessactions -fmt delim -hdr off %Sess%') do ( set ac=%%i set de=%%j IF %%i==%CMD% ( echo. echo Executing %CMD%..... call csmcli -noinfo cmdsess -quiet -action %CMD% %Sess% GOTO run ) ELSE rem ) GOTO error :run FOR /F "tokens=1-30 delims=," %%i in ('csmcli -noinfo lssess -fmt delim -hdr off %Sess%') do ( 86 Tivoli Storage Productivity Center for Replication for Open Systems set sn=%%i set st=%%j set ss=%%k) @echo. @echo -----------FINAL STATUS-------------echo Session name: %sn% echo Status: %st% echo State: %ss% @echo ------------------------------------@echo. @echo Action %CMD% completed GOTO end :cancel @echo. @echo Action %CMD% cancelled GOTO end :syntax @echo. @echo Syntax error - use "TPCRscript.bat <session> <action>" GOTO end :error @echo. @echo WARNING: Action %CMD% not allowed GOTO end :end @echo. @echo Script execution terminated Run the following command to start the script: TPCRscript.bat session_name action Example 3-19 shows you the output of the script where suspend action is issued for a session. Example 3-19 Output of TPCRscript.bat C:\Program Files\IBM\TPC\cli>TPCRscript.bat SVC8-SVC2_MM suspend ******************************************************** ** TPC-R: ACTION EXECUTION SCRIPT ** ******************************************************** Do you want to issue suspend for the session SVC8-SVC2_MM? [Y/N]:y -----------INITIAL STATUS-----------Session name: SVC8-SVC2_MM Status: Normal State: Prepared ------------------------------------Executing suspend..... IWNR1026I [Aug 12, 2013 8:24:55 PM] The Suspend command in the SVC8-SVC2_MM session completed. -----------FINAL STATUS-------------Session name: SVC8-SVC2_MM Chapter 3. General administration and high availability 87 Status: Severe State: Suspended ------------------------------------Action suspend completed Script execution terminated 3.4 Tivoli Storage Productivity Center for Replication interaction with Tivoli Storage Productivity Center Because Tivoli Storage Productivity Center for Replication is a part of the Tivoli Storage Productivity Center, there is an interaction between them. Tivoli Storage Productivity Center is used as a monitoring tool and it monitors Tivoli Storage Productivity Center for Replication alerts. These alerts are defined in Tivoli Storage Productivity Center and they are enabled by default. This means that the Tivoli Storage Productivity Center monitors your replication and shows you different replication alerts that are triggered by specific conditions. Each condition has a related error message identifier that is displayed when it is detected. Table 3-2 shows the triggering conditions, an explanation, and related error messages. Table 3-2 Tivoli Storage Productivity Center for Replication Triggering Conditions 88 Triggering condition Explanation Related error message Replication Session Change An alert is generated if a replication session changes to the following states: Terminating Target Available Suspended, Suspended H2H3, Suspended H1H3 Recovering Preparing Prepared Flashing Defined An alert is generated if the following conditions are detected for a role pair: The role pair in a replication session passed the Recovery Point Objective (RPO) warning threshold. The role pair in a replication session passed the RPO severe threshold. ALR4339W Replication Suspending Event Notification The state of a replication session changed to suspending. ALR4339W Tivoli Storage Productivity Center for Replication for Open Systems Triggering condition Explanation Related error message Replication Communication Failure An alert is generated when the following communication errors are detected: The Replication standby server encountered communication errors with the Active server. The Replication server timed out when attempting to communicate with the storage system. The Replication server encountered communication errors with the storage system. The Replication active server stopped communicating with the standby server. ALR4339W Replication Management Server State Change An alert is generated when the replication HA connection changes to the following states: Unknown Synchronized Synchronization Pending Disconnected Disconnected Consistent ALR4339W Replication Configuration Change An alert is generated when the following replication configuration changes are detected: One or more path definitions were added or removed. One or more copy sets were added to a session. One or more copy sets were deleted from a session. ALR4339W Note: The error message identifiers help you to locate any other information about the error messages that are related to triggering conditions. You can check the information in the Messages section of the IBM Tivoli Storage Productivity Center Information Center or the IBM Tivoli Storage Productivity Center Messages Guide, SC27-4061. If you want to disable the alerts, you can log in to Tivoli Storage Productivity Center stand-alone GUI and in the navigation tree, click Replication Manager Alerting Replication Alerts and select the alert that you want to disable. This action opens an alert panel in which the alert details are shown. In the panel, you clear the Enabled option (as shown in Figure 3-23 on page 90) and then click Save. Alert is disabled and it does not appear in Alerts. Chapter 3. General administration and high availability 89 Figure 3-23 Enabling Tivoli Storage Productivity Center for Replication alerts In the same panel, you define triggered actions to occur as a result of the alert. You can define the following notifications or triggered actions: SNMP Trap Tivoli Enterprise Console / OMNIbus Event Login Notification Windows Event Log, UNIX Syslog Run Script Email When the alerts are enabled, they are shown in Tivoli Storage Productivity Center stand-alone GUI, as shown in Figure 3-24 on page 91. 90 Tivoli Storage Productivity Center for Replication for Open Systems Figure 3-24 Tivoli Storage Productivity Center for Replication Alerts in Tivoli Storage Productivity Center stand-alone GUI The alerts are also shown in the Tivoli Storage Productivity Center web-based GUI. When you log on to the web-based GUI, click Home and select Alerts, as shown in Figure 3-25. Figure 3-25 Tivoli Storage Productivity Center web-based GUI Chapter 3. General administration and high availability 91 As shown in Figure 3-26, the Alerts panel is where you see all of the alerts that are managed by Tivoli Storage Productivity Center. To view replication alerts, click the icon on the graph and you see all replication alerts. Figure 3-26 Tivoli Storage Productivity Center for Replication alerts To explore an alert, click the resource in Internal Resource column, as shown in Figure 3-26. If the resource is a storage system, click the hyperlink and Tivoli Storage Productivity Center for Replication GUI opens and the storage system details are displayed, as shown in Figure 3-27. If the user that is using the Tivoli Storage Productivity Center web-based GUI does not have access to Tivoli Storage Productivity Center for Replication, the Tivoli Storage Productivity Center for Replication login window opens. Enter a user name and password of a user who is authorized to use Tivoli Storage Productivity Center for Replication and the storage system details panel opens, as shown in Figure 3-27. For more information about the user access control, see 3.5.3, “Managing user access” on page 95. Figure 3-27 Storage System Details in Tivoli Storage Productivity Center for Replication GUI 92 Tivoli Storage Productivity Center for Replication for Open Systems If the internal resource is not shown or if it is a session name, double-click a new resource in the Internal Resource column (as shown in Figure 3-26 on page 141) and in a new window you see the details about the alert that are related to that internal resource, as shown in Figure 3-28. Figure 3-28 Alert information 3.5 Tivoli Storage Productivity Center for Replication security and user administration In this section, we describe the role-based security model of Tivoli Storage Productivity Center for Replication and how to add, modify, and remove user access to the application. Tivoli Storage Productivity Center for Replication does not maintain a directory of user names and passwords. Instead, the application uses the operating system repository or a Lightweight Directory Access Protocol (LDAP) repository for user authentication. The operating system repository is created by default during the installation of Tivoli Storage Productivity Center. For more information about the operating system and LDAP repositories, see the topic about changing the user authentication configuration in the IBM Tivoli Storage Productivity Center User's Guide, SC27-4060. If you choose to use LDAP authentication, you must install the LDAP repository after you install Tivoli Storage Productivity Center. You can use the Tivoli Storage Productivity Center for Replication GUI or CLI to assign the users and groups that are defined in the user repository to a user role. The roles are predefined in Tivoli Storage Productivity Center for Replication and determine the authorization level for individual users or all users who are in a group. Note: To log on to Tivoli Storage Productivity Center for Replication, the user must have an assigned user role or must belong to a group with an assigned role. Chapter 3. General administration and high availability 93 3.5.1 Adding Tivoli Storage Productivity Center users and groups to Tivoli Storage Productivity Center for Replication By default, the common user that was defined during the installation of Tivoli Storage Productivity Center and the user tpcFileRegistryUser are granted access to Tivoli Storage Productivity Center for Replication and assigned to the Administrator role. The user tpcFileRegistryUser is used only for recovery purposes. For example, if you accidentally delete the repository that you are using for authentication, you can access Tivoli Storage Productivity Center and Tivoli Storage Productivity Center for Replication by using the user tpcFileRegistryUser. The password for the user tpcFileRegistryUser is the same as the password that was entered for the common user during the installation of Tivoli Storage Productivity Center. To ensure smooth integration of Tivoli Storage Productivity Center with Tivoli Storage Productivity Center for Replication, complete the following tasks: Add all Tivoli Storage Productivity Center users and groups (other than those that are assigned by default) to Tivoli Storage Productivity Center for Replication. For example, if you added a TPCSuperuser group to Tivoli Storage Productivity Center for LDAP authentication, add that group to Tivoli Storage Productivity Center for Replication as well. Use the same user or group to log on to both applications. You can add users and groups to Tivoli Storage Productivity Center for Replication by using the GUI or the CLI. 3.5.2 Tivoli Storage Productivity Center for Replication role-based access control The following roles are defined in Tivoli Storage Productivity Center for Replication: Administrator Administrators have unrestricted access to all features and functions in Tivoli Storage Productivity Center for Replications. They can manage all replication-related activities and sessions. Administrators also manage access control and can assign users and groups to the Administrator, Monitor, or Operator role. They can manage all sessions and perform all actions that are associated with Tivoli Storage Productivity Center for Replication. Operator Operators can manage specific sessions as determined by a user in the Administrator role. Operators can issue commands only for sessions that they own. The volumes that are in a session that is assigned to one user cannot be added to another session that is assigned to a different user. Monitor Monitors can view information in the Tivoli Storage Productivity Center for Replication; however, they cannot modify or perform any commands or actions. 94 Tivoli Storage Productivity Center for Replication for Open Systems If a user is assigned to one role as an individual and a different role as a member of a group, the role with the highest level of authorization is granted to the user. For example, if a user belongs to a group that is assigned the Administrator role and belongs to a group that is assigned a Monitor role, the user is granted the authorization of the Administrator role. For more information about roles and how to assign a role to a group, see the topic about Tivoli Storage Productivity Center for Replication security in the IBM Tivoli Storage Productivity Center User's Guide, SC27-4060. 3.5.3 Managing user access To manage user access by using the Tivoli Storage Productivity Center for Replication GUI, select Administration in the navigation tree. The Administration page is displayed, as shown in Figure 3-29. This page lists all of the users and groups that were granted access to Tivoli Storage Productivity Center for Replication. Figure 3-29 Administration page You can add, modify, or remove user access from this page, as described in the following sections. Granting access to a user role Complete the following steps to add a user or group to a user role: 1. On the Administration page, click Add Access, as shown in Figure 3-30 on page 96. The Add Access wizard opens. Chapter 3. General administration and high availability 95 Figure 3-30 Adding a user or group to a role 2. On the Welcome page of the wizard, enter the user or group name for which you want to add access and the number of names that you want to be displayed. You can enter a number in the range of 1 - 100. The default is 50. If you want to search for all users, enter an asterisk (*) in the Users or group names field. If you want to search for users that contain certain characters, you can use the asterisk as a filter, as shown in Figure 3-31. In this example, only users or groups that contain the characters db2 are displayed. Figure 3-31 Search for the user or group to assign to a role 96 Tivoli Storage Productivity Center for Replication for Open Systems 3. On the Select Users and Groups page of the wizard, select the user or group for which you want to grant access, as shown in Figure 3-32. Only those users or groups with names that contain the characters db2 are displayed. You can select multiple users or groups. Figure 3-32 Select the user or group to assign to a role 4. On the Select Access Level page of the wizard, click the role that you want to assign to the user or group. In Figure 3-33, the Operator role is selected for the group DB2USERS and the sessions that can be managed by the users in that group are selected. Figure 3-33 Select the role that you want to assign Chapter 3. General administration and high availability 97 5. On the Confirm page of the wizard, review your selections. Click Back if you want to make other changes or click Next to continue. 6. When you are prompted, click Finish to complete the wizard. The user or group and its role are displayed on the Administration page, as shown in Figure 3-34. Figure 3-34 Administrator page with new DB2USERS group added 3.5.4 Modifying access to a user role You can modify the access that is assigned to a user or group. For example, you can reassign a user who is in the Operator role to the Administrator role. You also can add or remove sessions for a user who is assigned to the Operator role. Complete the following steps to change the role for a user or group: 1. On the Administration page, click the user or group that you want to modify, click View/Modify Access in the Select Action list, and then click Go, as shown in Figure 3-35 on page 99. The View/Modify Access page opens. 98 Tivoli Storage Productivity Center for Replication for Open Systems Figure 3-35 Modify a user or group to a role 2. On the View/Modify Access page, click a role if you want to change the user role. If you want to change the sessions that are assigned to a user in the Operator role, select or clear the applicable sessions. In Figure 3-36, the group DB2USERS is changed from the Operator role to the Administrator role. Figure 3-36 Modify the access for the user or group Chapter 3. General administration and high availability 99 3. Click OK. The role for the DB2USERS group changes from Operator to Administrator on the Administration page, as shown in Figure 3-37. Figure 3-37 Administration panel 3.5.5 Removing access to a user role To remove a user or group from a role, on the Administration page, click the user or group that you want to remove, click Remove Access in the Select Action list, and then click Go. The user or group is removed from the list of users and roles on the Administration page. When you remove access, the user or users in a group cannot access the Tivoli Storage Productivity Center for Replication GUI or run commands from the command line. 3.6 Tivoli Storage Productivity Center for Replication advanced tools Advanced tools are useful utilities and settings that assist you with your work in Tivoli Storage Productivity Center for Replication. By using advanced tools, you can package log files, set the browser refresh rate, and enable or disable the Metro Mirror heartbeat feature. To manage advanced tools, select Advanced Tools in the navigation tree of the Tivoli Storage Productivity Center for Replication GUI. The Advanced Tools page opens, as shown in Figure 3-38 on page 101. 100 Tivoli Storage Productivity Center for Replication for Open Systems Figure 3-38 Advanced Tools page You can configure and use the utilities and settings in this page, as described in the following sections. 3.6.1 Packaging log files Tivoli Storage Productivity Center includes a utility that packages the log files that are created by the application. By using this utility, you can collect all log files in one location for diagnostic purposes. For example, you might be asked to package these files and send them to IBM Software Support. Complete the following steps to create a log file package: 1. On the Advanced Tools page, click Create under Package Log Files. When the log package is created, the package file name and location on the Tivoli Storage Productivity Center for Replication management server is displayed as a link, as shown in Figure 3-39 on page 102. Chapter 3. General administration and high availability 101 Figure 3-39 Link to the log package.jar file 2. Click the link to download the log package to the server on which the web browser is running. Note: If you want to download log packages that were created previously, click Display PE Packages. 3.6.2 Setting the auto refresh rate for the browser On the Advanced Tools page, you can define the rate in seconds in which the content in the web browser is refreshed. You can enter a number 5 - 3600; the default is 30, as shown in Figure 3-39. 3.6.3 Managing the Metro Mirror heartbeat When the Metro Mirror heartbeat is enabled, the Tivoli Storage Productivity Center for Replication management server sends a signal to all connected ESS800, DS6000, and DS8000 storage systems on which the server is managing replication relationships. If the connection is lost to one storage system, the heartbeat signal is stopped to the remaining storage systems. The volumes on the other storage systems are also frozen to maintain consistency across the storage systems. If the connection is lost to one of the storage systems, the storage system responds by freezing all logical storage subsystem (LSS) pairings that are managed by the management server. This process of freezing LSS pairings across the storage systems helps to ensure consistency across the storage systems. The Metro Mirror heartbeat is available for Metro Mirror sessions that do not have HyperSwap enabled. 102 Tivoli Storage Productivity Center for Replication for Open Systems When you are determining whether to use the Metro Mirror heartbeat, analyze your business needs. If you disable the Metro Mirror heartbeat, data might become inconsistent if the management server is down or connection to a storage system is lost. If you enable the Metro Mirror heartbeat and a freeze occurs, your applications cannot perform write operations until the freeze timeout value for the storage system passes. For more information about the Metro Mirror heartbeat, see the topic about using the Metro Mirror heartbeat in the IBM Tivoli Storage Productivity Center User's Guide, SC27-4060. To enable or disable the Metro Mirror Heartbeat, on the Advanced Tools page, click Enable Heartbeat or Disable Heartbeat. By default, the Metro Mirror Heartbeat is disabled, as shown in Figure 3-40. Figure 3-40 Enable or disable the Metro Mirror heartbeat 3.7 Tivoli Storage Productivity Center for Replication Console Tivoli Storage Productivity Center for Replication provides a detailed log of user and system activity. This log is called the Tivoli Storage Productivity Center for Replication Console. The Tivoli Storage Productivity Center for Replication Console detects dependent messages and groups them as so-called child/children messages under the root message for the logged event, which significantly improves the readability of the log. The console also provides a hyperlink-based help system for the various messages. You can start the console by clicking Console from the navigation tree area of the Tivoli Storage Productivity Center for Replication GUI, as shown in Figure 3-41 on page 104. Chapter 3. General administration and high availability 103 Figure 3-41 Opening Console from navigation tree You also can click Open Console in the message lines, which is in the upper section of the Work Area after you performed specific actions in Tivoli Storage Productivity Center for Replication, as shown in Figure 3-42. Figure 3-42 Example of Open Console hyperlink 104 Tivoli Storage Productivity Center for Replication for Open Systems Figure 3-43 shows the Tivoli Storage Productivity Center for Replication Console window with various roots and a pointer to child messages. Figure 3-43 Tivoli Storage Productivity Center for Replication Console window The console lists the message IDs of the messages as hyperlinks. Clicking these hyperlinks takes you to the associated help panels, as shown in Figure 3-44 on page 106. Chapter 3. General administration and high availability 105 Figure 3-44 Help panel If you created a log package and must download it later, the console shows you the log package destinations as hyperlinks. By clicking these hyperlinks, the package file is saved. 3.8 Tivoli Storage Productivity Center for Replication High Availability Tivoli Storage Productivity Center for Replication offers support for creating a more resilient, highly available Tivoli Storage Productivity Center for Replication environment by using a standby server concept. In addition to your active Tivoli Storage Productivity Center for Replication server, you can install a second Tivoli Storage Productivity Center for Replication server into your infrastructure (for example, at your remote site) and define it as a Tivoli Storage Productivity Center for Replication standby server. Tivoli Storage Productivity Center for Replication then replicates all changes of the active server’s repository to the repository of the standby server. Note: Because the servers communicate with each other over TCP/IP network, make sure that they are authenticated through all firewalls. At any time, a takeover process can be started at the standby server. This takeover process stops any relationship between active and standby server and turns the standby server into an active Tivoli Storage Productivity Center for Replication server with the same configuration the original server had at the time of takeover. This takeover process often occurs after the active server fails or is down because of a disaster. 106 Tivoli Storage Productivity Center for Replication for Open Systems The Tivoli Storage Productivity Center for Replication standby server does not need to be on the same operating system platform as the active Tivoli Storage Productivity Center for Replication server. Tivoli Storage Productivity Center for Replication supports a standby server that is running in another platform. This section guides you through the steps to set up a Tivoli Storage Productivity Center for Replication Server as a standby server and explains how to start a takeover process. Figure 3-45 shows an overview of a typical two-site storage infrastructure with a high available Tivoli Storage Productivity Center for Replication installation. Figure 3-45 Active and standby Tivoli Storage Productivity Center for Replication servers As Figure 3-45 shows, both servers must have IP connectivity to each other and to all storage systems that are managed by Tivoli Storage Productivity Center for Replication. Note: Tivoli Storage Productivity Center for Replication supports one standby server for an active server. This is also true for a three-site environment. 3.8.1 Setting up a Tivoli Storage Productivity Center for Replication standby server To set up a Tivoli Storage Productivity Center for Replication standby server for your active server, you must install the Tivoli Storage Productivity Center to the standby server. This task also installs Tivoli Storage Productivity Center for Replication. Chapter 3. General administration and high availability 107 The standby server can be set up by using one of the following methods: Setting up a different server as the standby server Setting up the server you are logged in to as the standby server Note: The standby server cannot manage sessions that are running in the active server. Also, the standby server must be configured after you have your High Availability plan defined. After setting a server as a standby server, you cannot use this server for any other purpose than a Takeover. Setting up a different server as the standby server You set up a Tivoli Storage Productivity Center for Replication standby server by logging in to the active server and defining a different server as a standby server. Assume that you have an active Tivoli Storage Productivity Center for Replication server with some sessions defined, but without a standby management server, as shown in Figure 3-46. Figure 3-46 Active Tivoli Storage Productivity Center for Replication server with defined sessions To define the standby Tivoli Storage Productivity Center for Replication server, click Management Servers in the navigation tree from of your active Tivoli Storage Productivity Center for Replication Server or click Configure in the Health Overview panel. The Management Servers panel of your active server opens, as shown in Figure 3-47 on page 109. You can see an entry for your server with its DNS name and the information that it has the active role. 108 Tivoli Storage Productivity Center for Replication for Open Systems Figure 3-47 Active Tivoli Storage Productivity Center for Replication server: Management Servers panel From the drop-down menu of the Management Servers panel, select Define Standby and click Go, as shown in Figure 3-48. Figure 3-48 Active Tivoli Storage Productivity Center for Replication server: Select Define Standby Chapter 3. General administration and high availability 109 Tivoli Storage Productivity Center for Replication now shows a panel in which you must enter the IP address or the fully qualified DNS name of your designated Tivoli Storage Productivity Center for Replication standby server. You also must enter a user name and a password for the standby server, as shown in Figure 3-49. This user must be a Tivoli Storage Productivity Center for Replication Administrator. Click OK after you enter and verify your information. Figure 3-49 Define address and user credentials for standby Important: Defining a Tivoli Storage Productivity Center for Replication server as a standby server overwrites the complete database of the standby server. There is no way within Tivoli Storage Productivity Center for Replication to recover the configuration after it is overwritten. Also, Tivoli Storage Productivity Center for Replication server uses TCP port 9561 for communication with other Tivoli Storage Productivity Center for Replication servers for high-availability purposes. After you click OK, a confirmation message is shown that explains that you are about to overwrite the current configuration for this management server and prompts you to confirm that you want to continue, as shown in Figure 3-50. Click Yes. Figure 3-50 Standby server confirmation message 110 Tivoli Storage Productivity Center for Replication for Open Systems Tivoli Storage Productivity Center for Replication establishes communication with the designated standby server, turns it into standby mode, and then starts to synchronize the repository of the active server with that of the standby server. The Management Servers status switches to a Connected status and warning, as shown in Figure 3-51, while the repository of active Tivoli Storage Productivity Center for Replication is copied to the standby Tivoli Storage Productivity Center of Replication server. Figure 3-51 Status after define of standby server After the synchronization process completes, the state turns to a Synchronized status and you see the content of the Management Servers panel of your active server that is shown in Figure 3-52. Figure 3-52 Standby server is synchronized Chapter 3. General administration and high availability 111 The standby server Tivoli Storage Productivity Center for Replication now shows that it is connected to the remote server, as shown in Figure 3-53. Figure 3-53 Health Overview panel after standby synchronization Setting up the server you are logged in to as the standby server You can also define your standby server by logging in to the designated standby server and set it as standby. From the Management Servers panel, select Set this Server as Standby in the drop-down menu and click Go, as shown in Figure 3-54 on page 113. 112 Tivoli Storage Productivity Center for Replication for Open Systems Figure 3-54 Set the current server as a Tivoli Storage Productivity Center for Replication standby server In the next panel, you must specify the IP address or DNS name of the server for which your current server acts as a standby server. You do not have to supply any user credentials because you do not overwrite the configuration of the active server or damage it in any other way. Click Ok to define your server as standby, as shown in Figure 3-55 on page 113. Figure 3-55 Enter the address of the active Tivoli Storage Productivity Center for Replication server Chapter 3. General administration and high availability 113 Important: Defining a Tivoli Storage Productivity Center for Replication server as a standby server overwrites the complete database of the standby server. There is no way within Tivoli Storage Productivity Center for Replication to recover the configuration after it is overwritten. After you click OK, a confirmation message is shown that provides a warning that you will overwrite the current configuration for this management server and prompts you to confirm that you want to continue, as shown in Figure 3-56. Click Yes. Figure 3-56 Set this Server as Standby confirmation message Tivoli Storage Productivity Center for Replication now establishes communication with the designated active server and starts to synchronize the repository of the active server with the standby server. The Management Servers status switches to Connected status, as shown in Figure 3-57 on page 114, but it is still in warning because the servers are not yet synchronized. Figure 3-57 Warning status 114 Tivoli Storage Productivity Center for Replication for Open Systems After the synchronization process completes, the state turns to Synchronized and you see the content of the Management Servers panel of your active server that is shown in Figure 3-58. Figure 3-58 Standby Server that is synchronized The standby server is successfully defined for your active Tivoli Storage Productivity Center for Replication server. Your active server works as before (but now t it propagates all changes to your standby server). However, your standby server now has the following different properties: Configuration of the Tivoli Storage Productivity Center for Replication standby server in terms of Storage Systems, ESS/DS Paths, Sessions, and Copy Sets was overwritten with the configuration of the active Tivoli Storage Productivity Center for Replication server. The Sessions menu item is disabled so that you cannot view or modify any Session or Copy Set-related configurations from the standby server. You can view the Storage Subsystem and ESS/DS Paths configuration, but you cannot make any changes from the standby server. You can access the Advanced Tools menu but you cannot alter the Heartbeat setting from the standby server. You can still access the Tivoli Storage Productivity Center for Replication Console from the standby server. Note: User access data is not synchronized between active and standby Tivoli Storage Productivity Center for Replication servers. Setting up standby server by using CLI You can also use the Tivoli Storage Productivity Center for Replication CLI to define a standby server for your active server or to define your current server as a standby server to a different server. Chapter 3. General administration and high availability 115 To define a standby server for your active server, open a CLI command window on your active server and run the setstdby CLI command, as described in the following steps: 1. Run csmcli.bat from your default Tivoli Storage Productivity Center for Replication installation directory TPC_Install\Program Files\IBM\TPC\cli. The command opens a CLI window. If you did not set up the CLI properties file, the CLI prompts you to enter a username and password for logging on to the server. On AIX and Linux servers, you must run the csmcli.sh script from the default Tivoli Storage Productivity Center for Replication installation directory /opt/IBM/TPC. 2. Run the lshaservers command to verify that your active server is not already connected to a standby server, as shown in Example 3-20. Example 3-20 List HA servers csmcli> lshaservers Server Role Status Port ========================================================== SSCTCP42-T.windows.ssclab-lj-si.net ACTIVE No Standby 9561 csmcli> 3. Run the setstdby command the set the standby server. Through the CLI, you are informed that this operation overwrites the contents of the standby server database, and you are prompted to confirm that you want to continue, as shown in Example 3-21. Example 3-21 Adding standby server csmcli> setstdby -password 12345678 -server 172.31.149.2 -username Administrator IWNR3111W [Aug 15, 2013 12:56:01 AM] This command will define another management server as a standby for this server. This will overwrite the configuration of the specified standby. Do you want to continue? [y/n]:y IWNR3020I [Aug 15, 2013 12:56:05 AM] Connection to the active high-availability server at 172.31.83.171 making the server IICTPCRT1-PRI.windows.ssclab-lj-si.net a standby was successful. csmcli> 4. Run the lshaserves command again to confirm that your active server now has a standby server, as shown in Example 3-22. Example 3-22 New standby server csmcli> lshaservers Server Role Status Port ============================================================= SSCTCP42-T.windows.ssclab-lj-si.net ACTIVE Synchronized 9561 IICTPCRT1-PRI STANDBY Synchronized 9561 csmcli> The standby server is successfully defined for your active Tivoli Storage Productivity Center for Replication server. 3.8.2 Takeover If your active Tivoli Storage Productivity Center for Replication server fails (or if there is a planned failover), you must perform a takeover of the active server role on your standby Tivoli Storage Productivity Center for Replication server. 116 Tivoli Storage Productivity Center for Replication for Open Systems The takeover action is a manual process, which can be started through the GUI or the CLI on the Tivoli Storage Productivity Center for Replication standby server. After you perform the manual takeover on the standby server, the synchronization of repository changes stops and the Tivoli Storage Productivity Center for Replication standby server becomes an active server with the same configuration as the original active server. This is the case even when the original active server is still running. In this case, you have two active Tivoli Storage Productivity Center for Replication servers with identical configurations in your environment. You can manipulate your copy services configurations from both servers, although changes in the Tivoli Storage Productivity Center for Replication databases are no longer synchronized between the two active servers. This can lead to inconsistencies in your overall configuration, which can damage your environment. Therefore, we do not recommend that you have two active Tivoli Storage Productivity Center for Replication servers. Important: Before you attempt a Tivoli Storage Productivity Center for Replication takeover, we recommend that you always shut down the active Tivoli Storage Productivity Center for Replication server or stop the replication server. You can start a takeover only from the standby server. In a planned situation (for example, for maintenance purposes), we recommend that you first shut down the Tivoli Storage Productivity Center for Replication or stop the replication server by running the stopTPCreplication.bat command. After you stop the active Tivoli Storage Productivity Center for Replication server, the standby server is in Disconnected Consistent status, as shown in Figure 3-59. Figure 3-59 Standby server status: Disconnected Consistent You can see that all storage systems that are connected as the standby server received the configuration of the storage systems via the repository synchronization process from the active server. Chapter 3. General administration and high availability 117 The Sessions hyperlink in the navigation tree area is grayed out (as shown in Figure 3-59) because the Tivoli Storage Productivity Center for Replication server is still the standby server. Click Management Servers, which opens the Management Servers panel of your standby server, as shown in Figure 3-60. Figure 3-60 Management Servers panel on Standby server You now see a list of two Tivoli Storage Productivity Center for Replication servers with active and standby roles. The status of both management servers is Disconnected Consistent from the point of view of the standby server. This means that the standby server cannot communicate with its active server, but it has a consistent database and can take over the role of the active server. In the drop-down menu, select Takeover and click Go (as shown in Figure 3-61 on page 119) to start the takeover process. 118 Tivoli Storage Productivity Center for Replication for Open Systems Figure 3-61 Standby server: Takeover You also have the opportunity to attempt to reconnect to your active server before you decide that a takeover is necessary. The active server is down, so you can omit this step. You first see a confirmation message that warns you that if the original active server is still up, you have two active Tivoli Storage Productivity Center for Replication servers with identical configurations in your environment, as shown in Figure 3-62. Figure 3-62 Standby server: Confirm takeover Because you shut down your original active server, click Yes to continue. Tivoli Storage Productivity Center for Replication changes the role of your standby server to an active server, as shown in Figure 3-63 on page 120. Chapter 3. General administration and high availability 119 Figure 3-63 Takeover action After few seconds, the Management Servers panel that is shown in Figure 3-64 opens. Figure 3-64 Takeover complete 120 Tivoli Storage Productivity Center for Replication for Open Systems Your standby server is now an active Tivoli Storage Productivity Center for Replication server. The Sessions menu item in the Navigation Area is now active. You can manipulate your sessions from the activated standby server. Click Sessions in the navigation area. The Sessions Overview panel opens in which a list of the sessions that were originally configured on the previous active Tivoli Storage Productivity Center for Replication server are shown, as shown in Figure 3-65. Figure 3-65 Sessions on the new active TPC-R server You can also perform the takeover process by using the CLI and the hatakeover command that is run by the standby server, as shown in Example 3-23. Example 3-23 Takeover command in CLI csmcli> hatakeover IWNR3114W [Aug 15, 2013 2:20:27 AM] This command will make this standby management server an active management server. Both management servers will be active with identical configurations. Do you want to continue? [y/n]:y IWNR3063I [Aug 15, 2013 2:20:33 AM] Successfully issued the takeover to the standby server SSCTCP42-T.windows.ssclab-lj-si.net with the active HA server IICTPCRT1-PRI. csmcli> lshaservers Server Role Status Port ========================================================== SSCTCP42-T.windows.ssclab-lj-si.net ACTIVE No Standby 9561 csmcli> Tivoli Storage Productivity Center for Replication does not offer a failback function. Complete the following steps to return to your original active server: 1. Start your recovered original Tivoli Storage Productivity Center for Replication server. 2. On the original active Tivoli Storage Productivity Center for Replication GUI, select Management Servers and then select Remove Standby from Select Action drop-down menu. Chapter 3. General administration and high availability 121 3. After the standby server is removed, select Set this Server as Standby from the Select Action drop-down menu. Tivoli Storage Productivity Center for Replication GUI prompts you to specify the name or IP address of the Active Server. 4. Wait until both servers reach the Synchronized status. 5. Perform a takeover on this Tivoli Storage Productivity Center for Replication server after synchronization completes. You have two active servers during this part of the process. 6. On the original standby server, remove the standby server by clicking Remove Standby from the drop-down menu 7. Set your original standby server as a standby server to the original active server. 3.8.3 Best practices In this section, we describe best practices for configuring and using Tivoli Storage Productivity Center for Replication in a highly available Tivoli Storage Productivity Center for Replication environment. High-availability configuration The Tivoli Storage Productivity Center for Replication high-availability configuration is highly recommended because it provides high availability of replication management. As a best practice, we recommend that you have the active Tivoli Storage Productivity Center for Replication server always in primary site, while the standby server is required in disaster site. If you have a three-site solution, the standby server is not required in the intermediate site, so in a three-site solution, such as Metro Global Mirror, the standby server is required in the third site. Tivoli Storage Productivity Center for Replication does not support two standby servers. If there is a disaster on the primary site, the standby server is in Disconnected Consistent status and is ready to takeover. This action makes the standby server active and you can continue to manage replication. Accidentally removing the standby server If you accidentally remove the standby server from the active server, you can reconnect the standby server. The standby server is in Disconnected Consistent status. On the standby server, you must run Reconnect action and it synchronizes the repository with your active server. Loss of connectivity in high-availability configuration When you lose connectivity between the active and standby server, the servers has the Disconnected Consistent status. When the connection is available, the communication between the servers must be manually reconnected. To do this, select Reconnect action on the Management Servers panel from the drop-down menu and then click Go. The server is synchronized again, and you have high-available configuration. 122 Tivoli Storage Productivity Center for Replication for Open Systems Note: Tivoli Storage Productivity Center for Replication does not automatically resynchronize the servers if the loss of connectivity was the result of a network issue breaking communication. Because Tivoli Storage Productivity Center for Replication cannot determine what caused the breakage, the server is not automatically resynchronized. The original active server might be corrupted during the downtime. If this was the case, we do not want to wipe out the standby, which might be the only uncorrupted version of the server. For this reason, Tivoli Storage Productivity Center for Replication waits for a customer command that indicates that the active server is not corrupted. Upgrading use scenario Upgrading Tivoli Storage Productivity Center for Replication in a high-availability configuration requires planning and step-by-step procedures because the servers are synchronized. In this section, we describe a procedure to upgrade the active and standby Tivoli Storage Productivity Center for Replication server. Complete the following steps to upgrade the servers: 1. Run the takeover command of active server on the standby server. This makes your standby server active and ready for upgrade. 2. Upgrade the standby server. 3. Wait for the standby server to complete the upgrade installation and start. The standby server is active server with no defined standby server. 4. Upgrade the active server. 5. If no changes were made to the configuration while the active server is upgraded, reestablish the High Availability function from the active server to the defined standby server by selecting Reconnect action. 6. If configuration changes were made to the standby server, synchronize the High Availability function from the standby server to the active by using the Define Standby action. This defines your active server as standby. To go to the original configuration, you must perform a takeover, make that new standby server as an active server, and define its standby server (which was the standby server). Note: During the initial synchronization, the current information in the repository is saved and held until the synchronization is complete. If an error occurs during this process, the server repository is restored to its original state before the synchronization process began. If an error occurs during the synchronization process that causes the status to be in the disconnected or inconsistent state, you can reconnect to a synchronized state. 3.9 Starting and stopping the Tivoli Storage Productivity Center for Replication server In this section, we describe how to verify that Tivoli Storage Productivity Center for Replication components are running and how to start or stop Tivoli Storage Productivity Center for Replication components if they must be restarted. Scripts for starting and stopping Tivoli Storage Productivity Center for Replication components are provided by the Tivoli Storage Productivity Center installation. Chapter 3. General administration and high availability 123 3.9.1 Verifying the status of components After you install Tivoli Storage Productivity Center, you can verify whether the Tivoli Storage Productivity Center for Replication components are running. The procedure that is described in this section can also be used if there is a problem with Tivoli Storage Productivity Center for Replication. We also describe a procedure to start and stop Tivoli Storage Productivity Center for Replication server. Starting from version 5.2, Tivoli Storage Productivity Center for Replication is running as a process in a Windows environment. To check whether the process is running, start Task Manager on Windows, as shown in Figure 3-66, and look for java.exe *32 processes. Figure 3-66 Starting Windows Task Manager To check which Java process is using Tivoli Storage Productivity Center for Replication, you must add the Command Line column, as shown in Figure 3-67 on page 125. This column shows details about the processes where you can see that Tivoli Storage Productivity Center for Replication process is started, as shown in Figure 3-68 on page 125. 124 Tivoli Storage Productivity Center for Replication for Open Systems Figure 3-67 Selecting Command Line view Figure 3-68 Tivoli Storage Productivity Center for Replication process running Chapter 3. General administration and high availability 125 On AIX and Linux servers, you can check whether the Tivoli Storage Productivity Center for Replication components are running by running the following command: ps -aef | grep replication You can also check whether the Tivoli Storage Productivity Center for Replication components are running on the Windows operating system by completing the following steps: 1. In a Windows Command Prompt, go to the directory TPC_installation_directory\wlp\bin\ where TPC_installation_directory is the top-level directory where you installed Tivoli Storage Productivity Center (for example, C:\Program Files\IBM\TPC\). 2. Run the server.bat status replicationServer command, which should return a status of running, as shown in Example 3-24. Example 3-24 TPC-R status running C:\Program Files\IBM\TPC\wlp\bin>server.bat status replicationServer Server replicationServer is running. If the Tivoli Storage Productivity Center for Replication components are not running, you see a status as shown in Example 3-25. Example 3-25 TPC-R status not running C:\Program Files\IBM\TPC\wlp\bin>server.bat status replicationServer Server replicationServer is not running. On the AIX or Linux operating system, you run the ./server status replicationServer command from the TPC_installation_directory/wlp/bin/ where TPC_installation_directory is the top-level directory where you installed Tivoli Storage Productivity Center; for example, /opt/IBM/TPC/. You can also check whether Tivoli Storage Productivity Center of Replication server is running by entering the address of Tivoli Storage Productivity Center for Replication server (https://hostname:port/CSM) in a supported web browser. If you see the Tivoli Storage Productivity Center for Replication login page, it means that all Tivoli Storage Productivity Center for Replication components are running. Otherwise, you see the message that is shown in Figure 3-69. Figure 3-69 Tivoli Storage Productivity Center for Replication server is not running 126 Tivoli Storage Productivity Center for Replication for Open Systems On the Windows operating system, the Tivoli Storage Productivity Center of Replication server use scheduled tasks to start the servers when the Windows computer is started again. To view the scheduled tasks for the Device server and the Replication server on Windows, start the Windows Task Scheduler by clicking Start Administrative Tools Task Scheduler. In the Task Scheduler navigation tree, click Task Scheduler Library. The scheduled task for the Device server is called startDevServer, and the scheduled task for the Replication server is called startRepServer, as shown in Figure 3-70. Figure 3-70 Tivoli Storage Productivity Center for Replication server scheduled task 3.9.2 Starting and stopping Tivoli Storage Productivity Center for Replication To start and stop Tivoli Storage Productivity Center for Replication, you run scripts on the server where the Tivoli Storage Productivity Center for Replication is installed. The scripts are in the TPC_installation_directory\scripts\ directory where TPC_installation_directory is the top-level directory where you installed Tivoli Storage Productivity Center; for example, C:\Program Files\IBM\TPC\. The scripts folder also contains Tivoli Storage Productivity Center scripts to start and stop Tivoli Storage Productivity Center components, which are Data server, Device server, Storage Resource Agent, web server, and JazzSM. To start the Tivoli Storage Productivity Center for Replication server on the Windows operating system, enter the startTPCReplication.bat command from the scripts folder in an administrator Windows command prompt (see Figure 3-71 on page 128), or run the script as administrator from Windows Explorer (see Figure 3-72 on page 128). Chapter 3. General administration and high availability 127 Figure 3-71 Running the script from Command Prompt Figure 3-72 Running the script from Windows Explorer Tivoli Storage Productivity Center for Replication server starts and you can check the status by logging in to Tivoli Storage Productivity Center for Replication. To stop the Tivoli Storage Productivity Center for Replication server on the Windows operating system, enter the stopTPCReplication.bat command from the scripts folder in an administrator Windows Command Prompt, or run the script as administrator from Windows Explore. Figure 3-73 on page 129 shows you the message when the Tivoli Storage Productivity Center for Replication server stops. 128 Tivoli Storage Productivity Center for Replication for Open Systems Figure 3-73 Stopping Tivoli Storage Productivity Center for Replication To start or stop the Tivoli Storage Productivity Center for Replication servers on the Linux or AIX operating systems, enter the following commands in the default TPC_install_directory, which is /opt/IBM/TPC/scripts: Start Tivoli Storage Productivity Center for Replication server: /TPC_install_directory/scripts/startTPCReplication.sh Stop Tivoli Storage Productivity Center for Replication server /TPC_install_directory/scripts/stopTPCReplication.sh 3.10 Using CSV files for importing and exporting sessions In this section, we describe how to import and export a comma-separated value (CSV) file. A CSV file includes each of the Copy Sets that you want to add to the session and Copy Sets that are generated from existing sessions. You also see how to use a CSV file to record Copy Sets by using a text editor or spreadsheet editor. Note: CSV files are text files that are created in a spreadsheet program such, as Microsoft Excel. To manage Import and Export Sessions, you must have an Administrator or Operator role. 3.10.1 Exporting CSV files By exporting a CSV file, you can maintain a backup copy of your copy sets; for example, if you lose your session or upgrade to a different server. By exporting the copy sets in a session, you can take a snapshot of your session at a particular point and save the exported file for backup or to be used for import purposes. You export the Copy Sets from a session into a CSV file, which you view or edit in a spreadsheet program. Chapter 3. General administration and high availability 129 Access for export activity is managed in the Session panel in the Navigation Area. You can start this panel by clicking Sessions in the Navigation Area of the Tivoli Storage Productivity Center for Replication GUI, as shown in Figure 3-74. Figure 3-74 Tivoli Storage Center for Replication GUI Select the session that you want to export by clicking the radio button on the left side of the Session Name. Select Export Copy Sets in the drop down-menu and then click Go, as shown in Figure 3-75. Figure 3-75 Select session to Export Copy Sets 130 Tivoli Storage Productivity Center for Replication for Open Systems The Export Copy Sets panel opens. Tivoli Storage Productivity Center for Replication creates a CSV file that contains the Copy Sets and provides a link to download the CSV file. Click the CSV file name link, as shown in Figure 3-76. Figure 3-76 Export Copy Sets You can open this file or save it by downloading it. We recommend that you open it only to read the content. Do not edit the file now. However, if you want to edit the file, make your edits after you save the file by using a spreadsheet program, as described in 3.10.3, “Working with CSV files under Microsoft Excel” on page 139. If you are using Microsoft Internet Explorer as your web browser, click Save. By using Internet Explorer, you can choose the directory to which you save the CSV file. If you are using Mozilla Firefox as your web browser, click Save File, as shown in Figure 3-77 on page 132. You can choose the directory where you download your files by clicking in Mozilla Firefox menu bar Tools Options. You can specify the directory that you want for saving the files in the Downloads area of the Options menu. Chapter 3. General administration and high availability 131 Figure 3-77 Selecting Save File option Click Finish to close the Export Copy Set window. 3.10.2 Importing CSV files By importing a CSV file, you can recover a backup copy of your Copy Sets; for example, if you lose your session, or upgrade to a different server. You also can import a previous exported session and add Copy Sets by using a spreadsheet program, such as Microsoft Excel, as shown in 3.10.3, “Working with CSV files under Microsoft Excel” on page 139. You can import Copy Sets from a CSV file that you previously created by using one of the following methods: Import a Copy Sets in a new Session Import a Copy Sets in existing Session These methods are described next. Importing a Copy Set in a new Session In this section, we describe the steps that are used to import the saved CSV file that contains Copy Sets in a new session. From the Sessions panel, click Create Session to proceed, as shown in Figure 3-78 on page 133. 132 Tivoli Storage Productivity Center for Replication for Open Systems Figure 3-78 Create Session Select the Session Type from the drop-down menu and click Next, as shown in Figure 3-79. Note: The Session Type should have the same Session Type defined into the previously exported CSV file that is to be imported. Figure 3-79 Choose Session Type panel Complete the Session Name, Description, and Properties sections as you require. Figure 3-80 on page 134 shows an example of how you specify this information for a FlashCopy session. Click Next to continue. Chapter 3. General administration and high availability 133 Figure 3-80 Session properties In the next panel, specify the Site Location, as shown in Figure 3-81. Select the Site Location from the drop down-menu and then click Next. Note: The Site Locations should be the same as defined in the previously exported Session. Figure 3-81 Session Site Locations 134 Tivoli Storage Productivity Center for Replication for Open Systems Repeat this process for specifying other Locations as your session requires. A successfully created session message is displayed. Click Launch Add Copy Set Wizard at the bottom of the panel, as shown in Figure 3-82. Figure 3-82 Starting Add Copy Sets Wizard In the Add Copy Set Wizard panel, select Use a CVS file to import copy sets to use a CVS file to import Copy Sets. You can enter a file name manually, but we recommend that you use the browse option to avoid entering an error. Click Browse to proceed, as shown in Figure 3-83. Figure 3-83 Choosing CSV file to be imported Chapter 3. General administration and high availability 135 Select the exported or created CSV file. Click Open, as shown in Figure 3-84. Notes: Consider the following points as you proceed: It is not possible to choose multiple CSV files in the same operation. The Copy Sets in CSV files have a specific format to address Copy Services functions, such as FlashCopy (FC), Metro Mirror (MM), and Metro/Global Mirroring (MGM). With the specific formats, it is not possible to import a CSV file with specific characteristics into another file with different characteristics. Be sure that Copy Sets in the CSV file have the same Site Location as defined in the Session that Copy Sets are imported to avoid errors. The CSV file is case-sensitive. Figure 3-84 Opening exported Copy Set file Click Next. Tivoli Storage Productivity Center for Replication checks if the volumes are defined in another session. It might show you a warning, as shown Figure 3-85 on page 137. After you click Next, Tivoli Storage Productivity Center for Replication shows you the reason for the warning. (This warning does not prohibit you from adding this Copy Set.) 136 Tivoli Storage Productivity Center for Replication for Open Systems Figure 3-85 Matching results warning After clicking Next, Tivoli Storage Productivity Center for Replication shows the panel to select the Copy Sets. It also shows the reasons for the warning message, if there is one. Verify whether the selected Copy Set to be imported is selected and click Next, as shown in Figure 3-86. Figure 3-86 Selecting and Checking Copy Sets to be imported Chapter 3. General administration and high availability 137 Tivoli Storage Productivity Center for Replication displays the panel to confirm that you want to add the Copy Sets. Click Next to confirm that you want to add the Copy Sets. Click Finish to exit the wizard, as shown in Figure 3-87. Figure 3-87 Finishing importing Copy Sets Importing Copy Sets into an existing session From the Session window, select the session to which you want to add the Copy Sets, then select Add Copy Sets from the drop-down menu. Click Go, as shown in Figure 3-88. Figure 3-88 Adding Copy Sets to existing Session The steps to add the Copy Sets are the same as described in “Importing a Copy Set in a new Session” on page 132. When you are adding a Copy Sets to an existing Session with Copy Sets already active with Status Normal and State Target Available, the Status changes to Warning, as shown in Figure 3-89 on page 139. 138 Tivoli Storage Productivity Center for Replication for Open Systems Figure 3-89 Warning when Copy Sets are added to an existing active Session Tivoli Storage Productivity Center for Replication automatically starts the copying process. The session changes its status to Normal when the new Copy Sets finishes its initial copy process and enters Prepared state in the MM configuration, as shown in Figure 3-90. Figure 3-90 Session back to normal after adding Copy Sets 3.10.3 Working with CSV files under Microsoft Excel To simplify creating and implementing sessions, you can create a session with small Copy Sets session and export this session to be used in the future under Microsoft Excel. To open and edit a Copy Sets Session that was saved in CSV format, you start Microsoft Excel and open this file in the directory where you saved the file during the Export Copy Sets process. The Copy Sets Session file name for the FC session that was exported in Figure 3-76 on page 131 has the name FCDB2session2013-08-13-01-56-27.csv. Tivoli Storage Productivity Center for Replication creates the exported session with the name of the session that is appended with date and time stamp. This file name is the file name that is used when you are importing a Copy Sets Session file. As shown in Figure 3-91 on page 140, you can open and edit the spreadsheet to add volumes that are related to the session that you are working with and import the session back to your Tivoli Storage Productivity Center for Replication session, as described in 3.10.2, “Importing CSV files” on page 132. Chapter 3. General administration and high availability 139 Figure 3-91 FC exported session Figure 3-91 shows you an exported FC session, which includes the following information: FCDB2session is the exported session name. FlashCopy is the session type. H1 and T1 are labels that describe the Copy Set roles of the storage systems and volumes that belong to the exported FlashCopy session. Under these labels are the storage systems and volumes. 3.11 Backing up and restoring a repository The Tivoli Storage Productivity Center for Replication repository contains all product data, including data about storage systems, sessions, copy sets, paths, user administration, and management servers. You can back up this data and use the backup file to recover from a disaster or restore a previous configuration. As described in 3.10.1, “Exporting CSV files” on page 129, copy sets also can be backed up and recovered by using CSV files, but this does not cover other Tivoli Storage Productivity Center for Replication repository data. It is recommended that you back up Tivoli Storage Productivity Center for Replication regularly, especially in the following situations: After the Tivoli Storage Productivity Center for Replication database data is changed, such as adding or deleting a storage system, changing properties, and changing user privileges. After an Tivoli Storage Productivity Center for Replication session changes direction. For example, if an MM session was copying data from H1 to H2 when the backup was taken, and later, the session was started in the H2 to H1 direction. The session must be in the Prepared state before you create the backup. After a site switch was declared and the Enable Copy To Site command was issued. After you create a backup, consider deleting the previous backup to prevent Tivoli Storage Productivity Center for Replication from starting the copy in the wrong direction. 140 Tivoli Storage Productivity Center for Replication for Open Systems Note: You must have Administrator privileges to back up and restore the Tivoli Storage Productivity Center for Replication repository. Also, ensure that all Tivoli Storage Productivity Center for Replication sessions are in the Defined, Prepared, or Target Available state before the backup is created. Backing up Tivoli Storage Productivity Center for Replication repository To back up the Tivoli Storage Productivity Center for Replication repository, you run the mkbackup command from the Tivoli Storage Productivity Center for Replication CLI. For more information about how to start the CLI, see 3.1.2, “Accessing Tivoli Storage Productivity Center for Replication CLI” on page 65. Example 3-26 shows you how to start a backup of Tivoli Storage Productivity Center for Replication repository. Example 3-26 Backup of Tivoli Storage Productivity Center for Replication repository C:\Program Files\IBM\TPC\cli>csmcli Tivoli Storage Productivity Center for Replication Command Line Interface (CLI) Copyright 2007, 2012 IBM Corporation Version: 5.2.0 Build: 20130719-0641 Server: SSCTCP42-T.windows.ssclab-lj-si.net Port: 9560 Authentication file: C:\Users\tpcadmin\tpcr-cli\tpcrcli-auth.properties csmcli> mkbackup IWNR1905I [Aug 14, 2013 2:18:30 AM] Backup of internal data store completed successfully. The following file was created: C:\Program Files\IBM\TPC\wlp\usr\servers\replicationServer\database\backup\tpcrBackup_2013081 4_021829944.zip csmcli> The backup is created in a new file when you create a backup. It is your responsibility to delete backup versions that are no longer needed. The backup file is named yyyyMMdd_HHmmssSSS.zip, where: yyyy is the year MM is the month dd is the day HH is the hour mm is the minute ss is the seconds SSS is the milliseconds when the backup command was run By default, the backup file is stored in the following location: TPC_Install\ProgramFiles\IBM\TPC\wlp\usr\servers\replicationServer\database\backup You can change the default location by editing the db.backup.location property in the rmserver.properties file. The rmserver.properties file is in the following location: TPC_Install\Program Files\IBM\TPC\wlp\usr\servers\replicationServer\properties Chapter 3. General administration and high availability 141 Example 3-27 shows you how to change rmserver.properties file. Example 3-27 Location of Tivoli Storage Productivity Center for Replication repository backup # Property db.backup.location: [ backup directory ] # This property controls where the internal data store will be backed up # when using the mkbackup command. The default in the code is database/backup # and relative to the runtime directory. Only change this if you want to # direct the backup files to be written to a different location. NOTE: This # property is not required to be set in this file. db.backup.location=database/backup Restoring Tivoli Storage Productivity Center for Replication repository Restoring of the Tivoli Storage Productivity Center for Replication repository from a backup file takes the Tivoli Storage Productivity Center for Replication back to the point when the backup was made. Relationships on the storage systems that were created by Tivoli Storage Productivity Center for Replication after the backup was made no longer are managed by Tivoli Storage Productivity Center for Replication until you add the copy set to the session and Tivoli Storage Productivity Center for Replication assimilates the relationship into the session. Copy sets that were deleted after the backup are restored and a subsequent Start command to the session creates relationships. Therefore, you must remove the deprecated copy sets before the Start command is run. Note: After a GM session is restored, you must stop the GM master and subordinates before the GM session is restarted. Also, restoring the database does not require Administrator privileges. However, you must access the files on the Tivoli Storage Productivity Center for Replication server where you backed up the Tivoli Storage Productivity Center for Replication. Complete the following steps to restore the Tivoli Storage Productivity Center for Replication repository from a backup file: 1. Stop Tivoli Storage Productivity Center for Replication on the active management server by running the stopTPCReplication.bat command, as described in “Starting and stopping Tivoli Storage Productivity Center for Replication” on page 127 and shown in Example 3-28. Example 3-28 Stopping Tivoli Storage Productivity Center for Replication C:\Program Files\IBM\TPC\scripts>stoptpcreplication Server replicationServer stopped. No Instance(s) Available. C:\Program Files\IBM\TPC\scripts> 2. Delete the csmdb directory and all of its contents, as shown in Figure 3-92 on page 143. The csmdb directory is in TPC_Install\IBM\TPC\wlp\usr\servers\replicationServer\database. 142 Tivoli Storage Productivity Center for Replication for Open Systems Figure 3-92 Deleting csmdb 3. Extract the backup file into the TPC_Install\IBM\TPC\wlp\usr\servers\replicationServer\database directory, as shown in Figure 3-93. Figure 3-93 Extracting backup file Chapter 3. General administration and high availability 143 4. Restart IBM Tivoli Storage Productivity Center for Replication on the active management server by running the startTPCReplication.bat command, as described in “Starting and stopping Tivoli Storage Productivity Center for Replication” on page 127 and shown in Example 3-29. Example 3-29 Start Tivoli Storage Productivity Center for Replication C:\Program Files\IBM\TPC\scripts>starttpcreplication C:\Program Files\IBM\TPC\scripts> 5. Resolve any changes that occurred since the backup was created. 6. Start the IBM Tivoli Storage Productivity Center for Replication sessions by using the appropriate start commands. The start commands reestablish the relationship between the volume pairs and synchronize data on those volumes. If you have a standby management server, reestablish that standby relationship to update the database on the standby server, as shown in Figure 3-94. Figure 3-94 Reconnecting Standby Tivoli Storage Productivity Center for Replication server 3.12 Tivoli Storage Productivity Center for Replication SNMP management Tivoli Storage Productivity Center for Replication servers can send Simple Network Management Protocol (SNMP) traps to registered SNMP managers when various events occur. In the following sections, the SNMP alerts and the basic SNMP setup are described. 3.12.1 SNMP Alerts SNMP alerts are sent during the following general events: Session state change Configuration change Suspending-event notification Communication failure Management Server state change In the following sections, trap descriptions for an event are described. 144 Tivoli Storage Productivity Center for Replication for Open Systems Session state change SNMP trap descriptions This section describes the SNMP traps that are sent during a session state change. A different trap is sent for each state change. Note: Traps for Session state change events are sent only by the Tivoli Productivity Center for Replication active server. A session state change SNMP trap is sent when the session changes to one of the following states: Defined Preparing Prepared Suspended Recovering Flashing Target Available Suspending (Metro Global Mirror only) SuspendedH2H3 (Metro Global Mirror only) SuspendedH1H3 In addition, session state change SNMP traps are sent when a recovery point objective (RPO) threshold (warning or severe threshold) is exceeded for a role pair that is in the session. Configuration change SNMP trap descriptions This section describes the SNMP traps that are sent when a configuration change occurs. Note: Traps for configuration change events are sent only by Tivoli Storage Productivity Center for Replication active server. Configuration change SNMP traps are sent after the following configurations changes are made: One or more copy sets are added or deleted from a session. PPRC path definitions are changed. Suspending-event notification SNMP trap descriptions These SNMP traps that are sent during a suspending-event notification. Suspending-event notification SNMP traps indicate that a session moved to a Severe status because of an unexpected error. Note: Traps for suspension events are sent only by the Tivoli Storage Productivity Center for Replication active server. Communication-failure SNMP trap descriptions This section describes the SNMP traps that are sent during a communication-failure. Note: Traps for communication failure events are sent by active and Stand-by Tivoli Storage Productivity Center for Replication servers. Chapter 3. General administration and high availability 145 Communication-failure SNMP traps are sent after the following events occur: A server times out when it attempts to communicate with a storage system. A server encounters errors when it attempts to communicate with a storage system. An active server terminates communication with a standby server because of communication errors. A standby encounters communication errors with an active server. Management Servers state-change SNMP trap descriptions This section describes the SNMP traps that are sent when the state of the management server changes. Note: Traps for communication failure events are sent by active and Stand-by Tivoli Storage Productivity Center for Replication servers. A management server state change SNMP trap is sent when the management server changes to one of the following states: Unknown Synchronization Pending Synchronized Disconnected Consistent Disconnected Tivoli Storage Productivity Center for Replication SNMP traps summary The Table 3-3 on page 147 summarize the Tivoli Storage Productivity Center for Replication SNMP traps that are reporting their respective Object ID for each type of event. 146 Tivoli Storage Productivity Center for Replication for Open Systems Table 3-3 Tivoli Storage Productivity Center for Replication traps description Event Object ID Trap description Session state change event 1.3.6.1.4.1.2.6.208.0.1 The state of session X changed to Defined. 1.3.6.1.4.1.2.6.208.0.2 The state of session X changed to Preparing. 1.3.6.1.4.1.2.6.208.0.3 The state of session X changed to Prepared. 1.3.6.1.4.1.2.6.208.0.4 The state of session X changed to Suspended. 1.3.6.1.4.1.2.6.208.0.5 The state of session X changed to Recovering. 1.3.6.1.4.1.2.6.208.0.6 The state of session X changed to Target Available. 1.3.6.1.4.1.2.6.208.0.19 The state of session X changed to Suspending. 1.3.6.1.4.1.2.6.208.0.20 The state of session X changed to SuspendedH2H3. 1.3.6.1.4.1.2.6.208.0.21 The state of session X changed to SuspendedH1H3. 1.3.6.1.4.1.2.6.208.0.22 The state of session X changed to Flashing. 1.3.6.1.4.1.2.6.208.0.23 The state of session X changed to Terminating. 1.3.6.1.4.1.2.6.208.0.26 The recovery point objective for the role pair of X in session Y passed the warning threshold of Z seconds. 1.3.6.1.4.1.2.6.208.0.27 The recovery point objective for the role pair of X in session Y passed the severe threshold of Z seconds 1.3.6.1.4.1.2.6.208.0.7 One or more copy sets were added or deleted from this session. Configuration change event An event is sent for each session at least every 15 minutes. 1.3.6.1.4.1.2.6.208.0.8 Peer-to-Peer Remote Copy (PPRC) path definitions were changed. An event is sent for each path configuration change. Suspension event 1.3.6.1.4.1.2.6.208.0.9 The session is in a Severe state because of an unexpected error. Communication failure event 1.3.6.1.4.1.2.6.208.0.10 Server X timed out attempting to communicate with storage system Y. 1.3.6.1.4.1.2.6.208.0.11 Server X encountered errors while attempting to communicate with storage system Y. 1.3.6.1.4.1.2.6.208.0.12 Active server X terminated communication with standby server Y because of communication errors. 1.3.6.1.4.1.2.6.208.0.13 Standby server X encountered communication errors with active server Y. Chapter 3. General administration and high availability 147 Event Object ID Trap description Management Server state change event 1.3.6.1.4.1.2.6.208.0.14 The IBM Tivoli Storage Productivity Center for Replication Server Management Server connection X Y changed state to Unknown (previously Offline). 1.3.6.1.4.1.2.6.208.0.15 The IBM Tivoli Storage Productivity Center for Replication Server Management Server connection X Y changed state to Synchronized. 1.3.6.1.4.1.2.6.208.0.16 The IBM Tivoli Storage Productivity Center for Replication Server Management Server connection X Y changed state to Disconnected Consistent (previously Consistent Offline). 1.3.6.1.4.1.2.6.208.0.17 The IBM Tivoli Storage Productivity Center for Replication Server Management Server connection X Y changed state to Synchronization Pending. 1.3.6.1.4.1.2.6.208.0.18 The IBM Tivoli Storage Productivity Center for Replication Server Management Server connection X Y changed state to Disconnected. 3.12.2 SNMP setup Complete the following steps to set up the SNMP on Tivoli Storage Productivity Center for Replication: 1. Configure the SNMP community name. By default, the SNMP community name on Tivoli Storage Productivity Center for Replication has a value of public. To change the community name, modify or add the csm.server.snmp_community_string property in the rmserver.properties file, which is in the WAS_HOME/usr/servers/replicationServer/properties directory. 2. Add the SNMP managers. To add an SNMP manager, the mksnmp CLI command must be used, as shown in Example 3-30. Example 3-30 mksnmp CLI command to add an SNMP manager csmcli> mksnmp -server 192.0.0.4 -port 166 IWNR1701I [Aug 19, 2013 4:02:45 PM] Host 192.0.0.4:166 was added to the SNMP listeners list. To check the list of SNMP managers that are configured on Tivoli Storage Productivity Center for Replication, use the lssnmp CLI command, as shown in Example 3-31. Example 3-31 lssnmp CLI command to list the SNMP managers configured csmcli> lssnmp SNMP Manager Port ================= 192.0.0.4 166 192.0.0.3 162 192.0.0.2 162 192.0.0.1 162 148 Tivoli Storage Productivity Center for Replication for Open Systems 3. Configure the SNMP managers with the Tivoli Storage Productivity Center for Replication MIB files. Tivoli Storage Productivity Center for Replication uses management information base (MIB) files to provide a textual description of each SNMP alert that is sent by IBM Tivoli Storage Productivity Center for Replication. You must configure the SNMP manager to use the SYSAPPL-MIB.mib and ibm-TPC-Replication.mib files. These MIB files are in the installation DVD in the root/replication/CSM-Client/etc directory. Follow the directions that are provided by your SNMP manager application to configure it to use the MIB files. Tivoli Storage Productivity Center for Replication sends all SNMP alerts to each registered SNMP manager. SNMP alerts are not specific to any particular session, and all alerts for any session are sent. You cannot choose to send a subset of SNMP alerts; nevertheless, the information that is reported in Table 3-3 on page 147 can be used to configure the SNMP manager to discard the traps considered irrelevant. Note: By default, Tivoli Storage Productivity Center for Replication sends SNMP traps to the Tivoli Storage Productivity Center alerting feature (see 3.4, “Tivoli Storage Productivity Center for Replication interaction with Tivoli Storage Productivity Center” on page 88). You can configure the Tivoli Storage Productivity Center for Replication to change the destination Tivoli Storage Productivity Center where to send these traps by changing the csm.server.tpc_data_server.address property in the rmserver.properties file, which is in the WAS_HOME/usr/servers/replicationServer/properties directory. 3.13 Adding and connecting to storage systems You must add connections to storage systems before you can use Tivoli Storage Productivity Center for Replication to manage data replication. Complete the following steps to add a storage system by using the Tivoli Storage Productivity Center for Replication GUI: 1. In the navigation tree, select Storage Systems. The Storage Systems Welcome page opens, as shown in Figure 3-95 on page 150. This page lists all of the storage systems that were added to Tivoli Storage Productivity Center for Replication. Chapter 3. General administration and high availability 149 Figure 3-95 Storage Systems Welcome page 2. On the Storage Systems page, click Add Storage Connection, as shown in Figure 3-96. Figure 3-96 Adding a connection to a storage system 3. On the Type page of the Add Storage System wizard (see Figure 3-96), click the icon for the storage system that you want to add. The Connection page of the wizard opens. Note: On the Type page of the Add Storage System wizard, use the Storwize Family icon to add a Storwize V3500, Storwize V3700, or Storwize V7000 storage system. 150 Tivoli Storage Productivity Center for Replication for Open Systems 4. An example of a DS8000 connection) is shown on the Connection page, a shown in Figure 3-97 on page 152. Complete the connection information for the storage system. The following sections show the Connection page for DS8000, SAN Volume Controller, and XIV systems. The fields are the same on the Connection pages for SAN Volume Controller Storwize Family, and Storwize V7000 Unified storage systems. 3.13.1 DS8000 Connection page You must use a Hardware Management Console (HMC) connection to connect to a DS8000 storage system if the system is a DS8700 or later or is on an Internet Protocol version 6 (IPv6) network. If the storage system is earlier than DS8700 and is on an Internet Protocol version 4 (IPv4) network, you can connect to the system directly. Setting up an HMC connection Click HMC and complete the connection information for the primary and optional secondary HMC, as shown in Figure 3-97 on page 152. A secondary HMC is used for redundancy. Both HMCs must be configured identically and must have the same user name and password. Note: A dual HMC (primary and secondary HMC) while optional is highly recommended for redundancy purposes when Tivoli Storage Productivity Center for Replication is used. Chapter 3. General administration and high availability 151 Figure 3-97 Add a DS8000 connection by using an HMC connection Setting up a Direct connection Click Direct Connect and complete the connection information for cluster 0 and cluster 1, as shown in Figure 3-98 on page 153. The port, user name, and password for cluster 0 are automatically entered in the corresponding fields for cluster 1. You can edit this information, if required for your environment. 152 Tivoli Storage Productivity Center for Replication for Open Systems Figure 3-98 Add a DS8000 connection by using a direct connection Chapter 3. General administration and high availability 153 Complete the connection information as shown in Figure 3-99. Figure 3-99 Add a SAN Volume Controller connection 154 Tivoli Storage Productivity Center for Replication for Open Systems 3.13.2 XIV System Storage Connection window Complete the connection information as shown in Figure 3-100. Figure 3-100 Add an XIV system connection Tip: When you are entering the connection information as shown in Figure 3-100, you must enter the IP information for only one of the nodes. Tivoli Storage Productivity Center for Replication discovers the rest automatically. 3.14 Adding and connecting host systems Host systems are required to enable certain replication features for storage systems. There are two types of host systems to which you can connect: an AIX host system or a z/OS host system. A connection to an AIX host system is required if you want to enable the Open HyperSwap feature in Metro Mirror Failover/Failback sessions. Chapter 3. General administration and high availability 155 A connection to a z/OS host is required if you want to enable z/OS features such as HyperSwap and the management of freeze operations in Tivoli Storage Productivity Center for Replication sessions. If Tivoli Storage Productivity Center for Replication is installed on the z/OS host system, the host system connection is automatically displayed on the Host Systems page. This connection is referred to as the native z/OS connection. Note: If Tivoli Storage Productivity Center for Replication is installed on a z/OS system other than the host system, you must add the connection to the host system by using a host name or IP address for the system. Complete the following steps to add a host system by using the Tivoli Storage Productivity Center for Replication GUI: 1. In the navigation tree, select Host Systems. The Host Systems window opens. A list of all host systems that were added to Tivoli Storage Productivity Center for Replication appears. 2. On the Host Systems window, click Add Host Connection, as shown in Figure 3-101. The Add Host Connection window opens. Figure 3-101 Adding a connection to a host system 3. In the Add Host Connection window, select the host system type and complete the connection information for the host. The following sections provide connection information by host system type. 156 Tivoli Storage Productivity Center for Replication for Open Systems 3.14.1 AIX Host System Select AIX and complete the connection information for the host system, as shown in Figure 3-102. Figure 3-102 Add an AIX host connection 3.14.2 z/OS Host System Select z/OS and complete the connection information for the host system, as shown in Figure 3-103. Note: The port number, user name, and password must be the same as the values that are specified for management address space IOSHMCTL SOCKPORT parameter and Resource Access Control Facility (RACF®) settings on the host system. For more information about the host system configuration, see the IBM Tivoli Storage Productivity Center for Replication for System Z Installation and Configuration Guide, SC27-4091. Figure 3-103 Add a z/OS host connection Chapter 3. General administration and high availability 157 158 Tivoli Storage Productivity Center for Replication for Open Systems 4 Chapter 4. Using Tivoli Storage Productivity Center for Replication with DS8000 In this chapter, we describe the latest functions for DS8000 that are supported up to Tivoli Storage Productivity Center for Replication v5.2 for open systems. We also show you how to set up replication sessions and how to manage sessions. Also provided are state transition diagrams for session types. The state transition diagrams describe each session and show the potential states and the next steps to perform. Finally, we describe some helpful use cases and provide recommendations for how to perform disaster recovery scenarios. We also provide troubleshooting guidance. This chapter includes the following topics: Capabilities overview New functions for DS8000 Managing DS8000 sessions Use cases Troubleshooting © Copyright IBM Corp. 2014. All rights reserved. 159 4.1 Capabilities overview DS8000 Copy Services is a collection of functions that provide disaster recovery, data migration, and data duplication solutions. There are two main types of Copy Services functions: Point-in-Time Copy that includes the FlashCopy capabilities, and Remote Mirror and Copy that includes the Metro Mirror, Global Copy, Global Mirror, and Metro/Global Mirror capabilities. The Point-in-Time Copy functions are used for data duplication, and the Remote Mirror and Copy functions are used for data migration, high availability, and disaster recovery. For more information about DS8000 Copy Services, see IBM System Storage DS8000 Copy Services for IBM System z, SG24-6787, and IBM System Storage DS8000 Copy Services for Open Systems, SG24-6788. The DS8000 copy services functions support open systems (Fixed Block) and System z count key data (CKD) volumes. Tivoli Storage Productivity Center for Replication provides management for the DS8000 copy services in various combinations. In the following sections, we provide an overview of the Tivoli Storage Productivity Center for Replication capabilities for DS8000 Copy Services. To describe the flow of the operations that Tivoli Storage Productivity Center for Replication supports for each session type, State Transition Diagrams are provided. These diagrams are not intended to be exhaustive of all the actions that Tivoli Storage Productivity Center for Replication can start in every specific condition (for example, the StartGC actions are not shown in any diagram), but they list the actions that are considered the most significant to describe the product capabilities. Table 4-1 shows a description of the notation that is used in the state transition diagrams. Table 4-1 State transition diagrams notation Notation Description Session status is in Defined state. Session status is in a Normal state. Session status is Severe. Session status is in a Warning state. Denotes a state transition following the Action 160 Tivoli Storage Productivity Center for Replication for Open Systems Notation Description Denotes a condition in which the host should work on the Location Site. Denotes a state transition following the action of Enabling the Copy to SiteX. 4.1.1 FlashCopy By using the DS8000 FlashCopy feature, you can create point-in-time copies of logical volumes that make source and target copies immediately available to the users. When a FlashCopy operation is started, it takes only a few seconds to complete the process of establishing the FlashCopy pair and creating the necessary control bitmaps. Thereafter, you have access to a Point-in-Time Copy of the source volume. When the pair is established, you can read and write to the source and target volumes. In a FlashCopy relationship, the source and target volumes must exist within the same storage system. For this reason, FlashCopy is considered to be a single-site replication capability. The following variations of FlashCopy are available: Standard FlashCopy: Uses a fully provisioned volume as a target volume. FlashCopy Space Efficient (SE): Uses Track-Space-Efficient volumes as FlashCopy target volumes and must be in a background no-copy relationship. An SE volume has a virtual size that is equal to the source volume size. However, space is not allocated when the volume is created and the FlashCopy started. Space is allocated in a repository when a first update is made to a track on the source volumes, which causes the source track to be copied to the FlashCopy SE target volume to maintain the point-in-time copy. Writes to the SE target also use repository space. Extent-Space-Efficient (ESE) volume FlashCopy is supported starting with the DS8000 microcode version 6.2. With this kind of FlashCopy, space is not allocated when the thin provisioned volume is created. Extents are allocated from an extent pool when the first update is made to an extent on the thin-provisioned volume. Thin provisioning does not use tracks from a repository; instead, they use tracks from the extent pool. Note: Tivoli Storage Productivity Center for Replication support for ESE volumes in all remote copy relationship is available with version 5.1 or higher. Tivoli Storage Productivity Center for Replication manages all the variations of DS8000 FlashCopy through the Point in Time session types that currently includes only the FlashCopy session. The FlashCopy session is shown in Figure 4-1 on page 162. Chapter 4. Using Tivoli Storage Productivity Center for Replication with DS8000 161 Figure 4-1 FlashCopy session With this type of session, Tivoli Storage Productivity Center for Replication users can start a FlashCopy for all the volumes in the session. Figure 4-2 shows the state changes for a FlashCopy session. Figure 4-2 Change state diagram for a FlashCopy session 4.1.2 Metro Mirror DS8000 Metro Mirror, which is also known as synchronous Peer-to-Peer Remote Copy (PPRC) is a two-site, synchronous remote copy technology. It provides real-time mirroring of logical volumes between two DS8000s that can be up to 300 km from each other. As a synchronous copy solution, write operations are completed on both copies (primary and secondary site) before they are considered to be complete. The Metro Mirror is the main building block of the high-availability solutions and is based on the DS8000 HyperSwap capabilities. When a Metro Mirror operation is started, a mirroring relationship is established between the source and the target volume and a control bitmap of the out-of-sync tracks is created. Then, a full asynchronous copy process starts. After the initial copy is completed, the relationship goes to Full Duplex status and the mirroring process become synchronous. Tivoli Storage Productivity Center for Replication manages all of the variations of DS8000 Metro Mirror through the Synchronous session types that include three Metro Mirror sessions. 162 Tivoli Storage Productivity Center for Replication for Open Systems Metro Mirror Single Direction With the Metro Mirror Single Direction session type, Metro Mirror replication is available only from the primary site and it is not allowed any action that inverts the replication direction. With this type of session, Tivoli Storage Productivity Center for Replication allows user to perform the following tasks: Start the Metro Mirror. Pause and resume the Metro Mirror. Recover the Metro Mirror secondary site volumes, which makes them available for the use at the remote site. Restart the Metro Mirror following a recovery. This is accomplished by performing an incremental copy. The Metro Mirror Single Direction session is shown in Figure 4-3. Figure 4-3 Metro Mirror Single Direction session The state changes for a Metro Mirror Single Direction session are shown in Figure 4-4. Figure 4-4 State changes for a Metro Mirror Single Direction session Metro Mirror Failover/Failback The Metro Mirror Failover/Failback session type enables the direction of the data replication to switch. With this session type, it is possible to use the secondary site as the production site and then copy changes that are made at the secondary site back to the primary site. By using this type of Tivoli Storage Productivity Center for Replication session, uses can perform the following tasks: Start the Metro Mirror. Pause and resume the Metro Mirror. Chapter 4. Using Tivoli Storage Productivity Center for Replication with DS8000 163 Recover the Metro Mirror secondary volumes and make them available for use at the secondary site. Restart the Metro Mirror following a recovery. This is accomplished by performing an incremental resynchronization. Perform a switch site role, which makes the secondary site source for the replication. Restart the Metro Mirror following a switch site role, which copies the changes that are made at the secondary site back to the primary. This is accomplished performing an incremental resynchronization. Resume the original direction of the Metro Mirror after switching back to the original site roles. This is accomplished by performing an incremental resynchronization. Open HyperSwap: With version 4.2 or higher, Tivoli Storage Productivity Center for Replication supports the Open HyperSwap function for Metro Mirror Failover/Failback session type. For more information about Open HyperSwap, see 2.1.6, “HyperSwap configuration for z/OS and Open systems” on page 45. The Metro Mirror Failover/Failback session is shown in Figure 4-5. Figure 4-5 Metro Mirror Failover/Failback session The state changes for a Metro Mirror Failover/Failback session are shown in Figure 4-6 on page 165. Table 4-1 on page 160 provides a description of the states. 164 Tivoli Storage Productivity Center for Replication for Open Systems Figure 4-6 Change state diagram for a Metro Mirror Failover/Failback session Metro Mirror Failover/Failback with Practice Metro Mirror Failover/Failback with Practice replication combines Metro Mirror Failover/Failback and FlashCopy capabilities to provide a point-in-time copy of the data on the secondary site. This session type provides volumes that can be used to practice for disaster recovery without losing your disaster recovery capability. By using this type of Tivoli Storage Productivity Center for Replication session, you can perform the following tasks: Start the Metro Mirror. Pause and resume the Metro Mirror. Create a consistent copy of Metro Mirror secondary site at the secondary site by using FlashCopy. This copy can be used as a practice copy for DR test. Recover the Metro Mirror secondary site volumes and make them available for use at the secondary site. This also creates a copy of Metro Mirror secondary site at the remote site by using FlashCopy. Restart the Metro Mirror following a recovery. This is accomplished by performing an incremental resynchronization. Perform a switch site role, which makes the secondary site the source for the replication. Chapter 4. Using Tivoli Storage Productivity Center for Replication with DS8000 165 Restart the Metro Mirror following a switch site role, which copies the changes that were made at the secondary site back to the primary. This is accomplished by performing an incremental copy. Resume the original direction of the Metro Mirror after switching back to the original site roles. This is accomplished by performing a full copy. Limitation: The use of Track Space Efficient volumes as a FlashCopy target for practice copy (H2 volumes) is not allowed in this session type. The Metro Mirror Failover/Failback with Practice session is shown in Figure 4-7. Figure 4-7 Metro Mirror Failover/Failback with Practice session The state changes for a Metro Mirror Failover/Failback with Practice session are shown in Figure 4-8 on page 167. 166 Tivoli Storage Productivity Center for Replication for Open Systems Figure 4-8 Change state diagram for a Metro Mirror Failover/Failback with Practice session 4.1.3 Global Mirror DS8000 Global Mirror, previously known as Asynchronous PPRC, is a two-site, long-distance, asynchronous, remote copy technology. This solution integrates the Global Copy and FlashCopy technologies. With Global Mirror, the data that the host writes at the primary (local) site is asynchronously mirrored to the storage unit at the secondary (remote) site. With special management steps and under control of the local master storage unit, a consistent copy of the data is automatically maintained and periodically updated by using FlashCopy on the storage unit at the remote site. Note: You need extra storage at the remote site for these FlashCopies. Because of its asynchronous mirroring characteristics, the Global Mirror supports unlimited distances between the local and remote site. It is typically used for disaster recovery (DR) solutions or for those applications that cannot be affected by the latency effects of synchronous replication. Tivoli Storage Productivity Center for Replication manages all of the variations of DS8000 Global Mirror through the Asynchronous session types that include four Global Mirror sessions. Chapter 4. Using Tivoli Storage Productivity Center for Replication with DS8000 167 Global Mirror Single Direction session With the Global Mirror Single Direction session type, Global Mirror replication is available only from the local site. Tivoli Storage Productivity Center for Replication does not allow any action that inverts the replication direction. By using this type of Tivoli Storage Productivity Center for Replication session, you can perform the following tasks: Start the Global Mirror. Pause and resume the Global Mirror. Recover Global Mirror secondary volumes, which makes them available for use at the remote site. Restart the Global Mirror following a recovery. This is accomplished by performing an incremental copy. Note: Track Space Efficient volumes can be used as Journal volumes (J2 volumes) for this session type. The Global Mirror Single Direction session is shown in Figure 4-9. Figure 4-9 Global Mirror Single Direction session The state transitions for a Global Mirror Single Direction session are shown in Figure 4-10. Figure 4-10 Change state diagram for a Global Mirror Single Direction session 168 Tivoli Storage Productivity Center for Replication for Open Systems Global Mirror Failover/Failback The Global Mirror Failover/Failback session type enables the direction of the data replication to be switched. With this session type, the remote site can be used as a production site and changes that are made at the remote site are copied back to the local site. By using this type of Tivoli Storage Productivity Center for Replication session, you can perform the following tasks: Start the Global Mirror. Pause and resume the Global Mirror. Recover the Global Mirror secondary volumes, which makes them available for use at the remote site. Restart the Global Mirror following a recovery. This is accomplished by performing an incremental resynchronization. Perform a switch site role, which makes the remote site the source for the replication. Restart the replication (only the Global Copy) following a switch site role, which copies the changes that were made at the remote site back to the local. This is accomplished by performing an incremental resynchronization. Resume the original direction of the Global Mirror after returning to the original site roles. This is accomplished by performing an incremental resynchronization. Note: Track Space Efficient volumes can be used as Journal volumes (J2 volumes) for this session type. The Global Mirror Failover/Failback session is shown in Figure 4-11. Figure 4-11 Global Mirror Failover/Failback session The state transitions for a Global Mirror Failover/Failback session are shown in Figure 4-12 on page 170. Chapter 4. Using Tivoli Storage Productivity Center for Replication with DS8000 169 Figure 4-12 Change state diagram for a Global Mirror Failover/Failback session Global Mirror Failover/Failback with Practice Global Mirror Failover/Failback with Practice replication combines Global Mirror Failover/Failback and FlashCopy capabilities to provide a point-in-time copy of the data on the remote site. This session type provides volumes that can be used to practice for disaster recovery without losing your disaster recovery capability. By using this type of Tivoli Storage Productivity Center for Replication session, you can perform the following tasks: Start the Global Mirror. Pause and resume the Global Mirror. Create a consistent copy of Global Mirror secondary site at the remote site by using FlashCopy. This copy can be used as practice copy for a DR test. Recover the Global Mirror secondary site volume, which makes them available for use in the remote site. This also creates a copy of Global Mirror secondary site in the remote site by using the FlashCopy. Restart the Global Mirror following a recovery. This is accomplished by performing an incremental resynchronization. Perform a switch site role, which makes the remote site the source for the replication. 170 Tivoli Storage Productivity Center for Replication for Open Systems Restart the replication (only the Global Copy) following a switch site role, which copies the changes that were made at the remote site back to the local. This is accomplished by performing an incremental copy. Resume the original direction of the Global Mirror after returning to the original site roles. This is accomplished by performing a full copy. Limitation: Track Space Efficient (TSE) volumes can be used only for Journal volumes (J2 volumes) for this session type. TSE volumes cannot be used as FlashCopy targets for the practice copy (H2 volumes) in Tivoli Storage Productivity Center for Replication. The Global Mirror Failover/Failback with Practice session is shown in Figure 4-13. Figure 4-13 Global Mirror Failover/Failback with Practice session Figure 4-14 on page 172 shows the state transitions for a Global Mirror Failover/Failback with Practice session. Table 4-1 on page 160 provides a description of the states. Chapter 4. Using Tivoli Storage Productivity Center for Replication with DS8000 171 Figure 4-14 Change state diagram for a Global Mirror Failover/Failback with Practice session Global Mirror Either Direction with Two-Site Practice By using Global Mirror Either Direction with Two-Site Practice replication, you can run Global Mirror replication from the local or remote site. This session type provides volumes on the local and remote site that you can use to practice for disaster recovery without losing your disaster recovery capability. This type of Tivoli Storage Productivity Center for Replication session allows a user to perform the following tasks: Start the Global Mirror. Pause and resume the Global Mirror. Create a consistent copy of Global Mirror secondary site at the remote site by using the FlashCopy. This copy can be used as a practice copy for disaster recovery test. Recover the Global Mirror secondary site volumes, which makes them available for use in the remote site. This also creates a copy of Global Mirror secondary site in the remote site by using the FlashCopy. Restart the Global Mirror following a recovery. This is done by performing an incremental resynchronization. Perform a switch site role, which makes the remote site the source for the replication. 172 Tivoli Storage Productivity Center for Replication for Open Systems Restart the Global Mirror following a switch site role, which copies the changes that were made at the remote site back to the local. This is accomplished by performing a full copy. A full disaster recovery capability is now restored between the original remote and local site. Resume the original direction of the Global Mirror after returning to the original site roles. This is accomplished performing a full copy. Limitation: TSE volumes can be used only for Journal volumes (J2 and J1 volumes) for this session type. TSE volumes cannot be used as FlashCopy targets for the practice copy (H2 and H1 volumes) in Tivoli Storage Productivity Center for Replication. The Global Mirror Either Direction with Two-Site Practice session is shown in Figure 4-15. Figure 4-15 Global Mirror Either Direction with Two Site Practice The state transitions for a Global Mirror Either Direction with Two-Site Practice session is shown in Figure 4-16 on page 174. Chapter 4. Using Tivoli Storage Productivity Center for Replication with DS8000 173 Figure 4-16 Change state diagram for a Global Mirror Either Direction with Two-Site Practice session 4.1.4 Metro Global Mirror The Metro Global Mirror function enables a three-site, high-availability disaster recovery solution. It combines the capabilities of Metro Mirror and Global Mirror functions for greater protection against planned and unplanned outages. Metro Global Mirror uses synchronous replication to mirror data between a local site and an intermediate site, and asynchronous replication to mirror data from an intermediate site to a remote site. In this configuration, a Metro Mirror pair is established between two nearby sites (local and intermediate) to protect from local site disasters. The Global Mirror volumes can be thousands of miles away and continue to be updated if the original local site suffered a disaster and I/O must be failed over to the intermediate site. Metro Global Mirror is fully supported only on the DS8000, while the ESS800 is supported only when it is acting as primary (or active) site of the Metro Mirror. Tivoli Storage Productivity Center for Replication manages all of the variations of DS8000 Metro Global Mirror through the Three Sites session types that include two Metro/Global Mirror sessions. 174 Tivoli Storage Productivity Center for Replication for Open Systems Metro Global Mirror combines Metro Mirror synchronous copy and Global Mirror asynchronous copy into a single session, where the Metro Mirror target is the Global Mirror source. By using Metro Global Mirror replication, you can switch the direction of the data flow so that you can use your intermediate or remote site as your production site. By using this type of Tivoli Storage Productivity Center for Replication session, a user can perform the following tasks: Start the Metro Global Mirror. Pause and resume both Metro Mirror and Global Mirror leg of Metro Global Mirror. Start the Global Mirror directly from local site to remote site. This uses the Global Mirror Incremental Resync feature. Recover the Metro Mirror secondary site volumes, which makes them available for use in the intermediate site. Recover the Global Mirror secondary site volumes, which makes them available for the use in the remote site. Restart the Metro Global Mirror following a recovery of Metro Mirror or Global Mirror secondary site. Perform a switch site role, which makes the intermediate or the remote site source for the primary replication. Start a Metro Global Mirror that has the intermediate site volumes as the primary site for the Metro Global Mirror. This is the typical HyperSwap scenario. Start a cascading Global Copy that has the remote site volumes as the primary site for the replication. This is a typical Go-Home scenario. Start a Metro Mirror that has the intermediate site volumes as the primary site for the Metro Mirror. This is the typical HyperSwap scenario when the remote site is not available. Resume the original direction of the Metro Global Mirror after returning to the original site roles. Note: TSE volumes can be used as Journal volumes (J3 volumes) for this session type. The Metro Global Mirror session is shown in Figure 4-17. Figure 4-17 Metro Global Mirror session The state transitions for a Metro Global Mirror session that has the host running on Local site is shown in Figure 4-18. For a description of the states, see Table 4-1 on page 160. Chapter 4. Using Tivoli Storage Productivity Center for Replication with DS8000 175 Figure 4-18 Change state diagram for a Metro Global Mirror session while the host is running on Local Site 176 Tivoli Storage Productivity Center for Replication for Open Systems Figure 4-19 shows the state transitions for a Metro Global Mirror session when the host runs on Intermediate site. Figure 4-19 Change state diagram for a Metro Global Mirror session while the host is running on Intermediate Site Chapter 4. Using Tivoli Storage Productivity Center for Replication with DS8000 177 Finally, Figure 4-20 shows the state transition for a Metro Global Mirror session when the host is supposed to run on Remote site. Figure 4-20 Metro Global Mirror session while the host is running on Remote Site Metro Global Mirror with Practice The Metro Global Mirror with Practice replication combines Metro Mirror, Global Mirror, and FlashCopy capabilities to provide a point-in-time copy of the data on the remote site. This session type provides volumes that you can use to practice for disaster recovery without losing your disaster recovery capability. By using this type of Tivoli Storage Productivity Center for Replication session, a user can perform the following tasks: Start the Metro Global Mirror. Pause and resume the Metro Mirror and Global Mirror leg of Metro Global Mirror. Create a consistent copy of Global Mirror secondary site at the remote site by using the FlashCopy. This copy can be used as practice copy for disaster recovery testing. Start the Global Mirror directly from local site to remote site. This uses the Global Mirror Incremental Resync feature. Recover the Metro Mirror secondary site volumes, which makes them available for the use in the intermediate site. 178 Tivoli Storage Productivity Center for Replication for Open Systems Recover the Global Mirror secondary site volumes, which makes them available for use in the remote site. Restart the Metro Global Mirror following a recovery of Metro Mirror or Global Mirror secondary site. Perform a switch site role, making the intermediate or the remote site the source for the primary replication. Start a Metro Global Mirror that has the intermediate site volumes as the primary site for the Metro Global Mirror. This is the typical HyperSwap scenario. Start a cascade Global Copy that has the remote site volumes as the primary site for the replication. This is a typical Go-Home scenario. Resume the original direction of the Metro Global Mirror after returning to the original site roles. Limitation: TSE volumes can be used only for Journal volumes (J3 volumes) for this session type. Tivoli Storage Productivity Center for Replication does not allow the use of TSE volumes as FlashCopy target for the practice copy (H3 volumes). The Metro Global Mirror with Practice session is shown in Figure 4-21. Figure 4-21 Metro Global Mirror with Practice session Chapter 4. Using Tivoli Storage Productivity Center for Replication with DS8000 179 The state transitions for a Metro Global Mirror with Practice session that has the host running on Local site is shown in Figure 4-22. Figure 4-22 Metro Global Mirror with Practice session while the host is running on Local Site 180 Tivoli Storage Productivity Center for Replication for Open Systems The state transitions for a Metro Global Mirror with Practice session when the host is supposed to run on Intermediate site are shown in Figure 4-23. Figure 4-23 Metro Global Mirror with Practice session while the host is running on Intermediate Site Chapter 4. Using Tivoli Storage Productivity Center for Replication with DS8000 181 The state transition for a Metro Global Mirror with Practice session when the host is running on Remote site is shown in Figure 4-24. Figure 4-24 Metro Global Mirror with Practice session while the host is running on Remote Site 4.2 New functions for DS8000 In this section, we describe the new functions for DS8000 that were introduced in the latest versions of Tivoli Storage Productivity Center for Replication. 4.2.1 FlashCopy consistency groups for FlashCopy sessions Consistency Group FlashCopy is an option of the FlashCopy capability that allows the creation of a consistent point-in-time copy across multiple volumes, even across multiple storage systems. By temporarily freezing the I/O activity on the volumes, consistency group FlashCopy helps users to create a consistent point-in-time copy without quiescing the application. Consistency Group FlashCopy ensures that the order of dependent writes is always maintained and thus creates host-consistent copies, not application-consistent copies. The copies have power-fail or crash level consistency. 182 Tivoli Storage Productivity Center for Replication for Open Systems To recover an application from Consistency Group FlashCopy target volumes, you must perform the same recovery as is done after a system crash or power outage. Starting with version 5.1.1.0 of Tivoli Storage Productivity Center for Replication, the consistency group option is transparently implemented in all the FlashCopy session. Figure 4-25 shows the Tivoli Storage Productivity Center for Replication console window in which messages are reported that are related to a FlashCopy session. As highlighted, a message of releasing the I/O is reported, which states that a freeze/unfreeze operation was performed against the volumes within the session. Figure 4-25 FlashCopy session console messages There is no means of disabling the consistency group option for the FlashCopy sessions. Note: The consistency group option applies only to the FlashCopy type session. All the other sessions that use FlashCopy to create practice copy do not use this option. 4.2.2 Global Mirror pause with consistency The Global Mirror pause with consistency is a capability that can be requested by submitting a SCORE/RPQ to IBM for the microcode level 6.3.1 for DS8700 and DS8800, and level 7.0.5 for DS8870. By using this capability, the Global Mirror can be paused, which leaves the Global Mirror secondary site volumes in a consistent state. Specifying this new option in the Global Mirror pause command, the Global Mirror first completes the ongoing consistency group. After it is hardened on the journal volumes, all the Global Copy pairs are suspended, which does not allow any further update from the primary storage systems. The Global Mirror pausing consistently allows several Tivoli Storage Productivity Center for Replication sessions to use the function and speed up the time it takes to perform some operations. This Global Mirror pausing option spares any further action to make the Global Mirror secondary site volumes consistent. The standard recovery process, which involves the consistency group checking and Fast Reverse Restore FlashCopy, is still needed for all the planned and unplanned Global Mirror scenarios in which the Global Mirror was not paused with the proper “with consistency” option. Chapter 4. Using Tivoli Storage Productivity Center for Replication with DS8000 183 Tivoli Storage Productivity Center for Replication uses the Global Mirror pause command whenever a Suspend of a Global Mirror (or Global Mirror leg in the case of Metro Global Mirror session) is started. Starting with Tivoli Storage Productivity Center for Replication version 5.2, the Global Mirror pause with consistency option is transparently used for those storage systems that fulfill the microcode requirements. Figure 4-26 and Figure 4-27 show the report of the session details of a Global Mirror FO/FB session where a suspend command was issued and the Pause with consistency option was used by Tivoli Storage Productivity Center for Replication. Figure 4-26 Session Details window after a Suspend command The Role Pairs Info tab (see Figure 4-26) shows that H1 - H2 Global Copy pairs are already recoverable with a time stamp that is the same of the consistency group that was hardened on the journal. Figure 4-27 Global Mirror Info tab after a Suspend command In the Global Mirror Info tab (see Figure 4-27), a Paused with secondary consistency state is reported. 184 Tivoli Storage Productivity Center for Replication for Open Systems Note: There is no means of disabling the Pause with consistency option for the Tivoli Storage Productivity Center for Replication sessions. The Tivoli Storage Productivity Center for Replication always uses this option following a Global Mirror suspend command. 4.2.3 Easy Tier Heat Map Transfer The IBM System Storage DS8000 Easy Tier heat map transfer function transfers heat map information from a source storage system to one or more target storage systems. Each target storage system then generates volume migration plans that are based on the heat map data and the physical configuration of the storage system. This process ensures that the performance characteristics of the target storage systems are consistently updated to reflect the performance characteristics of the source storage system. The Easy Tier heat map transfer function is available for System Storage DS8000 Release 7.1 and later. IBM Tivoli Storage Productivity Center for Replication supports the DS8000 Easy Tier heat map transfer function with version 5.1.1.1 or higher. The storage systems must meet the following requirements: The source and target storage systems must be connected to Tivoli Storage Productivity Center for Replication by using a Hardware Management Console (HMC) connection. The Easy Tier heat map transfer function must be enabled on the source and target storage systems. To support the Easy Tier heat map transfer function, another software component is installed simultaneously to Tivoli Storage Productivity Center for Replication. This component, which is called Heat Map Transfer Utility (HMTU), operates as a daemon that is running on the Tivoli Storage Productivity Center for Replication server and performs the following actions: Loads storage system configuration information Pulls heat maps from the source storage system Applies source heat maps on the target storage system Records the heat maps transfer results All of the Easy Tier heat map transfer-related tasks are performed by the HMTU. By using its web-based GUI, Tivoli Storage Productivity Center for Replication offers an effective user interface to configure the HTMU. For more information about Easy Tier heat map transfer, see IBM System Storage DS8000 Easy Tier Heat Map Transfer, REDP-5015. In the following sections, the HMTU main configuration steps through the Tivoli Storage Productivity Center for Replication web-based GUI are described. Adding a storage system to HMTU Before a DS8000 storage system is added to HMTU, you must verify whether the Heat Map Transfer function is enabled on the box. For this purpose, the showsi DSCLI command can be used, as shown in Example 4-1 on page 186. Chapter 4. Using Tivoli Storage Productivity Center for Replication with DS8000 185 Example 4-1 Showsi command to verify the Easy Tier settings dscli> showsi IBM.2107-75XC891 Name desc ID IBM.2107-75XC891 Storage Unit IBM.2107-75XC890 Model 961 WWNN 5005076303FFD414 Signature 6641-eccc-7ca9-7c1a State Online ESSNet Enabled Volume Group V0 os400Serial 414 NVS Memory 2.0 GB Cache Memory 48.7 GB Processor Memory 62.2 GB MTS IBM.2421-75XC890 numegsupported 1 ETAutoMode all ETMonitor all IOPMmode Managed ETCCMode Disabled ETHMTMode Enabled The ETHMTMode setting reports the status of the Heat Map Transfer function. The scope of Easy Tier Heat Map Transfer is determined by the following Easy Tier automatic mode settings: With ETAutoMode set to tiered and ETMonitor set to automode, Heat Map Transfer and data placement occurs for logical volumes in multi-tiered pools only. With ETAutoMode set to all and ETMonitor set to all, Heat Map Transfer and data placement occurs for logical volumes in all pools. To change the Easy Tier settings, including the Heat Map Transfer, you can use the chsi DSCLI command, as shown in Example 4-2. Example 4-2 Enabling Heat Map Transfer function dscli> chsi -ethmtmode enable IBM.2107-75XC891 CMUC00042I chsi: Storage image IBM.2107-75XC891 successfully modified. Tip: If you do not have Easy Tier activated and want to run an Easy Tier evaluation on the primary and secondary storage systems, you can set the Easy Tier control on the primary and secondary storage systems to monitor only (-etmonitor all). The heat map transfer utility then automatically transfers the heat map data and uses this data to generate an Easy Tier report, without changing the data layout on either of the storage systems. Log on to the Tivoli Storage Productivity Center for Replication GUI to start the DS8000 adding procedure. Complete the following steps: 1. From the Health Overview window, access the Storage Systems panel through one of the available links, as shown in Figure 4-28 on page 187. 186 Tivoli Storage Productivity Center for Replication for Open Systems Figure 4-28 Health Overview window 2. On the Storage Systems panel, click the Easy Tier Heat Map Transfer tab, then click Add Storage System, as shown in Figure 4-29. Figure 4-29 Adding storage system Chapter 4. Using Tivoli Storage Productivity Center for Replication with DS8000 187 3. Select the Storage Systems to be included on the HMTU, as shown in Figure 4-30. Click Add Storage Subsystems. Figure 4-30 Storage System selection Note: In the Add Storage System to Easy Heat Map Transfer panel, Tivoli Storage Productivity Center for Replication shows only the storage systems with the Heat Map Transfer function internally enabled. 4. After the storage systems are included in HMTU, all of the systems are presented with inactive connection status. Select which storage system must have the transfer enabled first and then click Enable Transfer, as shown in Figure 4-31. Figure 4-31 Enabling map transfer 5. Click Yes in the confirmation panel to complete the operation, as shown in Figure 4-32. Figure 4-32 Enable Transfer confirmation panel 188 Tivoli Storage Productivity Center for Replication for Open Systems Checking the transfer status To check the transfer status and validate when the latest transfer occurred, you can use two different processes: click Select Action and then select View Transfer Status, or click the paired storage systems, as shown in Figure 4-33. Figure 4-33 View Transfer status Statistics and some other information about the latest transfer are reported in the Transfer Results panel, as shown in Figure 4-34. Figure 4-34 Transfer results Removing a storage system from HMTU To remove a storage system from the HMTU configuration, complete the following steps: 1. From the Easy Tier Heat Map Transfer tab, select the storage system to be removed and then click Disable Transfer to stop transfer processes, as shown in Figure 4-35. Figure 4-35 Disabling Heat Map transfer Chapter 4. Using Tivoli Storage Productivity Center for Replication with DS8000 189 2. Click Yes in the confirmation panel, as shown in Figure 4-36. Figure 4-36 Disable transfer confirmation panel 3. Select the storage system to be removed and then click Remove Storage System from the Select Action drop-down menu, as shown in Figure 4-37. Figure 4-37 Removing Storage System 4. Click Yes in the confirmation panel to completely remove the storage system from the HMTU configuration, as shown in Figure 4-38. Figure 4-38 Remove Storage System confirmation panel Important: When you enable or disable the use of the Easy Tier heat map transfer function in Tivoli Storage Productivity Center for Replication, the function is not enabled or disabled on the storage systems that are connected to Tivoli Storage Productivity Center for Replication. The configuration options that you set for Easy Tier heat map transfer in Tivoli Storage Productivity Center for Replication are used only by Tivoli Storage Productivity Center for Replication. 190 Tivoli Storage Productivity Center for Replication for Open Systems 4.2.4 Global Mirror Info Tab for DS8000 sessions Tivoli Storage Productivity Center for Replication Version 4.2 introduced a specific informational tab in the Session Details panel (see Figure 4-39), which provides useful information and details about the Global Mirror status. The following Global Mirror information was made available: Data exposure information Current Global Mirror settings Statistics of successful and unsuccessful consistency groups Figure 4-39 Global Mirror Info tab in Session Details panel Chapter 4. Using Tivoli Storage Productivity Center for Replication with DS8000 191 Some of this information is available at a glance directly from the Role Pairs Info tab in the Session Detail panel, as shown in the Figure 4-40. Figure 4-40 Global Mirror session info at a glance Selecting the Global Mirror Info tab (see Figure 4-39 on page 191) shows more information. On the left side of the tab, the following information about the current Global Mirror status is reported, as shown in Figure 4-41 on page 193: 192 Global Mirror master logical subsystem (LSS) Master Consistency group time Master time during last query Data exposure time Session ID Master State Unsuccessful consistency groups (CGs) during last formation CG interval time Max Coordination time Max CG drain time List of subordinates (if any) Tivoli Storage Productivity Center for Replication for Open Systems Figure 4-41 Global Mirror status information An expandable section is reported whenever there is unsuccessful CG information that was encountered since the start of the session. In this case, the following information is shown for the last, previous, and first unsuccessful CG: Failing LSS Error reason Master state On the right side of the tab, the Data Exposure graph is shown, as shown in Figure 4-42 on page 194. The Data Exposure graph shows the instant Recovery Point Objective (RPO) trend for the last 24 hours or the last 15 minutes. You can set up a data exposure threshold, which highlights unusual spikes. Chapter 4. Using Tivoli Storage Productivity Center for Replication with DS8000 193 Figure 4-42 Data Exposure graph Moving the mouse over the bullets in the graph, a callout appears which shows that the data exposure exceeded the threshold, as shown in Figure 4-43. Figure 4-43 Data exposure exceeded 194 Tivoli Storage Productivity Center for Replication for Open Systems 4.2.5 Global Mirror Historical Data Starting with Tivoli Storage Productivity Center for Replication version 5.1, the Global Mirror historical data is available to be exported in comma-separated value (CSV) file format. Export can create the following types of CSV files: A file that contains data about the RPO A file that contains data about the logical subsystem (LSS) out-of-sync tracks The data in the CSV file can be used to analyze trends in your storage environment that affect your RPO. Note: There is a Global Mirror Reporting Tool that is not included with the product. However, it is available for use and includes a pre-setup spreadsheet for customers to import data into, and can be downloaded from this website: http://www-01.ibm.com/support/docview.wss?uid=swg21609629 Exporting the data To export the Global Mirror historical data, you can click Export Global Mirror Data on the Global Mirror tab (see Figure 4-42 on page 194) or click Export Global Mirror Data from the drop-down menu in the Session Detail panel, as shown in Figure 4-44. Figure 4-44 Export Global Mirror Data Chapter 4. Using Tivoli Storage Productivity Center for Replication with DS8000 195 The Export Historical Data for Global Mirror wizard is displayed, as shown in Figure 4-45. Figure 4-45 Export Historical Data wizard The following information is required to complete the export: The role pair for the data that you want to show in the CSV file. Multiple role pairs are available for Metro Global Mirror sessions and for Global Mirror Either Direction session. The type of data that you want to export to a CSV file. Depending on the data type that you select, the CSV file contains data about the RPO or data about LSS out-of-sync tracks. The date range for the data that you want to show in the export file. The date range maximum for RPO files is 31 days of data and the maximum for LSS out-of-sync track files is seven days of data. 196 Tivoli Storage Productivity Center for Replication for Open Systems Click Next. If the export was successful, a link to the CSV file is provided on the Results page, as shown in Figure 4-46. The CSV file now can be saved to your local system. Figure 4-46 Historical Global Mirror data export results panel Using the data Tivoli Storage Productivity Center for Replication provides the Global Mirror historical data in the CSV file format that can be imported in a spreadsheet. The layout of the two files is fixed and contains the fields that are shown in Table 4-2 on page 198 and Table 4-3 on page 199. Chapter 4. Using Tivoli Storage Productivity Center for Replication with DS8000 197 Table 4-2 RPO data file layout 198 Column Name Description A Query Time Query sample time as reported by the Tivoli Storage Productivity Center for Replication server. B Hardware Time Time that is reported internally by the Master system. Can be different from the Query Time because Master System time and Tivoli Storage Productivity Center for Replication server time might not be aligned. C Interval Sample interval in seconds. D Master Session Number Global Mirror session number. The format is 0xn where n is the session number. E Master Box Name Serial number of the Master system. The format that is used is 2107.XXXXX, where XXXXX is the storage image serial number. F Master LSS Global Mirror master Logical Subsystem. The format is 0xnn, where nn is the LSS number. G Master State Status of the Global Mirror Master. H Last Consistency Group Formation Time Last consistency group formation time as reported by the Master system. I Average RPO Calculated average RPO for the last sample in milliseconds. J RPO at Time of Last Query Instant RPO at the last query in milliseconds. This is the difference between the Hardware Time and the Last Consistency Group Formation Time. K Successful Consistency Groups in Interval Number of successful consistency groups that are formed in the last sample interval. L Number Failed Consistency Groups in Interval Number of unsuccessful consistency groups that are formed in the last sample interval. M Number Failed Consistency Groups Since Last Successful Number of unsuccessful consistency groups that are formed in a row. N Total LSSs Total number of LSSs that are defined to the Global Mirror session. O Total Out of Sync Tracks Total number of Out of Sync Tracks that are calculated at the query time. P Total Joined Total number of volumes that joined the Global Mirror session. Q Total Suspended Total number of volumes that were suspended in the Global Mirror session (joined or in join pending). R Most Recent Consistency Group Error Error that is reported for the last unsuccessful consistency group formation. S Most Recent Consistency Group Error State Global Mirror state at the time of the last unsuccessful consistency group formation. Tivoli Storage Productivity Center for Replication for Open Systems Table 4-3 LSS out-of-sync tracks file layout Column Name Description A Query Time Query sample time as reported by the Tivoli Storage Productivity Center for Replication server. B Hardware Time Time that is reported internally by the system (can be the Master or a subordinate system). Can be different from the Query Time because the hardware time and Tivoli Storage Productivity Center for Replication server time might not be aligned. C Interval Sample interval. D Session Number Global Mirror session number. The format is 0xn, where n is the session number. E Box Name Serial number of the system (can be the Master or a subordinate system). The format is 2107.XXXXX, where XXXXX is the storage image serial number. F LSS LSS queried. The format is 0xnn, where nn is the LSS number. G Out Of Sync Tracks Total number of the out-of-sync tracks for the queried LSS. A five-row header, which is common for both CSV files, is automatically created that reports general information about the file. A sample of this header for an RPO data file is reported in Figure 4-47. #Generated at:,5/15/2013 12:26 #Session Name:,MGM_ITSO #Role Pair:,H2-J3 #Start Date:,9-May-13 #End Date:,15-May-13 <statistics data here> Figure 4-47 RPO data file header The CSV file format is suitable to be processed by using a spreadsheet application. By using pivot tables or a similar feature, you can sort or aggregate the data to obtain more usable information that can be used for performance tuning or problem determination purposes. Also, by using the spreadsheet chart feature, you can create a graph for historical trend information, as shown in Figure 4-48 on page 200. You can also create a punctual interval analysis, as shown in Figure 4-49 on page 200. Chapter 4. Using Tivoli Storage Productivity Center for Replication with DS8000 199 Figure 4-48 Historical RPO chart Figure 4-49 Out of Sync Tracks versus LSS chart 200 Tivoli Storage Productivity Center for Replication for Open Systems 4.2.6 Managing z/OS HyperSwap from Tivoli Storage Productivity Center for Replication for Open Systems Tivoli Storage Productivity Center for Replication for Open Systems version 5.2 can manage z/OS HyperSwap enabled sessions through an IP connection to a z/OS server. For more information, see Chapter 7, “Managing z/OS HyperSwap from Tivoli Storage Productivity Center for Replication for Open Systems” on page 355. 4.3 Managing DS8000 sessions As described in 4.1, “Capabilities overview” on page 160, Tivoli Storage Productivity Center for Replication support many types of DS8000 replication topologies that combine various copy services features. In the following sections, we describe how to set up and manage replication sessions. We summarize the tunable parameters for every session that is supported and describe some scenarios that require a full copy of data. 4.3.1 DS8000 Path management Before we start to operate with a DS8000 session, we must properly define the replication connectivity schema to implement. This involves managing the logical paths. The logical paths define the relationship between a source LSS and a target LSS that is created over a physical path (IO port). Tivoli Storage Productivity Center for Replication includes the Path Manager feature to provide control of logical paths when relationships between source and target storage systems are established. Path Manager helps you control the port pairing that Tivoli Storage Productivity Center for Replication uses when the logical paths are established and ensure redundant port combinations. It also keeps that information persistent for use when the path is terminated because of a suspended operation. Tivoli Storage Productivity Center for Replication provides you the following options to create the logical paths and specify port pairing: Adding logical paths automatically, Tivoli Storage Productivity Center for Replication automatically picks the paths or uses paths that were established. Adding logical paths and creating port pairing by using a CSV file. Adding logical paths by using Tivoli Storage Productivity Center for Replication GUI. Adding logical paths automatically If you do not specify the port pairing, Tivoli Storage Productivity Center for Replication queries the storage systems to check whether there are established paths. By using the CSV file, you can ensure redundant port combinations and use only the specified ports. If at least one path is established, Tivoli Storage Productivity Center for Replication uses that path and it does not create more paths. Otherwise, if no path is established, Tivoli Storage Productivity Center for Replication queries the storage systems to pick the available ports (if any) to create a path. In this case, Tivoli Storage Productivity Center for Replication creates only one path per LSSs pair. Note: This option does not ensure that you have redundant logical paths. Chapter 4. Using Tivoli Storage Productivity Center for Replication with DS8000 201 Adding logical paths by using a CSV file You can add logical paths by creating a CSV file. The CSV file specifies storage systems pairings and associated port pairings that are used by Tivoli Storage Productivity Center for Replication to establish the logical paths. By using the CSV file, you can ensure redundant port combinations and use only the specified ports. Tivoli Storage Productivity Center for Replication uses the ports that are listed in the CSV file when you run the start command (that is, Start H1 H2) and attempts to establish the paths between any LSS on those two storage systems. To add logical paths by using a CSV file, complete the following steps: 1. Create a CSV file that is named portpairings.csv in the install_root/IBM/TPC/wlp/usr/servers/replicationServer/properties directory. Note: In the install_root/IBM/TPC/wlp/usr/servers/replicationServer/properties directory, you find the portpairings.csv.sample file, which you can use and rename to portpairings.csv An example of a CSV file is shown in Example 4-3. Example 4-3 Sample of portpairings.csv file #Primaries ---> Secondaries 2107.ALD71:2107.ANZ41,0x0002:0x0002,0x0006:0x0006,0x0132:0x0132,0x0136:0x0136 2107.ACD21:2107.ALZ61,0x0002:0x0002,0x0006:0x0006,0x0132:0x0132,0x0136:0x0136 #Secondaries ---> Tertiaries 2107.ANZ41:2107.YX531,0x0231:0x0003,0x0206:0x0233,0x0005:0x0001,0x0235:0x0101 2107.ALZ61:2107.AXG11,0x0102:0x0333,0x0206:0x0233,0x0035:0x0001,0x0305:0x0131 #Primaries ---> Tertiaries 2107.ALD71:2107.YX531,0x0231:0x0003,0x0131:0x0233,0x0232:0x0232,0x0236:0x0236 2107.ACD21:2107.AXG11,0x0331:0x0333,0x0031:0x0233,0x0232:0x0232,0x0236:0x0236 Each line in the file represents a storage system-to-storage system pairing. The first value represents the storage systems, which are delimited by a colon. The remaining values are the port pairs, which are delimited by a colon. All values are separated by a comma and commented lines must start with # character. The following roles must be followed when the CSV port pairings are used: – The entry for a storage system pair and the port pairs are bidirectional. This means that a line that has systemA:systemB is equivalent to a line that has systemB:systemA. Lines that are incorrectly formatted are discarded. For example, if a line contains ports without the 0x, or does not contain port pairs that are delimited by the : character, the entire line is discarded. – A line can be properly formatted but contain invalid ports for your storage system configuration. In this case, the ports are passed down to the storage system to be established and there is no validation that is done in Tivoli Storage Productivity Center for Replication. The valid ports might be established by the storage system, while the invalid ports can be rejected. – If a file contains duplicate lines for the same storage systems, the ports on the last line are used. Also, the entries are bidirectional. Thus, if you have systemA:systemB and then a line with systemB:systemA, the second line is the line that is used. 202 Tivoli Storage Productivity Center for Replication for Open Systems – Any line that starts with a # character is considered a comment and is discarded. The # must be at the start of the line. Placing it in other positions can cause the line to be invalid. – The portpairings.csv is not shared between two Tivoli Storage Productivity Center for Replication servers in a high-availability environment. Thus, different port pairings can be established from the standby server after a takeover. You must copy the portpairings.csv file to the standby server to ensure that the two files are equal. 2. To enable the changes in the file, you must perform a task that requires new paths to be established. For example, suspend a session to remove the logical paths and then issue the Start H1 H2 command to enable the paths to use the port pairings in the CSV file. Note: By enabling the CSV file port pairing, you cannot differentiate LSS logical paths definitions within a storage systems pairing. If you must use different port pairings among LSSs within the same storage systems pairing, you must not use the portpairings.csv file. Adding logical paths by using Tivoli Storage Productivity Center for Replication GUI You can add logical paths by using the Tivoli Storage Productivity Center for Replication GUI. In this section, we describe how to add the logical paths. Before you add the paths, you must ensure that you defined the appropriate storage systems on the Storage Systems panel. To add the logical paths, complete the following steps: 1. In the Tivoli Storage Productivity Center for Replication navigation tree, select ESS/DS Paths. The panel in which you manage the paths opens, as shown in Figure 4-50. Figure 4-50 Manage paths Chapter 4. Using Tivoli Storage Productivity Center for Replication with DS8000 203 2. Click Manage Paths. The Path Management wizard opens, as shown in Figure 4-51. From the drop-down menu in the wizard, select the source storage system, source logical storage system, target storage system, and target logical storage system. Click Next. Figure 4-51 Selecting Source and Target storage systems 3. From the drop-down menu in the wizard, select the source port and target port and click Add. You can add multiple paths between the logical storage subsystems, or one at a time. After you make your selections, click Next, as shown in Figure 4-52. Figure 4-52 Adding ports 204 Tivoli Storage Productivity Center for Replication for Open Systems 4. Confirm your selections and click Next, as shown in Figure 4-53. Figure 4-53 Confirm the paths 5. Verify the Results panel and click Finish to exit the wizard, as shown in Figure 4-54. Figure 4-54 Results panel Chapter 4. Using Tivoli Storage Productivity Center for Replication with DS8000 205 6. By clicking the Storage System, you see the path that were added, as shown in Figure 4-55. Figure 4-55 Managed paths Logical Paths requirements and limitations There are some considerations that are related to logical paths that we must remember when we are planning the replication configuration. Logical Paths requirements PPRC technology requires at least one logical path per LSS pair to establish a mirroring relationship. Tivoli Storage Productivity Center for Replication does not check the path’s availability before starting a mirroring relationship. If no paths are available between two DS8000s, this leads to an error at the first attempt to establish a pair relationship. Although the physical Fibre Channel link is bidirectional, the logical path definition is not. Therefore, to use the same port pair in both directions we must define a logical path in both storage systems (for example, one from box A to B and another from box B to A). If you are not using the CSV file to establish the paths (as described in section “Adding logical paths by using a CSV file” on page 202), the following recommendations are important: Establish all the paths in both directions to avoid bandwidth limitations in the failback operations. Provide connectivity and path definitions from the local to remote site and vice versa for the three site session types. This is because many operations in a Metro Global Mirror configuration require a full interconnection among the three sites. Logical Paths limitations The following limitations apply to logical paths: Maximum number of logical paths per LSS pair is 8. Maximum number of LSS pairs per source LSS is 4. Note: These limitations might change in future releases and are the supported limits at the time of this writing. 206 Tivoli Storage Productivity Center for Replication for Open Systems Give specific attention to the second limitation in the case of asymmetrical pairings of LSSs. For example, consider the configuration that is shown in Figure 4-56. Figure 4-56 Metro Global Mirror with asymmetric LSS pairing configuration In this configuration, LSS pairings are not symmetrical for the Global Mirror because volumes that belong to LSS 20 are replicated in LSS 30, 31, 32, and 33. During the normal Metro Global Mirror operations, this LSS pairing does not create problems. However, consider a scenario in which a Failover/Failback operation is required for volumes on the intermediate site (that is, Metro Mirror secondary volumes). This is a typical switch site scenario that can be managed through Tivoli Storage Productivity Center for Replication by following the transition diagram that is shown in Figure 4-57 on page 208. Chapter 4. Using Tivoli Storage Productivity Center for Replication with DS8000 207 Figure 4-57 State transition diagram In this example, when the Failback operation is performed, Tivoli Storage Productivity Center for Replication attempts to establish one path between LSS 20 in Site 2 and LSS 10 in Site 1. However, because there are four LSS pairs from LSS 20 still defined (even if they not used), it fails, as shown in Figure 4-58 on page 209. 208 Tivoli Storage Productivity Center for Replication for Open Systems Figure 4-58 Failed Failover operation 4.3.2 Setting up a session In this section, the setup process for a sample session is described. Consider that the process of defining a session is about the same for all the DS8000 session types. Only the number of volumes that define a copy sets and the session parameters (see 4.3.3, “Session tunable parameters” on page 230) are different among the session types. For this reason, the processes in this section can be used to define virtually any type of DS8000 session. Creating Metro Mirror Failover/Failback with Practice session Log on the Tivoli Storage Productivity Center for Replication GUI interface to start the session creating process. Complete the following steps: 1. From the Health Overview window, open the Session panel by using one of the available links, as shown in Figure 4-59 on page 210. Chapter 4. Using Tivoli Storage Productivity Center for Replication with DS8000 209 Figure 4-59 Health Overview panel with the Session links 2. In the Session panel, click Create Session, as shown in Figure 4-60. Figure 4-60 Session panel 3. The Create Session panel opens. From the Choose Hardware Type drop-down menu, select DS8000, DS6000, ESS800, as shown in Figure 4-61 on page 211. 210 Tivoli Storage Productivity Center for Replication for Open Systems Figure 4-61 Choose Hardware Type menu 4. From the Choose Session Type drop-down menu, select Metro Mirror Failover/Failback w/ Practice, as shown in Figure 4-62. Figure 4-62 Choose Session Type menu 5. Click Next to go to the Session Properties panel. The Properties panel requires that you specify at least a name for the session, which is about to be created (valid characters for the session name are: A-Z, a-z, 0-9, ',', '-', '.', ' ', '_'). An optional Description is recommended to understand the purpose of the session because the session name might not indicate the purpose of the session. Possible session-specific tunable parameters also must be set in this panel. Figure 4-63 on page 212 shows the setting for this sample. Chapter 4. Using Tivoli Storage Productivity Center for Replication with DS8000 211 Figure 4-63 Session Properties panel 6. Click Next to go to the Site Locations panel. Because the Metro Mirror Failover/Failback with Practice session type is a two-site replication topology, two location sites must be specified. From the drop-down menu, select the Site 1 location, as shown in Figure 4-64. Figure 4-64 Site Location Panels for Site 1 212 Tivoli Storage Productivity Center for Replication for Open Systems 7. Click Next to define the Site 2 location, as shown in Figure 4-65. Figure 4-65 Site Location Panels for Site 2 8. Click Next to see the results of the session creation, as shown in Figure 4-66. Figure 4-66 Create session Results panel 9. Click Finish to close the Create Session wizard or Launch Add Copy Sets Wizard to add copy sets in this session. Chapter 4. Using Tivoli Storage Productivity Center for Replication with DS8000 213 After the session is created, the Session panel shows the new session in Inactive status, as shown in Figure 4-67. Figure 4-67 Session panel showing the new session Complete the following steps to add the copy sets to the session: 1. To start the Add Copy Set wizard, use one of the following methods: – Click Launch Add Copy Sets Wizard in the Create session wizard, as shown in Figure 4-66 on page 213. – Select the radio button of the session name in the main Session panel and then click Add Copy Set from the drop-down menu. – Click the session name in the main Session panel, and then click Add Copy Set from the drop-down menu in the Session Detail panel. The Add Copy Set wizard opens, as shown in Figure 4-68. The Metro Mirror Failover/Failback with Practice session is a two-site replication topology with each copy sets formed by the following volumes: – H1 volume for the host volume in site 1. This is Metro Mirror primary volume. – H2 volume for the host volume in site 2. This is the practice FlashCopy target volume. – i2 volumes for the intermediate volume in site 2. This is Metro Mirror secondary volume. As shown in Figure 4-68 on page 215, you must specify the storage system (#1 in the figure), the Logical Subsystem (#2 in the figure), and Volume ID (#3 in the figure) for each volume within the copy set. This process always starts with the H1 volumes. 214 Tivoli Storage Productivity Center for Replication for Open Systems Figure 4-68 Host 1 volume selection After the volume selection (see Figure 4-68) is completed, the volume details are reported on the right side of the panel. In the select volume drop down-menu, you can select all of the volumes that belong to the LSS that was selected. You can define more copy sets at once. In this case, the selection of the copy set to be added definitively to the session can be refined later. Important: The intermix of volumes with different sizes or space allocation methods (standard or ESE) within the same copy set is not allowed. The characteristics of H1 volumes determine the characteristics of the remaining volumes in the copy sets. For example, if the H1 volume is a 10 GB Extent Space Efficient volume, all the other volumes within the copy sets must have the 10 GB size and ESE space allocation method. For more information about TSE volumes usage as FlashCopy targets, see 4.1, “Capabilities overview” on page 160. 2. Click Next to go the H2 volume selection panel, as shown in Figure 4-69 on page 216. The Host 2 volume selection drop-down menu shows only one volume candidate because it is the only one in the selected storage system and LSS that has the same characteristics of the H1 volume. Chapter 4. Using Tivoli Storage Productivity Center for Replication with DS8000 215 Figure 4-69 Host 2 volume selection 3. Click Next and complete the copy set definition by selecting the i2 volume, as shown in Figure 4-70. Figure 4-70 Intermediate 2 volume selection 4. When the volume selection for the copy set is completed, click Next to start the matching process. After the matching process is completed, the Select Copy Sets panel opens, as shown in Figure 4-71 on page 217. 216 Tivoli Storage Productivity Center for Replication for Open Systems Figure 4-71 Select Copy Set panel By clicking Add More, more copy sets can be added to the session by using the same process. When all of the copy sets are defined, you select the copy set to add to the session and click Next to continue. 5. The wizard prompts you to confirm your configuration, as shown in Figure 4-72. Click Next. Figure 4-72 Add copy sets confirmation panel Chapter 4. Using Tivoli Storage Productivity Center for Replication with DS8000 217 When the Copy Set is added successfully, click Finish, as shown in Figure 4-73. Figure 4-73 Add copy sets results panel If you have a large configuration to define to a session, this process can be laborious. In this case, the Add Copy Set wizard provides the CSV file import feature that simplifies the copy sets definition process. For more information, see “Importing CSV files” on page 132. Managing a session After we define a session and populate the session with Copy Sets, we can start managing the replication through Tivoli Storage Productivity Center for Replication. Again, the process of managing a session is about the same for all the DS8000 session types. So, the basic concepts we describe in this section apply to almost all of the session types. In this section, we describe how to use the Tivoli Storage Productivity Center for Replication GUI to manage the Metro Mirror Failover/Failback with Practice session that was previously defined in some actual situations. First, we describe a normal operation scenario in which the following actions are performed: 1. Start the Metro Mirror. 2. Run a FlashCopy to create practice volumes for Disaster Recovery testing. The flow of the operation is shown in Figure 4-74 on page 219. 218 Tivoli Storage Productivity Center for Replication for Open Systems Figure 4-74 State transition diagram for first scenario We then consider a scenario of planned outage of the primary site. In this case, the process can be used: 1. Suspend the Metro Mirror. 2. Recover the Metro Mirror secondary volumes. 3. Start the Metro Mirror from Site 2 site to Site 1. The flow of the operations for this second scenario is shown in Figure 4-75. Figure 4-75 State transition diagram for second scenario Starting the Metro Mirror Figure 4-76 on page 220 shows the ITSO-MM-FOFB-wP session as we defined it. We defined only one copy set in our example. Because this is Failover/Failback type of a session, it can be started in direction from Host 1 to Host 2 and in direction from Host 2 to Host 1. Initially, the session can be started only in direction from Host 1 to Host 2. To start it, from the drop-down menu, select Start H1 H2 and then click Go. Chapter 4. Using Tivoli Storage Productivity Center for Replication with DS8000 219 Figure 4-76 Start Metro Mirror The message that is shown in Figure 4-77 is a warning that you are about to start a Metro Mirror session. It starts copying the data from Host 1 to Intermediate 2 volumes that were defined by adding copy sets, which overwrite any data on Intermediate 2 volumes. At this stage, data on Host 2 volumes is not yet overwritten. Figure 4-77 Start H1 H2 confirmation panel Click Yes to continue. 220 Tivoli Storage Productivity Center for Replication for Open Systems In Figure 4-78, the session details are shown after the Metro Mirror is started. We can find the following information: 1. At the top of the panel is a message that confirms that start of Metro Mirror session is complete. 2. The status of the session is shown in the middle of the panel. The session is in Preparing state and Warning status because the copying is still in progress. 3. The Detailed Status field shows the current action Tivoli Storage Productivity Center for Replication is performing. 4. The progress bar shows the copy progress for the Metro Mirror (it shows 0% because the copy is started). Also, the Non-Participating Role Pairs are shown at the bottom of the panel. Non-Participating Role Pairs are role pairs that are not involved in any replication activity, but can become active during specific configurations of the session. Figure 4-78 Session Details panel Chapter 4. Using Tivoli Storage Productivity Center for Replication with DS8000 221 After the initial copy is completed, the session goes to Normal status and Prepared state, as shown in Figure 4-79. Figure 4-79 Session Details showing the session in Normal status The following actions are now available: Flash Start H1 H2 StartGC H1 H2 Stop Suspend Flashing the session Now that the volumes of the session are synchronized, we can start different actions against the Metro Mirror session. One of these actions is Flash. By using the Flash action, you can create a consistent copy of i2 volumes on H2 volumes and overwrite data on Host 2 volumes. From the Sessions Details panel, select Flash from the drop-down list and click Go, as shown in Figure 4-80 on page 223. 222 Tivoli Storage Productivity Center for Replication for Open Systems Figure 4-80 Session Details panel showing the Flash action A confirmation panel opens. Click Yes to continue. The Flash command is used to create a consistent point in time copy of H1 volumes to the H2 volumes for test purposes. This is achieved completing the following steps: 1. Run a Metro Mirror Freeze/Unfreeze command to bring the i2 volumes in consistent state. 2. Establish the FlashCopy to H2 volumes. 3. Restart the Metro Mirror. All of these actions are reported in the console log, as shows Figure 4-81. Figure 4-81 Console log The status of the Metro Mirror session briefly changed to Warning status while the resynchronization process was active. After the copy is completed, the session status is returned to Normal. In Figure 4-82 on page 224, you can see the session details after the Flash action was performed. Chapter 4. Using Tivoli Storage Productivity Center for Replication with DS8000 223 Figure 4-82 Session Details panel showing the Flash action results In the row that lists the H2-I2 pair (see Figure 4-82), you can see the time stamp when the point in time copy was created. This can be used as a reference. After the Flash action completes, you can start using the Host 2 volumes. The point in time copy is created with the background copy option and the progress bar for H2-I2 role pair shows the percentage of copied data. You can use Flash action any time in the life span of the session. Suspending the session After the volumes of the session are synchronized, we can start the Suspend action. From the Sessions Details panel, select Suspend from the drop-down menu and click Go, as shown in Figure 4-83 on page 225. 224 Tivoli Storage Productivity Center for Replication for Open Systems Figure 4-83 Session Details panel showing the Suspend action Confirm the action in the next panel to continue. The Suspend command is used to create a consistent copy of the secondary volumes. This is achieved issuing a Metro Mirror Freeze. The status of our Metro Mirror session, as shown in Figure 4-84, changed from Normal to Severe status, which indicates that data is no longer replicated between Host 1 and Host 2 volumes. The volumes in H1-I2 role pair are in recoverable (that is, consistent) status. Figure 4-84 Session Details panel showing the Suspend action results Chapter 4. Using Tivoli Storage Productivity Center for Replication with DS8000 225 After the Metro Mirror session is suspended, the following actions are available: Recover Start H1 H2 StartGC H1 H2 Recovering the session After the Metro Mirror session and its associated copy sets are suspended, we can start the secondary volumes recovery process by selecting Recover from the drop-down menu, as shown in Figure 4-85. Click Go to continue. Figure 4-85 Session Details panel showing the Recover action Confirm the action in the next panel to continue. The Recover command is used to make the H2 volumes available for the host and ready to be copied back to the Site 1. This is achieved by issuing multiple Metro Mirror Failover commands that establish Out of Sync Tracks bitmaps on the i2 and H2 volumes. The Recover command also establishes a new FlashCopy to the H2 volumes. Important: The Recover command overwrites the content of the H2 volumes that are issuing a FlashCopy from i2 to H2. Before you run the Recover command, make sure that all the host activity on H2 volumes is stopped. There is a message at the top of the window (as shown in Figure 4-86 on page 227) that indicates that Recover action was successfully completed. The status of our Metro Mirror session is Normal and the State is Target Available, which indicates that H2 volume is available to your host. Also, the new FlashCopy was established between i2 and H2. 226 Tivoli Storage Productivity Center for Replication for Open Systems Figure 4-86 Session Details panel showing the Recover action results After the Metro Mirror session is recovered in Target Available state, the following options are available: Flash Start H1 H2 StartGC H1 H2 There also is the option to switch the production site by selecting Enable Copy To Site 1. Reversing the Metro Mirror After the Recover action, Host 2 volumes are active. Because the Host 2 site is now the active site, you can start copying from Host 2 to Host 1 volumes. To do this, from the drop-down menu (as shown in Figure 4-86), select Enable Copy To Site 1 and then click Go. The panel that is shown in Figure 4-87 warns that you are about enable commands with which you can copy data to Site 1. Click Yes to proceed. Figure 4-87 Enable Copy to Site 1 confirmation panel Chapter 4. Using Tivoli Storage Productivity Center for Replication with DS8000 227 At this stage, data on Host 1 volumes is not yet overwritten, but the following actions are now enabled: Flash Start H2 H1 StartGC H2 H1 Select Start H2 H1 and click Go, as shown in Figure 4-88. Figure 4-88 Session Details panel showing the Start H2 H1 action Confirm the action in the next panel to continue. The Start H2 H1 command is intended to be used to switch the Metro Mirror direction temporarily when the host is working on Site 2. In this case, the synchronization process from H2 to H1 volumes is incremental. The message at the top of the window that is shown in Figure 4-89 on page 229 confirms that start of Metro Mirror session is complete. The session is in Preparing state and Warning status. 228 Tivoli Storage Productivity Center for Replication for Open Systems Figure 4-89 Session Details panel showing the Start H2 H1 action results After the resynchronization is complete, the session goes to Normal status and Prepared state, as shown in Figure 4-90. Figure 4-90 Session Details panel showing the session in Normal status To return to the original configuration, the process is the same as described in “Recovering the session” on page 226 and “Reversing the Metro Mirror” on page 227 where the role of H1 and H2 is reversed. A full copy from H1 to H2 is required in this case. Chapter 4. Using Tivoli Storage Productivity Center for Replication with DS8000 229 4.3.3 Session tunable parameters In this section, we describe the tunable parameters (session Options) for all of the session types that are available for DS8000. All of these tunable parameters can be set during the session definition (see 4.3.2, “Setting up a session” on page 209). Most of these parameters can be modified later by changing the properties of the session. To modify the options for a session, go to the Session main panel and select the session, as shown in Figure 4-91. Figure 4-91 Select the session in the main Session panel From the drop-down menu, select View / Modify Properties and then click Go, as shown in Figure 4-92 on page 231. 230 Tivoli Storage Productivity Center for Replication for Open Systems Figure 4-92 Select View / Modify Properties From the View / Modify Properties panel, the session options can be modified, as shown in Figure 4-93. Figure 4-93 View / Modify Properties panel Chapter 4. Using Tivoli Storage Productivity Center for Replication with DS8000 231 FlashCopy session tunable parameters The FlashCopy session includes the following options: Incremental Select this option to apply incremental changes to the target volume. After the initial FlashCopy operation, only data that changed on the source volume since the last FlashCopy operation was performed is copied to the target volume. If you select this option, a persistent FlashCopy relationship is created regardless of whether you select the Persistent option. Persistent Select this option to keep the FlashCopy relationship established on the hardware after all source tracks are copied to the target volume. If you do not select this option, the local replication relationship ends after the target volume contains a complete point-in-time image of the source volume No Copy Select this option if you do not want the hardware to write the background copy until the source track is written to. Data is not copied to the target volume until the blocks or tracks of the source volume are modified. This option is required for space-efficient volumes. Allow FlashCopy target to be Metro Mirror source Select this option to enable the FlashCopy operation if the target volume of the FlashCopy relationship is also the source volume of a Metro Mirror relationship. If this option is not selected, the FlashCopy operation fails. This option requires that the IBM Remote Pair FlashCopy option is available for your IBM System Storage DS8000 storage system. Select one of the following options to specify whether you want to maintain consistency, if possible: – Don't attempt to preserve Metro Mirror consistency Click this option if you want the FlashCopy operation to complete without preserving consistency of the Metro Mirror relationship on the remote site. The FlashCopy operation does not occur on the remote site. – Attempt to preserve Metro Mirror consistency but allow FlashCopy even if Metro Mirror target consistency cannot be preserved Click this option to preserve the consistency of the Metro Mirror relationship at the target of the FlashCopy relationship when the source and target of the FlashCopy relationship are the source of a Metro Mirror relationship. If the consistency cannot be preserved, a full copy of the Metro Mirror relationship at the target of the FlashCopy relationship is performed. To preserve consistency, parallel FlashCopy operations are performed on both sites, if possible. – Attempt to preserve Metro Mirror consistency but fail FlashCopy if Metro Mirror target consistency cannot be preserved Click this option to prevent a full copy from being performed over the Metro Mirror link. Instead, parallel FlashCopy operations are performed on both sites, if possible. If the consistency cannot be preserved, the flash for the FlashCopy relationships fails, and the data of the Metro Mirror relationship at the target of the FlashCopy relationship is not changed. 232 Tivoli Storage Productivity Center for Replication for Open Systems Metro Mirror sessions tunable parameters Different session options are available for the Metro Mirror session type, depending on the topology of the session. Metro Mirror Single Direction and Metro Mirror Failover/Failback The following Metro Mirror options are available: Metro Mirror Suspend Policy options Select one of the following options to specify the policy for holding or releasing input/output (I/O) after a Metro Mirror relationship is suspended. When a relationship is in a Suspended state, write operations from the source volume are no longer mirrored to the target volume: – Hold I/O after Suspend Click this option to prevent the source volume from receiving new data after the relationship is suspended. Use this option if you want to determine the scope of the suspension before new data is written to the source volume. This option helps to ensure that the data on the source and target volumes remains the same. To enable write operations to the source volume to continue, issue the Tivoli Storage Productivity Center for Replication Release I/O command for the session. If you do not issue this command, write operations are enabled when the hardware timeout value on the storage system expires. – Release I/O after Suspend Click this option to enable the source volume to automatically receive data after the relationship is suspended. Use this option if you want to limit the affect on the applications that are writing to the source volume. This option is enabled by default Fail MM/GC if target is online (CKD only) Select this option to fail any session commands for a Metro Mirror or Global Copy relationship if the target volume is in the Online state. For more information about this state, see the documentation for the storage system. This option applies only to count key data (CKD) volumes. Reset Secondary Reserves Select this option to remove any persistent reserves that might be set on the target volumes of the copy sets when a Start command is issued for the session. Metro Mirror FO/FB with Practice In addition to the options that were described for the Metro Mirror Failover/Failback (FO/FB) session type (see “Metro Mirror Single Direction and Metro Mirror Failover/Failback” on page 233), the Persistent FlashCopy option for Role Pair H2-I2 is available for the Metro Mirror FO/FB with Practice session type. Select this option to keep FlashCopy pairs persistent on the hardware. Global Mirror sessions tunable parameters Different session options are available for Global Mirror session types, depending on the topology of the session. Chapter 4. Using Tivoli Storage Productivity Center for Replication with DS8000 233 Global Mirror Single Direction and Global Mirror FO/FB For the Role Pair H1-J2, the following Global Mirror options are available: Consistency group interval time (seconds). Enter how often, in seconds, the Global Mirror session attempts to form a consistency group. A lower value can reduce the data exposure of the session. However, a lower value also causes the session to attempt to create consistency groups more frequently, which can increase network traffic. Possible values are 0 - 65535. The default is 0 seconds. Global Mirror settings: In addition to the Consistency Group Interval Time, the Maximum Coordination Interval Time and the Maximum Consistency Group Drain Time are parameters that affect the Global Mirror behavior. By default, Tivoli Storage Productivity Center for Replication establishes a Global Mirror session that uses the default values for these two parameters. The default values are 50 (ms) for Maximum Coordination Interval Time and 30 (seconds) for Maximum Consistency Group Drain Time. These values are the recommended values that fit most of the Global Mirror installations. If a modification of these two parameters is required, this can be done only by using the chsess CSMCLI command. Depending on the Role Pair that is involved and the session type, different options are available for the chsess CSMCLI command to modify Maximum Coordination Interval Time and the Maximum Consistency Group Drain Time settings. For the Global Mirror Single Direction, Global Mirror Failover/Failback and Global Mirror Failover/Failback with Practice session types you can use the following commands: chsess -maxdrain xx NameSession to set to xx seconds the Maximum Consistency Group Drain Time for the session NameSession chsess -coordint yy NameSession to set to yy milliseconds the Maximum Coordination Interval Time These settings require a Global Mirror session suspension. Recovery Point Objective Alerts Specify the length of time that you want to set for the RPO thresholds. The values determine whether a Warning or Severe alert is generated when the RPO threshold is exceeded for a role pair. The RPO represents the length of time (in seconds) of data exposure that is acceptable if a disaster occurs. Use the following options to set the RPO threshold values. For both options, you can specify an RPO threshold in the range of 0 65535 seconds. The default is 0 seconds, which specifies that no alerts are generated: – Warning level threshold (seconds). Enter the number of seconds that you want to set for the warning level RPO threshold. If the RPO is greater than this value, a warning console message is generated, an SNMP trap is sent, and the session status changes to Warning. If the value in this field is other than 0, it must be greater than the value in the Consistency group interval time (seconds) field and less than the value in the Severe level threshold (seconds) field. – Severe level threshold (seconds) – Enter the number of seconds that you want to set for the severe level RPO threshold. If the RPO is greater than this value, an error console message is generated, an SNMP trap is sent, and the session status changes to Severe. If the value in this field is other than 0, it must be greater than the value in the Warning level threshold (seconds) field. 234 Tivoli Storage Productivity Center for Replication for Open Systems Fail MM/GC if target is online (CKD only) Select this option to fail any session commands for a Metro Mirror or Global Copy relationship if the target volume is in the Online state. For more information about this state, see the documentation for the storage system. Reset Secondary Reserves Select this option to remove any persistent reserves that might be set on the target volumes of the copy sets when a Start command is issued for the session. Global Mirror FO/FB with Practice In addition to the options that were described for the Global Mirror FO/FB session type (see “Global Mirror Single Direction and Global Mirror FO/FB” on page 234), the following specific FlashCopy Options for Role Pair H2-I2 are available for the Global Mirror FO/FB with Practice session type: Persistent Select this option to keep FlashCopy pairs persistent on the hardware. No Copy Select this option if you do not want the hardware to write the background copy until the source track is written to. Data is not copied to the H2 volume until the blocks or tracks of the i2 volume are modified. For the Role Pair I1-J2, the Reflash After Recovery FlashCopy option is available. Select this option if you want to create a FlashCopy replication between the i2 and J2 volumes after the recovery of a Global Mirror Failover/Failback with Practice session. If you do not select this option, a FlashCopy replication is created between the i2 and H2 volumes only. Global Mirror Either Direction with two Site Practice For the Role Pair H1-J2, the following Global Mirror options are available: Consistency group interval time (seconds) Enter how often, in seconds, the Global Mirror session attempts to form a consistency group. A lower value can reduce the data exposure of the session. However, a lower value also causes the session to attempt to create consistency groups more frequently, which can increase network traffic. Possible values are 0 - 65535. The default is 0 seconds. Global Mirrors settings: For the Global Mirror Either Direction with Two Site Practice session type you can use the following commands: chsess -maxdrain_h1j2 xx NameSession to set to xx seconds the Maximum Consistency Group Drain Time for the session NameSession for the Role Pair H1-J2. chsess -coordint_h1j2 yy NameSession to set to yy milliseconds the Maximum Coordination Interval Time for the Role Pair H1-J2. These settings require a Global Mirror session suspension. Chapter 4. Using Tivoli Storage Productivity Center for Replication with DS8000 235 Recovery Point Objective Alerts Specify the length of time that you want to set for the RPO thresholds. The values determine whether a Warning or Severe alert is generated when the RPO threshold is exceeded for a role pair. The RPO represents the length of time (in seconds) of data exposure that is acceptable if a disaster occurs. Use the following options to set the RPO threshold values. For both options, you can specify an RPO threshold in the range of 0 65535 seconds. The default is 0 seconds, which specifies that no alerts are generated: – Warning level threshold (seconds) Enter the number of seconds that you want to set for the warning level RPO threshold. If the RPO is greater than this value, a warning console message is generated, an SNMP trap is sent, and the session status changes to Warning. If the value in this field is other than 0, it must be greater than the value in the Consistency group interval time (seconds) field and less than the value in the Severe level threshold (seconds) field. – Severe level threshold (seconds) Enter the number of seconds that you want to set for the severe level RPO threshold. If the RPO is greater than this value, an error console message is generated, an SNMP trap is sent, and the session status changes to Severe. If the value in this field is other than 0, it must be greater than the value in the Warning level threshold (seconds) field. For the Role Pair H2-J1, the following Global Mirror options are available: Consistency group interval time (seconds) Enter how often (in seconds) the Global Mirror session attempts to form a consistency group. A lower value can reduce the data exposure of the session. However, a lower value also causes the session to attempt to create consistency groups more frequently, which can increase network traffic. Possible values are 0 - 65535. The default is 0 seconds. Global Mirror settings: For the Global Mirror Either Direction with Two Site Practice session type, you can use the following commands: chsess -maxdrain_h2j1 xx NameSession to set to xx seconds the Maximum Consistency Group Drain Time for the session NameSession for the Role Pair H2-J1. chsess -coordint_h2j1 yy NameSession to set to yy milliseconds the Maximum Coordination Interval Time for the Role Pair H2-J1. These settings require a Global Mirror session suspension. Recovery Point Objective Alerts Specify the length of time that you want to set for the RPO thresholds. The values determine whether a Warning or Severe alert is generated when the RPO threshold is exceeded for a role pair. The RPO represents the length of time (in seconds) of data exposure that is acceptable if a disaster occurs. Use the following options to set the RPO threshold values. For these options, you can specify an RPO threshold in the range of 0 65535 seconds. The default is 0 seconds, which specifies that no alerts are generated: – Warning level threshold (seconds) Enter the number of seconds that you want to set for the warning level RPO threshold. If the RPO is greater than this value, a warning console message is generated, an SNMP trap is sent, and the session status changes to Warning. If the value in this field is other than 0, it must be greater than the value in the Consistency group interval time (seconds) field and less than the value in the Severe level threshold (seconds) field. 236 Tivoli Storage Productivity Center for Replication for Open Systems – Severe level threshold (seconds) Enter the number of seconds that you want to set for the severe level RPO threshold. If the RPO is greater than this value, an error console message is generated, an SNMP trap is sent, and the session status changes to Severe. If the value in this field is other than 0, it must be greater than the value in the Warning level threshold (seconds) field. The following general options also are available: Fail MM/GC if target is online (CKD only) Select this option to fail any session commands for a Metro Mirror or Global Copy relationship if the target volume is in the Online state. For more information about this state, see the documentation for the storage system. This option applies to CKD volumes only. Reset Secondary Reserves Select this option to remove any persistent reserves that might be set on the target volumes of the copy sets when a Start command is issued for the session. Metro Global Mirror sessions tunable parameters Different session options are available for Metro Global Mirror session type, depending on the topology of the session. Metro Global Mirror For the Role Pair H1-J3, the following Global Mirror options are available: Consistency group interval time (seconds) Enter how often (in seconds) the Global Mirror session attempts to form a consistency group. A lower value can reduce the data exposure of the session. However, a lower value also causes the session to attempt to create consistency groups more frequently, which can increase network traffic. Possible values are 0 - 65535. The default is 0 seconds. Global Mirror settings: For the Metro Global Mirror and Metro Global Mirror with Practice session type, you can use the following commands: chsess -maxdrain_h1j3 xx NameSession to set to xx seconds the Maximum Consistency Group Drain Time for the session NameSession for the Role Pair H1-J3. chsess -coordint_h1j3 yy NameSession to set to yy milliseconds the Maximum Coordination Interval Time for the Role Pair H1-J3. These settings require a Global Mirror session suspension. Chapter 4. Using Tivoli Storage Productivity Center for Replication with DS8000 237 Recovery Point Objective Alerts Specify the length of time that you want to set for the RPO thresholds. The values determine whether a Warning or Severe alert is generated when the RPO threshold is exceeded for a role pair. The RPO represents the length of time (in seconds) of data exposure that is acceptable if a disaster occurs. Use the following options to set the RPO threshold values. For both options, you can specify an RPO threshold in the range of 0 65535 seconds. The default is 0 seconds, which specifies that no alerts are generated: – Warning level threshold (seconds) Enter the number of seconds that you want to set for the warning level RPO threshold. If the RPO is greater than this value, a warning console message is generated, an SNMP trap is sent, and the session status changes to Warning. If the value in this field is other than 0, it must be greater than the value in the Consistency group interval time (seconds) field and less than the value in the Severe level threshold (seconds) field. – Severe level threshold (seconds) Enter the number of seconds that you want to set for the severe level RPO threshold. If the RPO is greater than this value, an error console message is generated, an SNMP trap is sent, and the session status changes to Severe. If the value in this field is other than 0, it must be greater than the value in the Warning level threshold (seconds) field. For the Role Pair H2-J3 the following Global Mirror options are available: Consistency group interval time (seconds) Enter how often, in seconds, the Global Mirror session attempts to form a consistency group. A lower value can reduce the data exposure of the session. However, a lower value also causes the session to attempt to create consistency groups more frequently, which can increase network traffic. Possible values are 0 - 65535. The default is 0 seconds. Global Mirror settings: For the Metro Global Mirror and Metro Global Mirror with Practice session type, you can use the following commands: chsess -maxdrain_h2j3 xx NameSession to set to xx seconds the Maximum Consistency Group Drain Time for the session NameSession for the Role Pair H2-J3. chsess -coordint_h2j3 yy NameSession to set to yy milliseconds the Maximum Coordination Interval Time for the Role Pair H2-J3. These settings require a Global Mirror session suspension. Recovery Point Objective Alerts Specify the length of time that you want to set for the RPO thresholds. The values determine whether a Warning or Severe alert is generated when the RPO threshold is exceeded for a role pair. The RPO represents the length of time (in seconds) of data exposure that is acceptable if a disaster occurs. Use the following options to set the RPO threshold values. For those options, you can specify an RPO threshold in the range of 0 65535 seconds. The default is 0 seconds, which specifies that no alerts are generated: – Warning level threshold (seconds) Enter the number of seconds that you want to set for the warning level RPO threshold. If the RPO is greater than this value, a warning console message is generated, an SNMP trap is sent, and the session status changes to Warning. If the value in this field is other than 0, it must be greater than the value in the Consistency group interval time (seconds) field and less than the value in the Severe level threshold (seconds) field. 238 Tivoli Storage Productivity Center for Replication for Open Systems – Severe level threshold (seconds) Enter the number of seconds that you want to set for the severe level RPO threshold. If the RPO is greater than this value, an error console message is generated, an SNMP trap is sent and the session status changes to Severe. If the value in this field is other than 0, it must be greater than the value in the Warning level threshold (seconds) field. The following general options also are available: Fail MM/GC if target is online (CKD only) Select this option to fail any session commands for a Metro Mirror or Global Copy relationship if the target volume is in the Online state. For more information about this state, see the documentation for the storage system. This option applies to CKD volumes only. Reset Secondary Reserves Select this option to remove any persistent reserves that might be set on the target volumes of the copy sets when a Start command is issued for the session. Metro Mirror Suspend Policy options Select one of the following options to specify the policy for holding or releasing I/O after a Metro Mirror relationship is suspended. When a relationship is in a Suspended state, write operations from the source volume are no longer mirrored to the target volume: – Hold I/O after Suspend Select this option to prevent the source volume from receiving new data after the relationship is suspended. Use this option if you want to determine the scope of the suspension before new data is written to the source volume. This option helps to ensure that the data on the source and target volumes remains the same. To enable write operations to the source volume to continue, run the Tivoli Storage Productivity Center for Replication Release I/O command for the session. If you do not run this command, write operations are enabled when the hardware timeout value on the storage system expires. – Release I/O after Suspend Select this option to enable the source volume to automatically receive data after the relationship is suspended. Use this option if you want to limit the affect on the applications that are writing to the source volume. This option is enabled by default. Metro Global Mirror with Practice In addition to the options that were described for the Metro Global Mirror session type (see “Metro Global Mirror” on page 237), the No Copy FlashCopy option for Role Pair H3-I3 is available for the Metro Global Mirror with Practice session type. Select this option if you do not want the hardware to write the background copy until the source track is written to. Data is not copied to the H2 volume until the blocks or tracks of the i2 volume are modified. HyperSwap related tunable parameters When a z/OS host connection is made available to Tivoli Storage Productivity Center for Replication (see “Adding and connecting host systems” on page 155), other z/OS HyperSwap options are available for some session types. Chapter 4. Using Tivoli Storage Productivity Center for Replication with DS8000 239 Metro Mirror Single Direction and Metro Mirror FO/FB with Practice The Enable Hardened Freeze HyperSwap related option applies to Metro Mirror Single Direction and Metro Mirror FO/FB with Practice session types. Select this option to enable the z/OS I/O Supervisor to manage freeze operations. With this option, IOS can freeze volumes regardless of whether the Tivoli Storage Productivity Center for Replication server is started or stopped. Note: This option requires the z/OS address spaces Basic HyperSwap Management and Basic HyperSwap API (see “Managing z/OS HyperSwap from Tivoli Storage Productivity Center for Replication for Open Systems” on page 355) even though the HyperSwap function is not available for the type of session. Metro Mirror FO/FB, Metro Global Mirror, and Metro Global Mirror with Practice The following HyperSwap related options apply to Metro Mirror FO/FB, Metro Global Mirror, and Metro Global Mirror with Practice session types: Enable Hardened Freeze Select this option to enable the z/OS I/O Supervisor to manage freeze operations. With this option, I/O Supervisor can freeze volumes regardless of whether the Tivoli Storage Productivity Center for Replication server is started or stopped. Manage H1-H2 with HyperSwap Select this option to trigger a HyperSwap operation, which redirects application I/O to the target volumes when there is a failure on the host accessible volumes. Tivoli Storage Productivity Center for Replication uses HyperSwap to manage the H1-H2 sequence of a Metro Mirror or Metro Global Mirror session. Setting this option automatically sets the Release I/O after suspend Metro Mirror policy. The following settings are available: – Disable HyperSwap Select this option to prevent a HyperSwap operation from occurring. – On Configuration Error: • Partition the system(s) out of the sysplex Select this option to partition a new system out of the sysplex when an error occurs because the system cannot be added to the HyperSwap configuration. • Disable HyperSwap Select this option to prevent a HyperSwap operation from occurring. – On Planned HyperSwap Error: • Partition out the failing system(s) and continue swap processing on the remaining system(s) Select this option to partition out the failing system and continue the swap processing on any remaining systems. • Disable HyperSwap after attempting backout Select this option to enable I/O Supervisor to back out the HyperSwap operation, if possible, if an error occurs during HyperSwap processing. HyperSwap is disabled. 240 Tivoli Storage Productivity Center for Replication for Open Systems – On Unplanned HyperSwap Error: • Partition out the failing system(s) and continue swap processing on the remaining system(s) Select this option to partition out the failing systems and continue HyperSwap processing on the remaining systems when a new system is added to the sysplex and the HyperSwap operation does not complete. Requirement: You must restart the system if you select this option. • Disable HyperSwap after attempting backout Select this option to enable I/O Supervisor to back out the HyperSwap operation, if possible, if an error occurs during HyperSwap processing. HyperSwap is disabled. Note: When Manage H1-H2 with HyperSwap is used with Enable Hardened Freeze, the freeze option is ignored. HyperSwap includes I/O Supervisor for managing freeze operations. The Enable Hardened Freeze option ensures data integrity if Tivoli Storage Productivity Center for Replication freezes and HyperSwap is not enabled for a session. Open HyperSwap related tunable parameters When an AIX host connection is established to Tivoli Storage Productivity Center for Replication (see “Adding and connecting host systems” on page 155), the Manage H1-H2 with Open HyperSwap Open HyperSwap option is available for Metro Mirror Failover/Failback session type. Select this option to trigger an Open HyperSwap operation for volumes that are attached to an IBM AIX host. This option redirects application I/O to the target volumes when there is a failure on the host accessible volumes. Tivoli Storage Productivity Center for Replication uses Open HyperSwap to manage the H1-H2 sequence of a Metro Mirror session. Only volumes that are attached to host systems that are defined in the Tivoli Storage Productivity Center for Replication Host Systems panel are eligible for Open HyperSwap. The Disable Open HyperSwap setting also is available. Select this option to prevent an Open HyperSwap operation from occurring while keeping the configuration on the host system and all source and target volumes coupled. For more information about Open HyperSwap implementation, see “HyperSwap configuration for z/OS and Open systems” on page 45. 4.3.4 Scenarios requiring a full copy Tivoli Storage Productivity Center for Replication uses all of the DS8000 Copy Services options to minimize the need to perform a full copy of data for a session while questioning among its states. Nevertheless, in some cases, a full copy of data is unavoidable. For instance, starting an Inactive session always requires a full copy of the data (often called Initial Copy). Furthermore, there are other session-specific conditions where the full copy is still required. In general, a specific action might not require a full copy, depending on the sequence of operations that were previously started. There are some particular actions that, irrespective of the previous actions that were performed, always require a full copy. In these cases, Tivoli Storage Productivity Center for Replication explicitly warns the user that a full copy is going to be started, as shown in Figure 4-94 on page 242. Chapter 4. Using Tivoli Storage Productivity Center for Replication with DS8000 241 Figure 4-94 Confirmation panel In the following sections, we describe the scenarios that require a full copy of data. Important: Tivoli Storage Productivity Center for Replication Start actions that usually perform the data copy incrementally might require a full copy to ensure the data consistency in case of unplanned mirroring disruption situations. 242 Tivoli Storage Productivity Center for Replication for Open Systems Metro Mirror Failover/Failback with Practice session While returning to the original configuration after a switch site role, a full copy of data is required to perform the final StartH1 H2 action, as shown in Figure 4-95. Figure 4-95 Start H1 H2 action that requires a Full Copy Chapter 4. Using Tivoli Storage Productivity Center for Replication with DS8000 243 Global Mirror Failover/Failback with Practice session While returning to the original configuration after a switch site role, a full copy of data is required to perform the final StartH1 H2 action, as shown in Figure 4-96. Figure 4-96 Start H1 H2 action that requires a Full Copy 244 Tivoli Storage Productivity Center for Replication for Open Systems Global Mirror Either Direction with Two Site Practice session For this session, the following scenarios require a full copy of data, as shown in Figure 4-97: While performing a switch site role, a full copy of data is required by running the StartH2 H1 action. While returning to the original configuration after the switch site role, a full copy of data is required to perform the final StartH1 H2 action. Figure 4-97 Actions that require Full Copy Metro Global Mirror session For this session, the following scenarios require a full copy of data: Consider a configuration where the host was running on local site and a switch site role between local and intermediate site is performed after the Global Mirror was suspended. While returning to the original configuration, a full copy of data is required to perform the final StartH1 H2 H3 action, as shown in Figure 4-98 on page 246. Chapter 4. Using Tivoli Storage Productivity Center for Replication with DS8000 245 Figure 4-98 Start H1 H2 H3 action that requires a Full Copy Consider a configuration where the host was running on the intermediate site and a switch site role between intermediate and local site is performed after the Global Mirror was suspended. While returning to H2 H1 H3 configuration, a full copy of data is required to perform the final StartH2 H1 H3 action, as shown in Figure 4-99 on page 247. 246 Tivoli Storage Productivity Center for Replication for Open Systems Figure 4-99 Start H1 H2 H3 action that requires a Full Copy Consider a configuration where the host is running on a local or intermediate site with the Global Mirror running. When the H3 volumes are recovered with the Metro Mirror suspended, starting the StartH3 H1 H2 action (see Figure 4-100 on page 248) requires a full copy from the remote to local site, and from the local to intermediate site. Chapter 4. Using Tivoli Storage Productivity Center for Replication with DS8000 247 Figure 4-100 Start H3 H1 H2 action requiring a Full Copy Consider a configuration where the host is running on remote site with a cascading Global Copy running (H3 H1 H2). When the H1 volumes are recovered, starting the StartH3 H1 H2 action (see Figure 4-101) or the StartH1 H2 H3 action (see Figure 4-102 on page 249) requires a full copy of data across the three sites. Figure 4-101 Start H3 H1 H2 action that requires a Full Copy 248 Tivoli Storage Productivity Center for Replication for Open Systems Figure 4-102 Start H1 H2 H3 action that requires a Full Copy Incremental Resync: In a three-site configuration, the Incremental Resync a Global Mirror relationship can be established between the local and remote site without the need to replicate all the data. After the Metro-Global Mirror relationships are established with the Incremental Resync feature enabled, the Global Mirror must be running for at least 10 - 15 minutes before an incremental resynchronization can be started from local to remote site; otherwise, a full copy occurs. Metro Global Mirror with Practice session For this session, the following scenarios require a full copy of data: Consider a configuration where the host is running on a local or intermediate site with the Global Mirror running. When the H3 volumes are recovered with the Metro Mirror suspended, starting the StartH3 H1 H2 action (see Figure 4-103) requires a full copy from the remote to local site, and from the local to intermediate site. Figure 4-103 Start H3 H1 H2 action that requires a Full Copy Consider a configuration where the host is running on remote site with a cascading Global Copy running (H3 H1 H2). When the H1 volumes are recovered, starting the StartH3 H1 H2 action (see Figure 4-104 on page 250) or the StartH1 H2 H3 action (see Figure 4-105 on page 250) requires a full copy of data across the three sites. Chapter 4. Using Tivoli Storage Productivity Center for Replication with DS8000 249 Figure 4-104 Start H3 H1 H2 action that requires a Full Copy Figure 4-105 Start H1 H2 H3 action that requires a Full Copy Incremental Resync: In a three sites configuration, the Incremental Resync can establish Global Mirror relationship between the local and remote site without the need to replicate all of the data. After the Metro-Global Mirror relationships are established with the Incremental Resync feature enabled, the Global Mirror must be running for at least 10 - 15 minutes before an incremental resynchronization can be started from the local to remote site; otherwise, a full copy occurs. 4.4 Use cases In this section, some helpful use cases are provided for the following scenarios: Practicing disaster recovery by using FlashCopy sessions Two site planned outages scenarios Three site planned outages scenarios 250 Tivoli Storage Productivity Center for Replication for Open Systems 4.4.1 Practicing disaster recovery by using FlashCopy sessions Tivoli Storage Productivity Center for Replication offers sessions with practice volumes with which you can practice disaster recovery while maintaining the disaster recovery capabilities. Practice volumes are available in Metro Mirror Failover/Failback sessions, Global Mirror Failover/Failback, Global Mirror Either Direction sessions, and Metro Global Mirror with Practice sessions. The use of Tivoli Storage Productivity Center for Replication sessions with practice volumes greatly simplifies the task of creating practice copies for disaster recovery testing. All of the operations that are needed to create a point-in-time consistent copy of the production data are performed transparently by running the Flash command. With sessions with practice volumes, Tivoli Storage Productivity Center for Replication always assumes that the practice volumes are used for practicing disaster recovery and in the case of real disaster. All of the recovery actions that Tivoli Storage Productivity Center for Replication performs in the case of real disaster takes into account this assumption. For instance, when a Recover command is issued in a session with practice volumes, the Tivoli Storage Productivity Center for Replication always creates a consistent copy of practice volumes by flashing the intermediate volumes. While most disaster recovery implementations benefit from this Tivoli Storage Productivity Center for Replication feature, this represents a limitation in some cases. For instance, some disaster recovery implementations use different sets of volumes for testing and real recovery. In these cases, the sessions with practice volumes should not be used because some scenarios (for example, the go-home procedure) might lead to unpredictable results. A combination of replication and FlashCopy sessions can be used instead. By combining replication and FlashCopy sessions, we can cover a range of situations that sessions with practice volumes do not handle. In addition to the scenario that we described, we can manage the following components: Configurations with multiple sets of practice volumes Configuration that uses Space Efficient Volumes as practice volumes Three-site configurations where practice volumes are required at the intermediate site Configuration in which Flash before resync function is required While implementing these combinations of sessions provides the opportunity to handle more complex configuration, it increases the management complexity. The following steps often are required to create a consistent point-in-time copy by using a combination of two sessions: 1. Suspend the mirroring session and, as a precaution, recover the volumes to be flashed. 2. Run the FlashCopy by using the FlashCopy session. 3. Resume the mirroring of the suspended session. In the next section, an example of a combination of the Tivoli Storage Productivity Center for Replication sessions is described. Using FlashCopy session with Metro Mirror session In this example, we consider a Metro Mirror configuration with another set of Space Efficient Volumes in the secondary site. To manage this configuration, we must set up the following Tivoli Storage Productivity Center for Replication sessions: Session ITSO-TEST: Metro Mirror Failover/Failback session that manages the Metro Mirror. Chapter 4. Using Tivoli Storage Productivity Center for Replication with DS8000 251 Session ITSO-TEST-FC: FlashCopy session that includes managing the FlashCopy and the use of the secondary Metro Mirror volumes as FlashCopy source. Because the target volume is a Track Space Efficient volume, the no copy option must be used for this session. This configuration is shown in Figure 4-106. Figure 4-106 Combining Metro Mirror and FlashCopy sessions As the first step, we must create a consistent copy of the volumes in the Site 2. To achieve this, perform the Suspend action for the session ITSO-TEST. Important: With the introduction of the FlashCopy consistency group feature for FlashCopy sessions (see 4.2.1, “FlashCopy consistency groups for FlashCopy sessions” on page 182), the FlashCopy session can create a consistent copy of Metro Mirror secondary volumes, even without suspending the Metro Mirror. The flashing operation freezes the secondary volume, which freezes the application. The customer must weigh the cost of doing that at the remote site versus the primary site. As shown in Figure 4-107, the session ITSO-TEST is in a recoverable state, which means that the secondary volumes are consistent. Figure 4-107 Session panel showing the recoverable state for the Metro Mirror session 252 Tivoli Storage Productivity Center for Replication for Open Systems In this case, a recover operation is not needed because the secondary volumes are already in a consistent state. GM and MGM session: Before the introduction of the Pause with Consistency feature, another Recover operation was always needed to create a consistent copy before flashing the Global Mirror secondary volumes for Global Mirror and Metro Global Mirror session types. With this new feature, the Recover operation becomes unnecessary because following a Suspend operation, the Global Mirror secondary volumes are already in recoverable state, as shown in Figure 4-26 on page 184. This applies only to DS8000 Storage Systems that support the Pause with Consistency feature. For more information, see 4.2.2, “Global Mirror pause with consistency” on page 183. The second step is to flash the secondary volumes by issuing a Flash command to the session ITSO-TEST-FC. Again, the session ITSO-TEST-FC is in a recoverable state, as shown in Figure 4-108. Figure 4-108 Session panel showing the recoverable state for the FlashCopy session Now we can proceed with the final step of resynchronization of the Metro Mirror. Issue the Start H1 H2 command for the session ITSO-TEST. Both sessions are now in Normal state, as shown in Figure 4-109 on page 254. Chapter 4. Using Tivoli Storage Productivity Center for Replication with DS8000 253 Figure 4-109 Session panel showing the Normal Status for the sessions After the tasks on FlashCopy target volumes are completed, a cleanup is needed to release the space that is allocated by the Space Efficient volumes. This clean up is automatically performed when the FlashCopy session is ended. 4.4.2 Two-site planned outages scenarios In the following sections, we describe some scenarios of planned outages in a two-site Global Mirror configuration. We also show how to manage these situations with Tivoli Storage Productivity Center for Replication. Consider the two-site configuration that is shown in Figure 4-110 on page 255. 254 Tivoli Storage Productivity Center for Replication for Open Systems Figure 4-110 Two-site Global Mirror configuration This configuration can be implemented in Tivoli Storage Productivity Center for Replication by using a Global Mirror with Practice session, as show in Figure 4-111 on page 256. Chapter 4. Using Tivoli Storage Productivity Center for Replication with DS8000 255 Figure 4-111 Two-site Global Mirror implementation In the normal operation scenario, the session is running with Global Mirror forming consistency groups. For the following scenarios, we assume that the active Tivoli Storage Productivity Center for Replication server is not affected by any outages. Planned outage of Site 1 storage systems In this scenario, we consider a planned maintenance activity that requires powering off the SIte 1 storage systems. We also describe the go-home procedure to return to the original configuration. The flow of the Tivoli Storage Productivity Center for Replication operations is shown in Figure 4-112 on page 257. Assuming that the host operations are stopped on Site 1, we can complete the following steps: 1. Start a Suspend action on the Tivoli Storage Productivity Center for Replication session. This performs a Global Mirror pause operation and a suspension of the Global Copy pairs H1-I2. After the action is complete, the status of the session is Severe and the state is Suspended. 2. Issue the Recover action on the Tivoli Storage Productivity Center for Replication session. This performs the following actions: – Failover i2 volumes to H1 volumes – Recover the last consistency group (for more information, see 4.2.2, “Global Mirror pause with consistency” on page 183) 256 Tivoli Storage Productivity Center for Replication for Open Systems – FlashCopy the i2 volumes to the H2 volumes – Force Failover H2 volumes to H1 volumes The H2 volumes are now ready to be used by host. After the action is complete, the status of the session is Normal and the state is Target Available. Now we can start the host operations on the H2 volumes and powering off the storage systems in Site 1 can proceed. Tivoli Storage Productivity Center for Replication shows an alert about the communication loss to Site 1 storage systems, but this does not affect the current configuration. After the maintenance is completed and the Site 1 storage systems are running again, we can start the go-home procedure by completing the following steps: 1. Issue the Enable Copy to Site 1 action on the Tivoli Storage Productivity Center for Replication session. This makes available the actions to be used for the go-home procedure. This action does not change any state of the session. 2. Start a StartH2 H1 action on the Tivoli Storage Productivity Center for Replication session. This starts a Global Copy that performs the following actions: – – – – – – Failback i2 volumes to H1 volumes Change the mode for I2-H1 pairs from Global Copy to Metro Mirror Wait until the I2-H1 pairs are in Full Duplex Freeze I2-H1 pairs Remove I2-H1 relationships Failback H2 volumes to H1 volumes The session remains in Warning status because the replication configuration that is now running does not ensure data consistency. Figure 4-112 Site 1 planned outage state transition diagram Chapter 4. Using Tivoli Storage Productivity Center for Replication with DS8000 257 After the operations on H2 volumes are stopped, we can proceed with the following steps: 1. Issue the Suspend action on the Tivoli Storage Productivity Center for Replication session. This performs the following actions: – Change the mode for H2-H1 pairs from Global Copy to Metro Mirror – Wait until the H2-H1 pairs are in Full Duplex – Freeze H2-H1 pairs After the action is complete, the status of the session is Severe and the state is Suspended. 2. Issue the Recover action on the Tivoli Storage Productivity Center for Replication session. This makes the H1 volumes available to the host that is performing an H1 to H2 failover. After the action is complete, the status of the session is Normal and the state is Target Available. 3. Issue the Enable Copy to Site 2 action on the Tivoli Storage Productivity Center for Replication session. This makes available the actions to complete the go-home procedure. This action does not change any state of the session. Now we can start the host operations on the H1 volumes and complete the go-home procedure. We start a StartH1 H2 action on the Tivoli Storage Productivity Center for Replication session. This performs the following operations: Remove H1-H2 pairs Start H1-I2 pairs in Global Copy mode Wait until the H1-I2 first pass copy is completed Start the Global Mirror H1-H2 The go-home procedure is then completed and the normal operation configuration is restored. In this case, a full copy of the data is required (for more information, see 4.3.4, “Scenarios requiring a full copy” on page 241). Planned outage of Site 2 storage systems In this scenario, we consider a planned maintenance activity that requires powering off the SIte 2 storage systems. We also describe the go-back procedure to return to the original configuration. The flow of the Tivoli Storage Productivity Center for Replication operations is shown in Figure 4-113 on page 259. Assuming that the host operations are running on Site 1, we can complete the following steps: 1. Start a Suspend action on the Tivoli Storage Productivity Center for Replication session. This performs a Global Mirror pause operation and a suspension of the Global Copy pairs H1-I2. After the action is complete, the status of the session is Severe and the state is Suspended. Now we can proceed with powering off the storage systems in Site 2. Tivoli Storage Productivity Center for Replication alerts us about the communication loss to Site 2 storage systems, but this does not affect the current configuration. After the maintenance is completed and the Site 2 storage systems are running again, we can start the procedure to return to the original configuration. 2. Start a StartH1 H2 action on the Tivoli Storage Productivity Center for Replication session. This performs the following operations: – Resume the Global Mirror H1-I2 – Wait until the H1-I2 first pass copy is completed – Start the Global Mirror H1-H2 258 Tivoli Storage Productivity Center for Replication for Open Systems Figure 4-113 Site 2 planned outage state transition diagram The go-back procedure is then completed and the normal operation configuration is restored. This procedure does not require full copy of the data. 4.4.3 Three-site planned outages scenarios In the following sections, we describe some scenarios of planned outages in a three-site Metro Global Mirror configuration. We also show how to manage these situations with Tivoli Storage Productivity Center for Replication. Consider the three-site configuration that is shown in Figure 4-114 on page 260. Chapter 4. Using Tivoli Storage Productivity Center for Replication with DS8000 259 Figure 4-114 Three-site Metro Global Mirror configuration This configuration can be implemented in Tivoli Storage Productivity Center for Replication by using a Metro Global Mirror with Practice session, as shown in Figure 4-115 on page 261. 260 Tivoli Storage Productivity Center for Replication for Open Systems Figure 4-115 Three-site Metro Global Mirror implementation In the normal operation scenario, the session is running with Metro Mirror synchronized and Global Mirror forming consistency groups. For the following scenarios, we assume that the active Tivoli Storage Productivity Center for Replication server is not affected by any outages. Planned outage of Site 1 storage systems In this scenario, we consider a planned maintenance activity that requires powering off the Site 1 storage systems. During the maintenance activity, all of the Disaster Recovery capabilities must remain active. We also describe the go-home procedure to return to the original configuration. The flow of the Tivoli Storage Productivity Center for Replication operations is shown in Figure 4-116 on page 262, Figure 4-117 on page 263, and Figure 4-118 on page 264. Assuming that the host operations are stopped on Site 1, we can complete the following steps: 1. Start a Suspend action on the Tivoli Storage Productivity Center for Replication session. This performs a Freeze operation that makes the H2 volumes in Consistent status. After the action is complete, the status of the session is Severe and the state is Suspended. The Global Mirror H2-H3 is still running. 2. Issue the RecoverH2 action on the Tivoli Storage Productivity Center for Replication session. This performs the following actions: – Suspend the Global Copy pairs H2-I3 – Failover H2 volumes. Chapter 4. Using Tivoli Storage Productivity Center for Replication with DS8000 261 The H2 volumes are now ready to be used by host. After the action is complete, the status of the session is Normal and the state is Target Available. After this action is run, the Global Mirror leg is not creating consistency groups anymore. 3. Issue the Enable Copy to Site 1 action on the Tivoli Storage Productivity Center for Replication session. This makes available the actions to be used for the go-home procedure. This action does not change any state of the session. 4. Start a StartH2 H3 action on the Tivoli Storage Productivity Center for Replication session. This restarts the Global Mirror and performs the following operations: – Force Failover I3 volumes to H1 volumes – Resume the Global Copy H2-I3 Figure 4-116 Site 1 planned outage state transition diagram: Stage One Now we can start the host operations on the H2 volumes and powering off the storage systems in Site 1 can proceed. Tivoli Storage Productivity Center for Replication alerts you about the communication loss to Site 1 storage systems, but this does not affect the current configuration. For more information about the states, see Table 4-1 on page 160. 262 Tivoli Storage Productivity Center for Replication for Open Systems Figure 4-117 Site 1 planned outage state transition diagram: Stage Two After the maintenance is completed and the Site 1 storage systems are running again, we can start the following go-home procedure: 5. Start a StartH2 H1 H3 action on the Tivoli Storage Productivity Center for Replication session. This performs the following operations: – – – – – – – – – – Failback I3 volumes to H1 volumes Wait until the I3-H1 first pass copy is completed Enable the Incremental Resync from H2 and I3 with noinit option Suspend the Global Copy pairs H2-I3 Wait until the I3-H1 copy is completed (100% copied) Failover H1 volumes Failback H1 volumes to I3 volumes Start H2-H1 Metro Mirror pairs with the Incremental Resync with option override Wait until the H1-I3 first pass copy is completed Start the Global Mirror H1-H3 After the action is complete, the status of the session is Normal and the state is Prepared. Chapter 4. Using Tivoli Storage Productivity Center for Replication with DS8000 263 After the operations on H2 volumes are stopped, we can proceed with the following steps: 6. Start a Suspend action on the Tivoli Storage Productivity Center for Replication session. This performs a Freeze operation that makes the H1 volumes in Consistent status. After the action is complete, the status of the session is Severe and the state is Suspended. The Global Mirror H1-H3 is still running. 7. Issue the RecoverH1 action on the Tivoli Storage Productivity Center for Replication session. This performs the following actions: – Suspend the Global Copy pairs H1-I3 – Failover H1 volumes The H1 volumes are now ready to be used by host. After the action is complete, the status of the session is Normal and the state is Target Available. After this action is run, the Global Mirror H1-H3 is not creating consistency groups. 8. Issue the Enable Copy to Site 2 action on the Tivoli Storage Productivity Center for Replication session. This makes available the actions to complete the go-home procedure. This action does not change any state of the session. Figure 4-118 Site 1 planned outage state transition diagram: Stage Three 9. Initiate a StartH1 H2 H3 action on the Tivoli Storage Productivity Center for Replication session. This performs the following operations: – – – – – – – – – – – – Force Failover I3 volumes to H2 volumes Resume the Global Copy H1-I3 Failback I3 volumes to H2 volumes Wait until the I3-H2 first pass copy is completed Enable the Incremental Resync from H1 and I3 with noinit option Suspend the Global Copy pairs H1-I3 Wait until the I3-H2 copy is completed (100% copied) Failover H2 volumes Failback H2 volumes to I3 volumes Start H1-H2 pairs with the Incremental Resync with option override Wait until the H2-I3 first pass copy is completed Start the Global Mirror H2-H3 The go-home procedure is then completed and the normal operation configuration is restored. None of these procedures required a full copy of the data. 264 Tivoli Storage Productivity Center for Replication for Open Systems Planned outage of Site 2 storage systems In this scenario, we consider a planned maintenance activity that requires powering off the SIte 2 storage systems. During the maintenance activity, all of the Disaster Recovery capabilities must be active. We also describe the go-back procedure to return to the original configuration. The flow of the Tivoli Storage Productivity Center for Replication operations is shown in Figure 4-119. Assuming that the host operations are running on Site 1, we can complete the following steps: 1. Start a StartH1 H3 action on the Tivoli Storage Productivity Center for Replication session. This starts the Global Mirror from Site 1 to Site 3 and performs the following operations: – – – – – – – Freeze H1-H2 pairs Failover I3 volumes Stop the H2-H3 Global Mirror session Remove the H1-H2 pairs Start H1-I3 pairs with the Incremental Resync with option recover Wait until the H1-I3 first pass copy is completed Start the Global Mirror H1-H3 Figure 4-119 Site 2 planned outage state transition diagram Now we can proceed with powering off the storage systems in Site 2. Tivoli Storage Productivity Center for Replication alerts you about the communication loss to Site 2 storage systems, but this does not affect the current configuration. After the maintenance is completed and the Site 2 storage systems are running again, we can start the procedure return to the original configuration. 2. Start a StartH1 H2 H3 action on the Tivoli Storage Productivity Center for Replication session. This performs the following operations: – – – – – – – – – – Failback I3 volumes to H2 volumes Wait until the I3-H2 first pass copy is completed Enable the Incremental Resync from H1 and I3 with noinit option Suspend the Global Copy pairs H1-I3 Wait until the I3-H2 copy is completed (100% copied) Failover H2 volumes Failback H2 volumes to I3 volumes Start H1-H2 pairs with the Incremental Resync with option override Wait until the H2-I3 first pass copy is completed Start the Global Mirror H2-H3 The go-back procedure is then completed and the normal operation configuration is restored. None of these procedures required a full copy of the data. Chapter 4. Using Tivoli Storage Productivity Center for Replication with DS8000 265 Planned outage of Site 1 and Site 2 storage systems In this scenario, we consider a planned maintenance activity that requires powering off the Site 1 and SIte 2 storage systems. In this case, we temporarily restart the host operation from the Site 3. We also describe the go-home procedure to return to the original configuration. The flow of the Tivoli Storage Productivity Center for Replication operations is shown in Figure 4-20 on page 178 and Figure 4-21 on page 179. Assuming that the host operations were stopped on Site 1, we can complete the following steps: 1. Start a Suspend action on the Tivoli Storage Productivity Center for Replication session. This performs a Freeze operation that makes the H2 volumes in Consistent status. After the action is complete, the status of the session is Severe and the state is Suspended. The Global Mirror H2-H3 is still running. 2. Issue the RecoverH3 action on the Tivoli Storage Productivity Center for Replication session. This performs the following actions: – Suspend the Global Copy pairs H2-I3 – Failover I3 volumes – Recover the last consistency group (if needed, see 4.2.2, “Global Mirror pause with consistency” on page 183) – FlashCopy the I3 volumes to the H3 volumes The H3 volumes are now ready to be used by host. After the action is complete, the status of the session is Normal and the state is Target Available. 3. Issue the Enable Copy to Site 1 action on the Tivoli Storage Productivity Center for Replication session. This makes available the actions to be used for the go-home procedure. This action does not change any state of the session. 266 Tivoli Storage Productivity Center for Replication for Open Systems Figure 4-120 Site 1 and Site 2 planned outage state transition diagram: Stage One Now we can start the host operations on the H3 volumes and powering off the storage systems in Site 1 and Site 2 can proceed. Tivoli Storage Productivity Center for Replication alerts you about the communication loss to Site 1 and Site 2 storage systems, but this does not affect the current configuration. Chapter 4. Using Tivoli Storage Productivity Center for Replication with DS8000 267 Figure 4-121 Site 1 and Site 2 planned outage state transition diagram: Stage Two After the maintenance is completed and Site 1 and Site 2 storage systems are running again, we can start the go-home procedure. 4. Start a StartH3 H1 H2 action on the Tivoli Storage Productivity Center for Replication session. This performs the following operations: – – – – Remove H1-H2 pairs Remove H2-I3 pairs Start H1-H2 pairs in Global Copy mode Start H3-H1 pairs in Global Copy mode After the action is complete, the status of the session is Warning and the state is Preparing. This action performs a full copy from the H3 volumes to the H1 volumes, and, in cascading, to H2 volumes (see 4.3.4, “Scenarios requiring a full copy” on page 241.). When the initial copy is completed, we can continue the go-home procedure. The session remains in Warning status because the replication configuration that is now running does not ensure data consistency. After the operations on H3 volumes are stopped, we can proceed with the following steps: 5. Issue the Suspend action on the Tivoli Storage Productivity Center for Replication session. This performs the following actions: – – – – – Change the mode for H3-H1 pairs from Global Copy to Metro Mirror Wait until the H3-H1 pairs are in Full Duplex Freeze H3-H1 pairs Wait until the H1-H2 copy is completed (100% copied) Suspend H1-H2 pairs After the action is complete, the status of the session is Severe and the state is Suspended. 6. Issue the Recover action on the Tivoli Storage Productivity Center for Replication session. This makes the H1 volumes available to the host by removing the H3-H1 pairs. After the action is complete, the status of the session is Normal and the state is Target Available. 268 Tivoli Storage Productivity Center for Replication for Open Systems 7. Issue the Enable Copy to Site 2 action on the Tivoli Storage Productivity Center for Replication session. This makes the actions available to complete the go-home procedure. This action does not change any state of the session. Now we can start the host operations on the H1 volumes and complete the go-home procedure. Figure 4-122 Site 1 and Site 2 planned outage state transition diagram: Stage Three 8. Start a StartH1 H2 H3 action on the Tivoli Storage Productivity Center for Replication session. This performs the following operations: – – – – Resume H1-H2 pairs in Metro Mirror mode Start H2-I3 pairs Wait until the H2-I3 first pass copy is completed Start the Global Mirror H2-H3 The go-home procedure is then completed and the normal operation configuration is restored. In this case, a full copy of the data is required to populate Site 2 and to restart the Global Mirror to Site 3 (see 4.3.4, “Scenarios requiring a full copy” on page 241). Planned outage of Site 3 storage systems In this scenario, we consider a planned maintenance activity that requires powering off the Site 3 storage systems. We also describe the go-back procedure to return to the original configuration. The flow of the Tivoli Storage Productivity Center for Replication operations is shown in Figure 4-123 on page 270. Assuming that the host operations are running on Site 1, we can complete the following steps: 1. Start a SuspendH2H3 action on the Tivoli Storage Productivity Center for Replication session. This performs a Global Mirror pause operation and a suspension of the Global Copy pairs H2-I3. After the action is complete, the status of the session is Severe and the state is SuspendedH2H3. Now we can proceed with powering off the storage systems in Site 3. Tivoli Storage Productivity Center for Replication alerts you about the communication loss to Site 3 storage systems, but this does not affect the current configuration. After the maintenance is completed and the Site 3 storage systems are running, we can start the procedure to return to the original configuration. 2. Start a StartH1 H2 H3 action on the Tivoli Storage Productivity Center for Replication session. This performs the following operations: – Resume the Global Copy H2-I3 – Wait until the H2-I3 first pass copy is completed Chapter 4. Using Tivoli Storage Productivity Center for Replication with DS8000 269 – Restart the Global Mirror H2-H3 The go-back procedure is then completed and the normal operation configuration is restored. This procedure does not require full copy of the data. Figure 4-123 Site 3 planned outage state transition diagram 4.5 Troubleshooting This section provides troubleshooting guidance for managing Tivoli Storage Productivity Center for Replication with DS8000 storage systems. 4.5.1 Managing loss of connection to storage system The loss of connection to DS8000 storage systems leads all the active Tivoli Storage Productivity Center for Replication sessions that are using that DS8000 to an indeterminate state. In Figure 4-124, the console log shows the connection loss events. Figure 4-124 Console Log showing a connection loss event In Figure 4-125 on page 271 and Figure 4-126 on page 271, the statuses of the storage system and session after a connection loss are shown. 270 Tivoli Storage Productivity Center for Replication for Open Systems Figure 4-125 Storage System Details panel that shows Disconnected status Figure 4-126 Session Details panel that shows Severe status Tivoli Storage Productivity Center for Replication continues polling the storage systems. After the connection problem is fixed, the connectivity to the storage system and the actual session status are immediately restored. Other than the full box failure, there are two main causes that lead to a DS8000 connection loss: network problems and HMC problems. In the following session, we describe this two connection loss scenario. Chapter 4. Using Tivoli Storage Productivity Center for Replication with DS8000 271 Important: The loss of connection to storage systems from the stand-by Tivoli Storage Productivity Center for Replication server does not affect the active sessions status. Nevertheless, it is recommended that you fix the cause of the connection loss immediately to avoid any serious issues if there is takeover. The same problem determination for the active server that is described later in this section can be used to analyze the stand-by server connection loss events. Network problem Network problems often are temporary events because the redundancy of the network infrastructure provides the means to recover multiple hardware or software failures. Typical causes of persistent Tivoli Storage Productivity Center for Replication connection losses are major hardware or software problems in the network infrastructure and network security policies reconfiguration. When the network problem becomes persistent, some Tivoli Storage Productivity Center for Replication checking can be done to understand the nature of the problem. In the following section, we describe some of most common network issues that lead to a persistent connection loss. Some mitigation tasks also are proposed. Tivoli Storage Productivity Center for Replication server network isolation When the network issue affects only the Tivoli Storage Productivity Center for Replication server or the LAN that Tivoli Storage Productivity Center for Replication is connected to, a complete loss of the connectivity to all storage systems (not only DS8000) occurs. The connection to the stand-by server also is affected. In this case, because the remote connection to the Tivoli Storage Productivity Center for Replication also is not available, only a physical direct connection to the server can help analyze and resolve the problem. The Tivoli Storage Productivity Center for Replication HA configuration that uses two different LANs for active and stand-by server can mitigate this kind of problem. Storage systems network isolation When the network issue affects a storage system’s LAN (assuming that is different from the Tivoli Storage Productivity Center for Replication LAN), a complete loss of the connectivity to all storage systems (not only DS8000) that are using that LAN occurs. In this case, the connectivity to Tivoli Storage Productivity Center for Replication is still available and this can help to address the issues. A dual HMC configuration that uses two different LANs for primary and secondary HMC can mitigate this kind of problem. HMC problems The DS8000 HMC is a multi-purpose piece of equipment that provides the services that the client needs to configure and manage the storage and manage some of the operational aspects of the Storage System. It also provides the interface where service personnel perform diagnostic and repair actions. The HMC is the communication interface between Tivoli Storage Productivity Center for Replication and DS8000 controller. A software or hardware failure of the HMC causes the loss of communication between Tivoli Storage Productivity Center for Replication and DS8000. In this case, the HMC also becomes unresponsive to other connection types, such as the DSCLI or a simple ping. The HMC functions are not related to data management, so an HMC failure does not affect the normal DS8000 operations. When a software failure occurs, a simple reboot of the HMC is enough to resolve the problem in most cases. More serious software problems might require a fresh installation of the HMC. A dual HMC configuration can mitigate this kind of problem. 272 Tivoli Storage Productivity Center for Replication for Open Systems Note: HMC problems often simultaneously affect active and stand-by Tivoli Storage Productivity Center for Replication server. Internal communication problems The HMC uses the ESSNI service to communicate to the internal DS8000 cluster nodes. If this service is not working, the HMC loses the communication to the DS8000 clusters. In this case, the HMC is still reachable but cannot carry any command to the DS8000, which includes Tivoli Storage Productivity Center for Replication commands. In Figure 4-127, we show how the Connection Details panel reports this status. In most cases, a restart of the ESSNI service (which can be performed only by an IBM service representative) is enough to resolve the problem. Figure 4-127 Connection Details panel 4.5.2 Managing suspending events Unplanned replicating suspension events can occur following a hardware or connectivity failure. The suspension event notification is sent from DS8000 to the Tivoli Storage Productivity Center for Replication through the IP storage system connection and can affect one or more active sessions. Notifications that are related to volumes that are not used in active sessions are discarded from Tivoli Storage Productivity Center for Replication. Tivoli Storage Productivity Center for Replication performs different actions depending on the session that is affected by the suspension event. In particular, if the suspension event is related to a Metro Mirror replication that is managed by Tivoli Storage Productivity Center for Replication with a Metro Mirror or Metro Global Mirror session types, Tivoli Storage Productivity Center for Replication ensures the data consistency that is starting a freeze. Following a suspension, Tivoli Storage Productivity Center for Replication updates the affected session with a status and a state accordingly to the event. In particular, the status always becomes Severe because a major disruption of the replication configuration occurred while the state depends on the type of replication that was affected (Metro Mirror or Global Mirror) and on the state at the suspension time. Chapter 4. Using Tivoli Storage Productivity Center for Replication with DS8000 273 Global Copy relationships that are affected by suspension events can resume automatically after the cause of the suspension is removed. For this reason, Tivoli Storage Productivity Center for Replication sessions that involve Global Mirror replication can resume from a suspension without any user intervention. Temporary suspensions in Global Copy relationships can occur because of poor performance in the replication operations, for example. In the following sections, we describe how to analyze and restore a Tivoli Storage Productivity Center for Replication session after a persistent suspension event. Analyzing the suspension events Tivoli Storage Productivity Center for Replication reports the suspending event in the session information and in the console log. Figure 4-128 shows the Session Details panel in which the suspension event is reported. Figure 4-128 Session Details panel after a suspension event Clicking the role pair that is affected by the suspension opens the role pair panel, as shown in Figure 4-129. In this panel, all of the pairs that are affected by the suspension are identified with an error symbol. Figure 4-129 Role pair H1-H2 panel that shows the pairs that are affected by the suspension 274 Tivoli Storage Productivity Center for Replication for Open Systems Clicking the pair shows a description of the error, as shown Figure 4-130. Figure 4-130 Detailed message of the suspension event Finally, when the message code is clicked, the full error description and the reason codes are displayed, as shown in Figure 4-131. Figure 4-131 Error full description panel Chapter 4. Using Tivoli Storage Productivity Center for Replication with DS8000 275 In the Tivoli Storage Productivity Center for Replication console log, the error message and the actions that were started automatically by Tivoli Storage Productivity Center for Replication are displayed, as shown in Figure 4-132. Figure 4-132 Console log reporting a suspension event All of the information that is provided by Tivoli Storage Productivity Center for Replication can be used as a starting point to determining the cause of the suspension event. Restoring the session after a suspension event It is important to highlight that there is no standard action to perform following a suspension event; any occurrence should be treated as a separate instance. Even if in most cases restarting the session is enough to restore the normal status of the session, a complete root cause analysis is always recommended. Starting actions without identifying the cause of the suspension event can lead to unpredictable results. Further, identifying the proper action to perform, even after the reason for the suspension event was explained, might not always be an easy task. In rolling disaster scenarios, for example, the pair suspension can be only the first in a sequence of events that leads to a major disruption. In these cases, the appropriate action might not be restoring the session to the status before the suspension moment, but a full session recovery to an alternative site might be considered instead. Suspension events can occur at any time, even during a session transition from a configuration to another (for example, during a go-home procedure after a planned outage as described in 4.4.2, “Two-site planned outages scenarios” on page 254). For this reason, accordingly to the status and the state at the suspension moment, by using Tivoli Storage Productivity Center for Replication, users can start the action that is needed to restore (or recover) the session to the wanted configuration. After the session restart is identified as the appropriate action because of the suspension event analysis, we can proceed the session restoration process. Table 4-4 on page 277 shows the actions that can be performed to restore a session according to the Session type, the configuration that is running at the moment of the suspension, and the pair that was suspended. 276 Tivoli Storage Productivity Center for Replication for Open Systems Table 4-4 Action to restart a session following a suspension event Session Type Configuration running Pair suspended Action to restore Metro Mirror H1 H2 H1-H2 Start H1 H2 H2 H1 H2-H1 Start H2 H1 H1 H2 H1-H2 Start H1 H2 H2 H1 H2-H1 Start H2 H1 H1 H2 H3 H1-H2 Start H1 H2 H3 H1 H2 H3 H2-H3 Start H1 H2 H3 H2 H1 H3 H2-H1 Start H2 H1 H3 H2 H1 H3 H1-H3 Start H2 H1 H3 H3 H1 H2 H3-H1 Start H3 H1 H2 H3 H1 H2 H1-H2 Start H3 H1 H2 H1 H3 H1-H3 Start H1 H3 H1 H2 H2-H3 Start H1 H2 Global Mirror Metro Globe Mirror Chapter 4. Using Tivoli Storage Productivity Center for Replication with DS8000 277 278 Tivoli Storage Productivity Center for Replication for Open Systems 5 Chapter 5. Tivoli Storage Productivity Center for Replication with SAN Volume Controller and Storwize family In this chapter, we describe the use of Tivoli Storage Productivity Center for Replication v5.2 to manage and monitor Copy Services in the IBM Storwize family of Storage Systems. We show you how to set up replication sessions, how to manage these sessions, and give some tunable parameters guidance. We also provide some disaster recovery scenarios and troubleshooting guidance. The IBM Storwize family of Storage Systems includes the following models: IBM System Storage SAN Volume Controller IBM Storwize V7000 and V7000 Unified IBM Flex Systems V7000 Storage Node IBM Storwize V3700 IBM Storwize V3500 (available in some geographies) Note: The IBM Flex System™ V7000 Storage Node is available as an integrated component of IBM Flex System and IBM PureFlex™ Systems. Although functionally equivalent to Storwize V7000, Flex System V7000 is not officially supported by Tivoli Storage Productivity Center for Replication V5.2. Ask for a request for price quotation (RPQ) if you intend to use the Flex Systems V7000 Storage Node with Tivoli Storage Productivity Center for Replication V5.2. For more information about the IBM Storwize family of Storage Systems, see this website: http://www-03.ibm.com/systems/storage/storwize/ © Copyright IBM Corp. 2014. All rights reserved. 279 This chapter includes the following topics: 280 Introduction SAN Volume Controller Storwize Products New Functions Session Types and Setup Why and when to use certain session types Disaster Recovery use cases Troubleshooting Tivoli Storage Productivity Center for Replication for Open Systems 5.1 Introduction This section provides an overview of the Storwize family and describes the replication Session types that are supported on the Storwize product portfolio. 5.1.1 The Storwize family of Storage Products The first product that was started in the Storwize family of Storage systems was the SAN Volume Controller in July 2003. Since then, new members were added to the family so that business environments of any size can find a model that best fits their needs. Table 5-1 shows the basic features that differentiate the members of the Storwize family. Table 5-1 Storwize Storage Systems Basic differentiators SAN Volume Controller V7000 V7000 Unified V3700 V3500 Nodes or Controllers 2, 4, 6, or 8 2, 4, 6, or 8 2, 4, 6, or 8 2 2 I/O Groups 1-4 1-4 1-4 1 1 External Storage Array Virtualization Yes Yes Yes No No FlashCopy Yes Yes Yes Yes Yes Global Mirror Yes Yes Yes Yes No Metro Mirror Yes Yes Yes Yes No Block Storage Virtualization Yes Yes Yes Yes Yes File system Services (NAS - CIFS or NFS) No No Yes No No Note: All members of the Storwize family run the same code, so they provide the same Copy Services functions to the storage managed by them as external arrays (SAN Volume Controller), internal disks (V3700, V3500), or both (V7000 and V7000 Unified). They also support Remote Copy services between different family models. 5.1.2 Tivoli Storage Productivity Center for Replication and the Storwize family Tivoli Storage Productivity Center for Replication for Open Systems provides copy services management for SAN Volume Controller, V7000, V7000 Unified, and V3700 with the following session types. IBM Storwize V3500 does not support Global or Metro Mirror. Only FlashCopy sessions are supported for this model: – – – – – – FlashCopy Metro Mirror Single Direction Metro Mirror Failover/Failback Metro Mirror Failover/Failback with Practice Global Mirror Single Direction Global Mirror Failover/Failback Chapter 5. Tivoli Storage Productivity Center for Replication with SAN Volume Controller and Storwize family 281 – Global Mirror Failover/Failback with Practice – Global Mirror Failover/Failback with Change Volumes Consider the following points concerning Tivoli Storage Productivity Center for Replication with the Storwize family of Storage Systems: Copy Services in the Storwize family have similar names (such as, FlashCopy, Global, and Metro Mirror) and the same type of functionality as those in the IBM DS8000 family, but they are different in their internal working, limits, and capabilities. For example, Global Mirror in DS8000 involves Journal Volumes, which are not applicable for SAN Volume Controller. You see Tivoli Storage Productivity Center for Replication lists similar session types in Chapter 4, “Using Tivoli Storage Productivity Center for Replication with DS8000” on page 159, but do not confuse them. Also, it is impossible to configure remote copy services between storage systems of different families; for example, attempting to configure a Global Mirror session between a Storwize V7000 and a DS8870. After you deploy Tivoli Storage Productivity Center for Replication (including storage systems that are under its management and configured data replication sessions in them), you should no longer use the storage systems native management interface (GUI or command-line interface) to manage these replication sessions unless you are facing a problem with Tivoli Storage Productivity Center for Replication and were instructed to do so by an IBM Service Representative. Doing so causes a number of inconsistencies in Tivoli Storage Productivity Center for Replication database and logs and can lead to unpredictable results. In the following sections, we provide a brief architectural description of each Storwize Storage product as an introduction to explore in detail the use of Tivoli Storage Productivity Center for Replication. For more information about the Storwize family of Storage Systems and their respective Copy Services functions, see the IBM Redbooks that are listed in Table 5-2. Table 5-2 Recent IBM Redbooks on Storwize Storage products 282 IBM Redbooks Number Website IBM System Storage SAN Volume Controller Best Practices and Performance Guidelines SG24-7521-02 http://publib-b.boulder.ibm.com /abstracts/sg247521.html?Open IBM System Storage SAN Volume Controller and Storwize V7000 Replication Family Services SG24-7574-02 http://publib-b.boulder.ibm.com /abstracts/sg247574.html?Open Implementing the IBM System Storage SAN Volume Controller V6.3 SG24-7933-01 http://publib-b.boulder.ibm.com /abstracts/sg247933.html?Open Implementing the IBM Storwize V7000 V6.3 SG24-7938-01 http://publib-b.boulder.ibm.com /abstracts/sg247938.html?Open Implementing the IBM Storwize V3700 SG24-8107-00 http://publib-b.boulder.ibm.com /abstracts/sg248107.html?Open Tivoli Storage Productivity Center for Replication for Open Systems 5.2 SAN Volume Controller The SAN Volume Controller’s primary function is to act as a gateway, which provides a common virtualization layer to other storage systems, such as DS8870, XIV, and supported storage systems from other vendors (see Figure 5-1). Among other features, SAN Volume Controller provides a common set of Advanced Copy Services functions that can be used across all its managed storage systems, whether homogeneous or heterogeneous. Figure 5-1 SAN Volume Controller conceptual and topology overview SAN Volume Controller was designed under project COMmodity PArts Storage System or COMPASS with the goal of using, as many as possible, off-the-shelf standard components. Its hardware is based on IBM xSeries® 1U rack servers. The most recently released hardware node, the 2145-CG8, is based on IBM System x3550 M3 server technology with an Intel Xeon 5500 2.53 GHz quad-core processor, 24 GB of cache, four 8 Gbps Fibre Channel ports, and two 1 GbE ports, as shown in Figure 5-2. Figure 5-2 One pair of SAN Volume Controller 2145-CG8 nodes The SAN Volume Controller node model CG8 now offers a FlashCopy ports expansion option that gives you four more FlashCopy ports per node. By using this expansion option, some of these other ports can be configured as dedicated to remote copy services connections. Chapter 5. Tivoli Storage Productivity Center for Replication with SAN Volume Controller and Storwize family 283 Tip: When SAN Volume Controller is used intensively for remote copy services, the use of dedicated ports for remote copy services significantly reduces the odds of encountering problems because of Fibre Channel fabric traffic congestion. In this type of scenario, consider the use of this FlashCopy ports expansion option and modify the SAN zoning configuration. 5.3 Storwize Products As of April 2012, IBM shipped over 21,500 SAN Volume Controller engines to almost 7,000 SAN Volume Controller systems worldwide. To extend the offerings range of storage virtualization, new products were developed that were based on SAN Volume Controller that provides the following advantages: Run the same code and provide the same functions and benefits in a more compact, dedicated hardware packaging. Include their own, underlying storage layer that supports different kinds of disks for different purposes. 5.3.1 Storwize V7000 The Storwize V7000 controller module includes two redundant controller canisters and 12 or 24 SAS disk drives in a 2U standard, 19-inch rack cabinet, as shown in Figure 5-3. Optionally, this controller module can be attached to Expansion modules to increase the number of managed disks. With an optional license, the Storwize V7000 can provide the same virtualization layer that it gives to its internal disks to external, supported storage arrays that are attached to it through SAN. Figure 5-3 Storwize V7000 module The following models are available for Controller or Expansion modules, depending on the capacity of the hard disk drives (HDDs) that best suits your needs: One model that can hold up to 12 Large Form Factor (LFF), 3.5-inch SAS HDDs One model that can hold up to 24 Small Form Factor (SFF), 2.5-inch SAS HDDs, or E-MLC solid-state drive (SSDs) This makes the Storwize V7000 internal storage highly scalable. Each Controller enclosure can have up to nine expansion enclosures that are attached to it. By using SFF enclosures, one I/O group can have up to 240 HDDs. A Storwize V7000 system can have up to four Controller enclosures or I/O groups. 284 Tivoli Storage Productivity Center for Replication for Open Systems Layers The introduction of the Storwize V7000 with its own internal storage also introduced the concept of layers in the remote copy partnerships between systems. Layers include the following features: There are two layers, the storage layer and the replication layer. The layer that a system belongs to is controlled by a system parameter, which can be changed by using the command-line interface (CLI) command chsystem -layer <layer>. SAN Volume Controller systems always are in the replication layer, whereas a Storwize V7000 can be in the replication or storage layer. By default, a Storwize V7000 is in the storage layer. Changing the layer is only performed at initial setup time or as part of a major reconfiguration. To change the layer of a Storwize, the system must meet the following pre-conditions: – The Storwize must not have any host objects defined and must not be presenting any volumes to an SAN Volume Controller as managed disks. – The Storwize must not be visible to any other SAN Volume Controller or Storwize in the SAN fabric. This prerequisite might require SAN zoning changes. A system can form remote copy partnerships with systems in the same layer only. A SAN Volume Controller can virtualize a Storwize V7000 only if the Storwize V7000 is in Storage layer. A Storwize V7000 in Replication layer can virtualize a Storwize V7000 in Storage layer. Figure 5-4 shows the concept of layers. Figure 5-4 Storwize partnerships and layers Note: Tivoli Storage Productivity Center for Replication does not configure the layer that a Storwize V7000 belongs to, nor does it establish partnerships. This must be done via the Storwize GUI or CLI before you attempt to create a Session in Tivoli Storage Productivity Center for Replication. Chapter 5. Tivoli Storage Productivity Center for Replication with SAN Volume Controller and Storwize family 285 5.3.2 Storwize V7000 Unified At the block storage level, the Storwize V7000 Unified is functionally identical to the Storwize V7000. The difference between the products is that a pair of file system management nodes were included on top of the standard Storwize V7000. These nodes run in a cluster with the same code as the IBM Scale Out Network Attached Storage product and use volumes that are provided by the Storwize V7000 to build file systems and provide CIFS or NFS services to the attached IP networks. Figure 5-5 shows the Overview window of the Storwize V7000 Unified with the file system portion highlighted in the red box. Figure 5-5 Storwize V7000 Unified Overview window Tivoli Storage Productivity Center for Replication version 5.2 supports Block level Copy Services in Storwize V7000 Unified version 1.4, but does not yet support the management of file system Replication or Remote Caching. For Tivoli Storage Productivity Center for Replication, Storwize V7000 and Storwize V7000 Unified are equivalent in Copy Services management. 5.3.3 Storwize V3700 and V3500 The Storwize V3700 is fancifully equivalent to the V7000. It has the same enclosure models, which can have Large Form Factor 3.5-inch HDDs or Small Form Factor 2.5-inch HDDs. The Storwize V3700 and V7000 feature the following differences: Storwize V3700 has its configuration that is limited to one controller enclosure and up to four expansion enclosures. Storwize V3700 does not support virtualization of external storage arrays; it supports its own internal disks only. The Storwize V3500, which is available only in a few geographies, accepts no expansion enclosures and does not support remote replication. 286 Tivoli Storage Productivity Center for Replication for Open Systems 5.4 New Functions Among the many new functions that are included in Tivoli Storage Productivity Center for Replication version 5.2, two of them address the management of new major functions in the Storwize family. The following new major functions are described in the following sections: Global Mirror Failover/Failback with Change Volumes session Support for the SAN Volume Controller 6.4 option to move volumes between I/O groups 5.4.1 Global Mirror Failover/Failback with Change Volumes session The Global Mirror Failover/Failback with Change Volumes session is available only for the Storwize family of Storage Systems. It provides the same capabilities as the Global Mirror Failover/Failback session type, but it also provides the option of enabling or disabling the use of Change Volumes. Change Volumes are composed of a source change volume and a target change volume that contain a point-in-time image of the data from the source and target volumes. A FlashCopy operation occurs between the source volume and the source change volume. The frequency of the FlashCopy operation is determined by the cycle period. The data on the source change volume is then replicated to the target volume, and finally to the target change volume. Important: Do not confuse Change Volumes with FlashCopy target volumes or Practice volumes. Change Volumes are dedicated to their respective SAN Volume Controller Global Mirror sessions. Practice volumes are available for some session types in the DS8000 family. Because the data that is replicated between sites contains point-in-time changes rather than all changes, a lower bandwidth link is required between the sites. A regular Global Mirror configuration requires the bandwidth between sites to meet the long-term peak I/O workload, whereas Global Mirror with Change Volumes requires it to meet the average I/O workload across a Cycle Period only. However, the use of change volumes can result in an increase to your data exposure because it changes your Recovery Point Objective (RPO). Therefore, you might want to include or exclude change volumes in your Global Mirror sessions, depending on your network traffic or business requirements. Note: One important feature of this kind of session is that you can monitor the current RPO of your session. You can set two levels of thresholds, Warning and Severe, from 1 second to 48 hours, and Tivoli Storage Productivity Center for Replication sends you an alert if your remote copy session is no longer protecting your data for any reason with the RPO you expect. 5.4.2 Support for the SAN Volume Controller 6.4 option to move volumes between I/O groups Tivoli Storage Productivity Center for Replication version 5.2 supports in its operations the new option that is available in SAN Volume Controller code version 6.4 and higher to non-disruptively migrate a volume to another I/O group. This is often done to manually balance the workload across the nodes in a Storwize clustered system. A compressed volume can also be moved, and you can specify the preferred node in the new I/O group. Chapter 5. Tivoli Storage Productivity Center for Replication with SAN Volume Controller and Storwize family 287 Tip: The move volume operation does not change which I/O groups can access the volume, only the caching I/O group is changed. If you move a volume that is in a FlashCopy Session, the FlashCopy bitmaps remain in the original I/O group. Hence, these volumes cannot be moved when the FlashCopy Session is in Prepare state. 5.5 Session Types and Setup Because all products in the Storwize family run the same code and have the same Copy Services functionality, the available Session types are the same as the types that are described in 5.1.2, “Tivoli Storage Productivity Center for Replication and the Storwize family” on page 281. In this section, we describe how to set up Copy Services sessions for storage systems from the Storwize family. The following assumptions are made: Storage Systems were already configured into Tivoli Storage Productivity Center for Replication, including user IDs with proper privilege to create and manage sessions. Storage Systems that were involved were properly configured to handle Copy Services. Also, proper licenses were enabled, when applicable. Proper communication links were established and configured. In the case of Metro Mirror, that means the inter-switch links (ISLs) and zoning between the Storage Systems are in place. Partnerships between source and target systems were successfully created. Source and target volumes were already provisioned in the storage systems that are involved. Special attention should be paid if thin-provisioned volumes are used in sessions, when applicable. Note: These tasks were not described in more detail to avoid repetition with other published documents. For more information about how to perform these prerequisite tasks, see the publications that are listed in Table 5-2 on page 282. Creating sessions by using the web-based GUI Creating sessions by using the web-based GUI is a two-step process that is run by two wizards in sequence. The first wizard creates the basic session and prompts you to choose the hardware type, session type, and storage systems that participate in the session, with a few tunable parameters. The second wizard adds Copy Sets to the session, and prompts you to select the volumes and the roles each volume plays in each Copy Set. Complete the following steps: 1. Go into Tivoli Storage Productivity Center for Replication by using a user ID with Administration privilege and, in the left menu, click Sessions Create Session, as shown in Figure 5-6 on page 289. A new browser window opens and starts the Create Session wizard starts. 288 Tivoli Storage Productivity Center for Replication for Open Systems Figure 5-6 Tivoli Storage Productivity Center for Replication web-based GUI Create Session wizard 2. In the Create Session wizard window that is shown in Figure 5-7, choose the hardware type and session type. Click Next. Figure 5-7 Choose Hardware Type and Session Type Note: The Create Session wizard presents you with three options in the Storwize family: SAN Volume Controller, Storwize Family (In this case, eStorwize V7000, V3700, or V3500), and Storwize V7000 Unified. However, regardless of the hardware type you choose, you have the same options in the Choose Session Type drop-down menu. 5.5.1 FlashCopy sessions Complete the following steps: 1. In the main Tivoli Storage Productivity Center for Replication window, click Sessions Create Session, as shown in Figure 5-6 on page 289. Chapter 5. Tivoli Storage Productivity Center for Replication with SAN Volume Controller and Storwize family 289 2. In the Create Session wizard, Choose Session Type window, select the following Hardware Type and FlashCopy as Session Type: – Hardware Types: • • • SAN Volume Controller Storwize Family Storwize V7000 Unified – Session Types: FlashCopy 3. The Session Properties window opens. Enter a name and a description for your session. By using the session name, you can uniquely identify the session type and help you deduce to which servers, applications, or services it relates so that you can quickly debug any errors. In the example that is shown in Figure 5-8, we entered FCDB2session as our session name. Figure 5-8 FlashCopy Session Properties for Storwize family 4. Configure the FlashCopy session tunable parameters. The Incremental flag (see Figure 5-8) prevents FlashCopy from copying the entire source volume whenever a Flash command is run, which reduces the copy time and the Storwize cluster workload. The background copy rate specifies the speed at which that particular FlashCopy session moves data. Table 5-3 on page 291 shows the correlation between the values that are specified and the actual copy speed. A value of zero disables the background copy, and 256 KB is the default grain size in SAN Volume Controller code 6.2 and up. Click Next. 290 Tivoli Storage Productivity Center for Replication for Open Systems Table 5-3 Background Copy Rate Background copy rate Data copied per second Grains per second (256 KB grain) Grains per second (64 KB grain) 01-10 128 KB 0.5 2 11-20 256 KB 1 4 21-30 512 KB 2 8 31-40 1 MB 4 16 41-50 2 MB 8 32 51-60 4 MB 16 64 61-70 8 MB 32 128 71-80 16 MB 64 256 81-90 32 MB 128 512 91-100 64 MB 256 1024 5. Configure the Site Locations. In the case of FlashCopy sessions, there is only one site. Select the storage system that hosts the source and target volumes and performs the FlashCopy operation. In the example that is shown in Figure 5-9, we selected svc08 as the storage system. Click Next. Figure 5-9 FlashCopy Site Locations for Storwize family In the wizard, you see the results of the Create Session operation and you have the option of finishing the wizard without further action or starting the Add Copy Sets wizard, as shown in Figure 5-10 on page 292. Chapter 5. Tivoli Storage Productivity Center for Replication with SAN Volume Controller and Storwize family 291 Figure 5-10 FlashCopy Create Session Results 6. You can start the Add Copy Sets wizard any time by selecting Sessions in the upper left menu. Select the session to which you want to add copy sets, then select Add Copy Sets, as shown in Figure 5-11. Figure 5-11 Add Copy Sets to a Session 7. The Add Copy Sets wizard open a new window and prompts you to select the source volume, which is referred to by Tivoli Storage Productivity Center for Replication as Host1 (H1). Select the storage system from the drop-down menu, then select the I/O group to which the volume belongs, then the volume, as shown in Figure 5-12 on page 293. Click Next. 292 Tivoli Storage Productivity Center for Replication for Open Systems Note: You can also add copy sets to a session by importing a previously exported comma-separated value (CSV) file. For more information about this procedure, see 3.10.2, “Importing CSV files” on page 132. Figure 5-12 Select the source volume Host1 for the copy set 8. The wizard prompts you to select the target volume Target1 (T1); in this case, Host1 volume Red_vol01. Select H1, as shown in Figure 5-13. Click Next. Figure 5-13 Select the target volume Target1 for the copy set 9. By using the wizard, you can add more Copy Sets to the list before they are added to the session. Click Add More in the Select Copy Sets window (as shown in Figure 5-14 on page 294) and then repeat steps 5 and 6, as needed. Confirm that the required Copy Sets are selected and then click Next. Chapter 5. Tivoli Storage Productivity Center for Replication with SAN Volume Controller and Storwize family 293 Figure 5-14 Select Copy Sets to add to Session 10.You are prompted to reconfirm the number of Copy Sets that you want to add to the Session and, if confirmed, perform the actual operation. A message is shown with the results. Note: Tivoli Storage Productivity Center for Replication automatically creates a Consistency Group for the Copy Sets in a FlashCopy Session. Copy Sets that are added later to this FlashCopy Session by Tivoli Storage Productivity Center for Replication also are added to this Consistency Group. If the operation was successful, click Finish to close the wizard. If the operation was unsuccessful, verify the messages in the Console window to troubleshoot the operation before you try again. 5.5.2 Metro Mirror sessions The Metro Mirror session creation process is similar to the FlashCopy session creation process. You create a Session by selecting the hardware and session types, then add copy sets to the session. The difference is that the wizard prompts you for the specific parameters for this kind of session. Complete the following steps: 1. In the main Tivoli Storage Productivity Center for Replication window, click Sessions Create Session. Note: A comparable process was shown in 5.5, “Session Types and Setup” on page 288, beginning with Figure 5-6 on page 289. The session creation process is similar across all session types; therefore, not all panels are repeated here. 294 Tivoli Storage Productivity Center for Replication for Open Systems 2. In the Create Session wizard, Choose Session Type window, select the following Hardware Type and one of the Synchronous Session Types: – Hardware Types: • • • SAN Volume Controller Storwize Family Storwize V7000 Unified – Session Types: • • • Metro Mirror Single Direction Metro Mirror Failover/Failback Metro Mirror Failover/Failback with Practice 3. In the Properties window, enter the name and description of the Session. Note: If you chose a Metro Mirror Failover/Failback with Practice session, you are asked for the parameters of the FlashCopy between H2 (target volume) and I2 (practice volume), in addition to Name and Description. You also are prompted if this FlashCopy is to be Incremental and for the background copy rate, as shown in Figure 5-15 and Table 5-3 on page 291. Figure 5-15 Metro Mirror with Practice: Session Properties window 4. In the Location Site 1 window, select the storage system that hosts the H1 volumes, as shown in Figure 5-16 on page 296. Chapter 5. Tivoli Storage Productivity Center for Replication with SAN Volume Controller and Storwize family 295 Figure 5-16 Metro Mirror Site 1 selection 5. In the Location Site 2 window, select the storage system that hosts the H2 and I2 volumes, as shown in Figure 5-17. Figure 5-17 Metro Mirror Site 2 selection 6. If the Results window shows that the session was successfully created, click Launch Add Copy Sets Wizard. If the session was not created successfully, you should trouble shoot the error message before you attempt to create the session again. 7. In the Select Host1 window of the Add Copy Sets wizard, select the storage system, I/O Group, and Volume for the H1 volume, as shown in Figure 5-18 on page 297. 296 Tivoli Storage Productivity Center for Replication for Open Systems Optionally, use a CSV file to import copy sets (for more information, see “Importing CSV files” on page 132). Figure 5-18 Add Copy Sets wizard Choose Host1 volume 8. In the Choose Host2 window, select the storage system, I/O Group, and Volume for the H2 volume. Click Next to continue. If you selected a Metro Mirror Failover/Failback with Practice session in step 2, you see the Select Intermediate2 window. Select the storage system, I/O Group, and Volume for the I2 volume, as shown in Figure 5-19. Click Next. Figure 5-19 Add Copy Sets wizard Choose Intermediate2 volume 9. If the Matching was successful (as shown in Figure 5-19), the Select Copy Sets window opens. Click Add More and repeat steps 7 and 8 (see Figure 5-18 on page 297 and Figure 5-19) as needed. Click Next. You are prompted to reconfirm the number of Copy Sets that you want to add to the Session and, if confirmed, perform the operation. A message is shown with the Results. If the operation was successful, click Finish to close the wizard. If the operation failed, open the Console window to review the error messages. Chapter 5. Tivoli Storage Productivity Center for Replication with SAN Volume Controller and Storwize family 297 5.5.3 Global Mirror sessions The same considerations that are described in 5.5.2, “Metro Mirror sessions” on page 294, are valid here for Global Mirror sessions. Complete the following steps: 1. In the main Tivoli Storage Productivity Center for Replication window, click Sessions Create Session. Note: A comparable process was shown in 5.5, “Session Types and Setup” on page 288, beginning with Figure 5-6 on page 289. The session creation process is similar across all session types; therefore, not all panels are repeated here. 2. In the Choose Session Type window of the Create Session wizard, select the following Hardware Type and one of the Asynchronous Session Types: – Hardware Types:SAN Volume Controller: • • Storwize Family Storwize V7000 Unified – Session Types:Global Mirror Single Direction: • • • Global Mirror Failover/Failback Global Mirror Failover/Failback with Practice Global Mirror Failover/Failback with Change Volumes Click Next. 3. In the Properties window, enter a name and description for the session and, depending on the chosen session type, set up the following parameters: – If you chose a Global Mirror Failover/Failback with Practice session you also are prompted for the parameters of the FlashCopy between Host Volume 2 (H2) and Intermediate Volume 2 (I2), if this FlashCopy is to be Incremental, and the background copy rate. These parameters are the same as those for the Metro Mirror Failover/Failback with Practice that is shown in Figure 5-15 on page 295. – If you chose a Global Mirror Failover/Failback with Change Volumes session, you are prompted for the Change Volumes tunable parameters. Selecting the Enable Change Volumes option (see Figure 5-20 on page 299) enables Change Volumes when the session is created. The Cycle period value gives you the interval of FlashCopy operations between H1-C1 and H2-C2 (the default value is 300 seconds or 5 minutes). The Recovery Point Objective Alerts values give you the RPO threshold values that Tivoli Storage Productivity Center for Replication uses to send Warning or Severe alerts. A value of zero disables such alerts, as shown in Figure 5-20 on page 299. Note: Cx is the abbreviation for Change volume and Hx is the abbreviation for Host volume. For more information about the volume types and the abbreviations that are used by Tivoli Storage Productivity Center for Replication, see 1.2, “Terminology” on page 3. 298 Tivoli Storage Productivity Center for Replication for Open Systems Figure 5-20 Global Mirror Failover/Failback w/ Change Volumes Properties 4. In the Location Site 1 window, select the storage system that hosts H1 volumes. If you chose a Global Mirror Failover/failback with Change volume, this storage system also hosts the Change Volumes C1. 5. In the Location Site 2 window, select the storage system that hosts H2 volumes. If you chose a Global Mirror Failover/failback with Practice volume, this storage system also hosts the Practice Volumes I2. If you chose a Global Mirror Failover/failback with Change volumes, this storage system also hosts the Change Volumes C2. 6. If the Results window shows that the session was successfully created, click Launch Add Copy Sets Wizard. 7. In the Choose Host1 window of the Add Copy Sets wizard, select the storage system, I/O Group, and Volume for the H1 volume, as shown in Figure 5-21 on page 300. Click Next. Chapter 5. Tivoli Storage Productivity Center for Replication with SAN Volume Controller and Storwize family 299 Figure 5-21 Add Copy Sets Choose Host1 volume If you chose a Global Mirror Failover/failback with Change volumes in step 2, you see the Choose Change1 volume window, as shown in Figure 5-21. Select the storage system, I/O Group, and Volume for the C1 volume. Click Next. Optionally, you can use a CSV file to import copy sets. For more information, see “Importing CSV files” on page 132. 8. In the Choose Host2 window, select the storage system, I/O Group, and Volume for the H2 volume. Click Next to continue. If you selected a Metro Mirror Failover/Failback with Practice session in step 2, you see the Select Intermediate2 window. Select the storage system, I/O Group, and Volume for the I2 volume. Click Next. If you chose a Global Mirror Failover/Failback with Change volumes in step 2, you see the Choose Change2 Volume window. Select the storage system, I/O Group, and Volume for the C2 volume. Click Next. 9. If the Matching was successful, you see the Select Copy Sets window. Click Add More and repeat step 7 (see Figure 5-21) and step 8 as needed. Click Next. The wizard prompts you to reconfirm the number of Copy Sets that you want to add to the session and, if confirmed, perform the actual operation. A message is shown with the results. If the operation was successful, click Finish to close the wizard. Open the Console window to review the error messages if the operation failed. 300 Tivoli Storage Productivity Center for Replication for Open Systems 5.6 Why and when to use certain session types The choice of session type depends on your company or business’ Disaster Recovery (DR) plan and the level of protection that is required for each application and service. If you still do not have a DR plan, consider preparing a preliminary DR plan. In this section, we provide an overview about the basic selection criteria. 5.6.1 When to use FlashCopy FlashCopy creates a point-in-time copy of volumes that can be used by other servers and applications independently of the original source volumes. Because the FlashCopy operation is fast, production I/O can be quiesced for brief periods without disrupting applications and users, thus enabling the Flash operation to produce a consistent copy of the original set of volumes. FlashCopy sessions do not perform data replication to another site; source and target volumes exist in the same storage system. In most cases, FlashCopy alone is not a suitable option for disaster recovery. However, it can be associated with other tools for disaster recovery, such as off-site tape backup vaulting, or even improve resources usage. An example is application testing or online database backup by using Tivoli Storage Manager Transparent Data Protection. For more information, see 5.4.1, “Global Mirror Failover/Failback with Change Volumes session” on page 287. 5.6.2 When to use Metro Mirror Metro Mirror performs a synchronous copy of volumes between separate storage systems. By definition, synchronous replication makes the issuing host wait for its write I/Os to complete at the local and remote storage systems, which for the remote systems include round-trip network delay. The main goal when Metro Mirror is used is to achieve zero Recovery Point Objective (RPO); that is, zero data loss. Metro Mirror replication is the better choice whenever the distance between the sites that are hosting the replicating storage systems falls within metropolitan distances (under 300 km) and the application software can withstand longer I/O latencies without severely degrading performance. Metro Mirror typically requires faster, larger-bandwidth links between sites. For campus-wide distances (up to 10 km), this can be achieved with native Fibre Channel long-wave links by using dark fibers or dense wavelength division multiplexing (DWDM). However, when Network Service Providers are used, the cost of such fast, high-bandwidth links can make Metro Mirror cost-prohibitive for applications that tolerate greater than zero RPO. 5.6.3 When to use Global Mirror Global Mirror performs an asynchronous copy between separate storage systems. Write I/O operations are acknowledged when they can be committed to the local storage system, sequence-tagged, and then passed on to the replication network. They do not wait for remote storage acknowledgement. Global Mirror can be used with farther distances between sites (up to 8000 km) without compromising performance on the application software in the local site. However, it does move your RPO to a value greater than zero. Chapter 5. Tivoli Storage Productivity Center for Replication with SAN Volume Controller and Storwize family 301 Global Mirror with Change Volumes Enabling change volumes moves your RPO to an even greater value; but, at the same time, you can use a smaller bandwidth between sites, depending on the difference between peak and average I/O workload during cycle periods. 5.7 Disaster Recovery use cases In this section, we describe some alternative topologies for SAN Volume Controller or Storwize implementation and how these topologies relate to Tivoli Storage Productivity Center for Replication. 5.7.1 SAN Volume Controller Stretched Cluster SAN Volume Controller Stretched Cluster (also known as Split Cluster or Split I/O Group) is an implementation topology where the individual nodes of each SAN Volume Controller I/O group in a cluster are placed in separate sites or failure domains. This topology requires a minimum of three sites or failure domains, each one with at least one storage system that is managed by the SAN Volume Controller cluster. The storage system in the site without SAN Volume Controller nodes host the active SAN Volume Controller quorum disk. Figure 5-22 shows one example of such topology that uses no Inter-Switch Link (ISL) between switches. Figure 5-22 Two-node SAN Volume Controller Stretched Cluster topology example Note: This scenario is only possible with SAN Volume Controller because other members of the Storwize family have both nodes of an I/O group physically inside the same controller canister. The SAN Volume Controller Stretched Cluster is a fault-tolerant, high-availability solution. Metro Mirror and Global Mirror are disaster recovery solutions. Table 5-4 on page 303 shows their functional differences. 302 Tivoli Storage Productivity Center for Replication for Open Systems Table 5-4 SAN Volume Controller Stretched Cluster and Metro/Global Mirror comparison Feature Stretched Cluster Metro/Global Mirror Failover Automatic and transparent failover, volume LUNid unchanged Manual Failover, MM/GM source, and target volume LUNids are different Resynchronization Automatic Manual, power fail consistency Consistency across multiple volumes Not applicable; each volume mirror has individual consistency Consistency groups across multiple volumes available Server I/O performance impact over long distances Response time similar to synchronous copy because of cache mirroring between both sites Metro Mirror performs synchronous replication, response time depends on distance; Global Mirror is asynchronous, response time independent from distance For more information about SAN Volume Controller Stretched Cluster, see IBM Techdoc WP102134 IBM SAN Volume Controller 7.1 SVC cluster spanning multiple data centers (Stretched Cluster / Split I/O group), WP102134, which is available at this website: http://w3-03.ibm.com/support/techdocs/atsmastr.nsf/WebIndex/WP102134 SAN Volume Controller Stretched Cluster and Tivoli Storage Productivity Center for Replication A SAN Volume Controller Stretched Cluster is seen and handled by Tivoli Storage Productivity Center for Replication as one single storage entity, no different from its classical cluster configuration with all nodes and I/O groups physically in the same rack. Tip: High-availability solutions that use SAN Volume Controller Stretched Cluster use primarily SAN Volume Controller Volumes Mirroring, which is not managed by Tivoli Storage Productivity Center for Replication. To manage SAN Volume Controller Volumes Mirroring, use Tivoli Storage Productivity Center or SAN Volume Controller management tools (GUI or CLI). The use of SAN Volume Controller in a stretched cluster often requires extensive use of volumes with at least one mirrored copy. The use of FlashCopy or Global/Metro Mirror in this situation means that even more copies of the same data are created. Even if you use thin-provisioned volumes, more storage capacity is required. Considerations are different depending on the session type when Tivoli Storage Productivity Center for Replication is used with a SAN Volume Controller Stretched Cluster. FlashCopy sessions For SAN Volume Controller Stretched Cluster, a typical volume has two mirrored copies, one in each failure domain. Therefore, each copy is physically hosted by a different managed storage system in the SAN Volume Controller cluster. One of these copies is the primary copy, with all read I/O being performed on it and all write I/O being performed first on it then replicated to the other copies. We advise that you configure these mirrored volumes with the primary copy in the same failure domain as the volume preferred node. Chapter 5. Tivoli Storage Productivity Center for Replication with SAN Volume Controller and Storwize family 303 When you are configuring a FlashCopy session with the source volume as one such mirrored volume, the configuration and placement of the target volume depends on the use you intend to make of it. If your FlashCopy target is intended as a point-in-time backup copy for quick restore if required and it is not mapped to other servers, you might want to configure this target volume and its preferred node in the same failure domain as the secondary mirror copy. Care should be taken with the use of storage capacity in the failure domains. If your servers are concentrated in one failure domain, the other requires much more available capacity, as shown in Figure 5-23. Figure 5-23 SAN Volume Controller Stretched Cluster with FlashCopy target in failure Domain 2 If you intend to use your FlashCopy target volume by another server or application (for example, tape backup or application test), consider placing this target volume in the same failure domain as this alternative server. Be careful if your servers are concentrated in one failure domain because this might cause the SAN Volume Controller node in this domain to become overloaded, as shown in Figure 5-24. Figure 5-24 SAN Volume Controller Stretched Cluster with FlashCopy target with alternative server Set the FlashCopy source volume attribute -mirrorwritepriority to redundancy. 304 Tivoli Storage Productivity Center for Replication for Open Systems It is unlikely that you want the target FlashCopy volume to be mirrored across failure domains (it would be the fourth copy of the same data). Consider carefully if you have a possible recovery scenario that might require this other mirroring. Metro Mirror and Global Mirror sessions With Metro Mirror and Global Mirror sessions, a target storage system is required. Consider the following points: Except for Storwize V3500, the target system can be any member of the Storwize family. When another SAN Volume Controller cluster is used as the target system, it can be a Stretched Cluster or not. When the Metro Mirror session is used, this target SAN Volume Controller system can be placed in failure domain 3, which is co-located with the Storage System that hosts the active quorum disk. In this scenario, this SAN Volume Controller target system can be the Metro Mirror target system and host of the active quorum disk at the same time, as shown in Figure 5-25. Note: Although you can set up a topology that includes three or four different sites by using stretched cluster and Metro or Global Mirror, do not confuse this scenario with other session types that involve three or more sites, such as Metro Global Mirror, which is available for DS8000. Tivoli Storage Productivity Center for Replication treats a SAN Volume Controller stretched cluster as a single storage system (as source or target) in a session. Figure 5-25 Metro Mirror between a SAN Volume Controller stretched cluster and a Storwize V7000 Chapter 5. Tivoli Storage Productivity Center for Replication with SAN Volume Controller and Storwize family 305 5.7.2 Global Mirror Forwarding I/O Group The Forwarding I/O Group is an alternative way to configure the SAN zoning between the local and remote Storwize systems. Instead of making all of your Storwize local nodes communicate with all of your remote nodes, you can elect one or more I/O groups on each site and include only these I/O Groups in your Global Mirror zones. The local SAN Volume Controller or V7000 detects which nodes have inter-cluster links, and any Global Mirror I/O are forwarded to these nodes before the I/O is sent to the remote system, as shown in Figure 5-26. Note: This topology has as a prerequisite of more than one I/O group in either or both of your Storwize paired systems. Figure 5-26 SAN Volume Controller or Storwize Forwarding I/O Group The use of a Global Mirror Forwarding I/O group has the advantage of the chances of hosts that are attached to the other I/O groups face degradation on their I/O are greatly reduced should your WAN face any congestion and consequentially buffer credit starvation. For more information about Forwarding I/O Groups and how to set them up, see Chapter 12 of IBM System Storage SAN Volume Controller and Storwize V7000 Replication Family Services, SG24-7574-02. Note: Tivoli Storage Productivity Center for Replication does not play any role in Forwarding I/O Group setup. This is done by changing SAN zoning configuration before you get the Storwize systems paired for remote replication. After the pairing is done, you can create your Global Mirror sessions normally in Tivoli Storage Productivity Center for Replication and these sessions use the Forwarding I/O Group topology. 306 Tivoli Storage Productivity Center for Replication for Open Systems 5.8 Troubleshooting A problem with a replication session often means that this session went to a state that was unexpected, unwanted, or both. Troubleshooting these problems might require gathering more information than Tivoli Storage Productivity Center for Replication alone can give you. Experience shows that, in these cases, the more data that you have for cross-reference, the better your chances are of establishing the root cause of your replication problem and fixing it. In this section, we describe how to interpret the information Tivoli Storage Productivity Center for Replication gives you regarding a troubled replication session, and how to cross-reference this information with other information sources, such as Tivoli Storage Productivity Center, storage systems, and SAN switches. Note: It can be helpful to review the logs of Storage Systems and SAN switches directly to collect them for cross-reference. However, as described in 5.1.2, “Tivoli Storage Productivity Center for Replication and the Storwize family” on page 281, after you started managing these devices by using Tivoli Storage Productivity Center for Replication or Tivoli Storage Productivity Center, do not change their replication configuration by using the Storage System’s own GUI or CLI unless you are instructed to do so by IBM Support. For more information about possible replication services problems on the Storwize family, see Chapter 13, “Troubleshooting Replication Family Services” of IBM System Storage SAN Volume Controller and Storwize V7000 Replication Family Services, SG24-7574-02. 5.8.1 Storwize family replication error codes Table 5-5 provides a description of commonly seen replication error codes in the Storwize family when an error occurs. Table 5-5 Storwize replication error codes Error 1720: In a Metro Mirror or Global Mirror operation, the relationship has stopped and lost synchronization, for a reason other than a persistent I/O error. Possible Cause Suggested additional information Intercluster SAN/WAN link failed Examine the following SAN switches and router logs for evidence of link trouble: Brocade fabriclog Cisco show logging log Destination Storwize cluster instability Examine the event logs of the destination cluster to determine whether it had problems around the time of your error condition. Metro Mirror Destination Cluster Performance Check the performance of the destination cluster. Check whether remote mDisks are responding well. Check whether CPUs of the remote nodes are running over 80 percent. Compare it with earlier performance statistics, if available. Chapter 5. Tivoli Storage Productivity Center for Replication with SAN Volume Controller and Storwize family 307 Error 1910: A FlashCopy mapping task was stopped because of the error that is indicated in the sense data. Related FlashCopy session stopped in Cascaded FlashCopy Verify your Cascaded FlashCopy sessions Error 1920: Global and Metro Mirror persistent error. Insufficient WAN bandwidth Performance issues at the remote cluster Verify whether WAN link is overconfigured or with poor quality Verify whether WAN link is driving more data than it can handle Check the performance of the destination cluster: Check whether remote mDisks are responding well. Check whether CPUs of the remote nodes are running over 80 percent. Compare it with earlier performance statistics, if available. If an external storage system is used, verify its error logs. Metro Mirror or Global Mirror target volume is a FlashCopy source in Preparing or Prepared state Volumes in the Prepared state have write cache in write-through mode, which reduces their write performance. Source volume or storage controller overloaded Collect and verify Storwize performance data at the time the error occurred. 5.8.2 Troubleshooting replication links Problems that are encountered by your replication sessions and might be traced back to your replication links often occur because of the following causes: Your replicated Storage Infrastructure grew in capacity or I/O demand, and the replication link bandwidth did not grow. Other applications and services started using the replication link for inter-site communication. The quality of service (QoS) of the replication link was reduced for some reason. Changes in networking devices (SAN or IP), such as firmware update or configuration, caused an unexpected impact. Changes in replication session parameters caused more data to be transmitted over the replication link. A good starting point to debug replication link problems is to use Tivoli Storage Productivity Center for Replication to trace back when the problems with your sessions began. You can also check your Problem and Change Management tool or network device logs for evidence of events right before the problems started that might be related to the behavior you are experiencing. Also, 308 Tivoli Storage Productivity Center for Replication for Open Systems For more information about how to troubleshoot your network devices and links, see Chapter 13, “Troubleshooting Replication Family Services” of IBM System Storage SAN Volume Controller and Storwize V7000 Replication Family Services, SG24-7574-02. Chapter 5. Tivoli Storage Productivity Center for Replication with SAN Volume Controller and Storwize family 309 310 Tivoli Storage Productivity Center for Replication for Open Systems 6 Chapter 6. Using Tivoli Storage Productivity Center for Replication with XIV In this chapter, we describe the Tivoli Storage Productivity Center for Replication 5.2 features that are related to IBM XIV Storage Systems (XIV). Support: Support for XIV is available starting with Tivoli Storage Productivity Center for Replication 4.2.2. Tivoli Storage Productivity Center 5.2 supports only XIV Gen2 hardware and XIV Gen3 hardware. This chapter includes the following topics: Overview Snapshot sessions Metro Mirror Failover/Failback sessions Global Mirror Failover/Failback sessions Adding XIV volume protection Disaster Recovery use cases Troubleshooting © Copyright IBM Corp. 2014. All rights reserved. 311 6.1 Overview As of Tivoli Storage Productivity Center for Replication 4.2, you can manage copy services solutions on IBM XIV storage systems. XIV support is included as a part of Tivoli Storage Productivity Center for Replication and does not require any other installation. The following copy services terms that are related only to XIV storage systems are referenced and described in this chapter: Consistency group A set of volumes that is treated as a single volume. Mirror A replica of a volume or consistency group to another volume or consistency group. Pool An allocation of space that is used to create volumes. Snapshot A point-in-time copy of a volume or consistency group. Snapshot group A group of snapshots that is formed from a consistency group. On XIV storage systems, primary and secondary volumes are referred to as master (primary) and subordinate (secondary) volumes. For more information about XIV Storage System Copy Services, see IBM XIV Storage System Copy Services and Migration; SG24-7759, which is available at this website: http://www.redbooks.ibm.com/redpieces/abstracts/sg247759.html?Open 6.1.1 XIV consistency groups All session types in Tivoli Storage Productivity Center for Replication use XIV consistency groups. The consistency groups are created and named by Tivoli Storage Productivity Center for Replication. To determine the consistency group name for a session, we use the following approach: 1. 2. 3. 4. Use the Tivoli Productivity Center for Replication session name (limited to 58 characters). If that name exists, use the session name with “_001” appended. Keep trying “_00x” names up to x=30. If all of those names exist, the consistency group is not created. Because of this naming convention, the consistency group names that are created might not be the same between XIV storage systems in a single session. For example, you can have a consistency group that is named mmSession_001 on one XIV and a consistency group that is named mmSession_002 on the other. The consistency group name depends on what consistency groups exist on the individual XIV storage systems at the time Tivoli Storage Productivity Center for Replication attempts to create them. The consistency group name is shown in the Session Details panel, as shown in Figure 6-1 on page 313. By using this panel, you can see what is used on the XIV Storage System, which can be important for debugging any issues. 312 Tivoli Storage Productivity Center for Replication for Open Systems Figure 6-1 Consistency groups that are listed in Session Details You can also see the consistency group name in the Console log as it is created, as shown in Figure 6-2. Figure 6-2 Consistency group creation that is logged in the console 6.1.2 XIV connections To add a connection to an XIV Storage System, from the menu select Storage Systems Add Storage Connection. This starts a wizard for adding a storage connection for all of the supported storage system device types. When you select the XIV icon, you are prompted to enter connection information, which includes a single IP address to the XIV Storage System, a user name, and a password, as shown in Figure 6-3. The XIV user must have storage administrator authority. Figure 6-3 Add a single IP address for the XIV connection Tip: When you add the IP address of an XIV Storage System, you get three connections between it and Tivoli Storage Productivity Center for Replication. You do not need to enter all three IP addresses. Chapter 6. Using Tivoli Storage Productivity Center for Replication with XIV 313 After you complete the wizard to add the storage system, an SSH connection is established and the XIV appears in the list of connections, as shown in Figure 6-4. Figure 6-4 Status of storage system connections If the connection was successful, the storage system is listed under the Storage Systems tab, as shown in Figure 6-5. It is also available for selection in the Add Copy Sets wizard for the sessions. Figure 6-5 Successfully added XIV storage systems 314 Tivoli Storage Productivity Center for Replication for Open Systems Various panels within Tivoli Storage Productivity Center for Replication, such as those shown in Figure 6-4 on page 314 and Figure 6-5 on page 314, display the Local Status for the added XIV storage systems. This status represents the status of the main connection between the Tivoli Storage Productivity Center for Replication server and the IP address that you added. It does not include the status of the other IP connections to the XIV that are automatically discovered. To view the status for all of the connections to an XIV Storage System, select the radio button for the host name or IP address that you added (the main connection), choose View/Modify Connections Details from the list of actions, and click Go, as shown in Figure 6-6. Figure 6-6 View/Modify Connection Details If you prefer, you can choose to click the link to the host name to go directly to the Connection Details panel (as shown in Figure 6-7 on page 316) for a particular device instead. Chapter 6. Using Tivoli Storage Productivity Center for Replication with XIV 315 Figure 6-7 shows the Local Connection Status for the main IP address that you entered for the XIV Storage System. It also lists other Module Connections on the right in the panel. The other connections show the status of the connections to the other IP addresses that Tivoli Storage Productivity Center for Replication found for the XIV Storage System. Figure 6-7 Connection Details for multiple IP addresses Connections: The connection status values are all independent and do not roll up to provide an overall status value for the XIV Storage System. The other connections provide redundancy and failover for the nodes of the storage system. 6.2 XIV session types The following session types are available for XIV storage systems: Snapshot Metro Mirror Failover/Failback Global Mirror Failover/Failback Note: There are no practice session types available for XIV storage systems. In the following sections, we describe each session type and how to use it. 6.2.1 Snapshot sessions Snapshot is a session type that creates a point-in-time copy of a volume or set of volumes without having to define a specific target volume. The target volumes of a snapshot session are automatically created when the snapshot is created. The XIV Storage System uses advanced snapshot architecture to create many volume copies without affecting performance. By using the snapshot function to create a point-in-time copy and to manage the copy, you can save storage. With the XIV Storage System snapshots, no storage capacity is used by the snapshot until the source volume (or the snapshot) is changed. 316 Tivoli Storage Productivity Center for Replication for Open Systems Note: The snapshot session type is only available for XIV storage systems. Figure 6-8 shows a snapshot session in Tivoli Storage Productivity Center for Replication. Figure 6-8 Snapshot session Configuration XIV snapshot session support is available with all Tivoli Storage Productivity Center editions. You must have the following environment to work with snapshot sessions in Tivoli Storage Productivity Center for Replication: One or more XIV storage systems, with pools and volumes configured IP connectivity between the XIV Storage System and the Tivoli Storage Productivity Center for Replication server Limitations The XIV snapshot session has the following limitations: Session name is limited to 58 characters. Consistency group is limited to 128 volumes. This is not enforced by Tivoli Storage Productivity Center for Replication. All volumes from a session must be in the same pool. Volumes that are mapped to a host cannot be deleted while mapped. Locked volumes are read-only. Snapshot groups can be automatically deleted. This is based on deletion priority and pool space. Creating a snapshot session After you add connections to the XIV storage systems and meet the configuration requirements, you are ready to start creating sessions and adding copy sets to them. Complete the following steps to set up a snapshot session for data replication with Tivoli Storage Productivity Center for Replication: 1. Select Sessions from the navigation tree and click Create Session to display the Create Session wizard, as shown in Figure 6-9 on page 318. Choose XIV and Snapshot and click Next. Chapter 6. Using Tivoli Storage Productivity Center for Replication with XIV 317 Figure 6-9 Create snapshot session 2. As shown in Figure 6-10, enter Session name and description, and click Next. Figure 6-10 Session Properties 318 Tivoli Storage Productivity Center for Replication for Open Systems 3. Choose the location for the session, as shown in Figure 6-11. Click Next. Figure 6-11 Session Location The Session is successfully created, as shown in Figure 6-12. Figure 6-12 Create Session Result page Chapter 6. Using Tivoli Storage Productivity Center for Replication with XIV 319 Adding Copy Sets to snapshot session After a session is defined, Tivoli Storage Productivity Center for Replication must know on which volumes to act. Complete the following steps to add copy sets to the snapshot session: 1. To add copy sets on the XIV Storage System to your created session, on the Results page of the Create Session wizard (see Figure 6-12 on page 319), click Launch Add Copy Sets Wizard. 2. In the Add Copy Sets wizard, select the storage system, storage pool, and volume. Click Next (see Figure 6-13). Figure 6-13 Host Storage system selection page 320 Tivoli Storage Productivity Center for Replication for Open Systems If the Copy set matches were successful, click Next and you see the Select Copy Sets page, as shown in Figure 6-14. Figure 6-14 Copy Sets selection 3. Select the Copy Set that you want to add and click Next. On the Confirm page, click Next to confirm. If the Copy Set was created, you see the Results page, as shown in Figure 6-15. Figure 6-15 Add Copy Set result page Chapter 6. Using Tivoli Storage Productivity Center for Replication with XIV 321 4. Click Finish and the wizard closes. You can see the new defined session in the Sessions panel, as shown in Figure 6-16. Figure 6-16 XIV snapshot session Activating a snapshot session After a session is defined, you can access its details and modify it from the Session Details window, as shown in Figure 6-17. Because this session was not run, the details under Snapshot Groups remain empty. Figure 6-17 Detailed view of XIV snapshot session; inactive and has not yet run 322 Tivoli Storage Productivity Center for Replication for Open Systems Complete the following steps to activate the Tivoli Storage Productivity Center for Replication snapshot session: 1. In the Session Details panel, click the pull-down list, select Create Snapshot, and then click Go, as shown in Figure 6-18. Figure 6-18 XIV Create snapshot 2. A new wizard opens. The actions that you are about to take on those volumes are confirmed. Under Advanced Options, you also can modify various XIV specific values, including the actual snapshot group name and deletion priority, as shown in Figure 6-19. Figure 6-19 Confirmation of snapshot session activation and options 3. Make the appropriate selections and click Yes. Tivoli Storage Productivity Center for Replication now runs the snapshot command on the defined copy sets in the session, as shown in Figure 6-20 on page 324. Chapter 6. Using Tivoli Storage Productivity Center for Replication with XIV 323 Figure 6-20 Session is activated; XIV took the snapshot of the volumes in the Copy Set Other Tivoli Storage Productivity Center for Replication snapshot actions inside a session After a snapshot session is defined, you can also take other actions as you can do from the XIV GUI or XIV command-line interface (CLI,) such as a Restore operation, as shown in Figure 6-21. Figure 6-21 XIV snapshot session actions 324 Tivoli Storage Productivity Center for Replication for Open Systems 6.2.2 Metro Mirror Failover/Failback sessions Metro Mirror is a method of synchronous, remote data replication that operates between two sites that are up to 300 kilometers apart. You can use failover and failback to switch the direction of the data flow. Metro Mirror replication maintains identical data in the source and target. When a write is issued to the source copy, the changes that are made to the source data are propagated to the target before the write finishes posting. If the storage system fails, Metro Mirror provides zero loss if data must be used from the recovery site. If you are familiar with the use of the Metro Mirror session type with other supported storage systems, you find the process within Tivoli Storage Productivity Center for Replication is similar. In this section, we highlight areas that are unique to the XIV Storage System. Figure 6-22 shows Metro Mirror session in Tivoli Storage Productivity Center for Replication. Figure 6-22 XIV Metro Mirror session Configuration You must have the following environment to work with Metro Mirror sessions: Two or more XIV storage systems with pools and volumes configured. IP connectivity between the XIV storage systems and the Tivoli Storage Productivity Center for Replication server. Remote mirroring connectivity that is configured for the two XIV storage systems in the session. Matching volumes on the source and target XIV storage systems. All volumes are in same pool on each host site. Reference: For more information about XIV System configuration, see the IBM XIV Storage System User Manual, GC27-2213-02, which is available at this website: http://publib.boulder.ibm.com/infocenter/ibmxiv/r2/topic/com.ibm.help.xiv.doc/d ocs/GC27-2213-02.pdf Limitations The XIV Metro Mirror session has the following limitations: Session name is limited to 58 characters. Consistency group is limited to 128 volumes. This is not enforced by Tivoli Storage Productivity Center for Replication. Chapter 6. Using Tivoli Storage Productivity Center for Replication with XIV 325 All volumes from a session must be in the same pool. Volumes that are mapped to a host cannot be deleted while they are mapped. Locked volumes are read-only. XIV hardware is limited to 512 mirroring relationships. Creating a Metro Mirror session To set up Metro Mirror for snapshots, you must create and define a session for this type of Copy Service, add the XIV volumes from both XIVs to this newly defined session, and activate the session. The XIV pool and volumes must be defined by using the XIV GUI or XIV CLI before Tivoli Storage Productivity Center for Replication is used for this process. Complete the following steps to define a XIV Metro Mirror session: 1. In the Tivoli Storage Productivity Center for Replication, browse to the Sessions panel and click Create Session. Note: A comparable process was shown in “Creating a snapshot session” on page 317, beginning with Figure 6-9 on page 318. The session creation process is similar across all session types; therefore, not all panels are repeated here. 2. Select the XIV as the storage type and click Next. 3. Define the Tivoli Storage Productivity Center for Replication session type, as shown in Figure 6-23. In the red box in the upper right section of the panel is an icon that changes according to the session types. The session wizard also varies slightly, depending on the session type that is defined. Figure 6-23 Tivoli Storage Productivity Center for Replication Session wizard: Metro Mirror option Select Metro Mirror Failover/Failback, and click Next to proceed with the definition of the session properties. 326 Tivoli Storage Productivity Center for Replication for Open Systems 4. In the Properties panel that is shown in Figure 6-24, enter a Session name (required) and a Description (optional) and click Next. Figure 6-24 Properties panel 5. In the Site Locations panel that is shown in Figure 6-25, from the Site 1 Location drop-down menu, select the site of the first XIV. The list shows the various sites that are defined. Click Next. Figure 6-25 Site Locations panel Chapter 6. Using Tivoli Storage Productivity Center for Replication with XIV 327 6. Define the secondary or target site, as shown in Figure 6-26. From the Site 2 Location drop-down menu, select the appropriate target or secondary site that has the target XIV and corresponding volumes. Click Next. Figure 6-26 Site location for secondary site Tivoli Storage Productivity Center for Replication creates the session and displays the result, as shown in Figure 6-27. Figure 6-27 New Metro Mirror session 328 Tivoli Storage Productivity Center for Replication for Open Systems 7. Click Finish to view the session, as shown in Figure 6-28. Figure 6-28 Metro Mirror session without any copy sets Defining and adding copy sets to a Metro Mirror session After a Metro Mirror session is defined, the XIV volumes must be specified for that session. Complete the following steps: 1. The Copy Sets wizard features various dependent drop-down menus, as shown in Figure 6-29. Select the XIV in the first site, the pool, and the first volume you want to have as part of the Metro Mirror copy set. Click Next. Figure 6-29 Add Copy Sets wizard for Metro Mirror Chapter 6. Using Tivoli Storage Productivity Center for Replication with XIV 329 2. Make the appropriate selections for site 2 (target site), as shown in Figure 6-30. Click Next. Figure 6-30 Target panel for the first volume of the Copy Set wizard 3. Add volumes to the Copy Sets. Figure 6-31 shows the first volume that is defined for the Copy Set. Figure 6-31 Confirming first volume selection for this Copy Set 4. You can add a second volume to the copy set. Depending on your business needs, you might have several volumes (all within the same pool at each XIV) in one copy set, or individual volumes. 330 Tivoli Storage Productivity Center for Replication for Open Systems To add another volume, click Add More. Tivoli Storage Productivity Center for Replication tracks the first volume, as you see when you complete the wizard. 5. Figure 6-32 shows the second volume that we are adding to the copy set (we also selected the same values for the primary XIV and pool). Make the appropriate selections and click Next. Figure 6-32 Adding a second volume to Copy Set 6. The wizard prompts for the secondary XIV values, as shown in Figure 6-33. Make the appropriate entries and click Next. Figure 6-33 Copy Set wizard for second XIV and target volume selection panel Chapter 6. Using Tivoli Storage Productivity Center for Replication with XIV 331 The Copy Set wizard now has both volumes selected, and you can add more volumes, if required, as shown in Figure 6-34. Click Next. Figure 6-34 Two Copy Sets in Metro Mirror Session Note: If you must add a large set of volumes, you can import the volume definitions and pairings from a comma-separated variable (.csv) file. For more information, see the Tivoli Productivity Center Information Center, which is available at this website: http://pic.dhe.ibm.com/infocenter/tivihelp/v59r1/index.jsp?topic=%2Fcom.ibm. tpc 7. Tivoli Storage Productivity Center for Replication confirms that the volumes are added to the set, as shown in Figure 6-35. Click Next. Figure 6-35 Copy Set wizard prompt for confirmation of the addition of both volumes to set 332 Tivoli Storage Productivity Center for Replication for Open Systems Tivoli Storage Productivity Center for Replication updates its repository and indicates the progress of the update, as shown in Figure 6-36. Figure 6-36 Progress of updating repository After Tivoli Storage Productivity Center for Replication completes the Copy Set process, the Results panel opens and you can click Finish, as shown in Figure 6-37. Figure 6-37 Results panel 8. Click Finish. The updated Session Details window opens, as shown in Figure 6-38. Figure 6-38 Metro Mirror Session details at the completion of both wizards Activating Tivoli Storage Productivity Center for Replication Metro Mirror session Now that you defined a session and added a copy set that contains volumes, you can move on to the next phase, and activate the session by completing the following steps: 1. From the Select Action menu, select Start H1 H2, and click Go to activate the session, as shown in Figure 6-39 on page 334. Chapter 6. Using Tivoli Storage Productivity Center for Replication with XIV 333 Figure 6-39 Action items that are available to the Metro Mirror Session 2. You are prompted for confirmation, as shown in Figure 6-40. Click Yes. Figure 6-40 Last warning before taking the Metro Mirror Session active After the Tivoli Storage Productivity Center for Replication commands are sent to the XIV, Tivoli Storage Productivity Center for Replication continues to update the same Session Details window to reflect the latest status, as shown in Figure 6-41 and Figure 6-42 on page 335. After the synchronization, the status changes to Normal status. Figure 6-41 Progress actions for Metro Mirror session: Part 1 334 Tivoli Storage Productivity Center for Replication for Open Systems Figure 6-42 Various progress actions for Metro Mirror session: Part 2 Suspending the Metro Mirror session At some point, you might want to suspend the Metro Mirror session. This might be dictated by various business reasons or physical issues, such as a communication link failure, or a true site outage. Suspending the Mirror session also is the first step for allowing the target volumes to be accessible, and reversing the actual mirror direction. To make the target volumes available, you must access the Session and perform a Suspend and then Recover. Complete the following steps: 1. Browse to the Session Details panel and select Suspend, as shown in Figure 6-43. Click Go to start the Suspend action. Figure 6-43 Suspend action A confirmation window opens in which you are warned about the Suspend action, as shown in Figure 6-44 on page 336. Click Yes to proceed. Chapter 6. Using Tivoli Storage Productivity Center for Replication with XIV 335 Figure 6-44 Warning The updated Session Details window opens as a result of the Suspend action, as shown in Figure 6-45. Figure 6-45 Tivoli Storage Productivity Center for Replication Metro Mirror Session being suspended 2. After you suspend a Metro Mirror link, you can perform a Recover operation, which causes Tivoli Storage Productivity Center for Replication to reverse the link and begins to move information from the Target/Slave volume back to the Master/Primary volume. This process is also known as moving data from the Secondary back to the Primary. Tivoli Storage Productivity Center for Replication can complete this process only after the link is suspended. Make note of the difference in the Session Details window that is shown in Figure 6-46 in which the Recover action is allowed because the link was suspended. Select Recover and then click Go. Figure 6-46 Session Details panel that shows the Recover option is available 336 Tivoli Storage Productivity Center for Replication for Open Systems 3. Tivoli Storage Productivity Center for Replication prompts you to confirm the operation, as shown in Figure 6-47. Click Yes. Figure 6-47 Final confirmation before the link for Metro Mirror Session is reversed Tivoli Storage Productivity Center for Replication now prepares both XIVs for the upcoming role change. This makes the target volumes immediately available, as shown in Figure 6-48. Figure 6-48 Target available status 4. You also have the option of replacing and updating the Primary/Master volume with information from the Target/Slave volume (Production Site Switch). From the Select Action drop-down menu, select Enable Copy to Site 1, as shown in Figure 6-49 on page 338. Chapter 6. Using Tivoli Storage Productivity Center for Replication with XIV 337 Figure 6-49 Preparing to reverse link The icon has the blue triangle over H2, which indicates that the mirror session switched and Site 2 is now active. 5. Click Go, and then confirm the selection (see Figure 6-50), which causes Tivoli Storage Productivity Center for Replication to send the appropriate commands to both XIVs. Figure 6-50 Confirm Enable Copy to Site 1 of the Metro Mirror session 6. After the reversal, you must activate the link, which is shown as the Start H2 H1 menu choice that is now available in the drop-down menu that is shown in Figure 6-51 on page 339. Click Go and confirm to have Tivoli Storage Productivity for Replication activate the link in reverse. 338 Tivoli Storage Productivity Center for Replication for Open Systems Figure 6-51 Metro Mirror before the link was activated in the reverse direction Figure 6-52 shows that Tivoli Storage Productivity for Replication activated the link in reverse, and that the volumes fully replicated themselves back to the original source volumes. Figure 6-52 Metro Mirror Session fully reversed and completed In this example, the secondary volumes are available for immediate production usage and replication back to the old master. 6.2.3 Global Mirror Failover/Failback sessions Global Mirror is a method of asynchronous, remote data replication that operates between two sites at longer distances. You can use failover and failback to switch the direction of the data flow. The data on the target often is written a few seconds after the data is written to the source volumes. When a write is issued to the source copy, the change is propagated to the target copy, but subsequent changes are allowed to the source before the target verifies that it received the change. Because consistent copies of data are formed on the secondary site at set intervals, data loss is determined by the amount of time since the last consistency group was formed. If your system stops, Global Mirror might lose some data that was being transmitted when the disaster occurred. Global Mirror still provides data consistency and data recoverability if there is a disaster. If you are familiar with the use of the Global Mirror session type with other supported storage systems, you find the process within Tivoli Storage Productivity Center for Replication to be similar. In this section, we highlight areas that are unique to the XIV Storage System. Chapter 6. Using Tivoli Storage Productivity Center for Replication with XIV 339 Figure 6-53 shows Global Mirror session in Tivoli Storage Productivity Center for Replication. Figure 6-53 XIV Global Mirror session Configuration You must have the following environment to work with Global Mirror sessions: At least two XIV storage systems, with pools and volumes configured IP connectivity between the XIV storage systems and the Tivoli Storage Productivity Center for Replication server Remote mirroring connectivity that is configured for the two XIV storage systems in the session Matching volumes on the source and target XIV storage systems All volumes in same pool on same site Reference: For more information about XIV System configuration, see the IBM XIV Storage System User Manual, GC27-2213-02, which is available at this website: http://publib.boulder.ibm.com/infocenter/ibmxiv/r2/topic/com.ibm.help.xiv.doc/d ocs/GC27-2213-02.pdf Limitations The XIV Metro Mirror session includes the following limitations: Session name is limited to 58 characters. Consistency group is limited to 128 volumes. This is not enforced by Tivoli Storage Productivity Center for Replication. All volumes from a session must be in the same pool. Volumes that are mapped to a host cannot be deleted while they are mapped. Locked volumes are read-only. XIV hardware is limited to 512 mirroring relationships. Creating a Global Mirror session To use Tivoli Storage Productivity Center for Replication for any type of XIV Copy Services (including the asynchronous mirror capabilities of XIV), you first must create and define a session, add the XIV volumes to that session, and activate the session. The process for setting up Tivoli Storage Productivity Center for Replication Global Mirror with XIV is nearly identical to what was already described in “Creating a Metro Mirror session” on page 326. 340 Tivoli Storage Productivity Center for Replication for Open Systems The XIV pool and volumes must be defined by using the XIV GUI or CLI before Tivoli Storage Productivity Center for Replication is used for this process. At the time of this writing, XIV pools or volumes cannot be created from Tivoli Storage Productivity Center for Replication. Complete the following steps to define a Tivoli Storage Productivity Center for Replication session for asynchronous mirroring: 1. In the Tivoli Storage Productivity Center for Replication GUI, browse to the Sessions window and click Create Session. For more information, see the process that is shown starting with Figure 6-24 on page 327. 2. When you are prompted for a session type, select Asynchronous; Global Mirror, as shown in Figure 6-54. Click Next to start the process. Figure 6-54 Asynchronous Session Type panel 3. Make the appropriate entries and selections in the panel, as shown in Figure 6-55 on page 342. The difference between Metro Mirror and Global Mirror sessions is that for Global Mirror, Tivoli Storage Productivity Center for Replication asks for the Recovery Point Objective (RPO) in seconds, and the selection box underneath prompts you for the scheduling interval. Chapter 6. Using Tivoli Storage Productivity Center for Replication with XIV 341 Figure 6-55 Asynchronous Properties; RPO options 4. Click Next to proceed through the wizard’s instructions to finish the process. This is the same process that is described in , “Creating a Metro Mirror session” on page 326. Defining and adding Tivoli Storage Productivity Center for Replication copy sets to a Global Mirror session This second phase of the Tivoli Storage Productivity Center for Replication process for Global Mirror, adding copy sets, is identical to what is described in , “Defining and adding copy sets to a Metro Mirror session” on page 329. Activating the Tivoli Storage Productivity Center for Replication Global Mirror session This is the last phase of the process. You are now ready to activate the Global Mirror session. From the drop-down action menu, select Start H1 H2, and click Go to activate the session, as shown in Figure 6-56. Figure 6-56 Session Actions for Global Mirror 342 Tivoli Storage Productivity Center for Replication for Open Systems Suspending the Global Mirror session Tivoli Storage Productivity Center for Replication treats Global Mirrors the same way as Metro Mirrors. As describe in , “Suspending the Metro Mirror session” on page 335, you might want to suspend, if not reverse, the Global Mirror session. This reversal is done by using the same process that is described in , “Suspending the Metro Mirror session” on page 335. 6.3 Adding XIV volume protection Tivoli Storage Productivity Center for Replication has another protection function for storage volumes, whereby you can restrict certain volumes from other Tivoli Storage Productivity Center for Replication Sessions or Copy Sets. Complete the following steps: 1. From the Storage Systems tab, select the XIV system and click Volume Protection, as shown in Figure 6-57. Figure 6-57 Select array and then Volume Protection Chapter 6. Using Tivoli Storage Productivity Center for Replication with XIV 343 2. Use the various drop-down menus that are shown in Figure 6-58 to select the pool and volumes. The use of an asterisk (*) in the last input field returns a list of all of the volumes that are in that pool. Optionally, you can use that field to filter the list of volumes that is returned. Figure 6-58 Choose Volumes panel 3. Click Next to display the volumes (as shown in Figure 6-59) and select the volumes that you want to mirror. Figure 6-59 Select Volumes panel 4. Click Next. Tivoli Storage Productivity Center for Replication ensures that the selected volumes are protected from other Tivoli Storage Productivity Center for Replication operations. Important: These actions help inside the Tivoli Storage Productivity Center for Replication system only. Any administrator who is accessing the XIV GUI directly is not informed of the volume protections. They still see any snapshot or volume locks that are part of normal operations, but not any of the protections that are described here. 344 Tivoli Storage Productivity Center for Replication for Open Systems 6.4 Disaster Recovery use cases Tivoli Storage Productivity Center for Replication and XIV remote mirroring solutions (Metro Mirror and Global Mirror) can be used to address various failures and planned outages, from events that affect a single XIV system or its components, to events that affect an entire data center or campus, or events that affect an entire geographical region. When the production XIV system and the disaster recovery (DR) XIV system are separated by increasing distance, disaster recovery protection for more levels of failures is possible, as shown in Figure 6-60. A global distance disaster recovery solution protects against single-system failures, local disasters, and regional disasters. Figure 6-60 Disaster Recovery protection levels The following configurations are possible: Single-site high-availability XIV Remote Mirroring configuration Protection for the event of a failure or planned outage of an XIV system (single-system failure) can be provided by a zero-distance high-availability (HA) solution, including another XIV system in the same location (zero distance). Usage of this configuration is an XIV synchronous mirroring solution that is part of an HA clustering solution, including servers and XIV storage systems. Figure 6-61 shows a single-site HA configuration in which both XIV systems are in the same data center. Figure 6-61 Single site HA configuration Chapter 6. Using Tivoli Storage Productivity Center for Replication with XIV 345 Metro region XIV Remote Mirroring configuration Protection against the failure or planned outage of an entire location (local disaster) can be provided by a metro distance disaster recovery solution (as shown in Figure 6-62), which includes another XIV system in a different location within a metro region. The two XIV systems might be in different buildings on a corporate campus or in different buildings within the same city. Typical usage of this configuration is an XIV synchronous mirroring solution. Figure 6-62 Metro region disaster recovery configuration Out-of-region XIV Remote Mirroring configuration Protection against a failure or planned outage of an entire geographic region (regional disaster) can be provided by a global distance disaster recovery solution (as shown in Figure 6-63), which includes another XIV system in a different location outside the metro region. (The two locations might be separated by up to a global distance.) Typical usage of this configuration is an XIV asynchronous mirroring solution. Figure 6-63 Out-of-region disaster recovery configuration 346 Tivoli Storage Productivity Center for Replication for Open Systems Metro region plus out-of-region XIV mirroring configuration Certain volumes can be protected by a metro distance disaster recovery configuration, and other volumes can be protected by a global distance disaster recovery configuration, as shown in Figure 6-64. Figure 6-64 Metro region plus out-of-region configuration Typical usage of this configuration is an XIV synchronous mirroring solution for a set of volumes with a requirement for zero RPO, and an XIV asynchronous mirroring solution for a set of volumes with a requirement for a low, but non-zero RPO. Figure 6-64 shows a metro region plus out-of-region configuration. Snapshots can be used with Remote Mirroring to provide copies of production data for business or IT purposes. Moreover, when they are used with Remote Mirroring, snapshots provide protection against data corruption. As with any continuous or near-continuous remote mirroring solution, XIV Remote Mirroring cannot protect against software data corruption because the corrupted data is copied as part of the remote mirroring solution. However, the XIV snapshot function provides a point-in-time image that can be used for rapid restore in the event of software data corruption that occurred after the snapshot was taken. XIV snapshot can be used with XIV Remote Mirroring, as shown in Figure 6-65 on page 348. Chapter 6. Using Tivoli Storage Productivity Center for Replication with XIV 347 Figure 6-65 Combining snapshots with Remote Mirroring Recovery by using a snapshot warrants deletion and re-creation of the mirror, as shown in the following examples: XIV snapshot (within a single XIV system) Protection against software data corruption can be provided by a point-in-time backup solution by using the XIV snapshot function within the XIV system that contains the production volumes. XIV local snapshot and Remote Mirroring configuration An XIV snapshot of the production (local) volume can be used in addition to XIV Remote Mirroring of the production volume when protection against logical data corruption is required in addition to protection against failures and disasters. The other XIV snapshot of the production volume provides a quick restore to recover from data corruption. Another snapshot of the production (local) volume can also be used for other business or IT purposes (for example, reporting, data mining, and development and test). Figure 6-66 shows an XIV local snapshot plus Remote Mirroring configuration. Figure 6-66 Local snapshot plus Remote Mirroring configuration 348 Tivoli Storage Productivity Center for Replication for Open Systems XIV remote snapshot plus Remote Mirroring configuration An XIV snapshot of the consistent replicated data at the remote site can be used in addition to XIV Remote Mirroring to provide another consistent copy of data that can be used for business purposes, such as data mining and reporting, and for IT purposes, such as, remote backup to tape or development, test, and quality assurance. Figure 6-67 shows an XIV remote snapshot plus Remote Mirroring configuration. Figure 6-67 XIV remote snapshot plus Remote Mirroring configuration 6.5 Troubleshooting Even with careful planning and execution, you might still encounter errors when you are attempting data replication tasks. This section provides guidance for some of the common errors that might occur. Troubleshooting resources The following files and tools can help you find more information when you are examining the errors: Log package The log package does not require direct access to the Tivoli Storage Productivity Center for Replication file system. It contains logs with details regarding the actions in Tivoli Storage Productivity Center for Replication, such as xivApiTrace. Tivoli Storage Productivity Center for Replication Console The Console is a listing in the GUI of csmMessage.log that is on the Tivoli Storage Productivity Center for Replication server. It can be opened by selecting Console from the navigation tree. Figure 6-68 shows a sample of the type of messages that are available in the Console. It can be used to identify steps that succeeded and you can isolate the step that failed. It also includes a historical reference of actions against the Tivoli Storage Productivity Center for Replication server. Figure 6-68 Sample Console listing Chapter 6. Using Tivoli Storage Productivity Center for Replication with XIV 349 It can also be accessed by using links that are provided during actions within the GUI. This can be useful for providing more information at the time of the error. Click the (Open Console) link, as shown in Figure 6-69. Figure 6-69 Console link for a running action You also can click the link to the message ID (for example, IWNR1026I) to open the message description. Troubleshooting issues with Metro Mirror and Global Mirror sessions This section addresses some of the issues you might encounter with Metro Mirror and Global Mirror sessions. Symptoms that you might see, example errors, and steps to resolve errors are provided to aid you with troubleshooting. Issue: Pool/snapshot size not large enough for global mirroring This issue includes the symptoms that are shown in Example 6-1 and Example 6-2. Example 6-1 With volume IO pair errors after starting session, all pairs go suspended IWNR2055W [Aug 22, 2013 9:16:45 AM] The pair in session volumespace for copy set XIV:VOL:7803441:100987 with source XIV:VOL:7803441:100987(io_todd_3) and target XIV:VOL:7803448:101660(io_todd_3) in role pair H1-H2 was suspended due to a reason code of Master_Pool_Exhausted, but was not yet consistent; no action was taken on the session. Example 6-2 Session after prepared moves severe/suspended on volume IO IWNR2050E [Aug 22, 2013 9:48:42 AM] The pair in session testfullpool for copy set XIV:VOL:7803441:100985 with source XIV:VOL:7803441:100985(io_todd_1) and target XIV:VOL:7803448:101658(io_todd_1) in role pair H1-H2 was suspended unexpectedly with a reason code of Master_Pool_Exhausted. 350 Tivoli Storage Productivity Center for Replication for Open Systems Complete the following steps to resolve the issue: 1. Increase the size of the pool and snapshot space of the pool. The pool size must be more than three times the I/O volumes total size for the pool. If there is enough pool space, the snapshot space is not as important. 2. Refresh the configuration for the XIV Storage System. 3. Restart the session. Issue: Consistency group name exists All operations are successful and the session runs correctly. There are no specific errors for this situation. The folloing snapshot options are available: Consistency group for the session is listed as <session name>_001. XIV automatically increments existing names. This is a cosmetic issue unless volumes intended for the session are also in the consistency group. (See the next troubleshooting topic.) Complete the following steps to resolve this issue: 1. 2. 3. 4. End the session. Remove all of the volumes from the consistency group on the XIV. Remove the consistency group on the XIV. Restart the session. Issue: Volume already is a part of consistency group This issue includes the symptoms that are shown in Example 6-3. Example 6-3 Pair errors after starting session: VOLUME_BELONGS_TO_CG IWNR2108E [Aug 23, 2013 12:17:42 PM] A hardware error occurred during the running of a command for the pair in session existingMM_CG for copy set XIV:VOL:7803441:100985 with source XIV:VOL:7803441:100985(io_todd_1) and target XIV:VOL:7803448:101658(io_todd_1) in role pair H1-H2. The hardware returned an error code of VOLUME_BELONGS_TO_CG. Complete the following steps to resolve this issue: 1. Remove all of the volumes from the existing consistency group on the XIV. 2. Restart the session. Issue: Volume already is a part of mirroring relationship This issue includes the symptoms that are shown in Example 6-4, Example 6-5 on page 352, and Example 6-6 on page 352. Example 6-4 Volume is in relationship: VOLUME_IS_MASTER/SLAVE IWNR2108E [Aug 23, 2013 1:25:56 PM] A hardware error occurred during the running of a command for the pair in session exisitingMirrors for copy set XIV:VOL:7803441:100985 with source XIV:VOL:7803441:100985(io_todd_1) and target XIV:VOL:7803448:101658(io_todd_1) in role pair H1-H2. The hardware returned an error code of VOLUME_IS_MASTER. Chapter 6. Using Tivoli Storage Productivity Center for Replication with XIV 351 Example 6-5 Volume is in relationship: VOLUME_HAS_MIRROR IWNR2108E [Aug 23, 2013 1:41:46 PM] A hardware error occurred during the running of a command for the pair in session exisitingMirrors for copy set XIV:VOL:7803441:100986 with source XIV:VOL:7803441:100986(io_todd_2) and target XIV:VOL:7803448:101659(io_todd_2) in role pair H1-H2. The hardware returned an error code of VOLUME_HAS_MIRROR. Example 6-6 Volume mirror copy set is wrong copy type IWNR2512E [Aug 23, 2013 1:25:56 PM] The volume mirror copy set XIV:VOL:7803441:100987 with source XIV:VOL:7803441:100987(io_todd_3) and target XIV:VOL:7803448:101660(io_todd_3) in session exisitingMirrors existed on the hardware but was not the right copy type. Complete the following steps to resolve this issue: 1. Deactivate the mirror. 2. Remove the mirror. 3. Restart the session. Issue: Volumes have existing snapshots/replications This issue includes the symptoms that are shown in Example 6-7. Example 6-7 Pair errors after starting the session IWNR2108E [Aug 23, 2013 11:07:15 AM] A hardware error occurred during the running of a command for the pair in session todd-mm for copy set XIV:VOL:7804988:580312 with source XIV:VOL:7804988:580312(io_todd_001) and target XIV:VOL:1302136:107903(io_todd_001) in role pair H1-H2. The hardware returned an error code of VOLUME_HAS_SNAPSHOTS. Complete the following steps to resolve this issue: 1. Remove the existing snapshots and replications on the XIV. 2. Restart the session. Issue: Sessions go severe because of XIV hardware link errors This issue includes the symptoms that are shown in Example 6-8 and Example 6-9. Example 6-8 Prepared session and pairs go suspended or suspend after starting session IWNR2061E [Aug 23, 2013 7:41:37 AM] The pair was suspended on the hardware because the source was disconnected from the target. Example 6-9 Mirrors on XIV show RPO lagging IWNR2750E [Aug 23, 2013 11:53:00 AM] Recovery Point Objective for session todd-gm-connectiondown has passed the threshold of 30 seconds. Complete the following steps to resolve the issue: 1. Re-establish the link between the XIV storage systems. 2. Resolve lagging issues between the XIV storage systems. 3. Sessions resolve on their own or you can restart the session. 352 Tivoli Storage Productivity Center for Replication for Open Systems Hardware troubleshooting: The following troubleshooting topics deal specifically with hardware configuration changes that might occur. Issue: Changes to volume and pool name or size This issue includes the following symptoms: Pair errors after the session is started. Error returns BAD_NAME. Complete the following steps to resolve the issue: 1. Refresh the configuration for the XIV Storage System. 2. Restart the session. Issue: Changes to XIV hardware mirror relationships or consistency groups This issue includes the following symptoms: Manually deactivate mirror; Tivoli Storage Productivity Center for Replication session is suspended. Remove mirror relationships; Tivoli Storage Productivity Center for Replication session is suspended. Remove volume from consistency group or group mirror; Tivoli Storage Productivity Center for Replication session stays prepared, but it no longer has control of that volume for future commands. Support: Tivoli Storage Productivity Center for Replication does not support handling any of these situations, but these situations usually are not unrecoverable. Each situation is unique, but in most cases, restarting the session resolve any manual manipulation of the hardware. Issue: Changes to Global Mirror properties (RPO or Schedule) There are no specific errors for this situation. You see the old values for RPO Threshold and Sync Schedule when you are looking at the session properties or the hardware mirrors. Tivoli Storage Productivity Center for Replication does not automatically pick up changes that are made to Global Mirror properties on the hardware. Complete the following steps to resolve the issue: 1. Change the properties in the Tivoli Storage Productivity Center for Replication session panel. 2. Restart the session. Chapter 6. Using Tivoli Storage Productivity Center for Replication with XIV 353 354 Tivoli Storage Productivity Center for Replication for Open Systems 7 Chapter 7. Managing z/OS HyperSwap from Tivoli Storage Productivity Center for Replication for Open Systems Tivoli Storage Productivity Center for Replication version 5.2 can open a connection to a z/OS server from a Tivoli Storage Productivity Center for Replication distributed installation. In this chapter, we describe the steps that are needed to connect to, configure, and manage z/OS HyperSwap from Tivoli Storage Productivity Center for Replication 5.2. This chapter includes the following topics: Overview of z/OS HyperSwap Prerequisites z/OS HyperSwap sessions Description and usage of HyperSwap enabled sessions Use cases © Copyright IBM Corp. 2014. All rights reserved. 355 7.1 Overview of z/OS HyperSwap z/OS HyperSwap technology became the industry standard by removing the effect of storage systems failures for System z customers. The technology is provided in several different implementation options to meet the various needs of the System z and z/OS customer base. It extends the Parallel Sysplex® redundancy to storage systems, so whether your requirements are continuous availability, disaster recovery, or business continuity, z/OS HyperSwap technology can provide a solution for your environment. HyperSwap functionality provides planned and unplanned actions in an z/OS environment. By using Planned HyperSwap actions, the following tasks can be peformed: Transparently switch all primary storage systems disks with the secondary storage systems disks. Perform storage systems configuration maintenance and planned site maintenance without requiring any applications to be quiesced. Unplanned HyperSwap action contains other functions to transparently switch to use auxiliary storage systems if an unplanned outage of the primary storage systems occurs. Unplanned HyperSwap action allows production systems to remain active during a storage system failure. The storage system failures \ no longer constitutes a single point of failure for an entire Parallel Sysplex. Tivoli Storage Productivity Center for Replication manages the HyperSwap function with code in the Input/Output Supervisor (the I/O Supervisor component of z/OS). IBM analyzed all field storage system failures and created a set of trigger events that are monitored by z/OS HyperSwap. When one of these HyperSwap trigger events occurs, a “Data Freeze” across all LSSs on all storage systems is started. All I/O to all devices is queued (Extended Long Busy state), which maintains full data integrity and cross volumes data consistency. z/OS then completes the HyperSwap function of recovering the target devices and rebuilding all z/OS internal control blocks to point to the recovered target devices. When this process is complete, all I/O is released and all applications continue to run against the recovered target devices, which transparently manage a complete storage system outage, with a dynamic “busy” and a redirection of all host I/O. Applications must tolerate the Extended Long Busy state, which is not apparent to their operation, but elongates I/O that is in progress until the HyperSwap actions are completed. As of the Tivoli Storage Productivity Center version 5.2, Tivoli Storage Productivity Center for Replication that is running on an open system (Windows, AIX, or Linux) or running on z/OS can manage z/OS HyperSwap, as shown in Figure 7-1 on page 357. By using this Tivoli Storage Productivity Center for Replication configuration, many HyperSwap sessions can be managed in different sysplex or monoplex environments. Compared to older versions of Tivoli Storage Productivity Center for Replication that were running on z/OS in which you can manage only one HyperSwap session from one Tivoli Storage Productivity Center for Replication, you can manage HyperSwap sessions in multiple sysplexes and monoplexes from one Tivoli Storage Productivity Center for Replication server with version 5.2 running on open systems or z/OS. 356 Tivoli Storage Productivity Center for Replication for Open Systems Figure 7-1 z/OS HyperSwap The HyperSwap function can be used in continuous availability, disaster recovery, or business continuity solutions that are designed with two or three sites and based on synchronous replication. The following Tivoli Storage Productivity Center for Replication sessions use HyperSwap functions: Basic HyperSwap Metro Mirror with Failover/Failback Metro Global Mirror Metro Global Mirror with Practice For more information about these sessions, see 7.3, “z/OS HyperSwap sessions” on page 360. Chapter 7. Managing z/OS HyperSwap from Tivoli Storage Productivity Center for Replication for Open Systems 357 7.2 Prerequisites In this section, the prerequisites for the Basic HyperSwap implementation are described. 7.2.1 Hardware Tivoli Storage Productivity Center for Replication and HyperSwap sessions require IBM Storage Systems DS8000, DS6000, or ESS800 with advanced copy function Metro Mirror. Metro Mirror replication must be established before HyperSwap can be enabled. 7.2.2 Software The Basic HyperSwap function is supported by z/OS version 1.12 and later and requires two HyperSwap address spaces that must be running in z/OS. Note: To use IP Management of HyperSwap, you need z/OS Version 1 Release 13 or z/OS Version 2 Release 1 with APAR OA40866. The IP Management of HyperSwap is required for open systems. The following HyperSwap address spaces must be running: HyperSwap Management address space HyperSwap API address space You can start both of these address spaces by adding simple procedures to SYS1.PROCLIB, and then the START procmemname command is run manually, or by including the command in the COMMNDxx member of your SYS1.PARMLIB. The examples of the PROCLIB members and HyperSwap Management and HyperSwap API address space are shown in Example 7-1 and Example 7-2. Example 7-1 HyperSwap Management started task JCL //HSIB PROC PORT=5858 //STEP EXEC PGM=IOSHMCTL,TIME=NOLIMIT,REGION=0M, // PARM='SOCKPORT=&PORT' //SYSPRINT DD SYSOUT=A Example 7-2 HyperSwap API started task JCL //HSIBAPI JOB MSGLEVEL=(1,1),TIME=NOLIMIT,REGION=0M // EXEC PGM=IOSHSAPI 7.2.3 Connectivity Participating hosts in HyperSwap sessions must have FICON connections to both storage systems in a Metro Mirror relationship. This means that primary and secondary devices must be defined in the IODF and have operational paths to all devices. It is also suggested that both storage systems be defined with the same number of paths and the same number of Parallel Access Volume (PAV) aliases. After the HyperSwap is done, all host read and write operations are sent to auxiliary storage system. 358 Tivoli Storage Productivity Center for Replication for Open Systems Note: You also can have multiple source or multiple target systems for the HyperSwap. There is no restriction of having only a single source or target box. 7.2.4 Enabling a host name or IP address connection to a z/OS host system To connect z/OS host systems in Tivoli Storage Productivity Center for Replication that is running on Windows, Linux, AIX, or z/OS, you can use a z/OS host name or IP address. By adding a z/OS host to Tivoli Storage Productivity Center for Replication, you can fully manage HyperSwap sessions that are running on that z/OS host system. This feature enables a single instance of Tivoli Storage Productivity Center for Replication to manage multiple HyperSwap sessions that are running in different z/OS systems and sysplexes. For more information about adding the hosts, see section 7.4.1, “Setting up a HyperSwap enabled session” on page 369. 7.2.5 Enabling z/OS HyperSwap and adding a Tivoli Storage Productivity Center for Replication user to z/OS host Complete the following steps on z/OS host to enable z/OS HyperSwap. These steps set the required Resource Access Control Facility (RACF) settings on the host system and define the SOCKPORT parameter when the HyperSwap management address space IOSHMCTL is started: 1. Use an OMVS segment to define the name BHIHSRV as a user, as shown in the following example command, where user_identifier is a number that represents the user: ADDUSER BHIHSRV OMVS(UID(user_identifier) SHARED HOME(‘/’)) NOPASSWORD Note: If your installation uses the STARTED class or the started procedures table (ICHRIN03) of the z/OS Security Server, ensure that the user BHIHSRV is associated with the started task BHIHSRV. For more information about the use of the STARTED class or the started procedures table, see Security Server RACF Security Administrator's Guide, SA22-7683-15, which is available at this website: http://www-01.ibm.com/support/docview.wss?uid=pub1sa22768315 2. If the ANT.REPLICATIONMANAGER entity is not defined to the FACILITY class, run the following command: RDEFINE FACILITY ANT.REPLICATIONMANAGER UACC(NONE) 3. Authorize the name BHIHSRV to the ANT.REPLICATIONMANAGER entity in the FACILITY class by running the following command: PERMIT ANT.REPLICATIONMANAGER CLASS(FACILITY) ID(BHIHSRV) ACCESS(CONTROL) 4. To define the user ID and password that are used for authentication from Tivoli Storage Productivity Center for Replication to the z/OS host system, run the following commands: ADDUSER userid PASSWORD(password) PERMIT ANT.REPLICATIONMANAGER CLASS(FACILITY) ID(userid) ACCESS(CONTROL) You must enter this user ID and password when you add the z/OS host system to Tivoli Storage Productivity Center for Replication. 5. To activate the changes in the previous steps, run the following command: SETROPTS RACLIST(FACILITY) REFRESH Chapter 7. Managing z/OS HyperSwap from Tivoli Storage Productivity Center for Replication for Open Systems 359 6. Start the IOSHMCTL address space with the SOCKPORT parameter, as shown in the following example: //HSIB JOB MSGLEVEL=(1,1),TIME=NOLIMIT,REGION=0M //IEFPROC EXEC PGM=IOSHMCTL,PARM=’SOCKPORT=port_number’ The port_number is 1 - 65535. You must enter this port number when you add a z/OS host system to Tivoli Storage Productivity Center for Replication, as described in 7.4.1, “Setting up a HyperSwap enabled session” on page 369. 7.3 z/OS HyperSwap sessions The following Tivoli Storage Productivity Center for Replication sessions use HyperSwap functions: Basic HyperSwap Metro Mirror Failover/Failback Metro Global Mirror Metro Global Mirror with Practice These sessions are described next. 7.3.1 Basic HyperSwap sessions Basic HyperSwap is a Copy Services solution that provides continuous availability of data if a storage system failure occurs. It uses z/OS HyperSwap functionality to extend Parallel Sysplex availability to include management across planned and unplanned events. It also masks storage system failures through a switch to the Metro Mirror target devices. This solution works on the same data center floor, and can be extended across two local sites or three site configurations with Metro Global Mirror architecture. The scope of the HyperSwap functionality that is provided is only z/OS. With the Basic HyperSwap session type, Tivoli Storage Productivity Center for Replication offers only single site HyperSwap functionality and is not intended for two site HyperSwap functionality. Planned or unplanned Metro Mirror suspend capabilities are not available for Basic HyperSwap sessions, even though these functions are performed as part of the HyperSwap process. The Basic HyperSwap session type does not ensure any data consistency on auxiliary storage systems in case of mirroring failures. For this reason, Basic HyperSwap can be considered a Continuous Availability feature without disaster recovery capabilities. Basic HyperSwap replication performs the following tasks: Manages count key data (CKD) volumes in Metro Mirror to manage synchronous copy relationships only. The graphical user interface (GUI) shows only CKD volumes when you add a copy set. The command-line interface (CLI) does not add a copy set if a fixed block volume is specified. Monitors events that indicate a storage device failed. Determines whether the failing storage device is part of a Metro Mirror synchronous pair. Determines the action to be taken from policy. 360 Tivoli Storage Productivity Center for Replication for Open Systems Ensures that data remains consistent during the HyperSwap process. Swaps the I/O between the primary logical devices in the consistency group with the secondary logical devices in the consistency group. A swap can occur from the preferred logical devices to the alternative logical devices or from the alternative logical devices to the preferred logical devices. Figure 7-2 shows the Basic HyperSwap session in Tivoli Storage Productivity Center for Replication. Figure 7-2 Basic HyperSwap session 7.3.2 HyperSwap enabled Metro Mirror Failover/Failback sessions Metro Mirror Failover/Failback with the HyperSwap function enabled combines the continuous availability of Basic HyperSwap with the redundancy of a two-site Metro Mirror Failover/Failback solution when CKD volumes are managed on the z/OS host. If the primary volumes encounter a permanent I/O error, the I/O is automatically swapped to the secondary site with minimal effect on the application. Tivoli Storage Productivity Center for Replication in Metro Mirror Failover/Failback with HyperSwap session provides a data freeze if the link failure and other conditions occurred. With this solution, Tivoli Storage Productivity Center for Replication provides a disaster recovery capability and the HyperSwap function. As a result, all data on all storage systems at the remote site is data consistent to the Point in Time of the failure. A HyperSwap function can provide planned or unplanned actions. A planned action is used when you must perform some storage system maintenance on a primary storage or some primary site management, for example. Swap occurs when you run a HyperSwap command from the GUI, CLI, or the SETHS SWAP z/OS system command. For more information about this command, see z/OS V1R13.0 MVS™ System Commands, SA22-7627-28. The Unplanned HyperSwap feature provides other functions to transparently switch to use auxiliary storage systems in the event of unplanned outages of the primary storage systems. Unplanned HyperSwap action allows production systems to remain active during a storage system failure. Storage system failures no longer constitute a single point of failure. Figure 7-3 shows you Metro Mirror Failover/Failback session with HyperSwap enabled in Tivoli Storage Productivity Center for Replication. Figure 7-3 Metro Mirror Failover/Failback session Chapter 7. Managing z/OS HyperSwap from Tivoli Storage Productivity Center for Replication for Open Systems 361 Figure 7-4 shows the state transition diagram for a Metro Mirror Failover/Failback session that shows the effect of the HyperSwap actions. Figure 7-4 HyperSwap enabled Metro Mirror FO/FB transition diagram 7.3.3 HyperSwap enabled Metro Global Mirror sessions In a Metro Global Mirror session with HyperSwap enabled, a failure on the primary storage system causes an automatic HyperSwap operation, which transparently redirects application I/O to the auxiliary (intermediate) storage system. The Global Mirror relationship in the session continues to run uninterrupted throughout this process. With this configuration, you can achieve almost a zero data loss at larger distances. By using synchronous mirroring, you can switch from the primary site to the intermediate site during a planned or unplanned outage as in the Metro Mirror Failover/Failback session. It also provides continuous disaster recovery protection of the intermediate and remote site if a switch from primary site occurs. With this configuration, you can reestablish direction from H2 (intermediate) H1 (local) H3 (remote) recover ability while production continues to run at site H2. This setup also can reduce the workload on-site H1. 362 Tivoli Storage Productivity Center for Replication for Open Systems Figure 7-5 shows Metro Global Mirror with HyperSwap session in Tivoli Storage Productivity Center for Replication. Figure 7-5 Metro Global Mirror session Figure 7-6 on page 364 and Figure 7-7 on page 365 show the state transition diagrams for a Metro Global Mirror session that shows the effect of the HyperSwap actions. Chapter 7. Managing z/OS HyperSwap from Tivoli Storage Productivity Center for Replication for Open Systems 363 From Host on Intermediate Site Transition Diagram From Host Remote Site Transition Diagram Inactive session Host on Local site Host on Local site StartH1H3 StartH1H2H3 StartH1H2H3 StartH1H2H3 StartH1H2H3 StartH1H3 SuspH2H3 Suspend StartH1H3 Suspend Host on Local site StartH1H2H3 StartH1H3 Suspend StartH1H3 Enable Copy To Site 2 RecoverH3 Recover HyperSwap RecoverH2 RecoverH3 StartH1H2 RecoverH1 StartH1H2 Suspend StartH1H2 Enable Copy To Site 1 Enable Copy To Site 1 StartH2H1 Host on Remote site StartH2H1 StartH1H2 Host on Intermediate site Suspend RecoverH2 StartH2H1 Go to Host on Remote Site Transition Diagram Go to Host on Intermediate Site Transition Diagram Enable Copy To Site 1 Figure 7-6 Host that is running on a local site 364 Tivoli Storage Productivity Center for Replication for Open Systems Host on intermediate site From Host on Local Site Transition Diagram StartH2H3 Host on Intermediate site StartH2H1H3 StartH2H1H3 StartH2H1H3 StartH2H1H3 StartH2H3 SuspH1H3 Suspend StartH2H3 Suspend Host on Intermediate site StartH2H1H3 StartH2H3 Suspend StartH2H3 Enable Copy To Site 1 RecoverH3 Recover HyperSwap RecoverH1 RecoverH3 StartH2H1 RecoverH2 StartH2H1 Suspend StartH2H1 Enable Copy To Site 1 Enable Copy To Site 2 StartH1H2 Host on Remote site Host on Local site StartH1H2 StartH2H1 Suspend RecoverH1 StartH1H2 Go to Host on Remote Site Transition Diagram Go to Host on Local Site Transition Diagram Enable Copy To Site 2 Host on Local site Figure 7-7 Host that is running on an intermediate site Chapter 7. Managing z/OS HyperSwap from Tivoli Storage Productivity Center for Replication for Open Systems 365 7.3.4 HyperSwap enabled Metro Global Mirror with Practice sessions In a Metro Global Mirror session with Practice and HyperSwap enabled, a failure on the primary storage system causes an automatic HyperSwap operation as in the Metro Global Mirror session with HyperSwap enabled. The difference for the Metro Global Mirror session with HyperSwap is that this session uses practice volumes for disaster recovery practice. Figure 7-8 shows you the Metro Global Mirror with Practice and HyperSwap session. Figure 7-8 Metro Global Mirror with Practice session Figure 7-9 on page 367 and Figure 7-10 on page 368 show the state transition diagrams for a Metro Global Mirror session that shows the effect of the HyperSwap actions. 366 Tivoli Storage Productivity Center for Replication for Open Systems From Host on Intermediate Site Transition Diagram From Host Remote Site Transition Diagram Inactive session Host on Local site Host on Local site StartH1H3 StartH1H2H3 StartH1H2H3 Flash StartH1H2H3 StartH1H3 SuspH2H3 StartH1H2H3 Flash Suspend StartH1H3 Suspend Suspend StartH1H2H3 StartH1H3 StartH1H3 RecoverH3 HyperSwap RecoverH2 Recover Enable Copy To Site 1 Flash Enable Copy To Site 1 Enable Copy To Site 1 Host on Remote site Host on Intermediate site Host on Remote site Go to Host on Remote Site Transition Diagram Flash Go to Host on Intermediate Site Transition Diagram Go to Host on Remote Site Transition Diagram Figure 7-9 Host that is running on a local site Chapter 7. Managing z/OS HyperSwap from Tivoli Storage Productivity Center for Replication for Open Systems 367 From Host on Local Site Transition Diagram Host on Intermediate site StartH2H3 StartH2H1H3 StartH2H1H3 Flash StartH2H1H3 StartH2H3 SuspH1H3 StartH2H1H3 Flash Suspend StartH2H3 Suspend Flash Suspend StartH1H1H3 StartH2H3 StartH2H3 RecoverH3 HyperSwap RecoverH1 Recover Enable Copy To Site 1 Flash Enable Copy To Site 1 Host on Remote site Go to Host on Remote Site Transition Diagram Enable Copy To Site 2 Host on Remote site Host on Local site Go to Host on Local Site Transition Diagram Figure 7-10 Host that is running on an intermediate site 368 Flash Tivoli Storage Productivity Center for Replication for Open Systems Go to Host on Remote Site Transition Diagram 7.3.5 Hardened Freeze The z/OS HyperSwap facilities also provide an optional Hardened Freeze capability for Metro Mirror Single Direction, Metro Mirror Failover/Failback, Metro Mirror Failover/Failback with Practice, Metro Global Mirror, and Metro Global Mirror with Practice session types. This function enables the z/OS HyperSwap subcomponent of I/O Supervisor to directly manage the suspension events (planned and unplanned) without requiring any intervention with Tivoli Storage Productivity Center for Replication. This feature greatly enhances the management of planned and unplanned suspension events, as described in the following sample scenarios: A disabled Metro Mirror session that is not HyperSwap enabled is managed by Tivoli Storage Productivity Center for Replication that is running on z/OS and a planned or unplanned suspend occurs. In this scenario, if the Hardened Freeze option is not selected, the suspend operation is performed by Tivoli Storage Productivity Center for Replication. Because Tivoli Storage Productivity Center for Replication is on the same disks that are part of the Metro Mirror session and, therefore, subject to freeze, this can lead the Tivoli Storage Productivity Center for Replication to freeze, which prevents the successful completion of the suspend operations. Having the Hardened Freeze enabled, the suspend operation is performed by I/O Supervisor, which does not require access to disks to complete the freeze operations. A disabled Metro Mirror session that is managing z/OS storage that is not HyperSwap enabled is managed by Tivoli Storage Productivity Center for Replication that is running on Open Systems. Consider a situation in which an extended outage in the network infrastructure prevents Tivoli Storage Productivity Center for Replication from communicating with the storage systems. In this scenario, without Hardened Freeze enabled, an unplanned suspension event does not trigger a freeze, which leaves the auxiliary storage systems inconsistent (and affects primary storage systems). With the Hardened Freeze option enabled, the suspend operation is performed by I/O Supervisor, which does not require network connectivity to complete the freeze operations. The Hardened Freeze is an inherent capability of HyperSwap enabled session types. 7.4 Description and usage of HyperSwap enabled sessions In this section, we describe how to set up HyperSwap enabled sessions and how they can be managed through the Tivoli Storage Productivity Center for Replication GUI. Several unplanned scenarios also are described. 7.4.1 Setting up a HyperSwap enabled session To enable the HyperSwap functions for a Tivoli Storage Productivity Center for Replication session, you must first set up the z/OS components, starting with the address spaces, as described in “Software” on page 358. After the z/OS address spaces are running, the communication between Tivoli Storage Productivity Center for Replication and z/OS can be established. From the Health Overview window, open the Host Systems panel through one of the available links, as shown in Figure 7-11 on page 370. Chapter 7. Managing z/OS HyperSwap from Tivoli Storage Productivity Center for Replication for Open Systems 369 Figure 7-11 Health Overview window From the Host System panel, click Add Host Connection, as shown in Figure 7-12. Figure 7-12 Add Host System The Add Host Connection panel opens, as shown in Figure 7-13. Select the z/OS connection type and provide the following required information: IP address or Host Name of one or more of the z/OS systems forming the sysplex. Note: We advise that you define connections to two or more members (systems or hosts, for example) in the sysplex for redundancy. 370 Tivoli Storage Productivity Center for Replication for Open Systems Port that is used to communicate with HyperSwap address space. This port must be the same as specified in the HyperSwap Management address space definition. The default is 5858. User name and password for Tivoli Storage Productivity Center for Replication that are defined in z/OS as described in “Enabling z/OS HyperSwap and adding a Tivoli Storage Productivity Center for Replication user to z/OS host” on page 359 and shown in Figure 7-13. Figure 7-13 Add Host Connection panel Click Add Host and wait for the connection to be established. When the connection is established, the Host Systems panel shows the host as Connected, as shown Figure 7-14. Figure 7-14 Host System panel that shows the host is connected Now we are ready to create the session. The process of creating a HyperSwap enabled session is the same as any other DS8000 session (see 4.3, “Managing DS8000 sessions” on page 201). When at least one Host System is defined, the HyperSwap options are made available for the HyperSwap capable session types. To enable the HyperSwap for a session, select the Manage H1-H2 with HyperSwap option in the Session Properties panel and then select the system (or Sysplex) from the drop-down menu, as shown in Figure 7-15 on page 372. Chapter 7. Managing z/OS HyperSwap from Tivoli Storage Productivity Center for Replication for Open Systems 371 Figure 7-15 Sysplex selection in the Session Properties panel Click Next and complete the session creation process. By opening the Session Details panel (see Figure 7-16), we can see that an association with a z/OS system is shown, which means that the session is HyperSwap enabled. Figure 7-16 Session Details panel that shows the z/OS association 372 Tivoli Storage Productivity Center for Replication for Open Systems The z/OS components still show that there is no active configuration to manage, as shown in Figure 7-17. D HS,CONFIG IOSHM0304I Active Configurations No configuration data D HS,STATUS IOSHM0303I HyperSwap Status Replication Session: N/A Socket Port: 5858 HyperSwap disabled: No configuration data SYSTEM1: No configuration data Figure 7-17 z/OS displays Select Start H1 H2 from the Select Action drop-down menu and click Go to start the session. During the session starting process, Tivoli Storage Productivity Center for Replication performs the following tasks, which are also reported in the console log (see Figure 7-18.): Establishes the mirroring relationships (in this example, there is only a Metro Mirror) and waits until all of the replication is in consistent state Loads the mirroring configuration to the HyperSwap address space Figure 7-18 Tivoli Storage Productivity Center for Replication console log Chapter 7. Managing z/OS HyperSwap from Tivoli Storage Productivity Center for Replication for Open Systems 373 After the session configuration is successfully loaded to z/OS, the HyperSwap management is now performed by the z/OS IOS component (which is in the Syslog), as shown in Figure 7-19. 16.54.50 584 584 16.54.52 585 585 16.55.21 16.55.21 16.55.21 16.55.21 16.55.21 16.55.21 16.55.21 16.55.21 16.55.21 interval 16.55.21 16.55.25 16.55.25 STC00054 IOSHM0201I HyperSwap Configuration LoadTest fails 584 Reason: Configuration Validation fails on member SYSTEM1 Reason Code: 40. Devices: 00F43-00F83 STC00054 IOSHM0201I HyperSwap Configuration LoadTest fails 585 Reason: Configuration Validation fails on member SYSTEM1 Reason Code: 50. Devices: 00F83-00F43 STC00054 IOSHM0501I Response from API for FC = 0, RC = 4, Rsn = 0 STC00054 IOSHM0501I Response from API for FC = 1, RC = 0, Rsn = 3 STC00054 IOSHM0200I HyperSwap Configuration Load complete STC00054 *IOSHM0803E HyperSwap enabled with limited capability STC00054 IOSHM0805I HyperSwap Enabled STC00054 IOSHM0501I Response from API for FC = 0, RC = 0, Rsn = 0 STC00054 IOSHM0501I Response from API for FC = 19, RC = 0, Rsn = 2 STC00054 IOSHM0501I Response from API for FC = 13, RC = 0, Rsn = 0 STC00054 IOSHM0808I HyperSwap Configuration Monitoring started, time = 5 minutes STC00054 IOSHM0501I Response from API for FC = 15, RC = 0, Rsn = 0 STC00054 IOSHM0305I HyperSwap allowed by operator STC00054 IOSHM0300I HyperSwap function enabled for all PPRC pairs Figure 7-19 HyperSwap address space that shows the configuration loading Note: The IOSHM0201I LOADTEST fails messages (as shown in Figure 7-19) are typical and used by Tivoli Storage Productivity Center for Replication to assure that they identify which of the storage systems is the primary. Querying the z/OS components, an active configuration is now shown, as shown in Figure 7-20 on page 375. 374 Tivoli Storage Productivity Center for Replication for Open Systems D HS,CONFIG IOSHM0304I Active Configurations Replication Session Name Replication Session Type ITSO-MM-HS HyperSwap D HS,CONFIG(DETAIL) IOSHM0304I HyperSwap Configuration Replication Session: ITSO-MM-HS Prim. SSID UA DEV# VOLSER Sec. SSID UA DEV# Status 06 03 00F43 8K1103 06 03 00F83 D HS,STATUS IOSHM0303I HyperSwap Status Replication Session: ITSO-MM-HS Socket Port: 5858 HyperSwap enabled New member configuration load failed: Disable Planned swap recovery: Disable Unplanned swap recovery: Disable FreezeAll: Yes Stop: No Figure 7-20 z/OS display that shows the configuration status Finally, the Tivoli Storage Productivity Center for Replication shows the session in HyperSwap enabled status by showing a green H in the drawing that represents the session, as shown in Figure 7-21. Figure 7-21 Session Details panel that shows the HyperSwap enabled status Chapter 7. Managing z/OS HyperSwap from Tivoli Storage Productivity Center for Replication for Open Systems 375 Now that the configuration is loaded in the z/OS address space, we can perform a HyperSwap test. The volume 8K1103 is online with the device number 0F43, as shown in Figure 7-22. D U,VOL=8K1103 RESPONSE=SYSTEM1 IEE457I 17.14.51 UNIT STATUS 220 UNIT TYPE STATUS VOLSER 0F43 3390 O 8K1103 VOLSTATE PRIV/RSDNT Figure 7-22 z/OS display that shows the device number for volume 8K1103 From the Session Detail panel, select HyperSwap from the Select Action drop-down menu (as shown in Figure 7-23) and click Go. Figure 7-23 Session Details panel that shows the HyperSwap action Click Yes in the confirmation panel, as shown in Figure 7-24. Figure 7-24 Confirmation panel 376 Tivoli Storage Productivity Center for Replication for Open Systems The HyperSwap process starts and the z/OS system log reports the actions that are performed by HyperSwap address space, as shown Figure 7-25. 17.18.41 17.18.41 17.18.41 17.18.41 17.18.41 17.18.41 17.18.41 17.18.41 17.18.41 17.18.41 17.18.41 17.18.41 17.18.41 17.18.41 17.18.41 17.18.41 17.18.41 17.18.41 17.18.41 17.18.41 17.18.41 17.18.41 17.18.41 17.18.41 17.18.41 17.18.41 17.18.41 17.18.41 17.18.41 17.18.41 17.18.41 17.18.41 17.18.41 17.18.41 17.18.41 17.18.41 17.18.41 17.18.41 17.18.41 17.18.41 17.18.41 17.18.41 17.18.41 17.18.41 17.18.41 17.18.41 STC00054 IOSHM0400I 17:18:41.68 HyperSwap requested STC00054 IOSHM0424I Master status = 00000000 00000000 0000000F00000000 STC00054 IOSHM0401I 17:18:41.68 Planned HyperSwap started - UserExit STC00054 IOSHM0424I Master status = 00000000 00000000 0000000F01000000 STC00054 IOSHM0417I 0:00:00.00 Response from SYSTEM1, API RC = 0, Rsn = 2 STC00054 IOSHM0424I Master status = 00000000 80000000 0000000F01000000 STC00054 IOSHM0402I 17:18:41.69 HyperSwap phase - Validation of I/O connectivity starting STC00054 IOSHM0501I Response from API for FC = 14, RC = 0, Rsn = 0 STC00054 IOSHM0417I 17:18:41.70 Response from SYSTEM1, API RC = 0, Rsn = 0 STC00054 IOSHM0424I Master status = 00000000 80000000 0000000F02000000 STC00054 IOSHM0403I 17:18:41.70 HyperSwap phase - Validation of I/O connectivity completed STC00054 IOSHM0404I 17:18:41.70 HyperSwap phase - Freeze and quiesce DASD I/O starting STC00054 IOSHM0501I Response from API for FC = 17, RC = 0, Rsn = 0 STC00054 IOSHM0417I 17:18:41.71 Response from SYSTEM1, API RC = 0, Rsn = 0 STC00054 IOSHM0424I Master status = 00000000 80000000 0000000F03000000 STC00054 IOSHM0405I 17:18:41.71 HyperSwap phase - Freeze and quiesce DASD I/O completed STC00054 IOSHM0406I 17:18:41.71 HyperSwap phase - Failover PPRC volumes starting STC00054 IOSHM0501I Response from API for FC = 10, RC = 0, Rsn = 0 STC00054 IOSHM0417I 17:18:41.72 Response from SYSTEM1, API RC = 0, Rsn = 0 STC00054 IOSHM0424I Master status = 00000000 80000000 0000000F04000000 STC00054 IOSHM0407I 17:18:41.72 HyperSwap phase - Failover PPRC volumes completed STC00054 IOSHM0408I 17:18:41.72 HyperSwap phase - Swap UCBs starting STC00054 IOSHM0501I Response from API for FC = 3, RC = 0, Rsn = 0 STC00054 IOSHM0417I 17:18:41.73 Response from SYSTEM1, API RC = 0, Rsn = 0 STC00054 IOSHM0424I Master status = 00000000 80000000 0000000F05000000 STC00054 IOSHM0409I 17:18:41.73 HyperSwap phase - Swap UCBs completed STC00054 IOSHM0410I 17:18:41.73 HyperSwap phase - Resume DASD I/O starting STC00054 IOSHM0501I Response from API for FC = 6, RC = 0, Rsn = 0 STC00054 IOSHM0417I 17:18:41.84 Response from SYSTEM1, API RC = 0, Rsn = 0 STC00054 IOSHM0424I Master status = 00000000 80000000 0000000F06000000 STC00054 IOSHM0411I 17:18:41.84 HyperSwap phase - Resume DASD I/O completed STC00054 IOSHM0501I Response from API for FC = 18, RC = 0, Rsn = 0 STC00054 IOSHM0429I 17:18:41.84 HyperSwap processing issued an UnFreeze STC00054 IOSHM0412I 17:18:41.84 HyperSwap phase - Cleanup starting STC00054 IOSHM0501I Response from API for FC = 12, RC = 0, Rsn = 0 STC00054 IOSHM0417I 17:18:41.85 Response from SYSTEM1, API RC = 0, Rsn = 0 STC00054 IOSHM0424I Master status = 00000000 80000000 0000000F08000000 STC00054 IOSHM0413I 17:18:41.85 HyperSwap phase - Cleanup completed STC00054 *IOSHM0803E HyperSwap Disabled STC00054 IOSHM0809I HyperSwap Configuration Monitoring stopped STC00054 IOSHM0501I Response from API for FC = 0, RC = 4, Rsn = 0 STC00054 IOSHM0417I 0:00:00.00 Response from SYSTEM1, API RC = 0, Rsn = 0 STC00054 IOSHM0424I Master status = 20000000 00000000 0000000F09000000 STC00054 IOSHM0414I 17:18:41.86 Planned HyperSwap completed STC00054 IOSHM0200I HyperSwap Configuration Purge complete STC00054 IOSHM0424I Master status = 20000000 00000000 0000001000000000 Figure 7-25 z/OS system log showing the ongoing HyperSwap Note: Message “IOSHM0429I 17:18:41.84 HyperSwap processing issued an UnFreeze” (as shown in Figure 7-25) indicates that the HyperSwap is complete now. After Resume and UnFreeze are complete, I/Os resumes processing. Cleanup is not necessary for the applications and system to resume running and is purposely designed to avoid the use of CPU resources (which potentially take a long time) so that the customer's applications can continue. Chapter 7. Managing z/OS HyperSwap from Tivoli Storage Productivity Center for Replication for Open Systems 377 Also, the Tivoli Storage Productivity Center for Replication console log shows the HyperSwap replication messages, as shown in Figure 7-26. Figure 7-26 Console log that shows the HyperSwap messages Checking the volume 8K1103, we can see that the volume is now online with device number 0F83 (see Figure 7-27), which proves that the HyperSwap occurred. RESPONSE=SYSTEM1 IEE457I 17.19.50 UNIT STATUS 220 UNIT TYPE STATUS VOLSER 0F83 3390 O 8K1103 VOLSTATE PRIV/RSDNT Figure 7-27 z/OS display that shows the device number for volume 8K1103 The session now shows Normal status and Target Available state, as shown in Figure 7-28. Figure 7-28 Session Details panel that shows the session status after the HyperSwap 378 Tivoli Storage Productivity Center for Replication for Open Systems Following the HyperSwap, the configuration was purged and the HyperSwap disabled, as shown in Figure 7-29. D HS,STATUS 17.20.16 STC00054 IOSHM0303I HyperSwap Status 672 672 Replication Session: N/A 672 Socket Port: 5858 672 HyperSwap disabled: 672 No configuration data 672 SYSTEM1: 672 No configuration data 672 Figure 7-29 z/OS displays that shows there is no configuration loaded To return to the original configuration, we first must restore the Metro Mirror. Select the Start H2 H1 action and wait for the session to go into Normal status. The new configuration is then loaded to the HyperSwap address space, as shown is Figure 7-30. D HS,CONFIG(DETAIL) 17.47.11 STC00054 607 607 607 IOSHM0304I HyperSwap Configuration 607 607 Replication Session: ITSO-MM-HS Prim. SSID UA DEV# VOLSER Sec. SSID UA DEV£ Status 06 03 00F83 8K1103 06 03 00F43 Figure 7-30 z/OS displays that shows a new configuration is loaded To perform the final HyperSwap, we simulate an outage on primary storage system by running the VARY 0F83,OFFLINE,FORCE command. This action triggers an unplanned HyperSwap, as shown in Figure 7-31 on page 380. Note: Running this command is called boxing the device. You can “unbox” the device by running a VARY 0F83,ONLINE,UNCOND command on the old primary. The device does not come online because of duplicate volume serial (volser) numbers; however, this should be sufficient to unbox the device. Chapter 7. Managing z/OS HyperSwap from Tivoli Storage Productivity Center for Replication for Open Systems 379 17.50.46 17.50.46 17.50.46 17.50.46 17.50.46 17.50.46 17.50.46 17.50.46 17.50.46 17.50.46 17.50.46 17.50.46 17.50.46 17.50.46 17.50.46 17.50.46 17.50.46 17.50.46 17.50.46 17.50.46 17.50.46 17.50.46 17.50.46 17.50.46 17.50.46 17.50.46 17.50.46 17.50.46 17.50.46 17.50.46 17.50.46 17.50.46 17.50.46 17.50.46 17.50.46 17.50.46 17.50.46 17.50.46 17.50.46 17.50.46 17.50.46 17.50.46 17.50.46 17.50.46 17.50.46 17.50.46 17.50.46 17.50.46 17.50.50 STC00054 STC00054 STC00054 STC00054 STC00054 STC00054 STC00054 STC00054 STC00054 STC00054 STC00054 STC00054 STC00054 STC00054 STC00054 STC00054 STC00054 STC00054 STC00054 STC00054 STC00054 STC00054 STC00054 STC00054 STC00054 STC00054 STC00054 STC00054 STC00054 STC00054 STC00054 STC00054 STC00054 STC00054 STC00054 STC00054 STC00054 STC00054 STC00054 STC00054 STC00054 STC00054 STC00054 STC00054 STC00054 STC00054 STC00054 STC00054 STC00054 IOSHM0400I 17:50:46.62 HyperSwap requested IOSHM0424I Master status = 00000000 00000000 0000001000000000 IOSHM0401I 17:50:46.62 Unplanned HyperSwap started - ENF IOSHM0424I Master status = 00000000 00000000 0000001001000100 IOSHM0417I 0:00:00.00 Response from SYSTEM1, API RC = 0, Rsn = 2 IOSHM0424I Master status = 00000000 80000000 0000001001000100 IOSHM0402I 17:50:46.64 HyperSwap phase - Validation of I/O connectivity starting IOSHM0501I Response from API for FC = 14, RC = 0, Rsn = 0 IOSHM0417I 17:50:46.65 Response from SYSTEM1, API RC = 0, Rsn = 0 IOSHM0424I Master status = 00000000 80000000 0000001002000100 IOSHM0403I 17:50:46.65 HyperSwap phase - Validation of I/O connectivity completed IOSHM0404I 17:50:46.65 HyperSwap phase - Freeze and quiesce DASD I/O starting IOSHM0501I Response from API for FC = 17, RC = 0, Rsn = 8 IOSHM0417I 17:50:46.66 Response from SYSTEM1, API RC = 0, Rsn = 0 IOSHM0424I Master status = 00000000 80000000 0000001003000100 IOSHM0405I 17:50:46.66 HyperSwap phase - Freeze and quiesce DASD I/O completed IOSHM0501I Response from API for FC = 96, RC = 0, Rsn = 0 IOSHM0501I Response from API for FC = 97, RC = 0, Rsn = 0 IOSHM0406I 17:50:46.66 HyperSwap phase - Failover PPRC volumes starting IOSHM0501I Response from API for FC = 10, RC = 0, Rsn = 0 IOSHM0417I 17:50:46.67 Response from SYSTEM1, API RC = 0, Rsn = 0 IOSHM0424I Master status = 00000000 80000000 0000001004000100 IOSHM0407I 17:50:46.67 HyperSwap phase - Failover PPRC volumes completed IOSHM0408I 17:50:46.67 HyperSwap phase - Swap UCBs starting IOSHM0501I Response from API for FC = 3, RC = 0, Rsn = 0 IOSHM0417I 17:50:46.68 Response from SYSTEM1, API RC = 0, Rsn = 0 IOSHM0424I Master status = 00000000 80000000 0000001005000100 IOSHM0409I 17:50:46.68 HyperSwap phase - Swap UCBs completed IOSHM0410I 17:50:46.68 HyperSwap phase - Resume DASD I/O starting IOSHM0501I Response from API for FC = 6, RC = 0, Rsn = 0 IOSHM0417I 17:50:46.79 Response from SYSTEM1, API RC = 0, Rsn = 0 IOSHM0424I Master status = 00000000 80000000 0000001006000100 IOSHM0411I 17:50:46.79 HyperSwap phase - Resume DASD I/O completed IOSHM0501I Response from API for FC = 18, RC = 0, Rsn = 8 IOSHM0429I 17:50:46.79 HyperSwap processing issued an UnFreeze IOSHM0412I 17:50:46.79 HyperSwap phase - Cleanup starting IOSHM0501I Response from API for FC = 12, RC = 0, Rsn = 0 IOSHM0417I 17:50:46.80 Response from SYSTEM1, API RC = 0, Rsn = 0 IOSHM0424I Master status = 00000000 80000000 0000001008000100 IOSHM0413I 17:50:46.80 HyperSwap phase - Cleanup completed *IOSHM0803E HyperSwap Disabled IOSHM0809I HyperSwap Configuration Monitoring stopped IOSHM0501I Response from API for FC = 0, RC = 4, Rsn = 0 IOSHM0417I 0:00:00.00 Response from SYSTEM1, API RC = 0, Rsn = 0 IOSHM0424I Master status = 20000000 00000000 0000001009000100 IOSHM0414I 17:50:46.80 Unplanned HyperSwap completed IOSHM0200I HyperSwap Configuration Purge complete IOSHM0424I Master status = 20000000 00000000 0000001100000100 IOSHM0200I HyperSwap Configuration LoadTest complete Figure 7-31 Unplanned HyperSwap related messages in the z/OS system log 380 Tivoli Storage Productivity Center for Replication for Open Systems 7.5 Use cases Most z/OS customers require continuous availability and disaster recovery to protect their business applications. To address the high availability requirements of business applications, many z/OS customers implemented Parallel Sysplex. However, high availability also must be extended to storage systems. Storage systems today manage more data and, therefore, the effect of a storage system outage is more widespread, often affecting a Parallel Sysplex and potentially causing a Parallel Sysplex wide outage. To address these outages, the HyperSwap technology helps mask storage system failures with an Extended Long Busy function (ELB) to the application I/O followed by a redirection of that I/O to a recovered secondary device. By using this technology, there is no effect on business applications when a storage system planned or unplanned outage occurs. In this section, two high availability and Disaster Recovery scenarios and the possible solutions that are based on HyperSwap technology are described. Scenario 1: Active-Active campus configuration An Active-Active campus is a high availability solution that often is based on advanced clustering and data replication technologies. This kind of solution provides continuous availability features, which implement hardware redundancy in multiple locations and sophisticated software facilities that allow workload switching among the sites. Also, data replication plays an important role in this kind of solution, which provides a consistent copy of data across the campus. In a typical Active-Active campus configuration, the application workload is running in two separate sites that are interconnected through LAN and SAN extensions. Consistent copies of the data are continuously present in both sites. This solution can manage (transparently to the users) various critical situations, such as single or multiple hardware failures or even an entire site failure. In terms of business continuity, the Active-Active campus configuration cannot be considered a Disaster Recovery solution because, the connection latency overhead often requires a relatively short distance between the campus sites that do not survive in the case of major natural disasters. Figure 7-32 on page 382 shows a schematic representation of an Active-Active campus configuration that is based on System z and DS8000 technologies. Chapter 7. Managing z/OS HyperSwap from Tivoli Storage Productivity Center for Replication for Open Systems 381 Figure 7-32 Active-Active campus configuration In this scenario, the application workload is running in Site A and Site B. The Parallel Sysplex facility manages the availability of the application across the sites while the data is replicated by using synchronous mirroring technologies, such as DS8000 Metro Mirror. To manage the data replication and the data availability, a Tivoli Storage Productivity Center for Replication for an Open systems solution can be implemented. Figure 7-33 on page 383 shows a possible implementation of Tivoli Storage Productivity Center for Replication for Open systems to manage the data availability for this scenario. In this solution, an Active-Standby Tivoli Storage Productivity Center for Replication configuration is deployed across the two sites, with the active server running on the primary storage site (Site A). An IP connection is provided to manage the storage systems and to communicate with the z/OS HyperSwap address spaces. A Metro Mirror Failover/Failback session with HyperSwap enabled is defined to Tivoli Storage Productivity Center for Replication to manage this kind of configuration. With the Parallel Sysplex facilities, this Tivoli Storage Productivity Center for Replication implementation provides high availability features that cover many failure scenarios. Note: A Parallel Sysplex is not required to use z/OS HyperSwap. A customer can also use z/OS HyperSwap with a non-parallel sysplex. For example, a sysplex without a Coupling Facility (CF) or with a system that is running in XCF-local mode. 382 Tivoli Storage Productivity Center for Replication for Open Systems Figure 7-33 Open systems implementation for an Active-Active campus configuration Note: For more information about Tivoli Storage Productivity Center for Replication HyperSwap on z/OS, see IBM Tivoli Storage Productivity Center for Replication for Series z, SG24-7563, which is available at this website: http://www.redbooks.ibm.com/redpieces/abstracts/sg247563.html?Open Chapter 7. Managing z/OS HyperSwap from Tivoli Storage Productivity Center for Replication for Open Systems 383 Figure 7-34 shows a primary storage systems failure in Site A. users SITE A SITE B ..00101010.. ...10010100.. ....11101010.. .....00110101.. ..00101010.. ...10010100.. ....11101010.. .....00110101.. HyperSwap Production Campus Figure 7-34 Primary storage systems failure in an Active-Active campus configuration In this case, the failure of primary storage system triggers a HyperSwap that allows application transparent switching to the auxiliary storage systems. 384 Tivoli Storage Productivity Center for Replication for Open Systems Figure 7-35 shows a complete Site A failure. users SITE A SITE B ..0010101 ..00101010.. . 010. 01 0.. 0 . .. .100101 10010100 00. 0.. ...10010100.. ....11101010.. ....11 .. 101010. .. .....00110101.. ... ...0 . 0110101 1.. . ..00101010.. ...10010100.. ....11101010.. .....00110101.. HyperSwap Production Campus Figure 7-35 Entire primary site failure in an Active-Active campus configuration The HyperSwap capabilities of Tivoli Storage Productivity Center for Replication enable the applications that are running on Site B to survive the Site A failure by switching to the Site B storage systems. In addition, the Parallel Sysplex facilities allow an application that is switching from Site A to Site B with minimal or no downtime. Scenario 2: Three-site configuration A three-site configuration combines the high availability features of an Active-Active campus configuration with Disaster Recovery capabilities. In addition to the infrastructure that is required for the campus solution, a remote third site is provided with computing capabilities and storage capacity for Disaster Recovery purposes. To make this solution effective in terms of Recovery Time Objective (RTO) and Recovery Point Objective (RPO), more data replication capabilities must be provided to ensure data availability at the remote site. Furthermore, to be considered effective in terms of Disaster Recovery, a three-site solution must have sufficient distance between the campus sites and the remote site such that it ensures the survival of at least one site in the case of major disaster. For this reason, the distance between the campus sites and the remote site often does not allow the use of synchronous replication technologies because of the latency effects on write operations. Chapter 7. Managing z/OS HyperSwap from Tivoli Storage Productivity Center for Replication for Open Systems 385 Figure 7-36 shows a schematic representation of a three-site configuration that is based on System z and DS8000 technology. Figure 7-36 Three-site configuration In this scenario, the application workload is usually running in a campus infrastructure. Asynchronous mirroring technologies, such as DS8000 Global Mirror, are used to replicate the data from the intermediate site (Site B) to the remote site (Site C). Combining HyperSwap capability and Global Mirror management facilities, Tivoli Storage Productivity Center for Replication for Open Systems provides a single point of control for data availability management, monitoring, and alerting. Figure 7-37 on page 387 shows a possible implementation of Tivoli Storage Productivity Center for Replication for Open systems to manage the data availability for this scenario. In this solution, an Active-Standby Tivoli Storage Productivity Center for Replication configuration is deployed across two sites, with the active server running on the primary storage site (Site A) and the Standby server in the remote site (Site C). An IP connection is provided to manage the storage systems and to communicate with the z/OS HyperSwap address spaces. A Metro Global Mirror session with HyperSwap enabled is defined to Tivoli Storage Productivity Center for Replication to manage this kind of configuration. In addition to the failure scenarios that were described for the Active-Active configuration, this Tivoli Storage Productivity Center for Replication implementation provides protection from other unplanned disastrous events. 386 Tivoli Storage Productivity Center for Replication for Open Systems Figure 7-37 Tivoli Storage Productivity Center for Replication implementation for a three-site configuration Figure 7-38 shows the entire Site B failure. users SITE A SITE B ..00101010.. ...10010100.. ....11101010.. .....00110101.. SITE C ..00101010.. . .00 00101010 0101010.. ...1 . 00 ..1 0010 0 0 100.. ...10010100.. ....11101010.. .... .. 111 1 1010. 10 .... .. .00 0110101 1. .....00110101.. Data replication Production Campus Data replication Disaster Recovery Site Figure 7-38 Intermediate site failure in a three-site configuration Chapter 7. Managing z/OS HyperSwap from Tivoli Storage Productivity Center for Replication for Open Systems 387 In this case, the disaster affects only the application that is running in Site B and the Parallel Sysplex facilities can help to minimize the business effects. From the Disaster Recovery point of view, the Tivoli Storage Productivity Center for Replication provides capabilities to restart the replication to remote site directly from the primary site without requiring a full copy of the data by using the Global Mirror Incremental Resync feature. Figure 7-39 shows a complete production campus failure scenario. users SSITE SI TEE A SITE B ..00101010 ..00101010.. 00101010 0.. ...10010 0 10 00 0.. ...10010100.. ....11101010.. ....1110 111 1 11 10 11 010 0.. .....00110101.. .....001 .001 . 001 110 0101. 1 . SITE C ..00101010.. .. . .00 . 00101010 101010.. ...10010100.. ...10010100.. ....11101010.. ....11101010 .. .....00110101.. .....00110101 1.. ..00101010.. ...10010100.. ....11101010.. .....00110101.. Production Campus Disaster Recovery Site Figure 7-39 Production campus failure in a three-site configuration A complete production campus failure is a Disaster Recovery scenario that requires a full recovery of the operations to the remote site. Tivoli Storage Productivity Center for Replication also offers all of the capabilities that are needed to perform the data recovery operations and the functionalities to return to the original three-site configuration (Go-home procedures). 388 Tivoli Storage Productivity Center for Replication for Open Systems 8 Chapter 8. Hints and tips In this chapter, we offer information that we encountered while we were writing this book that might help you. It includes support references and helpful tips. This chapter includes the following topics: Introduction VMware, DS8000, and Tivoli Storage Productivity Center for Replication DS8000 LSS symmetry HyperSwap enabled sessions troubleshooting Stuck in a particular state High availability server platforms Simple Network Management Protocol setup Tivoli Storage Productivity Center for Replication logging Auto refresh rate User authentication issues IBM Software Support Lifecycle Tivoli Storage Productivity Center support matrix © Copyright IBM Corp. 2014. All rights reserved. 389 8.1 Introduction In this chapter, we include the information that we found helpful at the time of this writing. We advise that before you take any action, you search for the latest support bulletins and alerts because the situation might be improved, was fixed, or new functionality might be added in versions were released after this publication was produced. For more information about supported hardware, platforms, and products for each Tivoli Storage Productivity Center for Replication version, see this website: http://www-01.ibm.com/support/docview.wss?uid=swg21386446 8.2 VMware, DS8000, and Tivoli Storage Productivity Center for Replication In this section, we describe some hints and tips for running VMware in a Tivoli Storage Productivity Center for Replication environment. Also described are VMWare vStorage API for Array Integration (VAAI) usage and tips for running with DS8000. 8.2.1 Hosting by using virtual servers The main goal of the use of the VMware Compute Core feature is to virtualize server resources and aggregate them in logical pools that can be allocated to multiple workloads. vSphere ESXi is the virtualization layer that abstracts server hardware resources and shares them with multiple virtual machines. By running vMotion, you can migrate running virtual machines between hosts. However, if you install Tivoli Storage Productivity Center for Replication into a virtual VMware server and run a vMotion, Tivoli Storage Productivity Center for Replication often disables the communication between the Tivoli Storage Productivity Center for Replication server and its managed storage resources. Tip: Use the High Availability options that are available for Tivoli Storage Productivity Center for Replication as described in 1.3, “Architecture” on page 7, and use dedicated hardware resources to host Tivoli Storage Productivity Center for Replication server. 8.2.2 VAAI and DS8000 VMware VAAI uses specific functions from the storage array hardware to drive vSphere vStorage operations. For instance, for VAAI XCOPY, IBM FlashCopy at the track level is used. To use the VAAI XCOPY primitive, the FlashCopy feature of the DS8870 must be enabled. This means that a FlashCopy license for Fixed Block capacity is required. In any instance in which XCOPY is not supported, the storage array indicates to the host that XCOPY is not supported, and the host performs the copies. The only impact to applications is that operations that might otherwise use XCOPY do not get the benefit of hardware acceleration. You should take the standard precautions concerning code versions compatibility. Check code versions compatibility if you are planning to use VAAI with DS8000, and even more so if 390 Tivoli Storage Productivity Center for Replication for Open Systems you are planning to combine VAAI features with DS8000 Copy Services that are managed directly or by using Tivoli Storage Productivity Center for Replication. The first step is to make sure that you have the appropriate DS8000 firmware version. Previous versions of DS8000 firmware had problems with the VAAI Zero Blocks/Write same features, which can be easily solved with a firmware upgrade or a workaround. For more information, see the Flash alert that is available at this website: http://www-01.ibm.com/support/docview.wss?uid=ssg1S1004112 Check the IBM System Storage Interoperation Center (SSIC) and select the VMware Operating System version that you use. The SSIC is available at this website: http://www-03.ibm.com/systems/support/storage/ssic/interoperability.wss The next step is to carefully plan your remote replication sessions and topology. Remember the restrictions and limitations when you are cascading copy services across volumes. If you plan to use VAAI XCOPY, the following restrictions apply: A Fixed Block FlashCopy license is required. Logical unit numbers (LUNs) are used by the ESX and ESXi servers must not be larger than 2 TB. For optimal performance, use volumes of 128 GB or less. Track Space Efficient volumes and Extent Space Efficient volumes cannot be used. The target of an XCOPY operation cannot be a Remote Mirror source volume. 8.3 DS8000 LSS symmetry Unlike the IBM ESS800 systems, logical subsystems (LSSs) are logical constructs in the IBM System Storage DS8000 series. A single LSS can have volumes coming from different physical arrays. This simplifies the LSS design layout; for example, with the possibility to assign LSSs to applications without concern of the underlying physical disk resources. LSSs play an important role on copy services sessions. In Metro Mirror, logical paths are defined between source and target LSSs within source and target DS8000 Storage Systems. These logical paths run through the physical links between the storage subsystems and are unidirectional. To avoid having issues with logical path limits on the DS8000s, we recommend that you configure your remote copy sessions with a one-to-one, symmetrical LSS configuration. In the DS8000, this is achieved by, for example, making all volumes that are defined in DS8000 #1 LSS 00 that are mirrored to remote DS8000 #2 have their respective target volumes, also in LSS 00. For more information, see IBM System Storage DS8000 Copy Services for Open Systems, SG24-6788-06, which is available at this website: http://publib-b.boulder.ibm.com/abstracts/sg246788.html?Open 8.4 HyperSwap enabled sessions troubleshooting After a Tivoli Storage Productivity Center for Replication session configuration with HyperSwap enabled is successfully loaded in the z/OS address spaces, the HyperSwap and Chapter 8. Hints and tips 391 freeze capabilities are delegated to the z/OS components. For this reason, any unplanned event regarding the Metro Mirror is managed directly by z/OS address spaces, which leaves only the management of planned actions and monitoring operations to Tivoli Storage Productivity Center for Replication. If a communication loss to z/OS address spaces occurs, Tivoli Storage Productivity Center for Replication logs some error messages in the console that states that the communication to the IOS was interrupted. Typical Tivoli Storage Productivity Center for Replication console messages that indicate that the isolation between Tivoli Storage Productivity Center for Replication and z/OS IOS are reported in Example 8-1. Example 8-1 Tivoli Storage Productivity Center for Replication to IOS connection loss messages IWNR5429E [2013-08-15 11:51:37.388-0700] The session ITSO-MM-HS has become disconnected from IOS while a sequence was managed by HyperSwap. Tivoli Storage Productivity Center for Replication is currently unable to manage HyperSwap, but a HyperSwap might still occur. IWNR7043E [2013-08-15 11:55:38.301-0700] Unable to connect to the host 192.0.0.4:5858 Although in most cases the communication loss is caused by network issues, some basic checking can always be performed to verify the heath status of the HyperSwap z/OS components, including the following checks: Determine whether the HyperSwap address spaces are running. This check can be performed through System Display and Search Facility (SDSF) or by using z/OS Display Active command, as shown in Example 8-2. Example 8-2 Display Active (D A,L) command output 10.36.38 SYSTEM1 IEE114I 10.36.38 2013.219 ACTIVITY 917 JOBS M/S TS USERS SYSAS INITS ACTIVE/MAX VTAM 00002 00018 00001 00038 00008 00001/00020 LLA LLA LLA NSW S DFM DFM DFM SDF SDF SDF OWT S JES2 JES2 IEFPROC VLF VLF VLF NSW S DLF DLF DLF SDSF SDSF SDSF NSW S IGVDGNPP IGVDGNPP IGVDGNPP STGINIT STGINIT STGINIT OWT S RRS RRS RRS VTAM1 VTAM1 VTAM NSW S TCAS TCAS TSO APPC APPC APPC NSW S ASCH ASCH ASCH TCPIP TCPIP TCPIP NSW SO INETD1 STEP1 IBMUSER FTP1 STEP1 IBMUSER OWT AO IWNSRV IWNSRV STEP1 HSIBSOCK HSIBSOCK STEP NSW SO HSIBAPI HSIBAPI IBMUSER OWT C OAS 00012 NSW S NSW S NSW S OWT S NSW S OWT S NSW S OWT AO IN SO NSW S Review the Address Spaces job log for error messages. Check the HyperSwap configuration status. This check can be performed by using the z/OS Display HyperSwap commands, as shown in the Example 8-3. Example 8-3 Display HyperSwap command output D HS,STATUS RESPONSE=SYSTEM1 IOSHM0303I HyperSwap Status 797 Replication Session: ITSO-MM-HS Socket Port: 5858 HyperSwap enabled 392 Tivoli Storage Productivity Center for Replication for Open Systems New member configuration load failed: Disable Planned swap recovery: Disable Unplanned swap recovery: Disable FreezeAll: Yes Stop: No D HS,CONFIG IOSHM0304I Active Configurations Replication Session Name Replication Session Type ITSO-MM-HS HyperSwap Check the devices status by using the z/OS Display Unit and Display Matrix commands. 8.5 Stuck in a particular state If Tivoli Storage Productivity Center for Replication Session is stuck in a particular state, the recommended workaround in this case is to stop and restart the Tivoli Storage Productivity Center for Replication processes by using the following scripts: Tip: Before the server is restarted, try running the Refresh States command from the session drop-down menu. Windows: – TPC_install_directory\scripts\stopTPCReplication.bat – TPC_install_directory\scripts\startTPCReplication.bat Default TPC_install_directory in Windows is C:\Program Files\IBM\TPC. AIX or Linux – TPC_install_directory/scripts/stopTPCReplication.sh – TPC_install_directory/scripts/startTPCReplication.sh Default TPC_install_directory in AIX or Linux is /opt/IBM/TPC. Example 8-4 shows an example of running scripts to start and restart the Tivoli Storage Productivity Center for Replication server in Windows. Example 8-4 Stop and Restart Tivoli Storage Productivity Center for Replication Server processes C:\Program Files\IBM\TPC\scripts>stoptpcreplication.bat Server replicationServer stop failed. Check server logs for details. SUCCESS: The process with PID 3168 (child process of PID 4680) has been terminated. C:\Program Files\IBM\TPC\wlp\bin\server.bat status replicationServer Server replicationServer is not running. C:\Program Files\IBM\TPC\scripts>starttpcreplication.bat C:\Program Files\IBM\TPC\scripts> C:\Program Files\IBM\TPC\wlp\bin\server.bat status replicationserver Server replicationserver is running. Chapter 8. Hints and tips 393 C:\Program Files\IBM\TPC\scripts> 8.6 High availability server platforms When you are operating in a high availability environment, your Tivoli Storage Productivity Center for Replication active server and standby server can be servers of the same operating systems, or servers of different operating systems. For example, your active server can be a Windows server and your standby server can be a Linux server or vice versa. A same-server example is when your active server and your standby server both are AIX servers. One such case of Tivoli Storage Productivity Center for Replication high availability is to have your main site with the active server running on z/OS (in a Mainframe LPAR) and your standby server running on a Windows server in the remote data center so that you do not need a Mainframe LPAR for the standby server. 8.7 Simple Network Management Protocol setup Tivoli Storage Productivity Center for Replication can be sent up by sending the Simple Network Management Protocol (SNMP) traps to registered SNMP managers when various events occur, including the following events: Session state change Configuration change Suspending-event notification Communication failure High-availability state change You can use the mksnmp command-line interface (CLI) command to add a specified manager to the list of servers to which SNMP alerts are sent. For more information about the mksnmp command, see IBM TotalStorage Productivity Center for Replication Command-line Interface User's Guide, SC32-0104, which is available at this website: http://publib.boulder.ibm.com/infocenter/tivihelp/v4r1/index.jsp?topic=%2Fcom.ibm. sspc_v13.doc%2Ffqz0_r_sspc_rep_publications.html You can see the SNMP traps in the CsmTrace.log files, as shown in Figure 8-1. The figure contains a segment of the log. As such, you can see the details of the trap that is captured and prepared. 394 Tivoli Storage Productivity Center for Replication for Open Systems [2006-06-23 16:16:12.828-07:00] Work-2 RepMgr D com.ibm.csm.server.session.snmp.SnmpNotification sendMsg TRACE: Message: version=1 communityString=public errorStatus=Success operation=V2 TRAP requestId=0 correlator=0 ( 1.3.6.1.2.1.1.3:17270546, 1.3.6.1.6.3.1.1.4.1:1.3.6.1.4.1.2.6.204.2.1.3, 1.3.6.1.6.3.1.1.4.3:1.3.6.1.4.1.2, 1.3.6.1.4.1.2.6.204.3.1:ess_gmsd_cli, 1.3.6.1.4.1.2.6.204.3.2:Preparing, 1.3.6.1.4.1.2.6.204.3.3:Prepared, 1.3.6.1.4.1.2.6.204.3.4:H1) Figure 8-1 CsmTrace.log Additionally, the Tivoli Storage Productivity Center for Replication Server can be set up to receive SNMP traps from the IBM ESS model 800. Although they are not required, the use of the SNMP alert reduces the latency between the time that a freeze event occurs and the time that Tivoli Storage Productivity Center for Replication recognizes that the event is occurring. With or without the SNMP alert function, however, Tivoli Storage Productivity Center for Replication maintains data consistency of its sessions during the freeze event. The SNMP trap destination can be set up on your ESS system via the ESS Specialist. 8.8 Tivoli Storage Productivity Center for Replication logging If problems occur within your Tivoli Storage Productivity Center for Replication server environment, there are several different ways that you can collect logs. 8.8.1 Collecting logs by using GUI To collect logs via the Tivoli Storage Productivity Center for Replication GUI, click the Advanced Tools in the menu. After you reach the Advanced Tools page, click Create. 8.8.2 Collecting logs by using CLI You can also collect logs via the Tivoli Storage Productivity Center for Replication CLI. start by opening a command prompt from your Tivoli Storage Productivity Center for Replication server and enter mklogpkg and then press Enter. The command prompt displays the location of the logs. 8.8.3 Collecting logs manually The logs manually also can be collected manually. You can collect the Tivoli Storage Productivity Center for Replication logs by compressing all of the files in the following directories: C:\Program Files\IBM\IBM TotalStorage Productivity Center for Replication V3.1\WAS\profiles\CSM\logs\ C:\Program Files\IBM\IBM TotalStorage Productivity Center for Replication V3.1\WAS\profiles\CSM\logs\CSM Chapter 8. Hints and tips 395 8.9 Auto refresh rate You can customize the auto refresh rate by going to the My Work panel on the left side on the main menu and clicking Advanced Tools. The Advanced Tools panel opens. Under the Set browser auto-refresh rate option, you can define the refresh rate for all non-wizard panels. The default auto-refresh rate is 30 seconds. This might be useful if you intend to use the Tivoli Storage Productivity Center for Replication main window to provide a continuous, visual status of your data replication sessions. 8.10 User authentication issues In this section, we describe how to address issues that might occur when you try to log on to Tivoli Storage Productivity Center for Replication or add a user. These issues often occur as a result of the following problems: Tivoli Storage Productivity Center internal web server (WebSphere Application Server) is not running. There are firewall or network issues that are blocking communication from the Tivoli Storage Productivity Center for Replication server. 8.10.1 An error is displayed when you try to log on The error that is shown in Figure 8-2 on page 396 is displayed when you try to log on to Tivoli Storage Productivity Center for Replication and an authentication issue occurred. Figure 8-2 Log on error 396 Tivoli Storage Productivity Center for Replication for Open Systems First, try to determine whether the Tivoli Storage Productivity Center web server is working. If it is running, check whether there are firewall or network issues. Also, check with your network or security administrator if there were recent changes in network traffic policies. If you cannot log in to check this problem by using any of the users you registered, you can try to log on to Tivoli Storage Productivity Center for Replication by using the common user or the user tpcFileRegistryUser. For more information about these default users, see 3.5.1, “Adding Tivoli Storage Productivity Center users and groups to Tivoli Storage Productivity Center for Replication” on page 94. 8.10.2 An error occurs when you try to add a user If Tivoli Storage Productivity Center for Replication cannot access the repository that is used for user authentication, you cannot add a user to Tivoli Storage Productivity Center for Replication. Figure 8-3 on page 397 shows the error that is displayed when you try to add the user from the Add Access wizard in the Tivoli Storage Productivity Center for Replication GUI. Figure 8-3 Add user error First, try to determine whether the Tivoli Storage Productivity Center web server is working. If it is running, check whether there are firewall or network issues. Also, check with your network or security administrator if there were recent changes in network traffic policies. 8.11 IBM Software Support Lifecycle To determine whether your Tivoli Storage Productivity Center for Replication Version is still supported or whether you should upgrade, browse to this IBM Software Lifecyle website: http://www.ibm.com/software/support/lifecycle/index_t.html Browse through the list of all products, starting with the letter T, or use your browser’s search function to look for the product name or product ID (PID). The column on the right shows Chapter 8. Hints and tips 397 when the product was released and when the support ends. Select your products, and then click View details at the bottom of the page. A list of only the selected products opens, to which you can subscribe by using RSS technology. 8.12 Tivoli Storage Productivity Center support matrix To find the Tivoli Storage Productivity Center support matrix for various components and versions, browse to this Tivoli Storage Productivity Center support website: http://www-01.ibm.com/support/docview.wss?uid=swg21386446 398 Tivoli Storage Productivity Center for Replication for Open Systems A Appendix A. Tivoli Storage Productivity Center for Replication and Advanced Copy Services In this appendix, Tivoli Storage Productivity Center for Replication integration with Advanced Copy Services for PowerHA® System Mirror for i is introduced. Advanced Copy Services (ACS) is a set of tools that was written by IBM Lab Services for IBM i customers. These tools provide more functions for PowerHA SystemMirror for i that you can use to simplify and customize your PowerHA SystemMirror for i runtime environment. © Copyright IBM Corp. 2014. All rights reserved. 399 A.1 Integration with Tivoli Storage Productivity Center for Replication You can use ACS to manage Metro Mirror and Metro Global Mirror copy services for the DS8000 storage systems that are in your environment. Integration with Tivoli Storage Productivity Center for Replication is required to manage Metro Global Mirror replication through ACS. Integration with Tivoli Storage Productivity Center for Replication is also required to create consistency groups for Metro Mirror replication through ACS. If you do not want to form consistency groups for Metro Mirror replication, Tivoli Storage Productivity Center for Replication is not required. To manage Metro Global Mirror replication or Metro Mirror replication with consistency groups, you must first create the following sessions in Tivoli Storage Productivity Center for Replication and define these sessions in ACS. The sessions that you create depend on the copy service that you want to manage: Metro Mirror Failover/Failback Metro Global Mirror Figure A-1 shows the ACS and Tivoli Storage Productivity Center for Replication relationship for a three-site DS8000 environment that uses Metro Global Mirror replication. Figure A-1 DS8000 three-site disaster recovery solution with Metro Global Mirror 400 Tivoli Storage Productivity Center for Replication for Open Systems Note: For single-point administration, you should manage all functions and features for the sessions, such as adding copy sets and starting the sessions, through ACS exclusively after you define the sessions in ACS. Do not use the Tivoli Storage Productivity Center for Replication GUI or command-line interface to manage the sessions. For more information about ACS and Tivoli Storage Productivity Center, see the following resources: PowerHA SystemMirror for IBM i Cookbook, SG24-7994, which is available at this website: http://publib-b.boulder.ibm.com/abstracts/sg247994.html?Open The IBM i Advanced Copy services wiki, which is available at this website: https://www.ibm.com/developerworks/community/wikis/home?lang=en#!/wiki/IBM%20i% 20Advanced%20Copy%20Services Appendix A. Tivoli Storage Productivity Center for Replication and Advanced Copy Services 401 402 Tivoli Storage Productivity Center for Replication for Open Systems B Appendix B. Tivoli Storage Productivity Center for Replication integration In this appendix, Tivoli Storage Productivity Center for Replication integration with IBM Tivoli System Automation Application Manager is introduced. Tivoli System Automation Application Manager is an application that provides a single point for managing heterogeneous business resources. These resources include applications, services, mounted disks, and network addresses. © Copyright IBM Corp. 2014. All rights reserved. 403 B.1 Integration with Tivoli Storage Productivity Center for Replication Tivoli System Automation Application Manager includes the Distributed Disaster Recovery (DDR) feature that uses Tivoli Storage Productivity Center for Replication to provide a data replication and disaster recovery solution for open systems. The DDR feature is available in Tivoli System Automation Application Manager version 3.2 or later and requires Tivoli Storage Productivity Center for Replication version 4.1.1.1 or later. Tivoli System Automation Application Manager supports the Metro Mirror Failover/Failback session for the following storage systems: ESS800 DS6000 DS8000 SAN Volume Controller Storwize V3500 Storwize V3700 Storwize V7000 Storwize V7000 Unified Tivoli System Automation Application Manager uses Tivoli Storage Productivity Center for Replication to manage replication between two sites. To enable Tivoli System Automation Application Manager to use Tivoli Storage Productivity Center for Replication, you must create a replication domain and references. The replication domain points to the Tivoli Storage Productivity Center for Replication server or the server and the standby server in a high availability environment. The replication references point to Tivoli Storage Productivity Center for Replication sessions. Note: For single-point administration, you should manage all functions and features for the Tivoli Storage Productivity Center for Replication sessions through Tivoli System Automation Application Manager exclusively after you define the replication domain and references in Tivoli System Automation Application Manager. Do not use the Tivoli Storage Productivity Center for Replication GUI or command-line interface to manage the sessions. For more information about the integration of Tivoli Storage Productivity Center for Replication with Tivoli System Automation Application Manager, including the steps that are required to perform the integration, see Tivoli System Automation Application Manager Administrator's and User’s Guide, which is available at this website: http://www.ibm.com/developerworks/servicemanagement/dca/saam/resources.html 404 Tivoli Storage Productivity Center for Replication for Open Systems Figure B-1 shows the Tivoli System Automation Application Manager integration with Tivoli Storage Productivity Center. Figure B-1 Configuration for two-site disaster recovery Appendix B. Tivoli Storage Productivity Center for Replication integration 405 406 Tivoli Storage Productivity Center for Replication for Open Systems Related publications The publications that are listed in this section are considered particularly suitable for a more detailed discussion of the topics that are covered in this book. IBM Redbooks The following IBM Redbooks publications provide more information about the topics in this document. Some publications that are referenced in this list might be available in softcopy only: Tivoli Storage Productivity Center V5.2 Release Guide, SG24-8204 IBM Tivoli Storage Productivity Center for Replication for Series z, SG24-7563 IBM TotalStorage Productivity Center for Replication Using DS8000, SG24-7596 IBM TotalStorage Productivity Center for Replication on Windows 2003, SG24-7250 IBM TotalStorage Productivity Center for Replication on Linux, SG24-7411 Implementing the IBM System Storage SAN Volume Controller V6.3, SG24-7933 IBM System Storage SAN Volume Controller and Storwize V7000 Replication Family Services, SG24-7574 IBM System Storage DS8000 Copy Services for IBM System z, SG24-6787 IBM System Storage DS8000 Copy Services for Open Systems, SG24-6788IBM System Storage DS8000 Easy Tier Heat Map Transfer, REDP-5015 IBM XIV Storage System Copy Services and Migration, SG24-7759 You can search for, view, download, or order these documents and other Redbooks, Redpapers, Web Docs, draft, and other materials at the following website: http://www.ibm.com/redbooks Other publications The following publications also are relevant as further information sources: IBM Tivoli Storage Productivity Center for Replication 5.2 for System z Installation and Configuration Guide, SC27-4091 IBM Tivoli Storage Productivity Center for Replication 5.2 for System z User’s Guide, SC27-4092 IBM Tivoli Storage Productivity Center for Replication 5.2 for System z Command-Line Interface User’s Guide, SC27-4093 IBM Tivoli Storage Productivity Center for Replication 5.2 for System z Problem Determination Guide, SC27-4094 IBM Tivoli Storage Productivity Center Version 5.2 Installation and Configuration Guide, SC27-4058 © Copyright IBM Corp. 2014. All rights reserved. 407 Online resources The following websites also are relevant as further information sources: IBM Tivoli Storage Productivity Center for Replication Information Center: http://pic.dhe.ibm.com/infocenter/tivihelp/v59r1/index.jsp Tivoli Storage Productivity Center support website: http://www-01.ibm.com/support/docview.wss?uid=swg21386446 IBM Software Lifecyle website: http://www.ibm.com/software/support/lifecycle/index_t.html Tivoli Storage Productivity Center Suite Customer Support Technical Information Newsletter: http://www-01.ibm.com/support/docview.wss?uid=swg27017347 Help from IBM IBM Support and downloads: http:///www.ibm.com/support IBM Global Services: http:///www.ibm.com/services 408 Tivoli Storage Productivity Center for Replication for Open Systems Tivoli Storage Productivity Center for Replication for Open Systems Tivoli Storage Productivity Center for Replication for Open Systems Tivoli Storage Productivity Center for Replication for Open Systems Tivoli Storage Productivity Center for Replication for Open Systems (0.5” spine) 0.475”<->0.873” 250 <-> 459 pages Tivoli Storage Productivity Center for Replication for Open Systems Tivoli Storage Productivity Center for Replication for Open Systems Back cover ® Tivoli Storage Productivity Center for Replication for Open Systems Master Tivoli Storage Productivity Center for Replication in open systems Manage replication services from one interface Use all of the latest copy services features This IBM Redbooks publication for the Tivoli Storage Productivity Center for Replication for the Open environment walks you through the process of establishing sessions, and managing and monitoring copy services through Tivoli Storage Productivity Center for Replication. The book introduces enhanced copy services and new session types that are used by the latest IBM storage systems. Tips and guidance for session usage, tunable parameters, troubleshooting, and for implementing and managing Tivoli Storage Productivity Center for Replication’s latest functionality up to v5.2 also are provided. Tivoli Storage Productivity Center for Replication’s integration and latest functionality includes Global Mirror Pause with Consistency, Easy Tier Heat Map Transfer, and IBM System Storage SAN Volume Controller Change Volumes. As of v5.2, you can now manage z/OS Hyperswap function from an Open System. IBM Tivoli Storage Productivity Center for Replication for Open Systems manages copy services in storage environments. Copy services are used by storage systems, such as IBM System Storage DS8000, SAN Volume Controller, IBM Storwize V3700, V3500, V7000, V7000 Unified, and IBM XIV Storage systems to configure, manage, and monitor data-copy functions. Copy services include IBM FlashCopy, Metro Mirror, Global Mirror, and Metro Global Mirror. This IBM Redbooks publication is the companion to the draft of the IBM Redbooks publication Tivoli Storage Productivity Center V5.2 Release Guide, SG24-8204. It is intended for storage administrators who ordered and installed Tivoli Storage Productivity Center version 5.2 and are ready to customize Tivoli Storage Productivity Center for Replication and connected storage. This publication also is for anyone that wants to learn more about Tivoli Storage Productivity Center for Replication in an open systems environment. ® INTERNATIONAL TECHNICAL SUPPORT ORGANIZATION BUILDING TECHNICAL INFORMATION BASED ON PRACTICAL EXPERIENCE IBM Redbooks are developed by the IBM International Technical Support Organization. Experts from IBM, Customers and Partners from around the world create timely technical information based on realistic scenarios. Specific recommendations are provided to help you implement IT solutions more effectively in your environment. For more information: ibm.com/redbooks SG24-8149-00 0738439320