1
/*
Arduino Code
The following demo code is complied in Arduino (www.arduino.cc) and uses two
subroutines. You are free to copy/paste the code into the Arduino compiler.
Ensure the motor controller is connected properly before use.
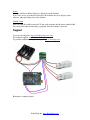
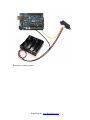
The serial data line of the motor controller should be connected to pin 1 (Tx) on the
Arduino.
*/
int servopulse1 = 1250;
int servopulse2 = 1500;
int servopin1 = 9;
int servopin2 = 10;
int motor_reset = 2;
//test servo tilt position (0deg =0 to 180deg =1500)
//test servo pan position (0deg =0 to 180deg =1500)
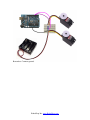
//yellow wire from servo 1 to digital pin 9
//yellow wire from servo 2 to digital pin 10
//motor reset pin connected to digital pin 2
void setup()
{
pinMode(motor_reset, OUTPUT);
pinMode(servopin1, OUTPUT);
pinMode(servopin2, OUTPUT);
//digitalWrite(motor_reset, LOW);
Serial.begin(9600);
//sets pin as output
//sets pin as output
//sets pin as output
//do not activate motor driver
//communication at 9600 baud
// reset motor controller
digitalWrite(motor_reset, LOW);
delay(50);
digitalWrite(motor_reset, HIGH);
delay(50);
// reset delay
}
void loop()
{
servoposition();
motorcontrol();
}
// subroutine servoposition
// subroutine motor control
//subroutine servoposition
void servoposition()
{
digitalWrite(servopin1, HIGH);
delayMicroseconds(servopulse1);
digitalWrite(servopin1, LOW);
digitalWrite(servopin2, HIGH);
// Start the pulse to servo 1
// Length of the pulse sets the servo position
// Stop the pulse
// Start the pulse to servo 2
RobotShop Inc. www.RobotShop.com