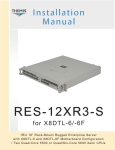
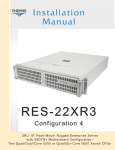
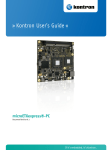
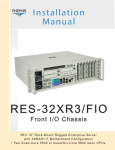
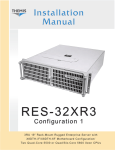
1
User Manual NanoSWITCH TM TM Layer 3 Gigabit Ethernet Switch for Networked Systems in Demanding Applications M N a n o S W I T C H TTM Layer 3 Gigabit Switch for Networked Systems M N a n o S W I T C H TTM Layer 3 Gigabit Switch for Networked Systems M N a n o S W I T C H TTM Layer 3 Gigabit Switch for Networked Systems M N a n o S W I T C H TTM Layer 3 Gigabit Switch for Networked Systems M N a n o S W I T C H TTM Layer 3 Gigabit Switch for Networked Systems M N a n o S W I T C H TTM Layer 3 Gigabit Switch for Networked Systems M N a n o S W I T C H TTM Layer 3 Gigabit Switch for Networked Systems M N a n o S W I T C H TTM Layer 3 Gigabit Switch for Networked Systems NanoSWITCH™ User Manual Version 1.0— May 2013 Themis Computer—Americas and Pacific Rim 47200 Bayside Parkway Fremont, CA 94538 Phone (510) 252-0870 Fax (510) 490-5529 World Wide Web http://www.themis.com Themis Computer—Rest of World 5 Rue Irene Joliot-Curie 38320 Eybens, France Phone +33 476 14 77 80 Fax +33 476 14 77 89 Copyright © 2013 Themis Computer, Inc. ALL RIGHTS RESERVED. No part of this publication may be reproduced in any form, by photocopy, microfilm, retrieval system, or by any other means now known or hereafter invented without the prior written permission of Themis Computer. The information in this publication has been carefully checked and is believed to be accurate. However, Themis Computer assumes no responsibility for inaccuracies. Themis Computer retains the right to make changes to this publication at any time without prior notice. Themis Computer does not assume any liability arising from the application or use of this publication or the product(s) described herein. RESTRICTED RIGHTS LEGEND: Use, duplication, or disclosure by the United States Government is subject to the restrictions set forth in DFARS 252.227-7013 (c)(1)(ii) and FAR 52.227-19. TRADEMARKS and SERVICEMARKS Themis® is a registered trademark of Themis Computer, Inc. All other trademarks, servicemarks, or registered trademarks used in this publication are the property of their respective owners. CE Marking This product complies with the European EMC Directive (2004/108/EC) and the European Low Voltage Safety Directive (2006/95/EC)/. Safety Precautions Instructions regarding safety precautions during installation, operation, or maintenance of the equipment are given in the section entitled “Safety Instructions” on page iv. WARNINGS and CAUTIONS The definitions of WARNINGS and CAUTIONS as used in this document are given in the Preface in the section entitled “Notes, Cautions, Warnings, and Sidebars”. Themis Customer Support North America, South America, and Pacific Rim Telephone: Fax: E-mail: Web Site: NanoSWITCH™ User Manual, Version 1.0 May 2013 Part Number: 119870-024 510-252-0870 510-490-5529 [email protected] http://www.themis.com NanoSWITCH™ User Manual Version Revision History Version 1.0..............................................................................................May 2013 Themis Computer iii NanoSWITCH™ User Manual Version 1.0 Safety Instructions To maximize user safety and ensure correct device operation, all instructions contained in this section should be read carefully. Caution: It is important that the user observe all warnings and instructions that are on the device and contained in this manual. • The device must be used in accordance with the instructions for use. • Make sure the device has adequate ventilation. • The device is no longer safe to operate when — the device has visible damage or — the device no longer functions. • In these cases, the device must be shut down and secured against unintentional operation. • Repairs may only be carried out by a person authorized by Themis Computer. • If extensions are made to the device, the legal stipulations and the device specifications must be observed. Electrostatic Discharge (ESD) A sudden discharge of electrostatic electricity can destroy static-sensitive devices or micro-circuitry. Proper packaging and grounding techniques are necessary precautions to prevent damage. Always take the following precautions: 1. Transport boards in static-safe containers such as boxes or bags. 2. Keep electrostatic-sensitive parts in their containers until they arrive at staticfree stations. 3. Always be properly grounded when touching a sensitive board, component, or assembly. 4. Store electrostatic-sensitive boards in protective packaging or on conductive foam. iv Themis Computer NanoSWITCH™ User Manual Grounding Methods Guard against electrostatic damage at workstations by following these steps: 1. Cover workstations with approved anti-static material. Provide a wrist strap connected to a work surface and properly grounded tools and equipment. 2. Use anti-static mats, heel straps, or air ionizers to give added protection. 3. Handle electrostatic-sensitive components, boards, and assemblies by the case or the PCB edge. 4. Avoid contact with pins, leads, or circuitry. 5. Turn off power and input signals before inserting and removing connectors or test equipment. 6. Keep the work area free of non-conductive materials such as ordinary plastic assembly aids and Styrofoam. 7. Use field service tools, such as cutters, screwdrivers, and vacuums that are conductive. 8. Always place drives and boards PCB-assembly-side down on the foam. Themis Computer v NanoSWITCH™ User Manual vi Version 1.0 Themis Computer Table of Contents Version Revision History ...................................................................................................... iii Safety Instructions ................................................................................................................ iv How to Use This Manual ......................................................................................................xv 1. Overview and Specifications ........................................................................................ 1-1 1.1 Overview ................................................................................................................ 1-1 1.2 Product Description ............................................................................................... 1-2 1.2.1 A Multi-Layer Switch ................................................................................ 1-2 1.2.2 Layout and Indications ............................................................................... 1-3 1.3 Specifications ......................................................................................................... 1-6 1.3.1 General ....................................................................................................... 1-6 1.4 Packaging and Shipping ......................................................................................... 1-6 2. Installation and Operation ........................................................................................... 2-1 2.1 Connecting ............................................................................................................. 2-1 2.2 Applying Power ..................................................................................................... 2-2 2.2.1 Provide Adequate Cooling ......................................................................... 2-2 2.3 Configuring the NanoSWITCH™ ......................................................................... 2-2 2.3.1 NanoSWITCH™ Management Port .......................................................... 2-2 2.3.2 Booting the NanoSWITCH™ .................................................................... 2-3 2.3.3 Command Modes and User Privilege Levels ............................................ 2-4 2.3.4 Initial Configuration .................................................................................. 2-6 2.4 The GUI Interface ................................................................................................ 2-10 3. Single Board Computer (SBC) .................................................................................... 3-1 3.1 Overview ................................................................................................................ 3-1 3.2 Item Description .................................................................................................... 3-1 3.3 Themis Computer Configurations ....................................................................................................... 3-3 vii NanoSWITCH™ User Manual Version 1.0 Appendix A. Connectors, Pinouts and Signals .............................................................. A-1 A.1 Circular Connectors .............................................................................................. A-1 A.1.1 4-Pin Power Connector J1 ........................................................................ A-2 A.1.2 19-Pin GBe Connectors J2 thru J6 ............................................................ A-3 A.1.3 6-Pin CANBus Connector J7 .................................................................... A-4 A.1.4 6-Pin 1553 Connector J8 ........................................................................... A-4 A.1.5 6-Pin USB1 Connector J9 ......................................................................... A-5 A.1.6 26-Pin Multi I/O Connector J10 ............................................................... A-5 A.1.7 13-Pin GBe Connector J11 ....................................................................... A-7 Appendix B. InsydeH2O® BIOS Setup Utility ...............................................................B-1 B.1 Introduction ............................................................................................................B-1 B.2 Starting the BIOS Setup Utility .............................................................................B-1 B.2.1 Navigating the Utility Screens ...................................................................B-2 B.3 Main BIOS Setup ...................................................................................................B-3 B.3.1 System Overview .......................................................................................B-4 B.3.2 System Time/System Date .........................................................................B-4 B.3.3 Language ....................................................................................................B-5 B.4 Advanced Setup .....................................................................................................B-5 B.4.1 Boot Configuration ....................................................................................B-6 B.4.2 Peripherals Configuration ..........................................................................B-7 B.4.3 IDE Configuration .....................................................................................B-8 B.4.4 Video Configuration ..................................................................................B-9 B.4.5 USB Configuration ..................................................................................B-10 B.4.6 Chipset Configuration ..............................................................................B-11 B.4.6.1 NorthBridge Configuration .......................................................B-12 B.4.6.2 NorthBridge PCIe Configuration ..............................................B-13 B.4.6.3 APU GPP Features Configuration ............................................B-14 B.4.6.4 Hudson-1 FCH Configuration ..................................................B-15 B.4.6.5 SouthBridge/GPP Configuration ..............................................B-16 B.4.6.6 SouthBridge PCIe Configuration ..............................................B-17 B.4.6.7 SouthBridge PCIe Port Features Configuration ........................B-18 B.4.7 ACPI Tables/Features Control .................................................................B-19 B.4.8 CPU Related Settings ...............................................................................B-20 B.4.9 AMD PBS Option ....................................................................................B-21 viii Themis Computer Table of Contents B.5 Security Configuration .........................................................................................B-22 B.6 Power Configuration ............................................................................................B-23 B.6.1 Advanced CPU Control ...........................................................................B-24 B.7 Boot Configuration ..............................................................................................B-25 B.7.1 EFI Configuration ....................................................................................B-26 B.7.2 Legacy Boot Device Configuration .........................................................B-27 B.8 Exit Menu ............................................................................................................B-28 Appendix C. AMI BIOS Setup Utility .............................................................................C-1 C.1 Introduction ............................................................................................................C-1 C.1.1 Starting the BIOS Setup Utility .................................................................C-1 C.2 Main BIOS Setup ...................................................................................................C-2 C.2.1 System Overview: ......................................................................................C-3 C.2.1.1 BIOS Information .......................................................................C-3 C.2.1.2 System Memory Information ......................................................C-3 C.2.1.3 System Time/System Date ..........................................................C-4 C.3 Advanced Setup Configuration ..............................................................................C-4 C.3.1 CPU Configuration ....................................................................................C-6 C.3.2 IDE Configuration .....................................................................................C-7 C.3.3 Floppy Configuration .................................................................................C-9 C.3.4 ACPI Settings ..........................................................................................C-10 C.3.4.1 General ACPI Configuration ....................................................C-11 C.3.4.2 Advanced ACPI Configuration .................................................C-12 C.3.4.3 Chipset ACPI Configuration .....................................................C-13 C.3.4.4 Chipset ACPI Configuration Settings .......................................C-13 C.3.5 AHCI Configuration ................................................................................C-14 C.3.6 Event Log Configuration .........................................................................C-15 C.3.7 Hardware Health Configuration ...............................................................C-16 C.3.8 MPS Configuration ..................................................................................C-17 C.3.9 SMBIOS Configuration ...........................................................................C-18 C.3.10 USB Configuration ..................................................................................C-19 C.3.10.1 USB Mass Storage Device Configuration ................................C-20 C.4 Advanced PCI/PnP Settings .................................................................................C-21 C.5 Boot Settings ........................................................................................................C-23 C.5.1 Boot Settings Configuration ....................................................................C-24 Themis Computer ix NanoSWITCH™ User Manual Version 1.0 C.6 Security Setup ......................................................................................................C-25 C.7 Advanced Chipset Settings ..................................................................................C-27 C.7.1 North Bridge Chipset Configuration ........................................................C-28 C.7.2 South Bridge Chipset Configuration ........................................................C-30 C.8 Exit Options .........................................................................................................C-32 C.8.1 Save Changes and Exit ............................................................................C-32 C.8.2 Discard Changes and Exit ........................................................................C-33 C.8.3 Load Optimal Defaults .............................................................................C-33 C.8.4 Load Fail-Safe Defaults ...........................................................................C-33 Appendix D. Repackaging Instructions .......................................................................... D-1 D.1 Repackaging for Shipment .................................................................................... D-1 D.2 Packaging Components ......................................................................................... D-2 D.3 Instructions for Repackaging ................................................................................ D-3 Index ................................................................................................................ Index-1 Reader Comment Card x Themis Computer Table of Contents List of Figures Figure 1 NanoSWITCH™................................................................................................ xv Figure 1-1 NanoSWITCH™.............................................................................................. 1-1 Figure 1-2 Block Diagram of NanoSWITCH™................................................................ 1-3 Figure 1-3 Layout and Indications..................................................................................... 1-5 Figure 2-1 NanoSWITCH™ Boot Screen......................................................................... 2-4 Figure 2-2 CLI Command Modes ..................................................................................... 2-5 Figure 2-3 Example GUI Configuration Screen.............................................................. 2-10 Figure 3-1 Intel® Block Diagram ...................................................................................... 3-3 Figure 3-2 AMD Block Diagram....................................................................................... 3-4 Figure A-1 NanoSWITCH™ Connector Numbering........................................................ A-1 Figure B-1 Splash Screen ................................................................................................... B-2 Figure B-2 BIOS Information Screen ................................................................................ B-2 Figure B-3 Setup Screen Legend ....................................................................................... B-3 Figure B-4 Main Setup Screen ........................................................................................... B-4 Figure B-5 Advanced Settings Screen ............................................................................... B-5 Figure B-6 Boot Configuration Settings ............................................................................ B-6 Figure B-7 Peripheral Configuration Settings.................................................................... B-7 Figure B-8 IDE Configuration Settings ............................................................................. B-8 Figure B-9 Video Configuration Settings .......................................................................... B-9 Figure B-10 USB Configuration Settings .......................................................................... B-10 Figure B-11 Chipset Configuration Settings ...................................................................... B-11 Figure B-12 NorthBridge Configuration............................................................................ B-12 Figure B-13 NorthBridge PCIe Configuration Settings ..................................................... B-13 Figure B-14 APU GPP Features Configuration Screen ..................................................... B-14 Figure B-15 Hudson-1 FCH Configuration Settings.......................................................... B-15 Figure B-16 SouthBridge/GPP Configuration Settings ..................................................... B-16 Themis Computer xi NanoSWITCH™ User Manual Version 1.0 Figure B-17 SouthBridge PCIe Configuration Settings ..................................................... B-17 Figure B-18 SouthBridge PCIe Port Features Configuration Settings............................... B-18 Figure B-19 ACPI Tables/Features Control....................................................................... B-19 Figure B-20 CPU Related Settings..................................................................................... B-20 Figure B-21 AMD PBS Option .......................................................................................... B-21 Figure B-22 Security Configuration Settings..................................................................... B-22 Figure B-23 Power Configuration...................................................................................... B-23 Figure B-24 Advanced CPU Control ................................................................................. B-24 Figure B-25 Boot Configuration ........................................................................................ B-25 Figure B-26 EFI Configuration .......................................................................................... B-26 Figure B-27 Legacy Boot Device Configuration ............................................................... B-27 Figure B-28 Exit Menu ...................................................................................................... B-28 Figure C-1 Main Setup Screen ........................................................................................... C-3 Figure C-2 Advanced Settings ........................................................................................... C-5 Figure C-3 CPU Configuration Settings ............................................................................ C-6 Figure C-4 IDE Configuration Settings ............................................................................. C-7 Figure C-5 Floppy Configuration Settings......................................................................... C-9 Figure C-6 ACPI Settings ................................................................................................ C-10 Figure C-7 General ACPI Configuration Settings ........................................................... C-11 Figure C-8 Advanced ACPI Configuration Settings........................................................ C-12 Figure C-9 AHCI Configuration Settings ........................................................................ C-14 Figure C-10 Event Log Configuration Settings ................................................................. C-15 Figure C-11 Hardware Health Configuration Settings....................................................... C-16 Figure C-12 MPS Configuration Settings .......................................................................... C-17 Figure C-13 SMBIOS Configuration Settings ................................................................... C-18 Figure C-14 USB Configuration Settings .......................................................................... C-19 Figure C-15 USB Mass Storage Device Configuration Settings ....................................... C-20 Figure C-16 PCI/PnP Configuration Settings .................................................................... C-21 xii Themis Computer Table of Contents Figure C-17 Boot Settings.................................................................................................. C-23 Figure C-18 Boot Settings Configuration .......................................................................... C-24 Figure C-19 Security Settings ............................................................................................ C-26 Figure C-20 Advanced Chipset Settings ............................................................................ C-27 Figure C-21 North Bridge Configuration........................................................................... C-28 Figure C-22 South Bridge Configuration........................................................................... C-30 Figure C-23 Exit Options Screen ....................................................................................... C-32 Figure D-1 Packaging Components................................................................................... D-2 Figure D-2 Order of Assembly.......................................................................................... D-4 List of Tables Table 1-1 Circular Connector Part Numbers................................................................... 1-4 Table 1-2 NanoSWITCH™ General Specifications ....................................................... 1-6 Table 3-1 SBC Features ................................................................................................... 3-2 Table A-1 Circular Connector Part Numbers.................................................................. A-2 Table A-2 4-Pin Power Connector Pinouts ..................................................................... A-2 Table A-3 19-Pin Circular Connector Pinouts ................................................................ A-3 Table A-4 CANBus Connector Pinouts .......................................................................... A-4 Table A-5 1553 Connector Pinouts................................................................................. A-4 Table A-6 USB Connector Pinouts ................................................................................. A-5 Table A-7 26-Pin Circular Connector Pinouts ................................................................ A-6 Table A-8 13-Pin Circular Connector Pinouts ................................................................ A-8 Themis Computer xiii NanoSWITCH™ User Manual xiv Version 1.0 Themis Computer Preface Section How to Use This Manual This document, entitled NanoSWITCH™ User Manual, provides instructions on how to install, configure, and power up the NanoSWITCH™ (see Figure 1). The NanoSWITCH™ is a Layer 3 Gigabit Ethernet Switch based on a Marvell Multilayer Switch Device offering 10 Gigabit Ethernet ports for connecting multiple Ethernet networked devices in demanding applications. . Figure 1. NanoSWITCH™ An overview of NanoSWITCH™ design and specifications is provided in Chapter 1 of this manual. Themis Computer xv NanoSWITCH™ User Manual Version 1.0 Themis Computer values its customer comments and opinions; therefore, a “Reader Comment Card” is located at the end of this manual for your use. Please take the time to fill out this card with any comments concerning Themis products and services, and return it to Themis Computer. Your comments may also be forwarded to Themis by sending email to [email protected]. Before you begin, carefully read each of the procedures in this manual. Serious damage can be caused by improper handling of the equipment. Intended Audience This manual is written for system integrators and programmers. It contains all necessary information for installation and configuration of the NanoSWITCH™ and assumes the BIOS program code is installed in the system Flash memory. Although all specific hardware features are described in the installation manual, programmers wishing to write code for the NanoSWITCH™ without the benefit of an operating system or real-time kernel will require additional data sheets. Unpacking Caution: The NanoSWITCH™ contains statically sensitive components. Industry-standard antistatic measures must be observed when removing the NanoSWITCH™ from its shipping container and during any subsequent handling. A wrist strap provides grounding for static electricity between your body and the chassis of the system unit. Remove the NanoSWITCH™ and accessories from the shipping container and check the contents against the packing list. Be certain to observe industry-standard ESD protection procedures when handling static-sensitive components. The package should include all elements of your order. Please report any shipping discrepancies to the Themis Computer Customer Support group immediately: [email protected] or 1-510-252-0870. xvi Themis Computer How to Use This Manual Chapter Overview The chapters and appendices of this manual are briefly outlined as follows: • Chapter 1 provides a brief overview of the NanoSWITCH™, along with its System, Environmental, and Power specifications. • Chapter 2 provides instructions on the installation and configuration of the NanoSWITCH™ for your particular environment and application. • Chapter 3 provides information on the optional SBC, if installed, in the NanoSWITCH™. • Appendix A provides pinouts and signal descriptions for the NanoSWITCH™ connectors. • Appendix B provides instructions on setting up and configuring the BIOS for the optional SBC, if installed, for those SBCs using the InsydeH2O® BIOS, primarily the AMD SBCs. • Appendix C provides instructions on setting up and configuring the BIOS for the optional SBC, if installed, for those SBCs using the AMI BIOS, primarily the Intel® SBCs. • Appendix D provides information about repackaging the equipment for return to the manufacturer. Notes, Cautions, Warnings, and Sidebars The following icons and formatted text are included in this document for the reasons described: Note: A note provides additional information concerning the procedure or action being described. Themis Computer xvii NanoSWITCH™ User Manual Version 1.0 Caution: A caution describes a procedure or action that may result in damage to the equipment. This may involve—but is not restricted to—heavy equipment or sharp objects. To reduce the risk, follow the instructions accompanying this symbol. Warning: A warning describes a procedure or action that may cause injury or death to the operator as a result of hazardous voltages. To reduce the risk, follow the instructions accompanying this symbol. Sidebar: A “sidebar” adds detail to the section within which it is placed, but is not absolutely vital to the description or procedure of the section. Website Information Themis Computer corporate and product information may be accessed on the World Wide Web by browsing the website http://www.themis.com. Your Comments are Welcome We are interested in improving our documentation and welcome your comments and suggestions. You can email your comments to us at [email protected]. Please include the document part number in the subject line of your email. xviii Themis Computer General Section Chapter 1NanoSWITCH™ Overview and Specifications 1.1 Overview The NanoSWITCH™ is a Layer 3 Gigabit Ethernet Switch based on a Marvell Multilayer Gigabit Ethernet Switch. It supports an optional Single Board Computer (SBC) Module which functions as a firewall with standard application software if installed. Without the SBC installed, the NanoSWITCH™ will function as a standalone managed Layer 3 switch. The NanoSWITCH™ is designed to be deployed as part of Ethernet networked systems in demanding applications. (See Figure 1-1) Figure 1-1. NanoSWITCH™ Themis Computer 1-1 NanoSWITCH™ User Manual 1.2 1.2.1 Version 1.0 Product Description A Multi-Layer Switch The NanoSWITCH™ is based on a Marvell DX4101 Multilayer Gigabit Ethernet Switch. It is managed by an ARM processor internal to the DX4101 running Linux. The switch supports a total of 12 Gigabit Ethernet interfaces, with two of these ports being used internally, leaving 10 Gigabit Ethernet ports available for connecting network devices. 11 Mighty Mouse connectors provide connections for external systems and devices. A NanoETXexpress mezzanine connector supports the optional installation of a Single Board Computer (SBC). With the optional SBC installed, the switch will function as a firewall with standard application software. If the SBC is not installed, the switch will function as a standalone managed Layer 3 switch. A block diagram is shown in Figure 1-2 on page 1-3. Main Features • Marvell DX4101 Multi-Layer Gigabit Ethernet Switch w/integrated processor • Layer 3 Routing and Layer 3 wire speed switching • Managed QoS, Multicasting and many more • Ten available 10/100/1000 Base-T Network ports • Mighty Mouse connectors • Option to install a Themis SBC inside, for use as a firewall and/or gateway for 1553 and/or CANbus • Option to populate 1553 circuits (requires optional SBC installed) • Mini PCIe connector to support CANbus (2 ports) • 1GB NAND Flash Memory • 1GB DDR2 Memory • Ruggedized • Water Resistant • Isolated input power supply (DC, from 10V to 36V) 1-2 Themis Computer 1—Overview and Specifications Port 4 Port 5 Port 6 10/100/1000 Base-T Port 2 10/100/1000 Base-T Marvell DX4101 Port 1 10/100/1000 Base-T Port 3 10/100/1000 Base-T Product Description DDR2 Memory 256MByte SPI flash Device (256Mbit) Internal ARM CPU Serial Port Serial Port 10/100/1000 Base-T Optional 10/100/1000 Base-T 10/100/ 1000 Base-T Tnano SBC (x86) Mezzanine Card 10/100/1000 Base-T Port 8 Port 9 Port 12 1553_1A/1B 1553 On Board CanBus Module x2 CanBus USB1 USB2 VGA 10/100/1000 Base-T Isolated Power Module 10/100/1000 Base-T Multilayer Gigabit Ethernet Switch 10/100/1000 Base-T DC Power Input 10V to 36V Serial COM1 10/100/1000 Base-T Port 11 Port 7 Serial port for SW Management Port 10 Figure 1-2. Block Diagram of NanoSWITCH™ 1.2.2 Layout and Indications The top of the NanoSWITCH™ features 11 Mighty Mouse connectors as depicted in Figure 1-3 on page 1-5. Table 1-1 on page 1-4 lists the connectors, their part numbers and suitable mating plugs for each connector type. Connectors J2 through J6 service the 10 GBe ports, two ports per connector. Each GBe connector has two LEDs alongside, one for each port. Each LED is labeled for the port with which it is associated. GBe link status and activity are indicated by these LEDs as indicated in Figure 1-3. Connector J1 provides power connections for the NanoSWITCH™, with an associated LED for power status indications. Connectors J7 through J9 provide Themis Computer 1-3 NanoSWITCH™ User Manual Version 1.0 auxiliary function connections as indicated in Table 1-1. J10 is a multi-I/O connector which provides for various inputs and outputs such as VGA, USB, and Serial as required. Connector J11 provides Ethernet connections for the first Ethernet port, (Port 0), for the optional Single Board Computer (SBC), if installed. Table 1-1. Circular Connector Part Numbers Themis Part Number Mighty Mouse Part Number Con tacts Use Units Suitable Mating Connector (Glenair or Amphenol Equivalent) J1 119637-L03 801-033-07M9-4PA 4 Input Power 1 801-007-16M9-4SA J2 thru J6 119641-L03 801-033-07M9-19SA 19 2 GBe ports each 5 801-007-16M9-19PA J7 119640-L03 801-033-07M6-6SC 6 CANBus 1 801-007-16M6-6PC J8 119639-L03 801-033-07M6-6SB 6 1553 1 801-007-16M6-6PB J9 119638-L03 801-033-07M6-6SA 6 USB 1 801-007-16M6-6PA J10 119642-L03 801-033-07M10-26SA 26 VGA, USB, Serial 1 801-007-16M10-26PA J11 119520-L02 801-033-07M8-13SA 13 SBC Mezz GBe port 1 801-007-16M8-13PA 1-4 Themis Computer 1—Overview and Specifications Product Description Port and SBC Eth0 LED Indications: = 1Gb Link Up Solid Green = 1Gb Link Activity Blinking Green = 100Mbit Link Up Solid Yellow = 100Mbit Link Activity Blinking Yellow = 10Mbit Link Up Solid Yellow Green Blinking Yellow Green = 10Mbit Link Activity Power LED Indications: = Normal Green = One or more power rails not normal Yellow Green Over Temp LED Indications: = Temperature Normal Green Red = Temperature out of Range Figure 1-3. Layout and Indications Themis Computer 1-5 NanoSWITCH™ User Manual 1.3 1.3.1 Version 1.0 Specifications General Table 1-2. NanoSWITCH™ General Specifications Parameter Description • 33mm (1.3”) deep Dimensions • 228.6mm (9”) long • 152.4mm (6”) wide Weight • 2.8 lb (1.27kg) Temperature Operating: Non-Operating: • –40° to +71° C (–40° to 160°F) Relative Humidity Operating: Non-Operating: • 10% to 95% (non-condensing) Shock • 50G @25 msec Vibration • 5G RMS 10Hz to 2kHz • –40° to +105° C (–40° to 221° F) • 0 to 100% (non-condensing) • MIL-STD-704A/E/F Compliance • MIL-STD-1275A/B/D • MIL-STD-461E 1.4 Packaging and Shipping The NanoSWITCH™ is packaged in a reusable shipping container. Approximate weight of an empty container, with packing material, is 2 pounds (906 g). The approximate weight of a NanoSWITCH™ with included hardware is approximately 3 pounds (1.36 kg). Therefore, both the shipping container and a fully installed NanoSWITCH™, including manual and associated paperwork, weigh approximately 5 pounds (2.27 kg). In the event it becomes necessary to return the unit to Themis, repackaging instructions are provided in Appendix D, “Repackaging Instructions”. 1-6 Themis Computer 2 2NanoSWITCH™ User ManualRES-31XR3 Installation Section Chapter 2 Installation and Operation This chapter describes how to install and operate the NanoSWITCH™. Caution: Use industry-standard ESD grounding techniques when handling all components. Wear an antistatic wrist strap and use an ESD-protected mat. Store ESD-sensitive components in antistatic bags before placing them on any surface. 2.1 Connecting All connections to the NanoSWITCH™ are made on the top of the NanoSWITCH™ box, depicted in Figure 1-3 on page 1-5. Table 1-1 on page 1-4 lists all the connectors, their part numbers and suitable mating plugs for each connector type. Caution: When mating and unmating connectors, care should be taken to remove power from the cable contacts, as it is possible to cause internal component damage by inadvertent power shorts. It is best to apply power only after cables are mated and secured. Themis Computer 2-1 NanoSWITCH™ User Manual 2.2 Version 1.0 Applying Power Connector J1 provides power connections for the NanoSWITCH™, with an associated LED for power status indication. The NanoSWITCH™ requires a low input voltage that range from a minimum voltage of +10VDC up to a maximum of +36 VDC. Input voltage is then converted to +12VDC, +3.3VDC, +5VDC, +1.8VDC, +1.5VDC, and +1.0VDC. These voltages are present on the power rails as long as input voltage is applied. Note: It is recommended that power not be applied to the NanoSWITCH™ until all cables which are to be used are connected and the terminal management software is configured and connected. 2.2.1 Provide Adequate Cooling This product has a relatively small power consumption, however, as with all electronic components, care should be taken to provide free airflow about the unit, or it should be mounted on a structure which can serve as a heat sink. The many different configurations and applications for our product make it impracticable to supply one standard heat dissipating solution. The heat dissipation method employed should suit the intended application. 2.3 Configuring the NanoSWITCH™ This section describes the configuration that must be performed after the NanoSWITCH™ is installed and power is applied, to prepare the switch for the network, and subsequent management by the web GUI interface. 2.3.1 NanoSWITCH™ Management Port The NanoSWITCH™ is configured and monitored through a desktop terminal system that runs terminal emulation software. The NanoSWITCH™ connects to the terminal through the DX4101 Management Port. To connect the NanoSWITCH™ to a terminal: 2-2 Themis Computer 2—Installation and Operation 1. Connect an RS-232 cable to the serial connector of a desktop system running terminal emulation software. 2. Connect the other end of the RS-232 cable to the DX4101 Management Port connector on the cable connected to the 26-pin Multi I/O connector J10. 3. Set the terminal emulation software parameters as follows: • Select the appropriate serial port to connect to the switch. • Set the data rate to 115200 baud. • Set the data format to 8 data bits, 1 stop bit, and no parity. • Set Flow Control to none. 2.3.2 Booting the NanoSWITCH™ After the local terminal is connected, turn on the power. The switch then goes through power-on self-test (POST). POST runs every time the switch is started and checks hardware components to determine if the NanoSWITCH™ is operational before completely booting. If the system detects a critical problem, the boot process stops. If POST passes successfully, a valid executable image is loaded into RAM. POST messages are displayed on the terminal and indicate test success or failure. The boot process runs for approximately 40-45seconds. See Figure 2-1 on page 2-4 for an example of a boot screen. When the boot process is complete, the NanoSWITCH™ displays the Command Line Interface (CLI), which initially appears as a User Name: prompt. The default user name is admin, and by default no password is required, (press Enter with no password entered). The command prompt will appear. By using the serial command interface of the DX4101 Management Port, the user enters directly into the Privileged EXEC Mode, the second level of command modes. Therefore, the command prompt appears as console#. The command prompt consists of the device host name, the default value of which is console>, followed by either the angle bracket (>), denoting the lowest user level command mode, the User EXEC Mode, or the number sign (#), for the Privileged EXEC Mode. The Privileged EXEC Mode allows access to system configuration commands. Themis Computer 2-3 NanoSWITCH™ User Manual Version 1.0 Figure 2-1. NanoSWITCH™ Boot Screen 2.3.3 Command Modes and User Privilege Levels A complete listing and thorough explanation of commands, command modes, and user privilege levels will be found in the NanoSWITCH™ Command Reference Guide. There are two user privilege levels, Level 1 and Level 15. User privilege Level 1 provides access to low level commands not involving system configuration. User privilege Level 15 provides access to all commands. User privilege Level 1 can access only the User EXEC Mode. User privilege Level 15 can access the Privi- 2-4 Themis Computer 2—Installation and Operation Configuring the NanoSWITCH™ leged EXEC Mode, and subsequent Global and Interface Configuration Modes. User privilege levels may be configured by the system administrator. User privilege Level 15 is required to access the GUI interface. There are four CLI command modes, each with its own set of commands (see Figure 2-2). The lowest level of command mode is the User EXEC Mode, (default command prompt console>), enabling the user to perform basic tests and display system information. The next higher level is the Privileged EXEC Mode, accessed by entering the enable command, (default command prompt console#). From this mode, the user may access the Global Configuration Mode by entering the command configure, (default command prompt console(config)#). The commands in this mode apply to features that affect the system as a whole, rather than a specific interface. For configuring specific interfaces, the user may enter one of the six Interface Configuration Modes. By default, no passwords are required for these modes, but they may be configured by system administrators. The command prompt will display according to the mode entered, i.e. console(config-if)#. Interface Configuration Modes User Name configure enable User Name Prompt User EXEC Mode Privileged EXEC Mode line Line Interface vlan database VLAN Database management access list Management Access List Global Configuration Mode interface port-channel Port Channel disable exit exit crypto key pub-key-chain ssh SSH Public Key-Chain interface Interface exit end Figure 2-2. CLI Command Modes Themis Computer 2-5 NanoSWITCH™ User Manual 2.3.4 Version 1.0 Initial Configuration In order to provide for access to the GUI interface to configure the NanoSWITCH™, it is necessary to configure the network interface to provide an IP address. This is done through the switch management serial access port. The preceding sections provide information for preparing the switch and a serial terminal for accessing the serial management port. By default, all ports are assigned to the interface VLAN 1, so that the initial configuration can deal with VLAN 1 only, obviating the need to set up an initial interface. If it is desired to use DHCP server mode to provide an IP address for your network, it is necessary to disable the DHCP client mode, since the switch can not be both a DHCP client and a DHCP server. If it is desired to provide a static IP address, it is necessary to insure that the DHCP client is disabled. A useful command for information is show ip interface. This command, issued with no parameters, lists the ip addresses which have been assigned for all the interfaces , if any. This is an EXEC mode command, and should be used before entering the Global Configuration mode. Use the following steps to set up the switch for network use. 1. Log in to the serial management port at the User Name: prompt. (Default user name is admin, no password). console# (command prompt, privileged EXEC mode) This is the place to issue the show ip interface command. show ip interface (Example response) IP Address I/F Type Status ---------------- ------- ------- ----------- 10.5.234.207/24 vlan 1 Static Valid 192.168.105.85/24 vlan 1 DHCP Valid 2. Disable the DHCP client. (The DHCP client interface may or may not be set, but in any case it is prudent to insure the DHCP client is disabled so that a static IP address can be set, or DHCP server mode can be entered.) console# (command prompt, privileged EXEC mode) configure <Enter> (Enter the Global Configuration Mode) console(config)# (command prompt, Global Conf. Mode) 2-6 Themis Computer 2—Installation and Operation Configuring the NanoSWITCH™ interface vlan 1 <Enter> (Enter the Interface Configuration Mode, interface VLAN 1) console(config-if)# (command prompt, Interface Config. Mode) no ip address dhcp <Enter> (releases any acquired IP address) console(config-if)# (command prompt) 3. Set a static IP address. console(config-if)# (command prompt) ip address 172.30.4.24 /16 (sets IP address to 172.30.4.24, prefix length 16 bits) console(config-if)# (command prompt) exit <Enter> (Exit the Interface Configuration Mode) console(config)# (command prompt) exit <Enter> (Exit the Global Configuration Mode) console# (command prompt) The NanoSWITCH™ is now accessible through the GUI interface from a browser via the static IP address. DHCP Server Mode To set up the DHCP server, follow these steps. 1. Log in to the serial management port at the User Name: prompt. (Default user name is admin, no password). 2. Disable the DHCP client. console# (command prompt, privileged EXEC mode) configure <Enter> (Enter the Global Configuration Mode) console(config)# (command prompt, Global Conf. Mode) interface vlan 1 <Enter> (Enter the Interface Configuration Mode, interface VLAN 1) console(config-if)# (command prompt, Interface Config. Mode) no ip address dhcp <Enter> (releases any acquired IP address) console(config-if)# (command prompt, Interface Config. Mode) 3. Enable the DHCP server mode, (and set up an address pool). exit <Enter> (Exit the Interface Configuration Mode) Themis Computer 2-7 NanoSWITCH™ User Manual Version 1.0 console(config)# (command prompt, Global Conf. Mode) ip dhcp server (enable DHCP server) console(config)# (command prompt, Global Conf. Mode) ip dhcp pool host switch (set up the address pool) address 192.168.1.100 255.255.255.0 00:15:C9:28:EF:AC console(config)# (command prompt, Global Conf. Mode) lease 0 0 1 console(config)# (command prompt, Global Conf. Mode) client-name rambostik console(config)# (command prompt, Global Conf. Mode) default-router 192.168.1.254 console(config)# (command prompt, Global Conf. Mode) dns-server 10.10.1.8 console(config)# (command prompt, Global Conf. Mode) domain-name themis.com console(config)# (command prompt, Global Conf. Mode) exit <Enter> (Exit the Global Configuration Mode) console# (command prompt) Or another example configure console(config)# (command prompt, Global Conf. Mode) ip dhcp server console(config)# (command prompt, Global Conf. Mode) ip dhcp pool network switch20 console(config)# (command prompt, Global Conf. Mode) address 192.168.1.0 /24 console(config)# (command prompt, Global Conf. Mode) lease 0 0 60 console(config)# (command prompt, Global Conf. Mode) ip dhcp excluded-address 192.168.1.254 2-8 Themis Computer 2—Installation and Operation Configuring the NanoSWITCH™ console(config)# (command prompt, Global Conf. Mode) default-router 192.168.1.254 exit <Enter> (Exit the Global Configuration Mode) console# (command prompt) DHCP Client Mode To have the NanoSWITCH™ acquire a dynamic IP address from a DHCP server, use these steps: 1. Log in to the serial management port at the User Name: prompt. (Default user name is admin, no password). 2. Disable the DHCP server. console# (command prompt, privileged EXEC mode) configure <Enter> (Enter the Global Configuration Mode) console(config)# (command prompt, Global Conf. Mode) no ip dhcp server console(config)# (command prompt, Global Conf. Mode) 3. Enable the DHCP client. console(config)# (command prompt, Global Conf. Mode) interface vlan 1 <Enter> (Enter the Interface Configuration Mode, interface VLAN 1) console(config-if)# (command prompt, Interface Config. Mode) ip address dhcp <Enter> (releases any static IP address, sends information to the DHCP server, acquires an IP address from the server) console(config-if)# (command prompt, Interface Config. Mode) exit <Enter> (Exit the Interface Configuration Mode) console(config)# (command prompt, Global Conf. Mode) exit <Enter> (Exit the Global Configuration Mode) console# (command prompt, privileged EXEC mode) Themis Computer 2-9 NanoSWITCH™ User Manual 2.4 Version 1.0 The GUI Interface After the NanoSWITCH™ has been configured with an IP address, the console of the switch can be accessed through a GUI interface via a browser using the IP address as configured in the previous section. This is the same console that is accessed through the CLI in the previous section. Most of the same commands are available through this interface. Some of the highest level system administrator commands are available only through the CLI interface. A sample GUI configuration screen is shown in Figure 2-3. The default user name is admin, and by default, there is no password required. Figure 2-3. Example GUI Configuration Screen 2-10 Themis Computer Optional Equipment Chapter 3 Single Board Computer (SBC) 3.1 Overview The NanoSWITCH™ is designed to support an optionally installed Single Board Computer (SBC). This chapter describes the types of SBCs which may be installed in the NanoSWITCH™. 3.2 Item Description The optional SBC is a CPU mezzanine card using the industry standard NanoETXexpress® form factor and Type 1 pin assignments. The CPU mezzanine card is mounted on the NanoSWITCH™ circuit board, which interfaces the processor module with the external circular connectors and provides support including I/O and system management functions. The I/O support on the circuit board includes GBE, PCIe, two native serial ports, and a Solid-State Disk drive attached to one of the three SATA ports of the SBC, which can serve as a boot device for the system. The CPU mezzanine card uses one of the processors listed in Table 3-1. For connectivity to I/O devices, the CPU will be paired with a CH as listed in Table 3-1. The BIOS is contained in a flash device connected to the CH over the SPI interface. Themis Computer 3-1 NanoSWITCH™ User Manual Version 1.0 Table 3-1 lists major features of the optional SBC Table 3-1. SBC Features Parameter 3-2 Description Processor Intel® Atom N455/ICH8M AMD Fusion T40N/A55E Memory Ethernet port Single 10/100/1000 MB Ethernet I/O Ports Video 1 VGA port BIOS 2MB BIOS Flash InsydeH2O® BIOS for AMD Processor AMI BIOS for Intel® Processor TPM Standard or 2GB DDR3 on board 32GB iSSD on main circuit board 4 USB 2.0 ports 2 Serial ports MiniPCIe Card Slot (for options) 1553 (optional) CANBus (optional) Themis Computer 3—Single Board Computer (SBC) 3.3 Configurations The optional SBCs available feature CPUs by both Intel® and AMD. Support for the SBC is installed on the NanoSWITCH™ main circuit board, and includes control and I/O functions. Figure 3-1 diagrams the Intel® SBC, along with its I/O support. Figure 3-2 on page 3-4 illustrates the AMD SBC and its I/O support. NanoSWITCH Board CPU Board CRT 1 GB DDR3 onboard memory 667 MHz Intel Atom N-455 BGA 559 pin 22x22 mm PCIe x1 (PT1 Lane 3) PCIe to PCI Bridge PCI DDC 1553 Mini PCIe Card Slot 6-pin header ICH8M BGA 676 pin 31 x 31 mm I2C USB 2.0 x 8 3 SATA II HD Audio Interface Fintek F75111 SMBus GLCI (port 6)Giga LAN 82567V LCI LM96163CISD (CPU Temp) LPC Bus SPI BIOS Watchdog Timer/GPIO I2C Ethernet Connector A, B ADI (H/W monitor) AD7999-1 PCIe 1x5 PATA NanoATX-Express 220-Pin Connector x4 DMI PCIe x1 2 GB NAND Flash on board J8 (1553) 18-bit LVDS J7 (CANBus) USB2 SATA1 CANBus Internal Cable LPC Bus Super I/O COM2 COM1 TPM VGA USB0 J10 USB1 J9 (USB) SATA0 SanDisk iSSD Card Default: 32GB PCIe x1 (FT1, Lane2) MDI GE MAC/PHY J11 Transformers 10/100/1000 Base-T Figure 3-1. Intel® Block Diagram Themis Computer 3-3 NanoSWITCH™ User Manual Version 1.0 NanoSWITCH Board Processor Board Display Port X2 24-bit LVDS x2 2 GB DDR3 800-1066MT/s Single Channel DDR3 AMD AMD FT1 APU VGA I/F EMBEDDED JTAG Ontario, U1 VGA DAC PROBE 413 Ball BGA test pads 19 x19 mm 4x1 PCIe for Debug DX11 IGP Gen2 GPP PCIe GEN2 4x1 1 x4 UMI-LINK PCIe x1 (PT1 Lane 3) Sandisk iSSD APU FAN SATAII, 1x PCIe Gen2 I/F Port 2 ,x1 PCIe Gen2 AZALIA HD Audio HW Monitor I/F GIGABIT ETHERNET GPP1 USB 2.0 (12) + 1.1 (2) HD Audio I/F USB 2.0 x 5 SATA II (6 ports total) SATA II, 4x INT. CLKGEN SMBus/ I2C LPC I/F LPC I/F PCI I/F SPI I/F SPI I/F SPI ROM GPIOs x8 Connector A, B Hudson-E1 FCH 605 Ball BGA 23 x 23 mm DDC 1553 Mini PCIe Card Slot NanoATX-Express 220-Pin Connector x4 UMI U7 PCI J8 (1553) 6-pin header PCIe x1 Gen 1 AMD TSI PCIe to PCI Bridge J7 (CANBus) USB2 SATA1 CANBus Internal Cable Super I/O LPC Bus COM2 COM1 TPM VGA USB0 J10 USB1 SATA0 J9 (USB) SanDisk iSSD Card Default: 32GB PCIe x1 (FT1, Lane2) MDI GE MAC/PHY J11 Transformers 10/100/1000 Base-T Figure 3-2. AMD Block Diagram 3-4 Themis Computer A Appendix Connectors, Pinouts and Signals A.1 Circular Connectors A fully populated NanoSWITCH™ uses 11 Mighty Mouse circular connectors, of 7 different kinds. These connectors and their numbering are illustrated in Figure A-1. Figure A-1. NanoSWITCH™ Connector Numbering Themis Computer A-1 NanoSWITCH™ User Manual Table A-1. Circular Connector Part Numbers Themis Part Number Mighty Mouse Part Number Contacts Use Connectors per Unit J1 119637-L03 801-033-07M9-4PA 4 Input Power 1 J2 thru J6 119641-L03 801-033-07M9-19SA 19 2 GBe ports each 5 J7 119640-L03 801-033-07M6-6SC 6 CANBus 1 J8 119639-L03 801-033-07M6-6SB 6 1553 1 J9 119638-L03 801-033-07M6-6SA 6 USB 1 J10 119642-L03 801-033-07M10-26SA 26 VGA, USB, Serial 1 J11 119520-L02 801-033-07M8-13SA 13 SBC Mezz GBe port 1 A.1.1 4-Pin Power Connector J1 Table A-2. 4-Pin Power Connector Pinouts 1 4 2 Pin No. Signal Name Description 1 GND Chassis GND 2 NC No Connection 3 28V_IN 28V (10 to 36V) DC Power Input 4 28V_IN_RTN 28V (10 to 36V) DC Return 3 Power Connector Face View A-2 Themis Computer A—Connectors, Pinouts and Signals Circular Connectors A.1.2 19-Pin GBe Connectors J2 thru J6 Each of the five 19-Pin connectors carries signals of two GBe ports, Ports 1&2, Ports 3&4, Ports 5&6, Ports 7&8, and Ports 9&10. Table A-3. 19-Pin Circular Connector Pinouts 1 2 4 8 5 9 13 3 6 10 14 17 7 11 15 18 12 Signal Name Description 1 GE1_PAIR1_P GEPort 1,Pair 1 + 2 GE1_PAIR1_N GEPort 1,Pair 1 - 3 GE1_PAIR2_P GEPort 1,Pair 2 + 4 GE1_PAIR3_P GEPort 1,Pair 3 + 5 GE1_PAIR3_N GEPort 1,Pair 3 - 6 GE1_PAIR4_P GE Port 1,Pair 4 + 7 GE1_PAIR2_N GEPort 1,Pair 2 - 8 NC No Connection 9 GE2_PAIR4_N GEPort 2,Pair 4 - 10 NC No Connection 11 GE1_PAIR4_N GEPort 1,Pair 4 - 12 NC No Connection 13 GE2_PAIR2_P GEPort 2,Pair 2 + 14 GE2_PAIR4_P GEPort 2,Pair 4 + 15 GE2_PAIR3_P GEPort 2,Pair 3 + 16 GE2_PAIR3_N GEPort 2,Pair 3 - 17 GE2_PAIR2_N GEPort 2,Pair 2 - 18 GE2_PAIR1_P GEPort 2,Pair 1 + 19 GE2_PAIR1_N GEPort 2,Pair 1 - 16 19 19-Pin GBe Connector Face View Themis Computer Pin No. A-3 NanoSWITCH™ User Manual A.1.3 6-Pin CANBus Connector J7 Table A-4. CANBus Connector Pinouts 1 2 6 3 4 5 Pin No. Signal Name Description 1 CAN_A_HIGH CANBUS A Signal “High” 2 CAN_A_LOW CANBUS A Signal “Low” 3 GND Digital Ground 4 CAN_B_HIGH CANBUS B Signal “High” 5 CAN_B_LOW CANBUS B Signal “Low” 6 GND Digital Ground CANBus Connector Face View A.1.4 6-Pin 1553 Connector J8 Table A-5. 1553 Connector Pinouts 2 1 6 3 4 5 Pin No. Signal Name Description 1 CHA1_1553_P Pair A + 2 CHA1_1553_N Pair A - 3 CHB1_1553_P Pair B + 4 CHB1_1553_N Pair B - 5 N/C No Connection 6 Chassis GND Shield 1553 Connector Face View A-4 Themis Computer A—Connectors, Pinouts and Signals Circular Connectors A.1.5 6-Pin USB1 Connector J9 This connector provides for the second USB interface, (USB1), from the SBC, if installed.. Table A-6. USB Connector Pinouts 2 1 Pin No. Signal Name Description 1 5V_USB1_PWR 5V Power USB1 2 USB1_P USB1 Pair + 3 USB1_N USB1 Pair - 4 N/C No Connection 5 N/C No Connection 6 GND Digital Ground 6 3 4 5 USB Connector Face View A.1.6 26-Pin Multi I/O Connector J10 This connector provides for control and display I/O of the NanoSWITCH™. VGA output, serial port I/O for both the optional SBC and internal processor, the first SBC USB interface I/O, (USB0), and I2C I/O are routed through this connector, as well as Power Button and System Reset signals. Provision is also made for an external battery input through this connector. Themis Computer A-5 NanoSWITCH™ User Manual Table A-7. 26-Pin Circular Connector Pinouts Pin # Signal Name I/O Description 1 VGA_RED Out SBC VGA Output 2 GND Bi Digital Ground 3 VGA_GRN Out SBC VGA Output 4 GND Bi Digital Ground 5 VGA_BLU Out SBC VGA Output 18 6 GND Bi Digital Ground 23 7 VGA_HSYNC Out SBC VGA Output 8 VGA_VSYNC Out SBC VGA Output 9 VGA_I2C_CLK Out SBC VGA Output 10 VGA_I2C_DAT In VGA Signal In 11 GND Bi Digital Ground 12 PWRBTN_L In SBC Power Button Input (see notes) 13 NC/GPO1/SW_SYSRSTn Opt Opt. Config. (see notes) 14 USB0_N Bi SBC USB0 - 15 USB_PWR_5v In USB0 5V Power 16 NC/GPI1 Opt Opt. Config. (see notes) 17 GND Bi Digital Ground 18 USB0_P Bi SBC USB0 + 19 SBC_SERIAL_RXD In SBC COM1 Receive 20 SBC_SERIAL_TXD Out SBC COM1 Transmit 21 GND Bi Digital Ground 22 SWITCH_SERIAL_RXD In Eth. Sw. Ser. Receive 23 SWITCH_SERIAL_TXD Out Eth. Sw. Ser. Transmit 24 EXT_BATTERY_INPUT In (See Notes) 25 NC/GPI2 Opt Opt. Config. (see notes) 26 NC/GPI3 Opt Opt. Config. (see notes) 1 2 4 3 9 12 6 5 7 8 11 10 14 13 17 16 19 21 15 20 22 25 24 26 26-Pin Multi I/O Connector Face View A-6 Themis Computer A—Connectors, Pinouts and Signals Circular Connectors Notes for this connector: • Pin 12 - SBC Power Button Signal. Connected to a momentary contact push button, hold down for 4 seconds to power down the SBC. Press again to power up the SBC. • Pin 13 - Default is no connection. Can be configured as either a General Purpose Input to the SBC or a Reset signal to the GBE switch.. A low pulse on this line will reset the GBE switch section of the box, (not the SBC). • Pin 16 - Default is no connection. Can be configured as a General Purpose Input to the SBC. • Pin 24 - External Battery Input for clock backup. This input is not required for the NanoSWITCH™ to function. A user has an option to use an internal 3.3V Lithium battery to keep time and date when an SBC is powered down. In the case where an internal battery is not used, the user has an option to use an external battery, 3.3V to 45V. If no backup battery is used, the SBC will still function, but it will lose date and time on power down. Since the SBC can always obtain time from an NTP server if it is connected, or from a PTP master clock if part of a PTP network, a backup battery may not be a requirement for some applications. • Pins 25 and 26 - General Purpose Input. The default is no connection. Can be configured as a General Purpose input to the SBC. A.1.7 13-Pin GBe Connector J11 The 13-Pin GBe Connector serves as the GBe connector for the optional SBC, if installed. Themis Computer A-7 NanoSWITCH™ User Manual Table A-8. 13-Pin Circular Connector Pinouts 1 Pin No. Signal Name Description RJ45 Pin# 1 SBC_ETH0_PAIR4_N SBC Ethernet Signal 1, Pair 4 - 8 2 SBC_ETH0_PAIR3_N SBC Ethernet Signal 1, Pair 3- 5 3 N/C No Connection N/C 4 SBC_ETH0_PAIR2_P SBC Ethernet Signal 1, Pair 2 + 3 5 SBC_ETH0_PAIR1_P SBC Ethernet Signal 1, Pair 1 + 1 6 N/C No Connection N/C 7 SBC_ETH0_PAIR4_P SBC Ethernet Signal 1, Pair 4 + 7 8 N/C No Connection N/C 9 SBC_ETH0_PAIR3_P SBC Ethernet Signal 1, Pair 3 + 4 10 SBC_ETH0_PAIR2_N SBC Ethernet Signal 1, Pair 2 - 6 11 N/C No Connection N/C 12 SBC_ETH0_PAIR1_N SBC Ethernet Signal 1, Pair 1 - 2 13 N/C No Connection N/C 2 8 7 6 9 3 13 12 10 11 5 4 13-Pin GBe Connector Face View A-8 Themis Computer B BIOS Setup Utility Appendix InsydeH2O® BIOS Setup Utility B.1 Introduction This chapter describes the InsydeH2O® BIOS Setup Utility for the optionally installed AMD Single Board Computer in the NanoSWITCH™. The InsydeH2O® ROM BIOS is an UEFI-type BIOS stored in a Flash EEPROM which is connected through SPI. This allows the BIOS configuration data to be retained when power is removed, and allows the BIOS to be easily updated. However, the system date and time is not retained when power is removed. Caution: Do not upgrade the BIOS unless your system has a BIOS-related issue. Flashing the wrong BIOS can cause irreparable damage to the system. In no event shall Themis be liable for direct, indirect, special, incidental, or consequential damages arising from a BIOS update. If you have to update the BIOS, do not shut down or reset the system while the BIOS is updating. This is to avoid possible boot failure. B.2 Starting the BIOS Setup Utility The BIOS Setup Utility may be access while the system is booting up after initial power application, or when rebooted by simultaneously pressing the <CTRL>, <ALT> and <DELETE> keys. An initial “splash” screen will appear, and while the Themis Computer B-1 NanoSWITCH™ User Manual Version 1.0 “splash” screen is visible, pressing the <F2> key will bring up the BIOS Setup Utility (See Figure B-1 on page B-2). It may be necessary to press the <F2> key more than once to bring up the Setup screen. The first screen to appear is the BIOS Information Screen (Figure B-2) which displays the BIOS version details. Use the leftright <arrow> keys to select the desired menu. Figure B-1. Splash Screen Figure B-2. BIOS Information Screen B.2.1 Navigating the Utility Screens The InsydeH2O® BIOS Setup Utility screen has two frames. (See Figure B-3). The left frame displays information items in black and the options that can be configured in blue. When an option is selected in the left frame, it is highlighted in white, and the right frame displays a text message for the highlighted configurable option. The InsydeH2O® BIOS Setup Utility navigation keys are shown in the legend in Fig- B-2 Themis Computer B—InsydeH2O® BIOS Setup Utility ure B-3. Most of these navigation keys can be used at any time during the setup navigation process. The left and right <arrow> keys select the menu at the top. The up and down <arrow> keys select the configurable item. Press <Enter > to bring up the sub menu to configure the item. Note: Options printed in Bold are default settings. Selected item explanation Selected item in White Configurable item in Blue Selection key legend Figure B-3. Setup Screen Legend B.3 Main BIOS Setup To view the Main setup screen, use the left-right <arrow> keys to select the Main menu tab at the top.You can always return to the Main setup screen by selecting the Main tab on the top of the screen. The Main BIOS Setup screen is shown in Figure Themis Computer B-3 NanoSWITCH™ User Manual Version 1.0 B-4. Figure B-4. Main Setup Screen B.3.1 System Overview System details such as Processor Type, Bus Speed, Memory Speed, Cache, and Memory details are listed, along with the BIOS version. The configurable items in this screen are Language, System Time and System Date. B.3.2 System Time/System Date Use this option to change the system time and date. Highlight System Date or System Time using the <Arrow> keys. Key in new values through the keyboard and press <Enter>. Press the <Tab> key to move between fields. The date must be entered in B-4 Themis Computer B—InsydeH2O® BIOS Setup Utility MM/DD/YY format. The time is entered in HH:MM:SS format. Note: The time is in the 24-hour format. For example, 5:30 P.M. appears as 17:30:00. B.3.3 Language Use the <Arrow> keys to select the desired BIOS Menu language, and press <Enter> to select it. B.4 Advanced Setup Caution: It is advisable not to change from the default settings, as they are set according to the hardware design of this board. Options in Bold are the default settings. Use the horizontal arrow keys to select the Advanced Settings screen. Use the vertical arrows to select the submenu items, and hit <Enter> to access them. Figure B-5. Advanced Settings Screen Themis Computer B-5 NanoSWITCH™ User Manual B.4.1 Version 1.0 Boot Configuration Figure B-6. Boot Configuration Settings • The Boot Configuration screen sets the power-on state for the Numlock key. B-6 Themis Computer B—InsydeH2O® BIOS Setup Utility Advanced Setup B.4.2 Peripherals Configuration Figure B-7. Peripheral Configuration Settings • Enhanced Host Controller Interface (EHCI) Sets the EHCI for USB ports 0, 1, and 2 to Auto detect or Disabled. • Azalia • SATA • SATA Port(s) Power on • Serial Port(s) Themis Computer B-7 NanoSWITCH™ User Manual B.4.3 Version 1.0 IDE Configuration Figure B-8. IDE Configuration Settings • IDE Controller Allows the IDE Controller to be Enabled or Disabled. • Configure SATA • SATA Port(s) 0 thru 4 connections • Channel 4 B-8 Themis Computer B—InsydeH2O® BIOS Setup Utility Advanced Setup B.4.4 Video Configuration Figure B-9. Video Configuration Settings • Enable or Disable Edid Support Option. Themis Computer B-9 NanoSWITCH™ User Manual B.4.5 Version 1.0 USB Configuration Figure B-10. USB Configuration Settings • Enable or Disable USB 2.0 Controller. • Enable or Disable USB Legacy support. B-10 Themis Computer B—InsydeH2O® BIOS Setup Utility Advanced Setup B.4.6 Chipset Configuration Figure B-11. Chipset Configuration Settings • Select NorthBridge/GNB Options Screen. • Select Hudson-1 FCH Family Product Errata Screen. • Select SouthBridge/GPP Options Screen. • Set the PCI Latency Timer Setting • Enable or Disable Spread Spectrum Operation. Themis Computer B-11 NanoSWITCH™ User Manual Version 1.0 B.4.6.1 NorthBridge Configuration Figure B-12. NorthBridge Configuration • Select the PCI Express Configuration Screen. B-12 Themis Computer B—InsydeH2O® BIOS Setup Utility Advanced Setup B.4.6.2 NorthBridge PCIe Configuration Figure B-13. NorthBridge PCIe Configuration Settings • Enable dynamic link frequency changes. • Configure the GPP Link • Configure the processor GPP features. Themis Computer B-13 NanoSWITCH™ User Manual Version 1.0 B.4.6.3 APU GPP Features Configuration Figure B-14. APU GPP Features Configuration Screen • Configure the PCIe port link Speed Mode to Gen1 or Gen2. • Configure the Link ASPM. B-14 Themis Computer B—InsydeH2O® BIOS Setup Utility Advanced Setup B.4.6.4 Hudson-1 FCH Configuration Figure B-15. Hudson-1 FCH Configuration Settings • Enable or Disable various FCH fixes. Themis Computer B-15 NanoSWITCH™ User Manual Version 1.0 B.4.6.5 SouthBridge/GPP Configuration Figure B-16. SouthBridge/GPP Configuration Settings • Select PCI Express Configurations Screen. B-16 Themis Computer B—InsydeH2O® BIOS Setup Utility Advanced Setup B.4.6.6 SouthBridge PCIe Configuration Figure B-17. SouthBridge PCIe Configuration Settings • Select an individual PCIe Port to configure. Themis Computer B-17 NanoSWITCH™ User Manual Version 1.0 B.4.6.7 SouthBridge PCIe Port Features Configuration Figure B-18. SouthBridge PCIe Port Features Configuration Settings • Enable PCIe Port ASPM. B-18 Themis Computer B—InsydeH2O® BIOS Setup Utility Advanced Setup B.4.7 ACPI Tables/Features Control Figure B-19. ACPI Tables/Features Control • FACP - C2 Latency Value = Enabled • • FACP - C3 Latency Value = Enabled • • FACP - RTC s4 Wakeup = Enabled • • APIC - IO APIC Mode = Enabled • HPET - HPET Support = Enabled • _OCS Support = Enabled • Fusion Utility = Disabled Themis Computer B-19 NanoSWITCH™ User Manual B.4.8 Version 1.0 CPU Related Settings Figure B-20. CPU Related Settings • CPU P-State Setting = Auto • SVM Support = Enabled B-20 Themis Computer B—InsydeH2O® BIOS Setup Utility Advanced Setup B.4.9 AMD PBS Option Figure B-21. AMD PBS Option • Travis Power Control = Enabled • External LAN Controller = Auto • PXE Boot to EXT_LAN = Disabled Themis Computer B-21 NanoSWITCH™ User Manual B.5 Version 1.0 Security Configuration Figure B-22. Security Configuration Settings • Install or change Supervisor Password. • Install or change User Password. Supervisor Password must be installed in order to install a User Password B-22 Themis Computer B—InsydeH2O® BIOS Setup Utility B.6 Power Configuration Figure B-23. Power Configuration • Select the Advanced CPU Control screen to configure various CPU parameters. • ACPI s3 = Enabled • Thermal Fan Control = Auto • Wake on PME = Enabled • Auto Wake on s5 = Disabled Themis Computer B-23 NanoSWITCH™ User Manual B.6.1 Version 1.0 Advanced CPU Control Figure B-24. Advanced CPU Control • Cool N’ Quiet Support = Enabled Enable or Disable Cool and Quiet Support. • Hardware Thermal Control = Auto B-24 Themis Computer B—InsydeH2O® BIOS Setup Utility B.7 Boot Configuration Figure B-25. Boot Configuration • UEFI Boot = Enabled • Quick Boot = Enabled • Quiet Boot = Enabled • PXE Boot to LAN = Disabled • ACPI Selection = ACPI 3.0 • USB Boot = Enabled • EFI Device First = Disabled Themis Computer B-25 NanoSWITCH™ User Manual Version 1.0 • Select EFI to configure the Internal EFI shell. • Select Legacy to configure Legacy Boot Device Priority. • B.7.1 EFI Configuration Figure B-26. EFI Configuration • B-26 Themis Computer B—InsydeH2O® BIOS Setup Utility Boot Configuration B.7.2 Legacy Boot Device Configuration Figure B-27. Legacy Boot Device Configuration • Select Normal Boot Option Priority or Advanced Boot Option Priority. • Select the Boot Device Themis Computer B-27 NanoSWITCH™ User Manual B.8 Version 1.0 Exit Menu Figure B-28. Exit Menu • Exit Saving Changes When users have completed system configuration, select this option to save changes, exit BIOS setup menu and reboot the computer to take effect of all system configuration parameters. • Save Change Without Exit Save changes and continue in the BIOS Setup Utility. • Exit Discarding Changes Select this option to quit Setup without making any permanent changes to the system configuration. • Load Optimal Defaults The BIOS automatically configures all setup items to optimal settings when users select this option. Optimal Defaults are designed for maximum system performance, but may not work best for all computer applications. In particular, do not use the Optimal Defaults if the user’s computer is experiencing system configuration problems. • Load Custom Defaults Load previously saved Custom Defaults. B-28 Themis Computer B—InsydeH2O® BIOS Setup Utility • Save Custom Defaults Save the current settings as Custom Defaults. • Discard Changes Discard any changes previously made and continue in the BIOS Setup Utility. Themis Computer B-29 NanoSWITCH™ User Manual B-30 Version 1.0 Themis Computer C BIOS Setup Utility Appendix AMI BIOS Setup Utility C.1 Introduction This chapter describes the AMI BIOS Setup Utility for the optionally installed Intel® Single Board Computer in the NanoSWITCH™. The AMI ROM BIOS is stored in a Flash EEPROM and can be easily updated. This chapter explains the basic navigation of the AMI BIOS Setup Utility setup screens. Caution: Do not upgrade the BIOS unless your system has a BIOS-related issue. Flashing the wrong BIOS can cause irreparable damage to the system. In no event shall Themis be liable for direct, indirect, special, incidental, or consequential damages arising from a BIOS update. If you have to update the BIOS, do not shut down or reset the system while the BIOS is updating. This is to avoid possible boot failure. C.1.1 Starting the BIOS Setup Utility Turn on the computer and check for the “patch code”. If there is a number assigned to the patch code, the on board CPU is supported by current BIOS. If there is no number assigned to the patch code, please contact a Themis application engineer to obtain an up-to-date patch code file, to ensure the system status of CPU is valid. Then press <DEL> to enter Setup menu. The first screen to appear is the Main Settings Screen. (See Figure C-1). The Main Themis Computer C-1 NanoSWITCH™ User Manual Version 1.0 BIOS setup menu screen has three frames. The left frame displays all the options that can be configured. Grayed-out options cannot be configured. Options in blue can be configured by the user. The bottom right frame displays the key legend. The frame above the key legend is an area reserved for a text message. When an option is selected in the left frame, it is highlighted in white. Often a text message will accompany it. The AMI BIOS Setup Utility uses a key-based navigation system called “hot keys”. Most of the AMI BIOS setup utility “hot keys” can be used at any time during the setup navigation process. These keys include <F1>, <F10>, <Enter>, <ESC>, arrow keys, etc. Note: Options printed in Bold are default settings. C.2 Main BIOS Setup When you first enter the AMI BIOS Setup Utility, you will enter the Main setup screen.You can always return to the Main setup screen by selecting the Main tab on C-2 Themis Computer C—AMI BIOS Setup Utility the top of the screen. The Main BIOS Setup screen is shown in Figure C-1. Figure C-1. Main Setup Screen C.2.1 System Overview: The following BIOS information will be displayed: C.2.1.1 BIOS Information This area displays the BIOS version, the build date, and ID of the BIOS. C.2.1.2 System Memory Information This area displays the size of the system memory. Themis Computer C-3 NanoSWITCH™ User Manual Version 1.0 C.2.1.3 System Time/System Date Use this option to change the system time and date. Highlight System Date or System Time using the <Arrow> keys. Key in new values through the keyboard and press <Enter>. Press the <Tab> key to move between fields. The date must be entered in MM/DD/YY format. The time is entered in HH:MM:SS format. Note: The time is in the 24-hour format. For example, 5:30 P.M. appears as 17:30:00. C.3 Advanced Setup Configuration Caution: It is advisable not to change from the default settings, as they are set according to the hardware design of this board. Options in Bold are the default settings. Use the horizontal arrow keys to select the Advanced Settings screen. Use the verti- C-4 Themis Computer C—AMI BIOS Setup Utility cal arrows to select the submenu items, and hit <Enter> to access them. Figure C-2. Advanced Settings Themis Computer C-5 NanoSWITCH™ User Manual C.3.1 Version 1.0 CPU Configuration Figure C-3. CPU Configuration Settings • Max CPUID Value Limit = Disabled This item allows users to limit the maximum value of CPUID. • Execute-Disable Bit Capability = Enabled This item allows users to enable or disable the No-Execution page protection technology. • Hyper Threading Technology = Enabled This item allows users to enable or disable Intel® Hyper Threading technology. • Intel® Speed Step™ tech = Enabled CPU runs at its default speed if disabled; CPU speed is controlled by the operating system if enabled. C-6 Themis Computer C—AMI BIOS Setup Utility Advanced Setup Configuration • Intel® C-STATE tech = Enabled This item allows the CPU to save more power in idle mode. • Enhanced C-States = Enabled Enable / Disable Intel® C-STATE technology C.3.2 IDE Configuration Figure C-4. IDE Configuration Settings • ATA/IDE Configuration = Enhanced This item allows users to select Disabled / Compatible / Enhanced modes. When set to Enhanced mode, users can select IDE or AHCI mode. When set to Compatible mode, users can select “SATA only,” “SATA Primary, PATA Secondary” or “PATA Only.” Themis Computer C-7 NanoSWITCH™ User Manual Version 1.0 • Primary / Secondary / Third IDE Master / Slave BIOS auto detects the presence of an IDE device, and displays the status of auto detection of the IDE device. — Type: Select the type of SATA driver; [Not Installed] [Auto] [CD/DVD] [ARMD] — LBA/Large Mode: Enables or Disables the LBA Mode. — Block (Multi-Sector Transfer): Enables or Disables data multi-sectors transfers. — PIO Mode: Select the operating mode of PIO. — DMA Mode: Select the operating mode of DMA — S.M.A.R.T.: Select the smart monitoring, analysis, and reporting technology. — 32Bit Data Transfer: Enables or disables 32-bit data transfer. • Hard Disk Write Protect = Disabled Disable / Enable device write protection. This will be effective only if device is accessed through BIOS. • IDE Detect Time Out (Sec) This item allows users to select the time out value for detecting ATA/ATAPI devices. • ATA(PI) 80Pin Cable Detection This item allows users to select the way to detect IDE 80-pin cable. C-8 Themis Computer C—AMI BIOS Setup Utility Advanced Setup Configuration C.3.3 Floppy Configuration Figure C-5. Floppy Configuration Settings • Floppy A/B Select the type of floppy drive, if any are connected to the system. Disabling the floppy driver is recommended if no floppy drive is connected. Themis Computer C-9 NanoSWITCH™ User Manual C.3.4 Version 1.0 ACPI Settings Figure C-6. ACPI Settings C-10 Themis Computer C—AMI BIOS Setup Utility Advanced Setup Configuration C.3.4.1 General ACPI Configuration Figure C-7. General ACPI Configuration Settings • Suspend Mode = Auto Select the ACPI state used for system suspend. • RePOST Video on S3 Resume = NO This item allows users to invoke VGA BIOS POST on S3/STR resume. Themis Computer C-11 NanoSWITCH™ User Manual Version 1.0 C.3.4.2 Advanced ACPI Configuration Figure C-8. Advanced ACPI Configuration Settings • ACPI Version Features This item allows users to enable RSDP pointers to 64-bit fixed system description tables. • ACPI APIC support = Enabled Include APIC table pointer to RSDT pointer list. • AMI OEMB table = Enable Include OEMB table pointer to R(x)SDT pointer lists. • Headless Mode = Disable Enable / Disable headless operation mode through ACPI. C-12 Themis Computer C—AMI BIOS Setup Utility Advanced Setup Configuration C.3.4.3 Chipset ACPI Configuration C.3.4.4 Chipset ACPI Configuration Settings • Energy Lake Feature = Disabled This item allows users to configure Intel’s® Energy Lake power management technology. • APIC ACPI SCI IRQ = Disabled Enable / Disable APIC ACPI SCI IRQ • USB Device Wakeup From S3/S4 = Disabled Enable / Disable USB Device Wakeup from S3/S4 • High Performance Event Timer = Disabled Enable / Disable High Performance event timer. Themis Computer C-13 NanoSWITCH™ User Manual C.3.5 Version 1.0 AHCI Configuration Figure C-9. AHCI Configuration Settings • AHCI Port0 / Port1 / Port2 While entering setup, BIOS auto detects the presence of IDE devices and displays the status of detected IDE devices. C-14 Themis Computer C—AMI BIOS Setup Utility Advanced Setup Configuration C.3.6 Event Log Configuration Figure C-10. Event Log Configuration Settings • View Event Log View all unread events in the Event Log. • Mark all events as read Mark all unread events as read. • Clear Event Log Discard all events in the Event Log. Themis Computer C-15 NanoSWITCH™ User Manual C.3.7 Version 1.0 Hardware Health Configuration Figure C-11. Hardware Health Configuration Settings • Hardware Health Function = Enabled This item allows users to display or hide the status of a H/W monitor. • ACPI Critical Shutdown Temp This item allows users to set the value of CPU shutdown temperature in ACPI OS. • Temperature and Voltage Information Local (System) / Remote (CPU) Temperature. VBAT / VIN / +5VSB C-16 Themis Computer C—AMI BIOS Setup Utility Advanced Setup Configuration C.3.8 MPS Configuration Figure C-12. MPS Configuration Settings • MPS Revision This item allows users to select MPS reversion. Themis Computer C-17 NanoSWITCH™ User Manual C.3.9 Version 1.0 SMBIOS Configuration Figure C-13. SMBIOS Configuration Settings • SMBIOS SMI Support = Enabled SMBIOS SMI wrapper support for PnP function 50h-54h. C-18 Themis Computer C—AMI BIOS Setup Utility Advanced Setup Configuration C.3.10 USB Configuration Figure C-14. USB Configuration Settings • Legacy USB Support = Enabled Enable the support for legacy USB. Auto option disables legacy support if no USB devices are connected. • USB 2.0 Controller Mode = HiSpeed This item allows users to select HiSpeed (480 Mbps) or FullSpeed (12 Mpbs). • BIOS EHCI Hand-Off = Enabled This is a workaround for the OS without EHCI hand-off support. The EHCI ownership change should claim by EHCI driver. Themis Computer C-19 NanoSWITCH™ User Manual Version 1.0 • Hotplug USB FDD Support = Auto A dummy FDD device is created that will be associated with the hot-plugged FDD later. Auto option creates this dummy device only if there is no USB FDD present. C.3.10.1USB Mass Storage Device Configuration Figure C-15. USB Mass Storage Device Configuration Settings • USB Mass Storage Reset Delay = 20 Sec Number of seconds POST waits for the USB mass storage device after start unit command. • Emulation Type = Auto If Auto, USB devices less than 530MB will be emulated as Floppy and remaining as hard drive. Force FDD option can be used to force a FDD formatted drive to boot as FDD (Example, ZIP drive). C-20 Themis Computer C—AMI BIOS Setup Utility C.4 Advanced PCI/PnP Settings Select the PCI/PnP tab from the BIOS setup screen to enter the Plug and Play BIOS Setup screen. Users can display a Plug and Play BIOS Setup option by highlighting is using the <Arrow> keys. All Plug and Play BIOS Setup options are described in this section. The Plug and Play BIOS Setup screen is shown below. Figure C-16. PCI/PnP Configuration Settings • Clear NVRAM = NO Set this value to force the BIOS to clear the Non-Volatile Random Access Memory (NVRAM). The Optimal and Fail-Safe default setting is NO. Themis Computer C-21 NanoSWITCH™ User Manual Version 1.0 • Plug & Play O/S = NO when set to NO, the BIOS configures all devices in the system. If set to YES, and the OS supports Plug & Play, then rebooting the system is not required after the OS finishes configuration of the plug and play devices. • PCI Latency Timer Value in units of PCI clocks for PCI device latency timer register. • Allocate IRQ to PCI VGA = YES When to ES will assign IRQ to PCI VGA card if the card requests an IRQ. When set to NO the BIOS will not assign an IRQ to PCI VGA card even if the card requests it. • Palette Snooping = Disabled This item is designed to solve problems caused by some non-standard VGA cards. • PCI IDE BusMaster = Enabled When set to enable BIOS, it uses PCI bus mastering for reading/writing to IDE devices. • OffBoard PCI/ISA IDE Card = Auto Some PCI IDE cards may require this to be set to the PCI slot number that is holding the card. When set to Auto, it will work for most PCI IDE cards. • IRQ3 / 4 / 5 / 7 / 9 / 10 / 11 This item allows users to respectively assign an interruptive type for IRQ3, 4, 5, 7, 9, 10, 11. • DMA Channel0 / 1 / 3 / 5 / 6 / 7 When set to Available, will allow specified DMA to be available to be used by PCI/PnP devices. When set to Reserved, will allow specified DMA to be reserved for use by legacy ISA devices. • Reserved Memory Size This item allows users to reserve a specific size of memory block for legacy ISA devices. C-22 Themis Computer C—AMI BIOS Setup Utility C.5 Boot Settings Figure C-17. Boot Settings Themis Computer C-23 NanoSWITCH™ User Manual C.5.1 Version 1.0 Boot Settings Configuration Figure C-18. Boot Settings Configuration • Quick Boot = Enabled This item allows BIOS to skip certain tests while booting. This will decrease the time needed to boot the system. • Quiet Boot = Disabled If this option is set to Disabled, the BIOS displays normal POST messages. If enabled, an OEM Logo is shown instead of POST messages. • AddOn ROM Display Mode = Force BIOS Set display mode for option ROM. • Bootup Num-Lock = ON Select the Power-on state for Num-Lock. C-24 Themis Computer C—AMI BIOS Setup Utility Security Setup • PS/2 Mouse Support = Auto Select support for PS/2 Mouse. • Wait for “F1” If Error = Enabled Wait for the F1 key to be pressed if an error occurs. • Hit “DEL” Message Display = Enabled Displays “Press DEL to run Setup in POST.” • Interrupt 19 Capture = Disabled This item allows option ROMs to trap interrupt 19. C.6 Security Setup Select Security from the main BIOS setup menu. All Security Setup options, such as Themis Computer C-25 NanoSWITCH™ User Manual Version 1.0 password protection and virus protection are described in this section. Figure C-19. Security Settings • Change supervisor / User Password Select this option and press <ENTER> to access the sub menu, and then type in the password. • Boot Sector Virus Protection = Disabled The boot sector virus protection will warn if any program tries to write to the boot sector. C-26 Themis Computer C—AMI BIOS Setup Utility C.7 Advanced Chipset Settings Figure C-20. Advanced Chipset Settings Themis Computer C-27 NanoSWITCH™ User Manual C.7.1 Version 1.0 North Bridge Chipset Configuration Figure C-21. North Bridge Configuration • DRAM Frequency This item allows users to change DRAM frequency manually. • Configure DRAM Timing by SPD This item allows users to Enable or Disable detect by DRAM SPD. • Memory Hole This item allows users to free 15 MB to 16MB of memory size for some ISA devices. • Imitate Graphics Adapter This item allows users to select which graphics controller to use as the primary boot device. C-28 Themis Computer C—AMI BIOS Setup Utility Advanced Chipset Settings • Internal Graphics Mode Select Select the amount of system memory that can be used by the internal graphics device. • DVMT Mode Select Displays the active system memory mode. • DVMT / FIXED Memory Specify the amount of DVMT / FIXED system memory to allocate for video memory. • Boot Display Device Select boot display device at POST stage. • Flat Panel Type This item allows users to select panel resolution. • Spread Spectrum Clock This item allows users to Enable or Disable the Spread Spectrum clock. Themis Computer C-29 NanoSWITCH™ User Manual C.7.2 Version 1.0 South Bridge Chipset Configuration Figure C-22. South Bridge Configuration • USB Functions Options are: Disabled, 2 USB Ports, 4 USB Ports, 6 USB Ports, or 8 USB Ports. • USB2.0 controller = Enabled Enables or Disables the USB 2.0 Controller. • GbE Controller = Enabled Enables or Disables the GbE Controller. • GbE LAN Boot = Disabled Enables or Disables GbE LAN boot. • GbE Wake Up from S5 = Disabled Enables or Disables GbE LAN wake up from S5 function. C-30 Themis Computer C—AMI BIOS Setup Utility Advanced Chipset Settings • HDA Controller = Disabled Enables or Disables the HDA Controller • SMBUS Controller = Disabled Enables or Disables the SMBUS Controller • SLP_S4# Min. Assertion Width This item allows users to set a delay of sorts. • PCIE Port 0 / 1 / 2 / 3 / 4 This item allows users to configure PCIE Ports. • PCIE High Priority Port = Disabled This item allows users to set the highest priority PCIE port. • PCIE Port 0 / 1 / 2 / 3 / 4 IOxAPIC This item allows users to Enable or Disable PCIE port’s IOxAPIC Themis Computer C-31 NanoSWITCH™ User Manual C.8 Version 1.0 Exit Options Figure C-23. Exit Options Screen C.8.1 Save Changes and Exit When users have completed system configuration, select this option to save changes, exit BIOS setup menu and reboot the computer to take effect of all system configuration parameters. 1. Select Save Changes and Exit from the Exit menu and press <Enter>. The following message appears: Save Configuration Changes and Exit Now? [Ok] [Cancel] C-32 Themis Computer C—AMI BIOS Setup Utility Exit Options 2. Select [Ok] or [Cancel]. C.8.2 Discard Changes and Exit Select this option to quit Setup without making any permanent changes to the system configuration. 1. Select Discard Changes and Exit from the Exit menu and press <Enter>. The following message appears: Discard Changes and Exit Setup Now? [Ok] [Cancel]. 2. Select [Ok] or [Cancel]. C.8.3 Load Optimal Defaults The BIOS automatically configures all setup items to optimal settings when users select this option. Optimal Defaults are designed for maximum system performance, but may not work best for all computer applications. In particular, do not use the Optimal Defaults if the user’s computer is experiencing system configuration problems. 1. Select Load Optimal Defaults from the Exit menu and press <Enter>. The following message appears: Load Optimal Defaults? [Ok] [Cancel]. 2. Select [Ok] to load Optimal defaults C.8.4 Load Fail-Safe Defaults The BIOS automatically configures all setup options to fail-safe settings when users select this option. Fail-Safe Defaults are designed for maximum system stability, but not maximum performance. Select Fail-Safe Defaults if the user’s computer is experiencing system configuration problems. 1. Select Load Fail-Safe Defaults from the Exit menu and press <Enter>. The following message appears: Load Fail-Safe Defaults? [OK] [Cancel]. 2. Select [Ok] to load Fail-Safe defaults. Themis Computer C-33 NanoSWITCH™ User Manual C-34 Version 1.0 Themis Computer DApril 2013 Appendix Repackaging Instructions D.1 Repackaging for Shipment If it becomes necessary for any reason to return your NanoSWITCH™ unit back to Themis, it is very important that the original packaging materials be used according to the repackaging instructions found in this appendix. Themis has qualified all of its shipping materials to meet the highest of standards and the rigors of today’s shipping methods, thus insuring total protection of the product during delivery. Failure to use original packaging materials, exactly as described in this appendix may invalidate the warranty. If the original packaging is no longer serviceable, or no longer available, please contact Themis Customer Support for a new shipping box to send back your XV1. When using the original packaging, please remember to place your NanoSWITCH™ back into the static protection bag. Caution: Failure to use the original Themis packaging materials, and failure to follow the instructions of this Appendix C, may invalidate the warranty. The following instructions assume the original packaging components are still available, and in serviceable condition. If not, please contact Themis for a new shipping box and packaging components for your NanoSWITCH™. Themis Computer D-1 NanoSWITCH™ User Manual D.2 Version 1.0 Packaging Components The original packaging components are shown in Figure D-1. They comprise a packaging box, perimeter crush resistant foam, and upper (perimeter) crush-resistant removable foam pieces to accommodate all NanoSWITCH™ variations. The top and bottom crush-resistant foam layers are identical components, placed so that the flat side is always facing up (opening of box). Removable Foam Blocks For Customization Perimeter Foam Bottom and Top Inserts Figure D-1. Packaging Components D-2 Themis Computer D—Repackaging Instructions D.3 Instructions for Repackaging Re-assemble the packaging material about the equipment in accordance with the following instructions (see Figure D-2): 1. Inspect the original packaging materials for serviceability. 2. Place perimeter crush-resistant layer into the shipping box, making sure the corners of the foam fit snugly into the corners of the box. 3. Place the first top/bottom layer into the box, centered into the perimeter foam cutout. Make sure the flat side of the foam is facing up (opening of box). 4. Place the wrapped (static protection bag) NanoSWITCH™ on top of the layer (top/bottom layer) that was just inserted into the middle of the shipping box. 5. Place the remaining top/bottom layer directly on top of the wrapped NanoSWITCH™ unit. Make sure the flat side of the foam is facing up (opening of box). 6. Make sure all components of the box are firmly in place, pressing down on the surface area of the foam to insure proper seating of the material. 7. Seal the top of the box with strong packaging tape, wrapping the tape completely around the box, both lengthwise, and crosswise. 8. Prepare for shipment in accordance with the instructions received from Themis Computer. Note: Please contact Themis if new packaging material, or shipping instructions are required. You can reach Themis at 1 (510) 252-0870 Mon–Fri, 8am–5pm PST, or by Email to [email protected]. Themis Computer D-3 NanoSWITCH™ User Manual Version 1.0 The order of assembly when repackaging the NanoSWITCH™ for shipment as shown in Figure D-2. Figure D-2. Order of Assembly D-4 Themis Computer Index A AMI BIOS Setup Utility .......................... C-1 Applying Power ........................................ 2-2 Provide Adequate Cooling .................. 2-2 B BIOS AMI BIOS Setup Utility Advanced Chipset Settings ........ C-27 North Bridge Chipset Configuration ........... C-28 Boot Display Device .......C-29 Configure DRAM Timing by SPD .....................C-28 DRAM Frequency ...........C-28 DVMT / FIXED Memory C-29 DVMT Mode Select ........C-29 Flat Panel Type ...............C-29 Imitate Graphics Adapter C-28 Internal Graphics Mode Select ...................C-29 Memory Hole ..................C-28 Spread Spectrum Clock ..C-29 South Bridge Chipset Configuration ........... C-30 GbE Controller ................C-30 GbE LAN Boot ...............C-30 GbE Wake Up from S5 ...C-30 HDA Controller ..............C-31 PCIE High Priority Port ..C-31 PCIE Port 0 / 1 / 2 / 3 / 4 .C-31 PCIE Port 0 / 1 / 2 / 3 / 4 IOxAPIC .............C-31 SLP_S4# Min. Assertion Width ..................C-31 SMBUS Controller .........C-31 USB Functons .................C-30 Themis Computer USB2.0 controller ...........C-30 Advanced PCI/PnP Settings ....... C-21 Allocate IRQ to PCI VGA ... C-22 Clear NVRAM ..................... C-21 DMA Channel0 / 1 / 3 / 5 / 6 / 7 ............................. C-22 IRQ3 / 4 / 5 / 7 / 9 / 10 / 11 .. C-22 OffBoard PCI/ISA IDE Card C-22 Palette Snooping .................. C-22 PCI IDE BusMaster ............. C-22 PCI Latency Timer ............... C-22 Plug & Play O/S ................... C-22 Reserved Memory Size ........ C-22 Advanced Setup Configuration .... C-4 ACPI Settings ...................... C-10 Advanced ACPI Configuration ......C-12 ACPI APIC support ..C-12 ACPI Version Features .........C-12 AMI OEMB table .....C-12 Headless Mode ..........C-12 Chipset ACPI Configuration ......C-13 APIC ACPI SCI IRQ C-13 Energy Lake Feature .C-13 High Performance Event Timer .............C-13 USB Device Wakeup From S3/S4 ...C-13 General ACPI Configuration ......C-11 RePOST Video on S3 Resume ..........C-11 Suspend Mode ...........C-11 AHCI Configuration ............ C-14 AHCI Port0 / Port1 / Port2 ....................C-14 Index-1 NanoSWITCH™ User Manual CPU Configuration ................ C-6 Enhanced C-States ............C-7 Execute-Disable Bit Capability ..............C-6 Hyper Threading Technology ...........C-6 Intel® C-STATE tech .......C-7 Intel® Speed Step™ .........C-6 Max CPUID Value Limit ..C-6 Event Log Configuration ..... C-15 Clear Event Log ..............C-15 Mark all events as read ...C-15 View Event Log ..............C-15 Floppy Configuration ............. C-9 Floppy A/B .......................C-9 Hardware Health Configuration ........... C-16 ACPI Critical Shutdown Temp ...................C-16 Hardware Health Function ..............C-16 Temperature and Voltage Information .........C-16 IDE Configuration ................. C-7 ATA(PI) 80Pin Cable Detection ...............C-8 ATA/IDE Configuration ...C-7 Hard Disk Write Protect ...C-8 IDE Detect Time Out ........C-8 Primary / Secondary / Third IDE Master / Slave C-8 MPS Configuration .............. C-17 MPS Revision .................C-17 SMBIOS Configuration ....... C-18 SMBIOS SMI Support ....C-18 USB Configuration .............. C-19 BIOS EHCI Hand-Off ....C-19 Hotplug USB FDD Support ................C-20 Legacy USB Support ......C-19 USB 2.0 Controller Mode C-19 USB Mass Storage Device Index-2 Version 1.0 Configuration ......C-20 Emulation Type .........C-20 USB Mass Storage Reset Delay .............C-20 Boot Settings .............................. C-23 Boot Settings Configuration C-24 AddOn ROM Display Mode ...................C-24 Bootup Num-Lock ..........C-24 Hit “DEL” Message Display ................C-25 Interrupt 19 Capture ........C-25 PS/2 Mouse Support .......C-25 Quick Boot ......................C-24 Quiet Boot .......................C-24 Wait for “F1” If Error .....C-25 Exit Options ............................... C-32 Discard Changes and Exit .... C-33 Load Fail-Safe Defaults ....... C-33 Load Optimal Defaults ......... C-33 Save Changes and Exit ........ C-32 Introduction .................................. C-1 Starting the BIOS Setup Utility ......................... C-1 Main BIOS Setup ......................... C-2 System Overview ................... C-3 BIOS Information .............C-3 System Memory Information ...........C-3 System Time/System Date C-4 Security Setup ............................ C-25 Boot Sector Virus Protection C-26 Change supervisor / User Password .................. C-26 ® InsydeH2O BIOS Setup Utility ......... B-1 Advanced Setup ............................B-5 ACPI Tables/Features Control ......................B-19 AMD PBS Option .................B-21 Boot Configuration .................B-6 Chipset Configuration ...........B-11 Hudson-1 FCH Themis Computer Index Configuration ......B-15 NorthBridge Configuration ......B-12 APU GPP Features Configuration B-14 NorthBridge PCIe Configuration B-13 SouthBridge PCIe Configuration ......B-17 SouthBridge PCIe Port Features Configuration ......B-18 SouthBridge/GPP Configuration ......B-16 CPU Related Settings ............B-20 IDE Configuration ..................B-8 Peripherals Configuration .......B-7 USB Configuration ...............B-10 Video Configuration ...............B-9 Boot Configuration .....................B-25 EFI Configuration .................B-26 Legacy Boot Device Configuration ............B-27 Exit Menu ...................................B-28 Introduction ...................................B-1 Main BIOS Setup ..........................B-3 Language .................................B-5 System Overview ....................B-4 System Time/System Date ......B-4 Power Configuration ...................B-23 Advanced CPU Control ........B-24 Security Configuration ................B-22 Starting the BIOS Setup Utility ....B-1 Navigating the Utility Screens B-2 C Circular Connectors ..................................A-1 13-Pin GBe Connector J11 .................A-7 19-Pin GBe Connectors J2 thru J6 ......A-3 26-Pin Multi I/O Connector J10 .........A-5 4-Pin Power Connector J1 ..................A-2 6-Pin 1553 Connector J8 .....................A-4 Themis Computer 6-Pin CANBus Connector J7 .............. A-4 6-Pin USB Connector J9 ..................... A-5 Configurations .......................................... 3-3 Configuring the NanoSWITCH™ ............ 2-2 Booting the NanoSWITCH™ ............. 2-3 Initial Configuration ........................... 2-6 NanoSWITCH™ Management Port ... 2-2 Connecting ................................................ 2-1 G General Specifications .............................. 1-6 Global Configuration Mode ...................... 2-5 GUI Interface, The .................................. 2-10 H How to Use This Manual ............................xv Cautions .............................................. xvii Intended Audience ............................... xvi Notes ................................................... xvii Sidebars ............................................... xvii Unpacking ............................................ xvi Warnings ............................................. xvii Website Information ..........................xviii I Instructions for Repackaging ................... D-3 Interface Configuration Modes ................. 2-5 Item Description ....................................... 3-1 O Overview ............................................1-1, 3-1 P Packaging and Shipping ............................ 1-6 Packaging Components ............................ D-2 Privileged EXEC Mode ............................ 2-5 Product Description .................................. 1-2 A Multi-Layer Switch ......................... 1-2 Layout and Indications ........................ 1-3 Index-3 NanoSWITCH™ User Manual Version 1.0 R Repackaging for Shipment ....................... D-1 Repackaging Instructions ......................... D-1 S Safety Instructions ...................................... iv Electrostatic Discharge (ESD) ...............iv Operation of Laser Source Devices .......iv Specifications ............................................ 1-6 Dimensions ......................................... 1-6 Relative Humidity ............................... 1-6 Shock .................................................. 1-6 Temperature ........................................ 1-6 Vibration ............................................. 1-6 U User EXEC Mode ..................................... 2-5 user privilege levels .................................. 2-4 W Website Information ............................... xviii Index-4 Themis Computer Place Stamp Here Themis Computer 47200 Bayside Parkway Fremont, CA 94538 Attn: Publications Department Fold here; tape at top to seal Reader Comment Card We welcome your comments and suggestions to help improve the NanoSWITCH™ User Manual. Please take time to let us know what you think about this manual. •Information provided in the manual was complete. Agree___ Disagree___ Not Applicable___ •Information was well documented and easy to follow. Agree___ Disagree___ Not Applicable___ •Information was easily accessible. Agree___ Disagree___ Not Applicable___ Disagree___ Not Applicable___ •The manual was useful. Agree___ • Please write down any comments you may have about this manual, including how it can be improved: ___________________________________________________________ ___________________________________________________________ ___________________________________________________________ ___________________________________________________________ ___________________________________________________________ ___________________________________________________________ ___________________________________________________________ ___________________________________________________________ ___________________________________________________________ Name: _____________________________________________________ Title: _____________________________________________________ Company: _____________________________________________________ Address: _____________________________________________________