1
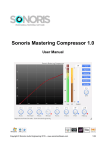
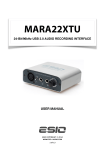
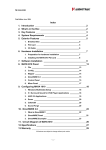
Waves C360° SurroundComp
Software Audio Processor
User’s Guide
Waves C360° software guide page 1 of 10
Introduction and Overview
Introducing Waves C360°, a Surround Soft Knee Compressor for 5 or 5.1
channels. C360°’s controls are the same as those of the L360° and the functions
are similar, but the sound is different. It begins attenuating before the level
reaches the threshold and attenuates more as the level reaches and passes the
threshold. The output signal will not exceed the specified ceiling, so it also
functions as a limiter and keeps the sound from digital clipping.
C360° supports operation at sample rates up to 96kHz.
BRIEF OVERVIEW
C360’s Compressor has a look-ahead mechanism (using 64 samples of delay) to
anticipate levels approaching the threshold, so in fact, its Attack time is negative.
It also incorporates Waves ARC – Auto Release Control. This technology sets
the optimal program-sensitive release time for the applied gain attenuation.
The C360° allows linked dynamics processing for preserving the cross-channel
balance and phantom imaging. It allows flexible link modes to fit right in with the
preferred grouping scheme that you wish to follow, or the one you think sounds
best. This is done on a single 5 or 5.1 Insert without the need to split to Multiple
stereo and mono groups. You get all the options on the same multichannel insert.
HOW DOES C360° WORK?
C360° is a soft-knee compressor that has an auto-makeup scheme. However low
you set your threshold, the gain is made up automatically. We call this Peak
reference compression. The Out Ceiling in this case defines peak output, though
the actual peak output will probably be lower than the Ceiling.
Any dynamics processor essentially “rides” the track’s gain automatically
according to a set of rules. In this case, the track’s gain will be attenuated as the
sound gets louder, allowing the overall gain to be boosted by the same amount
that the threshold is lowered. The result is that the dynamic range is compressed:
the lower passages get louder and the louder passages are relatively softer.
For example, the following image shows the compression curve for a single
channel. The left image shows a linear ascending level from –inf. to full scale and
the right shows the compressor’s effect when set to a –12dB threshold.
Waves C360° software guide page 2 of 10
C360° is useful when you have low-gain 5.1 material that needs to be boosted or
material with extreme dynamics that need to be tightened.
C360° PLUG-IN COMPONENTS.
The C360° Surround Compressor consists of components for 5 or 5.1 (6)
Channel Inserts. When working on a surround mix in a DAW environment, the
C360° should be listed in the insert menus of any 5 or 5.1 tracks, auxiliary inputs
and master fader tracks.
LINKED FUNCTION OF C360°.
C360° supports flexible and versatile linked functionality. Parameter linking is
easily carried out by using global threshold and ceiling controls. Dynamic process
linking is subject to a user-selected Link Mode, where certain channels are linked
to a common sidechain.
Parameter linking is important for the general settings. In this case, the user can
use a master threshold or master ceiling control to specify the same threshold or
ceiling value for all audio channels, assuring a common general makeup or level
maximization value. For example, specifying a common –6dB threshold and a
0dB ceiling to all channels will result in a general uniform 6dB boost.
Another type of link can be described as linked dynamics processing. In this
case, we link several channels to a common process sidechain. All of the
channels linked to a common sidechain will get the same gain attenuation when
the level in any of them exceeds the specified threshold. This type of link is
critical for the preservation of the cross-channel balance and direction of
phantom images. For example, in a stereo image, if we apply different
attenuation to the Left and Right channels, the Stereo image symmetry appears
distorted. The C360° offers up to 3 sidechains, which equal to 3 stereo
compressors. The Dynamics process link is user selected in the Link Mode
control right under the 3 attenuation meters. A straightforward color code helps
you keep track of which channels are linked to which sidechain.
For a detailed description of the dynamic process link modes, see Chapter 3 –
Link Modes in C360°.
Waves C360° software guide page 3 of 10
Using C360°
C360° has two main sections •
•
Threshold: Sets the peak reference point to which all compression will
relate. For example if you set the threshold to –6dB, the compressor will
begin attenuating when level gets around -12dB and then more and more.
Ceiling: Sets the output gain for the overall compression. Since the
compressor has auto makeup, the output may become louder than you
want. Use the Out Ceiling to set your desired output level.
As you take the threshold downward, the volume boost will be the most obvious
audible effect. Using the Master compression control the way we recommend in
the L360°, however, will not preserve the relative loudness and will instead
introduce a drop in the gain. The reason for this is that the soft knee response
begins attenuating long before the level reaches the threshold. The compression
effect of C360° is, however, more obvious than the limiting effect of the L360°,
and the goal is not necessarily to preserve transparency and gain loudness —so
listen carefully.
BASIC OPERATION
To operate C360°, insert it on the Multichannel track you wish to compress.
Begin to drag down the Master compression control and listen to the sound. The
overall track gain will be boosted as you take the threshold down. As the
threshold gets close to the level in any of the linked channels, attenuation will
occur. When you feel that your surround image is appropriately tight you can
leave the threshold and use the Output ceiling control to set the overall
compressor output to suite your balance with other sources.
If you are looking for a simple rule to follow, we recommend picking a louder
passage of the program and setting the threshold just 2dB below it. This recipe is
limited in its results but it’s sure to keep you in a safe setting range that won’t ruin
your audio. It may, however, present lighter compression than what you need or
want. Eventually you will have to trust your ears, which is always the
recommended way to go. Whatever sounds good, sounds good.
Waves C360° software guide page 4 of 10
Link Modes in C360°.
When we apply dynamics to a Stereo mix, we try to keep our stereo image stable
by applying the same gain attenuation to the left and right channels. For this
reason, we use a linked Dynamics process. The detector works on an L+R linked
sidechain and applies the same gain attenuation to both channels, preserving
their relative level and intended Stereo Image.
In Surround there are different approaches in the perception of the sound stage.
It may be regarded as a complete 360° sound field, while in other cases,
channels may be divided into sub stages. An example typical to Film post
production is to use the center speaker for direct dialog, the front L&R for general
soundtrack, and the back channels for sound effects and ambience. The
acronym for the LFE channel stands for Low Frequency Effects. The LFE in
today’s Home Theater electronics is typically played by a Subwoofer speaker,
which is generally used for reproduction of all Low frequencies in the program
redirected from the other channels by a Bass Management system.
C360° offers 5 Link Modes that let you use up to 3 separate sidechains. The
following section will describe the different link modes and the sound stage
disciplines they represent.
ALL LINKED
In this mode all channels are linked. As a result, you get uniform attenuation
preserving the whole surround image of the material, preserving even the
balance between the 5 main channels and the LFE channel. This link mode may
be preferred when re-mastering existing surround material, especially if
preservation of the complete mix balance is a defined goal.
5 LINKED | SUB
In this mode a separate sidechain is dedicated to the LFE or Subwoofer channel.
The sound stage is divided into the directional or main sound field consisting of
the 5 channels, and the Non-directional LFE channel. This will fully preserve the
direction of the surround image phantoms but it won’t introduce attenuation in
conjunction with high peaks in the LFE channel. For example, if you have a
soundtrack that introduces an earth-shattering kaboom, you don’t necessarily
want your whole 5 channel directional sound stage to duck its level. Surround
music production is a good application for this link mode.
FRONT | REAR | SUB
This mode uses all 3 sidechains. One sidechain for the front stage links the Left,
Center and Right channels, detecting and applying the same attenuation to all 3.
Another sidechain for the rear stage links the Rear Left and Rear Right channels,
Ls and Rs. The last sidechain goes to the Non-directional Subwoofer, or LFE
Waves C360° software guide page 5 of 10
channel. This mode can be useful in film soundtrack mastering when any
ambience and FX in the rear stage shouldn’t necessarily duck in conjunction with
Music or dialog events.
CENTER | QUAD | SUB
This mode uses all 3 sidechains. One for the Center channel independently: we
can consider this as the dialog sound stage. Another for the quad stage linking
Left, Right, Left surround, and Right surround to a common detection and
attenuation, fully preserving quadraphonic Phantom images. The last sidechain
goes to the Non-directional Subwoofer or LFE channel. This mode is again useful
in film soundtrack production where it is more critical to preserve the spatial
sound stage and leave maximum focus to dialog.
CENTER | FRONT LR | REAR (LFE IS BYPASSED)
This mode uses all 3 sidechains and leaves the Subwoofer or LFE channel idle
of processing. This mode makes the maximum split to different possible sound
stages. One is for the Center channel independently. We can consider this as the
dialog sound stage. Another is for the front Left and Right channels, or the front
stereo stage. The last sidechain goes to the Rear Left and Rear Right channels.
The Subwoofer output or LFE channel is also independent and is actually passed
through the C360° without being affected. We derived this link mode from the
track grouping routines of some surround mixing professionals setups, again in
the field of film soundtrack postproduction.
The default “All Linked (5ch)” and “All Linked | Sub”, are good places to start.
Then you can easily toggle between link modes to hear their sound.
LINK MODES, SIDECHAINS AND COLOR CODES.
C360° has up to 3 sidechains. This is equivalent in process power to 3 stereo
compressors. Each sidechain can detect level and apply gain attenuation to any
number of channels linked to it. To make it easier to know which channels are
linked to which sidechains we created a color code that will help you associate a
certain channel with its sidechain and attenuation meter at a glance.
In the Attenuation section, there are 3 attenuation meters – Yellow | Red | Blue.
Directly under the Attenuation meter is the Link Mode Selector control. The
selected link mode is displayed beneath the attenuation meters, listing the
Groups that are linked in their group color under the relating attenuation meter.
This meter also shows the attenuation for a certain group in its color. The
Threshold and Ceiling arrow controls will get their group’s team colors. So if you
are setting the threshold with a red arrow control, look for the red attenuation.
Controls with the same color will move together, linked in both control and
process.
Waves C360° software guide page 6 of 10
C360° Controls and Displays
THRESHOLD CONTROLS
Range: 0 to –48dB, default 0dB.
The Threshold is the peak reference point for the operation of the C360°
Compressor. Whenever the level in a certain channel approaches the specified
threshold, gain attenuation will be applied, thereby reducing the gain.
The Threshold controls are represented by little arrows next to a channel’s input
meter. Some channels will be grouped or linked to a common sidechain, the
Threshold controls are assigned a color by the sidechain they are linked to, in
conjunction with the selected Link Mode. Channels that are linked and have the
same color, will move together. It is not possible to define separate threshold
values to linked channels.
A Global Threshold control is located between the Threshold and Attenuation
meters showing an arrow directed toward the threshold section. This
control will move all the threshold controls at once, preserving any offsets
between the different linked groups. The range and value of this control is subject
to the actual Threshold controls. The highest and lowest threshold values set
boundaries for the control of the Global Threshold, so if you have one threshold
at 0dB and another at –48dB, the Global Threshold control will not make any
adjustment.
Waves C360° software guide page 7 of 10
CEILING CONTROLS
In the Output or Ceiling section, each channel has a meter and beside the meter,
an arrow control that sets and indicates the Ceiling or maximum peak value for
that channel and other channels linked to the same sidechain. The Ceiling
controls behave exactly the same as the Threshold controls.
Range: 0 to –48dB, default 0dB.
A Global Ceiling control is located between the Attenuation and Ceiling meters. It
shows an arrow pointing toward the Ceiling section -
.
This control will move all the Ceiling controls simultaneously, preserving any
existing offsets and bounded by the highest and lowest threshold values.
GLOBAL COMPRESSOR CONTROL –
The Global Compressor control is located under both the Global Ceiling and the
Global Threshold controls.
This control will move all Threshold controls and all Ceiling controls,
simultaneously preserving all current offsets with the highest and lowest
Threshold or Ceiling values bounding its effective range.
LINK MODE SELECTOR
The Link Mode Selector allows the selection of one of five available link modes. It
is located directly under the Attenuation meters section. A Link Mode defines
which channels are linked to which side chain. Selecting a certain link mode will
also affect the colors of the Threshold and Ceiling controls which will change to
the appropriate group color of the related sidechain. To better understand Link
Modes, read section 3— Link Modes in C360°.
Waves C360° software guide page 8 of 10
DITHER
On/Off – default on.
The Dither adds low level random noise and forces any quantization error noise
to become part of the dither noise. It is used to get the highest perceived
resolution when taking the 48-bit double-precision process back to 24-bit.
INPUT METERS
The input meters are the ones in the Threshold section. The Threshold arrow
controls were placed beside the meter for easy adjustment of the threshold value
in conjunction with the level in the related channel. Below the Input Meters are
peak indicators that show the peak level; they can be reset by clicking on them.
Input meters show 0 to –60dBfs.
OUTPUT METERS
The Output meters are the meters in the Ceiling section. The Ceiling arrow
controls were placed next to their associated output meters for easy adjustment
of the output peak value. Below the Output Meters are peak indicators that show
Waves C360° software guide page 9 of 10
the peak level for the related channel; they can be reset by clicking on them.
Output meters show 0 to –60dBfs.
ATTENUATION METERS
The 3 attenuation meters show the gain attenuation for each of the 3 possible
sidechains according to the selected Link Mode. Attenuation will show only for
active sidechains whenever the level in one or more of the channels linked to it
exceeds the specified Threshold. Above the Attenuation meters there are
numeric peak attenuation indicators. These will show the maximum attenuation
applied to a certain group until reset by clicking on it. The meter can show down
to 30dB of attenuation.
Waves C360° software guide page 10 of 10