1
ThinFax 336E
Data Traveler 336E
User’s Manual
Revision 1.0
Copyright 81997
EXP Computer, Inc.and EXP Memory Products.
All right reserved.
1.0 Edition, August, 1997
No part of this publication may be reproduced, stored in a retrieval system or
transmitted in any form or by any means, mechanically, electronically,
photocopying, or recording without the prior written consent of EXP Computer
Inc. and EXP Memory Products.
All trademarks and registered trademarks are of their respective companies.
The information in this publication has been carefully checked and is believed to be accurate as of its publication date. EXP
will not be held responsible for any inadvertent errors. All information in this publication is subject to change without notice.
EXP Computer, Inc.
141 Eileen Way
Syosset, NY 11791
USA
TEL: (516) 496-7629
FAX: (516) 496-2914
BBS: (516) 496-3753
EXP Memory Products.
12-C Mauchly
Irvine, CA 92718
USA
TEL: (714) 453-1020
FAX: (714) 453-1319
INTERNET:www.expnet.com
TABLE OF CONTENTS (Cont.)
TABLE OF CONTENTS
Copyright and Trademark information ................................................. iv
Program License Agreement ............................................................... viii
Warranty Information............................................................................ ix
1
INTRODUCTION
Features ...........................................................................................1
2
INSTALLATION
System Requirements......................................................................3
Hardware Installation .......................................................................3
Verification ........................................................................................5
Testing the Modem ..........................................................................7
3
USING THE THINFAX ON A NOTEBOOK COMPUTER
Windows 95 ....................................................................................10
Enable 32bit Card Support for Windows 95..................................13
DOS and Windows 3.xx .................................................................15
Hardware Installation .....................................................................15
FCC Compliance Statements
FCC Part 68....................................................................................................
FCC Part 15....................................................................................................
EXP Computer, Inc.
EXP Memory Products.
Program License Agreement
EXP Computer, Inc.
EXP Memory Products.
Non-transferable Limited Warranty
READ THE FOLLOWING TERMS AND CONDITIONS CAREFULLY BEFORE
OPENING THE PACKAGE OR OPERATING THE EQUIPMENT. BY
OPENING THE PACKAGE OR OPERATING THE EQUIPMENT INDICATES
YOUR ACCEPTANCE OF THESE TERMS AND CONDITIONS. IN THE
EVENT THAT YOU DO NOT AGREE TO THESE TERMS AND
CONDITIONS, PLEASE RETURN THE PACKAGE UNOPENED. YOUR
MONEY WILL BE REFUNDED.
LICENSE
EXP Computer Inc., and EXP Memory Products ("EXP") warrant that the
Products manufactured or distributed by EXP to be free from failures due to
defects in materials or workmanship for the three years of the products.
This warranty is void if the Product is damaged by abnormal or improper use
or by accident, abuse or if any attempt to repair or modify the Product without
authorization from EXP. Your sales receipt or invoice, showing the date of
purchase and the name of the Authorized EXP Reseller, is your proof of the
date of purchase. During the warranty period, EXP will at its option, replace or
repair, at no charge, the Product that in its opinion is defective.
This program may be used on a single computer. The program may be
copied to any machine-readable for backup purposes to support your use of
the program on a single computer.
YOU MAY NOT USE, COPY, MODIFY, OR TRANSFER THE PROGRAM, OR
ANY COPY, MODIFICATION OR MERGED PORTION OF THE PROGRAM,
IN WHOLE OR IN PART, EXCEPT AS EXPRESSLY PROVIDED FOR IN
THIS LICENSE. IF YOU TRANSFER POSSESSION OF ANY COPY,
MODIFICATION OR MERGED PORTION OF THE PROGRAM TO ANOTHER
PARTY, YOUR LICENSE IS AUTOMATICALLY TERMINATED.
Before you return the failed Products, contact EXP. You must obtain a Return
Merchandise Authorization (RMA) number by calling EXP Computer Inc. at
(516) 496-7629. The RMA number should be displayed on the outside of the
returned package and on the accompanying packing list. EXP cannot be held
responsible for any package returned without the RMA number. You are
responsible for packaging, providing proof of the date of purchase and the
shipping cost of the failed product to EXP Computer, Inc. You are responsible
for mailing the Warranty Registration Card. The warranty claims may not be
honored if there is no corresponding registration card on file at EXP.
LIMITATION OF LIABILITY
IN NO EVENT, WILL EXP BE LIABLE FOR ANY DIRECT, INDIRECT,
SPECIAL, INCIDENTAL OR CONSEQUENTIAL DAMAGE, INCLUDING LOSS
OF PROFIT, LOSS OF SAVINGS; OR ANY OTHER DAMAGES CAUSED BY
PRODUCT OR FAILURE OF THE PRODUCT TO PERFORM.
IN NO EVENT WILL EXP BE LIABLE FOR ANY DIRECT, INDIRECT,
SPECIAL, INCIDENTAL, OR CONSEQUENTIAL DAMAGES, INCLUDING
LOSS OF PROFIT, LOSS OF SAVINGS, OR ANY OTHER DAMAGES
CAUSED BY PRODUCT OR FAILURE OF THE PRODUCT TO PERFORM.
This limitation of liability applies even if EXP has been advised of the possibility
of such damages. Some states do not allow the exclusion or limitation in
incidental or consequential damages, so the above exclusion or limitation may
not apply to you.
This limitation of liability applies even if EXP has been advised of the possibility
of such damages. Some states do not allow the exclusion or limitation in
incidental or consequential damages, so the above exclusion or limitation may
not apply to you.
1
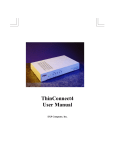
Package Contents
1.
2.
3.
4.
INTRODUCTION
Thank you and welcome to our next generation of the ThinFax modem card for
WINDOWS CE H/PC. This User's Manual explains in detail how to install, and how to
operate the ThinFax modem cards. The following product is covered in this manual:
ThinFax 336E
Data Traveler 336E
(Data/Fax Modem)
(ThinFax name will be used on this manual)
ThinFax cards has a maximum speed of 33,600 bps. The ThinFax 336E has an external
battery pack. The battery pack supplies necessary power to operate the card at high
speed with out any burden to the Windows CE H/PC main battery. The following item
are included in this package.
The ThinFax 336E PC Card.
External battery pack. (battery not included)
Telephone interface cable with RJ-11 Jack
This User’s manual
If any of these items is missing, please notify your dealer.
ThinFax 336E can also be used with a standard notebook computer equipped
with a PC Card (PCMCIA 2.10) slot. Users need a set of PC Card (PCMCIA 2.10)
device driver(s) with DOS-Based or WINDOWS-Based software to utilize Data/Fax
function.
FEATURES
‘
‘
‘
‘
‘
‘
‘
‘
‘
The external battery pack for extending use of the card. Requires two AA size
battery (not included)
PC Card (PCMCIA 2.10) Type II Card size, 54.0 mm x 85.6 mm x 5.0 mm
Data speed up to 33,600 bps
Data mode protocols:
CCITT
V.34, V.32bis, V.32, V.22bis, V.22, and V.21
Bell
103 and 212A
Error correction:
V.42, MNP 2-4
Data compression:
V.42bis, MNP5
Send and receive Fax speed up to 14,400 bps.
Fax mode protocols:
CCITT
V.17, V.29, V.27ter, and V.21 Ch. 2
EIA/TIA 578
Class 1, Class 2
Fax Group III compatible.
Automatic power save mode
Why should you use the battery pack?
Figure 1 Package Contents
A simple answer is the battery pack allows you to operate the ThinFax 336E
card longer than other manufacturer’s PC Cards. The current modem operation requires
high-speed connection which will drain the main battery in your Windows CE HP/C
without a backup battery source. Some of the HP/C also hve a limited current supply
through its PC Card slot, the battery pack will help you to over come the limitations.
2
Inserting the Card
Hold the card with the EXP logo on the top. Slide the card into the slot located at a side
of the WINDOWS CE H/PC. (See Figure 2)
INSTALLATION
This section contains information that you need to install a ThinFax 336E for
the WINDOWS CE H/PC, including how to insert and remove the card and how to test
the modem's installation with Terminal program.
Note1:
To prolong the WINDOWS CE H/PC 's battery life, the following
procedure should be observed:
If possible, use an AC Adapter whenever the ThinFax modem card is
plugged into the WINDOWS CE H/PC.
Use the external battery pack, if you plan to use the card for extended
period while on the H/PC’s battery power.
Figure 2 PC Card slot location
Removing the Card
SYSTEM REQUIREMENTS
Close all applications that have open file on the card. Turn off the HPC. Push the eject
button which is usually located on one side of the PC Card slot.
Most of the Windows CE H/PC have a limited current supply to the PC Card slot. This
limitation may vary among different manufacturers. Thus, we recommend using the
ThinFax card with the external battery pack attached.
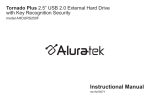
Connecting the ThinFax 336E parts together
The following figure illustrate how to connect all the ThinFax 336 components
Hardware Installation
Note:
Do not insert or remove the PCMCIA card when the WINDOWS CE H/PC
power is on. The illustration shows a typical PC Card slot location. Check
your H/PC users manual for more detail.
together.
Figure 3 ThinFax Components
Installing batteries
Tap on the “system” Icon. The System Properties, PC Card Category should have the
ThinFax 336E listed.
The external battery pack requires two AA size batteries. These batteries will
supply the necessary current needed by the ThinFax 336 series card. You may also use
Ni-Cad rechargeable batteries, which have a shorter service life. Neither the
rechargeable batteries nor charger is providing with this package. Figure 4.
Figure 6 System Properties
If you did not see the ThinFax 336E card, turn off the H/PC and reseat the card to make
sure it is fully inserted.
Figure 4 Battery Pack
Verification
ThinFax 336E
There is no software installation needed for this card. Windows CE has a built-in
device driver to support a Data/Fax modem. Tap on “My Handheld PC”, “Control
Panel”. The Control Panel appears as below.
Figure 5 Control Panel
Testing the Modem
Tap on the Terminal icon.
ThinFax 336E
This section provides information on how to verify the modem functionality using
the built-in Terminal program in Windows CE H/PC.
NOTE:
What type of telephone line is yours? Analog or Digital?
Check your telephone line, as the ThinFax 336 can be connected to an ANALOG Line
ONLY! (Normal house-hold line)
Figure 8 Communication Folder
On the Terminal screen, tap on Make a New Connection. Figure 9
Terminal program
Figure 9 Terminal
To start the Terminal you need to tap on My Handheld PC, then Program Files, and then
Communication. The H/PC should show the following screens.
In the Session Properties, in the Select a Modem pull-down menu should show the
ThinFax 336E modem. Figure 10
Figure 7 Program Files
Figure 10 Select a Modem (ThinFax 336)
Testing the Modem (Cont.)
3
Enter the Area code and the telephone number of your ISP or any local BBS.
As soon as you press the Enter key, the modem will attempt to make a connection
to a remote modem. You can also use the Pocket Internet Explorer to test the modem’s
operation. For more details of how to use these programs, please see the Microsoft
Handheld PC User’s Guide.
Using the ThinFax 336E in a Notebook Computer
Windows 95
The PCMCIA modem is a Windows 95 compatible product. It is installed as Plug-NPlay peripheral. A device driver for the modem is not required.
INSTALLING THE MODEM CARD
1. Start Windows 95 and insert the modem into PC Card (PCMCIA) slot. Check your
computer User’s manual for the slot location.
2. Windows 95 should respond with “New Hardware Found” window.
3. Select “Driver from disk provided by hardware manufacturer”, and insert the device
driver diskette, Windows 95 will try to locate the modem’s driver from the floppy
drive automatically. Select the EXP 33600 Fax-Data PCMCIA Modem. The system
will beep when the finishing installation procedures.
CHECKING YOUR MODEM INSTALLATION
After installation, you may wish to check if the computer recognized the
modem and the assigned COM port.
Click on Start => Settings => Control Panel => Modem => Diagnostics tab.
Locate the modem’ s COM port then highlight it. Click on ‘More Info... button.
IF SOMETHING GOES WRONG
After you inserted the card and there is no “New Hardware Found” window
prompt or there is no information about the modem. Then, please check the PCMCIA
Socket support. The 32-Bit Card support may not be enabled or working properly.
Then, follow the instructions for enabling the Socket support.
Windows 95 will try to communicate with the modem. The More Info... window
appears with all the modem identification information.
The modem is installed properly and ready to use. If you have a program that requires a
modem, please check your COM port setting. Match the COM port and the IRQ
(Interrupt Request) setting for the modem in the ‘More Info.. window.
ENABLING 32-BIT CARD SUPPORT OF Windows 95
Your system should be ready for PCMCIA socket support prior to operating the
ThinFax card. To check whether your computer is PCMCIA Socket supported, first,
double-click on the “System” icon from the “Control Panel” folder (you can select the
“Control Panel” under “Settings” from the “Start” menu to open the “Control Panel”
folder).
Click on the Device Manager Tab. If “PCMCIA Socket” is found with a cross (X) sign
next to the PCMCIA Controller as show above, it means the PCMCIA device driver is
not using 32-Bit Card Support. The socket(s) is not function properly. There should be
only one such line displayed.
In this case, double click on the PCMCIA Controller, and a dialog box will be displayed
as below. Please place a check mark next to the current configuration of Device usage
box, then select OK.
After the PCMCIA 32-Bit Card support is installed, Windows will ask you to reboot
your computer. Then you should repeat the installation procedures.
If the PCMCIA Socket is not found, then you must add a PCMCIA socket to your
system. Please click on the “Add New Hardware” icon in the Control Panel folder and
select “PCMCIA socket”. Select the appropriate type of PCMCIA Controller that
matches with yours and follow the on-screen instructions.
DOS and Windows 3.XX
SYSTEM REQUIREMENT
PC Card (PCMCIA 2.10) Device Driver:
Most of the notebook computer manufacturers supply their own device driver
program to operate the PC Card (PCMCIA) slot on their computers. If your
computer comes with the device driver to support PC Card (PCMCIA) slot
(i.e., Socket Service, Card Service, Card Installation Client, CardID, Cardtalk
etc.), you need to use the device driver to operate the ThinFax card. If the
computer did not come with any device driver, you should call the
manufacturer for the device driver.
4.
5.
6.
PC Card Type II or Type III slot(s)
The ThinFax is a Type II card (5 mm thickness). Check your computer PC
Card slot.
Hardware Installation
1.
2.
3.
Locate the PC Card (PCMCIA) slot, which is usually on one side of
the computer. Some PC Card (PCMCIA) systems allow "hot
insertion" (inserting the card while PC power still on).
Consult your computer User's manual for details.
If you are in doubt, turn the power off when inserting the card.
Align the modem card with the arrow sign pointing toward the
computer's slot. (Please note that the card is keyed to guide the
proper installation.)
Slowly insert the modem card into the slot and press firmly until the
modem =s connector is seated.
Insert the modem =s cable into the card.
Connect the RJ-11 connector to a working telephone line. (If you are
not planing to use the modem at this time, you may skip this step.)
You are now ready to use the modem.
FCC COMPLIANCE STATEMENTS
FCC Part 15
FCC Part 68
This equipment complies with Part 68 of FCC rules. On the Fax/Data modem there is a label
that contains, among other information, the FCC registration number and Ringer Equivalence
Number (REN) for the equipment. If requested, please provide this information to your telephone
company.
The REN is useful to determine the maximum number of devices may be able to ring when your
number is called. In most, but not all areas, the sum of the RENs of all devices should not exceed
five (5.0). To be certain of the number of the devices you may connect to your line, please call your
local telephone company.
This equipment has been tested and found to comply with the limits for a Class B digital
device, pursuant to Part 15 of the FCC Rules. These limits are designed to provide reasonable
protection against harmful interference in a residential installation. This equipment generates, uses
and can radiate radio frequency energy and, if not installed and used in accordance with the
instructions, may cause harmful interference to radio communications. However, there is no
guarantee that interference will not occur in a particular installation. If this equipment does cause
harmful interference to radio or television reception, which can be determined by turning the
equipment off and on, the user is encouraged to try to correct the interference by one or more of the
following measures:
If your Fax/Data Modem is seemed to cause harm to the telephone network, your telephone
company may discontinue your service temporarily. If possible, they will notify you in advance. But if
advance notice isn't practical, you will be notified as soon as possible. You will be advised of your
right to file a complaint with the FCC.
Reorient or relocate the receiving antenna.
Increase the distance between the equipment and receiver.
Connect the equipment into an outlet on a circuit different from that to which the receiver is
connected.
Consult the dealer or an experienced radio/TV technician for help.
Your telephone company may make changes in its facilities, equipment, operation, or procedures
that could affect the proper operation of your equipment. If they do, you will be given advance notice
so as to give you an opportunity to maintain uninterrupted service.
CAUTION: CHANGE OR MODIFICATIONS NOT EXPRESSLY APPROVED BY PARTY
RESPONSIBLE FOR COMPLIANCE COULD VOID THE USER'S AUTHORITY TO OPERATE
THE EQUIPMENT.
If you experience trouble with the Fax/Data Modem, please contact your dealer for repair/warranty
information. The telephone company may ask you to disconnect this equipment from the network
until the problem has been corrected or you are sure that the equipment is not malfunctioning.
There are no repaired that can be made by the customer to the Fax/Data Modem. All repairs need to
be made by Modem manufacture.
This equipment may not used on coin service provided by the telephone company. Connection to
party lines is subject to state tariffs. (Contact you state public utility commission or corporation
commission for information).
CONSUMER INFORMATION AND FCC REQUIREMENTS
The Telephone Consumer Protection Act of 1991 makes it unlawful for any person to use a
computer or other electronic device to send any message via a telephone fax machine unless such
message clearly contains in a margin at the top or bottom of each transmitted page or on the first
page of the transmission, the date and time it is sent and an identification of the business or other
entity, or other individual sending the message and the telephone number of the sending machine or
such business, other entity, or individual.
In order to program this information into your fax machine, you should complete the following steps:
(1) Under your Windows environment, go through Main-Control Panel-Date/Time to enter
the date and time information.
(2) Go to the Cover Page Setup section of your Fax software. Enter information about you
and your company for the fax page headers and click the OK button when all of the
information are completed.
Your Fax software will generate the required headers on the fax page according to the
information entered in the Cover Page Setup. If you need to know more detail about how
to use the setup, please consult the Cover Page Setup section of your Fax software
Users Guide.