1
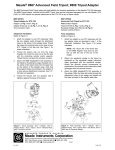
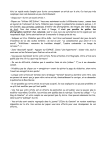
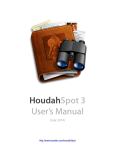
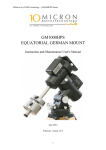
Olivon AZ Mount User Manual
Important Safety Note: DO NOT observe the sun with your telescope. Serious and
permanent damage to the observer’s eye may result.
Olivon AZ Mount User Manual
Assembly Instructions
A. Tripod Setup
1. Mount Installation:
Using the provided screws, attached the three tripod legs to the connection flanges on the
altazimuth mount, then secure the screws with the provided wing nuts.
2. Tripod Height Adjustment:
For all three tripod legs, extend the tripod legs by loosening the locking screws on the tripod legs
and pulling the lower leg sections outward, then tighten the locking screws to secure the position
of the lower leg sections.
Now spread the tripod legs and stand the tripod on even ground, so you can adjust the height of
each leg as required.
3. Accessory Tray Installation:
Fasten the accessory tray to the center brace of the tripod using the provided screws. Please do
not ignore this step as the tray not only provides you with the convenience of holding small
accessories but also adds stability to the tripod.
B. AZ Mount Setup
Elevation Adjustment Control And Telescope Tube Installation:
1. Slide Elevation Adjustment Control though the hole of the bolt on the side of AZ mount.
2. Place the telescope tube into the AZ fork mount, and align the threaded studs on the
telescope’s side with the slot near the top of the fork mount.
3. Using the two black thumbscrews, fasten the aligned parts mentioned in step 2.
4. Lastly use the small locking screw to secure the Elevation Adjustment Control to the
telescope’s threaded hole by the fastened parts mentioned in step 3.
C. Finder Scope/Red Dot Finder Installation
1. Remove the pair of nuts on the top of telescope near the eyepiece to expose the two bolts.
2. Align the holes on the base plate of your finder scope/red dot finder with the exposed bolt,
facing in the same direction as the main telescope.
3. Fasten the nuts removed in step 1 back to the exposed bolts, and secure the finder scope/
red dot finder.
Olivon AZ Mount User Manual
D. Eyepiece Installation
1. Remove the black dust cap on the focuser
2. Loosen the knurled screws
3. For Newtonian Telescopes:
Insert the eyepiece, then tighten the knurled screws to secure your eyepiece.
For Refraction Telescopes:
Insert the diagonal prism into the focuser first, tighten the knurled screws to secure the
prism. Then insert the eyepiece into the diagonal prism and secure it.
Telescope How-To’s
A. Aligning the Finder Scope to Main Telescope
An accurately aligned finder scope assists you in locating celestial objects quickly
We recommend performing the following procedure in daylight
1. Point your main telescope to a sharp object (example, church steeple, treetop, or telephone
pole) about 1 mile away, and accurately center the object on your telescope’s field of view.
2. Now look through the finder scope. Using the three side adjustment screws, accurately
center your target to the crosshairs in the finder scope.
3. Verify again that the same target is centered on both your finder scope and your main
telescope.
B. Aligning the Red Dot Finder
An accurately aligned red dot helps locate your target celestial object quickly in your view
We recommend performing the following procedure in daylight
1. Remove the plastic strip on the battery.
2. Turn on the Red Dot Finder by turning the small screw on the side. Adjust the brightness
of the Red Dot by turning the same screw.
3. Point your main telescope to a sharp object (for example, peak of a church, or top of a
tree) 1-2 km away, and accurately center the object on your telescope’s field of view.
4. Using the azimuth adjuster at the front end and the height adjuster at the rear end to point
accurately at your target.
5. Verify again that the same target is centered on the Red Dot Finder window and your main
telescope.
Olivon AZ Mount User Manual
C. Using the AZ-1 and AZ-2 Mounts
C1. Targeting a Celestial Object
1. Loosen the screw (located just under the fork mount) for the azimuth adjustment, which
controls the horizontal movement.
2. Keeping hold of the telescope tube with your hand, carefully loosen the locking screw on
the elevation rod (located on the side of the mount). Now your telescope is free to move
both vertically and horizontally.
3. Point the telescope to the approximate direction of your target celestial object, then use the
finder scope to point the telescope more accurately to your target. Now lock the elevation
rod screw.
4. Using the fine elevation adjustment control (flat screw) on the elevation rod which allows
you to tilt the telescope slightly, make the final adjustments so your target is centered on
the field of view of the eyepiece.
C2. Tracking the Targeted Celestial Object (“Guiding the Telescope”)
Before proceeding please read the above section on how to target a celestial object
1. The azimuth axis should remain unlocked during guiding if you followed section C1, so
simply push the telescope tube to change its position to follow your target.
2. However, as celestial objects move in an arc, therefore to keep your target centered, you
will also need to use the fine elevation adjustment control as required.
3. Guiding requires a little practice. With a little time you will be able to track your target
quickly and accurately.
C3. Focusing the View And Increasing Magnification
1. Center the object on your field of view
2. While looking through the eyepiece in the focuser, slowly turn the focus wheel until the
image is at the sharpest.
We recommend choosing the eyepiece with the least power to assist in focusing and locating
the celestial object easier. Once you have the object centered and focused, change the
eyepiece to increase the magnification. Refocusing will be required.
Enjoy the Views
&
Thank you for choosing Olivon
Olivon AZ Mount User Manual