1
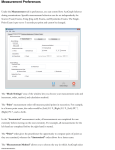
Patients
The “Patients” icon provides access to records for all the patients you have entered in
AcuGraph. By default, this screen opens to the Secure Mode. In this mode, no
personally identifiable patient information is shown, in compliance with HIPAA
regulations.
To switch to Open Mode and see all patient information, click on the “Show All” icon.
When you do so, you will see a warning informing you that your full patient list will now
be visible. You should only use this feature when your monitor is out of view of
any unauthorized persons.
To re-enter Secure Mode at any time, simply click the “Hide All” icon.
In Secure Mode, you can locate any specific patient by typing the patient’s name or ID
number in the search box. As you type the characters of the patient’s first or last name,
the search list will be narrowed and the number of patients found will decrease until
there is only one patient remaining. This patient’s name will then be shown.
If the patient’s first or last name alone is not sufficient to narrow the list to only one
patient, type a space and then the patient’s other name. You may type first, last or last,
first as long as you remember to separate the names with a space.
For example, let’s assume you are searching for a patient named David Rice. If you have
only one patient named David, typing the name “David” in the search box will display
David Rice. If you have more than one patient named David, you will have to type
David Rice. Similarly, you could type Rice David. Either entry will locate the correct
patient. Clicking on the X button to the right of the search box will clear the existing
search and the number of patients found will be reset to the number in the full list.
In Open Mode, the complete patient list is shown. Patients are listed by last name in
alphabetical order.
In Open Mode, you can quickly locate the patient you want in one of the following
three ways:
1. Scrolling: To locate an existing patient, use the scroll arrows to scroll through the
list of patients and click on the one you want to select.
2. Searching: A faster way to locate a patient is to simply begin typing the patient's
first or last name in the “Search” field. The list of names matching the letters you
type will automatically be produced as you type the letters of the name. Using this
feature, even with a database of thousands of patients, you can locate any specific
patient in a second or two. If you type two names, separate them with a space.
You may type first, last or last, first.
3. Sorting: You may also select patients by sorting your patient list. You may sort by
Last Name, First Name, Middle Name, Date of Birth, Date of Last Exam,
Number of Exams, ID Number, or Custom field. To sort by any of these
attributes, simply click on the column heading of the column you wish to use for
the sort.
Note that when you click on a column heading, a small arrowhead appears in the
heading. Clicking on the same heading again reverses the direction in which the arrow
points. When the arrow is pointing up, the items are sorted in alphabetical order (in the
case of names) and in descending order (in the case of dates.) Reversing the arrow's
direction reverses the direction of sort.
The “Add New Patient” icon opens the “Add New Patient” window, where you can
enter information about a patient who has not yet been added to the database.
Enter a new patient by performing the following steps:
1. Enter the patient’s name in the indicated fields. Use the “Tab” key to move
between fields.
2. Enter the patient’s date of birth in the format shown. The date of birth is used to
distinguish between different patients with the same name.
3. Enter the patient’s gender. The gender controls the gender of the illustrations that
will be used during the exam.
4. All the fields marked with an asterisk (*) must be entered. All other fields in the
Add New Patient window are optional.
5. When you have completed data entry for the new patient, choose “Add New
Patient and Begin Exam” to begin an exam on this patient directly, or “Add New
Patient and View Patient List” to return to the Patients tab with the new patient
selected.
The “Edit Patient” icon opens the “Edit Patient” window, where you can change
information about a patient who is already in the database.
Deleting Patients: Once a patient has been entered into the AcuGraph database, the
patient will remain in the database and cannot be removed or deleted. Similarly, exam
records cannot be deleted. This is to protect the integrity of your records.
If you wish to exclude a patient from appearing in patient lists or searches, simply
remove the check mark from the “Patient is Active” check box (in the “Edit Patient”
screen). This will change the patient to inactive status, and the patient will no longer be
shown in the patient listings.
To view patient records that have been marked inactive, go to the “General” tab of the
Preferences window and select “Show Inactive Patients.”
The “Last Graph” icon is a convenient, one-click way to display the last exam for the
selected patient without the need to select the exam from the list.
If you double click the selected patient or push the “Enter” key, a new exam for that
patient will automatically open. You can also start a new exam by clicking the “New
Exam” icon.
The “New Note” icon opens a window where the user may record notes relevant to the
patient’s case. This is a useful place to record symptoms, progress, treatment method,
etc. The first part of each note recorded will appear next to its associated graph in the
records list. Notes may be recorded in any length and contain any text you choose. You
may also paste text into the notes window from another application.
The “Insert Template” pull-down menu inserts a pre-formatted template in your note.
This is useful if you have a typical notes template you usually use, such as the S. O. A. P.
note format. You can add new custom templates to this menu in the “Notes” window of
the “Preferences” section.
Once you have selected a patient, a list of that patient’s exam records appears in the
bottom half of the Patients screen. You may select one or more exams by clicking to
highlight them in the list. If you select one exam, you may view it by clicking the “View
Graph” icon.
If you have selected more than one exam in the list, view them by clicking the
“Compare” icon.