1
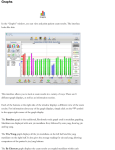
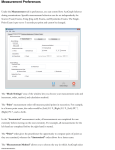
Exam
To perform an exam, begin by selecting which type of exam you wish to perform. The
exam type will always default to the last exam type you selected.
Your exam type choices are Source (Yuan) Points, Jing-well Points, Ryodoraku Points,
and Single Point. A description of each follows:
Source (Yuan) points are the most energetically active points on the channels, with 4-6
times more energetic activity than other points. These points are most associated with
the internal organs and with the general energetic state of the channels. Source point
graphs tend to show greater variability than Jing well graphs, and therefore tend to
manifest imbalances more readily than Jing well graphs.
Tsing (Jing-well) points are the beginning and ending points of the 12 main meridians,
and are the connection points between the main channels and the tendino-musculo
branches. These points were used more than 50 years ago by Kobei Akabane to measure
meridian energetics using the novel approach of counting the number of strokes of
burning wood across the point required to produce the sensory perception of heat. For
this reason, these points are sometimes referred to as “Akabane Points.”
Since then, these methods were adapted to electronic measurement, with good results.
Jing well graphs measure the general energetic balance of the meridians, as do Source
point graphs. The Jing well points, because they are the connections to the tendinomusculo branches, may tend to reveal imbalances associated with musculoskeletal
complaints, as well as more chronic conditions. Jing well graphs do not show as much
variability as Source point graphs, but the variability they show is clinically important. If
the Jing well points show imbalances, these must be substantially corrected before the
Source point imbalances can be successfully addressed. Therefore, it is a good idea to, at
least initially, take both types of measurements on patients.
Ryodoraku examination is generally used in Japanese Ryodoraku acupuncture, as
pioneered by Yoshio Nakatani, MD, PhD in the early 1950’s. This exam uses Source
points for 8 of the 12 meridians, but uses other points for the Small Intestine, Large
Intestine, Kidney and Bladder meridians. These are the points Dr. Nakatani originally
incorporated into his method. This exam is for those wishing to perform traditional
Japanese Ryodoraku Acupuncture. For more information about Dr. Nakatani and the
development of Ryodoraku acupuncture, please visit the AcuGraph website at
www.acugraph.com.
Single Point Exam: This exam is designed for the repeated measurement of a single
acupuncture point to assess skin resistance responses to various stimuli. At the
completion of each measurement, a dot is placed on the graph with the measured value
plotted. Subsequent measurements are then plotted and connected to show the relative
change in the readings (see illustration, below.) This exam does not produce any record
that is saved in the software.
Screening Mode: This optional feature is available to those users who have purchased
the AcuGraph Screening Module add on. When the “Screening Mode” icon is active, the
exam only requires measurement of the hands. The purpose of this feature is to allow
rapid and comfortable screening without the need for the patient to remove his or her
shoes. Because the screening exam is not a complete exam, treatment information is not
available for this exam.
The screening exam may be used to print the AcuGraph Screening Report—a very
useful report for public screening and practice-marketing events. To purchase the
AcuGraph Screening Module, please contact your AcuGraph distributor.
Speaking Exam: The AcuGraph software provides audio direction during an exam so
the user can focus on the patient without the need to continually look at the computer
screen. The voice prompts during the exam speak the name of the point to be measured
next. The volume level of the voice prompts and the probe tones can be set with the
sliders on the exam screen.
Skin Tone: The AcuGraph software allows you to choose the skin tone of the pictures
shown during the exam. To select between light and dark skin tone, visit the
"Measurement" tab of the Preferences section.
Performing an exam is quite easy and straightforward. The following tips will
help you perform exams quickly and accurately:
Probe Tip: Insert a cut cotton swab in the probe end so that the cotton of the swab
makes good contact with the metal of the probe tip. Standard cotton swabs are generally
readily available at drug stores and medical supply companies. We also offer pre-cut
swab tips on our website at www.acugraph.com.
Moisture: Moisten the cotton generously with water or saline solution, and shake off
any excess. An easy way to do this is to keep a small spray bottle near your AcuGraph
unit to occasionally spray the probe tip during exams. You may wish to lightly tap the
moistened probe once on a towel to remove excess moisture after moistening the tip.
The probe tip should be damp enough to leave a small moist spot on the patient's skin,
but not wet enough to drip or run. Be careful to not get any other part of your
AcuGraph unit wet. Do not use distilled water to wet the probe tip. Standard tap water,
mineral water, or saline solution are all acceptable choices.
For best results you should re-wet the probe tip after completing about 12 readings. A
convenient time to re-wet the probe is when moving from reading the hands to reading
the feet.
Hand Mass: Have the patient hold the hand mass with a medium grip in one hand. The
hand selected is not important, and may be changed for convenience. A tight grip is not
necessary. In the case of a Tsing (Jing-well) point exam, have the patient hold the hand
mass in the hand opposite the hand being examined.
Point Location: Be consistent in your point locations. Use the same point and same
landmarks on the left side that you used on the right side. This may sound obvious, but
careless point location is the number one cause of erroneous readings. A difference of
just a few millimeters can change the reading significantly.
Training Mode: If you are unsure of proper point location, or unable to duplicate
consistent readings on the same patient, try using the Training Mode of measurement.
This feature is activated in the “Measurement” window of the “Preferences” section.
When the Training Mode is active, each measurement consists of the following two
steps:
1. Locate the point precisely: Contact the patient’s skin with the probe in the
vicinity of the acupoint to be measured. Slowly slide the probe across the skin
until a sharp increase in the reading is noted. This sharp increase indicates you
have located the point exactly; this is where to take the reading. If you move off
the point, simply move back on until you have located the point of the highest
reading. Now remove the probe from the skin.
2. Measure the point: Place the probe at exactly the point of highest reading you
located in step one. The probe will read for two seconds to allow the reading to
stabilize, then will capture the reading into the software. Now move on to the
next point and repeat steps one and two.
Careful point location in this manner will produce very consistent and reliable graphs.
Always take the reading at the point of highest conductance.
Once you have practiced enough to feel confident in your point locations, you may
deactivate the Training Mode in the “Preferences” section.
Pressure and Angle: Be consistent in pressure and vector of probe placement. Light
pressure of 1-3 ounces is adequate, and the angle of the probe tip to the skin should
always be perpendicular. To keep pressure consistent, simply rest the probe on the skin,
with the weight of the probe being the only pressure used.
Timing: To take accurate measurements, you should hold the probe on the acupoint
until the readings stabilize, usually 1-3 seconds. Due to the nature of the tissue being
measured, readings may never completely stabilize on a single number, but readings will
reach a “plateau” of slower movement after 1-3 seconds of measurements. This is the
time to take the measurement.
To take the measurement, simply remove the probe from the skin; the measurement will
automatically be entered into the correct field in the program, and the probe controller
will emit a short double-beep sound to indicate the measurement was accepted.
Timed Measurements: If you prefer to take all your measurements after a timed
measurement interval, you can set the measurement interval in the preferences area.
With an automatic timed measurement interval, simply hold the probe on the point with
correct technique until you hear the double-beep sound indicating the measurement has
been taken. Then move to the next point.
Technique: Measurements will be most accurate when the skin is contacted and
released with a quick, intentional movement. When you are ready to record the
measurement, remove the probe from the skin with a quick movement.
If the software is not capturing the correct value (i.e. the value drops sharply) when you
lift off a point, you are probably not lifting the probe off the patient quickly enough. It
may take a little practice to achieve best results.
Correcting Errors: During the examination, if you take an erroneous reading or you
wish to repeat a measurement for any reason, you may move back to a specific point by
holding the SHIFT key and pressing the TAB key on your keyboard. Each press of the
TAB key will move backwards in the exam by one field. You may also simply click with
the mouse in the field for the measurement you wish to take.
Manual Entry: You may also enter measurements manually by typing the values into
the measurement fields and moving between fields with the TAB key. If you choose to
manually enter values, the AcuGraph probe still must be attached to the computer to
access the exam screen.
If you want to start the exam over, simply press the “Restart Exam” icon. Any values
already entered will be erased and the exam will start over at the beginning.
When you take the last measurement with the probe, AcuGraph will automatically save
the measurements and display the patient's exam results.
A NOTE ABOUT READING CONSISTENCY: Some users attempt to determine
the accuracy of the AcuGraph exam by performing back-to-back exams and comparing
them. They are disappointed to note that readings are not always the same when a
meridian is examined twice or more in a short period of time.
This occurs because the act of measuring an acupuncture point causes a certain amount
of electric charge to course through the meridian being measured. Studies have shown
that acupuncture meridians display “capacitance” or the ability to store electric charge.
This means that the act of taking the first reading “charges up” the meridian, and
subsequent readings for the next several hours may be affected by this artificial change
in charge.
Therefore, it is most correct and reliable to use the results from the first exam obtained,
rather than repeating an exam a few minutes after the previous exam. Similarly, it is not
effective or accurate to perform an exam directly after treatment. Best results are
obtained by waiting at least 24 hours between exams. Intentional, repeated
measurements are a misuse of this equipment, and provide no clinically relevant or
accurate information.
By following these guidelines, you'll find your readings to be consistent, accurate and
reliable.
For additional training in reading technique and interpretation, consider one of our live
seminars or seminars on DVD. Visit www.acugraph.com for more information.