1
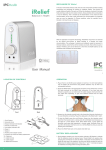
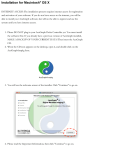
User Manual
Copyright 2014
Miridia Technology Inc.
All Rights Reserved
Revision A
www.AcuHorse.com
208-846-8448
Legal Use Information:
All contents Copyright 2003-2012 Miridia Technology Inc. All rights
reserved. No part of this manual or the software it describes may be
reproduced without express written consent of the copyright holder.
“AcuGraph” and “Digital Meridian Imaging” are Registered Trademarks of
Miridia Technology Inc.
“AcuHerb” and “IntelliGraph” are Trademarks of Miridia Technology Inc.
The AcuGraph Digital Meridian Imaging System is protected by U.S. Patent
No. 8,332,027.
Miridia Technology Inc.
1875 N. Lakes Place
Meridian, ID 83646
USA
208-846-8448
Credits:
AcuGraph Equine Edition represents the culmination of thousands of
hours of research, design, development, programming, and testing work by
a number of professionals. All of us at Miridia Technology Inc. offer our
heartfelt thanks to the following individuals for their contributions:
Conception and Design:
Dr. Adrian Larsen
Cameron Larsen
Acupuncture Consulting:
Dr. Shauna Ault
Dr. Dennis Baker
Monique Smith, L.Ac.
Dr. Lance Carlton Durrett
Christopher Harrison, L.Ac.
Kimberly Thompson, L.Ac.
Horse Models:
Sharon Katzke
Beta Testing:
Dr. Shauna Ault
Dr. David Lundquist
Valerie Hunter, L.Ac.
Van Harding, L.Ac.
Dr. Paul Silcox
Software Engineering:
Kimball Larsen
Steve Chamberlin
Hardware Engineering:
Alvin H. Larsen, Ph.D., P.E.
Drew Arbore
Brent Rasmussen
A Note About Meridian Nomenclature:
AcuGraph Equine Edition is programmed to comply with the World
Health Organization Standard Acupuncture Nomenclature, Second
Edition. Names and abbreviations are as follows:
Lung ........................................... LU
Large Intestine ........................... LI
Stomach ..................................... ST
Spleen ........................................ SP
Heart .......................................... HT
Small Intestine ........................... SI
Bladder ...................................... BL
Kidney ........................................ KI
Pericardium ................................ PC
Triple Energizer ......................... TE
Gallbladder ................................ GB
Liver ........................................... LR
Governor Vessel ........................ GV
Conception Vessel ..................... CV
Because different texts and different instructors have utilized a variety of
abbreviations and meridian names through the years, some of the names
and abbreviations used herein may not be familiar to the user.
Table of Contents:
Contacting Technical Support ..................................... 4
Chapter 1: Installing AcuGraph Equine Edition ........... 5
Installation for Windows 7/8 ............................. 8
Installation for Macintosh OS X ...................... 10
Setting Up AcuGraph ...................................... 13
Chapter 2: Using AcuGraph Equine Edition .............. 15
Precautions for Use ......................................... 15
Starting AcuGraph .......................................... 17
Patients ........................................................... 18
Records ........................................................... 22
Exam................................................................ 23
Graphs ............................................................. 29
PDF Printing .................................................... 42
Reference ........................................................ 49
Preferences ..................................................... 53
Chapter 3: Troubleshooting ...................................... 63
Limited Warranty............................................. 64
Return Policy ................................................... 68
Contacting Technical Support
If you need help installing or using AcuGraph Equine Edition, this manual
likely contains the answers you need.
Please also check the following web resources:
For Support
www.AcuHorse.com/support
For Other Resources, Tutorials, etc.
www.AcuHorse.com/resources
We can also be reached by telephone at
208-846-8448
4
Chapter 1: Installing AcuGraph Equine Edition
Introduction to Installation
There are several important steps to properly installing your AcuGraph
system. Please review the following outline to familiarize yourself with the
simple steps you will be following. IT IS VERY IMPORTANT TO
FOLLOW THE INSTRUCTIONS EXACTLY. This manual has been
carefully written and tested to ensure a trouble-free installation experience
for those who follow these directions.
Installation Outline
1.
Review the system requirements to ensure your computer meets
the minimum requirements to run AcuGraph.
2.
(If you are updating a current AcuGraph Equine Edition
installation) Back up your patient database.
3.
Install the Software—according to the instructions specific to your
computer’s operating system.
4.
Install the Hardware—but not until AFTER the software is
installed. Please follow the instructions specific to your computer’s
operating system.
Parts of the System
Your AcuGraph system consists of the following parts:
1.
The Software (provided on CD, Flash Drive or Download).
5
2.
The Probe Controller (This is the black box with “AcuGraph”
printed on the front.)
3.
The Probe and cables
4.
The Ground Pad (This is the round pad and sponge)
5.
The USB cable
Please locate and familiarize yourself with each of these items. Please DO
NOT plug anything in until you are instructed to do so in the installation
instructions, below.
1. Review the System Requirements:
For proper operation of your AcuGraph system, your computer should
meet the following minimum specifications:
Windows® :
• Operating System: Windows 7 or Windows 8
• Internet access
• 1GB RAM (minimum)
• >500 MHz processor
• Available USB port
• 1 GB free hard drive space
• 1024x768 Minimum screen resolution
Macintosh® :
• Operating System: OSX 10.7 or newer
• Internet access
• 512 MB RAM (minimum)
• Intel Processor
• Available USB port
• 1 GB free hard drive space
• 1024x768 Minimum screen resolution
Printing:
AcuGraph supports most laser and ink-jet printers. The printer you wish to
use must be accessible to your computer by direct connection to your
computer or through a network. Best results are obtained when graphs are
printed in color, and a color printer is therefore recommended.
6
Before you can print from AcuGraph, you must first install the driver
software supplied with your printer. Please refer to your printer’s
documentation for installation and operation instructions.
Internet Features:
Certain features of AcuGraph require Internet access for operation. These
features include Installation, Secure Backup, registration and emailing. If
you do not have Internet access, these features will not work, though the
remaining features of AcuGraph will function normally.
7
Installation for Windows 7/8®
INTERNET ACCESS: The installation process requires Internet access
for registration and activation of your software.
We recommend that you close all applications prior to starting the
installation of AcuGraph. If you already have a previous version of
AcuGraph Equine Edition installed, MAKE A BACKUP OF YOUR
CURRENT DATA! Then follow these steps to install AcuGraph in
Windows®:
1.
2.
3.
Run Windows Update! It is critical that Windows be fully
updated prior to commencing the installation process. If you skip
this step, AcuGraph may not operate properly.
Remove or temporarily disable all antivirus software. Such
software tends to interfere with the installation process.
Insert the AcuGraph CD or flash drive. The AcuGraph installer
should launch automatically. If the installer does not automatically
launch, navigate to the installer and launch it manually. When you
see the following screen, click “Next” to continue:
8
4.
Follow the installer instructions to complete the installation.
When program installation is complete, install your AcuGraph
probe by doing the following:
1.
Attach the black USB cable to the LEFT side of the case, as
shown below:
USB Cable
2.
The other end of the black USB cable plugs into the USB port on
your computer:
Your USB port will be labeled with this symbol:
NOTE: The USB cable ends are indexed to only insert one way. Do not
force the connection. If you are experiencing difficulty inserting the USB
plug, please make sure it is in the proper orientation. Normally, the molded
USB symbol is facing up.
3.
When you have plugged in your AcuGraph Probe Controller, a
small window may appear informing you that the system has
found new hardware and is installing drivers. When driver
installation is complete, you are ready to use your AcuGraph.
9
Installation for Macintosh® OS X
INTERNET ACCESS: The installation process requires Internet access for
registration and activation of your software.
We recommend that you close all applications prior to starting the
installation of AcuGraph. If you already have a previous version of
AcuGraph Equine Edition installed, MAKE A BACKUP OF YOUR
CURRENT DATA! Then follow these steps to install AcuGraph.
1.
Insert the AcuGraph CD or flash drive and open it. You will see
the following screen:
10
2.
Double click the AcuGraph Equine Edition.pkg icon. You will see
the welcome screen of the installer:
Click “Continue” and follow the instructions in the installer through the
installation process. When the process is complete, attach the AcuGraph
probe to your USB port as shown:
USB Cable
1.
The other end of the black USB cable plugs into the USB port on
your computer:
11
NOTE: The USB cable ends are indexed to only insert one way. Do not
force the connection. If you are experiencing difficulty inserting the USB
plug, please make sure it is in the proper orientation. Normally, the molded
USB symbol is facing up.
12
Setting Up AcuGraph
Now that you have installed AcuGraph, it is time to set up your new
software. This set up operation only needs to be completed once. To set up
your software and prepare it for use, please follow these steps:
1.
Double-click on the AcuGraph 4 icon to start the application.
AcuGraph Equine Edition
2.
Read and accept the terms and conditions set forth in the license
agreement.
3.
REGISTRATION INFORMATION: A window will appear
requesting registration information.
NOTE: You MUST enter the information requested in the boxes marked
with stars. Please enter the information exactly as you want it to appear in
your software registration. When you have completed the registration
screen, please press “Save.”
13
4.
A window will appear asking for your password. The factory-set
password is “energy” (all lower case, without quote marks.) The
password can be changed in the “Preferences” Section of
AcuGraph.
5.
The first time you launch AcuGraph Equine Edition, you will be
given a checklist of items to complete your AcuGraph setup.
Follow the instructions to complete the checklist.
Congratulations!
Your AcuGraph system is ready for use!
14
Chapter 2: Using AcuGraph Equine Edition
Precautions for Use
Safety First!
THE ACUGRAPH EQUINE EDITION SYSTEM IS FOR USE BY
QUALIFIED PROFESSIONALS ONLY! ALWAYS OBSERVE
PROPER SAFETY TECHNIQUE WHEN WORKING AROUND
EQUINES.
FAILURE TO OBSERVE PROPER SAFETY PROCEDURES MAY
RESULT IN SERIOUS INJURY OR DEATH. IF YOU OR YOUR
PATIENT IS UNCOMFORTABLE WITH THE ACUGRAPH
PROCEDURE, DISCONTINUE USE AT ONCE.
MIRIDIA TECHNOLOGY INC. HEREBY DISCLAIMS ALL
LIABILITY FOR YOUR USE OF THIS EQUIPMENT, INCLUDING
CLAIMS FOR INJURY TO HUMANS OR ANIMALS, PROPERTY
DAMAGE, LOSS, OR DEATH. IF YOU DO NOT AGREE TO BE
BOUND BY THESE TERMS, PLEASE RETURN YOUR
EQUIPMENT TO YOUR VENDOR. BY USING THIS EQUIPMENT,
YOU CERTIFY THAT YOU ARE PROFESSIONALLY QUALIFIED
TO WORK IN THE FIELD OF EQUINE ACUPUNCTURE AND
THAT YOU AGREE TO OBSERVE PROPER SAFETY
PROCEDURES AT ALL TIMES.
PROTECT YOURSELF, YOUR PATIENT, AND YOUR EQUIPMENT
WITH CARE! PAY PARTICULAR ATTENTION TO PLACEMENT
OF EQUIPMENT, ROUTING OF CABLES, AND THE DEMEANOR
OF YOUR PATIENT AT ALL TIMES. DO NOT PLACE YOURSELF
IN A DANGEROUS SITUATION.
15
Contraindications
Your AcuGraph system produces extremely low voltages and measurement
currents, far below the threshold of physical sensation. Nevertheless, your
AcuGraph probe should never be used in the mouth, eyes, or mucosa, on
sensitive skin, or on rashes, lesions, or wounds.
Important Note
YOUR ACUGRAPH UNIT IS NOT A MEDICAL OR VETERINARY
DEVICE. IT HAS NOT BEEN EVALUATED BY THE U.S. FOOD
AND DRUG ADMINISTRATION, NOR HAS ANY STATEMENT IN
THIS MANUAL BEEN EVALUATED BY THE U.S. FOOD AND
DRUG ADMINISTRATION. THE ACUGRAPH HARDWARE AND
SOFTWARE ARE NOT INTENDED TO DIAGNOSE, TREAT,
CURE, OR PREVENT ANY DISEASE. THIS EQUIPMENT IS FOR
EXPERIMENTAL USE ONLY, AND DOES NOT TAKE THE PLACE
OF PROPER DIAGNOSIS AND TREATMENT BY A PROPERLY
LICENSED HEALTHCARE PROFESSIONAL.
Equipment Care
Your AcuGraph probe controller unit contains sensitive electronic
components. Moisture, static electricity, shocks, dropping the unit,
excessive heat, and condensation may all have a damaging effect on your
equipment. Please be careful to protect your AcuGraph unit for best results
and a long service life.
The AcuGraph Equine Edition includes a heavy-duty carry case designed
for use both for transporting your equipment, and also during the exam
process. The case provides physical protection as well as protection from
dirt, dust, liquids, etc.
YOUR WARRANTY DOES NOT COVER PHYSICAL DAMAGE
TO YOUR EQUIPMENT FROM ABUSE, NEGLECT,
ACCIDENTS OR PREVENTABLE CAUSES. DAMAGE CAUSED
BY AN ANIMAL IS NOT COVERED BY YOUR WARRANTY.
Please protect your equipment.
16
Starting AcuGraph
To start AcuGraph, double-click on the AcuGraph icon.
AcuGraph Equine Edition
When the program is started, it will automatically check your USB port to
see if the probe controller is attached. If the probe controller is NOT
attached, the program will function normally, but the Exam function will
not be available.
If you have started AcuGraph without the probe controller attached and
you need to perform an exam, you may attach the probe controller to the
USB port and retry the desired function.
Password
The “AcuGraph Password” screen requires the entry of a password before
any patient data will be displayed. This is to protect the confidentiality of
your patient records.
The default password from the factory is set as “energy” (all lower-case,
and no quotes.) It is important that you change the password to one of your
own choosing to prevent unauthorized access to protected patient data. The
password can be changed in the “General” tab of the “Preferences” section
of the software.
If you lose or forget your password, you will have to contact technical
support to regain access to the software. For your protection, you will be
required to verify valid ownership of AcuGraph Equine Edition to receive a
new password.
17
Patients
The “Patients” icon provides access to records for all the patients you have
entered in AcuGraph. The scrolling list at the top of the window lists all
patients by column, and the search box allows searching by name. You may
also sort patients by clicking on the header of each column to sort by the
name or date in that column. For example, if you click on the “Facility
Name” column, all patients will be sorted by facility name and facilities will
be listed in alphabetical order.
The “Add Patient” icon opens the “Add New Patient” window, where you
can enter information about a patient who has not yet been added to the
database. The items with stars are required to add a new patient.
18
The “Edit Patient” icon opens the Edit Patient window, where you can
change information about a patient who is already in the database. Patients,
once entered, cannot be deleted.
The “Last Graph” icon is a convenient, one-click way to display the last
exam for the selected patient without the need to select the exam from the
list.
19
If you double click the selected patient or push the “Enter” key, a new
exam for that patient will automatically open. You can also start a new exam
by clicking the “New Exam” icon. You must have your AcuGraph probe
connected to your computer to perform an exam.
The “New Note” icon opens a window where the user may record notes
relevant to the patient’s case. This is a useful place to record symptoms,
progress, treatment method, etc. The first part of each note recorded will
appear next to its associated graph in the records list. Notes may be
recorded in any length and contain any text you choose. You may also paste
text into the notes window from another application.
The “Insert Template” pull-down menu inserts a pre-formatted template in
your note. This is useful if you have a typical notes template you usually use,
such as the S. O. A. P. note format. You can add new custom templates to
this menu in the “Notes” window of the “Preferences” section.
20
Once you have selected a patient, a list of that patient’s exam records
appears in the bottom half of the Patients screen. You may select one or
more exams by clicking to highlight them in the list. If you select one exam,
you may view it by clicking the “View Graph” icon.
If you have selected more than one exam in the list, view them by clicking
the “Compare” icon.
The “Select All” icon will select all the records for the selected patient.
21
Records
In the “Records” screen, you can view all the records available for the
selected patient. Records are listed by date and type. Double clicking on any
record will display it in full.
Double click any record to view it, or highlight the record and click on
“View Graph.”
You may view multiple exams at the same time by selecting the exam
records and clicking “Compare.”
22
The “Print” icon will print the selected record or records.
Exam
To perform an exam, begin by selecting which type of exam you wish to
perform. The exam type will always default to the last exam type you
selected.
23
Your exam type choices are Jing-well Points and Single Point. A description
of each follows:
Jing-well points are the beginning and ending points of the 12 main
meridians, and are the connection points between the main channels and
the tendino-musculo branches. The Jing-well points are located just
proximal to the coronary band above the hoof. Jing-well graphs measure
the general energetic balance of the meridians.
Single Point Exam: This exam is designed for the repeated measurement
of a single acupuncture point to assess skin resistance responses to various
stimuli. At the completion of each measurement, a dot is placed on the
graph with the measured value plotted. Subsequent measurements are then
plotted and connected to show the relative change in the readings (see
illustration, below.) This exam does not produce any record that is saved in
the software.
Speaking Exam: The AcuGraph software provides audio direction during
an exam so the user can focus on the patient without the need to
continually look at the computer screen. The voice prompts during the
exam speak the name of the point to be measured next. The volume level of
the voice prompts and the probe tones can be set with the sliders on the
exam screen.
24
Performing an exam is quite easy and straightforward. The following
tips will help you perform exams quickly and accurately:
SAFETY FIRST: Always observe proper safety procedures when
working with equines! Do not place yourself, other humans, your
patient or your equipment in a potentially dangerous situation for any
reason!
Probe Tip: Insert a cut cotton swab in the probe end so that the cotton of
the swab makes good contact with the metal of the probe tip. Standard
cotton swabs are generally readily available at drug stores and medical
supply companies. We also offer pre-cut swab tips on our website at
www.acugraph.com.
Moisture: Moisten the cotton generously with water or saline solution, and
shake off any excess. An easy way to do this is to keep a small spray bottle
near your AcuGraph unit to spray the probe tip during exams. Be careful to
not get any other part of your AcuGraph unit wet, and do not wet the
probe beyond the tip.
Do not use distilled water to wet the probe tip. Standard tap water, mineral
water, or saline solution are all acceptable choices.
For best results you should re-wet the probe tip after completing 1-2
readings depending on the horse’s skin and hair. In the case of excessive
hair interfering with the exam, you may wish to shave the area above the
hoofs.
Ground Pad: The ground pad must make good electrical contact with the
skin to complete the electrical measurement circuit. For best results, wet the
sponge and place the ground pad in a relatively hairless area, such as the
lower abdomen or inside hind leg. Ensure that the pad is moist enough to
make a good connection with the skin.
The included surcingle strap may be used to hold the ground pad in place
during the exam, or you may have an assistant hold the pad in place.
Be sure to route the gray ground wire safely away from the horse’s legs to
avoid entangling the horse or tripping the operator.
Point Location: Be consistent in your point locations. Use the same point
and same landmarks on the left side that you used on the right side. This
may sound obvious, but careless point location is the number one cause of
erroneous readings. A difference of just a few millimeters can change the
reading significantly.
25
Technique: Angle the probe upward at the same angle as the hair grows
downward, so the probe can separate the hair and reach the skin. Place the
probe with a deliberate action and light to moderate pressure. Listen for the
audio feedback. You may move the probe during measurement to find the
highest reading, then hold it steady while the measurement completes.
Training Mode: If you are unsure of proper point location, or unable to
duplicate consistent readings on the same patient, try using the Training
Mode of measurement. This feature is activated in the “Measurement”
window of the “Preferences” section.
When the Training Mode is active, each measurement consists of the
following two steps:
1.
Locate the point precisely: Contact the patient’s skin with the
probe in the vicinity of the acupoint to be measured. Slowly slide
the probe across the skin until a sharp increase in the reading is
noted. This sharp increase indicates you have located the point
exactly; this is where to take the reading. If you move off the
point, simply move back on until you have located the point of the
highest reading. Now remove the probe from the skin.
2.
Measure the point: Place the probe at exactly the point of
highest reading you located in step one. The probe will read for
two seconds to allow the reading to stabilize, then will capture the
reading into the software. Now move on to the next point and
repeat steps one and two.
Careful point location in this manner will produce very consistent and
reliable graphs. Always take the reading at the point of highest conductance.
Once you have practiced enough to feel confident in your point locations,
you may deactivate the Training Mode in the “Preferences” section.
Timing: To take accurate measurements, you should hold the probe on the
acupoint until the readings stabilize, usually 1-3 seconds. The AcuGraph
software automatically times the reading and gives a double beep when the
reading has been captures. At this point you should remove the probe and
measure the next point.
Technique: Measurements will be most accurate when the skin is
contacted and released with a quick, intentional movement.
Correcting Errors: During the examination, if you take an erroneous
reading or you wish to repeat a measurement for any reason, you may move
26
back to a specific point by holding the “Shift” key and pressing the “Tab”
key. Each “Tab” will move backwards in the exam by one field. You may
also simply click with the mouse in the field for the measurement you wish
to take.
Manual Entry: You may also enter measurements manually by typing the
values into the measurement fields and moving between fields with the
“Tab” key. If you choose to manually enter values, the AcuGraph probe
still must be attached to the computer to access the exam screen.
If you want to start the exam over, simply click the “Restart Exam” icon.
Any values already entered will be erased and the exam will start over at the
beginning.
When you take the last measurement with the probe, AcuGraph
automatically saves the measurements and displays the patient’s exam
results.
A NOTE ABOUT READING CONSISTENCY: Some users attempt
to determine the accuracy of the AcuGraph exam by performing back-toback exams and comparing them. They are disappointed to note that
readings are not always the same when a meridian is examined twice or
more in a short period of time.
This occurs because the act of measuring an acupuncture point causes a
certain amount of electric charge to course through the meridian being
measured. Studies have shown that acupuncture meridians display
“capacitance” or the ability to store electric charge. This means that the act
of taking the first reading “charges up” the meridian, and subsequent
readings for the next several hours may be affected by this artificial change
in charge.
Therefore, it is most correct and reliable to use the results from the first
exam obtained, rather than repeating an exam a few minutes after the
previous exam. Similarly, it is not effective or accurate to perform an exam
directly after treatment. Best results are obtained by waiting at least 24
hours between exams. Intentional, repeated measurements are a misuse of
this equipment, and provide no clinically relevant or accurate information.
By following these guidelines, you’ll find your readings to be consistent,
accurate and reliable.
27
For additional training in reading technique and interpretation, view our
training resources at www.AcuHorse.com.
Re-Measuring Splits: A “Split” is a situation in which the right and left side
readings for a single meridian are significantly different from one another.
Splits are displayed in purple on the graph.
Most split meridians are actually the result of inaccurate point location.
Remember, the actual acupuncture point will return a higher reading than
the surrounding skin. Therefore, if the probe is not on the point when the
reading is taken, the reading will be artificially low.
For this reason, AcuGraph invites the user to re-measure any split
meridians by re-testing the low side of the meridian only. If you select this
option at completion of your exam, the software will prompt you which
meridians on which sides need to be re-measured.
Re-measuring split meridians provides greater accuracy by eliminating
measurement errors.
28
Graphs
In the “Graphs” window, you can view and print patient exam results. The
interface looks like this:
This interface allows you to look at exam results in a variety of ways. There
are 8 different graph displays, as well as an information section.
Each of the buttons at the right side of the window displays a different view
of the exam results. For information about any of the graph displays, simply
click on the “?” symbol in the upper right corner of the graph display.
The Baseline graph is the traditional, Ryodoraku-style
graph used in meridian graphing. Meridians are displayed
29
with fore yin meridians first, followed by fore yang, then hind yin and hind
yang.
The Yin/Yang graph displays all the yin meridians on the
left half and the yang meridians on the right half. It also
gives the average reading for yin and yang, allowing
comparison of the patient’s yin/yang balance.
The By Element graph displays the exam results as coupled
meridians within each element, and gives the average
reading for each element. This graph promotes 5-elements
analysis by showing the relative balance among the 5
elements. The shaded area behind the bars within each element illustrates
the average for that element.
The Energy Cycle graph displays the meridians in their
horary order, beginning with Lung. This graph style is
useful for analyzing the patient’s energetic balance
throughout different periods of the day.
In each of the above graph types, there are three horizontal lines
superimposed on the graph. The middle line is the Mean, or average, of
that patient’s readings. The upper and lower lines represent the normal
range of readings for that patient. Meridians with at least one reading in
this normal range are displayed as normal (except in the case of splits; see
below.) Meridians with both readings above this range are displayed as
excessive, and meridians with both readings below this range are displayed
as deficient.
Split Meridians: When a statistically significant difference exists between
the right and left readings on a given meridian, that meridian is considered
“Split” and is given special treatment. If a meridian is split, it will not be
displayed in any other way, even if it would otherwise be considered
excessive, deficient, or normal. A split condition takes precedence over
other considerations for any given meridian.
30
The 5 Elements graphic displays the classic 5-elements
chart with the relative excess (+), deficient (-), split (X), and
normal (=) meridians noted. Element averages are also
shown. This display is designed to facilitate understanding
of 5-elements energy transfers for this patient.
31
The Horary graphic displays the horary chart with
superimposed shading to show the relative energy level of
each meridian. More shading means a higher average
reading for the channel. Ideally, the shading should reach
the area between the inner and outer circles in the chart.
This graphic is useful for understanding the patient’s energetic condition at
various times of day.
32
The Ratios display gives information about the patient’s
relative energy balance.
This display shows several categories of energetic analysis. On the left is the
Chi Energy Level. This is a representation of the patient’s overall energetic
level. Note that it is possible for the patient to be too low or too high in
energy, and the ideal reading level is in the green area toward the center of
the vertical display bar. Various breeds will tend to read higher or lower
than other breeds. Therefore, this number has a broad “normal” range.
The bottom center shows the Yin/Yang Balance for the patient, with the
yin/yang tendency noted.
The right side of the display shows the patient’s Chi Energy Stability. This
is determined by analyzing the highest and lowest readings in the exam, in
relative comparison to the mean. Patients with a wider range of readings
from high to low will have lower relative energy stability. The green area
towards the top of the display represents the best balance.
You may want to think of stability as the opposite of variability. A graph
with high variability scores low for stability, and a graph with low variability
scores high for stability.
The center of the display shows the Right/Left and Fore/Hind balance
superimposed on a horse figure. The right/left balance reflects the relative
balance between readings on the right and left sides of the body, and the
33
Fore/Hind balance reflects the balance between the readings on the hands
and the feet.
Interpretation of these ratios categories is provided in the “Information”
display. See below.
The P.I.E. Graph stands for Personal Integrated Energetics
graph. This graph provides a snapshot of the patient’s
overall meridian balance in a simplified, user-friendly
format.
Within this graph, each meridian is represented by a color-coded slice of the
pie. Energetically healthy meridians extend fully to the edge of the circle and
are colored green. Energetically unhealthy meridians do not extend fully to
the edge of the circle. The smaller the shaded section of the pie slice, the
lower the health level of the meridian. Additionally, meridians are colorcoded according to imbalance, with red for excess, blue for deficiency and
purple for split.
The P.I.E. Score stands for Personal Integrated Energetic Score, and this
single number comprises a complete picture of your patient’s meridian
balance. The higher the score, the better the balance. Statistical analysis
methods are used to include all facets of meridian health in the score
calculation. The purpose of the score is to provide a fast, easy method of
graph comparison for owners, trainiers, and others who may not
understand graph analysis, but will understand a single-number score.
34
Remember, the P.I.E. scale is 0-100 and the scores may be anywhere within
that range. The scale on the left gives an idea of the typical degree of
imbalance for any score.
The Information display gives written information about
meridian functions, observed imbalances, potential
symptom associations, and energetic balance categories for
this exam. It is written on the level of the average patient to
facilitate understanding without confusing jargon.
Channel Illustration:
While viewing any bar-style graph, clicking on any of the bars opens the
channel illustration window as follows:
35
This window shows the meridian channel of the bar that was clicked in the
graph. The arrows will move forward and backward from meridian to
meridian.
The purpose of this illustration is to demonstrate the anatomical area where
the meridian channel runs. This is useful for explaining symptoms and
locations.
The channel in the picture will be color coded according to the graph bar
colors to demonstrate the energetic condition of the channel, whether it is
deficient, excessive, split or normal.
Icon Functions:
The “Begin Treatment” icon displays the acupoints of the selected
treatment in order. This function is designed to serve as a treatment guide
to the practitioner during treatment.
The arrow keys advance from point to point during treatment display.
These icons show the previous and next graphs in the database for this
patient. In the event that there is not a previous or next graph for this
patient, one or both of these icons is grayed out.
Using the previous and next icons is a convenient and quick way to view
previous and current treatments for the patient and to track patient
progress.
The “History” icon displays the “Historical Trends” window as follows:
36
The Historical Trends window displays the trends in PIE score, element
history, and most common imbalances for the selected patient. To choose
how many exams are included in the history, use the slider at the bottom
left of the screen.
The “Toggle Splits” icon removes split meridians from a graph. Because
hair can sometimes interfere with good measurement technique, you can
choose to ignore splits by setting both sides of the meridian to read at the
highest reading of the two sides.
This simplifies treatment plan selection, particularly when there are
excessive splits.
The “Compare” icon takes you to the “Patients” window with the list of
exams displayed for that patient. In this window, you can select specific
37
graphs for comparison. Select as many graphs as you care to from the
patient’s history for comparison or printing.
It is best to wait at least 24 hours after treatment before re-examining
your patient for comparison purposes. Re-examination directly after
treatment will not produce a valid result because Chi energy will still be in
flux from the treatment.
The Graph Normalization feature removes the effect of the outlying values
on the mean of the graph. If meridians are excessively high or low, and
therefore artificially changing the mean, normalization will correct the mean
and the categories of the other meridians.
By clicking the Normalize icon, you will eliminate the effect of the
excessively high or low meridians on the mean, and the meridians will be
automatically re-categorized into their correct categories. The treatment
protocol will likewise be adjusted. Use the normalize feature when there are
excessively high or low meridians in the graph.
Note that normalization does NOT remove the outliers (excessively
high or excessively low meridians) from the treatment protocol. It
only removes them from the calculation to prevent artificially skewing the
results. The outlying meridians are still treated and corrected.
The “Edit Graph” icon allows changes to the recorded values after the
graph has been displayed. The changes can be made by manually entering
new values, or by taking readings with the probe. Click in the box for the
reading you wish to change, and type a new number or use the probe to
take a new reading. NOTE: to preserve the integrity of your patient records,
AcuGraph only allows you to manually edit graph values up to 8 hours after
the exam.
The “New Note” icon opens a window where the user may record notes
relevant to the patient’s case. This is a useful place to record symptoms,
progress, treatment method, etc. The first part of each note recorded will
38
appear next to its associated graph in the records list. Notes may be
recorded in any length and contain any text you choose. You may also paste
text into the notes window from another application.
The “Insert Template” pull-down menu inserts a pre-formatted template in
your note. This is useful if you have a typical notes template you usually use,
such as the S. O. A. P. note format. You can add new custom templates to
this menu in the “Notes” window of the “Preferences” section.
The “Print/Email” icon opens the “Printing Options” window, where
custom reports can be defined and printed.
39
The main part of the Printing Options window is divided into three
sections: The “Graphs” section on the left controls which graphs will be
printed in the report. The “Information” section in the center controls
what text information will be included. The “Treatment” section on the
right selects what treatment information will be included in the report.
The “Brief Report for File” item provides a one-page summary report
including the Baseline graph and any treatment recommendations selected
under the “Treatment” section. This report is useful as a quick reference
and for paper files because it is brief and contains only the essential
information.
Under Treatments, you may choose which treatments to print, and
whether to print only lists of recommended points, or full reference
illustrations and information.
The other selectable items will be printed in the full report. The report will
only contain those items selected in the Printing Options window, allowing
you to customize your reports to your exact desires.
The Report Language selector is used to determine which language will be
used in your printed reports. This option is only available if you have
purchased additional language packs for your AcuGraph system.
The Printing Favorites section allows you to save printing preferences for
specific types of reports. For example, if you print a specific type of report
on a first visit, you can define the report and save it as a preset.
40
To do so, first click on the + sign to add a new report. Name it and save it.
Then select the contents of the report in the printing window and when you
are satisfied, click save. The presets you selected will be saved to the
currently shown Favorite.
The Cover Pages section lets you choose the cover page or pages for the
printed report. The following two options are available:
Report Explanation: This cover includes simple explanations of the
purpose and meaning of the AcuGraph report.
Custom Cover Page: This option attaches your own custom cover page to
your report. You can make your cover page as simple or complex as you
wish, and it can be more than one page if desired.
To create a custom cover page, simply create a document in any word
processing or page layout program you choose. You may include pictures,
text, formatting and design elements. When you have finished creating your
cover page, save it as a PDF. For more information on how to create a
PDF, please see PDF printing, below.
When you have saved your cover page as a PDF, visit the “Printing”
window of the “Preferences” section of AcuGraph. There, you can select
your PDF document to import it into AcuGraph as your custom cover
page.
For more information on importing a cover page, please see the Preferences
section of this manual.
AcuGraph includes the ability to email a patient report. To use this feature,
first select the options you wish to include in the report from the Printing
Options window. Then click the “Email” icon. The following window will
appear:
41
If the Patient’s email address is already in your patient database, the address
will appear in the box. If you don’t already have the patient’s email address,
you can type it into the box. You will then have the option to save the email
address you typed as part of the patient’s record for future use. Once you
have selected or entered the email address, click the “Email” icon to send
the patient’s report.
PDF Printing
AcuGraph includes the ability to produce reports in the PDF format
(Portable Document Format.) These reports can then be attached to
electronic medical records, appended to other PDF documents, or
electronically stored for later retrieval. PDF printing procedures are as
follows.
PDF Printing For Windows:
After you have selected report options and pressed “Print” in the
AcuGraph print window, the operating system will show the following print
window (or one similar):
42
In the “Select Printer” area, choose “Miridia PDF Maker” as your printer.
Then press “Print.”
Next, you will be asked to name your report and choose the location to save
it. When you have done so, press “Save” and your PDF report will be
created and saved.
43
PDF Printing For Macintosh:
After you have selected report options and pressed “Print” in the
AcuGraph print window, the operating system will show the following
screen:
From the PDF drop-down menu at the bottom left of the screen, select
“Save as PDF.”
44
Then name your report, choose the location to save it, and press “Save.”
Your PDF will be created and saved.
45
Treatments
The left side of the Graphs screen contains the
Treatment section. These 4 buttons control
which treatment recommendations will be
displayed below in the treatment
recommendations section of the window, based
on the information in the displayed graph.
You may choose which treatment
recommendation to view by clicking on the
appropriate button. All treatment
recommendations are presented as possibilities only, and the ultimate
decision of how to treat the patient rests with you, the licensed
practitioner. Though several treatment options are presented, it is not
appropriate or advisable to attempt to perform all the possible
treatments on the same patient the same day. Rather, you should pick
the one or two protocols you prefer and perform them. You may also
use treatments of your own choosing outside the scope of this
software.
Important Notes about Treatments:
MIRIDIA TECHNOLOGY INC. IS NOT LIABLE FOR RESULTS OF
TREATMENT, AND THE TREATMENT RECOMMENDATIONS
ARE TO BE CONSIDERED WITHIN THE CONTEXT OF THE
PATIENT’S SYMPTOMS, DIAGNOSIS, TRAINING, FITNESS
LEVEL, AND OVERALL STATE OF HEALTH. The AcuGraph
software does not and cannot consider each patient’s individual situation
beyond the electronic examination, and it does not take the place of the
practitioner’s experience, training, clinical judgment and skill. AcuGraph is
for experimental and investigational use only by appropriately licensed
practitioners.
MIRIDIA TECHNOLOGY INC. MAKES NO SPECIFIC
RECOMMENDATION FOR METHOD OF TREATMENT OF
ACUPUNCTURE POINTS. Common treatment methods include needle,
laser, pressure, and electrical stimulation. The method used is at the sole
discretion of the practitioner, within the scope of the licensed practice.
When a treatment protocol is selected, the recommended points will be
displayed in the columns below the treatment selection buttons. Next to
each recommended acupoint, in the “Reason” column, is displayed the
reason that particular point was selected. Some points will also display a star
in the right column. Clicking on the star will open a window displaying the
energetic effect of the selected point:
46
Clicking on the point name will open a reference window displaying the
location, attributes and function of that particular point:
47
The treatment types work in the following ways:
Basic treatment model: This model uses Luo points to treat split meridians,
Sedation points to treat excessive meridians, and Tonification points to treat
deficient meridians. This method does not pay any attention to the 5elements model or use group points.
In the Advanced treatment model, the points are selected to most
efficiently move energy from excess to deficiency. The Ko and Sheng cycles
are considered, as are Luo points and group points.
The Advanced treatment model considers all possible combinations of
points and makes a recommendation based on use of the fewest points
possible. It also considers musculo-tendino points for global and specific
effects.
Associated treatment model: This model uses the Associated (Back-Shu)
points specific to the meridian imbalances noted.
Custom treatments: This model displays user-defined custom treatments
tailored to the exam results. Custom treatments may be defined in the
Reference section.
Graph Effect Highlighting:
While viewing the PIE graph or any bar-style graph, if you roll your mouse
pointer over any of the treatment points listed under the basic, advanced, or
associated protocols, the portions of the graph that will be affected by that
point will be highlighted in a different color.
This feature is used to display the treatment effect of any point on the graph
results, thus giving a clear picture of the treatment rationale.
48
Reference
The reference section provides access to meridian channel illustrations,
point locations, information, and charts. To use the reference, click on any
category in the left column. Then choose the specific meridian from the
next column and the indicated point or meridian illustration will be
displayed. You can click on any category or meridian at any time to change
the information you are viewing. You can click on any point in any channel
to immediately display an illustration of that point.
In the “Charts” section, several types of reference charts are available,
including graphical charts and textual charts. When viewing any textual
chart, place the pointer over any acupoint to view a popup window with
complete information about the point.
49
Under “Conditions” in the “Treatments” section, you can look up
treatment point prescriptions by condition treated. Clicking on any point
name opens an illustration and information about that point.
Under “Custom” in the treatments section, user-defined custom
treatments may be viewed or modified.
In defining custom treatments, the practitioner may select which energetic
imbalances will trigger specific recommendations.
For each meridian, you may choose excessive, deficient, split, or any
combination of these. Any of the selected condition(s) in that meridian will
satisfy the requirement to trigger the recommendation.
If conditions are stipulated for more than one meridian, each meridian
stipulated must meet at least one of its stipulated conditions to trigger the
custom recommendation.
50
For example, if you check the boxes for Triple Energizer (TE) deficient and
Pericardium (PC) split, BOTH of these conditions must exist for the
recommendation to be triggered. Other conditions may exist in other
meridians as well, but they are not pertinent to this recommendation.
As an added example, if you check boxes for Triple Energizer (TE)
deficient and Triple Energizer (TE) excessive, and Pericardium (PC) split,
then the recommendation will be triggered if the Triple Energizer is
deficient and the Pericardium is split, OR if the Triple Energizer (TE) is
excessive and the Pericardium is split.
Any recommendation may be typed in the recommendations space. Some
categories of custom recommendations may include herbs, additional
acupuncture points, bodywork, exercises, etc.
Please note that ACUGRAPH ONLY SERVES AS A DATABASE TO
STORE THE PRACTITIONER’S RECOMMENDATIONS. MIRIDIA
TECHNOLOGY INC. IS NOT RESPONSIBLE FOR THE CUSTOM
RECOMMENDATIONS STORED, OR THE RESULTS OF THEIR
USE.
51
Recommendations that are triggered will be displayed in the Graphs
window treatment list and printed in the report, if selected.
52
Preferences
The Preferences section of AcuGraph is accessed by clicking on the
“Preferences” icon in the upper right corner of the main AcuGraph
window. This section of the program allows you to control a wide array of
features within the program. Though basic, default preferences are
configured when the software is installed we recommend you take time to
familiarize yourself with all the preference options so you can take full
advantage of the best features of AcuGraph Equine Edition.
General Preferences
Under the General preferences tab you have a variety of options to
customize your software.
53
Under “User Information” you can customize information about your
practice. The information entered under “User Information” will be printed
on the reports generated by AcuGraph.
Please note that the “User Name” is set at the time of installation and is
correlated with your software license for AcuGraph. This information
CANNOT be changed without obtaining a new license code. If you need
a new license code, please contact your AcuGraph Distributor.
The “Custom Field Title” section lets you name the custom field header
shown in the “Patients” section of AcuGraph. This is useful if you are
collecting any sort of custom information about your patients and you want
to designate the name of the field.
In the “Graph Colors” section of the Preferences window, you can
customize the colors used in your graphs. To do so, click on the color
square you wish to change, and select a new color from the selections
offered. Be sure to save your selection(s). The “Reset Colors” button
restores all colors to their factory defaults.
The “Enter New Registration Information” button is ONLY used for
entering a new license code, as described above. Please do not attempt to
change your registration information unless instructed to by Miridia
Technology Inc. You risk damaging your software and rendering it
inoperable.
Passwords
To protect private patient data, AcuGraph requires password authentication
to enter the program. The default password for AcuGraph is “energy” (all
lower case, without quote marks.) We recommend you set your own
password in the Preferences section, and follow proper security procedures
by keeping the screen from the public or patient view while patient names
are displayed (as in the “Patients” section.)
If you forget your password, contact Miridia technical support.
54
Measurement Preferences
Under the Measurement tab in Preferences, you can control how
AcuGraph behaves during examinations.
The “Mode Settings” area of the window lets you choose your
measurement scale and increment, order, method, and calculation method.
The “Measurement Method” allows you to choose the way in which
AcuGraph takes measurements.
Training Mode: If you are unsure of proper point location, or unable to
duplicate consistent readings on the same patient, try using the Training
Mode of measurement. This feature is activated in the “Measurement”
window of the “Preferences” section.
When the Training Mode is active, each measurement consists of the
following two steps:
55
1.
Locate the point precisely: Contact the patient’s skin with the
probe in the vicinity of the acupoint to be measured. Slowly slide
the probe across the skin until a sharp increase in the reading is
noted. This sharp increase indicates you have located the point
exactly; this is where to take the reading. If you move off the
point, simply move back on until you have located the point of the
highest reading. Now remove the probe from the skin.
2.
Measure the point: Place the probe at exactly the point of
highest reading you located in step one. The probe will read for
two seconds to allow the reading to stabilize, then will capture the
reading into the software. Now move on to the next point and
repeat steps one and two.
Careful point location in this manner will produce very consistent and
reliable graphs. Always take the reading at the point of highest conductance.
Once you have practiced enough to feel confident in your point locations,
you may deactivate the Training Mode.
“Timed” measurements can be set so that each point is measured for
exactly the same length of time. With the Timed measurement option
active, you need only to rest the probe tip on the point and hold it there.
The software will automatically take the measurement when the preset
length of time has passed.
56
Database Maintenance
Under the Database Maintenance tab in Preferences, you can control
how and when AcuGraph creates a backup of your database file.
IMPORTANT NOTICE
It is not a question of IF your hard drive will fail; it is a question of
WHEN. If you do not back up your data, YOU ARE PLANNING TO
LOSE IT!
It is very important that your database is backed up frequently,
preferably daily. We recommend that you check the box marked,
“Automatic Backup at Shutdown” and leave it checked.
And ALWAYS back up your data before installing or uninstalling
programs, upgrading or reinstalling AcuGraph, or changing your
computer hardware in any way. Your patient records are too valuable to
risk.
Also, be advised that if you uninstall AcuGraph without backing up,
YOU WILL LOSE YOUR PATIENT DATA. Please back up your data
before uninstalling or reinstalling AcuGraph.
To configure your automatic backup, please check the box marked,
“Automatic Backup at Shutdown.” Then, select the location for your
backup. The best option is to back up to the Miridia Secure Server through
the AcuGraph Secure Backup service. NOTE: You may check more than
one box to simultaneously back up to more than one location.
57
AcuGraph Secure Backup
AcuGraph Secure Backup is a low-cost program that PROTECTS your
patient data with secure, automatic off-site backup to our protected servers.
This means that your patient records have ultimate protection from
computer crashes, viruses, loss, theft, and disaster. Because your data is
automatically stored on our secure servers, you have the rock-solid
assurance that no matter what happens to your computer, or even your
clinic, your data is safe and accessible.
To further enhance your peace of mind, your data is encrypted before being
sent to our servers, so it cannot be intercepted on the internet. Once on our
servers, your data is inspected daily by our automated systems to ensure that
your backups are not corrupted. If there is ever any problem detected with
your data integrity, we inform you immediately and help you correct the
problem.
58
Your AcuGraph installation includes a free, 30-day trial of AcuGraph
Secure Backup. This trial is activated the first time you back up to our
secure server. This backup feature requires that your computer is connected
to the internet when you shut down AcuGraph. If your computer is not
connected to the internet, the program will inform you that the backup was
not successful.
If you do not have access to the internet, or choose not to use AcuGraph
Secure Backup, we recommend you back up to a portable drive such as a
USB flash drive or similar, so that the backup can be stored offsite in a
secure location. If this is not possible, back up the data to another computer
on the network or another drive to secure your patient data against hard
drive failure. Backing up to the same hard drive where your patient data is
stored only invites disaster in the case of a hard drive failure.
You may also use the controls in this window to manually back up or
restore your database at will, and to automatically back up to another
location.
Warning: If you restore a database from a backup, your ENTIRE
PATIENT DATABASE WILL BE REPLACED with the database in
the backup. This cannot be undone. Only use this feature if you are
sure it is the correct action to take.
Reports
59
In the “Reports” section of Preferences, you can customize your printed
reports in two ways:
Custom Cover Page: You can customize any AcuGraph report with your
own custom cover page. You can include graphics, pictures, text, or any
other elements you choose to include.
To create a custom cover page, simply create a document in any word
processing or page layout program you choose. When you have finished
creating your cover page, save it as a PDF. For more information on how to
create a PDF, please see “PDF Printing.”
Once you have created and saved your PDF, click on the “Browse” button
under “Custom Cover Page” and locate your saved PDF file. When you
select your file, it will be imported into AcuGraph and become available for
attachment to printed reports when selected in the Print window.
60
Meridian Analysis Information: You can edit the text that appears in
your on-screen and printed meridian analysis information reports in this
section.
Notes
In the “Notes” section of Preferences, you can create custom templates for
your notes. This feature is useful if you have specific types of notes you
keep on a regular basis. For example, you may have one note template you
use on the first visit, another for follow-up visits, etc.
The SOAP note format is pre-programmed in your AcuGraph software. To
add additional formats, click on the green “+” sign and type the name of
the new note template you wish to create.
61
Next, type the parts of the note format you wish to save as part of your
template. When you have customized it to your liking, click on the “Save”
icon and your new template is saved.
If you wish to modify any note template, you may do so by opening it in
this window, making the modifications and clicking on “Save.” You may
create an unlimited number of note templates.
62
Chapter 3: Troubleshooting
Before You Call Tech Support
AcuGraph has few requirements for successful operation, and most
problems can be solved by checking some simple items. If you are having a
problem, please check on the following items before calling technical
support. This will help us provide rapid service in the event of more
difficult problems and eliminate excess time spent on problems that can be
quickly and easily solved by users.
First, please make sure you have read the applicable sections of this manual.
The instructions in this manual have been carefully produced and
exhaustively tested for accuracy. More than half the calls to technical
support are simply because the AcuGraph user ignored the instructions in
this manual. Please READ and FOLLOW the manual instructions.
The Support section of the AcuGraph Equine Edition website
(www.AcuHorse.com/support) contains more thorough troubleshooting
information, demonstration videos, answers to frequent questions, etc.
63
Limited Warranty
The sole warranty regarding the Software and related materials is that the
original disk or flash drive is free from physical defects in material and
workmanship, assuming proper use, for a period of one year from date of
purchase. If such defect occurs during this period, you may return your
faulty media to Miridia Technology Inc., (Miridia) along with a dated proof
of purchase; Miridia will replace it free of charge. After one year, a
replacement disc or flash drive will require a nominal fee.
The sole warranty regarding the AcuGraph probe and probe controller is
that they are free from physical defects in material and workmanship,
assuming proper use, for a period of one year from date of purchase. If
such defect occurs during this period, you may return your faulty probe to
Miridia Technology Inc., (Miridia) along with a dated proof of purchase;
Miridia will replace it free of charge. After one year, a replacement probe
will require a fee.
Your sole and exclusive remedy for any breach of representation or
warranty is that Miridia, at its option, either (a) will refund your payment for
the software and probe upon your return of the software and probe, with a
copy of your receipt, or (b) will replace it on an exchange basis without
charge (except as provided above).
EXCEPT FOR THE EXPRESS WARRANTY SET FORTH ABOVE,
THIS SOFTWARE AND HARDWARE ARE PROVIDED “AS-IS,”
AND TO THE MAXIMUM EXTENT PERMITTED BY APPLICABLE
LAW, MIRIDIA DISCLAIMS ALL OTHER WARRANTIES, EXPRESS
OR IMPLIED, BY STATUTE OR OTHERWISE, REGARDING THE
SOFTWARE, DISK, AND RELATED MATERIALS, PROBE
HARDWARE, PROBE CONTROLLER, CABLES, CONNECTORS, OR
PROCESSOR, INCLUDING THEIR FITNESS FOR A PARTICULAR
PURPOSE, THEIR QUALITY, THEIR MERCHANTABILITY, OR
THEIR NONINFRINGEMENT. THE LIABILITY OF LICENSOR
UNDER THE WARRANTY SET FORTH ABOVE SHALL BE
LIMITED TO THE AMOUNT PAID BY THE CUSTOMER FOR THE
PRODUCT. SOME STATES DO NOT ALLOW THE EXCLUSION OF
IMPLIED WARRANTIES, SO THE ABOVE EXCLUSIONS MAY
NOT APPLY TO YOU. IN THAT EVENT, ANY IMPLIED
WARRANTIES ARE LIMITED IN DURATION TO 90 DAYS FROM
THE DATE OF PURCHASE OF THE SOFTWARE. THIS
WARRANTY GIVES YOU SPECIFIC LEGAL RIGHTS. YOU MAY
HAVE OTHER RIGHTS, WHICH VARY FROM STATE TO STATE.
64
IMPORTANT: YOUR ACUGRAPH UNIT IS NOT A MEDICAL OR
VETERINARY DEVICE. IT HAS NOT BEEN EVALUATED BY THE
U.S. FOOD AND DRUG ADMINISTRATION, NOR HAS ANY
STATEMENT IN THE USER MANUAL OR SOFTWARE BEEN
EVALUATED BY THE U.S. FOOD AND DRUG
ADMINISTRATION. THE ACUGRAPH DIGITAL MERIDIAN
IMAGING HARDWARE AND SOFTWARE ARE NOT INTENDED
TO DIAGNOSE, TREAT, CURE, OR PREVENT ANY DISEASE.
THIS EQUIPMENT IS FOR EXPERIMENTAL OR
INVESTIGATIONAL USE ONLY, AND DOES NOT TAKE THE
PLACE OF PROPER DIAGNOSIS AND TREATMENT BY A
LICENSED HEALTHCARE PROFESSIONAL.
Miridia has no control over your use of the Software and Hardware. Miridia
does not and cannot warrant the performance or results that may be
obtained by its use. Miridia does not represent, warrant, or guarantee the
accuracy and timeliness of the data contained in the Software and Miridia
shall have no liability of any kind whatsoever to you, or to any other party,
on account of any inaccuracies in or untimeliness of the data, or for any
delay in reporting such data contained in the Software. Various information
in the Software constantly changes, and the information in the Software is
only as of a particular date. Miridia does not warrant that the operation of
the Software will be uninterrupted or error free. Miridia is not responsible
for problems caused by accident, abuse, mishandling, alteration, or
improper use. Licensor does not warrant or guarantee the suitability of the
Software or Probe, or that either will meet your requirements.
TO THE MAXIMUM EXTENT PERMITTED BY APPLICABLE LAW,
MIRIDIA AND ITS SUPPLIERS WILL NOT BE LIABLE FOR ANY
INDIRECT, SPECIAL, INCIDENTAL, OR CONSEQUENTIAL
DAMAGES (INCLUDING DAMAGES FOR LOSS OF BUSINESS,
LOSS OF PROFITS, OR THE LIKE), WHETHER BASED ON
BREACH OF CONTRACT, TORT (INCLUDING NEGLIGENCE),
PRODUCT LIABILITY OR OTHERWISE, EVEN IF MIRIDIA OR ITS
REPRESENTATIVES HAVE BEEN ADVISED OF THE
POSSIBILITY OF SUCH DAMAGES AND EVEN IF A REMEDY SET
FORTH HEREIN IS FOUND TO HAVE FAILED OF ITS
ESSENTIAL PURPOSE. MIRIDIA’S TOTAL LIABILITY TO YOU
FOR ACTUAL DAMAGES FOR ANY CAUSE WHATSOEVER WILL
BE LIMITED TO THE AMOUNT PAID BY YOU FOR THIS
PRODUCT. SOME STATES DO NOT ALLOW THE LIMITATION
OF EXCLUSION OF LIABILITY FOR INCIDENTAL OR
CONSEQUENTIAL DAMAGES, SO THE ABOVE LIMITATION OR
EXCLUSION MAY NOT APPLY TO YOU.
65
THE ACUGRAPH EQUINE EDITION SYSTEM IS FOR USE BY
QUALIFIED PROFESSIONALS ONLY! ALWAYS OBSERVE
PROPER SAFETY TECHNIQUE WHEN WORKING AROUND
EQUINES.
FAILURE TO OBSERVE PROPER SAFETY PROCEDURES MAY
RESULT IN SERIOUS INJURY OR DEATH. IF YOU OR YOUR
PATIENT IS UNCOMFORTABLE WITH THE ACUGRAPH
PROCEDURE, DISCONTINUE USE AT ONCE.
MIRIDIA TECHNOLOGY INC. HEREBY DISCLAIMS ALL
LIABILITY FOR YOUR USE OF THIS EQUIPMENT, INCLUDING
CLAIMS FOR INJURY TO HUMANS OR ANIMALS, PROPERTY
DAMAGE, LOSS, OR DEATH. IF YOU DO NOT AGREE TO BE
BOUND BY THESE TERMS, PLEASE RETURN YOUR
EQUIPMENT TO YOUR VENDOR. BY USING THIS EQUIPMENT,
YOU CERTIFY THAT YOU ARE PROFESSIONALLY QUALIFIED
TO WORK IN THE FIELD OF EQUINE ACUPUNCTURE AND
THAT YOU AGREE TO OBSERVE PROPER SAFETY
PROCEDURES AT ALL TIMES.
PROTECT YOURSELF, YOUR PATIENT, AND YOUR EQUIPMENT
WITH CARE! PAY PARTICULAR ATTENTION TO PLACEMENT
OF EQUIPMENT, ROUTING OF CABLES, AND THE DEMEANOR
OF YOUR PATIENT AT ALL TIMES. DO NOT PLACE YOURSELF
IN A DANGEROUS SITUATION.
The limitations of damages set forth above are fundamental elements of the
basis of the bargain between Miridia and you. Miridia would not be able to
provide this product on an economic basis without such limitations.
You acknowledge that, in providing you with the Software and Hardware,
Miridia has relied upon your agreement to be bound by the terms of this
Agreement. You further acknowledge that you have read, understood, and
agreed to be bound by the terms of this Agreement, and hereby reaffirm
your acceptance of those terms. You further acknowledge that this
Agreement, together with the stipulations contained in the software license,
constitute the complete statement of the agreement between you and
Miridia, and that the Agreement does not include any other prior or
contemporaneous promises, representations, or descriptions regarding the
Software or Hardware. This Agreement is not, however to limit any rights
that Miridia may have under trade secret, copyright, patent, or other laws
that may be available to it. The agents, employees, distributors, and dealers
of Miridia are not authorized to make modifications to this Agreement, or
to make any additional representations, commitments, or warranties binding
on Miridia. Accordingly, additional statements such as dealer or other
66
advertising or presentations, whether oral or written, do not constitute
representations or warranties by Miridia and should not be relied upon. This
Agreement may be modified only in writing. If any provision of this
Agreement is invalid or unenforceable under applicable law, it is to that
extent, deemed omitted and the remaining provisions will continue in full
force and effect. The validity and performance of this Agreement shall be
governed by Idaho State law (without reference to choice of law principles),
except as to copyright and trademark matters, which are covered by United
States Federal laws. This Agreement shall be construed as to its fair
meaning and not strictly for or against either party.
67
Return Policy
All new AcuGraph systems are fully protected by a 30-day, money-back
guarantee. You may return your AcuGraph system anytime within the first
30 days of ownership for a full refund of the purchase price paid.
If you need to return your system, please contact your distributor or Miridia
Technology Inc. for instructions.
Note: Accessories purchased with your AcuGraph system may be subject to
separate return policies. Shipping fees are not eligible for refund. Please visit
www.AcuGraph.com/shop for details.
68