1
SpectraPure ®
FLOW RESTRICTOR REMOVAL, ADJUSTMENT
AND REPLACEMENT
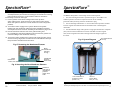
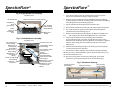
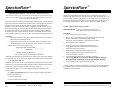
1. Locate the yellow concentrate tubing (Fig. B for Single-Membrane System or
Fig. C) for Dual-Membrane System). Remove the tubing from its push-fitting
at the membrane as follows:
a.) Firmly depress and hold the push-fitting collar down with your
thumbnail.
b.) While the push-fitting collar is depressed, pull the tubing straight
out of the push-fitting. Once the tubing is removed, release the
collar.
2.
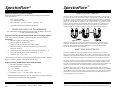
Carefully remove the flow restrictor assembly, now visible as a plastic insert In
the end of the yellow tubing (Fig. E). You may use an object such as a dull
knife to help pry the flow restrictor insert from the end of the tubing. The
entire flow restrictor (consisting of the insert coller and thin capillary tubing)
may then be gently extracted.
SpectraPure ®
5.
Re-insert the flow restrictor assembly into the yellow tubing and firmly
re-seat the insert into the end of the yellow tubing by carefully pressing on
the insert with your thumbnail. Care should be taken not to crush or otherwise damage the end of the capillary tubing protruding from the end of
the insert.
6.
Re-insert the yellow tubing into its push-fitting in the RO membrane as
follows:
a.) Moisten the O-ring seal inside the concentrate outlet fitting by dripping
a few drops of clean water into the fitting.
b.) Grasp the yellow tubing near the flow restrictor end, and insert the
tubing into the push-fitting. Push the tubing into the fitting until
resistance is felt, approximately 1/2 inch (12.7 mm). The tubing is now
resting on the O-ring seal inside the fitting.
c.) Firmly push the tubing approximately an additional 1/4 inch
(6.35 mm) further into the fitting to completely seat the line into
the fitting and O-ring seal.
7.
Turn on the system water supply and check for leaks prior to further
use or testing. If a leak is observed, you may not have pushed the
yellow tubing into the push-fitting far enough to seal the tubing against
the O-ring. Turn off the system water supply and reseat the tubing as
described above.
Note: Take care not to crush or otherwise damage the delicate capillary
tubing.
3.
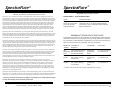
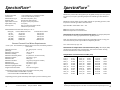
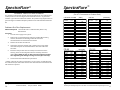
Refer to the Flow Restrictor Tables (Fig. D). Find the table that represents the
Flow Restrictor Assembly for the system that you have. Find the product
flow rate in the left-hand column and the length of the
flow restrictor in the right-hand column.
Example: If your Flow Restrictor Assembly is for a 90 GPD Membrane and
the product flow rate is 170 mL/Min, then the flow restrictor length should
be cut to 6.5 inches (16.5 mm). 170 is about halfway between 164 (7 in.)
and 175 (6 in.).
4.
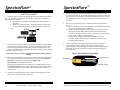
yellow tubing
capillary tubing
plastic insert
Using a new single-edge razor blade, carefully measure and then cut the
flow restrictor to the total length indicated.
SpectraPure®Inc.
12
Fig. E: Flow Restrictor Assembly
480.894.5437 Call us toll-free 1.800.685.2783
2167 East Fifth St, Tempe, Arizona 85281
SpectraPure®Inc. Fax 480.894.6109 Fax us toll-free 1.877.527.7873
E-mail: [email protected] Visit us on the web www.spectrapure.com
13