1
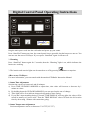
SAUNAGEN INFRARED SAUNA
OWNER’S MANUAL
THIS MANUAL IS FOR MODEL
PH-I
PH-II
PH-III
PH-IV
Thank you for choosing the SaunaGen Infrared Sauna!
1
Welcome
Dear Customer,
Thank you for purchasing SaunaGen products, we congratulate you on your new path to better
health. SaunaGen is striving to become the best infrared sauna supplier in the world; our list of
consumers increase daily and we believe your success is our success. We attribute this growth and
success entirely to our customer satisfaction, the recognized health benefits, and the quality of our
workmanship. At SaunaGen, we use only the finest materials coupled with state-of-art construction
and the highest safety standard in the industry.
You will be surprised at the noticeable effects of pain relief, weight control, stress reduction,
skin stimulation due to an increased blood circulation when using the SaunaGen.
Whatever your needs, we invite you to experience the difference with SaunaGen:
A difference in health benefit, a difference in quality, and a difference in attitude to our team
service and support.
The whole SaunaGen team is looking forward to and ready to provide you with an excellent
customer services.
Sincerely yours
SaunaGen Family
2
Introduction
SaunaGen congratulates you on your new path to better health! Thousands of users enjoy the
benefits of an infrared sauna every day. Now you can enjoy the great benefits of far-infrared heat
within the privacy of your own home.
Please read this manual carefully and thoroughly before using a SaunaGen Infrared Sauna for
the first time. We recommend for you to keep this manual for future reference.
Benefits:
Superior Detoxification: Removes Heavy Metals & Fat-stored Toxins
Increased Cardiovascular Conditioning
Stimulated Immune System
Improved Circulation
Pain Relief
Weight Loss and Cellulite Reduction
Beautiful Skin
Stress Reduction
You will be surprised at the noticeable effects on pain relief, weight control, skin stimulation, and
stress reduction due to an increased blood circulation when using this product.
SaunaGen Features:
High quality wood craftsmanship
High quality electronic control system & digital control panel
High quality car audio CD-Player
Pre-assembled board and build-in electrical elements makes the installation easy
Accurate temperature sensor
Energy efficient
Comfortable backrest
Considerate detailed designs, such as: tea-board, vent, towel rack, magazine-rack…etc
3
Packaging List for Model PH-I
Any missing parts please contact SaunaGen customer service at 1-800-319-3588.
Item Number:
1. Front Panel, 2. Back Panel, 3. Left Side panel, 4. Right Side Panel
5. Bottom Panel, 6. Top panel, 7. Top Cover, 8. Backrest , 9. Bench Panel,
10. Bench Heater Panel, 11. CD-Player, 12. CD-Cover Box, 13. Reading Light
Front Panel
Back Panel
Top Panel
Bench Heater Panel
Side Panel (L) Side Panel (R) Bottom Panel
Top Cover
Backrest
CD/Radio Player
CD Cover Box
4
Bench Panel
Reading Light
Packaging List for Model PH-II
Any missing parts please contact SaunaGen customer service at 1-800-319-3588.
Item Number:
1. Front Panel, 2. Back Panel, 3. Left Side panel, 4. Right Side Panel
5. Bottom Panel, 6. Top panel, 7. Top Cover, 8. Backrest, 9. Bench Panel,
10. Bench Heater Panel, 11. CD-Player, 12. CD-Cover Box, 13. Reading Light
Front Panel
Top Panel
Back Panel
Side Panel (L) Side Panel (R)
Top Cover
Backrest
Bench Heater Panel CD/Radio Player
CD Cover Box
5
Bottom Panel
Bench Panel
Reading Light
Packaging List for Model PH-III
Any missing parts please contact SaunaGen customer service at 1-800-319-3588.
Item Number:
1. Front Panel, 2. Back Panel, 3. Left Side panel, 4. Right Side Panel
5. Bottom Panel, 6. Top panel, 7. Top Cover, 8. Backrest, 9. Bench Panel,
10. Bench Heater Panel, 11. CD-Player, 12. CD-Cover Box, 13. Reading Light
Front Panel
Back Panel Side Panel (L) Side Panel (R)
Top Panel
Bench Heater Panel
Top Cover
Backrest
CD/Radio Player
Radio Cover Box
6
Bottom Panel
Bench Panel
Reading Light
Packaging List for Model PH-IV
Any missing parts please contact SaunaGen customer service at 1-800-319-3588.
Item Number:
1. Front Panel, 2. Left Back Panel, 3. Right Back Panel, 4. Left Side panel,
5. Right Side Panel, 6. Bottom Panel, 7. Top panel, 8. Top Cover, 8. Backrest,
9. Bench Panel, 10. Bench Heater Panel, 11. CD-Player, 12. CD-Cover Box, 13. Reading Light
Front Panel
Bottom Panel
Bench Panel
Back Panel(L)
Top Panel
Back Panel (R) Side Panel (L) Side Panel (R)
Top Cover
CD/Radio Player
7
CD-Cover Box
Backrest
Reading Light
Installation Requirements
1.Do not plug any other appliances into the outlet with your SaunaGen® infrared sauna.
2.Install the sauna on a completely level floor.
3.Do not spray the exterior with water. If the floor is damp, install a floor separator to keep the
sauna high & dry.
4.Do not store flammable objects or chemical substances near the sauna.
5. The sauna must be placed indoors and in a dry area. Moisture will cause damage to the
interior and exterior of the sauna.
8
Assembly Instructions
Assembly of the sauna requires at least 2 adults to complete. Please read the instructions thoroughly
before and during assembly to ensure proper installation of the sauna.
<1> LOCATION OF SAUNA
When you find a good location for your sauna, please notice the following.
1. The main power cord on the sauna must be easily accessible.
2. The location must be dry and leveled.
<2> PLACING BOTTOM PANEL
Place the bottom panel on the floor. Make sure that the FRONT direction of your sauna room.
(
Front
<3> CONNECTING BACK PANEL TO BOTTOM PANEL
Attach the back panel to the bottom panel by lining up the back panel on the groove of the bottom
panel. Align buckles on both panels and fasten them. (Please hold the back panel until one of the
side-panel had been installed.)
9
<4> INSTALL SIDE PANELS
Install the side panels (Left & Right) to the bottom and back panels by lining up buckles and
fastening them securely in place.
1. Please be sure which side panel is Left Side and Right Side.
2. Make sure that all buckles are properly secured in place on all panels.
<5>INSTALLING BENCH HEATER PANEL & PLUG BENCH HEATER CABLE
Slide down the bench heater panel by lining up its sides with the vertical guides on each side panel.
1. The heater grill is facing outward (toward the front of the sauna).
2. Push the bench heater panel all the way down until it is touching the bottom panel and securely in
place.
3. Plug in the bench heater cable to the connector from the back panel.
<6>INSTALLING BENCH
Install the bench by sliding it over the horizontal bench guides on the side panels. Push the bench all
the way in until it can touch the back panel and is securely in place. Make sure of the bench position,
so, that the smooth and finished side of the bench are facing up and forward.
10
<7> CONNECTING FRONT PANEL
Align buckles with both side panels and secure in place by fastening them.
<8> PLACING TOP PANEL
Lower the top panel onto the assembled panels.
1. The top panel must be positioned so that the antenna and cables on the top panel are in the front
left corner, right above the CD/Radio player.
2. Gently place the top panel onto the rest of the assembled panels. When four corners are in place,
gently push down the top panel from the outside corners until it is snugly fit over the rest of
panels.
3. Make sure the cables in the front left corner do not get pinched between the panels.
11
<9> Placing Backrest
For better protection of your back during sauna session, please screw in the backrest on the back
panel.
<10>INSTALLING THE CD PLAYER
1. Slide CD-player through slot in front wall.
2. Bolt “Z” shaped bracket to stud on back of CD-player so that the two holes in the bracket are on
top of CD-player. Use screws provided to attach to front wall.
3. Connect the wires marked A.
4. Connect the wires marked B.
5. Connect the wires marked C
6. Connect the wires marked “Buzzer”.
7. Plug the antenna cable into the back of the CD.
12
<12> COVERING THE CD BOX
In order to protect the CD player, please cover the CD box with screws on front panel and left side
panel. Be sure all the cables are covered.
<13> THE MAIN POWER CONNECTION ON THE TOP PANEL
1. Connect the right front corner heater wires.
2. Connect the left front corner heater wires.
13
3. Connect the back heater wires.
4. Check to be sure that all connections to the control box are secure.
<14> PUT ON THE TOP PROTECTION COVER
Gently position the top cover onto the top panel and secure in place with the screws provided.
<15> ENJOY YOUR SAUNA!
Plug in the main power cord into the wall outlet and power up your sauna. Pop in your favorite CD
in the CD player of the sauna, grab some towels, a glass of water and step into your sauna and enjoy
the benefits of the SaunaGen!!
14
Digital Control Panel Operating Instructions
1. Power on
Plug the main power cord into the wall outlet and power up your sauna.
Press “Start/End” button one time, the control panel is now operable, but the heaters are not on. You
can now use the stereo CD-Player. If you repress “Start/End” again it will turn off.
2. Warming
Press “Start/End” button again for 5 seconds, then the “Warming” light is on, which indicates the
heaters are working.
3. The interior and exterior lights can be turned on or off by pressing
button at anytime.
4.How to use CD Player:
For more information, you can consult with the attached CD/Radio Instruction Manual.
1. Sauna Time Adjustment
Session time can be set between 0 and 90 minutes.
a) Press TIME UP/DOWN ARROWS to adjust time, time value will increase or decrease by 1
minute at a time.
b) By holding down the UP/DOWN ARROWS you can speed up the rate of change.
c) Time light will be lit to indicate changes being made to time setting.
d) If you don’t input anything during 5 seconds, TIME DISPLAY will stop glint, the value will be
stored in memory as preset value. Then the TIME DISPLAY value will show the left session
time by decreasing 1 minute with sauna time going.
2. Sauna Temperature Adjustment
Session temperature can be set between 67-167F℉(25-75℃)
15
Digital Control Panel Operating Instructions
a) Press TEMP UP/DOWN ARROWS to adjust temperature, temperature value will increase or
decrease by 1 degree at a time.
b) By holding down the UP/DOWN ARROWS, you can speed up the rate of change.
c) 0F(or 0 C) will be lit to indicate changes being made to temperature setting.
d) If you don’t input anything during 5 seconds, TEMPERATURE DISPLAY will stop, glint
value will be stored in memory as preset value and will be displayed at next start up. And the
TEMPERATURE DISPLAY value shows the sauna room inside current temperature.
e) During session time, when the temperature reaches the setting level on the control panel,
“Warming” indicator light will be off, micro-control will force the heaters to stop heating and
keep a constant-temperature status. The heaters will turn off and on periodically in order to
maintain the desired temperature inside the sauna.
3. Switch between 0F and 0 C
You can alternate between Fahrenheit and Celsius while in setting mode by pressing 0F / 0 C
button.
16
Recommendation for Operate
1.Set up the desired session temperature and time using the control panel. ( suggested 110F-120F)
2.Allow approximately 10~15 minutes for the sauna to warm up before beginning a session.
3.Recommend sauna session use is around 30-45 minutes.
4. The heaters automatically maintain the desired temperature inside the sauna
5. The ceiling vent can be opened at any time to for air circulation.
6. Always drink plenty of water before, during, and after a session. Doing so will replenish lost
fluids from the body through perspiration.
7. Take a hot shower or bath prior to the sauna session will further promote perspiration. However,
dry off thoroughly before going into the sauna because excessive water will stain or warp the wood.
A shower after the session is refreshing and rinsing perspiration from the body.
8.To absorb perspiration and keep the sauna tidy during the session, place a towel on the bench and
floor of the sauna. Keep one towel handy to wipe excessive sweat from your body.
9.The interior wood is aromatic and adds to the enjoyment of your sauna session. If you feel the
odor is too strong during the first few months of usage, you can wipe the wood with a damp cloth to
minimize the odor.
17
Recommendation for Use
1) To regulate the temperature inside the sauna during your session, use the roof vent or the door
(by setting it at an angle).
2) If you need more cooling, simply leave the door open until the air around you feel comfortable.
3) Drink plenty of fluids prior to, during, and after your sauna session.
4) If you take a hot /warm shower or bath before your sauna session, you may perspire more. Try it
with and without bathing or showering first to determine which way you prefer.
5) To utilize the sauna’s heat therapy effect, give your hair a hot oil treatment while in the sauna.
Put oil or treatment into your hair and wrap it with towel. After the session is over, rinse your
hair thoroughly.
6) Use at least 2-3 towels; sit on one towel folded over several times for added cushioning. Put
another towel on the floor to absorb excess sweat. A third towel draped over the knees may aid
you in comfort and useful to towel off the sweat.
7) Be sure to towel off excess sweat during your session to help the body perspire more freely.
8) To help relieve sore and tense muscles, massage the affected areas while in sauna to help heal
faster.
9) Do not put any lotions or oils on the body or face when using the sauna. This may block the
pores.
10) Shaving your face or legs with a razor while profusely sweating in a sauna yields an incredibly
smooth result without the use of gels or foams.
11) Do not eat anything at least an hour before your sauna session. It is better to go in the sauna on
an empty stomach. You are more likely to feel uncomfortable sitting in a sauna with a full
stomach.
12) To make the most out of your sauna session, work your muscles while in the sauna. Stretch your
arms and legs; massage your neck and feet, etc.
13) You can benefit from the relaxing and soothing effects of a regular sauna session by going to
sleep afterwards. The peaceful and relaxed state rendered by a sauna session will help you sleep
easier and better.
14) At the first sign of cold or flu, increasing your sauna sessions may be beneficial in boosting your
immune treatment and decreasing the reproductive rate of the viruses. Consult your physician
for the proper treatment and care for this or any other conditions.
15) To treat your ankles and feet more effectively, elevate them while inside the sauna. Any area that
you wish to achieve a specific deep heating effect should be moved as close to one of the heaters
as feels comfortable.
16) After the session is over, do not immediately jump into the shower. Since your body was heated
up during the session, if will continue to sweat even after the heaters are off. Sit in the sauna
with the door open and allow the body to sweat a little more as it cools off. Once you feel
comfortable enough, take a warm (or cool) shower to rinse the sweat off your body completely.
18
Safety
Read all health and safety instructions. If in doubt as to the advisability of using your infrared
sauna, consult with your physician prior to use. If you feel light-headed or heat exhaustion
during session, exit the sauna immediately.
1. Read and follow all instructions carefully.
2. When installing and using this electrical equipment, basic safety precautions should always
be followed.
3. To reduce the risk of injury, do not allow children to use the sauna unless they are closely
supervised at all.
4. Do not use the sauna immediately following strenuous exercise. Wait at least 30 minutes to
allow the body to cool down completely.
5. Excessive temperature has a high potential for causing fetal damage during the early months
of pregnancy. Pregnant or possibly pregnant women should contact their physician
prior to using the sauna.
6. Hypothermia Danger: Prolonged exposure to hot air will induce hypothermia. Hypothermia
occurs when the internal temperature of the body reaches a level several degrees above the
normal body temperature of 370C (98.6 0F). While hypothermia has many health benefits, if
is important not to allow your body’s core temperature to rise above 1030F. Symptoms of
excessive hypothermia include dizziness, lethargy, drowsiness, and fainting. The effects of
excessive hypothermia may include failure to perceive heat, failure to recognize the need to
exit, unawareness of impending hazard, fetal damage in pregnant women, physical inability
to exit the sauna, and unconsciousness.
7. The use of alcohol, drugs, or medications prior to or during the sauna session may lead to
unconsciousness.
8. Persons suffering from obesity or with a medical history of heart disease, low or high
blood pressure, circulatory system problems, or diabetes should consult a physician
prior to using the sauna.
9. Persons using medications should consult a physician before using the sauna since
some medications may induce drowsiness while others may affect heart rate, blood
pressure, and circulation.
10. Never sleep inside the sauna while the unit is in full operation.
11. DO NOT use any type of cleaning agents on the interior of the sauna.
12. DO NOT stack or store any object on top of or inside the sauna.
13. If power supply cord becomes damaged it must immediately be replaced by the
manufacturer, or its agent, or a similarly qualified person to avoid a hazard.
14. DO NOT use the unit during an electrical storm, as there is a remote risk of shock.
15. Altering or tampering of any electrical connections on the power supply will void the
manufacturer’s warranty.
16. Dry your hands before handling electrical controls. Never unplug the power cord or adjust
the controls with wet hands or when you have wet bare feet. A danger of electrical shock
exists.
17. DO NOT attempt any repair without consulting the manufacturer first. Unauthorized repair
attempts will void manufacturer’s warranty.
19
18. All natural wood articles have variations in the color, grain, and irregularities such as knots,
and fine cracks. These characteristics are a part of the natural beauty of the wood, and in no
way should be considered defective.
20
Important Safeguards For Your Sauna
1. READ INSTRUCTIONS -- All the safety and operating instructions should be read before
the sauna is installed and operated.
2. RETAIN INSTRUCTIONS -- The safety and operating instructions should be retained for
future reference.
3. FOLLOW INSTRUCTIONS -- All operating and usage instructions should be followed at
all times.
4. CLEANING -- Unplug the sauna from the wall outlet before cleaning DO NOT use liquid
cleaners or aerosol cleansers inside the sauna. Use a damp cloth for cleaning.
5. ATTACHMENTS-- Do not use any attachments that are not recommended by the
manufacturer, may be hazardous.
6. WATER OR MOISTURE—DO NOT use your sauna near water, e.g. near a bathtub, in a
wet basement, or near a swimming pool and the like.
7. POWER-CORD PROTECTION-- Power supply cord should be routed so it is not likely to
be walked on or pinched by items placed upon or against it.
8. LIGHTING-- For added protection for your sauna during a lightning storm, or when it is left
unattended and unused for long time, unplug it from the wall outlet.
9. OVERLOADING-- Do not overload wall outlet and extension cord as this can result in a
risk of fire or electric shock.
10. SERVCING-- Always unplug your sauna from the wall outlet before servicing.
11. REPLACEMENT PARTS--When replacement parts are required, be sure it is specified by
the manufacturer or have the same characteristics as the original parts. Unauthorized
substitutes may result in fire, electric shock or other hazards.
12. SAFETY CHECK--Upon completion of any service or repairs to your sauna, ask the service
technician to perform safety checks and determine that your sauna is in proper operation
condition.
21
Cleaning and Maintenance
Before using your infrared sauna for the first time, clean the inside of the sauna with a damp
cloth.
Use furniture polish to clean the exterior.
We recommend placing a soft towel on the floor and on the bench of the sauna to absorb
perspiration during sauna use.
Scratches and stains on the sauna can be removed by simply using fine grade sandpaper over
the damaged area.
22
Troubleshooting Guide
Problems
1
2
3
4
5
Power indicator light not
on
Function indicator light
not on
Infrared Heater will not
heat up
Sauna
room
not
maintaining
correct
temperature
Peculiar burning smell
Explanations
Solutions
The fuse is burned out
1.Check for power to the outlet.
2. Check connection between
power cord and main control unit.
Check or replace the fuse.
The corresponding indicator light is
broken or burned out.
Repair or replace the control
panel.
The wiring or some electronic
component in the circuit has failed
Repair or replace what has failed in
that circuit.
The heater is broken
Its life will be shortened gradually
from excessive use.
Replace with a new heater of the
same specifications.
The fuse is burned out.
Check or replace the fuse.
The wiring connection for the heater
is loose or in the wrong location.
Check it, and reconnect tightly.
Power cord is not plug-in
The circuit board is not functioning.
Check power output on the circuit
board
Problem with heater.
See Item #3.
Incorrect setting on control panel
Reset it.
Check sensor wire connection and
condition.
Check to see if sensor head is
visible inside the sauna room.
The temperature sensor wire may be
loose or broken.
Circuit problems (broken component,
short circuit, failure of controlling
system) causing the burning of some
component in the electrical system.
1) Unplug sauna, check the voltage.
The light bulb is burned out.
Replace light bulb.
1. Make sure the bulb is tight
enough to make good contact in the
light fixture.
2. Check the lighting protection
fuse.
Replace it.
The bulb is not secured in the base
6
The light not working
The socket is broken.
Problems with electrical
panel.
7
No sound or poor sound
from speakers
control
The speaker is broken or speaker is
loose
23
2) Find the objects with problems.
3) Replace the parts.
Check or replace the panel.
1. Check speaker wire.
2. Check speaker.
The wire connection is loose.
CD-player is not turned on.
CD-player is not functioning
Check connectors to be sure they
make good contact.
Turn on the CD-player.
1. Check faceplate contact on
the CD-player.
2. Check fuse in the fuse
holder.
Please contact the distributor with questions regarding customer service and
troubleshooting.
24
SaunaGen Infrared Sauna Warranty
Five-year limited warranty on electrical, heater and cabinetry.
One-year limited warranty on stereo.
THIS UNIT IS MEANT FOR INDOOR USE ONLY. WARRANTY IS VOIDED IF SAUNAGEN
INFRARED SAUNA IS PLACED IN AN OUTDOOR ENVIRONMENT.
Limited warranty on SaunaGen Infrared Sauna replacement parts. SaunaGen warrants its products
to be free of defects in material and workmanship. Parts, which become defective within the
warranty period, will be repaired except for damage due to negligence, abuse, misuse,
misapplication, unauthorized modifications, improper installation, or normal wear and tear.
SaunaGen will not cover any labor costs attributable to disassembly and reassembly of the unit.
SaunaGen will not be responsible for labor costs of the routine maintenance, adjustments or
alterations to the calibration of the electrical devices.
Any parts claimed to be defective must be shipped freight prepaid, to SaunaGen and the repaired or
replaced product will be returned to the sender freight collect. When sent to SaunaGen, the product
must be accompanied by the sales receipt or other proof of purchase date, as well as the sender’s
name, mailing address, daytime telephone number and any other information relating to the
sender’s claim. This warranty applies to products produced by SaunaGen after June 1, 2005.
This warranty is extended only to the original purchaser and terminated upon transfer of ownership.
This warranty shall not apply to any product or component used in any industrial, rental, club or
commercial purpose. This warranty shall not apply to any claims arising from the misuse, neglect,
accident, abuse, improper installation, including but not limited to exposure to fire or to excessive
heat, and other hazards of nature. Under no circumstances will the manufacturer be liable for any
special or consequential damages arising from the use of the product, components, and the parts
attached, or installed with it. Nor for injury to any person, any claims for damages arising form the
use, installation or servicing of the product. The purchaser is responsible for providing adequate
access to the equipment so that any necessary service may be performed. The purchaser must
establish, by dated sales slip, invoice or deliver receipt, the date of purchase. All costs for removing
and reinstalling the sauna including the freight charges to and from customer shall be at the
customer’s expense.
Jurisdictional provision: the laws of the State of California control the provisions of this document.
By accepting this warranty the buyer subjects itself to the jurisdiction of the laws of the State of
California and agrees that place of suit shall be in Sacramento County, California, USA.
Attached hereto is the warranty card, which must be completed and returned to SaunaGen within
thirty (30) days from the date of purchase of the SaunaGen products. Failure to return the warranty
card within thirty days of purchase will void this warranty without any further notice.
REGARDLESS OF THE WARRANTY CARD BEING RETURNED WITHIN THE SPECIFIED
TIME PERIOD. THERE SHALL BE NO WARRANTIES OR OBLIGATIONS; EXPRESS OR
IMPLIED HEREUNDER, SPECIFICALLY EXCLUDING ANY IMPLIED WARRANTY OF
MERCHANTABILITY OR FITNESS FOR A PARTICULAR PURPOSE, OTHER THAN
SPECIFICALLY DESCRIBED HEREIN. NO LIABILITY SHALL ACCURE TO SAUNAGEN®
EXCEPT AS SET FORTH HEREIN.
25
Please register your SaunaGen product to receive a full warranty. Please fill out
the following information and mail the form to the following address within 30
days from the date of purchase:
First Name: _________________________ Last Name: __________________________
Home Address: __________________________________________________________
City _______________________________________State__________ Zip__________
Phone: ______________________________ Fax: _________________________
E-mail Address: _________________________________________________________
Purchase Date: __________________________________________________________
Dealer Name: __________________________________________________________
C/No. (located outside of the package) _______________________________________
Optional: Please answer the questions below for us to better serve you and to improve customer
care.
What is the primary reason you purchased SaunaGen Infrared Sauna?
What was the greatest influence on your decision to purchase SaunaGen Infrared Sauna?
What magazines or publications do you subscribe to?
Where did you hear about SaunaGen?
Suggestions/Comments:
26
www.saunagen.com
27