1
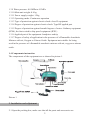
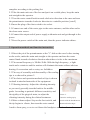
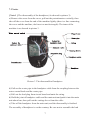
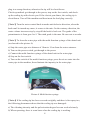
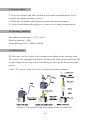
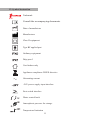
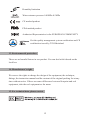
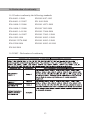
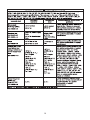
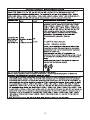
Contents
1 The installation and components of equipment—————————————1
1.1 Instruction——————————————————————————1
1.2 Components—————————————————————————1
1.3 The main technical specifications—————————————————1
1.4 Components instruction—————————————————————2
2. Installation and adjustment————————————————————2
3. Operation methods and function instruction—————————————3
4. Sterilization——————————————————————————4
5. Contraindication————————————————————————4
6. Storage and maintenance—————————————————————4
7. Troubleshooting and notes————————————————————5
7.1 Troubleshooting————————————————————————5
7.2 Notice———————————————————————————7
8. Precaution——————————————————————————9
9. Transportation————————————————————————10
10. Working condition——————————————————————10
11. After service—————————————————————————10
12. Symbol instruction——————————————————————11
13. Environmental protection———————————————————12
14. Manufacturer’s right—————————————————————12
15. For technical data, please contact————————————————12
16. Declaration of conformity———————————————————13
16.1 Product conformity the following standards————————————13
16.2 EMC - Declaration of conformity————————————————13
17. Statement——————————————————————————16
1 The installation and components of equipment
1.1 Instruction
Guilin Woodpecker Medical Instrument Co., Ltd. is a professional manufacturer
in researching, developing and producing ultrasonic scalers. The product is
mainly used for teeth cleaning and also an indisensable equipment for tooth
disease prevention and treatment.
The ultrasonic scaler UDS-J has scaling, perio functions with the following
features:
1.1.1 Automatic frequency tracking ensures that the machine always works on
the best frequency and more steadily.
1.1.2 Digitally controlled, easy operation and more efficient for scaling.
1.2 Components
1.2.1 The components of machine are listed in the packing list.
The scaling tips and other accessories are not listed in this instruction manual
completely. The detail can be found in the instruction for tips and packing list.
1.2.2 Product performance and structure
Ultrasonic scaler is composed of electro circuit, water way and ultrasonic
transducer.
1.2.3 Scope of application
Ultrasonic scaler UDS-J is used for the dental calculus elimination.
1.3 The main technical specifications
1.3.1 Power source input: 220-240V~
1.3.2 Main unit input: 24V~
50Hz/60Hz
50Hz/60Hz
l.3A
13.3 Output power: 3W to 20W
1.3.4 Output tip vibration frequency: 30kHz±3kHz
1.3.5 Output half-excursion force: <2N
1.3.6 Output primary tip vibration excursion: ≤100μm
1.3.7 Main unit fuse: T1.6AL 250V
1.3.8 Power source fuse: T0.5AL 250V
1
150mA
1.3.9 Water pressure: 0.01MPa to 0.5MPa
1.3.10 Main unit weight: 0.8 kg
1.3.11 Power supply weight: 1.2kg
1.3.12 Operating mode: Continuous operation
1.3.13 Type of protection against electric shock: class II equipment
1.3.14 Degree of protection against electric shock: Type BF applied part
1.3.15 Degree of protection against harmful ingress of water: Ordinary equipment
(IPX0), the foot switch is drip-proof equipment (IPX1)
1.3.16 Applied part of the equipment: handpiece and tip
1.3.17 Degree of safety of application in the presence of a Flammable Anesthetic
Mixture with air, Oxygen or Nitrous Oxide: Equipment not suitable for being
used in the presence of a flammable anesthetic mixture with air, oxygen or nitrous
oxide.
1.4 Components instruction
The components of the equipment are as showed in picture 1.
Picture 1
2. Installation and adjustment
2.1 Open the packing box, make sure that all the parts and accessories are
2
complete according to the packing list.
2.2 Take the main unit out of the box and put it on a stable plane, keep the main
unit straight to the operator.
2.3 Turn the water control knob towards clockwise direction to the max and turn
the potentiometer towards clockwise direction to a suitable position. [note2]
2.4 Insert the plug of the foot switch to its socket.
2.5 Connect one end of the water pipe to the water entrance, and the other end to
the clean water source.
2.6 Connect the output end of power supply with main unit and get through to the
power
2.7 Press the power switch of the main unit, then the power indicator shines.
3. Operation methods and function instruction
3.1 Direct the pit of the potentiometer at the "1" dial on the corer before turning
on the scaler, make the main unit straight to the operator and turn the water
control knob towards clockwise direction about three circles to the maximum.
3.2 The normal frequency is 30kHz±3kHz. With the high frequency , a light
touch and a certain to-and-fro motion will eliminate the tartar without obvious
heating. Overexertion and overstay are forbidden.
3.3 The way of assembly and disassembly of the scaling
tips is as showed in picture 2.
3.4 The choice and operation methods of tips is shown
in detail in attached materials of the equipment.
3.5 Vibrating intensity: Adjust the vibrating intensity
as you need, generally turn the knob to the middle
grade. According to patient's different sensitivity and
the rigidity of the gingival tartar, to adjust the
Picture 2:
vibrating intensity during the clinical treatment.
Fasten the scaling tip by
3.6 Water volume adjust: Step on the foot switch, and
wrench with the handbetween
the tip begins to vibrate, then turn the water control
thumb and index finger.
knob to form spray, so as to cool down the handpiece and clean the teeth.
3
3.7 The handpiece can be handled in the same gestureas a pen in hand.
3.8 During the clinical treatment, be sure not to make the end of tip touch the
teeth vertically and not to make the tip overexert on the surface of the teeth, in
case of hurting the teeth and damaging the tip.
3.9 After finishing operation, keep the machine working for 30 seconds with the
water supply in order to clean the handpiece and the scaling tip.
3.10 Unscrew the scaling tip and sterilize it.
4. Sterilization
4.1 All the scaling tips can be autoclaved.
4.2 Handpiece can be sterilized by any neutral sterilized liquid for cleaning and
sterilizing. Do not sterilize under the high temperature and pressure.
4.3 The scaling tip and wrench can be cleaned by ultrasonic cleaner.
5. Contraindication
5.1 The patient who has hemophilia is not allowed to use this equipment.
5.2 The patient or doctor who with heart pacemaker is forbidden to use this
equipment.
5.3 The heart disease patient, pregnant woman and children should be cautious to
use the equipment.
6. Storage and maintenance
6.1 The equipment should be handled carefully and lightly. Be sure that it is far
from the vibration, and is installed or kept in a cool, dry and ventilated place.
6.2 Don't store the machine together with the articles that are combustible
poisonous, caustic, or explosive.
6.3 This equipment should be stored in a room where the relative humidity is ≤
80%, atmospheric pressure is 50kPa to106kPa, and the temperature is -10℃ to
+50℃.
6.4 Please turn off the power switch and pull out the power plug when the
4
equipment is not used. If the machine is not used for a long time, please make it
get through to the power and water once per month for five minutes.
7. Troubleshooting and notes
7.1 Troubleshooting
Fault
Possible
Solutions
The scaling tip doesn’t The power line plug is in Make the plug insert to the
vibrate and there is no loose contact.
socket well.
water flowing out when The foot switch is in loose Insert the foot switch to its
stepping on the foot
contact.
switch.
The fuse of transformer is Open the power box, change
socket tightly.
broken.
a new T0.5AL250V fuse.
The fuse in the main unit Take off the cover, change a
is broken.
new T1.6AL250V fuse.
The scaling tip doesn’t The tip hasn’t been
vibrate but there is
Screw the tip on the
screwed on the handpiece handpiece tightly (picture 2).
water flowing out when tightly.
stepping on the foot
The connect plug between Contact our dealers or us.
switch.
the handpiece and the
circuit board is in loose
contact.
Something wrong with
Contact our dealers or us
the handpiece
[note 1].
The handpiece
The water control knob is Turn on the water control
generates heat.
in a low grade.
knob to a higher grade [note
2].
The potentiometer is
damaged [note 2].
5
Change a new one.
Fault
Possible
Solutions
The scaling tip vibrates The water control knob is Turn on the water control
but there is no fine
turn off.
knob [note 2].
spray when stepping on There is impurity in the
Clean inside of solenoid
the foot switch.
valve ( picture 5).
solenoid valve.
The water pipe is blocked. Clean the water pipe by
multi-function syringe [note
3].
There is still water
There is impurity in the
Clean inside of solenoid
flowing out after the
solenoid valve.
valve (picture 5).
power is off.
The amount of spouting The water control knob is Turn on the water control
water is too little.
in a low grade.
knob to a higher grade [note
2].
The water pressure is not Make the water pressure
high enough.
higher.
The water pipe is blocked Clean the water pipe by
multi-function syringe
[note2].
The vibration of the tip The tip hasn't been
Screw the tip on the
becomes weak.
handpiece tightly (picture 2).
screwed on to the
handpiece tightly.
The tip is vibrated loose. Screw the tip on the
handpiece tightly (picture 2).
The tip is damaged
Change a new one.
[ note3 ].
The vibration is
The potentiometer is
too strong and the
damaged [note 2].
Change a new one.
potentiometer is failure.
If the troubles still can't be solved, please contact with the local distributors or
our company.
6
7.2 Notice
[ Note 1 ] The disassembly of the handpiece (As showed in picture 3):
a) Remove the screw from the cover, pull out the potentiometer vertically, then
take off the cover from the end of the machine lightly (there is a line connecting
the cover and the machine, don't use too much strength). The inner of the
machine is as showed in picture 3.
Picture 3 The disassemblt of handpiece
b) Pull out the water pipe in the handpiece cable from the coupling between the
water control knob and the water pipe.
c) Pull out the lead plug from circuit board and untie the string.
d) Hold the joint of handpiece cable and the main unit and push it into the main
unit about lcm, then pull out the cutting sleeve from the cable.
e) Take off the handpiece from the main unit, and the disassembly is finished.
The assembly of handpiece is on the contrary. Be sure not to assemble the lead
7
plug in a wrong direction, otherwise the tip will be electriferous.
Check-up method: get through to the power, step on the foot switch, and checkup the scaling tip with electric pen. If the electric pen shines, the scaling tip is
electriferous. Turn off the machine and then insert the lead plug correctly.
[ Note 2] Turn the water control knob towards anticlockwise direction, when the
knob can't be turned any more, it comes to the min. On the contrary direction, the
water volume increases step by step till the knob is back-out. The grade of the
potentiometer is from gear l to 9. The ninth grade is the max. Be sure not to overdo.
[ Note 3] To clean the water pipe with the multi-function syringe of the dental unit
(as showed in the picture 4):
a) Snip the water pipe at a distance of 10cm to 15cm from the water entrance.
b) Turn on the power switch, get through to the power.
c) Connect the multi-function syringe of the dental unit to the water pipe.
d) Step on the foot switch.
e) Turn on the switch of the multi-function syringe, press the air or water into the
water pipe in the machine, then eliminate the impurity in the water pipe.
Picture 4 Multi-fuction syringe
[ Note 4] If the scaling tip has been screwed on tightly and there is fine spray too,
the following phenomena shows that the scaling tip was damaged:
a) The vibrating intensity and the pulverization degree become weak obviously.
b) When operating, there is some buzz when the scaling tip is working.
8
8. Precaution
8.1 Notice when using equipment
8.2 Keep the scaler clean before and after operation.
8.3 The scaling tip, wrench and handpiece must be sterilized before each treatment.
8.4 Don't screw the scaling tip when stepping on the foot switch.
8.5 The scaling tip must be fastened. There must be fine spray coming out from the
tip when operating.
8.6 Change a new one when the tip is damaged or worn excessively.
8.7 While scaler working ,the heat of scaling tip will become higher if there is no
water flowing out.Please keep the water flow smoothly.
8.8 Don't twist or rub the tip.
8.9 Don't use impure water source, and be sure not to use normal brine instead of
pure water source.
8.10 If use the water source without hydraulic pressure, the water surface should be
one meter higher than the head of the patient.
8.11 After operating, turn off electrical source, and then pull out the plug.
8.12 As a professional manufacturer of medical instruments, we are only
responsible for the safety on the following conditions:
8.12.1 The maintenance, repair and modification are made by the manufacturer or
the authorized dealer.
8.12.2 The changed components are original of "WOODPECKER" and operated
correctly according to instruction manual.
8.1.13 Please put the power plug into the socket easy to pull out, to make sure it
can be pull out in emergency.
8.1.14 The power supply is considered as a part of ME equipment.This device can
only be equipped with the special power supply of Guilin Woodpecker Medical
Instrument Co., Ltd.
8.1.15 The power supply is NOT waterproof. Please keep it dry and away from the
water.
8.16 The screw thread of the scaling tips produced by other manufacturers maybe
coarse, rusty and collapsed, which will damage the screw thread of the handpiece
irretrievably. Please use "WOODPECKER" brand scaling tip.
9
9. Transportation
9.1 Excessive impact and shake should be prevented in transportation. Lay it
carefully and lightly and don't invert it.
9.2 Don't put it together with dangerous goods during transportation.
9.3 Avoid solarization and getting wet in rain or snow during transportation.
10. Working condition
Environment temperature: +5℃ to +40℃
Relative humidity: ≤80%
Atmosphere pressure: 70kPa to106kPa
11. After service
We offer one year free repair to the equipment according to the warranty card.
The repair of the equipment should be carried out by professional technician. We
are not responsible for any irretrievable damage caused by the not professional
person.
Note: "P" was put on the valve seat to designate the water entrance.
Picture 5 The assembly and disassembly of the solenoid valve
10
12. Symbol instruction
Trademark
Consult the accompanying documents
Date of manufacture
Manufacturer
Class II equipment
Type BF applied part
Ordinary equipment
Drip-proof
Used indoor only
Appliance compliance WEEE directive
Alternating current
~24V power supply input interface
Foot switch interface
Water control knob
Atmospheric pressure for storage
Temperature limitation
11
Humidity limitation
Water entrance pressure 0.01MPa-0.5MPa
CE marked product
FDA marked product
Authorised Representative in the EUROPEAN COMMUNITY
Got the quality management system certification and CE
certification issued by TüV Rheinland
13. Environmental protection
There are no harmful factors in our product. You can deal with it based on the
local law.
14. Manufacturer’s right
We reserve the rights to change the design of the equipment, the technique,
fittings, the instruction manual and the content of the original packing list at any
time without notice. If there are some differences between blueprint and real
equipment, take the real equipment as the norm.
15. For technical data, please contact
12
16. Declaration of conformity
16.1 Product conformity the following standards
EN 60601-1:2006
EN ISO 9687:1995
EN 60601-1-2:2007
EN 1041:2008
EN 61000-3-2:2006
EN ISO 14971:2009
EN 61000-3-3:2008
EN ISO 7405:2008
EN 60601-1-4:1996
EN ISO 17664:2004
EN 60601-1-6:2007
EN ISO 17665-1:2006
EN 61205:1994
EN ISO 10993-1:2009
EN ISO 22374:2005
EN ISO 10993-5:2009
EN 62304:2006
EN ISO 10993-10:2010
EN 980:2008
16.2 EMC - Declaration of conformity
13
14
15
The device has been tested and homologated in accordance with EN 60601-1-2
for EMC. This does not guarantee in any way that this device will not be effected
by electromagnetic interference Avoid using the device in high electromagnetic
environment.
17. Statement
All rights of modifying the product are reserved to the manufacturer without
further notice. The pictures are only for reference. The final interpretation rights
belong to GUILIN WOODPECKER MEDICAL INSTRUMENT CO., LTD.
The industrial design, inner structure, etc, have claimed for several patents by
WOODPECKER, any copy or fake product must take legal responsibilities.
16
ZMN/WI-04-524
2.5 Edition