1
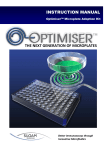
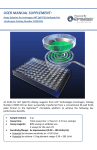
USER MANUAL Optimiser™ Microplate Description Optimiser™ Microplate System for Immunoassay (ELISA) Optimser™ Microplate System Top Well Through hole Optimiser™ Microplates Absorbent Pads Holder Microchannel Bottom Introduction The Optimiser™ integrates the Power of Microfluidics within the traditional microplate architecture to offer up to 10x saving on reagent consumption and total assay time. The Optimiser™ is SBS/ANSI compliant, can be used without any specialized liquid handling equipment, and can be read by conventional microplate fluorescence readers. For operation, reagents are sequentially added to the loading well, drawn into the channel by capillary forces and excess drawn out by absorbent pad. The microfluidic design ensures that the channel is not emptied by absorbent pad allowing for static incubation step. Subsequent liquid addition breaks capillary barrier at inlet and flow resumes. Please visit www.siloambio.com for more details. All assay reactions occur in the microfluidic channel at the bottom surface under each well. The high surface area to volume ratio and short diffusion distances of the microfluidic channels allow rapid reactions (5 to 10 minutes incubation/step for 30 to 60 minutes immunoassays). The Optimiser™ provides significant reagent savings, time savings and elimination of traditional wash requirements. Siloam Biosciences, Inc. 513-429-2976 www.siloambio.com Patent pending Document ID: OPTI-2-MS-0002-B3 Release date: February 9, 2011 Page 1 of 10 Optimiser™ Assembly 1. Place the holder on a flat work-surface with the Optimiser™ logo embossed on the front of the holder facing to the laboratory technician. 2. Place an absorbent pad on the top of the holder platform. The absorbent pad has a smooth surface and a rough surface. Position the absorbent pad with the smooth surface facing down (on holder) and rough surface facing up. 3. Place an Optimiser™ plate over the holder and pad with the well position markers (A through H) facing to the left. 4. Push the Optimiser™ microplate on the holder until it clicks in place. Ensure that the plate is locked in position (plate should not move more than 1 mm within holder). Siloam Biosciences, Inc. 513-429-2976 www.siloambio.com Patent pending Document ID: OPTI-2-MS-0002-B3 Release date: February 9, 2011 Page 2 of 10 Pipetting into the Optimiser™ Liquid handling on the OptimiserTM is very similar to a conventional microplate. Please follow the guidelines below for repeatable operation. Pipetting guidelines: Air bubble in solution will impede the flow of reagents from the well to the microfluidic chamber. Pipette carefully to prevent creation of air bubbles in samples and reagents o Make sure the end of tip is submerged into the solution when drawing the liquid up into the pipette tip o Push the pipette button to first stop to dispense the liquid into the well. DO NOT blow-out the residual liquid (by pushing to second stop) from the tip1. Please review a short instructional video at https://www.siloambio.com/optimiservideo.php to review the pipetting procedure. If there is bubble after loading, please use small (26 gauge) syringe needle (without syringe) to remove the bubble by gently poking it out. Recommended pipettes for samples and reagents: 0.1 – 10 µl Recommended pipettes for wash buffer: 1-100 µl The protocol described in the user manual suggests 10 µl of working volume for all liquid handling steps (except washing buffer). It is possible to use as low as 5 µl of volume, but it is necessary to ensure that all dispense volume is transferred to the well (not retained on the pipette tip outside surface). It is mandatory to use the 0.1-10 µl tips when dispensing lower than 10 µl. Please ensure that all reagents (for a given step in the assay sequence) are loaded within ~ 1 minute time span. If a large number of samples (or different concentration reagents during optimization) are to be loaded, please use a V-shape 96-well plate (or other reservoirs in 96-well format) to prepare the solutions and transfer to the Optimiser™ using a multi-channel pipette. The tip should NOT be placed into the through hole, as shown below. RIGHT WRONG 1. “Good Laboratory Pipetting Guide”, Thermo Scientific Finnpipette Finntip, http://www.pipettecalibration.net/pipettecalibration-files/Guide-To-Pipetting-2.pdf Siloam Biosciences, Inc. 513-429-2976 www.siloambio.com Patent pending Document ID: OPTI-2-MS-0002-B3 Release date: February 9, 2011 Page 3 of 10 Additional Equipment, Material and Reagents Required (not included) OptiMax™ Reagent Pack for Optimser™ Microplate, contains o OptiPrime™ Pre-Wetting Solution o OptiBind™ Coating Buffer o OptiWash™ Wash Buffer o OptiBlock™ Blocking Buffer o QuantaRed™ Enhanced Chemifluorescent HRP Substrate Kit Fluorescence 96-well microplate reader with appropriate filters (See example at https://www.siloambio.com/optimiser-reader-settings.pdf) Centrifuge Centrifuge tubes Precision micropipette set 5~50 µl multichannel micropipette 96-well polypropylene conical bottom plate or other 96-well format reservoirs Sample reservoirs Kimwipe® or tissue paper DI water For Alkaline Phosphatase based assay, use AttoPhos® AP Fluorescent Substrate for detection. Please contact Siloam for detail information. Related Product OMR-5 OMR-10 OMR-50 OptiMax™ 5-Plate Reagent Pack OptiMax™ 10-Plate Reagent Pack OptiMax™ 50-Plate Reagent Pack **CRITICAL CONSIDERATIONS FOR SUCCESSFUL ASSAY PROCEDURE** Only aqueous solutions have been verified in Optimiser. It is unknown whether solvent based solutions are compatible with the Optimiser. All solutions must be free of particulates, precipitates, and bubbles. All buffers, particularly blocking buffer, should be filtered using a 0.2 μm vacuum filtration system and stored at 2~8oC. If any precipitate appears, or if any well-flow issues arise, the buffers should be refiltered. It is necessary to prepare biological samples such as serum /cell lysates for analysis on the Optimiser by centrifuging samples at 13,000 g for 10 minutes and then using the supernatant. This process will ensure efficient flow through the microchannels. Horseradish peroxidase (SAv-HRP) is inactivated by sodium azide. Therefore, sodium azide should not be included in any buffers used for the biotinylated detection antibody, the washes, or the SAv-HRP itself. Don’t let the pipette tip touch the top ring surface (flat portion at top of each well). Avoid any cross contamination, particularly of SAv-HRP solution. Always change the pipette tips when handling different buffers/reagents or when changing from high to low – concentration solutions. Detection antibody and enzyme conjugates should be prepared in the blocking buffer employed in the assay to minimize nonspecific binding. Please pay extra attention to avoid air bubble in loading reagents with surfactant. The air bubble will impede reagent flow through the microchannels. For same reason, detergent (e.g. Tween-20) is NOT recommended for use in any solutions. Siloam Biosciences, Inc. 513-429-2976 www.siloambio.com Patent pending Document ID: OPTI-2-MS-0002-B3 Release date: February 9, 2011 Page 4 of 10 Example Procedure (Optimiser™ versus Standard 96-well Assay) The operation in ELISA includes four major steps: 1) reagent loading and incubation, 2) dilution, 3) washing, and 4) substrate loading followed by plate reading. The operation with the Optimiser is as simple as that with standard 96-well plates, as described below: Operation step Standard 96-well plate Reagent loading and incubation Load 100 µl of solution into each well, seal the plate with film, and incubate for 2 hours in room temperature. Optimiser™ Load 10 µL of solution into each well, incubate for 5~10 minutes in room temperature ONLY. See example protocols below. No sealing film is required. Dilution Dilute in tubes then transfer to plate; serial dilution in plate. All dilution must be done in tubes/reservoirs then transfer to plate. Washing After each incubation, load and aspirate/dump 300 µl wash buffer in each well, 35 times. Washing in Optimiser™: Load 30 µl of washing buffer into the well and wait until it is empty, no aspiration/dumping required When washing is required: 1) Two wash steps are required before loading substrate. 3) One wash step is required after loading the 3rd reagent and every reagent thereafter. (Please check the examples in following pages) Substrate loading and plate reading Load 100 µl substrate into each well, read with 96-well microplate reader. Load 10 µl chemifluorescence substrate into each well, wait until all wells empty, take the plate off the holder, wipe off the liquid residue on the bottom with Kimwipe or tissue paper, read with 96-well microplate fluorescence reader. Note that the substrate is still present in the microchannel and signal is generated from substrate volume in the microchannel. Reader set up Specify (a) wavelength, (b) gain/sensitivity setting, and (c) plate type. Please refer to TN0002 (https://www.siloambio.com/optimiser-readersettings.pdf) for reader set up procedure. Siloam Biosciences, Inc. 513-429-2976 www.siloambio.com Patent pending Document ID: OPTI-2-MS-0002-B3 Release date: February 9, 2011 Page 5 of 10 The following protocols are example applications for Optimiser™ Microplate System. Specific applications require optimization for reagent concentrations. See examples on Siloam’s website (reference to application notes) for optimization process. Example 1: Indirect ELISA Procedure using the Optimiser™ microplate REAGENT AND PLATE PREPARATION Coating Buffer: OptiBind™ Coating Buffer Blocking Buffer: OptiBlock™ Blocking Buffer Wash Buffer: OptiWash™ Wash Buffer Antigen Solution: Purified antigen diluted to 1 µg/ml with Coating Buffer. Primary Antibody Standards: Primary antibody (mouse IgG) diluted to various concentrations with appropriate matrices. 6) Secondary Antibody Solution: HRP conjugated anti-mouse IgG antibody diluted to 0.1 μg/ml with Blocking Buffer. Sodium azide is excluded from all buffers, as this interferes with HRP activity. 7) Chemifluorescent Substrate Final (Working) Solution: Equilibrate the QuantaRed™ substrate kit to room temperature for at least 10 minutes. Mix 50 parts QuantaRed™ Enhancer Solution with 50 parts QuantaRed™ Stable Peroxide and 1 part QuantaRed™ ADHP Concentrate. Use within 30 minutes of preparation. 8) Optimiser™ priming: Assemble Optimiser™ microplate with absorbent pad and holder, load 10 µl of Opti-Prime™ Solution into each well of the Optimiser™ plate, and wait until all wells are empty. Use the plate within 15 minutes. 1) 2) 3) 4) 5) ASSAY PROCEDURE Ensure that the Optimiser™ priming procedure as described in Step 8 of Reagent and Plate Preparation section is completed before starting the assay procedure. 1) Add 10 μl of Antigen Solution into each well, and incubate at room temperature for 5 minutes. 2) Add 10 μl of Blocking Buffer into each well, and incubate at room temperature for 5 minutes. 3) Pipette 10 μl of each Primary Antibody Standard into appropriate wells in triplicate rows, and incubate at room temperature for 10 minutes. 4) Add 30 μl of Wash Buffer into each well; wait until all wells are empty. 5) Add 10 μl of Secondary Antibody Solution into each well, and incubate at room temperature for 10 minutes. 6) Repeat step 4. 7) Change the absorbent pad 8) Repeat step 4. 9) Add 10 μl of QuantaRed™ Working Solution in each well, wait until all wells are empty, and take off the plate from the holder. Wipe off all residue from bottom of Optimiser™ plate with Kimwipe® . Measure the fluorescence at the time point 15 minutes after adding substrate. Siloam Biosciences, Inc. 513-429-2976 www.siloambio.com Patent pending Document ID: OPTI-2-MS-0002-B3 Release date: February 9, 2011 Page 6 of 10 TYPICAL DATA Results of a typical standard run of a cytokine protein indirect assay are shown below. (BioTek Flx800 Fluorescence reader, 528/20 for excitation, 590/35 for emission, sensitivity at 45, plate type “96 WELL PLATE”) 14000 12000 FLU 10000 8000 6000 4000 2000 0 0 2 4 6 8 Primary antibody (µg/ml) 10 12 Standard (µg/ml) 10 5 2.5 1.25 0.63 0.31 0.16 0.08 0.04 0 FLU 12265 12453 12459 12258 11270 10862 7955 4915 3156 171 Example 2: Sandwich ELISA Procedure for Optimiser™ REAGENT AND PLATE PREPARATION 1) 2) 3) 4) 5) 6) 7) 8) 9) Coating Buffer: OptiBind™ Coating Buffer Blocking Buffer: OptiBlock™ Blocking Buffer Wash Buffer: OptiWash™ Wash Buffer Capture Antibody Solution: Purified anti-mouse IL-2 antibody diluted to 2 µg/ml with Coating Buffer. Assay Standards: Recombinant protein diluted to various concentration with appropriate matrices. Detection Antibody Solution: Biotinylated antibody diluted to 2 μg/ml with Blocking Buffer. SAv-HRP: HRP conjugated streptavidin diluted to 0.125 μg/ml with Blocking Buffer for Optimiser™. Sodium azide is excluded from all buffers, as this interferes with HRP activity. Chemifluorescent Substrate Final (Working) Solution (for Optimiser™ assay): Equilibrate the QuantaRed™ substrate kit to room temperature for at least 10 minutes. Mix 50 parts QuantaRed™ Enhancer Solution with 50 parts QuantaRed™ Stable Peroxide and 1 part QuantaRed™ ADHP Concentrate. Use within 30 minutes of preparation. Optimiser™ priming: Assemble Optimiser™ microplate with absorbent pad and holder, load 10 µl of Opti-Prime™ Solution into each well of the Optimiser™ plate, and wait until all wells are empty. Use the plate within 15 minutes. Siloam Biosciences, Inc. 513-429-2976 www.siloambio.com Patent pending Document ID: OPTI-2-MS-0002-B3 Release date: February 9, 2011 Page 7 of 10 ASSAY PROCEDURE Ensure that the Optimiser™ priming procedure as described in Step 9 of Reagent and Plate Preparation section is completed before starting the assay procedure. 1) Add 10 μl of Capture Antibody Solution into each well, and incubate at room temperature for 5 minutes. 2) Add 10 μl of Blocking Buffer into each well, and incubate at room temperature for 5 minutes. 3) Pipette 10 μl of each Assay Standard* into appropriate wells in triplicate rows, and incubate at room temperature for 10 minutes. 4) Add 30 μl of Wash Buffer into each well; wait until all wells are empty. 5) Add 10 μl of Detection Antibody Solution into each well, and incubate at room temperature for 10 minutes. 6) Repeat step 4. 7) Add 10 μl of SAv-HRP Solution into each well, and incubate at room temperature for 10 minutes. 8) Change the absorbent pad 9) Repeat step 4 twice. 10) Add 10 μl of QuantaRed™ Working Solution in each well, wait until all wells are empty, and take off the plate from the holder. Wipe off all residue from bottom of Optimiser™ plate with Kimwipe® . Measure the fluorescence at the time point 15 minutes after adding substrate. *Additional volume of sample may improve assay sensitivity. Please discuss your application with Siloam tech support and we can offer more accurate guidance. TYPICAL DATA Results of a typical standard run of a cytokine protein sandwich assay are shown below. (BioTek Flx800 Fluorescence reader, 528/20 for excitation, 590/35 for emission, sensitivity at 45, plate type “96 WELL PLATE”) IL-2 (pg/ml) 10000 Optimiser™ Chemifluorescent FLU 1000 100 10 1 10 100 Antigen (pg/ml) Siloam Biosciences, Inc. 513-429-2976 www.siloambio.com 250 Average 5498 Blank-Subtracted 5256 125 2978 2736 63 1654 1412 31 1008 766 16 600 359 8 475 233 4 385 144 2 284 43 0 241 ― 1000 Patent pending Document ID: OPTI-2-MS-0002-B3 Release date: February 9, 2011 Page 8 of 10 Note: 1. 2. 3. 4. 5. 6. Make sure all wells are empty before loading the next reagent Please ensure that all reagents (for a given step in the assay sequence) are loaded within ~ 1 minute time span. If a large number of samples (or different concentration reagents during optimization) are to be loaded, please use a conical bottom 96-well plate (or other reservoirs in 96-well format) to prepare the solutions and transfer to the Optimiser™ using a multichannel pipette. Reading the signal within 15-30 minutes after loading the substrate usually offers the best sensitivity and dynamic range. Change the absorbent pad in following situations: After loading 120-140 µL total volume of solutions in each well. o Please design the load sequence such that the pad change is done prior to a wash step. Do not wipe the bottom of the plate when changing the pad. Push the plate firmly onto the holder after changing the pad to ensure good contact between plate and absorbent pad. Changing the pad prior to the final wash (of the two-step wash sequence before adding substrate) may give lower background. A pad change is recommended prior to second run if all 96-wells of the Optimiser™ are not used for a test run. Since applications vary, each investigator should titrate the reagent to obtain optimal results. Following is the example concentration to start with: o For indirect immunoassay: Antigen concentration = 5 times concentrated as used in conventional 96-well HRP conjugated secondary antibody concentration = 0.1 µg/ml o For sandwich assay: Capture antibody concentration = same as that used in conventional 96-well Detection antibody concentration = same as that used in conventional 96-well SAv-HRP = 0.125 µg/mL In the rare instance where the liquid in the well does not flow through the microchannel within 10 minutes after loading, wipe off the residue and discard the reading from that well. Siloam Biosciences, Inc. 513-429-2976 www.siloambio.com Patent pending Document ID: OPTI-2-MS-0002-B3 Release date: February 9, 2011 Page 9 of 10 Troubleshooting Problem Flow failure – the well did not empty in 10 minutes Possible Cause Solution Bubble in the well Follow recommended pipetting guidelines, always prepare a little extra amount of reagent to avoid bubble in pipetting, avoid detergent. Do not dispense beyond first stop on the pipette. Solution contains precipitate. Centrifuge at 13,000g for 10 minutes or filter with 0.2 µm membrane. Plate loses contact with absorbent pad. Make sure the plate is firmly assembled with pad and holder. The plate is left too long in last incubation. Ensure that all incubation steps are no more than 20 minutes. Free enzyme left in the microchannel or well. Wash at least twice with 30 µL before loading substrate. Low quality blocking Use OptiBlock™ blocking buffer. Nonspecific binding to unblocked sites Prepare the detection antibody and enzyme conjugate in the blocking buffer. Residue left on bottom of plate Wipe the bottom of plate thoroughly before placing it in reader. Low signal/noise ratio Reagent concentrations need to be fully optimized OR all possible causes listed that lead to high background signal Perform full optimization to determine the reagent concentrations, especially for the detection antibody and enzyme conjugate. See application notes on Siloam’s website for example. Unable to assemble the plate with the holder The plate is not in the same direction as holder. Place the plate over the holder with correct orientation. High Background Signal Optimiser™ microplates (Products) are warranted to perform in conformance with published product specifications in effect at the time of sale as set forth in product documentation and/or package inserts. Products are supplied for Research Use Only. The use of this product for any clinical diagnostic applications is expressly prohibited. The warranty provided herein is valid only when used by properly trained individuals and is limited to one year from the date of shipment and does not extend to anyone other than the original purchaser. No other warranties express or implied, are granted, including without limitation, implied warranties of merchantability, fitness for any particular purpose, or non-infringement. Buyers’ exclusive remedy for non-conforming product during the warranty period is limited to replacement of or refund for the non-conforming product. Siloam Biosciences, Inc. 513-429-2976 www.siloambio.com Patent pending Document ID: OPTI-2-MS-0002-B3 Release date: February 9, 2011 Page 10 of 10