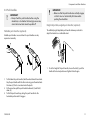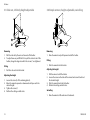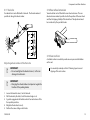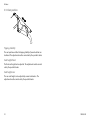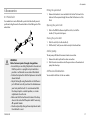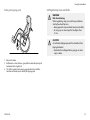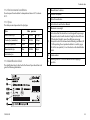
1
Küschall® K-Series
EN Active wheelchair
User Manual
This manual MUST be given to the user of the product.
BEFORE using this product, read this manual and save for future reference.
©2013 Küschall AG
All rights reserved. Republication, duplication or modification in whole or in part is prohibited without
prior written permission from Küschall AG. Trademarks are identified by ™and ®. All trademarks are
owned by or licensed to Küschall AG or its subsidiaries unless otherwise noted.
4.3
4.4
4.5
Contents
1
General. . . . . . . . . . . . . . . . . . . . . . . . . . . . . . . . . . . . . . . 5
1.1
Information about the User Manual . . . . . . . . . . . . . 5
1.2
Symbols . . . . . . . . . . . . . . . . . . . . . . . . . . . . . . . . . 5
1.3
Warranty. . . . . . . . . . . . . . . . . . . . . . . . . . . . . . . . . 6
1.4
Intended use. . . . . . . . . . . . . . . . . . . . . . . . . . . . . . 6
1.5
Service life . . . . . . . . . . . . . . . . . . . . . . . . . . . . . . . 6
1.6
Copyright protection . . . . . . . . . . . . . . . . . . . . . . . . 6
2
Safety . . . . . . . . . . . . . . . . . . . . . . . . . . . . . . . . . . . . . . . . 7
2.1
Safety information. . . . . . . . . . . . . . . . . . . . . . . . . . 7
2.2
Safety devices . . . . . . . . . . . . . . . . . . . . . . . . . . . . . 7
3
Components and their functions . . . . . . . . . . . . . . . . . . .
3.1
Overview . . . . . . . . . . . . . . . . . . . . . . . . . . . . . . . .
3.2
Parking brakes. . . . . . . . . . . . . . . . . . . . . . . . . . . . .
3.3
Backrest . . . . . . . . . . . . . . . . . . . . . . . . . . . . . . . . .
3.4
Push handles. . . . . . . . . . . . . . . . . . . . . . . . . . . . . .
3.5
Side rest, infinitely height adjustable . . . . . . . . . . . .
3.6
Simple armrest, height-adjustable,
swivelling . . . . . . . . . . . . . . . . . . . . . . . . . . . . . . . .
3.7
Mudguard. . . . . . . . . . . . . . . . . . . . . . . . . . . . . . . .
3.8
Clothes-guard . . . . . . . . . . . . . . . . . . . . . . . . . . . . .
3.9
Footrest . . . . . . . . . . . . . . . . . . . . . . . . . . . . . . . . .
3.10 Antitipper . . . . . . . . . . . . . . . . . . . . . . . . . . . . . . . .
3.11 Vario-Ax . . . . . . . . . . . . . . . . . . . . . . . . . . . . . . . . .
3.12 Rear wheel extension . . . . . . . . . . . . . . . . . . . . . . .
3.13 Seat cushion . . . . . . . . . . . . . . . . . . . . . . . . . . . . . .
3.14 Seat position . . . . . . . . . . . . . . . . . . . . . . . . . . . . . .
4
8
8
9
10
11
12
12
13
13
14
14
15
15
15
16
Accessories . . . . . . . . . . . . . . . . . . . . . . . . . . . . . . . . . . . . 17
4.1
Pelvic belt . . . . . . . . . . . . . . . . . . . . . . . . . . . . . . . . 17
4.2
Air pump . . . . . . . . . . . . . . . . . . . . . . . . . . . . . . . . 17
Passive illumination . . . . . . . . . . . . . . . . . . . . . . . . . 17
Luggage carrier . . . . . . . . . . . . . . . . . . . . . . . . . . . . 18
Transit wheels . . . . . . . . . . . . . . . . . . . . . . . . . . . . . 18
5
Setup . . . . . . . . . . . . . . . . . . . . . . . . . . . . . . . . . . . . . . . . 20
5.1
Safety information. . . . . . . . . . . . . . . . . . . . . . . . . . 20
6
Using the wheelchair . . . . . . . . . . . . . . . . . . . . . . . . . . . .
6.1
Safety information. . . . . . . . . . . . . . . . . . . . . . . . . .
6.2
Braking during use . . . . . . . . . . . . . . . . . . . . . . . . .
6.3
Getting in and out of the wheelchair . . . . . . . . . . . .
6.4
Driving and steering the wheelchair . . . . . . . . . . . . .
6.5
Negotiating steps and kerbs . . . . . . . . . . . . . . . . . .
6.6
Going up and down stairs . . . . . . . . . . . . . . . . . . . .
6.7
Negotiating ramps and slopes . . . . . . . . . . . . . . . . .
6.8
Stability and balance when seated . . . . . . . . . . . . . .
21
21
21
22
22
23
25
26
27
7
Transport . . . . . . . . . . . . . . . . . . . . . . . . . . . . . . . . . . . . .
7.1
Safety information. . . . . . . . . . . . . . . . . . . . . . . . . .
7.2
Folding and unfolding the wheelchair . . . . . . . . . . .
7.3
Removing and fitting the rear wheels . . . . . . . . . . . .
7.4
Transporting the occupied wheelchair in a
vehicle . . . . . . . . . . . . . . . . . . . . . . . . . . . . . . . . . .
29
29
29
30
8
Maintenance . . . . . . . . . . . . . . . . . . . . . . . . . . . . . . . . . .
8.1
Safety information. . . . . . . . . . . . . . . . . . . . . . . . . .
8.2
Maintenance Schedule . . . . . . . . . . . . . . . . . . . . . .
8.3
Cleaning . . . . . . . . . . . . . . . . . . . . . . . . . . . . . . . . .
8.4
Disinfection. . . . . . . . . . . . . . . . . . . . . . . . . . . . . . .
36
36
36
38
38
9
Troubleshooting. . . . . . . . . . . . . . . . . . . . . . . . . . . . . . . . 39
9.1
Safety information. . . . . . . . . . . . . . . . . . . . . . . . . . 39
9.2
Identifying and repairing faults . . . . . . . . . . . . . . . . 40
30
10 After Use. . . . . . . . . . . . . . . . . . . . . . . . . . . . . . . . . . . . . . 41
10.1 Re-use . . . . . . . . . . . . . . . . . . . . . . . . . . . . . . . . . . 41
10.2 Disposal . . . . . . . . . . . . . . . . . . . . . . . . . . . . . . . . . 41
11 Technical data . . . . . . . . . . . . . . . . . . . . . . . . . . . . . . . . .
11.1 Dimensions and weight . . . . . . . . . . . . . . . . . . . . . .
11.2 Environmental conditions . . . . . . . . . . . . . . . . . . . .
11.3 Tyres. . . . . . . . . . . . . . . . . . . . . . . . . . . . . . . . . . . .
11.4 Identification label. . . . . . . . . . . . . . . . . . . . . . . . . .
42
42
43
43
43
General
1 General
1.1 Information about the User Manual
Thank you for choosing a küschall® wheelchair.
This User Manual contains important information about using the
wheelchair. In order to ensure safety when using your wheelchair, read
the User Manual carefully and follow the safety information.
If your vision is impaired, you can view the user manual as a PDF file on
the Internet at www.kueschall.com and enlarge it on-screen as required.
If you cannot enlarge the texts and graphics sufficiently, please contact
the küschall® distributor for your country;
® addresses on the reverse of this document. If necessary, we will
provide you with a high resolution PDF file of the user manual.
Moreover, you can have the PDF file read out to you with the aid of
suitable programs using special language functions on your computer
(e.g. in Adobe®Reader®X: Shift+Ctrl+Y).
The equipment of your wheelchair may differ from the
descriptions and diagrams given here due to the wide range of
models available.
If you need additional information, please refer to our website at
www.kueschall.com.
WARNING!
Indicates a hazardous situation that could result in
serious injury or death if it is not avoided.
CAUTION!
Indicates a hazardous situation that could result in
minor or slight injury if it is not avoided.
IMPORTANT!
Indicates a hazardous situation that could result in
damage to property if it is not avoided.
Gives useful tips, recommendations and information for
efficient, trouble-free use.
This product complies with Directive 93/42/EEC
concerning medical devices. The launch date of this
product is stated in the CE declaration of conformity.
Symbols on the product
Snap hook symbol: Tie-down positions where the
restraint system straps must be placed in case of
transporting the occupied wheelchair in a vehicle.
1.2 Symbols
Symbols in this manual
In this User Manual warnings are indicated by symbols. The warning
symbols are accompanied by a heading that indicates the severity of
the danger.
1544595-B
5
K-Series
1.3 Warranty
Küschall AG guarantees that their wheelchairs are free from defects and
are fully functional. The warranty covers all faults and defects which are
verifiably attributable to faulty construction, substandard materials or
poor workmanship. Warranty claims against the manufacturer may only
be made by the distributor and not by the user of the product.
The warranty does not cover normal wear and tear, the consequences
of improper handling or damage, poor maintenance and incorrect
assembly or commissioning by the purchaser or a third person or faults
which are attributable to circumstances beyond our control. Wearing
parts are not covered by the guarantee. The warranty is voided if
modifications are made to the product which were not authorised and
not performed by the specialist dealer or if inappropriate accessories
or spare parts are used. The warranty does not cover consequential
costs arising from the rectification of defects such as freight and travel
expenses, labour costs, fees etc.
The term of the warranty is 24 months. The frame is guaranteed for
5 years.
safely (e.g. to propel themselves, steer, brake). The wheelchair should
only be used on level ground and accessible terrain, as well as indoors.
This active wheelchair needs to be subscribed and fit to your specific
health condition.
WARNING!
Any other or incorrect use could lead to hazardous
situations.
1.5 Service life
The expected service life is five years, presuming that the product is
used daily and in accordance with safety instructions, maintenance
instructions and intended use, stated in this manual.
1.6 Copyright protection
This User Manual is protected by copyright. It may not be reprinted or
copied or transferred to third parties in part or in full without the prior
written consent of the manufacturer.
Furthermore, the terms and conditions are part of the general terms and
conditions particular to the individual countries in which the product
is sold.
Quality and Flame Retardancy
Quality is fundamental to the company’s operation, working within the
disciplines of ISO 9001 and ISO 13485.
The wheelchair has been tested in accordance with EN 12183. It
includes a test for flammability.
1.4 Intended use
The active wheelchair is propelled manually and should only be used
for independent or assisted transport of a disabled person with mobility
difficulties. When used without an assistant, it should only be used by
persons who are physically and mentally able to use the wheelchair
6
1544595-B
Safety
2 Safety
2.1 Safety information
This section contains important safety information for the protection
of the wheelchair user and assistant and for safe, trouble-free use of
the wheelchair.
WARNING!
Risk of accidents and serious injury
Accidents with resulting serious injury can occur if the
wheelchair is wrongly adjusted.
– Adjustments at the wheelchair always must be carried
out by a specialist dealer.
WARNING!
Risk due to driving style being unsuitable for the
conditions
There is a risk of skidding on wet ground, gravel or
uneven terrain.
– Always adjust your speed and driving style to the
conditions (weather, surface, individual ability, etc.).
WARNING!
Risk due to wheelchair being out of control
At high speed you could lose control of your wheelchair
and overturn.
– Never exceed a speed of 7 km/h.
– Avoid collisions in general.
CAUTION!
Risk of burning
The wheelchair components can heat up when exposed
to strong sunlight.
CAUTION!
Risk of getting fingers caught
There is always a risk of getting, e.g. fingers or arms,
caught in the moving parts of the wheelchair.
– Make sure when activating the folding or insertion
mechanisms of moving parts, such as the removable
axle of the rear wheel, folding backrest or antitipper,
that nothing becomes caught.
2.2 Safety devices
WARNING!
Risk of injury
In a collision you could sustain injury to parts of your
body that extend beyond the wheelchair (e.g. feet or
hands).
– Avoid an unbraked collision.
– Never drive into an object head-on.
– Drive carefully through narrow passages.
WARNING!
Risk of accidents
Safety devices that are incorrectly set or no longer
working (brakes, antitipper) can cause accidents.
– Always check that the safety devices are working
before you use the wheelchair and have them
checked regularly by the specialist dealer.
The functions of the safety devices are described in chapter 3
Components and their functions, page 8 .
1544595-B
7
K-Series
3 Components and their functions
3.1 Overview
A
Push handle
B
Back
C
Rear wheel with handrim
D
Parking brake
E
Front wheel fork with front wheel
F
Footrest
G
Frame
H
Seat / Cushion
I
Clothes-guard
Short description
The küschall K-Series is a rigid frame wheelchair with folding backrest.
The equipment of your wheelchair may differ from the
diagram as each wheelchair is manufactured individually to
the specifications in the order.
8
1544595-B
Components and their functions
3.2 Parking brakes
Performance brake
The parking brakes are used to immobilise the wheelchair when it is
stationary to prevent it from rolling away.
WARNING!
Risk of overturning if you brake sharply
If you apply the parking brakes while you are moving,
the direction of movement can become uncontrollable
and the wheelchair may stop suddenly, which can lead
to a collision or to you falling out.
– Never apply the parking brakes while you are moving.
WARNING!
Risk of overturning
The parking brakes will not operate correctly unless
there is sufficient air in the tyres.
– Ensure the correct tyre pressure, 11.3 Tyres, page 43.
1.
2.
To apply the brake, push the brake lever forwards as far as possible.
To release the brake, pull the brake lever backwards.
Active brake
Standard brake
1.
2.
1.
2.
To apply the brake, pull the brake lever forwards beside or between
your knees as far as possible.
To release the brake, push the brake lever backwards beside or
between your knees.
To apply the brake, push the brake lever forwards as far as possible.
To release the brake, pull the brake lever backwards.
1544595-B
9
K-Series
3.3 Backrest
Backrest angle
Backrest cover
You can adjust the tension of the backrest cover as required.
The angle of the backrest can be adjusted. The adjustment must be
carried out by the specialist dealer.
Adjusting the backrest cover
Backrest bar
WARNING!
Risk of accidents
The backrest bar is not suited for lifting or carrying the
wheelchair with the user sitting in it as it can break.
– The backrest bar may not be used to lift or carry the
wheelchair while the user is sitting in it.
1.
2.
3.
Remove the backrest cushion A.
Loosen the Velcro® tapes B on the rear of the backrest cover by
simply pulling on them.
Tighten or loosen the tapes as required then reattach them.
WARNING!
Risk of tipping
If the bands are set very loose, the tipping point of your
wheelchair is changed for the worse.
– Ensure that the bands are set correctly.
Backrest height
The height of the backrest can be adjusted. The adjustment must be
carried out by the specialist dealer.
10
1544595-B
Components and their functions
3.4 Push handles
IMPORTANT!
– Always check the push handles before using the
wheelchair, as to whether the hand grips are secure,
cannot be turned and cannot be pulled off.
Foldable push handles (optional)
Foldable push handles are used when the push handles are only
required occasionally.
IMPORTANT!
– Make sure that the push handle does actually engage
so that it does not accidentally fold down while
pushing the wheelchair.
Height adjustable, angled push handles (optional)
The infinitely height adjustable push handles allow any assistant to
adjust the handles to a comfortable level.
1.
1.
2.
3.
To set the height of the push handles, loosen the bolt A, push the
handle to the desired position and tighten the bolt again.
To fold down the push handles, hold the wheelchair with one hand.
Grip the push handle with the other and using your thumb activate
the release (1) that is concealed under the plastic.
At the same time pull the push handle backwards (2) and fold it
down (3).
To fold the push handles up, bring the push handle into the
horizontal position until it engages.
1544595-B
11
K-Series
3.5 Side rest, infinitely height adjustable
3.6 Simple armrest, height-adjustable, swivelling
Removing
Removing
1.
2.
1.
Pull the side rest by the arm cushion out of the holder.
To adjust how easy or difficult it is to pull the side rest out of the
holder, change the degree to which the screws C are tightened.
Fitting
1.
Push the side rest into the holder.
Adjusting the height
1.
2.
3.
4.
Loosen the screw B of the retaining plate A.
Move the armrest upwards or downwards until you reach the
desired height.
Tighten the screw B.
Perform the setting on both sides.
Fitting
1.
Push the armrest into the holder.
Adjusting the height
1.
2.
3.
4.
Pull the armrest out of the holder.
Loosen the screw on the tube of the armrest and screw it back in at
the desired height.
Push the armrest back into the holder.
Perform the setting on both sides.
Swivelling
1.
12
Raise the armrest and pull it upwards out of the holder.
Raise the armrest a little and swivel it outwards.
1544595-B
Components and their functions
3.7 Mudguard
3.8 Clothes-guard
In order to prevent dirt from the wheels spraying upwards, a removable
mudguard can be fitted. The position of the mudguard can be adjusted.
The adjustment must be carried out by the specialist dealer.
A clothes-guard can be fitted to protect your clothes. Before folding the
back of the wheelchair, the clothes-guard must first be folded inwards
against the backrest.
Folding in
Removing
1.
2.
Pull the mudguard upwards out of the holder.
To adjust how easy or difficult it is to pull the mudguard out of the
holder, change the degree to which the screws A are tightened.
1.
Raise the clothes-guard at the front and swivel it inwards in front
of the backrest.
Fitting
1.
Push the mudguard into the holder.
1544595-B
13
K-Series
3.9 Footrest
WARNING!
Risk of overturning
On uneven or soft ground, the antitipper can sink into
potholes or directly into the ground, thereby curtailing
or eliminating its safety function.
– Only use the antitipper when travelling on even and
firm ground.
The height of the footrest can be adjusted. The adjustment must be
carried out by the specialist dealer.
Activating the antitipper
3.10 Antitipper
1.
Push the antitipper downwards against the spring and swivel it
backwards through 90° until it engages.
An antitipper prevents the wheelchair from tipping backwards.
WARNING!
Risk of overturning
Antitippers that are incorrectly set or no longer working
can lead to overturning.
– Always check that the antitipper is working before
using the wheelchair and have it set or readjusted by
a specialist dealer when required.
WARNING!
Risk of tipping
An activated antitipper can catch when negotiating a
step or an edge.
– Always deactivate the antitipper before driving over
a step or kerb.
Deactivating the antitipper
1.
Push the antitipper downwards against the spring and swivel it
inwards through 90° until it engages.
Setting the height
1.
14
Press the spring pin A on the antitipper and push the inner section
to the position required. Allow the spring pin to engage in the
nearest hole.
1544595-B
Components and their functions
3.11 Vario-Ax
3.12 Rear wheel extension
Your wheelchair can be fitted with a Vario-Ax. The Vario-Ax makes it
possible to change the wheel camber.
Your wheelchair can be fitted with a rear wheel extension. The rear
wheel extension makes it possible to alter the position of the rear wheel
and thus the tipping stability of the wheelchair. The adjustment must
be carried out by the specialist dealer.
3.13 Seat cushion
Adjusting wheel camber of the Vario-Ax
IMPORTANT!
– Do not overtighten the knurled screw A as this can
damage its mechanism.
A suitable cushion is needed to provide an even pressure distribution
on the seat.
Use an antislip underlay or Velcro® fastening tapes to avoid
slipping of the seat cushion.
IMPORTANT!
– Changing the wheel camber can impair or negate the
function of the parking brakes.
1.
2.
3.
4.
5.
Loosen the knurled screw A on the Vario-Ax.
Pull the wheel by the hub B until the desired angle is set.
A gentle engagement will indicate when it has reached one of the
four possible positions.
Retighten the knurled screw A.
Perform the same setting on both sides.
1544595-B
15
K-Series
3.14 Seat position
Tipping stability
The seat position and thus the tipping stability of your wheelchair can
be altered. The adjustment must be carried out by the specialist dealer.
Seat height front
The front seat height can be adjusted. The adjustment must be carried
out by the specialist dealer.
Seat height rear
The rear seat height can be adjusted by several centimeters. The
adjustment must be carried out by the specialist dealer.
16
1544595-B
Accessories
4 Accessories
Fitting the pelvic belt
1.
4.1 Pelvic belt
Your wheelchair can be fitted with a pelvic belt which will prevent
you from sliding forward in the wheelchair or from falling out of the
wheelchair.
Remove the backrest cover and attach the Velcro® fastener to the
backrest at the required height. Ensure that the fastener is at the
front.
Opening the pelvic belt
1.
Push in the PRESS button and pull the catch A out of the
buckle B. The pelvic belt opens.
Closing the pelvic belt
1.
2.
Push the catch A into the buckle B.
Pull the belt C until you are held securely in the wheelchair.
4.2 Air pump
The air pump is fitted with a universal valve connection.
WARNING!
Risk of serious injuries through strangulation.
– Ensure that you are sitting fully back in the seat and
that the pelvis is as upright and symmetrical as
possible - not forward on one side or tilted back.
– Position the lap belt so that the hip bones can be felt
above the belt.
– Adjust the length using the buckles so that there is
just sufficient room for your hand to slide between
your body and the belt. It is recommended that
the clasp is kept in a central position, i.e. make
adjustments to each side.
– Make sure that the belt cannot slide and the clasp
does not dissolve. Refit the pelvic belt if necessary,
® specialist dealer.
– Check and possibly change these adjustments each
time the belt is used.
1544595-B
1.
2.
Remove the dust cap from the valve connection.
Push the valve connection onto the open valve on the wheel and
pump the wheel up.
4.3 Passive illumination
You can attach reflectors to the rear wheels.
17
K-Series
4.4 Luggage carrier
WARNING!
– When using transit wheels, the parking brakes no
longer have any effect and you cannot control your
wheelchair via the handrims.
Your wheelchair can be fitted with a luggage carrier. When not in use,
the luggage carrier can be folded up.
WARNING!
Risk of tipping
Weight on the carrier changes the tipping behaviour of
the wheelchair. The wheelchair can tip forwards more
easily when the luggage carrier is loaded.
– Use the luggage carrier only for transporting small
and lightweight luggage.
– Avoid driving the wheelchair to fast when carrying
luggage.
– Avoid driving ramps and slopes when carrying
luggage.
– Do not stand on the luggage carrier.
Switching to transit wheels
1.
2.
3.
4.
5.
4.5 Transit wheels
If your wheelchair is too wide for certain applications, e.g.
trains/aeroplanes, narrow passageways, narrow doors, the transit
wheels can be used.
18
Lower the transit wheels into the operating position. To do this,
press the pin inwards until you can pull the tube down.
Press the second pin in.
Pull the tube further downwards until the pin engages into the slot.
Move the wheelchair to a stable object (door frame, heavy table),
which you can use for support and hold onto it firmly with one
hand.
Tilt the wheelchair until the rear wheel on the opposite side rises
off the floor.
Prior to removing the rear wheels, the distance between the
lowered transit wheels and the floor should not be more than
2 cm.
1544595-B
Accessories
6.
7.
Remove the rear wheel,
® 7.3 Removing and fitting the rear wheels, page 30.
Repeat the process on the other side.
Switching from transit wheels to rear wheels
1.
2.
3.
4.
5.
Move the wheelchair to a stable object, which you can use for
support and hold onto it firmly with one hand.
Tilt the wheelchair until the transit wheel on the opposite side rises
slightly off the floor.
Fit the rear wheel back onto the removable axle,
® 7.3 Removing and fitting the rear wheels, page 30.
Bring the transit wheels back into the inactive position.
Repeat the process on the other side.
1544595-B
19
K-Series
5 Setup
5.1 Safety information
CAUTION!
Risk of injury
– Before using the wheelchair, check its general
condition and its main functions, 8.2 Maintenance
Schedule, page 36.
Your specialist dealer will supply your wheelchair ready for use. Your
dealer will explain the main functions and ensure that the wheelchair
meets your needs and requirements.
20
1544595-B
Using the wheelchair
6 Using the wheelchair
6.1 Safety information
6.2 Braking during use
Whilst you are moving, you brake by transferring force to the handrim
with your hands.
WARNING!
Risk of overturning
If you apply the parking brakes while you are moving,
the direction of movement can become uncontrollable
and the wheelchair may stop suddenly, which can lead
to a collision or to you falling out.
– Never apply the parking brakes while you are moving.
WARNING!
Risk of accidents
Uneven tyre pressure can have a huge effect on
handling.
– Check the tyre pressure before each journey.
CAUTION!
Risk of crushing
There may be a very small gap between the rear wheel
and the mudguard with the risk that you could trap
your fingers.
– Ensure that you always propel your wheelchair using
the handrims only.
WARNING!
Risk of falling out of the wheelchair
If the wheelchair is rapidly decelerated by an assistant
pulling at the push handles, the user may fall out of the
wheelchair.
– Always apply the pelvic belt if present.
– Make sure your assistant has been trained individually
in transferring occupied wheelchairs.
CAUTION!
Risk of crushing
There may be a very small gap between the rear wheel
and the parking brake with the risk that you could trap
your fingers.
– Ensure that you always propel your wheelchair using
the handrims only.
CAUTION!
Risk of burning your hands
If you brake for a long time, a lot of frictional heat is
produced at the handrims (especially MaxGrepp and
Supergripp).
– Wear suitable gloves.
1.
1544595-B
Hold the handrims and press evenly with both hands until the
wheelchair stops.
21
K-Series
6.3 Getting in and out of the wheelchair
WARNING!
Risk of overturning
There is a high risk of overturning during the transfer.
– Only get in and out without assistance if you are
physically able to do so.
WARNING!
Risk of overturning
The wheelchair could tip forwards if you stand on the
footrest.
– Never stand on the footrest when getting in and out.
1.
2.
3.
4.
22
6.4 Driving and steering the wheelchair
You drive and steer the wheelchair using the handrims.
Before driving without an assistant you must find your wheelchair’s
tipping point.
WARNING!
Risk of tipping
The wheelchair can tip backwards if it is not fitted
with an antitipper . When finding the tipping point,
an assistant must stand immediately behind the
wheelchair to catch it if it tips over.
– To prevent tipping, install an antitipper device.
CAUTION!
If you release or damage the brakes the wheelchair
could roll away out of control.
– Do not support yourself on the brakes when getting
in and out.
WARNING!
Risk of tipping
The wheelchair can tip forwards.
– When setting up your wheelchair, test its behaviour
in terms of tipping forward and adjust your driving
style accordingly.
IMPORTANT!
The mudguards and armrests could become damaged.
– Never sit on the mudguards or armrests when getting
in and out.
CAUTION!
A heavy load hanging on the backrest can affect the
wheelchair’s centre of gravity.
– Change your driving style accordingly.
Apply the parking brakes.
Place your feet on the ground.
Hold the wheelchair and, if necessary, also hold a fixed object in
the vicinity.
Move slowly to chair.
1544595-B
Using the wheelchair
Finding the tipping point
6.5 Negotiating steps and kerbs
WARNING!
Risk of overturning
When negotiating steps you could lose your balance
and tip the wheelchair over.
– Always approach steps and kerbs slowly and carefully.
– Do not go up or down steps that are higher than
25 cm.
CAUTION!
An activated antitipper prevents the wheelchair from
tipping backwards.
– Deactivate the antitipper before going up or down
steps or kerbs.
1.
2.
3.
Release the brake.
Roll forwards a short distance, grasp both handrims firmly and pull
backwards with a slight kick.
The shift in weight and steering in opposite directions with the
handrims will enable you to identify the tipping point.
1544595-B
23
K-Series
With an assistant
Going up a step
WARNING!
Risk of serious injuries
Going up steps and kerbs frequently can result in earlier
than expected fatigue break of the wheelchair backrest.
The user might fall out of the wheelchair.
– Always use a tipper aid when going up steps or kerbs.
1.
2.
Move the wheelchair backwards until the rear wheels touch the
kerb.
The assistant should tilt the wheelchair using both push handles so
that the front wheels lift off the ground, then pull the rear wheels
over the kerb until the front wheels can be placed back on the
ground.
Without an assistant
Going down a step
1.
2.
3.
24
Move the wheelchair right up to the kerb and hold the handrims.
The assistant should hold both push handles, place one foot on the
tipper aid (if installed) and tilt the wheelchair backwards so that the
front wheels lift off the ground.
The assistant should then hold the wheelchair in this position, push
it carefully down the step and then tilt it forwards until the front
wheels are back on the ground.
1544595-B
Using the wheelchair
WARNING!
Risk of tipping
When going down a step without an assistant you
could tip over backwards if you cannot control your
wheelchair.
– First learn how to go down a step with an assistant.
– Learn how to balance on the rear wheels, 6.4 Driving
and steering the wheelchair, page 22.
6.6 Going up and down stairs
WARNING!
Risk of overturning
When negotiating stairs you could lose your balance
and overturn your wheelchair.
– Always use two assistants when negotiating stairs
with more than one step.
Going down a step
1.
2.
Move the wheelchair right to the kerb, lift the front wheels and
keep the wheelchair balanced.
Now slowly roll both rear wheels over the kerb. While doing this,
hold the handrims firmly with both hands until the front wheels
are back on the ground.
1.
1544595-B
You can go up and down stairs by taking them one step at a time,
as described above. The first assistant should stand behind the
wheelchair holding the push handles. The second assistant should
hold a solid part of the front frame to steady the wheelchair from
the front.
25
K-Series
6.7 Negotiating ramps and slopes
WARNING!
Risk due to wheelchair being out of control
When negotiating slopes or gradients your wheelchair
could tip backwards, forwards or sideways.
– Always have an assistant behind the wheelchair when
approaching long slopes.
– Avoid lateral slopes.
– Avoid slopes of more than 7°.
– Avoid jerking when changing direction on a slope.
CAUTION!
Your wheelchair could run away even on slightly sloping
ground if you do not control it using the handrims.
– Use the parking brakes if your wheelchair is stationary
on sloping ground.
26
Going up slopes
To go up a slope, you must create some momentum, keep up the
momentum and control the direction at the same time.
1.
Bend your upper body forwards and propel the wheelchair with
quick, powerful strokes on both handrims.
1544595-B
Using the wheelchair
Going down slopes
Leaning forwards
When going down slopes, it is important to control your direction and
particularly your speed.
1.
WARNING!
Risk of falling out
If you lean forwards out of the wheelchair you could
fall out of it.
– Never bend too far forwards and do not shift forwards
in your seat to reach an object.
– Do not bend forwards between your knees to pick up
something off the floor.
Lean back and carefully allow the handrims to run through your
hands. You should be able to stop the wheelchair at any time by
gripping the handrims.
CAUTION!
Risk of burning your hands.
If you brake for a long time, a lot of frictional heat is
produced at the handrims (especially MaxGrepp and
Supergripp).
– Wear suitable gloves.
6.8 Stability and balance when seated
Some everyday activities and actions require you to lean forwards,
sideways or backwards out of the wheelchair. This has a major effect
on the wheelchair’s stability. To keep your balance at all times, proceed
as follows:
1544595-B
1.
2.
3.
Point the front wheels forwards. (To do this, move your wheelchair
forwards slightly then back again.)
Apply both parking brakes.
When leaning forwards your upper body must remain over the
front wheels.
27
K-Series
Reaching backwards
WARNING!
Risk of falling out
If you lean too far backwards you could tip your
wheelchair over.
– Do not lean out over the backrest.
– Use an antitipper device.
1.
2.
3.
28
Point the front wheels forwards. (To do this, move your wheelchair
forwards slightly then back again.)
Do not apply the parking brakes.
When reaching backwards do not reach so far that you have to
change your sitting position.
1544595-B
Transport
7 Transport
7.1 Safety information
WARNING!
Risk of injury if the wheelchair is not properly
secured
In the event of an accident, braking manoeuvre, etc.
you may suffer serious injuries from flying wheelchair
parts.
– Always remove the rear wheels when transporting
the wheelchair.
– Firmly secure all wheelchair components in the
means of transport to prevent them from coming
loose during the journey.
IMPORTANT!
Excessive wear and abrasion could affect the strength
of load-bearing parts.
– Do not pull your wheelchair across abrasive surfaces
without the wheels fitted (e.g. pulling the frame over
tarmac).
Folding the wheelchair
1.
2.
3.
4.
Unfolding the wheelchair
IMPORTANT!
– When unfolding the wheelchair, do not pull the
backrest brace without previously releasing the
backrest using the cord.
– Check that the backrest is completely engaged on
the frame, before you use the wheelchair again.
7.2 Folding and unfolding the wheelchair
The wheelchair has a rigid frame. Nevertheless, the backrest can be
folded forwards and fixed there.
1.
2.
3.
1544595-B
Remove the seat cushion, if present.
Fold the clothes-guard, if present, inwards against the backrest on
both sides.
Pull the cord on the back of the wheelchair (1) and fold the backrest
forward (2) until it engages.
The wheelchair can now be lifted using the backrest brace.
Pull the cord on the backrest of the wheelchair (1).
Pull the backrest backwards (2) using the backrest brace, until the
backrest tube engages on both sides of the frame.
Fold the clothes-guard back into position on both sides.
29
K-Series
7.3 Removing and fitting the rear wheels
WARNING!
Risk of overturning
If the removable axle of a rear wheel is not fully
engaged, the wheel can become loose during use. This
can lead to overturning.
– Always ensure that the removable axles are fully
engaged whenever you fit a wheel.
Fitting the rear wheels
1.
2.
3.
4.
5.
6.
Release the brakes.
With one hand, hold the wheelchair upright.
With the other, hold the wheel through the external spoke rim
around the wheel hub.
Using your thumb, press the removable axle button and hold it
down.
Push the axle into the adapter sleeve B up to the stop.
Release the removable axle button and make sure that the wheel is
secure.
7.4 Transporting the occupied wheelchair in a
vehicle
Even when the küschall® K-Series wheelchair is properly secured and the
following rules are met, injuries to passengers may occur in a collision or
sudden stop. Therefore Küschall strongly recommends transferring the
wheelchair user to the vehicle seat with the seatbelt on. Do not make
alterations or substitutions to points of the wheelchair (structure, frame
or parts) without the written consent of Küschall AG.
WARNING!
Risk of serious injury or death
To use the wheelchair as a seat in a vehicle the backrest
height must be at least 400 mm.
Removing the rear wheels
1.
2.
3.
4.
30
Release the brakes.
With one hand, hold the wheelchair upright.
With the other, hold the wheel through the external spoke rim
around the wheel hub.
Using your thumb, press the removable axle button A. Keep it
pressed and pull the wheel out of the adapter sleeve B.
To transport the wheelchair with user in a vehicle, a restraint system
must be installed in the vehicle.
1544595-B
Transport
WARNING!
If, for some reason, it is impossible to transfer the
wheelchair user to a vehicle seat, the wheelchair can be
used as a seat in a vehicle if the following procedures
and regulations are followed.
– The wheelchair must be secured in the vehicle with a
4-point wheelchair restraint system.
– The user must wear a 3-point passenger restraint
system secured to the vehicle.
– The user must be additionally secured with a posture
belt in the wheelchair.
Both the 4-point wheelchair restraint system and the 3-point passenger
restraint system must be approved according to ISO-10542-2.
WARNING!
– Before journey contact transporter and request
information about the capability for the below
required equipment.
– Make sure there is sufficient free space around the
wheelchair and user to avoid the user making contact
with other vehicle occupants, unpadded parts of the
vehicle, wheelchair accessories or anchor points of
the restraint system.
WARNING!
Injury or damage may occur from wheelchair
components or accessories loosened during a collision
or sudden stop.
– Ensure all removable or detachable components and
accessories are removed from the wheelchair and
securely stored in the vehicle.
– It is essential to have your wheelchair checked by a
specialist dealer after an accident, collision etc.
IMPORTANT!
It is recommended that training be given on the proper
use of a restraint system product.
– Refer to the user manuals supplied with the restraint
systems.
– The following illustrations may differ depending on
the restraint system supplier.
Securing the wheelchair with a 4-point restraint system
WARNING!
– Make sure the tie-down points at the wheelchair are
not damaged and that the parking brakes are fully
functional.
– It’s recommended to use puncture-proof tyres during
transport to avoid brake problems due to reduced
tyre pressure.
1544595-B
31
K-Series
WARNING!
– Place the wheelchair with the user forward-facing in
direction of vehicle travel.
– Apply the wheelchair parking brakes.
– Activate antitipper (if installed).
Front side tie-down positions for belt straps
The wheelchair tie-down positions where the restraint system straps
must be placed are marked with snap hook symbols (see following
figures and section 1.2 Symbols, page 5 ).
1.
Using the front and rear straps of the 4-point restraint system,
secure the wheelchair to the vehicle mounted rails. Refer to the
user manual supplied with 4-point restraint system.
1.
2.
3.
4.
32
Attach the front straps above the castor supporters as shown in the
two figures above (see location of the attachment labels).
Attach front straps to the rail system referring to best practice
recommended instructions from the safety belt manufacturer.
Release parking brakes and apply tension front straps by pulling
the wheelchair backwards from the rear.
Re-apply parking brakes.
1544595-B
Transport
Rear side tie-down positions for snap hooks
IMPORTANT!
– Make sure that the snap hooks are covered with slip
resistant material to avoid laterally slipping on the
axle.
IMPORTANT!
– Check the plungers are fully engaged on both sides
and located in the same position of the cut-out
section of the rail.
– Make sure that the angle between the rails and the
straps lies between 40° and 45°.
Fit posture belt
WARNING!
The posture belt must be used in addition to but never
as a substitute for an approved passenger restraint
system (3-point belt).
1.
1.
2.
3.
Adjust posture belt to fit the wheelchair occupant, see section 4.1
Pelvic belt, page 17.
Attach the snap hooks to the axle right next to the axle holders as
shown in the two figures above (see location of the attachment
labels).
Attach rear straps to the rail system referring to best practice
recommended instructions from the safety belt manufacturer.
Tighten the straps.
1544595-B
33
K-Series
Fastening the 3-point passenger restraint system
WARNING!
– Ensure the 3-point passenger restraint system fits as
tightly across the user's body as possible without
discomfort and no part is twisted.
– Ensure the 3-point passenger restraint system is
not held away from the user's body by parts of the
wheelchair such as armrests or wheels etc.
– Ensure the user restraint has a clear path from the
user to the anchor point without interference by any
part of the vehicle, wheelchair, seating or accessory.
– Ensure the lap belt fits snugly over the occupant’s
pelvis and is not allowed to ride up into the
abdominal area.
– Ensure the user is able to reach the release mechanism
unaided.
IMPORTANT!
The illustration above may differ depending on the
restraint system supplier.
1.
34
Attach the 3-point passenger restraint system refering to the user
manual supplied with your 3-point restraint system.
1544595-B
Transport
30°
IMPORTANT!
– Apply the pelvic belt of the 3-point passenger
restraint system low across the pelvis so that the
angle of the pelvic belt is within the preferred zone
(A) of 30° to 75° to the horizontal. A steeper angle is
preferred, but never exceeding 75°.
75
°
A
1544595-B
35
K-Series
8 Maintenance
weekly
8.1 Safety information
WARNING!
Some materials deteriorate naturally over time. This
could result in damage to wheelchair components.
– Your wheelchair should be checked by a specialist
dealer at least once a year or if it has not been used
for a long period.
Your küschall® specialist dealer can provide help in carrying out
regular maintenance. To find an authorised specialist dealer
near you, contact the küschall® distributor for your country
(end of this document).
Check bolts
x
Check spokes
x
Check parking brakes
x
Have wheelchair checked
by a specialist dealer
1.
2.
3.
4.
To ensure safe and reliable operation, carry out the following checks
and maintenance regularly or have it carried out by another person.
2.
Check the tyre pressure
x
Check that rear wheels
are seated correctly
x
Checking the adjustment
of the backrest joint
x
Check pelvic belt
x
Check the tyre pressure, 11.3 Tyres, page 43.
Inflate the tyres to the required pressure.
Check the tyre tread at the same time.
If necessary, change the tyres.
annually
Pull on the rear wheel to check that the removable axle is seated
correctly. The wheel should not come off.
If the rear wheels are not engaged properly, remove any dirt or
deposits. If the problem persists, have the removable axles re-fitted
by a specialist dealer.
Check the adjustment of the backrest joint
1.
2.
Sit into the wheelchair and lean back on the backrest.
The backrest must be correctly engaged.
Pull the release cord. The pins must be free-moving on both sides.
Otherwise, the backrest joint will have to be re-fitted by a specialist
dealer.
Check pelvic belt
Visual check
x
Clean the front wheels
x
36
x
Check that rear wheels are seated correctly
1.
monthly
annually
Check the tyre pressure
8.2 Maintenance Schedule
weekly
monthly
1.
Check that the pelvic belt is adjusted correctly.
1544595-B
Maintenance
IMPORTANT!
– Loose pelvic belts must be adjusted by a specialist
dealer.
– Damaged pelvic belts must be replaced by a specialist
dealer.
Check the parking brakes
1.
2.
Visual check
1.
2.
1.
2.
IMPORTANT!
The parking brakes must be reset after replacing the
rear wheels or changing their position.
Examine your wheelchair for loose parts, cracks or other defects.
If you find anything, have your wheelchair checked immediately by
a specialist dealer.
Clean the front wheels
Checking after a heavy collision or blow
Check that the front wheels turn freely.
Remove any dirt or hair from the front wheel bearings.
IMPORTANT!
The wheelchair can sustain visibly undetectable
damage as a result of a heavy collision or hard blow.
– It is essential to have your wheelchair checked by a
specialist dealer after a heavy collision or hard blow.
Check the bolts
Bolts can work loose through constant use.
1.
2.
Check that the bolts are tight (on the footrest, seat cover, sides,
backrest, frame, seat module).
Tighten any loose bolts with the suitable torque. Therefore refer to
the Service Manual küschall K-Series, available on the internet at
www.kueschall.com.
IMPORTANT!
Safety nuts and bolts lose their effectiveness as a result
of repeated loosening and tightening.
– Safety nuts and bolts must be replaced by a specialist
dealer.
Repairing or changing an inner tube
1.
2.
3.
4.
5.
6.
Check the spoke tension
The spokes should not be loose or distorted.
1.
2.
Loose spokes must be tightened by a specialist dealer.
Broken spokes must be replaced by a specialist dealer.
1544595-B
Check that the parking brakes are positioned correctly. The brake
is set correctly if the brake shoe depresses the tyre by a few
millimeters when the brake is applied.
If you find that the setting is not correct, have the brakes correctly
set by a specialist dealer.
7.
Remove the rear wheel and release any air from the inner tube.
Lift one tyre wall away from the rim using a bicycle tyre lever. Do
not use sharp objects such as a screwdriver which could damage
the inner tube.
Pull the inner tube out of the tyre.
Repair the inner tube using a bicycle repair kit or, if necessary,
replace the tube.
Inflate the tube slightly until it becomes round.
Insert the valve into the valve hole on the rim and place the tube
inside the tyre (the tube should lie right round the tyre with no
creases).
Lift the tyre wall over the edge of the rim. Start close to the valve
and use a bicycle tyre lever. When doing this, check all the way
37
K-Series
8.
round to ensure that the inner tube is not trapped between the
tyre and the rim.
Inflate the tyre to the maximum operating pressure. Check that
no air is escaping from the tyre.
Spare parts
8.4 Disinfection
The wheelchair may be disinfected by spraying or wiping with tested,
approved disinfectants.
The Robert Koch Institute has a list of currently approved
disinfectants at www.rki.de.
All spare parts may be obtained from a küschall® specialist
dealer. A current list of spare parts is available on the internet
at www.kueschall.com.
8.3 Cleaning
Your wheelchair will serve you well for many years if you clean it
regularly.
IMPORTANT!
Sand and seawater can damage the bearings and steel
parts can rust if the surface is damaged.
– Only expose the wheelchair to sand and seawater
for short periods and clean it after every trip to the
beach.
IMPORTANT!
– Do not use coarse abrasives, aggressive cleaning
products or high-pressure cleaners.
1.
2.
3.
38
Clean the cushions and metal parts with a soft, damp cloth.
Dry the wheelchair carefully with a cloth after using it in the rain or
in the shower.
If the wheelchair is dirty, wipe off the dirt as soon as possible with a
damp cloth and dry it carefully.
1544595-B
Troubleshooting
9 Troubleshooting
9.1 Safety information
Faults may arise as a result of daily use, adjustments or changing
demands on the wheelchair. The table below shows how to identify
and repair faults.
CAUTION!
– Contact your specialist dealer immediately if you
notice a fault with your wheelchair, e.g. a significant
change in handling.
IMPORTANT!
– Some of the actions listed must be carried out by an
authorised specialist dealer. These are indicated. We
recommend that all adjustments are carried out by
a specialist dealer.
1544595-B
39
K-Series
9.2 Identifying and repairing faults
Fault
Possible cause
Action
The wheelchair does not travel
in a straight line
Incorrect tyre pressure on one rear wheel
Correct tyre pressure, ® 11.3 Tyres, page 43
One or more spokes broken
Replace faulty spoke(s), ® specialist dealer
Spokes tightened unevenly
Tighten loose spokes, ® specialist dealer
Front wheel bearings are dirty or damaged
Clean or replace the bearings, ® specialist dealer
The wheelchair tips backwards
too easily
Rear wheels are mounted too far forwards
Mount the rear wheels further back, ® specialist dealer
Back angle too large
Reduce the backrest angle, ® specialist dealer
The brakes are gripping poorly
or asymmetrically
Incorrect tyre pressure in one or both rear tyres
Correct tyre pressure, ® 11.3 Tyres, page 43
Brake setting incorrect
Correct the brake setting, ® specialist dealer
Rolling resistance is very high
Tyre pressure in rear tyres is too low
Correct tyre pressure, ® 11.3 Tyres, page 43
Rear wheels not parallel
Ensure the rear wheels are parallel, ® specialist dealer
Too little tension in front wheel bearing block
Tighten the nut on the bearing block axle slightly,
® specialist dealer
The front wheels wobble when
moving fast
The front wheel is stiff or stuck
40
Front wheel has worn smooth
Change front wheel, ® specialist dealer
Bearings are dirty or faulty
Clean or replace the bearings, ® specialist dealer
1544595-B
After Use
10 After Use
10.1 Re-use
The wheelchair is suitable for re-use. The following actions should be
taken:
•
•
•
Cleaning and disinfection, 8.3 Cleaning, page 38 and 8.4
Disinfection, page 38 in this manual.
Inspection, 8.2 Maintenance Schedule, page 36 in this manual.
The wheelchair should be adapted for the new user in accordance
with the service documentation (available from the küschall®
distributor in your country).
10.2 Disposal
Be environmentally aware and dispose of your wheelchair properly.
Disposal is subject to national and local regulations.
For correct disposal, contact your specialist dealer or ask
your town or district council about local waste management
companies.
1544595-B
41
K-Series
11 Technical data
11.1 Dimensions and weight
All dimension an weight specifications refer to a seat width of 400 mm,
seat depth of 400 mm in the lightest configuration of the wheelchair.
Dimension an weight may alter according to different configurations.
A Seat depth
375 - 525 mm, in increments of 25 mm
B Backrest angle
74°, 78°, 82°, 86°, 90°
C Knee-to-heel length
290 - 480 mm
D Seat height front
450 - 520 mm, in increments of 10 mm
E Seat height rear
380 - 490 mm, in increments of 10 mm
F Backrest height
270 - 480 mm, in increments of 15 mm
G Total length
75°: approx. 830 mm
90°: approx. 760 mm
H Seat width
340 - 480 mm, in increments of 20 mm
Seat width + 175 mm (wheel camber 0°)
I Total width
Seat width + 210 mm (wheel camber 3°)
Seat width + 260 mm (wheel camber 6°)
42
Weight
approx. 7.5 kg
Transport weight
(without rear
wheels)
approx. 5.2 kg
Maximum user
weight
120 kg
Reversing width
920 - 1230 mm
Center of gravity
80 - 140 mm, in increments of 15 mm
1544595-B
Technical data
11.2 Environmental conditions
A
Manufacturer’s address
Do not expose the wheelchair to temperatures below -20 °C or above
40 °C.
B
Product description
C
Date of manufacture
D
Instruction to read the User Manual
E
Maximum user weight
F
Instruction that this wheelchair is not designed for passenger
transport in vehicles with a backrest height less than 400 mm.
If the backrest height is more than 400 mm passenger
transport in vehicles is allowed under following conditions, ®
7.4 Transporting the occupied wheelchair in a vehicle, page
30. In this case symbol F is not struck out on the identification
label.
G
Serial number
H
Warning that this is an active wheelchair and tipping is
possible
11.3 Tyres
The ideal pressure depends on the tyre type:
Tyre
Max. pressure
Low-resistance tyre
7 bar
700 kPa
101 psi
Treaded tyre (marathon)
7.5 bar
750 kPa
108 psi
Slick tyres (speed run)
10 bar
1000 kPa
145 psi
Mountain bike tyre
4 bar
400 kPa
58 psi
-
Solid rubber tyre
-
-
11.4 Identification label
The identification label is attached to the frame of your wheelchair and
gives the following information:
A
B
CD
EF
G
H
1544595-B
Küschall AG
Benkenstrasse 260
4108Witterswil
SWITZERL
AND
www.kuschall.com
KÜSC
HALLKSERIESG3 SB420 mm
05/09/2012
Read user man
ual
120 kg
SN 01234567890
4 028698 113099
Made in Switzerland
Active wheelchair, tipping possible !
43
Küschall® distributors
United Kingdom:
Invacare Limited,
Pencoed Technology Park, Pencoed, Bridgend CF35 5AQ,
Switchboard
Tel: (44) (0)1656 776 200, Fax: (44) (0)1656 776 201,
Customer services
Tel: (44) (0) 1656 776 222, Fax: (44) (0) 1656 776 220
[email protected]
New Zealand:
Invacare New Zealand,
PO Box 62–124, 4 Westfield Place, Mt. Wellington
Auckland, New Zealand
Freephone: 8000 468 222, Freefax: 0800 807 788,
E-mail: [email protected]
Web: www.invacare.co.nz
Ireland:
Invacare Ireland Ltd,
Unit 5 Seatown Business Campus, Seatown Road, Swords,
County Dublin
Tel : (353) 1 810 7084, Fax: (353) 1 810 7085
[email protected]
Asia:
Invacare Asia Ltd.,
PO Box 5002, 1 Lenton Place,
North Rocks, NSW 2151, Australia
Phone: +61 2 8839 5330, Fax: +61 2 8839 5331
E-mail: [email protected]
Web: www.invacare.com
Australia:
Invacare Australia Pty Ltd,
ABN 45 074 676 378, PO Box 5002, 1 Lenton Place,
North Rocks, NSW 2151, Australia
Freephone: 1800 069 042, Fax: 02 8839 5353,
E-mail: [email protected]
Web: www.invacare.com.au
Küschall AG,
Benkenstrasse 260,
CH-4108 Witterswil,
www.kuschall.com
1544595-B
2013-09-01
*1544595B*