1
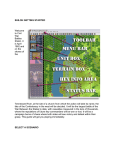
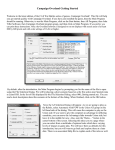
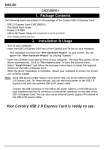
Bonaparte’s Peninsular War - Getting Started Tutorial
Napoleonic Battles: Bonaparte’s Peninsular War is the 10th title in this series and is the first title
to venture into the Spanish Ulcer, or Spanish Peninsula and the long war that raged there drawing
resources away from the other campaigns waged across the European continent. Legends were born, and
many careers were ended here, as Marechal after Marechal wrestled with the campaigns and guerilla
warfare that ravaged this land.
This guide is meant to give you a quick intro into the basics of the engine so you can begin play
as quickly as possible. It by no means can replace a thorough reading of the Main Program Help File &
User Manual. If you wish to print this it will generate approximately 8 pages.
First you will be taken to the File Selection
Dialog. Select the first scenario in the list
titled "000.Started.scn" and then ok.
This takes you to the A/I Selection Dialog
where you choose the side you wish to play.
For the purposes of this tutorial, select
French A/I "Manual" for yourself, and
"Automatic With Fog of War" for the Allies.
Click ok to get the game underway.
The Rules button can be visited in future
games, but for this scenario we will precede
with the default optional rules.
The map will appear along with a dialog announcing the
arrival of reinforcements. Click OK on this box and a
further screen appears announcing the French turn 1 of
10. Click it to close. (Tip: A turn in Napoleonic Battles
represents 15 minutes of real time and a hex covers 100
meters across). You can either left-click on this to make
it clear, or you can right-click it which will also cause it
to clear – however each subsequent turn it will display
shortly and then clear on its own.
The Started scenario pits you as Gen.Div. Marchand with elements of his VI Corps against a composite
force of infantry, cavalry and artillery from the Spanish army arrayed outside the hamlet of Alba de
Tormes (Tip: To see map labels press the Shift key. Press Shift+ALT to leave on and Shift again to
toggle off).
Click the Zoom-In and Zoom-Out buttons on the Toolbar. You will cycle through five map views – two
3D and three 2D. You can also use the scroll wheel on your mouse to change view levels. Choose a
display view according to your taste in order to better see your objectives, your forces and the action
around you as you play. (Tip: To scroll the map move your mouse pointer towards the map edge you
wish to move and the screen will scroll. If you prefer to use the scroll bars click Settings and de-select
Auto Scroll in the Menu Bar and you can control screen movement that way). For this tutorial we will
mostly be using the 2D Normal view.
Look at the map. Your forces in this scenario are deployed to the east. Some of the enemy’s forces are
located due west of you. (Tip: With fog of war active, enemy units you can’t see will be hidden from
you, meaning you have no Line of Sight (LOS) to them.) Pressing the Shift key will also display the
compass in the top left corner of the game map.
Two Spanish flags are located in the center of the map around Alba. These are your territorial
objectives. Click the Objectives Button on the Toolbar to show and hide these objective markers.
Now click on each objective hex and look at the Terrain Box in the Hex Info Area. The Terrain Box
shows the value of each objective.
Click Info and then Victory on the Menu Bar. The Victory
Dialog will appear. As you can see, to obtain a Major
Victory in this battle you must earn 200 victory points by the
scenario’s end. Click ok to close it.
Your goal in this scenario therefore, is to earn 200 victory
points in the 10 turns available, through any combination of
holding the objectives and inflicting losses on the enemy.
(Note: As you incur losses, points are taken away from you).
In this scenario your side moves first so let’s get your troops
in motion. For the purpose of this tutorial we are going to
focus mainly on game mechanics – so you can get right in
and begin to play. As you progress though you will want to
learn details of how Napoleonic battles were fought allowing
the different “arms” of your Army to complement each other
– softening up targets with artillery, bring home a cavalry
charge and following up with close infantry support. The game engine is designed to reward good tactics
and penalize poor ones, but not really prevent you from doing things that may be a-historical.
In Napoleonic Battles, infantry may maneuver in Column, Line, Square and sometimes Shortened or
Extended Line. To alternate between these formations, use the Change Line/Column, Change Square
and Change Extended Line buttons on the Toolbar. Toggling between Line & Column formation can
also be done with the “0” key on the number keypad on your keyboard. All of the “Hot Keys” available
in the game engine are listed on the last page of the Main Program Help File (press F1 to access).
Artillery may be Limbered or Unlimbered. To alternate between these formations, use the Change
Line/Column button on the Toolbar (or the 0 hot key).
Calvary and leaders are almost always Mounted (Dragoons only exception) though cavalry may Charge.
To alternate between these formations, use the Change Charging button on the Toolbar.
Supply Wagons always move in Column formation.
(Note: Not every order to change formation will be successful. The presence of the enemy may be
sufficient to interfere with the attempt. This presence is called the "Threat Value". Right clicking a Unit
Box will show the two values (ex. 500/0) with the first being total stacking in the hex and the second
being the threat value projected on the hex by opposing forces.)
(Tip: Column formation provides movement and attack benefits; Line formation provides firepower and
defense benefits; Square formation provides an improved defense against cavalry charge and artillery
must be Unlimbered to fire and Limbered to move other than changing facing. Generally, you may
change formation so long as a unit possesses sufficient movement points to do so and the threat is low).
The Unit Boxes of any units in the hex will be displayed in the Hex Info Area. We will start deploying a
screen of cavalry squadrons to block enemy cavalry attacks and allow us to bring up our infantry for an
attack. So take the 25e Dragons at hex 38,14 (Hex location is found to the far right bottom corner of
your screen) and double-click the hex – this will select the unit. Next click the “S” button on the Tool
Bar to “Change Skirmish/Squadron” – this will break off 1 squadron from the parent unit. (Note: to
recombine a deployed unit stack it with its parent and click the “S” again. The parent unit will have its
strength in yellow text.)
I chose to break off two squadrons and I am going to deploy them
to the north covering the road my infantry are approaching on. One
of these squadrons are still selected (image is highlighted in the
Hex Info Area) so it is ready to move - now right-click an adjacent
location, for example hex 38,13 and then on to 38,12. If able, the
squadron will move each hex after you click. The Status Bar will
tell you why if not. Go ahead and select your second squadron at
38,14 and move it to 38,13 to complete that screen. These units are
Dragons equipped with muskets so you can dismount them if you
wish to be able to conduct more effective ranged fire, but they may
also fire when mounted. They do so at a reduce effectiveness
however, similar to firing from Column formation for infantry.
Let’s now move a unit with the drag-n-drop method. Select the 11e
Dragons at hex 38,19 (on your left flank). Deploy two squadrons
here as well. Now click the hex with the left button and hold it
down, drag it a hex or two so that it moves further out on your left
flank and release the button – your unit will complete the move.
Linear Tactics reward you for guarding your flanks, so it is best to maintain cohesive lines where
possible. You may drag multiple hexes if your movement points will allow, but the path finding
algorithms take over and control where your unit goes if a decision needs to be made due to obstacles in
the desired path, so be careful with this method.
Complete deploying any cavalry screen you wish, but leave yourself enough formed units to bring home
a charge if the opportunity presents itself. Also let’s deploy some artillery on the high ground. The 5/5e
Art. a Cheval can move to hex 40,17 and unlimber, then rotate clockwise to correct its “facing” so that it
has a clear view of Alba and the units arrayed before it. (Note: Did the enemy fire at you? The system
handles enemy defensive fire during your turn and will likewise fire your units during its turn. This is
called opportunity fire and is conducted at 50% effectiveness.) Now let’s bring your infantry up, and
bring your reinforcements on the map.
Another form of movement is the ability to move an entire command down the road at a single time –
this is especially helpful in larger scenarios where there is a lot of marching to be done. Lets practice this
with our infantry…double click hex 45,13 which will select all units in the hex, then press and hold the
“Alt” key. Now right-click each road hex leading toward Alba…this will move all units along the path at
once. Alternatively you can also right-click your desired final destination hex and the computer will
move the column for you.
Now go to the “Units” menu on the Menu Bar and select “Arrived”. A dialog will be displayed and there
will be a single entry in it. Double-click this entry and these forces will be placed on the map. We could
have brought them on before doing the group movement, but you can repeat that process and have them
march down the road after the other infantry.
Given the short length of this scenario you may wish to max out your stacking limitations, so take the
second infantry unit in line and move it into the same hex as the first (for me that’s hex 39,13 now).
Continue this until you have the column brought up as far as you can. In subsequent turns you can
deploy from here and execute an assault on the towns defenders…or possibly react to their attack upon
you! The pace at which you advance will be dictated by ground conditions (currently dry), the type of
terrain you are moving through (open ground for these opening moves), the condition of your troops and
the overall tempo you are trying to maintain. It is usually best to move at a steady measured pace in
order to keep your forces in supporting distance rather than send some troops way out ahead on their
own. Doing this can sometimes lead them to being surrounded and eliminated…which will put a damper
on your attack in a hurry!
(Tip: Facing is important during combat. A unit may only fire at a target that it faces. Fire taken outside
a unit’s facing causes a severe "enfilade" penalty). Facing may be changed using Hot Keys or the three
buttons on the tool bar for that purpose.
This about brings us to the end of our first turn, but let’s conduct some long-range fire before we end.
Select the 5/5e "Art a Cheval" battery in hex 40,17 that we put into position earlier. Since it is a Horse
Artillery unit it can fire in the same turn in which it deployed. By right-clicking on its Unit Box we can
see its range as 9 hexes. Remembering the need to face the enemy, click the Visible Hexes button on the
Toolbar (Note: Click again to toggle off when no longer needed) to see what your targets of opportunity
are. You can select any non-shadowed enemy unit that sits within 9 hexes of your artillery battery to fire
upon. You can either press the “Ctrl” key to toggle into fire mode or press the fire button on the Tool
Bar. Then right-click on your desired target to conduct ranged fire. The results of your fire will show on
screen.
An alternative way to fire your artillery is with the
Artillery Dialog accessed by clicking the cannon ball
button on the Tool Bar. This useful tool lists all of your
unlimbered artillery on the map and all that have an
available target are in bold black text (the others are a light
gray). You can then cycle down your list and fire your
available artillery and the computer will highlight the
applicable target units as you go down the list. This is the
way I personally begin each of my turns as I usually want to leverage the effects of my artillery barrage
in any given turn.
So we have talked about simple movements, formation changes, facing and ranged fire. Let us take a
further moment and talk about melee – or hand to hand combat. You need to do this to take control of
occupied hexes and dislodge the defenders.
To enter an enemy occupied hex you must melee it. Only adjacent units may melee, so you would need
to move an infantry unit next to the desired hex. With your unit still selected right-click the destination
hex and your unit will be added to the Melee. It is possible to add multiple units to a Melee. (Note:
Stacking limits do apply based on unit types, see Parameter Data).
(Tip: There are benefits to keeping a leader stacked with your units when entering a melee, but there is
no need to go in with more than a single leader, as only the most senior leader will have his values
applied to the calculations.)
When ready click the Resolve Melee button on the Toolbar. Combat will take place, the results will be
displayed on the screen and the units will alter their position – with the victor occupying the hex and the
looser either retreating, or remaining where they started. (Tip: Loosing a melee can add large amounts of
Fatigue to your units – so calculate wisely and don’t melee more than you should or your force will
become highly fatigued and not able to achieve the objectives you have set for them.)
(Note: If you wish to have a more verbose
reporting of melee or ranged combat you can
go to the Settings menu and de-select the On
Map Results option. This will bring up a
dialog box after each action giving you a
variety of details. The up side is you get more
information, the downside being you must
click OK each time the box is displayed.)
Cavalry melee is similar, but there is the
added component of the “charge”. Generally
you want to initiate a charge with your attacking cavalry to gain momentum and take advantage of the
charge bonus (or “Factor” as noted in the Parameter Data File. The Charge Multiple is how many hexes
a cavalry unit can “carry home” a charge once the initial contact has been made.) Some units negate a
cavalry charge too, such as the Square formation for infantry, so be cautious what you are attacking! Oh,
and depending on the type of cavalry you are charging with, defending cavalry will also negate it –
especially important for this scenario!
So that covers the basics of the game mechanics. Further details of the menus, dialogs and other game
screens are covered in the Main Program Help File accessed from the Help menu or by pressing F1. A
further document – the User Manual – can also be accessed from the Help menu or by pressing F4. It
contains a wealth of detailed information and examples of all that is covered here as well as the combat
system, how calculations are made, special units, morale, leadership and the like. It is exceptionally
important to read this if you intend on gaining a solid grasp of the game system. And finally, pressing F2
will bring up the Parameter Data which will give you many details about the map effects, weapons,
weather and many other things.
Now, as far as winning the scenario before you. Maneuver is a key element in Napoleonic warfare.
While this map is rather small and the objectives focused, it is often more desirable for you to try and
turn the defenders flank and compromise their defensive position rather than trying to hammer forward
straight against their defenses. If you have enough artillery, and a strong enough infantry assault
force…and you think you can break them – then press on. But it is much wiser to force your opponent to
react to your movements rather than you bash your troops against their defensive wall.
As mentioned earlier, it is also wise to bring fire to bear and “soften up” a line before closing in for the
assault. Artillery is key, but also using ranged fire from your advancing Line infantry units can make a
big difference. Often times defenders will fail their morale checks and route out of the line, disrupting
neighboring units and opening opportunities for you.
The computer A/I will put up a reasonable defense, but it is possible to pull off a Major Victory in this
scenario as the French player.
When you have completed your initial moves click the Next Turn button on the Toll bar, this will
advance the game to the Allied turn. When the computer completes its move it will automatically
transition back to your turn. To restart the scenario click File then Selection in the Menu Bar. A list of
scenarios will appear and you may select any by double clicking its entry. This may be desirable now
that you have experimented a bit – and give you a chance to execute a plan without any test moves being
played. Good luck!