1
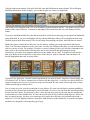
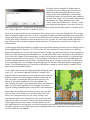
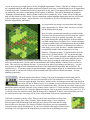
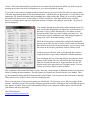
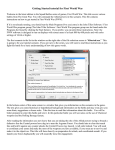
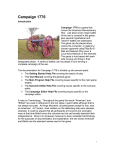
Campaign Overland Getting Started
Welcome to the latest edition of the Civil War Battles series of games, Campaign Overland! This file will help
you get started quickly with Campaign Overland. If you have just installed the game, then the Main Program
should be running. Otherwise, to run the Main Program, click on the Start button, then All Programs, then John
Tiller Software, then Campaign Overland program group, and then click on Main Program. If you prefer, you
can print these instructions. Note: the Overland software is designed to run on displays with screen areas of at least
800 by 600 pixels and with color settings of 16-bit or higher.
By default, after the introduction, the Main Program begins by prompting you for the name of the file to open
using the File Selection Dialog. We will be playing a short scenario based on a the first action near Spotsylvania
at Laurel Hill. In the list of files displayed by the File Selection Dialog, select 000_Getting started.scn. You can
read a short description about the scenario at the bottom of the dialog. When finished, click on the OK button.
Next, the A/I Selection Dialog will appear. As we are going to play as
the Rebels, select Automatic with FOW in the Union A/I group on the
left hand side of the dialog. This will cause the computer to play as the
Union side. If you want to give the computer an advantage in inflicting
casualties, you can move the Advantage slider towards Union side, but
leave it in the middle for now. Also, note the “Rules…” button in the
center bottom of the screen. Selecting this takes you to a page where
you can select from a multitude of optional rules which have varying
levels of impact on game play. We will leave them as defaults for this
introduction, but you will want to go back and explore these at a later
date. There is an associated Help file to explain each of the rules as well.
Next the Phase Dialog will appear indicating that it is the Union turn and
that there are a total of 8 turns in this scenario. Click anywhere in the dialog
and that will start the computer turn. Alternatively you can right-click on
the box and it will only briefly display for future turns and then
automatically disappear.
The battlefield will be drawn on the screen and you will see your
Confederate forces on the bottom of the map while the blue Union forces are shown on the top. The Union
forces go first so the AI will begin executing its turn. Your goal is to defend the line, inflict casualties, and hold
the three objectives indicated by the Rebel flags at hexes 7,15 – 10,13 & 14,13. As you watch the AI execute its
turn you can see it move forces and conduct ranged fire. If, as you grow more comfortable with the game
mechanics, you wish to speed the AI turn progress up you can hit the F8 key to activate “Fast AI Processing”.
This will speed things up considerably. Hit F6 to toggle this back off, if desired.
A new dialog is displayed at the beginning of your turn. It
gives us an update on several things which have taken place.
Some reinforcements have arrived, 2 units were undisrupted,
but no units were resupplied out of the 2 that needed to be.
We’ll come back to these factors in a minute, but first lets take
a few moments and become familiar with the game user
interface.
Along the top of the screen you have both a menu bar and a
tool bar with a variety of buttons. These are the primary means
of controlling the game. You can also use Hot Keys to issue some commands – a complete list of those can be
found on the last pages of the Main Program Help File (F1 in game, or from the Help menu). If you rest your
mouse over a button a pop-up window will appear telling you what it is. Take a moment and review these.
If you look at the bottom of the screen, you will see a status bar which will report information to you about the
battle and also error messages while you are playing. Notice that the message is telling you that it is 8 am and
daylight conditions. Visibility is at 70 hexes and its going to be a warm day, as it started near 80 degrees at
dawn. Using the left mouse button, click on various locations on the map. Notice that when you click on a
location containing soldiers, then the display on the left-hand side, the Hex Info Area, shows you a detailed
listing of the forces in that location. In this example, you can see that the location contains Brigadier General
Kershaw, Major Haskell and the Branch NC Battery from Haskell’s Battalion. You can change the position of
the Hex Info Area by going to the “Settings” menu, selecting “Hex Info Area” and then making a selection from
one of the options. I personally prefer to have it along the bottom of the screen.
Using the right mouse button, click in the Hex Info Area and hold down the mouse button. This will display
additional information. In this example, you see that the guns are a battery of Napoleons.
Unit facing is also displayed in the view as is the number of men stacked in the hex – 200 in this case, the white
number in the center of the hex. Command, Leadership & Movement allowances are also displayed for the
leaders.
If you press and hold the Shift key, then the on-map labels will be drawn showing you the significant landmarks
on the battlefield. If you press and hold the Alt key and then Shift these labels will stay displayed on the map.
Hit Shift again to make them turn off. This can be handy when making your plans, and for historical context.
Besides the menus, tool bar & hex info area you also interact with the game map using left & right mouse
clicks. You’ll do this to both move & fire your units. As with a lot of things in the game you can perform these
tasks in a variety of ways. For example, if you have a stack of infantry in a hex you can issue commands to the
entire stack at once by first double-clicking on the hex to select them all then performing the action.
Alternatively you can be more granular and interact with a single unit at a time. To do this left-click the hex,
then go to the hex info area and click on the picture of the unit you wish to command. That unit alone will
become highlighted and ready to accept orders.
Typically in my game play I will move units individually & fire units in stacks. That doesn’t always apply, but
it is often the case. To issue a command you will do so with the right-click…we will go over this in detail in a
couple of minutes once we have reviewed our troops and situation. We don’t want you moving units or firing
without considering the situation first!
Now it is time to review your forces and plan for your defense. We start with a defensive position straddling a
road and we have breastworks stretching out on our left flank. We can see not only from the initial dispositions,
but also from the Union’s first turn that we have a force bearing down on us by the road, but also through the
woods north-west of the Spindle farm. We have three points specifically to defend called Objective Hexes, but
they are spaced out they way they are to encourage us to protect the whole line, not just bunch up around a
single hex. Civil War fighting took place along lines, both defensively and offensively, so scenarios and game
mechanics are designed to encourage this type of play.
We begin with two brigades of infantry and two
regiments of cavalry along the line as well as two
battalions of guns and another battalion of guns
coming up the road. Additionally, remember that
notification window we got when the game shifted to
our turn? That’s right…we have some reinforcements
arriving this turn. So go ahead and click on the
“Units” menu item and then select “Arrived”. In the
new dialog box that appears we see that Col Perry is
arriving with some force…double click on that entry and Perry will be placed along with Law’s brigade at hex
0,22 – a nice addition to our force of another 930 men.
So we now need to consider our force placement. We see that we have some units along the line, but our right
flank is completely unprotected. Also, we have 3 regiments of infantry in column formation in our center with
advancing infantry not far away – so we’ll need to deploy them into defensive positions. If you examine the two
cavalry units on the left flank you will also note they are low on ammo. We will want to remedy that soon, as
they will not be able to mount an adequate defense otherwise. We also need to consider where to place our
reinforcements.
I would suggest deploying Humphrey’s brigade on our right flank, fanning out into the trees so that they can lay
down supporting fire for the guns at 13,12, but so they can also catch any Union force that tries to flank our
position through the trees. I would also deploy Kershaw’s bridge along the breastwork line in line formation so
that they may fire when targets present themselves. I would push Lomax’s boys out further on the left flank to
serve as an early warning for movements there. Artillery can be placed to support the line. I would place some
of my upcoming artillery on the crest at 13,18 to be backup for the line in case of a Union breakthrough, and
send the remaining portion to the left flank – as with that open area it is a prime location for a sweeping move
by the assaulting forces. Law’s brigade can be brought up to Dr. Durrett’s home and stand by to plug gaps as
needed. Your dispositions may vary, but reserves and defense in depth are critical factors to consider if you
intend to make a reasonable defense.
So let’s make some movements. Begin by double-clicking the units
at hex 9,15 – the leftmost regiment of Kershaw’s brigade. Now
right-click the hex immediately in front of them to move them into
position…but now we want to change formation, so they can fire.
You can do this by clicking the Hat icon on the tool bar, or by
hitting “0” key on the number pad. Now our regiment is in
line…but note, the leader is now mounted (in yellow text below his
name). So click off the regiment so it is no longer selected and
toggle the change formation again, so the leader is also dismounted.
Repeat this process along your line until you have your men how
you want them. Note the red arrows on the tool bar, these will
allow you to change the facing of your troops. Facing is very
important not only because it determines where you can fire with
your unit, but where your zone of control is put forth and how you
will be impacted from various angles. Taking enfilade fire will
have significant effects on your men, so as much as possible you want them facing forward against the enemy.
Use other regiments to cover flanks and create overlapping fields of fire. Much more detail on these subjects
can be found in the User Manual.
As you are moving you might want to use the “Highlight organization” feature. I like this as it helps me keep
my command control in order. Brigades should stay together at all times, as should higher levels of organization
as much as possible. Command and control is imperative in this game. Your units are heavily impacted based
on whether they are in their commanding officers sphere of influence. This can be determined by using the
“Highlight Command Range” function found on the tool bar or under the “View” menu. Select a leader and
then use this feature to see his radius. Used in conjunction with the highlight organization and you will be able
to keep a tight reign on things…and its dynamic, so it will update as you move around the map and select
different organizations and leaders.
As you position your troops, your movement may trigger
enemy opportunity fire. When it does, any losses you take
will be displayed on the map.
Now let’s take a moment and consider our reinforcements.
They have arrived a decent ways from the front line, and we
need them to come up as quickly as possible. We could
move them through the woods along the Po River and then
overland coming up our left flank, or we can take advantage
of road movement which will bring them up directly behind
our line. Lets choose the road. As mentioned we can move
units singly or as a stack, but there’s another method that is
exceptionally helpful when moving units over long
distances. Column movement. To do this double-click the
stack at hex 0,22 then hold the “Alt” key down and rightclick hex 10,27, which is down the road right near the block
house. The entire formation will move along the road in a
large column. This allows you to quickly move units across the map, using the road bonus (because if units
move in a stack they won’t get the road movement bonus) and limit the number of mouse clicks you have to
make. This works for any amount of troops…I have moved an entire Corps along a road this way – you just
need to have the highest level commander on the top of the stack and all troops under him will follow. Be
careful however – if you have troops in mixed formations, supply wagons mixed in, or related troops stacked
along the road as you pass all of them will have an undesired effect on this efficient movement – so some
planning is necessary.
The next action to learn about is Firing. You begin by figuring out which units can fire.
Some should be obvious based on fields of fire, but sometimes it is not clear. There’s a
button to toggle through “Next stack” and this works for both movement and firing based on
the mode you are in. Mode you say? Yes, whether you are in Movement or Fire mode. So far
we have been in movement mode, but now we need to switch to the other. Click on the cross hairs in the top left
hand corner which will shift our mode. In my scenario I have a unit at 15,11 that can shoot, so I double-click on
the unit to select the unit to fire. Using the right-mouse button, click in an enemy location (in my case 12,9). If it
is valid for you to fire on that location, then the firing will be conducted. If there is some reason that you can’t
fire on the location, then a message will be shown at the bottom of the screen explaining why.
I inflicted 4 casualties with my volley. There are three basic restrictions on firing. One,
you must be in range of the enemy location. Notice that the range of your weapons is
shown as part of the information in the Hex Info Area. Second, the units that are firing
must be able to see the target (The feature of Indirect Fire allows you to get around this
restriction under certain circumstances). If your Line-of-Sight to the target is blocked, then
an aiming circle will appear on the map showing you what terrain is blocking your view.
Finally, you must be facing the target unit. Notice that in the Hex Info Area there is an icon that shows what
direction you are facing. Also notice that after you fire, the words "Has Fired" appear in the Hex Info Area.
Once you have fired, you cannot move or do any additional firing with that unit until your next turn.
When you have the game in Fire mode you can cycle through all the units that need to shoot with the “Next
Unit” icon. Alternatively, once you become more comfortable with the game you can stay in Movement mode,
and then press and hold the Ctrl key when you are at a point that you want to shoot with a unit. I find this to be
my preferred method so I can address a section of the line in its entirety before moving on – rather than doing
all movement, then all firing & melee.
Additionally, since we have artillery in this scenario we can use the Artillery
Dialog box which not only allows us to quickly determine which batteries can
fire, but it also helps in targeting in that valid target units are highlighted when
each artillery piece is selected. An exceptionally useful tool when playing
large battles. I also, generally, will start my turn by firing off all my artillery at
available targets, and then base my actions on those results…in this case I have
two batteries that can fire, as they were the only two unlimbered at the
beginning of the turn. Limbered guns, or just unlimbered (in this turn) guns will not be shown in this dialog, and
guns which have no valid target will be grayed out. I concentrate my fire on the leading Union regiment in this
case, in hopes I can break them and disrupt the units following closely behind them.
After you have completed all of the actions you wish in your turn, you then advance the game to the Union turn
by pressing the Next Turn button on the toolbar. You will then see the Phase Dialog for the Union turn and the
computer will then automatically carry out the actions for the Union side. Once the computer finishes the Union
turn, your Phase Dialog will appear again and it will be your turn. At the beginning of each turn, you will see a
report telling you the status of your forces.
As hoped the lead unit routed which slowed the pace of the advancing force a bit, and we need a little more time
to complete our deployments. In my scenario however the 10th Michigan has already come through the trees and
is probing my defensive line. I complete my deployments, fire off quite a few vollies and then advance the turn
allowing the Union to continue their advance.
Turn 3 has the Union putting a decent amount of pressure on
my line, and already the 8th South Carolina boys are racking up
fatigue. Their aggressiveness is coming at a cost however, as
they have already suffered 288 casualties to my 68. As the
assault develops it’s obvious that Law’s brigade will be needed
in the center soon, if the Yanks don’t run first! So I move three
regiments into the woods leaving a gap between the two
commands. The remaining two regiments I leave on the road for
future needs. I have my artillery covering the approaches of my
left flank. While I prefer to not have them unsupported in this
fashion, there’s not much for it giving the size of my force.
Hopefully the Union will keep focused on a frontal assault.
The fighting is really heating up on turn 4 and one of my
brigades is pushed back from the line. Fortunately I can bring
my reserves into action and push back at the attackers in hopes
of shoring up my line.
I’m forced to pull one of my regiments out of the line, as they have been beaten pretty badly – when fatigue
mounts the chances for a rout are great, and that can undermine the integrity of your defensive line in a hurry.
At turn 5 The Union has breached my defenses at two points, but their attack has stalled out. More troops are
massing on the other side of the clearing however, so a renewed assault is coming.
If you wish to melee a hex to attempt to take it from the enemy you need to select the units you want to attack
with, then drag and drop them on the desired destination – which must be an adjacent hex. You will likely incur
opportunity fire from the defenders and surrounding hexes when you do this. When you are ready to conduct
the assault click the red arrow on the toolbar to “Resolve the Melee”. Plan these attacks pretty carefully
however, as losing a melee can cause significant amounts of fatigue to be added to your troops – they also all
become disrupted.
You continue playing the game in this fashion through a total of 8
turns. At the end, the program will display the victory outcome of
the battle. Victory will be determined by your ability to retain
possession of the Objectives while keeping your losses low. You
can check the victory conditions at any time during the game by
going to the “Info” menu and selecting “Victory”.
While the Union put up a valiant effort, and placed considerable
pressure on my line, my men’s resolve was too much for them and
they failed to break us free from our defenses. As you can see from
the screen on the left they paid dearly for their efforts as well.
At this point you will likely wish to play through the scenario a
couple more times to get really comfortable with the mechanics.
You can change the view of the map display using the two Zoom
buttons on the toolbar. The first will increase the scale the map
while the second will decrease it. Notice that there are two 3D
display modes in the game and two 2D display modes. You can
also use your mouse wheel to zoom in and out.
This completes a discussion of the basics of play. There are a large number of additional features you can learn
about by reading the documentation. The major game play features are described in the Users Manual. There
are also manuals detailing the Main Program and Scenario Editor. You may also be interested in the Campaign
Editor when you are ready to create your own campaign games.
There are many hours of enjoyment awaiting you with this tile. We encourage you to fully investigate all the
content…and when you have mastered the computer opponent consider venturing on-line to find other people to
play against via Email. That step will exponentially increase your enjoyment with the game. Good luck with
your defense and enjoy the battle!
John Tiller Software
[email protected]