1
MIXING AMPLIFIERS
MIXING AMPLIFIERS
Front panel
Technical Specifications
7
Frequency response
Distortion
Bass control
Treble control
S/N
LED indicators
Zone active indicators
Muted by priority LED
Weight
Dimensions
Operating temperature
40Hz 25kHz (+1/-3 dB)
<0,3% @ -6dB, 1kHz
+/- 10dB, 100 Hz
+/- 10dB, 10 kHz
amplifier: better than 95dB, 22Hz 22kHz
line:
better than 80dB, 22Hz 22kHz
mic:
better than 65dB, 22Hz 22kHz
limiter active, red
signal 100%, yellow
signal -25 dB, green
power on, green
protection active, red
Z1, Z2 and Z3 green LED
Z4 music on/off, orange
Z4 paging allowed on/off, orange
any of the priority modes active, red
approx.12,7 kg
430(W) x 88(H) x 356(D)mm
19” wide, 2U high
-10 to +45°C
Inputs
Sensitivity
Impedance
S/N (at max. volume)
Phantom power
Frequency response
Vox mute
Sensitivity
Impedance
S/N (at max. volume)
Phantom power
Frequency response
Sensitivity
Impedance
S/N (at max. volume)
Frequency response
Mute
Sensitivity
Impedance
S/N (at max. volume)
Frequency response
Sensitivity
Impedance
S/N (at max. volume)
Frequency response
Sensitivity
Impedance
S/N (at max. volume)
Frequency response
Tuning range
FM
AM
Aerial terminals
Sensitivity
S/N
Harmonic distortion
Frequency response
87,5 -108.0 MHz (50 kHz step)
531 1602 kHz (9 kHz step)
75 ? , unbalanced; IEC - male
AM antenna spring lock terminal
at 26 dB quieting (mono) 10,3 dBf, 0,9 µV/75 ?
at 40 kHz deviation; 74 dB (mono)
< 0,09% in mono mode
30 Hz 15kHz (+1/-3 dB, FM)
8
9
3
2
6
10
12
11
13
14
5
4
1
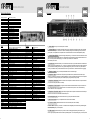
1. Power switch. Here you can switch the power on and off.
Outputs
Mic input 1; ¼” TRS phone jack at the front;
XLR3 combo, DIN5; Euro block
1,5 mV
600 ?
> 65 dB
14 V (internal jumper)
> 80Hz->15Khz (+1/-3 dB)
trigger level 0,6 mV, 1Khz, mutes mic 2,3,4+music, > 40 dB
Mic input 2,3 & 4: XLR3 balanced
1,5 mV
600 ?
> 65 dB
14 V (internal jumper)
> 80Hz->15Khz (+1/-3 dB)
Emergency input; euro block
1V
600 ?
> 80 dB
> 100Hz-> 25Khz (+1/-3 dB)
mutes all, > 40 dB
Aux input; RCA
500 mV (-6 dB)
22 k?
> 80 dB
> 40Hz-> 25Khz (+1/-3 dB)
Line 4; RCA
200 mV (-14 dB)
47 k?
> 80 dB
> 40Hz-> 25Khz (+1/-3 dB)
CD in
500 mV (-6 dB)
5 k?
> 80 dB
> 40Hz-> 25Khz (+1/-3 dB)
Tuner
8
Zone 1 3
Zone 4
High Z zone 1-2-3-4
Speaker selector
on/off
paging on/off music on/off
Speaker zone output, euro block
100V
Speaker out; euro block
50 (12,5 ? ) 70 (24,5 ? ) 100V (50 ? )
8?
Phantom power
14V; internal jumpers
Pre amp out
1V
Tuner (RCA mono)(MOH)
300 mV
Record out; RCA mono
1V
Priority out
24 V DC; max 1A, short circuit protected
High Z
Low Z
Mic 1-2-3-4
Level
Level
Level
Level
Chime
2 tone
activated by contact closure;
euro block DIN5
on/off and level set by trimmer
Priority
I
II
III
Emergency input / telephone
200 mV; 1 kHz VOX threshold
mutes all other signals
> 40 dB
Vox mute only for mic 1
0,6 mV; 1 kHz VOX threshold
mutes mic 2,3 & 4 + music
on/off/level set by trimmer
> 40 dB
Priority contact
> 40 dB
mutes all music inputs
2. Overload indicator. This red LED illuminates when one of the protections have been activated. No or distorted
sound will be heard anymore. This will be in case of overheating, being the result of drawing too much power from
your amplifier, or the impedance of the speaker lines connected are below the minimum load impedance (see17).
3. Level indicators/clip-limit. A green LED will light after powering on. To work within normal conditions the volume
indicator should be kept under 0dB (100%). At -2,5dB a limiter will be activated. This red LED indicates that the “auto
gain circuit” keeps the level below clipping. This is NOT a clip indicator, but an indication of
the “automatic gain control”.
4. Zone selectors. With these selectors you can activate the zone outputs. A green led at the left of the switches will
confirm that you have activated zone 1 to 3. For zone 4, two selectors are available. By means of those two selectors
you can decide to send background music only, spoken messages only, both or none of them. Two yellow leds will
confirm your selection. When you have selected the music only mode for zone 4, there will be silence during paging.
5. Master level control. Here you can adjust the desired volume of the overall signal.
6. Microphone 1 input. This balanced ¼” TRS phone jack has been wired in parallel with the other three input
options for microphone 1 at the back. For satisfying operation, use only one of these inputs at the time for microphone
1. Microphone 1 can be given a priority over all other inputs by using the VOX priority (see 29).
7. Microphone 1 level control. Adjusts the volume of the microphone connected to one of the four input connectors
(1/4” jack, XLR3 combo jack, DIN5 or euro block).
8. Microphone 2 3 level control. By turning each control clockwise the desired level of that input in the total mix is
set. To decrease these levels, turn counter-clockwise. The volumes of the inputs not in use, should be set fully
counter-clockwise. If not, hiss might occur.
9. Microphone 4 / line 4 level control. Adjusts the input signal of the microphone connected to the XLR combo jack
at the back or the line source connected to stereo RCA input 4.
10. “Muted by priority” led. This red led will blink when any priority status has been activated.
11. Music level control. Here you can adjust the level of the line source selected.
12. Line source selector. Select the desired music source to be heard (AUX, CD or TUNER).
13. Bass control. Adjust as per your taste. In reverberant rooms intelligibility can be increased by decreasing bass.
The centre position gives you a flat response.
14. Treble control. Adjust the level as per your taste or needs. Adding high frequencies gives brilliance to your
sound. High frequency feedback can be removed by decreasing treble. The centre position gives you a flat response.
9
2