1
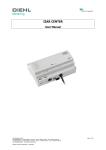
Last updated — 13.02.2012
© Anatomic SITT AB
EN
User manual - Zitzi Sharky Pro
Table of contents
Safety precautions
5
Armrests from seat
23
Introduction5
Mounting the armrests
23
Headrest7
Adjusting the height
23
Mounting the headrest bracket
7
Height adjustment of the headrest bracket
7
Mounting the headrest
Adjustment of the headrest
Mounting the forehead strap bracket
7
7
7
Backrest9
Installation of the backrest
Adjusting the backrest height
Adjusting the backrest angle
Adjusting the lateral support
Adjusting the lumbar support
9
9
9
9
9
Lateral support
11
Mounting the lateral support
11
Reinforced lateral support
11
Foldable lateral support
11
Seat part
13
Adjusting the seat part
13
Leg length difference
15
Adjusting the seat width
Adjusting the seat pocket
Abduction, adduction and windswept
13
15
15
Heating cushion
16
Heating cushion
16
Heating pads
16
Mounting the heating pads
16
Battery16
Charging the battery
17
Pelvis support
19
Mounting the pelvis support
19
Adjusting the pelvis support
Hip belt
21
Adjusting the hip belt bracket
21
Mounting the hip belt
2 (60)
19
User manual - Zitzi Sharky Pro
Adjusting the width
23
Adjusting the angle up/down
23
Adjusting the lateral angle
23
Cushion23
Armrests from the back, fixed
25
Mounting of fixed armrests
25
Adjusting the height
25
Adjusting the width
25
Adjusting the angle up/down
25
Adjusting the lateral angle
25
Cushion25
Armrests from the back, foldable
27
Mounting the foldable armrests
27
Adjusting the height
27
Adjusting the width
27
Adjusting the angle up/down
27
Adjusting the lateral angle
27
The folding function
27
Positioning harnesses
29
Mounting the lower mounting bracket
29
Mounting the upper mounting bracket
29
Adjusting the lower mounting bracket
Adjusting the upper mounting bracket
Mounting optional lower brackets
29
29
29
Driving bow
31
Mounting the driving bow
31
Upper arm support
33
Mounting the upper arm support
33
Adjusting the width
33
Adjusting the height
Adjusting the height
Cushion cover
31
33
33
21
© Anatomic SITT AB
EN
Table, fixed
35
Maintenance instructions
54
Mounting the table
35
Service intervals
54
Table, foldable
37
Gas piston must be activated regularly
54
Mounting the table
37
Changing the mounting holes
Using the folding function
35
37
Table, reinforced mounting brackets
39
Mounting of the reinforced table
39
Adjusting the width
39
Calf support
41
Mounting calf support
41
Adjusting the width
41
Cleaning and washing instructions
54
Tools54
Warranty55
Combinations55
Spare parts
55
Reconditioning55
Marking55
Recycling55
Summary and follow-ups
56
Adaptation and customization
57
Guidelines and recommendations
57
Footrest43
Allowed adaptations of the Sharky Pro
Mounting the footrest
Terms of sale
58
Adjusting the height
Optional mounting of the footrest
Safety stop
Adjusting the angle by the knee joint
Adjusting the angle by the ankle
41
43
43
43
43
43
Footrest brackets
45
Fixed footrest bracket
45
Turn-up footrest bracket
45
Flexible footrest bracket
Ball joint bracket
45
47
Mounting the flat seat
47
Mounting a seating system on a frame
49
Fixed mounting
49
Transportation in a vehicle
52
Guidelines for transportation in a car
52
Customer service
53
Crash tested and approved
© Anatomic SITT AB
Warranty58
Warranty claims
58
Technical data
59
User data
59
Returning products
Product data
58
59
45
Flat seat
Mounting with an adapter system
57
51
52
User manual - Zitzi Sharky Pro
3 (60)
Common details
Bricka
Distanser
stanser
Spakvred
ka
Vagnsbult
Distanser
Carriage bolts
Fingervred utv gänga
Bricka
Distanser
Finger knob
Finger knob
External thread
Internal thread
Spakvred
Vagnsbult
ser
Fingervred utv gänga
Spakvred
Fingervred inv gänga
Fingervred inv gänga
Sargsprint, olika storlekar
Lever handle
snyckel
Sargsprint, olika sto
Justeringsnyckel
Rail pin
Sargsprint, olika storlekar
Different sizes
Allen key
Integrated in the back profile
Ryggbricka
Ryggbricka
bricka
Allen key
The tool (4 mm hexagon key) you need to make adjustments
is integrated in the top of the back profile.
Ryggbricka
a
4 (60)
User manual - Zitzi Sharky Pro
© Anatomic SITT AB
Safety precautions
Introduction
For you to use all advandtages of the Zitzi Sharky Pro, it is important that you
read through this manual thoroughly. This applies to all persons who are in the
vicinity of the user. The product is designed for users with seating problems and
fits many different types of diagnoses. Adjustment of the Zitzi Sharky Pro should
always be performed by medically qualified person.
If you need additional information, please contact Anatomic SITT AB.
Field of application
The product is intended for use as a seating system together with the chassis
produced by Anatomic SITT AB. If the desire for another use can be found,
please contact Anatomic SITT AB.
Correspondence
Zitzi Sharky Pro and its accessories are CE marked products. A unique serial
number is located on a label placed under the activation housing. This serial
number should be quoted in any correspondence regarding the product.
Crash tested
Zitzi Sharky Pro is crash tested and approved according to ISO 16840-4.
For more information see page 52.
This product is manufactured by Anatomic SITT AB
Postal address Anatomic SITT AB, Box 6137, SE-600 06 Norrköping
Street address Anatomic SITT AB, Stohagsgatan 26, SE-602 29 Norrköping
Telephone +4611-161800
Fax +4611-162005
Email [email protected]
Web anatomicsitt.com, youtube.com/anatomicsitt
© Anatomic SITT AB
User manual - Zitzi Sharky Pro
5 (60)
H
F
I
E
E
E
A
E
E
E
C
D
6 (60)
User manual - Zitzi Sharky Pro
B
B
© Anatomic SITT AB
Headrest
Mounting the headrest bracket
Before you can assemble of the headrest bracket can be done, you must first
remove the allen key and other necessary details that are mounted already.
Slide the rail pins of the headrest bracket (A) into the tracks of the back profile.
Once you reach the desired position, tighten the four screws (B).
Mounting the headrest
Slide the square pipe of the headrest into the headrest bracket (C) and tighten
the lever handle (D) once you reach desired position.
Height adjustment of the headrest bracket
Loosen the screws (B) and then move the headrest bracket to desired position.
Then tighten the screws (B).
Adjustment of the headrest
When adjusting the 3-joint headrest, loosen the screw (E) in the joint you
wish to adjust. Once you reach the desired position, tighten the screw (E) again.
To adjust the height of the headrest, loosen the lever handle (D) and move the
headrest to desired position. Then tighten lever handle (D).
Mounting the forehead strap bracket
Before mounting the forehead strap bracket, the head support plate (H) needs to
be removed. To remove the head support plate, loosen the two screws (I).
Fit the forehead strap bracket into the holes (F) with the supplied mounting
hardware. See separate instructions for assembly of the forehead strap bracket.
© Anatomic SITT AB
User manual - Zitzi Sharky Pro
7 (60)
Back height (B)
Lateral support (D)
Lumbar support (E)
Back profile
Back angle (C)
Back attachment (A)
8 (60)
User manual - Zitzi Sharky Pro
© Anatomic SITT AB
Backrest
Installation of the backrest
The backrest attachment consists of 4 screws (A) and two rail pins.
Line up and slide down the back profile onto the rail pins on the back joint
housing. Then tighten the four screws (A) using the allen key.
The backrest is automatically positioned in the correct position through
pre-assembled stops in the back profile.
Adjusting the backrest height
To adjust backrest height, loosen the screws (B) on both sides of the back profile
using the allen key, and adjust to the desired height. When you are satisfied with
your setting, tighten the screws (B) again.
Adjusting the backrest angle
Place the activation lever (C) in active position by lifting it up and then
pushing it onto the heel.
To adjust the angle of the backrest, press the lip down. You can now move the
back to the desired position. Once you reach the desired angle, release the
activation lever again to retain your set angle.
Note!
Remember to always hold the back steady when you activate the gas piston.
Adjusting the lateral support
To adjust the width and height of the lateral support, loosen the finger knob (D)
and adjust to the desired height and width. Tighten the finger knob (D) when you
have reached the desired position.
Adjusting the lumbar support
Loosen the knob (E) and press the top end of the lumbar support which is
placed behind the back lining until the desired lower back depth is reached.
Hold the lumbar support in position and then tighten the knob (E).
Note!
The backrest height might need to be adjusted for the lumbar support
to be in the correct position.
Tip!
Remove the backrest lining to ensure a better lumbar support view
during adjustment.
© Anatomic SITT AB
User manual - Zitzi Sharky Pro
9 (60)
Reinforcement pipe
When reinforcing the backrest
C
B
D
A
F
Bricka
Distanser
E
Vagnsbult
Bricka
Fingervred utv gänga
Distanser
Spakvred
Fingervred inv gänga
Sargsprint, olika storlekar
Justeringsnyckel
Carriage bolt (A)
4 pcs
Bricka(B)
Washer
4 pcs
Finger knob (C)
4 pcs
Distanser
Ryggbricka
Bolt plate (D)
2 pcs
nser
10 (60)
Spakvred
User manual - Zitzi Sharky Pro
© Anatomic SITT AB
Lateral support
Mounting the lateral support
Mount the lateral support using carriage bolt (A), washer (B), finger knob (C) and
a bolt plate (D). The bolt plate (D) prevents the carriage bolt (A) from turning in
the slot.
Put the carriage bolt (A) through the bolt plate (D), the lateral support (E) and the
slot in the back plate (F). Then meet up with a washer (B) and a finger knob (C)
on opposite side of the back plate (F).
Tip!
See page 8-9 of this manual for information on adjusting the lateral support.
Optional lateral support
As an option to the fixed the lateral support you can use the foldable lateral
support or the reinforced lateral support. Assemble these in the same was as
described above.
Reinforcement pack contains of reinforced lateral supports and a reinforcement
pipe. See separate instructions for assembly of the reinforcement pack.
Reinforcement plate
Button
Foldable lateral support
Open the foldable lateral support by
pressing the red button
© Anatomic SITT AB
Reinforced lateral support
Reinforcement kit includes reinforced
lateral support and a reinforcement pipe
User manual - Zitzi Sharky Pro
11 (60)
Seat plate (A)
B
B
C
1
2
3
End cap
12 (60)
User manual - Zitzi Sharky Pro
© Anatomic SITT AB
Seat part
Adjusting the seat part
Seat depth, leg length difference and possible abduction/adduction of the leg
parts are easily adjusted. Start by removing the seat lining and the rear seat plate
(A) to access the adjustment screws (B) properly.
Note!
Note that you never have to unscrew the screws completely to adjust
the leg parts, it is enough to loosen them slightly.
Adjusting the seat width
In order to increase or decrease the seat width, the position of the leg part in
bottom profile should be changed. Start by removing the end cap located in the
front of the bottom profile and then loosen the screw (B) on the leg part with the
allen key. Once you have loosened the screw (B) slightly, pull out the entire leg
part from the bottom profile and move it to the desired track.
For maximum seat width, insert the rail pin in track 3, and for minimum seat
width, insert the rail pin in track 1. The leg part comes as default in track 1.
Tighten the screw (B) when you have reached desired position. The rear screw (C)
on the leg part may occasionally have to be loosened slightly.
Tip!
See measurement specifications of the seat unit on page 59 of this manual.
© Anatomic SITT AB
User manual - Zitzi Sharky Pro
13 (60)
Depth adjustment
plate
B
D
C
C
Seat base
14 (60)
User manual - Zitzi Sharky Pro
© Anatomic SITT AB
Seat part
Leg length difference
To change the leg length, loosen the screw (B) on the leg part using the
allen key, and then adjust the leg part to the desired length. Then tighten
the screw (B) again.
Adjusting the seat pocket
When adjusting the seat depth, the seat pocket should also be adjusted.
Loosen the leg part’s anterior screws (C) with the allen key and drag the depth
adjustment plate to the desired position. Then tighten the screws (C).
Tip!
To get a good starting point for setting the seat depth, the color scale on the
seatbase and depth adjustment plate is can be used as an help.
If the seat depth is adjusted to, for example 43 cm (grey field) the depth adjustment plate should also be pulled out to the grey field. This is in order to ensure
an as correct seat pocket size and subsequent seating position as possible.
Always fine-tune the settings after each client’s requirements.
Abduction, adduction and windswept
To adjust the leg part to any of these positions, loosen the screw (B) using
allen key, and move the leg part to desired postion. Tighten the screw (B).
Note!
Note that you never have to remove the screws completely to adjust,
it is enough to loosen them slightly.
© Anatomic SITT AB
User manual - Zitzi Sharky Pro
15 (60)
Heating cushion
Heating cushion
The heating pads keeps the body temperature automatically and prevents
cooling during cold weather. When body temperature has been reached,
the heating kit automatically turns off to save energy. If the temperature drops,
it is activated and re-heats up to body temperature.
The connectors are carefully chosen to minimize the risk of connecting
them wrong. Under no circumstances should the connectors, the battery or the
charger be exposed to water or moisture.
Mounting the heating pads
The heating pads are mounted under the seat and backrest lining by
attaching them with velcro.
Heating pads
The heating pads has a built-in temperature control within a
span from +27° C till +32° C.
The insulation withstands, low as well as high temperatures and is unaffected
by sunlight, moisture or chemicals. The pad material is flame retardant (FMVSS
302). The heating pad is made of leachy material to avoid condensation.
Battery
The battery is rechargable (Ni-MH) and may only be charged with the provided
charger. When the battery is depleted it should be turned in for recycling at your
local recycling station.
Note!
The battery should be turned in for recycling at your local recycling station
when depleted and unusable.
16 (60)
User manual - Zitzi Sharky Pro
© Anatomic SITT AB
Charging the battery
Follow below steps to charge the battery correctly. For further information and
instructions on the heating kit, see separate manual.
1)
Connect the charger to a wall socket, 230V, 50 Hz.
2)
Connect the charger to the control box.
3)
When an uncharged battery is connected, the indicator LED on the
charger flashes slowly with a yellow light. This indicates slow charge. After a while, the charger changes to quick charge, and the indicator LED starts flashing quickly with a green light.
4)
Leave the battery connected to the charger until the indicator LED shines with a constant green light. This indicates that the battery is fully charged and that the charger has changed to maintenance charge mode.
5)
Disconnect the power cord from the wall socket.
6)
Disconnect the charger from the control box.
Note!
If the charger LED flashes quickly with a yellow light, this indicates that your
battery is depleted/non-functional.
© Anatomic SITT AB
User manual - Zitzi Sharky Pro
17 (60)
B
A
C
D
E
F
18 (60)
User manual - Zitzi Sharky Pro
F
© Anatomic SITT AB
Pelvis support
Mounting the pelvis support
Before you can attach the pelvis support, you must remove the protective cover
(A). Remove the screw (B), and then remove the cover. The screw (B) is replaced
by another type of screw (C).
Mount the pelvis support in place of the protective cover (A) and secure with
the screw (C).
Adjusting the pelvis support
To adjust the angle of pelvis support, loosen the screw (C) (D) or (E) depending
on the settings you want to do. To adjust the height of the pelvis support plate
unscrew the screws (F) and move the plate to the desired position.
Tighten the screws (F) again.
uv som tas bort
Skruv som tas bort
© Anatomic SITT AB
KåpaCover
som tas(A)
bort
Removed
M6som
Screw
(B) vid monteringScrew (C)
Skruv
används
Replaced by (C)
New screw
Kåpa som Skruv
tas bort
Skruv som används
vidsom
montering
som tas bort
Kåpa
tas bort
User manual - Zitzi Sharky Pro
19 (60)
A
A
A
A
20 (60)
User manual - Zitzi Sharky Pro
© Anatomic SITT AB
Hip belt
Adjusting the hip belt bracket
To move the position of the hip belt bracket, loosen the screws (A) slightly and
adjust into desired position. Then tighten the screws (A).
Mounting the hip belt
When mounting the hip belt in the hip belt bracket, use a tri-glide buckle.
For assembly according to the tri-glide method, see picture.
Tri-glide method
© Anatomic SITT AB
User manual - Zitzi Sharky Pro
21 (60)
E
D
A
C
B
C
22 (60)
User manual - Zitzi Sharky Pro
© Anatomic SITT AB
Armrests from seat
Mounting the armrests
Slide the armrest into the intended tubes on the seat base. Once you reach the
desired width position of the armrest, tighten the screw (A).
Adjusting the width
To change the width of the armrest, loosen the screw (A) and then move the
armrest to desired position, then tighten the screw (A).
Adjusting the height
To adjust the height of the armrest, looen the lever handle (B) and move the
armrest to the desired height, then tighten the lever handle (B).
Adjusting the angle up/down
To adjust the angle of the armrest, loosen the lever handle (C) and move the
armrest to the desired angle, then tighten lever handle (C).
Adjusting the lateral angle
To adjust the lateral angle of the armrest, loosen the screw (D) and move the
armrest to the desired angle, then tighten the screw (D).
Cushion
Fasten the cushion on the armrest plate by attaching the velcro
straps through the four tracks (E) and connect them to each other in the
bottom of the plate.
© Anatomic SITT AB
User manual - Zitzi Sharky Pro
23 (60)
E
D
B
A
A
C
A
A
C
24 (60)
User manual - Zitzi Sharky Pro
© Anatomic SITT AB
Armrests from the back, fixed
Mounting of fixed armrests
Before mounting the armrests from the back, you must first remove the allen key
and possibly other details that are mounted already. These details may include a
headrest, upper mounting brackets and driving bow.
Slide the rail pins of the armrest bracket into the tracks of the back profile.
Once you reach desired position, tighten the screws (A). Reassemble the details
you removed before mounting the armrest bracket.
Adjusting the width
To change the width of the armrest, loosen the screw (A) and then move
the armrest to the desired positon, then tighten the screw (A).
Adjusting the height
To adjust the height of the armrest, loosen the lever handle (B) and move
the armrest to the desired height, then tighten lever handle (B).
Adjusting the angle up/down
To adjust the angle of the armrest, loosen the lever handle (C) and move
the armrest to the desired angle, then tighten lever handle (C).
Adjusting the lateral angle
To adjust the lateral angle of the armrest, loosen the screw (D) and move
the armrest to the desired angle. Then tighten the screw (D).
Cushion
Fasten the cushion on the armrest plate by attaching the velcro
straps through the four tracks (E) and connect them to each other in the
bottom of the plate.
© Anatomic SITT AB
User manual - Zitzi Sharky Pro
25 (60)
D
B
A
C
A
A
A
E
C
Three hole positions
To adjust the angle of the armrest
26 (60)
User manual - Zitzi Sharky Pro
© Anatomic SITT AB
Armrests from the back, foldable
Mounting the foldable armrests
Before mounting the armrests from the back, you must first remove allen key
and possibly other details that are mounted already. These details may include a
headrest, upper mounting brackets and driving bow.
Slide the rail pin of the armrest bracket into the tracks of the back profile.
Once you reach desired position, tighten the screws (A). Reassemble the details
you before mounting the armrest bracket.
Adjusting the width
To change the width of the armrest, loosen the screw (A) and then move the
armrest to the desired positon, then tighten the screw (A).
Adjusting the height
To adjust the height of the armrest, loosen the lever handle (B) and move
the armrest to the desired height, then tighten lever handle (B).
Adjusting the angle up/down
To adjust the angle of the armrest, loosen the lever handle (C) and move the
armrest to the desired angle, then tighten lever handle (C). See page 24-25.
Adjusting the lateral angle
To adjust the lateral angle of the armrest, loosen the screw (D) and move
the armrest to the desired angle, then tighten the screw (D).
The folding function
To fold the armrest to the side, pull the locking knob (E) down and fold away
the armrest. Ensure that it clicks when you turn back the armrest.
Ability to adjust the angle is given by three hole positions for the locking knob.
© Anatomic SITT AB
User manual - Zitzi Sharky Pro
27 (60)
E
A
D
B
B
D
E
C
Rail pin (A)
4 pcs
28 (60)
B
M6 Screw (B)
6 pcs
User manual - Zitzi Sharky Pro
B
Lower bracket (C)
Included as standard
Lower bracket (F)
Optional 2 pcs
© Anatomic SITT AB
Positioning harnesses
Mounting the lower mounting bracket
Before mounting the lower mounting bracket (C), you must first remove allen key
and possibly other details that are mounted already. These details may include a
headrest, upper mounting brackets and driving bow.
Slide the rail pins of the lower mounting bracket into the tracks of the back
profile. Once you reach the desired position, tighten the screws (B).
Reassemble the details you removed before mounting the armrest bracket.
Adjusting the lower mounting bracket
To adjust the height, loosen the screws (B) slightly and then move bracket to the
desired position, then tighten the screws (B).
Mounting the upper mounting bracket
Remove the allen key and slide the rail pins (A) of the upper mounting bracket
(D) in the track of the back profile. Once you reach the desired height of the
bracket, tighten the screws (B). Put the allen key back into the profile.
Adjusting the upper mounting bracket
For height and angle adjustment, loosen the screws (B) slightly and then move
the bracket to desired position, then tighten the screws (B).
Mounting optional lower brackets
For a lower attachment of the harness, an optional mounting bracket (F) may be
used. This is mounted with the included screw in existing holes on the seat base.
F
© Anatomic SITT AB
User manual - Zitzi Sharky Pro
29 (60)
A
30 (60)
User manual - Zitzi Sharky Pro
A
© Anatomic SITT AB
Driving bow
Mounting the driving bow
Before mounting the driving bow, you must first remove the allen key and
any other details that are mounted already. These details may be, for example,
headrest and upper mounting brackets.
Slide the rail pins of the driving bow into the back profile. Once you reach the
desired position, tighten the screws (A). Reassemble the details you possibly
removed before mounting the driving bow.
Adjusting the height
To adjust the height of the driving bow, loosen the screws (A) slightly and
then move the driving bow to the desired height. Tighten the screws (A) when
the desired height is reached.
Note!
Note that you never have to remove the screws completely to adjust
the height of the driving bow, it is enough to loosen them slightly.
© Anatomic SITT AB
User manual - Zitzi Sharky Pro
31 (60)
A
B
C
D
E
F
F
anser
ckel
Vagnsbult
Bricka
Fingervred utv gänga
Finger knob (A)
4 pcs
Bricka
Fingervred inv gänga
32 (60)
Distanser
Spakvred
Bricka(B)
Washer
Spacer (D)
4 pcs
4 pcs
Carriage bolt (E)
Distanser
4 pcs
Distanser
Sargsprint, olika storlekar
Spakvred
User manual - Zitzi Sharky Pro
© Anatomic SITT AB
Ryggbricka
Upper arm support
Mounting the upper arm support
Mount the upper arm support with the finger knobs (A), washers (B), spacers (D)
and carriage bolts (E). Note that the carriage bolts in the lateral support must be
replaced by the supplied, longer carriage bolts. For more detailed information
on how to mount lateral support, see page 6 of this manual.
Put the carriage bolts (E) through the lateral support and the slot in the
back plate. Then meet up with spacers (D), the upper arm support bracket (C),
washers (B) and a finger knobs (A) on the opposite side of the backrest.
Note!
The carriage bolts the in the lateral support must be replaced by the supplied,
longer carriage bolts when mounting the upper arm supports.
Adjusting the height
To adjust the height of the upper arm support, loosen the finger knobs (A)
and then adjust to the desired height. Tighten the finger knobs (A) when you
have reached the desired position.
Adjusting the width
To adjust the width of the upper arm support, loosen the screws (F), then
adjust to the desired width. Tighten the screws when you have reached the
desired position.
Note!
When adjusting the upper arm support, the lateral support is also
available to adjust at the same time.
Cushion cover
When the cushion cover needs to be washed you can easily remove it
from the upper arm support plate by stretching the elastic ribbon on the
back of the cover.
© Anatomic SITT AB
User manual - Zitzi Sharky Pro
33 (60)
Locking lever
Attachment widths
Choose between three mounting holes
34 (60)
User manual - Zitzi Sharky Pro
© Anatomic SITT AB
Table, fixed
Mounting the table
Put the table on the armrest plates and then rotate the locking lever of the
tableinto position below the armrest plate. The locking lever must be rotated
until it is inside the rim of the raised armrest plate.
Changing the mounting holes
There are 3 mounting widths to choose from. To change the width, use one of
the optional mounting holes located under the padding. The locking lever is
mounted in the center hole as default.
To change the mounting hole, you must first lift the back end of the padding.
The hole markings on the rear edge shows the size of the table.
Note!
Do not lift the front of the table.
© Anatomic SITT AB
User manual - Zitzi Sharky Pro
35 (60)
C
B
A
Position 1
36 (60)
User manual - Zitzi Sharky Pro
Position 2
Position 3
© Anatomic SITT AB
Table, foldable
Mounting the table
To mount the folding table, put the table mounting tube (A) through the tube (B)
located under the armrest plate. Push the table to the desired position and let it
rest on the armrest plates. Tighten the finger knob (C) to lock the table.
Using the folding function
To fold table to the side, first loosen the finger knob (C) slightly. Lift the table
and pull it forward. Lift table further and bring it to the side. When the table is in
its lowest position, push it back again and tighten finger knob (C).
1)
Pull the table forward
2)
Lift table further and bring it to the side
3)
When the table is in its lowest position, push it back again
Note!
Remember to tighten the finger knob (C) after using the foldable function of the
table. If locking levers are used, these must be turned in under the armrest plate
as described on page 34-35.
Remember!
Be sure to pull the table far enough forward when using the foldable function
so that the user is not damaged.
© Anatomic SITT AB
User manual - Zitzi Sharky Pro
37 (60)
Reinforced table
Bottom view
D
38 (60)
User manual - Zitzi Sharky Pro
D
D
D
© Anatomic SITT AB
Table, reinforced mounting brackets
Mounting of the reinforced table
To mount the reinforced table, put the table mounting tube (A) through the tube
(B) located under armrest plate. Then push the table to desired position and let it
rest on the armrest plates.
Tighten the finger knob (C) to lock the table.
Adjusting the width
Instead of adjusting the width of the armrests, you can adjust the width
of the table so that the mounting brackets will fit the mounting tubes in the
armrest brackets.To adjust the width, loosen the screws (D) and adjust to
the desired position. Then tighten the screws (D).
Note!
If the width adjustment of the table is not enough, it’s possible to adjust
the armrest width. See page 22-23 in this manual for further information.
A
B
© Anatomic SITT AB
C
User manual - Zitzi Sharky Pro
39 (60)
Footrest stay
E
E
A
A
B
C
D
E
D
E
F
Vagnsbult
Bricka
Foot plate
G
Fingervred utv gänga
Distanser
Spakvred
Fingervred inv gänga
Justeringsnyckel
M6 Countersunk (A)
4 pcs
40 (60)
Spacer (B)
4 pcs
User manual - Zitzi Sharky Pro
Sargsprint, olika storlekar
Rail pin (C)
2 pcs
Track nut (D)
4 pcs
Ryggbricka
M6 Screw (E)
4 pcs
© Anatomic SITT AB
Calf support
Mounting calf support
Before mounting the calf support, you must first remove any footrests from the
footrest stay. Start by removing the end cap (G) and then loosen the lever handle
(F) that holds the footrest in place on the footrest stay. Then drag the footrest
down.
Mount the calf support by pushing the rail pins (C) into the footrest stay, adjust
to the desired height and tighten the screws (E). Reassemble the footrest and it’s
end cap.
Tip!
To reassemble the footrest, see page 42-43 of this manual.
Adjusting the height
To adjust the height of the calf support, loosen the screws (E) slightly
and adjust to desired height, then tighten the screws (E).
Adjusting the width
To adjust the width of the calf support, loosen the screws (E) slightly
and adjust to desired width, then tighten the screws (E).
Note!
Do not forget to attach the footrest and the end caps when afterwards
mounting the calf support.
© Anatomic SITT AB
User manual - Zitzi Sharky Pro
41 (60)
Optional mounting
To come closer to the knee joint
B
C
A
E
D
Footrest profile
F
G
42 (60)
User manual - Zitzi Sharky Pro
© Anatomic SITT AB
Footrest
Mounting the footrest
Regardless of footrest version, the mounting is done in the same manner.
Start by removing the end cap (A) from the end of the bottom profile (B) and then
insert the rail pins (C) so that they aligned with the holes in the bottom profile
(B). Then attach the footrest with the screws (D) in the rail pins (C) through the
holes in the bottom profile (B).
Optional mounting of the footrest
To come closer to the knee joint, there is an optional mounting method where
you mount the footrest support on the opposite side of bottom profile (B).
Note!
Note that you do not need to disassemble the leg part from the profile to
mount the footrest.
Safety stop
Safety stop (G) in the form of a rail pin is mounted in the bottom of the footrest
stay inside the end cap. The safety stop (G) can also be used to return to a preset
height position.
Tip!
Attach an additional safety stop above the footrest of the footrest stay track to
easily return the footrest to an alternate height position (for example with or
without shoes).
Adjusting the angle by the knee joint
When the footrest is mounted onto the bottom profile it is possible to adjust the
angle of the footrest at the knee joint. Loosen the lever handle (E) and adjust to
the desired angle, then tighten the lever knob (E).
Adjusting the angle by the ankle
When the footrest is mounted onto the bottom profile it is possible to adjust the
angle of the footrest at the ankle. Loosen the lever handle (F) and adjust to the
desired angle, then tighten the lever knob (F).
© Anatomic SITT AB
User manual - Zitzi Sharky Pro
43 (60)
1
2
2
F
D
E
A
3
3
A
A
4
A
4
A
User manual - Zitzi Sharky Pro
4
A
A
B
C
A
B
C
44 (60)
3
A
A
B
© Anatomic SITT AB
Footrest brackets
Fixed footrest bracket (1)
To adjust the height of the footrest, release the lever handle (A) and then adjust
to desired height, then tighten the lever handle (A).
Flexible footrest bracket (2)
To adjust the footrest height, loosen the screw (D) and if necessary screw (E) and
adjust to desired height, then tighten the screw (D). Select length of the spring
balance by adjusting the screw (E) to desired position and tighten it. Use the
screw (E) to adjust the spring amplitude by tightening it the right position.
Tip!
The spring resistance can be adjusted with a screw in the spring assembly (F).
Turn-up footrest bracket (3)
To adjust the height of the footrest, loosen the lever handle (A) and adjust to the
desired height, then tighten lever handle (A). To use the turn-up feature lift the
foot plate in the front.
Ball joint bracket (4)
To adjust the height of the footrest, loosen the lever handle (A) and then
adjust to the desired height, then tighten lever handle (A).
To use the ball joint function, first loosen the screws (B) and (C) and
adjust to the desired position. Then tighten the screws (B) and secure the
position with the screw (C).
© Anatomic SITT AB
User manual - Zitzi Sharky Pro
45 (60)
A
B
F
G
C
D
E
M6 Countersunk
2+2 pcs
46 (60)
User manual - Zitzi Sharky Pro
Rail pins
4 pcs
Profiles
2 pcs
© Anatomic SITT AB
Flat seat
Mounting the flat seat
When mounting the flat seat, the standard seat parts are replaced by a flat seat
plate. Mounting the flat seat must be done with the provided mounting hardware
according to the description below.
When mounting the flat seat, the taller screws (A) should be put through the
rearmost holes (B) in the flat seat plate and the holes (C) in the profile.
Meet up on the opposite side with the rail pins (D). Do not tighten entirely.
Insert the rail pins (E) in the outermost tracks of the profile and attach the screws
(F) in these, through the holes (G) in the flat seat plate.
Push the rail pins of the flat seat plate assembly into the seat base in track 1
(see page 12) to the desired position, then tighten the screws (A).
Note!
Never use any screws other than the supplied. These are safety features.
If in need of other dimensions, please contact Anatomic SITT AB.
© Anatomic SITT AB
User manual - Zitzi Sharky Pro
47 (60)
48 (60)
User manual - Zitzi Sharky Pro
© Anatomic SITT AB
Mounting a seating system on a frame
Mounting on a frame
There are different ways to mount a seating system on a frame. The following
explains the different options. Choose the method that suits you the best.
Fixed mounting
Fixed mounting means that you attach the seating system directly onto the
frame. Mounting with this method must be made with the supplied mounting kit.
In the bottom of the seating system are two different hole patterns for
attachment on a frame. Choose the hole patterns that is best suited for a
mounting with good balance.
Note!
Never use any other screws than those supplied. These are security features.
If other dimensions are desired, please contact Anatomic SITT AB.
Note!
If using a flat seat, this must first be removed before mounting on a frame.
M6 Screw (A)
4 pcs
© Anatomic SITT AB
M6 Washer (B)
4 pcs
M6 Lock nut (C)
4 pcs
User manual - Zitzi Sharky Pro
49 (60)
Adapter plate
On the seating system
Base plate
On the frame
50 (60)
User manual - Zitzi Sharky Pro
© Anatomic SITT AB
Mounting a seating system on a frame
Mounting on a frame
There are different ways to mount a seating system on a frame. The following
explains the different options. Choose the method that suits you the best.
Mounting with an adapter system
An adapter system allows easy movement of the seating system between
different frames. An adapter system consists of an adapter plate on the seating
system and a base plate on each frame.
Start by mounting the base plate on the frame by fastening it with the
supplied screws, washers and nuts.
Then mount the adapter plate by sliding in the rail pins (A) into the outermost
tracks in the bottom of the seating system. Tighten the screws (B) when the
desired position is reached.
When both plates are mounted, these can be combined.
The seating system is properly secured when you hear a click.
Note!
Ensure that the seating system is secure on the frame before use.
Adapter plate
Attached to the seating system
© Anatomic SITT AB
Base plate
Attached to the frame
User manual - Zitzi Sharky Pro
51 (60)
Transportation in a vehicle
Guidelines for transportation in a car
When transporting a Sharky Pro in a car, mounted on the frame, the instructions
specified by the manufacturer of the frame shall be followed.
When Sharky Pro is mounted on Seabass Pro the frame should be secured in the
intended transportation brackets as shown below.
Note!
It is important that you only stretch the strap to low tension.
Over-tensing of the straps can cause the frame to become warped.
Crash tested and approved
Sharky Pro is crash tested and approved according to ISO 16840-4.
This standard acknowledges that the seating system may be fitted on all frames
that are approved according to ISO 7176-19, while maintaining their approval
for the combination.
Note!
Crash test is approval valid for weights up to 75 kg.
52 (60)
User manual - Zitzi Sharky Pro
© Anatomic SITT AB
Customer service
Scandinavia
SE
Anatomic SITT AB
Box 6137, SE-600 06 Norrköping
Stohagsgatan 26, SE-602 29 Norrköping
Tel. +46 11 161800, Fax +46 11 162005
Email [email protected]
DK
Anatomic SITT A/S
Viengevej 4, DK-8240 Risskov
Tel. +45 861 701 74, Fax +45 861 701 75
Email [email protected]
NO
FI
NO
MMS Medical Ltd
51 Eastgate Drive, Little Island, Cork
Tel. +353 021 461 8000, Fax +353 021 461 8099
PRT
Mobilitec
Rua dos Verdes 123, PRT-4470-658 Pedras
Tel. +351 229 436 130, Fax +351 229 436 139
FR
OX Orthopédix
27 rue François Gillet, FR-42400 St. Chamond
Tel. +33 477 195 994, Fax +33 426 303 789
Anatomic SITT Hjelpm. A/S
Litleåsveien 41, PostboksB 92, N-5871 Bergen
Tel. +47 55 392 080, Fax +47 55 392 090
IT
Ortopedia Castagna Centro Tecnico
Via Ghislanzoni 18/B, IT-23900 Lecco
Tel. +39 341 362 671, Fax +39 341 360 931
Handico Finland OY
Asemanaukio 7, FIN-04200 Kerava
Tel. +358 331 222 700, Fax +358 331 222 710
Email [email protected]
CH
Rehatec AG
Ringstrasse 15, CH-4123 Allschwill
Tel. +41 614 879 911, Fax +41 614 879 910
IS
Stod Hf Stoaekjadmidin
Tronuhraun 8, IS-220 Hafnarfjordur
Tel. +354 565 2885, Fax +354 565 1423
GR
Scan Ideal
28, Tzavela Str. GR-542 49 Thessaloniki
Tel. +302 310 320 150, Fax +302 310 350 151
Hjelpmiddelspesialisten A/S
Rosenholmsveien 22, N-1252 Oslo
Tel. +47 66 81 60 70, Fax +47 66 81 60 71
Email [email protected]
Europe
NL
IRL
Anatomic SITT Nederland BV
Sir Rowland Hillstraat 1C, NL-4004 JT Tiel
Tel. +31 344 63 45 40, Fax +31 344 62 33 61
Email [email protected]
SVN
Team Nova Reha
Gerecja vas 33, SVN-2288 Hajdina
Tel. +386 278 201 06, Fax +386 278 201 06
ES
Via Libre Fundosa Accesibilidad
Don Ramon de la Cruz 38, ES-28001 MADRID
Tel. +34 911 213 031, Fax +34 911 213 025
MLT
Be Independent Ltd
St Luke’s Road G’Mangia PTA MLT-1027
Tel. +356 214 662 66, Fax +356 214 656 70
Asia Pacific and Middle East
GBR
Consolor Ltd Unit A3
The Forelle Centre, Black Moor Road, Ebblake
Industrial Estate, Verwood, Dorset, BH31 6BB
Tel. +44 120 282 76 50, Fax +44 133 273 02 33
UAE
Al Safwa Mobility LLC (ASM)
Al Falah Street Harley Davidson, 2001, Abu Dhabi
Tel. +971 264 242 62, Fax +971 264 242 63
Email [email protected]
NZL
Cubro Rehab
PO Box NZL-9144, Tauranga
Tel. +64 757 78 816, Fax +64 757 78 827
AUS
Paediatric Mobility Equipment
Po Box 1118, Young, AUS-NSW259
Tel. +61 1300 131 884, Fax +61 1300 884 010
Email [email protected]
ISR
Special needs for Special children
48 Mordey Hagetaot St. Beer Sheva, ISR-84840
Tel. +972 8 62 875 85, Fax +972 862 819 61
GR
HandiTech Scandinavian Reha Aids Center
11 G Seferi Str. GR-542 50 Thessaloniki
Tel. +302 310 324 114, Fax +302 310 324 054
Email [email protected]
EST
Invaru Ltd
Peterburi tee 14A, EST-114 11 Tallin
Tel. +372 621 25 82, Fax +372 638 08 78
© Anatomic SITT AB
User manual - Zitzi Sharky Pro
53 (60)
Maintenance instructions
Service intervals
In order for the device to work properly, regular service and inspection must be
performed. The need for service depends on frequency of use and wear.
Check all moving parts and fasteners for wear. Service should always be
performed by professional and qualified personnel. If you are unsure,
please feel free to contact Anatomic SITT AB.
Cleaning and washing instructions
Plastic and metal parts can be wiped off with a damp cloth, or washed with
antibacterial liquid or similar. Think green, think about the environment!
Use biodegradable detergents.
Cushions, fabrics and belt cushions are washed in 60o degrees delicates and
may not be tumbled but can be dried in a drying cupboard. Follow the directions
on the respective laundry label. The same washing rules applies to positioning
harnesses and hip belts from Anatomic SITT AB.
Check the condition regularly and perform
maintenance when necessary.
Gas piston must be activated regularly
Gas piston should be used regularly to maintain its function. If the product
is not used, the gas piston should be activated at least once every 6 months.
Further, they should be stored so that the piston rod is placed facing downward.
Otherwise, the gas spring seal might break and the gas piston fail.
Tools
The tool (4 mm hexagon key) you need to make adjustments is integrated
in the the top of the profile of the backrest on the chair.
54 (60)
User manual - Zitzi Sharky Pro
© Anatomic SITT AB
Warranty
1 year against manufacturing defects. For more detailed information about the
warranty we provide, see page 58 of this manual.
Combinations
Zitzi Sharky Pro and its accessories are CE marked products that can be
combined with all the accessories described in this manual. Zitzi Sharky Pro is
suitable for use together with frames like Zitzi Flipper Pro, Zitzi Seabass Pro,
Mika and Flizzy. For other combinations please contact Anatomic SITT AB.
Spare parts
For the CE marking of the Zitzi Sharky Pro to be valid, the seating system may
only be fitted with spare parts delivered by Anatomic SITT AB.
Reconditioning
Reconditioning of the seating system may only be made with original parts from
Anatomic SITT AB.
Note!
Always check that the device is not customized when reconditioning,
before it is sent to new users.
Marking
Zitzi Sharky Pro and its accessories are CE marked products. A unique serial
number is located on a label placed under the activation housing. This serial
number should be quoted in any correspondence regarding the product.
Recycling
A used part or product should be dismantled and discarded. The parts should
be separated by material type, metal, plastic and combustibles (textiles).
Gas piston is sorted as hazardous material.
© Anatomic SITT AB
User manual - Zitzi Sharky Pro
55 (60)
Summary and follow-ups
Follow-up inspections
Continuously perform the follow-ups specified in each point.
You should check the following points every time patient to use the seating
system.
56 (60)
•
Continue to regularly perform the follow-ups which is described
in respective point.
•
Regularly examine that all the screws are securely locked.
•
Regularly examine the wear of straps and cushions.
•
Do not place the child in the seat until you hear the click sound
when you mount the seat in an underframe.
•
Do not tilt the seat too much forward when the child is
placed in the seat.
User manual - Zitzi Sharky Pro
© Anatomic SITT AB
Adaptation and customization
Guidelines and recommendations
Every time the Sharky Pro is altered in some way, an assessment has to be made
to determine if it is an adaptation or a customization.
An adaptation is any change made in comprehension of the CE mark. All other
changes are customizations. Adaptations must only be made by a person
deemed to be qualified for the task and should always be made in a professional
manner. The CE mark means that the product fulfils all of the essential European
safety requirements.
Note that a risk assessment always should be done for an adaptation as well as
for a customization of a medical aid. The product must never become dangerous
to use after adaptation.
The product should be fitted with a note that it is adapted to a specific user,
so that it cannot be mistaken for a standard model product.
Allowed adaptations of the Sharky Pro
Note that a risk assessment always should be done for an adaptation as well as
for a customization of a medical aid. The product must never become dangerous
to use after adaptation.
Cut footrest profiles
The footrest profile may be shortened to fit the user better.
Cut armrest profiles (armrest from seat)
The armrest profile may be shortened to fit the user better. The profile must only
be cut in the lower end (towards the seat) and M5 holes for safety stoppers must
be drilled and tapped. These holes must be drilled so that the safety stoppers
can be mounted in the track of the profile at a minimum distance of 10 mm from
the profile end.
Cut backrest profile
The backrest profile may be shortened to fit the user better. The profile must
never be shorter than allowing all the backrest brackets to be mounted on it.
Also, there must always be minimum 10 mm between the edge of the slot for
lumbar support adjustment and the end of the profile.
© Anatomic SITT AB
User manual - Zitzi Sharky Pro
57 (60)
Terms of sale
Warranty
Warranty against manufacturing errors is valid for one (1) year from delivery
date. Warranty is void if the product has been subjected to external factors or
rough handling. It’s required that the faulty product is returned for us to process
a warranty claim. Always attach the packing slip of the original delivery.
Warranty claims
Describe the error and the possible cause for this as thoroughly as possible.
Claim repairs or possible replacement under warranty. Always attach a copy of
the invoice and state that the product should be returned to you after repairs.
Provide a shipping address, a contact person and a phone number.
Make sure that you pack the product well to protect it from shocks during the
transportion. Note the shipping number in your documentation. This is so that
you can track the shipment should anything occur during transport.
Returning products
In the event of faulty orders or deliveries, the products should be returned
within 20 days from delivery. Always attach a copy of both the packing slip and
the invoice. Provide your reason for returning the products.
Make sure that you pack the product well to protect it from shocks during the
transportion. Note the shipping number in your documentation. This is so that
you can track the shipment should anything occur during transport.
For products returned more than 20 days from delivery
a refund is made of 80% of the invoice value
For products returned more than 60 days from delivery
a refund is made of 60% of the invoice value
For products returned more than 150 days from delivery
a refund is made of 40% of the invoice value
For products returned more than 360 days from delivery
no refund is made for the products
Customized products cannot be returned
58 (60)
User manual - Zitzi Sharky Pro
© Anatomic SITT AB
Technical data
C
G
D
E
A
I
F
B
H
User data
Size 1
Size 2
User length
150-180 cm
170-195 cm
Seat width (A)
36, 39, 42 cm
43, 46, 49 cm
Seat depth (B)
37-47 cm
45-55 cm
Lateral width (C)
27-35 cm
30-38 cm
Lateral depth (D)
21 cm
25 cm
Axilla height (E)
35-50 cm
40-55 cm
Leg length difference (F)
10 cm
10 cm
Abduction/Adduction
18° / 9°
18° / 9°
Product data
Size 1
Size 2
User width
130 kg*
130 kg*
Height (G)
67 cm
77 cm
Length (H)
52-62 cm
62-72 cm
Width (I)
43, 46, 49 cm
50, 53, 56 cm
Weight
14 kg
Back angle
-10° / +25°
-10° / +25°
* Crash test approval is valid for weights up to 75 kg.
© Anatomic SITT AB
User manual - Zitzi Sharky Pro
59 (60)
SE
Anatomic SITT AB (manufacturer)
Box 6137, SE-600 06 Norrköping, Sweden
Tel +46 11 16 18 00
Fax +46 11 16 20 05
Support +46 11 16 18 05
Street address
Stohagsgatan 26, SE-602 29 Norrköping, Sweden
DK
Anatomic SITT A/S
Viengevej 4, 8240 Risskov, Denmark
Tel +45 86 17 01 74
Fax +45 86 17 01 75
NO
Anatomic SITT / Hjelpmiddelspesialisten AS
Postboks 92 Nyborg, N5871 Bergen, Norway
Tel +47 55 39 20 80
Fax +47 55 39 20 90
NL
Anatomic SITT Nederland BV
Postbus 6027 / 4000 HA Tiel, Netherlands
Tel +31 344 63 45 40
Fax +31 344 62 33 61
anatomicsitt.com
[email protected]
youtube.com/anatomicsitt