1
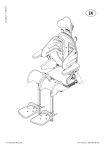
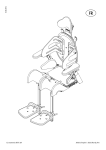
BR201209-01 . UT.02
2014.09.02
EN
User manual
Check the checkbox if the product is
CUSTOMIZED. The CE Mark is no
longer valid and should be removed.
The product is only intended for use as an under frame together with seating
systems produced by Anatomic SITT AB. If other uses are desired, please contact
Anatomic SITT AB.
Safety precautions
Introduction
For you to use all advandtages of the Zitzi Guppy, it is important that you read
through this manual thoroughly. This applies to all persons who are in the
vicinity of the user. Adjustment of the Zitzi Guppy should always be performed
by medically qualified person. If you need additional information, please contact
Anatomic SITT AB.
Correspondence
Zitzi Guppy and its accessories are CE marked products. A unique serial number
is located on a label placed on the lower part of the frame. This serial
number should be quoted in any correspondence regarding the product.
Craschtested and approved
Zitzi Guppy is craschtested and approved according to 7176-19 for 70 kg in
vehicle.
Obs!
The prescriber or person with equivalent qualifications and knowledge of the
user and the tool will always carry out a risk assessment before use. If this
analysis shows that there may be a risk of serious injury, the user must never
be left unattended when using the Guppy.
This product is manufactured by Anatomic SITT AB
Postal address Anatomic SITT AB, Box 6137, SE-600 06 Norrköping
Street address Anatomic SITT AB, Terminalgatan 1, SE-603 61 Norrköping
Telephone +4611-161800
Fax +4611-162005
Email [email protected]
Web anatomicsitt.com, youtube.com/anatomicsitt
© Anatomic SITT AB
User manual - Zitzi Guppy I 3
Table of contents
Safety precautions
3
Introduction
3
Seat part
6
Mounting of the seatplate
6
Tilt7
Tilt of the seat
7
Armrest9
Installation on chassis
9
Width adjustement
9
Height adjustment
Angle adjustment upwards and downwards
Depth adjustment
9
9
9
Driving-handle11
Installation of driving-handle
11
Angle adjustment of the driving-handle
11
Depth adjustment of the driving-handle
Angle adjustment of driving-handle
Fold the driving-handle
11
11
11
Wheels with Quick-release
12
Mounting of wheels with quick-release
12
Release the wheel
12
Driving wheels
13
Wheel position
13
Caster14
Installation of caster
14
Caster positioning
14
Mounting of the caster on the caster house fork 14
Caster fork position
Angle adjustment of caster fork
15
15
Brake17
Drum brake
© Anatomic SITT AB
17
Setting the brakes
17
Troubleshooting of the brakes
17
Releasing the brakes
Installation of drum brake
17
19
Parking brake
20
Installation of parking brake
20
Using the parking brake
20
Footrest21
Mounting of footrest
21
Adjusting the angle on the knee-joint
21
Safety stop
Adjustment the height of the footrest
21
21
Calf support
22
Mounting of calf support
22
Width adjustment of the calf support
22
Height adjustment of the calf support
22
Anti-tip device
23
Installation of anti-tip device
23
Step bar
24
Installation of the step-bar
24
Transportation kit
26
Installation of front bracket
26
Installation of safety-loop
26
Using the anti-tip device
Using the step-bar
Installation of rear bracket
Using the transportation kit
23
24
26
26
Direction lock
28
Install the direction lock
28
Releasing the direction lock
28
Activate direction lock
28
User manual - Zitzi Guppy I 4
EN
Mudguards29
Installation of mudguards
Adjusting the mudguard
29
29
Transportation in a vehicle
31
Guidelines for transportation in a car
31
Crash tested and approved
31
Paint
34
Tubular frame and details
35
Stability
35
Forks
Driving bow and push-handle
Brakes
Folding mechanism and tilt
35
35
35
35
Maintenance instructions
32
Function control
Service intervals
32
Adaptation and customization
36
Gas piston
32
Recommendations
Risk assessment
36
33
33
Warranty claims
Cleaning and washing instructions
Warranty
Combinations
Spare parts
Marking
Recycling
32
33
Terms of sale
37
Warranty
37
33
Returning products
37
Service
34
Finishing
34
Marking
Wheels
© Anatomic SITT AB
36
33
Reconditioning34
Cleaning
35
34
37
Customer service
38
Technical data
39
34
34
User manual - Zitzi Guppy I 5
Seat part
Installation of the mounting plate
The seating system mounting plate is easily mounted on the chassis by four (4)
screws, washers and nuts in selected tracks (A) on the chassis seatplate.
Place the seating systems mounting plate (B) on the chassis seatplate (C) and
stick through the supplied screw (D). Then meet up with nut and washer (F)
on the underside of its chassis seatplate. Tighten the screws (D) firmly.
Note!
The picture shows only one type of mounting plate assembly instructions. For
more information about mounting plates, see the instruction manuals for selected seating system.
B
D
C
A
F
© Anatomic SITT AB
User manual - Zitzi Guppy I 6
Tilt
Tilt the seat
The seatplate is adjustable at an angle between 0-32°. Press the tilt handle (A)
while holding the handle and pushing it upwards or downwards. Let go of the tilt
handle (A) when the seat is in the required position.
To restore the angle to its neutral position, press the tilt handle (A) and push the
handle upwards and backwards.
Obs!
Be careful to avoid risk of pinching while tilting the seat.
Obs!
Be aware of the possible increased risk of overturn during tilt.
A
© Anatomic SITT AB
User manual - Zitzi Guppy I 7
D
A
C
B
© Anatomic SITT AB
User manual - Zitzi Guppy I 8
Armrest
Mounting on the frame
Loosen the screws (A) completely on each side. Mount the mounting bracket
around the driving bow. Put back the screws (A) and tighten.
Height adjustment
Loosen the screws (A) and adjust to required height. Tighten the screws.
Width adjustment
Loosen the screws (B) and adjust to required width. Tighten the screws.
Angle adjustment upwards and downwards
To adjust the angle of the armrest loosen the adjuster (C) and adjust it to the
required angle. To compensate you can also adjust the angle in the armrests
attachment. Loosen the screws (A) and adjust the angle using the three holes
(E) in the attachment.
Depth adjustment
Loosen the screws (D) underneath the armrest plate and adjust to required
position using holes underneath.
© Anatomic SITT AB
User manual - Zitzi Guppy I 9
D
C
B
A
© Anatomic SITT AB
User manual - Zitzi Guppy I 10
Driving-handle
Installation of the driving-handle
Insert the attachment of the pusch-frame (A) in the provided holes underneath the seatplate on the rear of the chassis and then tighten the screws (B).
Choose between the four fixed positions.
Depth adjustment of the driving-handle
To adjust the push-frame (extend the depht of the seat) loosen the screws (B)
underneath the seatplate on the roar of the chassis and adjust to the desired
depht. Tighten the screws (B).
Notice!
The screw must fit into one of the four fixed positions that is available on the
driving-handle.
Angle adjustment of the driving-handle
You can adjust the angle according to the seating system you are provided with.
Release the the adjusters (C) on both sides. Adjust the push-frame to required
angle and then tighten the adjusters (C).
Notice!
The driving-handle shall always be in contact with the back of the seating
system during transportation in a vehicle.
Angle adjustment of driving-handle
Press the buttons (D) on the inside of the driving-handle and adjust.
Fold the push-frame
Release the adjusters (C) and fold the push-frame forewards. Tighten the adjusters
(C).
© Anatomic SITT AB
User manual - Zitzi Guppy I 11
Wheels with Quick-release
Mounting of wheels with quick-release
The wheels can easily be removed from the chassis which can be useful during
transport purposes.
Press and hold the button (B) in the wheel center. Push the wheel (A) until it
stops. Release the press button (B). Secure that the wheel is installated properly
by trying to pull it outwards without pressing the quick-release button (B).
Notice!
Secure that the wheel is installated properly by trying to pull it outwards.
Release the wheel
Press and hold the button (B) in the wheel center as you pull off the wheel from
the chassis.
B
A
© Anatomic SITT AB
User manual - Zitzi Guppy I 12
Driving wheels
Wheel position
Depending on the seating systems position on the chassis seatplate you can adjust
the wheel horizontally to maintain a correct centre of gravity and better balance.
To adjust the wheel in the right position, release the four screws (A) underneath
the wheel axle and adjust to the required depht. Secure and measure that the
wheel axle is on the same depht on both sides.
16” wheels are mounted i the provided holes B + C.
20”, 22” and 24” are mounted in the provided holes D + E.
For advice and help balancing the wheelchair, please contact your dealer.
Notice!
NOTE that changing the wheelposition might increase the risk of tipping.
Notice!
The screws should not be taken out completey. Just loosen them a little.
A
E
D
C
B
© Anatomic SITT AB
User manual - Zitzi Guppy I 13
Caster
Installation of caster
Insert the pin (A) underneath the chassis as illustrated. Then mount the front
wheel house (K) using screw (B), washer (C) and the eccentric nut (D) and tighten.
Mounting of the caster on the caster house fork
Mount the caster (F) into one of five different positions by using the caster fork
(K), the supplied axle (G), washer (H) and lock nut (I).
Place the caster (F) in the caster fork (K). Provide the axle (G) with a washer (H)
and lead the axle into one of the five provided holes and the caster. Mount a
washer (H), lock nut (I) on the other side and tighten. Finish by placing a nut
cover (J) over the lock nut. See the picture below.
Caster positioning
You kan adjust the castors in five different height positions. This allows you to
adjust the castor height after positioning the driving wheels.
Obs!
OBS! Secure that the screws is properly tighten after the adjustment.
E
D
C
B
A
K
J
G
H
J
I
F
© Anatomic SITT AB
User manual - Zitzi Guppy I 14
Caster
Caster fork position
You may need to adjust the caster fork (A) if the wheelchair doesn’t roll properly.
This can occur when adjusting the caster position without adjusting the caster
fork (A).
Make sure that the position of the caster attachment (B) is 90° in proposition to
the ground as illustrated.
Angle adjustment of caster fork
Loosen and rotate the eccentric nuts (C) on the caster attachment (B) until the
correct angle is obtained.
Tighten the screws properly after adjusting the caster fork.
Obs!
Make sure the screws are properly tightened after the adjustment.
C
B
A
90°
Ground
© Anatomic SITT AB
User manual - Zitzi Guppy I 15
A
B
C
E
D
Detailed drum brake
© Anatomic SITT AB
User manual - Zitzi Guppy I 16
Brake
Drum brake
The wheels are equipped with drum brakes that can be activated by the caretaker.
Always check that the brakes are working properly before use.
Press the right brakehandle (A) while pusching the wheelchair forward.
The brakehandle (A) should not be possible to press all the way to the driving
handle. About 5-10 mm’s should remain when brakes are set.
Repeat the procedure with the left brakehandle.
Setting the brakes
Press the brakehandle (A) and push the red locking device (B) forward.
Releasing the brakes
Press the brakehandle (A) and the locking device will release automatically. Then
let go of the brakehandle.
If the brakes does not work
Check the tension of both brakewires. If a wire has low tension, try to tens it by
loosen the screw (C) and then tighten again. If the adjustment is not enough try
the following quick-setup guide to re-tighten the brake cables.
1) Tighten the screw (C) to its bottom position
2) Loosen the nut (D)
3) Squeeze the brake by lifting the drum brake arm (E) and move the nut (D) further up the wire.
4)
Tighten the nut (D) and adjust the tension with the screw (C)
© Anatomic SITT AB
User manual - Zitzi Guppy I 17
A
C
B
D
F
© Anatomic SITT AB
E
User manual - Zitzi Guppy I 18
Brake
Installation of drum brake
You need to remove the wheel from the wheelchair to mount the drum brake.
Press the button on the quick-realease axle and pull the wheel and axle out from
the drum brake. See page 12.
Mount the drum brakes on the chassis by threading the large distance (A) to the
drum brake attachment as illustrated. Secure the large distance (A) with the large
nut (B) as illustrated. It is important to not tighten too hard.
Then take the screw (C) and put it in the ellipticall hole and thread the small distance (D) over the screw (C).
Fasten the screw (C) using a washer (E), nut (F) as illustrated. Tighten the both
nuts (B) and (F). Make sure the drum brake i properly positioned.
Put the wheel back on the wheelchair (page 12) when the installation of the drum
brake is done.
Obs!
Nut (B) (and screw C when selecting 16” wheels) has to be secured with a thread
lock, such as Loctite 243 or similar.
Note!
When selecting the 16 ” wheels, the screw (C) is threaded directly in the plate.
Note!
For more information on how to use the quick-release, see page 12.
Note!
The installation of the drum brake is the same for all wheel sizes.
© Anatomic SITT AB
User manual - Zitzi Guppy I 19
Parking brake
Installation of handbrake
The installation of the parking brake attachment should be installed as illustrated in the intended hole-pattern on the chassis side with the supplied screws (A),
washers (B) and nuts (C).
Adjust the handbrake (D) if necessary by loosen the screws (E) and then move
the handbrake forward and backwards in the track. Tighten the screws (E) when
required position is reached.
Using the handbrake
Set the handbrake (D) by pressing the handbrake arm forward. Pull the arm back
to release the handbrake.
C
B
A
D
© Anatomic SITT AB
E
User manual - Zitzi Guppy I 20
Footrest
Mounting of footrest
Insert the footrest attachment (A) in the front holes underneath the seatplate.
There is two positions for depht adjustment. Tighten the screws (B) on both
sides with washer and nuts (C).
Note!
Before installation you have to remove the seal from the seatplates. Then you
can easily insert the footrest attachment.
Safety stop
A pin (D) is installed in the bottom of the footrest attackment. The pin can also
be used to find back to a pre-set height position.
Tips!
Install an additional pin above the footrest in the footrest attachment to easily
find your way back to an alternative height position (eg with or without shoes).
Adjusting the angle on the knee-joint
When the footrest attachment is installed to the chassis you can adjust the
footrest angle at the knee-joint. Loosen the screw (E) slightly and adjust to the
desired angle. Tighten the screw.
Adjustment the height of the footrest
When the footrest attachment is installed to the chassis you can adjust the heght
of the footrest. Loosen the adjuster (F) and adjust to required height. Tighten the
adjuster.
C
E
B
A
F
D
© Anatomic SITT AB
User manual - Zitzi Guppy I 21
Calf support
Mounting of calf support
Install the calf support with the supplied screws and pins as illustrated into the
footrest attachment.
Height adjustment of the calf support
Loosen the screws (A) slightly and then adjust to the required height. Tighten the
screws (A)
Widht adjustment of the calf support
Loosen the screws (B) slightly and then adjust to the required widht. Tighten the
screws (B)
B
A
© Anatomic SITT AB
User manual - Zitzi Guppy I 22
Anti-tip device
Installation of anti-tip device
Install the anti-tip device on the wheel axle as illustrated using the supplied
screws (A), washer (B), nuts (C) and nut cover (D).
Insert the screw (A) into the holes on the anti-tip attachment and through
the chassis and put a washer (B) and nut (C) on the opposite side. Tighten the
screws.
Finish by placing nut covers (D) as illustrated.
Note!
Zitzi Guppy should always be equipped with anti-tip device because of its many
adjustment possibilities.
Using the anti-tip device
The anti-tip should be used for a safer and secure usage of the chassis. It can
easily be folded when not in use by carefully stepping down the anti-tip and turn
it aside. When deactivating, try to step on the anti-tip so close the anti-tip attachment as possible.
Make sure to turn the anti-tip advice until you hear a click, wich indicates that
the anti-tip is in its right position.
A
B
C
D
© Anatomic SITT AB
User manual - Zitzi Guppy I 23
Step bar
Insallation of the step bar
Install the step bar (A) on the inside of the chassis as illustrated. Thread the nuts
in the track and lock its position with the screws (B) from the outside.
Note!
The step bar is assembled on the right side as standard.
Using the step bar
The step bar facilitate the raising of the chassis when it is necessary (eg. at pa-
vements). Push the step bar with your foot while holding the driving handle and
gently pull the chassis backwards to free up some space under the castors.
Obs!
It is important to hold the driving handle firlmy while using the step bar.
B
A
© Anatomic SITT AB
User manual - Zitzi Guppy I 24
Transportation kit
Installation of front bracket
Mount the bracket with screw (A) and washer (B) to the chassis as illustrated. Do
not forget to mount the distance (C) as well.
Installation of rear bracket
The rear bracket shall be munted on the outside of the profile at the rear of the
chassis using the supplied screws (D), washers (E) and nuts (F) as illustrated.
Installation of safety-loop
Install the safety-loop on the inside of the profile with screws (G), washer (H) and
tube (I). The upper bracket is mounted at the rear of the seatplate with screws (J)
and nut (K).
Using the transportation kit
See ”Transport in vehicle” for more information and recommendations on how to
use the transportation kit safetly.
Check up!
The lock on the safety-loop should automatically lock when you fold the loop
towards the upper bracket.
Obs!
The push-frame shall always be in contact with the seating systems back during
transportation in a vehicle.
Craschtested and approved
Craschtested and approved according to 7176-19 for 70 kg.
Note!
When using the transportation kit, the angle of the chassis has to be 0°.
© Anatomic SITT AB
User manual - Zitzi Guppy I 25
Transportation kit
A
B
C
D
F
E
K
J
I
H
G
© Anatomic SITT AB
User manual - Zitzi Guppy I 26
Direction lock
Install the direction lock
Mount the direction lock to the castors using the supplied details.
Start by removing the castor attachment (A) from the chassis attachment (B) by
removing the screws (C). Then lift the end seal (D) from caster attachment (A)
top and remoe the center bolt (E).
Then mount the directional lock details (F) between the caster attachment (A)
and chassis attackhment (B) and between the caster attachment (A) and the
caster fork (G) with the supplied details as illustrated.
When the direction lock is installed, mount the caster on the chassis again. You
can adjust the direction lock by slightly adjusting screw (J).
Tips!
For more information about installing the castors, see page 18-21.
Activate direction lock
Pull the locking pin (H) straight up and then rotate 90° and release the pin (I) into
the hole in the movining part. Ensure that the direction is locked.
Releasing the direction lock
Pull the locking pin (H) straight up and then rotate 90° and release the pin into
the hole in the movining part. Ensure that the direction is locked.
Note!
Direction lock fits only by choosing the 7” castors.
© Anatomic SITT AB
User manual - Zitzi Guppy I 27
Direction lock
H
D
B
E
A
C
J
F
G
© Anatomic SITT AB
User manual - Zitzi Guppy I 28
Mudguards
Installation of mudguards
Mount the mudguards with the supplied screws (A), the spacer (B) and nuts (C).
Loosen the wheel with the quick-release function (see page 12). Loosen the
screw that holds the rotationlocker on the brake (see page 20) and then remove
the spacer.
Mount the mudguards and replace the removed spacer with the supplied,
shorter spacer (B).
Adjusting the mudguard
You can adjust the mudguars in height by loosen the screws (D). Adjust to required heigt and then tighten the screws (D).
Tips!
You just need to loosen the screws (D) slightly.
D
C
B
A
© Anatomic SITT AB
User manual - Zitzi Guppy I 29
Indication for transportation brackets
Guppy from above with the drive
wheels closest to the footer
© Anatomic SITT AB
User manual - Zitzi Guppy I 30
Transportation in a vehicle
Guidelines for transportation in a car
Fixing shall be done with straps, approved to ISO 10542, the intended
transport brackets as marked on the image description.
Note!
It is important that you only stretch the strap to low tension.
Over-tensing of the straps can cause the frame to become warped.
Crash tested and approved
is crash tested and approved according to ISO 7176-19 up to 70 kg.
Note!
Crash test is approval valid for weights up to 70 kg.
© Anatomic SITT AB
User manual - Zitzi Guppy I 31
Maintenance instructions
Service intervals
In order for the device to work properly, regular service and inspection must be
performed. The need for service depends on frequency of use and wear.
Check all moving parts and fasteners for wear. Service should always be
performed by professional and qualified personnel. If you are unsure,
please feel free to contact Anatomic SITT AB.
Cleaning and washing instructions
Plastic and metal parts can be wiped off with a damp cloth, or washed with
antibacterial liquid or similar. Think green, think about the environment!
Use biodegradable detergents.
Check the condition regularly and perform
maintenance when necessary.
Gas piston
Gas piston should be used regularly to maintain its function. If the product
is not used, the gas piston should be activated at least once every 6 months.
Further, they should be stored so that the piston rod is placed facing downward.
Otherwise, the gas spring seal might break and the gas piston fail.
Note!
Gas piston must be activated regularly
© Anatomic SITT AB
User manual - Zitzi Guppy I 32
Warranty
1 year against manufacturing defects. For more detailed information about the
warranty we provide, see page 49 of this manual.
Combinations
Zitzi Guppy and its accessories are CE marked products that can be
combined with all the accessories described in this manual. Zitzi Guppy is suitable for use together with seating systems like Zitzi Delfi Pro and Anatomic Sits.
For other combinations please contact Anatomic SITT AB.
Spare parts
For the CE marking of the Zitzi Guppy to be valid, the frame may only be fitted
with spare parts delivered by Anatomic SITT AB.
Marking
Zitzi Guppy and its accessories are CE marked products. A unique serial number is located on a label placed under the activation housing. This serial number
should be quoted in any correspondence regarding the product.
Recycling
A used part or product should be dismantled and discarded. The parts should
be separated by material type, metal, plastic and combustibles (textiles).
Gas piston is sorted as hazardous material.
Notice!
Always check that the device is not customized when reconditioning,
before it is sent to new users.
© Anatomic SITT AB
User manual - Zitzi Guppy I 33
Reconditioning
Service
Regular maintenance is important for the Guppy to funcion safe and properly.
The need for service changes is dependending on use and wear. Check all
moving parts and fasteners regularly. Useoriginal parts from Anatomic SITT AB
when reconditioning the Guppy.
Work should always be done by professional and qualified staff.
If you need support, you are always welcome to contact Anatomic SITT AB.
The need of reconditioning varies and must be judged case by case.
Go through all checkpoints at least once per year or as needed.
Functional control should be performed each time the Guppy is used.
Cleaning
Painted surfaces, wheels, front castors and handles is cleaned with cleaning
solvent. Never use paint thinner, gasoline or other solvent.
Finishing
After washing, all leads, confined space and drainage holes should be blown dry
and spray lubricated with thin oil.
Marking
Check that the CE-marking is intact and readable. The marking is located on the
tubular frame.
Wheels
Make sure both castors and rear wheels are not worn and that they spin easily
without noise. See page 14-21 of this manual for further information regarding
wheel and caster adjustment.
Paint
To prevent corrosion and touch up scratches, check for damages in the paint. If
needed, touch-up paint is available from Anatomic SITT AB.
© Anatomic SITT AB
User manual - Zitzi Guppy I 34
Stability
Check that all the wheels are firmly on the ground and that there is no
skewness in the chassis. See page 14-21 of this manual for further
information about wheel and castor adjustment.
Tubular frame and details
Welded and bolted joints. Grind bushings and hinges to operate without noise.
Lubricate as required. Also check the knobs, screws and other mounting parts.
Replace them if necessary.
Forks
Ensure that the fixings and bearings no play and they turn easily.
Lubricate the front forks when needed.
Driving bow and push-handle
Make sure the padding and handles are secure and that the push-handle is ‘
adjustable in height. Also check the condition of the knob and screw.
Brakes
Check that the drum brake and parking brake are working properly.
Additional information about the brakes, see page 22-27 of this manual.
Folding mechanism and tilt
Make sure that you can easily fold back tube and push bar and that it’s easily to
tilt the unit. See page 8-9 for more informtion about the tilt.
Function control
Function control means that you go through wheels, stability, brakes, push
handle and push bar.
Notice!
Always check that the device is not customized when reconditioning,
before it is sent to new users.
© Anatomic SITT AB
User manual - Zitzi Guppy I 35
Adaptation and customization
Guidelines and recommendations
Every time the Zitzi Guppy is altered in some way, an assessment has to be made
to determine if it is an adaptation or a customization.
An adaptation is any change made in comprehension of the CE mark. All other
changes are customizations. Adaptations must only be made by a person
deemed to be qualified for the task and should always be made in a professional
manner. The CE mark means that the product fulfils all of the essential European
safety requirements.
Risk assessment
Note that a risk assessment always should be done for an adaptation as well as
for a customization of a medical aid. The product must never become dangerous
to use after adaptation.
The product should be fitted with a note that it is adapted to a specific user,
so that it cannot be mistaken for a standard model product.
Note!
The CE-mark is no longer valid if the product is customized.
© Anatomic SITT AB
User manual - Zitzi Guppy I 36
Terms of sale
Warranty
Warranty against manufacturing errors is valid for one (1) year from delivery
date. Warranty is void if the product has been subjected to external factors or
rough handling. It’s required that the faulty product is returned for us to process
a warranty claim. Always attach the packing slip of the original delivery.
Warranty claims
Describe the error and the possible cause for this as thoroughly as possible.
Claim repairs or possible replacement under warranty. Always attach a copy of
the invoice and state that the product should be returned to you after repairs.
Provide a shipping address, a contact person and a phone number.
Make sure that you pack the product well to protect it from shocks during the
transportion. Note the shipping number in your documentation. This is so that
you can track the shipment should anything occur during transport.
Returning products
In the event of faulty orders or deliveries, the products should be returned
within 20 days from delivery. Always attach a copy of both the packing slip and
the invoice. Provide your reason for returning the products.
Make sure that you pack the product well to protect it from shocks during the
transportion. Note the shipping number in your documentation. This is so that
you can track the shipment should anything occur during transport.
For products returned more than 20 days from delivery
a refund is made of 80% of the invoice value
For products returned more than 60 days from delivery
a refund is made of 60% of the invoice value
For products returned more than 150 days from delivery
a refund is made of 40% of the invoice value
For products returned more than 360 days from delivery
no refund is made for the products
Customized products cannot be returned
© Anatomic SITT AB
User manual - Zitzi Guppy I 37
Customer service
Scandinavia
FR
OX Orthopédix
27 rue François Gillet, FR-42400 St. Chamond
Tel. +33 477 195 994, Fax +33 426 303 789
IT
Ortopedia Castagna Centro Tecnico
Via Ghislanzoni 18/B, IT-23900 Lecco
Tel. +39 341 362 671, Fax +39 341 360 931
CH
Rehatec AG
Ringstrasse 15, CH-4123 Allschwill
Tel. +41 614 879 911, Fax +41 614 879 910
SE
Anatomic SITT AB
Box 6137, SE-600 06 Norrköping
Stohagsgatan 26, SE-602 29 Norrköping
Tel. +46 11 161800, Fax +46 11 162005
Email [email protected]
DK
Anatomic SITT A/S
Viengevej 4, DK-8240 Risskov
Tel. +45 861 701 74, Fax +45 861 701 75
Email [email protected]
NO
Bardum A/S
Håndverksvein 8, N-1405 Langus
Tel. +47 64 91 80 60, Fax +47 64 91 80 66
IS
Stod Hf Stoaekjadmidin
Tronuhraun 8, IS-220 Hafnarfjordur
Tel. +354 565 2885, Fax +354 565 1423
Handico Finland OY
Asemanaukio 7, FIN-04200 Kerava
Tel. +358 331 222 700, Fax +358 331 222 710
Email [email protected]
GR
Scan Ideal
28, Tzavela Str. GR-542 49 Thessaloniki
Tel. +302 310 320 150, Fax +302 310 350 151
FI
SVN
Team Nova Reha
Gerecja vas 33, SVN-2288 Hajdina
Tel. +386 278 201 06, Fax +386 278 201 06
ES
Via Libre Fundosa Accesibilidad
Don Ramon de la Cruz 38, ES-28001 MADRID
Tel. +34 911 213 031, Fax +34 911 213 025
Europe
NL
MLT
GBR
GR
EST
IRL
PRT
Anatomic SITT Nederland BV
Sir Rowland Hillstraat 1C, NL-4004 JT Tiel
Tel. +31 344 63 45 40, Fax +31 344 62 33 61
Email [email protected]
Be Independent Ltd
St Luke’s Road G’Mangia PTA MLT-1027
Tel. +356 214 662 66, Fax +356 214 656 70
Asia Pacific and Middle East
UAE
Al Safwa Mobility LLC (ASM)
Al Falah Street Harley Davidson, 2001, Abu Dhabi
Tel. +971 264 242 62, Fax +971 264 242 63
Email [email protected]
AUS
Paediatric Mobility Equipment
Po Box 1118, Young, AUS-NSW259
Tel. +61 1300 131 884, Fax +61 1300 884 010
Email [email protected]
NZL
Invaru Ltd
Peterburi tee 14A, EST-114 11 Tallin
Tel. +372 621 25 82, Fax +372 638 08 78
Cubro Rehab
PO Box NZL-9144, Tauranga
Tel. +64 757 78 816, Fax +64 757 78 827
ISR
MMS Medical Ltd
51 Eastgate Drive, Little Island, Cork
Tel. +353 021 461 8000, Fax +353 021 461 8099
Special needs for Special children
48 Mordey Hagetaot St. Beer Sheva, ISR-84840
Tel. +972 8 62 875 85, Fax +972 862 819 61
MYS
Consolor Ltd Unit A3
The Forelle Centre, Black Moor Road, Ebblake
Industrial Estate, Verwood, Dorset, BH31 6BB
Tel. +44 120 282 76 50, Fax +44 133 273 02 33
HandiTech Scandinavian Reha Aids Center
11 G Seferi Str. GR-542 50 Thessaloniki
Tel. +302 310 324 114, Fax +302 310 324 054
Email [email protected]
Mobilitec
Rua dos Verdes 123, PRT-4470-658 Pedras
Tel. +351 229 436 130, Fax +351 229 436 139
© Anatomic SITT AB
The Gym & Care
1F-23 & 24, IOI Business Park, MYS-47100 Puchong
Tel. +603 8070 9166, Fax +603 8073 9166
Email [email protected]
User manual - Zitzi Guppy I 38
Technical data
B
A
C
E
D
with 16’’ wheels (6” casters)
Tilt
Seat
height
Weight
A
B
C
D
E
Size 1
0-32o
46 cm
14 kg
51 cm
67-73 cm
41 cm
57 cm
41 cm
Size 2
0-32o
46 cm
14 kg
56 cm
67-73 cm
41 cm
57 cm
46 cm
Size
with 20’’ / 22’’ / 24’’ wheels (6” casters)
E
Tilt
Seat
height
Weight
A
B
C
D
E
Size 1
0-32o
46 cm (20”)
15 kg
57 cm
71-82 cm
41 cm
57 cm
43,5 cm
39,5 cm
Size 2
0-32o
46 cm (20”)
15 kg
62 cm
71-82 cm
41 cm
57 cm
48,5cm
44,5 cm
Size
wiht mud flaps
The total lenght of the chassi change depending on location and wheels.
C measurement is taken at the height of castor house.
© Anatomic SITT AB
User manual - Zitzi Guppy I 39
SE
Anatomic SITT AB (manufacturer)
Box 6137, SE-600 06 Norrköping
Tel +46 11-16 18 00
Fax +46 11-16 20 05
Support +46 11-16 18 05
Visiting adress
Terminalgatan 1, SE-603 61 Norrköping
DK
Anatomic SITT A/S
Viengevej 4, 8240 Risskov, Denmark
Tel +45 86 17 01 74
Fax +45 86 17 01 75
NL
Anatomic SITT Nederland B.V.
Postbus 6027 / 4000 HA Tiel, The Netherlands
Tel +31 344 63 45 40
Fax +31 344 62 33 61
anatomicsitt.com
[email protected]
facebook.com/anatomicsitt
youtube.com/anatomicsitt
© Anatomic SITT AB
User manual - Zitzi Guppy I 40