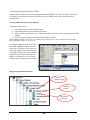
1
Corporate Strategy and Marketing Development Digital Media Repository (DMR 3.1p2) User Manual Digital Media Repository (DMR 3.1p2) User Manual 2 Table of Content Chapter 1: Implementing DMR Generate Element Report ________ 40 Chapter 4: Retrieving DMR content 1 File Browser __________________ 41 DMR Structure __________________1 File System Tab ................................... 42 Convert and Export Assets................... 50 DMR Roles and Responsibilities ____2 DMR User Access.................................. 2 Reports ______________________ 51 DMR Hardware and Software Requirements ___________________3 Chapter 5: Reporting features Where to Look for Digital Images ......... 3 How to Obtain New Digital Images....... 3 Chapter 6: Preparing files for loading Literature File Preparation for DMR Storage ______________________________4 54 General DMR Digitization Specifications and Guidelines ________________ 54 DMR Training Requirements _______4 Photographic Digitization Specifications .............................................................. 54 CMYK versus RGB ............................. 54 Non-Photographic Specifications ........ 55 5 Logging into the DMR _____________5 Password and Profiles ____________6 Supported characters and naming files55 User Preferences _______________13 Supported Character List for DMR...... 55 Unsupported database characters......... 55 File naming conventions (Important Information) ......................................... 56 Digital Image File Standards - New Digital Photography ............................. 56 User Preferences Window.................... 13 Job Jackets____________________23 Clipboard _____________________24 Project________________________24 Job Jacket Search ______________25 Preflighting – File Preparation for Loading ____________________________ 57 Job Jacket Properties (metadata)___26 Initiate File Preparation for DMR - Step 1............................................................ 58 Initiate File Preparation for DMR - Steps 2 & 3 .................................................... 58 Initiate File Preparation for DMR- Steps 4, 5 and 6.............................................. 59 Element Properties (metadata)_____28 Accessing Element Properties.............. 28 Renaming Elements ............................. 28 Chapter 3: Searching for DMR content 51 Element Thumbnail Report.................. 51 Steps to create a Thumbnail report: ..... 52 Element Details Report ........................ 52 Obtaining Digital Assets ___________3 Chapter 2: Navigating the DMR 41 29 Job Jacket Search ______________29 Optimizating PDF Files for use in DMR ____________________________ 59 Element Search ________________30 Steps for Advance Search: ................... 32 Named Queries for Elements ............... 33 Optimizing PDF files in Acrobat for Windows .............................................. 59 Create PDF with Distiller in Acrobat 8.0 Professional for Windows.................... 60 Event Search __________________34 Quick Search __________________37 Select Databases for Quick Search and Saved Queries ...................................... 38 Select Search Fields for Quick Search. 39 Quick Search Match Options ............... 39 Quick Search Criteria Options ............. 40 Microsoft Office Files____________ 62 Chapter 7: Populating the DMR Creating Sub Job Jackets (Modifies) 63 Deleting unwanted Job Jackets____ 65 3 63 Job Jacket Properties (Modifiers) ___66 Chapter 8: Managing DMR content Editing Job Jacket Properties ............... 66 97 Replacement of existing files______ 97 Check Out ............................................ 97 Cataloging Element (Modifiers) ____68 Dragging and Dropping file(s) into a Job Jacket.................................................... 68 Check In Options_______________ 98 Moving Elements______________ 100 Mass loading job jackets and files into the DMR _________________________69 Move Files/Records to another Job Jacket within the same database ................... 100 Move Elements/Records to Another Database............................................. 102 Creating folder structure on your desktop .............................................................. 69 Suggested organization structures........ 69 Adding files into folder structure......... 70 Loading folder structure into the DMR 70 Linking Elements (associations) .......... 71 Revisions____________________ 103 Creating Revisions ............................. 104 Renaming Revisions .......................... 106 Element Revision Window ................ 106 Revisions in Job Jackets..................... 107 Revisions in Search Result Windows 108 Element Properties ______________72 Editing Element Properties (Modifiers)72 Synchronizing Records ........................ 73 Mass metadata loading process............ 73 DMR Metadata Fields.......................... 75 Owner PIN* ......................................... 75 Description*......................................... 75 Language*............................................ 76 Country* .............................................. 76 Market Place* ...................................... 76 Business Unit* ..................................... 76 Media* ................................................. 77 Content Type*...................................... 77 Element Security - Public, Internal, Team Only, 3M Confidential ......................... 82 Stages ................................................... 82 Markups_____________________ 108 Creating Markups............................... 109 Markups Toolbar................................ 110 Adding Markups ................................ 110 Editing Markups................................. 111 Deleting Markups............................... 111 Markup Info Panel ............................. 111 Removing Element ____________ 111 Removing Elements from a Job Jacket ............................................................ 111 Purging Elements from the System.... 112 Unfiled Folders _______________ 113 Chapter 9: Using the VSRM Security Groups Metadata Standards for Language and Country Fields in the DMR ________84 114 Short Instructions _____________ 114 Language Code .................................... 84 Country Code ....................................... 85 Defining Country Code........................ 85 Detailed Instructions ___________ 115 Chapter 10: Copyright Elements in DMR 118 Wikipedia........................................... 118 Copyright validation .......................... 118 Sign Release –.................................... 119 Market Place Name and Description Translation ____________________86 VSRM Security Group(s) Synchronization _____________________________88 Stock Photography ____________ 120 Guidelines .......................................... 120 Stock photography purchase agreement ............................................................ 120 Purchased stock photography ............ 120 Steps for Preparing Elements for the GEDW________________________92 DMR Content Flow to GEDW ............ 92 Chapter 11: Exiting the DMR Place Holders __________________93 Creating Place Holders ........................ 93 Assigning Files to Place Holders ......... 95 Converting Elements to Place Holders 96 Logging off DMR ______________ 122 Exiting the DMR................................ 122 4 122 Appendices 124 Add new Reader or Modifier ............. 124 Appendix A - AREQ.......................... 124 Appendix B – Digitization Request Database (Reserved for BU Admin and Modifier use only).............................. 129 Appendix C – Hardware and Software requirements....................................... 131 5 Chapter 1 Chapter 1: Implementing DMR This manual contains user information on how to implement the Digital Media Repository 3.1p2. T he Digital Media Repository (DMR) is a secure, flexible, comprehensive and global database for managing important customer-focused graphical media. Typically, 3M business units have separate graphic libraries residing in several location worldwide, which are not available to all 3M communications, and do not have the functions and capabilities to support eBusiness strategies. When you place graphical and multimedia elements in the DMR, product information is readily available for 3M communicators, key customers, partners and the marketplace worldwide. The DMR is part of the Digitization initiative that provides the digital graphical foundation to build eBusiness solutions. DMR Structure The DMR structure is a tree-like structure that looks similar to a Windows File Manager/Explorer treelike structure of folders and files. The folders in DMR called job jackets. Job jackets are arranged in a file folder fashion and contain elements (or files) grouped in a logical manner. The grouping of elements within job jackets is similar to the grouping of files within hierarchical levels of file folders. Folders located within the job jackets that are directly located beneath the All Jobs job jacket are called sub job jackets. Sub job jackets (based on related information) help you organize elements, so that you can browse, access, and manipulate elements more efficiently. Carefully planned job jackets and sub job jackets allow users to view product information in a manner that is relevant to them. Mimicking the naming structure found in related Goods and Services Database (GSDB) hierarchies facilitates cross-referencing needs between GSDB and DMR. 1 DMR Roles and Responsibilities The DMR digitization process starts with planning. You need a plan for image loading, which starts by identifying key players and their specific roles and responsibilities. The most successful DMR implementation projects start with a careful evaluation of which parts of the project each team member will undertake. To help you, use the following definitions: This key player… Is responsible to… Business Unit Trustee Develop and implement DMR strategies and tactics to meet eBusiness objectives. For example, a trustee may be the marketing manager or the marketing communications manager. Business Unit Administrator Manage and maintain DMR content. This select individual has the modifier access level. In addition, this person is responsible for requesting the addition or removal of team members and suppliers from a job via the www.mmm.com/dmr Web site. They may also request modification for catalogers, job jackets, user access and password resets within their business unit databases. It is recommended that two administrators be assigned for each business unit. DMR User Access You need to obtain a user ID, password and team access. Access levels vary in your planning; make sure to obtain the appropriate access level. Submit request for DMR Access To request your DMR access, login to DMR Web Interface at: http://www3.3m.com/dmrweb/. Click on “Obtain ID and Password”, fill in all require fields and click “Submit Request”. You will receive the DMR user notification via e-mail when process completed. Obtaining the Appropriate Access Level There are different access levels for DMR, depending on roles and responsibilities. Defining access levels allow business units to tailor which images, documents and graphics are available to different user groups. Each level provides different privileges: Access level Public Allows access to the DMR for.. Items marked “Public” which you can browse, search open and download elements and create Web albums in DMR Web Interface. Reader Items marked “Team Only” within a specific job jacket structure, which you can browse, search and download in DMR desktop. You also can browse, search, open and download all items that have been marked “Public” and create Web album in DMR Web Interface. Modifier Items marked “Public”, “Team Only” or “Internal” within a specific job jacket structure. You may add contents, edit element metadata, purge, browse, search, open and download all elements so marked in DMR. You also can browse, search, open and download all items that have been marked “Public” and create Web album in DMR Web Interface. Business Unit All Modifier capabilities within specific job jacket structure. Responsible for assigning team Administrator members. 2 DMR Hardware and Software Requirements Note: To obtain Reader and Modifier level access, you must be part of a DMR team. To obtain DMR team access, you need to contact the BU Administrator for the desired job jacket structure. A complete listing of BU Administrators can be found on the DMR Web site or through the Digitization Request database (see Appendix B). Part of the planning process is to ensure that your workstation meets the minimum hardware and software requirements. Depending upon your access level, you may need to upgrade your workstation. Hardware and software requirements summarized by Public or Modifier access (see Appendix C). Obtaining Digital Assets In this section, you will get an overview of the following topics related to obtaining digital images. • Where to Look for Digital Assets • How to Obtain New Digital Images • Considerations before Obtaining Digital Asset Approval Please note that DMR content should support global 3M eBusiness and communications strategies DMR content may include existing images, brochures, technical data sheets, video and so on. Alternatively, you may need to develop new or customized media. In addition, remember to follow 3M digital photography guidelines found under documentation at the http://www.mmm.com/dmr/ Web site, and in Chapter 6 of this workbook. Since DMR content is shared and distributed globally, it is important that 3M have usage rights to all content elements. If 3M usage rights are not documented, obtain such rights before uploading elements to the DMR. State any limitations to 3M rights in the Limitations field for each DMR element. Where to Look for Digital Images There are many sources for digital assets, both internal and external to 3M. Some places to start are: • Internal sources, such as marketing communications personnel, support staff, professional services and digital centers of excellence. • External sources, such as the photographers, graphic designers, advertising agencies, prepress color houses, printers and video production houses. How to Obtain New Digital Images If you need new product images for DMR uploading, shoot images digitally using 3M digital electronic photography standards. Then you can load images with less preparation into the DMR. See Digital Image File Standards - New Digital Photography in Chapter 6. Considerations before Obtaining Digital Asset Approval Your business unit may have their own approval process for digital assets. In addition, consider these questions: 3 • • • • • • • • • What value is it to the business to have the asset in the DMR? Does 3M own the asset under consideration? If not, research how to obtain rights to the images. Is it the highest quality available? If not, you may want to re-shoot the image digitally. Is there a global need for it and is it appropriate for global use? What is its reuse value? Will the asset be shared with all 3M? Do we need scanning of analog materials? Will this asset be linked with the GSDB or other databases? What assets are missing? Literature File Preparation for DMR Storage How do you ensure that the marketing literature you have is ready for loading to the DMR? There are steps to follow to ensure your literature is complete and usable for eBusiness. DMR Training Requirements The Corporate Marking DMR Team developed the DMR file preparation process. It is a systematic process for checking 3M marketing communication literature files for completeness before uploading to the DMR. The contracted DMR Service Bureau or other contracted key strategic suppliers must perform this process before loading files to the DMR. This user manual gives you the tools to get started with DMR. As you become more proficient in its use, you may want to take the DMR Modifier training with Andy Kwong. Andy Kwong contact information: Phone: 651 733-0520 E-Mail address: [email protected] 4 Chapter 2 Chapter 2: Navigating the DMR Overview • Process of starting the DMR 3.1p2 program and accessing the Digital Media Repository desktop client. • For the first time login, server name must be entered. • Name (login ID) and Password must also be entered. Logging into the DMR First, log into the DMR system. To log in to the DMR program, access the Digital Media Repository. To start the DMR program, single-click or double-click the DMR icon that automatically added to your desktop when you downloaded the DMR software. The DMR login screen displays: Enter “dmr.mmm.com” for Server. Enter your DMR logon ID for Name. Enter your DMR Password. Click “OK” when done. A splash screen appears. Then the main window appears. When “ready” appears in the lower left corner, the login process is complete and you may begin. 5 Live Update feature Version 3.1p2 has new live update functionality built in similar to how MDUI and GSDB update their client software. At startup, the client software will check to see if there are any updates for the software and when there are new feature(s) add these to the client automatically. This is the last uninstall and install you should have to do for the MediaBank software for the foreseeable future. Password and Profiles Changing Your Password You allow changing your password at any time while in the client. 1. In the top menu, select User > Change Your Password. 2. The “Change Your Password” window will open. Enter your current password in the “Password” text field. Enter a new password in the “New Password” and “Confirm New Password” text fields. Click OK. NOTE: If you forget your password or your account gets disabled, contact DMR administrator to have it reset. Below is the URL to submit for password reset: http://us-burlives.mmm.com/groups/cmpa/DMRreq.nsf/dmrNav?OpenNavigator Menus and Toolbars After you successfully log into the client the following Menu displays: All MediaBank functions are arranged into a menu structure that groups together related features. The more commonly used functions can be accessed via buttons on the toolbar. The status bar gives you 6 feedback about what process the client is currently working on. This section provides brief descriptions of each menu option displayed in a table format and then later describes navigating through the client. File Menu The file menu is the first tap on the left of the main menu toolbar. For each option on the File Menu, the following table shows the equivalent toolbar button and description of what it does. Edit Menu The Edit menu contains the standard Edit menu functions of Cut, Copy, Paste, Delete, and Select. The difference between MediaBank and other applications is these functions have no effect on text typed in the client, they only effects selected elements. 7 View Menu The view menu has options to change the GUI to display things a certain way. This includes hiding certain toolbars and choosing how you want to view the elements. User Menu The user menu contains items that deal with various user functions. 8 Job Jacket Menu All the dropdown choices under the Job Jacket tab have to do with performing functions with job jackets. Those functions are not available to the general users are not described. 9 Element Menu The Element tab deals with all the different things that can be done to assets stored in MediaBank. 10 Element > Editing Menu The Element > Editing menu is a sub-menu available under the main Element menu. If you place the mouse cursor over the “Editing” menu, it opens up another submenu. The “Editing” menu provides different editing functions you can perform on an asset. These options remain grayed out until you select an element(s). 11 Window Menu The window menu displays a listing of all currently open MediaBank windows. There is also a menu to close all open MediaBank windows. This menu allows you to quickly open a specific window without having to search for it on your desktop. Help Menu The Help Menu currently has one sub menu. This menu brings up a window that displays information about your MediaBank system. Future versions of MediaBank will have a help system that can be accessed via this menu. 12 User Preferences User Preferences Window There are certain customizable preferences available to you as a user. Most of the preferences are saved in a database on the MediaBank server, which means you can move to different workstations and your preferences will be available to you at all times You can change your user preferences anytime during a client session. 1. Select User > User Preferences in main menu toolbar. 2. The User Preferences window contains 7 tabs. 13 General Tab • Default Profile Setup - Choose the profile you wish to have the system automatically login you in with. Once this option is set, the client will no longer prompt you for a profile at login. NOTE: You can always change your profile while logged into the system via the User....Change Profile Group... menu. • • Animate New Message Indicator - The messenger button in the toolbar, by default, starts to flash when new messages arrive. If you want to disable this behavior, uncheck this preference. Use Numbers When Sorting - This preference allows you to choose how MediaBank will sort columns numerically. o If this preference is left unselected MediaBank will sort numbers in the following manner: 1, 11, 12, 2. o If this preference is selected MediaBank will sort numbers in a more intuitive manner: 1, 2, 11, 12. • Java Web Messaging Polling Interval - This preference allows you to set how often you would like the web messenger to check for MediaBank messages. The default of five minutes is a good interval to choose. (This preference only needs to be set if you plan on using the java web client.) 14 • • • Quark Script, InDesign Script, and Illustrator Script - MediaBank has “Send To Quark”, “Send To InDesign”, and “Send To Illustrator” features. They allow users to send selected assets to these applications. If you plan on using this tool, you need to select the correct versions of the applications you are currently using. If you use multiple versions of these applications, you will need to change this preference before using that version. Enable Editing of Element Metadata in List View - Select this option to enable the editing of element metadata via the list views. This will allow you to change values in selected cells when viewing information via the list view. NOTE: You can select which columns show up in the list view via the Element and Job Jacket tab “Fields for list view and search results” preference. See the Element and Job Jacket tab sections below. Enable Editing of Job Metadata in List View - Select this option to enable the editing of job metadata via the list views. This will allow you to change values in selected cells when viewing information via the list view. NOTE: You can select which columns show up in the list view via the Element and Job Jacket tab “Fields for list view and search results” preference. See the Element and Job Jacket tab sections below. • • Confirm List View Edits - If you wish the system to prompt you to confirm a metadata change when editing in the list view, select this preference. If this is not selected all changes will take effect immediately after leaving the edited field or hitting the enter key. Enable QTransfer - QTransfer Remote Site - QTransfer is a separately purchased server module that allows users to background uploads and downloads of assets to remote MediaBank servers. This process will compress and transfer assets in the background, freeing up the user to perform other functions. This option will be disabled if the module has not been purchased and configured. If this option is enabled, contact your Administrator for proper usage. 15 Elements Tab • Draw Clipping Path on Thumbnail - The client has the ability to display clipping paths in the thumbnail and preview views. The clipping path appears as a neoncolored line. The default is to display the clipping path when looking at thumbnails and previews. All assets that have clipping paths have a broken circle symbol in the top left hand corner of the thumbnail. If you would rather the client not display the clipping path info, uncheck this option. If you turn this preference off, the clipping path info will not be displayed. You can toggle the clipping path view by clicking on the broken circle. • Use Multiple Colors for Clipping Path - If an image has a clipping path made up of multiple distinct paths, the client has the ability to display these paths as different colors. Each path appears as different neon-colored line. The default is to display the multiple distinct paths as different colors when looking at thumbnails and previews. All assets that have clipping paths have a broken circle symbol in the top left hand corner of the thumbnail. 16 • • • • If you would rather the client not display the multiple clipping path info as different colors, uncheck the, “Use Multiple Colors For Clipping Path”, option. If you turn this preference off, the multiple clipping path colors will not be displayed, all paths will be displayed as a single color, see figure 22 below. You can always toggle the clipping path view on and off by clicking on the broken circle. Dimensional Units - Allows you to select how you want dimensional units displayed in the client. MediaBank automatically extracts dimensional information on certain file types. The unit you select will be used in every location dimensional information is displayed. Perl Web Thumbnail Column Number - The number of thumbnail columns you would like displayed when viewing assets via Perl Web. Component Type on Export - This allows you to select which component type you want to download by default, when performing an export of an asset. The component type is defined as being the Hi-res or Lo-res version of an image asset. The default is to prompt you when an export is done. This gives you a choice at the time of the export. You need to select, “Retrieve Original Content” to get the Hires version. Otherwise, you will get a Lo-res version of the asset. Compress File Transfers - This preference tells the client to compress files before downloading them to your local machine. This will speed up the download process on slow internet connections. This preference was provided for those users who work from home or off-site from where the MediaBank server is. NOTE: This should only be used on connections made across the internet. This option should not be selected when working on local networks. It will cause the downloads to be slower if you select this option on a fast network. • Set Retrieved Page Contents As Read Only Upon Document Checkout - Selecting this preference will set all assets transferred with a page document to be “read only.” Most modern page layout applications allow users to edit linked files directly. If you check out a document with its linked assets and then edit one or more of those assets, your changes will be lost when you check the page in. You can set this preference as a reminder to prevent this type of loss from occurring. Because the linked assets are set as read only, they will not be editable. NOTE: If you need to use the edit functionality available in a page layout application there are options to checkout the assets with the page. See chapter 10 “Page Layout Apps” for more information on this workflow. • • • Prompt To View Checked Out Elements On Exit - Select this option if you want the “View Checked Out Elements” dialog to appear when logging out of the client. This dialog allows you to view which assets you have currently checked out and gives you the various check in and release options. The dialog will only be displayed if you have assets checked out. If this is not selected the client will not prompt you to view checked out assets. Fields for List View Columns - This preference allows you to customize which fields you would like displayed when looking at assets in list view. You are not limited in the number of fields that can be selected. You may select from all the available fields in MediaBank Select Five Fields for Filtering - When you are viewing a job jacket window or a search results window, you have the ability to filter through the assets being 17 • viewed. For example, let’s say a search results window has 500 assets in it, with a mixture of different asset types. Maybe you are only looking for EPS files. You can set a filter to only show assets with a File Type of EPSF. The window would then display only EPS files. The concept of filtering is covered in a later chapter. This setting allows you to choose five fields you would like to use for filtering. The fields you are able to choose from are a subset of the Fields for List View you selected in the previous topic. Select Four Fields for Thumbnail View - This preference allows you to select four fields that will be displayed under each asset when looking at them in large or medium thumbnail view. Job Jacket Tab • • Fields for List View and Search Results - This preference allows you to customize which fields you would like displayed when looking at job jackets returned during a job jacket search. You are not limited in the number of fields that can be selected. You may select from all the available job jacket fields in MediaBank. Select Four Fields For Thumbnail View - This preference allows you to select the four fields that will be displayed under each job jacket when looking at them in large or medium thumbnail view. 18 Search Tab • Quick Search and Saved Queries - Use the settings on this tab to define which databases to search, which fields to search on, and what behavior you want your results to be based on. o Quick Search allows you to quickly perform searches right from the toolbar based on the criteria you define on this tab. o Saved Queries are queries that you or another user has built and saved via the, “Element Search Window.” You can quickly select a saved query and have it execute without having to open the Element Search Window. NOTE: The more databases you select the longer searches will take. Only select those needed. 19 Report Tab The Report Tab allows you to choose various settings for your reports, including the number of columns on a report page as well as which fields to include in the report. You can also choose to save your reports as PDF in addition to the default HTML webpage format. 20 Action Tab • • • • • Double Click Element Action - This preference allows you to tell the client what action to perform when you double click on an element. Double Click Job Jacket Action - This preference allows you to tell the client what action to perform when you double click on a job jacket. Automatically Prompt for Action Comment after Editing - Most users are going to want to turn this off. In the process of Checking things in and out the client keeps an eye on the assets you currently have checked out. If this preference is checked, the client will automatically open the “Action Comment,” dialog every time it detects a checked out asset has been saved. If this preference is unchecked you will only get the prompt when you perform a check in function Catalog Override - This option causes MediaBank to prompt you with the “Catalog Override” dialog when cataloging new assets into the system. If this option is not selected the assets will transfer into the job jacket that they are dropped on and the defined cataloger settings will be used. Select Actions to Perform Upon Startup - Allows you to select which windows you would like to automatically open when you log into the client. For example, if you would like the job jacket tree to open automatically every time you log into the client, select that action. 21 Markups Tab • • Transparency - Allows you to set the transparency level when viewing markups. Font Style - Select the font size and style to be displayed when viewing markups. 22 Job Jackets Overview Job jackets are folders arranged in a hierarchical fashion that contain elements (or files) grouped in a logical manner, similar to Windows Explorer. Both job jackets and elements can have metadata assigned to them. Viewing Job Jackets 1. To open a job jacket, select Job Jacket > Browse to open job jackets window. [Ctrl-J, Cmd-J] from the DMR main menu bar. Multiple windows can be open at the same time. A button is also located on the Main toolbar. 2. The job jackets window appears. Job jacket contents can be viewed by opening the job jackets by “drilling” down the hierarchical job jacket tree using the “+”. Double-click on the job jacket you wish to open or select the job jacket, go to main menu and select Job Jacket > Open. This will open the job jacket window showing all the contents of the job. (Tip: MediaBank client remembers recently opened job jackets. Go to the main menu and select File > Recent Jobs > {Job Name} to open the job again) 23 Clipboard The clipboard is a temporary workspace you can use to store elements while you are working. The clipboard is session based, which means the items you place in the clipboard stay there only for your current login session. You can think of the clipboard as a temporary job jacket. To open the clipboard go to the Element > Clipboard menu. To move an element to the clipboard, simply drag the element from a job jacket onto the clipboard. Project Overview A Project is your very own customized Job Jacket. You can select any job jacket from any nested level in the main job tree and add it to your project tree. A Project is a collection of jobs your are working on. Instead of have to search or browse through the job tree for the jobs you are currently working on, you can add them to your Project, so they are easy to get to. The “Project window” functions are exactly the same as the “Job Jackets Window”. Note: Your project selections are kept in preference files on your local machine. They are not saved on the server. If you move to a different machine, your project tree will not be available. There are three options to open the Project: • Go to main menu and select Job Jacket > Project • Hold down the control+shift+J keys [PC] or cpmmand+shift+J keys [Mac] • Have the window open automatically using the settings in “User Preferences” 24 To add job jackets to the project tree: 1. Select the job(s) to be added to the project tree 2. Go to main menu, select Job Jacket > Add To Project To remove a job jacket from project: 1. In the Project window, select the job(s) you would like to remove from the Project 2. Go to main menu, select Job Jacket > Remove From Project Job Jacket Search The Job Jacket Search Window has two halves. In the top frame of the Job Jacket Search Window, you can build a detailed search query using multiple fields and search conditions. Multiple conditions can be concatenated by either an ‘AND’ or ‘OR’ operator. You also have the ability to save queries for future use. • The “Search Button” at the bottom of the window starts a search. • The “Reset Button” will clear the entire window of any queries or selections you have made. • The “Cancel Button” will close the Element Search Window. 25 To open the Job Jacket Search Window: Go to Main Menu and select Job Jacket > Search or press control+shift+F [PC] or commend+shift+F [Mac] Job Jacket Properties (metadata) There are two options to Job Jacket Properties: 1. Select desired job jacket by single-clicking on the job jackets window. Go to main menu select Job Jacket > Properties to open Job Jacket Properties window. 2. View the Job Jacket Properties (metadata). 26 3. After view the Job Jacket Properties (metadata) and click Close to close. 27 Element Properties (metadata) Overview • Metadata is information on each element (file). • Descriptive metadata enhances searching capabilities. • User must be a Modifier and have editing privileges to modify the element’s metadata. • Metadata fields displaying an asterisk (*) are required. Metadata is the information that describes an element (file) and defines how the element can be used. Examples of metadata are the owner’s PIN, business unit, photographer, country, and so on. Some fields are required; some are optional. Descriptive metadata enhances searching capabilities. For example, if you want to see all the elements that are the property of a certain owner, you can limit your search of the elements to this property. Accessing Element Properties Double click on the element(s) whose properties you wish to view. You can also select the element(s) and then choose Element > Properties or press control+I [PC] or command+I [Mac] NOTE: The editing of metadata (field values) is permission based. This means an administrator has to give you permission to make changes or add data to an element’s property. If you are only given read access, all the fields will be grayed out. Renaming Elements • • • To rename an element, open a Job Jacket in list view and right-click on the element you want to rename. Select rename and enter the new name for the element, then click OK. Make sure not to change the file extension when you rename elements. 28 Chapter 3 Chapter 3: Searching for DMR content Job Jacket Search Overview • Process of searching accessible Job Jacket properties. • Job jacket searches can be created like advanced element searches. • Job jacket searches do not have nested expressions. • Job jacket named queries can only be accessed within Job Jacket > Search …. Searching for Job Jackets 1. Select Job Jacket > Search… to access the Job Jacket Search window. Control+Shift+F[PC], Commend+Shift+F[Mac] 2. Select the criteria for finding job jackets. Select Search to start searching. If matches are found, Total Matches will show how many. Select the desired job jacket by single-clicking on it. The job jacket can be opened by either double-clicking on it or by selecting Open. Select Clear to reset Search window and Close to dismiss. 29 Element Search You can search selected accessible job jackets for desired elements and view your search results in a Search Result window. The Search Result window behaves like the browser window and allows you to conduct three types of element searches: 1. Simple Allows the user to select from a predefined list of element metadata fields that are AND’ed together, thus requiring all conditions to be true. This search query cannot be save for later use. 2. Advanced Allows the user to select from the entire element metadata field list – the user can select ‘Match All’ or ‘Match Any’ when combining multiple fields in the search. This search query can be save for later use. The saved qyeries are called Named Queries. 3. Named Queries Activated from Element > Named Queries. Will search the databases selected in User > Preferences. 30 Simple Search for Elements 1. To access the Search window, select Element > Search > Elements in the DMR window Control+F[PC], Commend+F[Mac]. The Search window displays. 2. Single-click on the desired criteria for finding elements. 3. Single-click the element databases to search. To select all databases, single-click the Select All button. To clear all selected databases, single-click the Deselect button. 4. Single-click Search to start searching. If matches found, the matches display and Total Matches shows the number found. 5. To bring up Search Result window, single-click View. 6. To reset the Search window, single-click Reset. 7. To end the search, single-click Close. 31 Advanced Search for Elements The Advanced tab lets you build a more detailed search query using multiple fields and search conditions. Whereas the ‘Simple’ search tab lets you quickly select from a predefined list of database fields to search on, the 'Advanced' tab lets you build the search query from scratch, allowing any combination of fields and conditions to be requested. Multiple conditions can be concatenated by either an ‘Match All’ or ‘Match Any’ operator. You also have the ability to save queries for future use. Use the following table of operator descriptions to help you select the appropriate search criteria: • • • • • • The ‘Match All’ operator narrows the search by requiring all conditions to be true. The ‘Match Any’ operator expands the search by requiring only one condition to be true. All date searches require the following date format to return accurate results mm/dd/yyyy (Example: 09/01/2009 for September 1, 2009) A synonym search has [Synonyms] at the end of the condition and will also search the predefined synonyms of keywords. This option will increase the search time. The Case sensitive option is available to refine keyword search results. A category search requires Media to be selected first, then Content Type, and so on, before the category values will be selectable. Steps for Advance Search: 1. To access the Search window, select Element >Search in the DMR window Control+F[PC], Commend+F[Mac]. The Search window displays. 2. Single-click the 'Advanced' tab to bring the tab to the foreground. 3. Single-click on the desired criteria for finding elements. Remember to check ‘Match All’ or ‘Match Any’ when combining the conditions. 4. Single-click one or more element databases to search. 32 To select all databases single-click the Select All button. To clear all selected databases, single-click the Deselect button. 5. Single-click Search to start searching. If matches found, the matches display and Total Matches shows the number found. 6. To bring up Search Result window, single-click View. 7. To reset the Search window, single-click Clear. 8. To end the search, single-click Close. Nested Expressions for Elements You can add nested expressions to advanced searches to help you further define your search. Nested expressions are very useful for applying order within the search conditions. Nested expressions resemble parenthesis in mathematical expressions. When you use a nested search, you direct the system to apply the condition within the parenthesis first. Then the rest of the expression is applied to the result of the nested expression. For example, in the expression, (7 –1) x 5, you first do the math inside the parenthesis (7-1 = 6), and then multiply the result by 5 for an answer of 30. In contrast, without parenthesis, your answer would be 7-1 x 5, or 7 – 5, which is equal to 2. You can see that incorrectly applying the parenthesis can drastically change your answer. 1. To specify a nested search, single-click on the nested expression control button (a green plus sign in front of an advanced search statement) in the Advanced Search window. The Nested Expression window displays. 2. Type in the appropriate fields, much like the Advanced Search window. Check ‘Match Any’ to apply the nested expression. 3. Single-click Cancel to dismiss the nested expression window. 4. Single-click Clear to reset the fields for the nested query. Named Queries for Elements • • Process of saving frequently used advanced searches and accessing them for later use. Named queries can be accessed by all users. Because the list of named queries is usable by all DMR users, the list of named queries could become extensive and unmanageable due to the large number of users. Accessing Named Queries Select a predefined named query in the Named pull down in the Advanced Search window. The databases selected at the bottom of the Advanced Search window are used for the search. 33 Event Search You can search for elements based on their historical events. MediaBank keeps an audit trail of everything that has been done to an asset from the moment it is put into the system. An event usually consist of the user who performed the event, the machine name the user was connecting from, the event, and the amount of time spent on the event. The Event Search window is very similar to the Element search window except for the field names, so review the Element Search section for ways of building queries. Some of the differences explain below. To open the Event Search Window, go to Element > Search > Events. 34 Event Searchable Fields The table below contains a listing of all the fields that can be searched and a description of what information they hold. FIELD DESCRIPTION Creation Date Description Element ID Event Job ID Stage Total Time The date the event occurred. Contains a description of the event or a user comment. Unique ID that MediaBank assigns to every asset. Types of events. See next section for definitions of events. Unique ID that MediaBank assigns to every job jacket. The stage the asset was at when the event occurred. Can be blank. Total time spent during this event. This mostly applies to the event of checking assets in and out. Username of person who performed event. Who Events The table below lists all the events that MediaBank currently tracks. You can search on these events when you choose the “Event” field when building your query. The events will appear in a dropdown list. EVENT DESCRIPTION Added to Job Element was added to a job jacket. The event list which job jacket name the element was added to in the description field. Element was archived. The element was assigned to a different user. Every time the element is assigned to a new user this event will be logged. Element was checked out with an InDesign Page. Archived Assignment Change Check Out(TCP) to InDesign Check Out(TCP) to Quark Checked in as new Revision Checked out (Mounted Volumes) Checked-in Checked-out Converted Converted to Place Holder Copied Files and Records Copied Files Only Copied Records Only Drag and Drop Drag and Drop LowResolution EPS Element was checked out with a Quark Page. Element was checked in as a new revision. Element was checked out using mounted volumes. Element was checked in. Element was checked out. Element was converted. Element was converted to a place holder. Element record and file was copied to another database(s). The physical element was copied from one folder to another. The Element record was copied to another database(s). Hires Element was downloaded. Low-res Element was downloaded. 35 EVENT DESCRIPTION Drag and Drop LowResolution EPS to InDesign Lo-wres EPS was dragged and dropped to InDesign. Drag and Drop LowResolution EPS to Quark Drag and Drop LowResolution TIFF Drag and Drop LowResolution TIFF to InDesign Lo-wres EPS was dragged and dropped to Quark. Drag and Drop LowResolution TIFF to Quark Drag and Drop Original Drag and Drop original to InDesign Drag and Drop original to Quark Drag and Drop to InDesign Drag and Drop to Quark Exported General Low-res TIFF was dragged and dropped to Quark. Imported Imported New Revision Modified Image Modify Element Type and Creator Modify Metadata Moved Files and Records Moved Files Only Moved Records Only Purged Purged Revision Released Released (Forced) Released (Modified) Removed from Job Renamed Restored Restored Copy Sent to Illustrator Sent to InDesign Sent to Quark Stage Change Lo-wrest TIFF was dragged and dropped. Low-res TIFF was dragged and dropped to InDesign. Hires element was dragged and dropped. Original element was dragged and dropped to InDesign. Original element was dragged and dropped to Quark. Element was dragged and dropped to InDesign. Element was dragged and dropped to Quark. Element was exported. A general event occurs when a user logs a comment on an asset. A user can log a comment at any time. Element was imported into the system. Element was imported as a revision. Element thumbnail and preview settings where modified. Element type and creator was changed. Element metadata (properties) was changed. Element record and file was moved to another database. The physical element was moved from one folder to another The element record was moved from one database to another. Element was purged from the system. A revision of an element was purged from the system. A user released an unmodified element from checkout. An administrator force released a checked out element. A user released a modified element from checkout. Element was removed from a job jacket. Element was renamed. Element was restored from archive. A copy of an element was restored. Element was sent to Illustrator using the “Send To Illustrator” function. Element was sent to InDesign using the “Send To InDesign” function Element was sent to Quark using the “Send To Quark” function The stage changed on the element. 36 EVENT DESCRIPTION Transfer of Image with a Page Checkout and its contents Element was transferred when the page it was linked to was checked out. Updated User performed an update on a checked out asset. Event Search Results The results pane in the Event Search window performs differently than the results pane on the Element Search window. In the results pane of an Event Search you can only do the following: • • Select the events that you would like to generate a list report on. View the elements associated with those events. An Event Search displays all of the events that meet the criteria of the search. Since an element could have thousands of events logged against it, you may have many results show up in the results pane yet only see a few elements when you hit the view button. You can sort on the Element ID column to make viewing these items easier. Quick Search You will often notice many of the events are linked to the same asset. An event may not have an associated element or may represent a purged element. Likewise, a markup record may exist from a purged element. This means the number of results in the list and those displayed in the window may not be the same. The total match number should be the number of items contained in the result list. The match value in the database results chart will equal the number of element-event relationships. Quick Search is a means of quickly typing in data to search without having to building a query. The following are the steps to setup the Quick Search function in 3.0: 1. In main toolbar go to User > User Preferences. Click on Search tab 2. Preset how search should be done, which database should be search, and which field should be to add Database(s) and Field(s) for Quick Search searched. Click on the add button 3. Go to main toolbar and type in a keyword in QUICK Search window and click “Go” 37 Add database button Add field button Remove field button Remove database button Select Databases for Quick Search and Saved Queries Select the databases that you would like “Quick Search” and the “Saved Queries” to search. When using “Quick Search” or “Saved Queries” there is no option to select particular databases. You must select at least one in your preferences. If you haven’t selected a database in your 'User Preferences’, you will get an error message. • To add a database to the list: 1. Under 'Select Databases for Quick Search and Saved Queries’, select the button with the + on it. 2. The database dialog will open, select the database(s) you wish to add. Multiple databases can be selected. Click the O.K button. 38 • To remove databases from the list: Select the database(s) that you would like to remove and click on the button with the - on it. NOTE: The more databases you select the longer searches will take. Only select those needed. Remove a database Select Search Fields for Quick Search After selecting the databases that Quick Search will search, you have to set which field(s) in the databases it should search. Quick Search will take the strings typed into its text field and look for them in the fields you select here. NOTE: This dialog will let you select all the fields. Don’t select all the fields only select the field(s) that are absolutely necessary. Selecting many will result in slow search speeds. • To add fields to the list follow these steps: 1. Under the, “Select Search Fields for Quick Search”, option choose the button with the + on it. 2. In the field selection window, select the fields you would like to add. You can select multiple fields at one time by holding the “Control” key while selecting. When you have finished selecting the fields, click the OK button. • To remove fields from the filter list follow these steps: Select the fields you would like to remove. When you have finished selecting the fields, click the button with the - sign on it Quick Search Match Options There are two options for how Quick Search will combine the strings you type in to perform a search. A user can choose between “ALL keywords” and “ANY keywords”. Choosing “ALL keywords” causes Quick Search to combine each keyword separated by a space with an AND operand. This means that Quick Search will only return a hit if it finds all the keywords in an element record. A user would choose this setting if they are looking for specific elements whose records will contain all of the keywords. Choosing “ANY keywords” causes Quick Search to treat each keyword separated by a space with an OR operand. This means that Quick Search will return a hit when any of the keywords are found. A user will probably choose this option most often. For example, they could type in multiple filenames and Quick Search will return any elements that contain any of the names typed in. 39 Quick Search Criteria Options Most people are going to choose the, “Contains”, option. This means quick search checks each field to see if it contains the strings you typed in. If you select the “Starts With” option, it will check to see if each field starts with the strings you typed in. NOTE: The “Starts With” option is a much faster search. So, if you know that the fields you are searching always contain an exact value, use this option. An example of this would be a field that contains an UPC code. Generate Element Report 1. Select element(s) 2. To generate Thumbnail Report, select Element > Report > Generate Thumbnail Report in main menu toolbar. Control+P[PC], Commend+P[Mac] 3. To generate details report, select Element > Report > Generate Detail Report in main menu toolbar. Control+Shift+P[PC], Commend+P[Mac 40 Chapter 4 Chapter 4: Retrieving DMR content Overview This chapter covers all the different ways of exporting copies of files from MediaBank to your desktop system and checking things out and permanently editing files. File Browser Most users are used to performing drag-n-drop actions on files. The file browser built into the client allows you to do just that. It’s a tool that allows you to select elements in the various MediaBank browse windows and drag them to a specific folder on your local machine. The file browser acts as a gateway between the MediaBank client and your desktop machine. The file browser allows you to mount any folder on your file system where you might want to place files. Once you have a folder mounted, you can drag an element from one of the client browse windows and drop it on the mount point in the file browser. The hi-res or lo-res file, depending on what you requested, will shoot right to your folder. You can’t drag directly from the client to your local file system. You must drag to a mounted folder in the file browser. It’s no different then having explorer open in Microsoft Windows or the finder open on a Mac. Steps to open the File Browser: 1. The quickest way to open the File Browser is to click on the File Browser button in the main menu toolbar. 2. You can also go to User > File Browser to open the File Browser window. 3. The “File Browser” window will open. Move it as close as possible to the side of your screen. Resize it to as small as possible. 41 File System Tab The file system tab is where you mount/un-mount local folders that you want to be able to drag to. However, it is not limited to just being a window to drag to. When a folder is mounted, you can drill down into it, just as you would a normal folder. If files exist in the folders, they are displayed in the window and you can click on them and perform “open” and “open in” operations. Steps to mount a folder: 1. Select the “Mount folder” button. You can also right click [PC] or control+click [Mac] on the “Mounts” icon and select the Mount folder menu option. Mount folder button 2. A “Select a Folder to Mount” window will open. This window should look familiar to you, it’s the standard folder browser for your OS. Browse to the folder you would like to mount. In this example, we are going to mount the “Project” folder. Click on the “Mount” button. Mount Button 3. The file browser will mount the folder. If you have anything in the folder, you mounted go ahead and drill down into it. Notice you see all the files just as if you where browsing through explorer or the finder. 42 4. Once a folder is mounted. The file browser will remember your selected mount points. So you can close the “File Browser” and the next time you open it your mounts will still be there. You can mount as many folders as you like. Steps to un-mount a folder: 1. In the File Browser window, select the mount point that you want to un-mount. Unmount Button 2. Click on the Un-mount button. You can also right click [PC] or control+click [Mac] on the mount point you want to un-mount and select the Un-mount folder menu option. 3. The mount point will get removed from the “Mounts” tree. Drag-n-Drop To The File Browser Once you have your mount points setup in the file browser, you can begin dragging elements to it. You will want to drag elements out of the DMR when you need to bring a copy of a file to your local machine. Elements that are TIFF or EPS image types need to be handled differently, than other element types. The reason for this is because it is highly likely they have both a hi-res and lo-res version. The follow are the steps to drag-n-drop all element types to the file browser: 1. Select the element you want to drag-n-Drop to the File Browser. 2. Drag-n-Drop it to the folder in the File Browser. 3. The Transfer Progress window will pop up while the file transfers to your local machine. 43 4. Look in the folder you just dragged to and the file should be there. Note: Image files such as TIF and EPS has low and high resolution images. To Drag-n-Drop the hi-res image in PC, hold the “H” key down while drug the file to the folder in File Browser. The MediaBank Tab The client has several directories it uses to transfer files when certain file transfer requests are made. These working directories are stored in paths under a folder called MediaBank, which is created in your home directory on your particular OS. On windows the path to the MediaBank dir: c:\documents and settings\your username\MediaBank\dmr.mmm.com\your username\. On OS X the path to the MediaBank dir: /users/your username/MediaBank/dmr.mmm.com/USPIN/checkout. You will see various folders under the MediaBank directory, but the most important folder is the one that is named with the server info you use to connect to the MediaBank server. This may be an IP address or a server name. Under that folder, you will see a folder named with your MediaBank username. It is under that folder where various working folders get created. Over time as you start using MediaBank more and more you will see the following working directories get created. • %mbcopies% - Files transferred here when a request to open a copy of a non-page type element • %mbjobs% - Files transferred here when a page type is checked out or open copy is done. • %mbworking% - Files dragged into InDesign or Quark get place in paths under this directory. • Checkout - Files transferred here when a non-page element type is checked-out. • keeps - Temp folder that you can keep files in when performing releases or check-in. If you click on the 'MediaBank' tab in the 'File Browser' window, you should immediately see the link between the folders described above and what it is displaying. This tab has mount points to the directories described above. It’s providing shortcuts to the MediaBank client working directories. This saves you from having to look for the folders or files by browsing on your file system to the directories. These mount points are always available in the file browser. You can minimize the frames that you don’t use by clicking on the yellow button with the minus sign on it. 44 The above images show File Browser MediaBank Tab with all working directory expanded and closed Download to Desktop Tool Download to Desktop tool is another option to download content from DMR to your desktop. After you selected the element(s), use one of the three following options. 1. As menu option under File > Export > Files To Desktop 45 2. As a button in the main toolbar 3. As a button in the toolbar of all browser windows Step 2 Steps to use Download Element(s) To Desktop 1. Select element(s) in the browser window 2. Click the “Download to Desktop” button in the browser toolbar Step 1 46 3. If you have the “User Preference” option “Component type on Export” set to prompt, you will be prompted with a question on whether you want to continue the download and asked which type of files you want to download. You have the choice of hires or lo-res. You will only get lo-res if the files being downloaded have lo-res files, else you will get hires. If you check the option 'Retrieve Original Content' you will receive all hires files. Click the YES button to start the download. The transfer window will pop up and the files get transferred to the desktop on the local machine. 4. Files located on the desktop Download to Local Machine This tool is almost exactly the same as the “Download to Desktop” tool except it prompts you to choose a folder to transfer the file(s). The button also located in three places same as “Download to Desktop”. The arrow on the button pointed to left instead of pointed down. 47 Step 2 Steps to Download Element(s) to Local Machine: 1. Select element(s) in the browser window 2. Click the “Download to Desktop” button in the browser toolbar Step 1 3. If you have the “User Preference” option “Component type on Export” set to prompt, you will be prompted with a question on whether you want to continue the download and asked which type of files you want to download. You have the choice of hires or lo-res. You will only get lo-res if the files being downloaded have lo-res files, else you will get hires. If you check the option 'Retrieve Original Content' you will receive all hi-res files. Click the YES button to start the download. 4. A window titled “Choose a Destination Directory” is going to pop up. Browser to and select the folder you want the files to download to. 5. The transfer window will pop up and the files get transferred to the folder on the local machine. NOTE: If you prefer to always get lo-res or hi-res files and don’t want to be prompted when downloading files, go into your “User Preferences” and set the “Component type on Export” option. 48 Open Copy The open copy function copies a file to your local machine and opens it in the application that is associated with that file type. For example, if you select a Photoshop file element and perform an open copy, it will be copied to your local machine and opened in Photoshop. You use the open copy function to just get a copy of a file. In a workflow you might use this function to just open a file to look at it. You might use open copy to open a file that you are going to edit and make a new file with. This function is not for making permanent changes to files on the MediaBank server. NOTE: The operating system is what handles which application a file opens in. If there is a problem opening a file, it’s probably because the operating system doesn’t know which application to use. For example, Windows doesn’t know how to open files that are missing an extension. To open an element(s) with the “Open Copy” function: 1. Do a search or open a job jacket and select the element(s) that you would like to open. 2. You have these options to launch the open copy function: • Go to main menu, select Element > Editing > Open Copy menu option • Do a right-click [PC] or control+click [Mac] on the element and go to Editing > Open Copy • Just hit the Enter key on your keyboard. This is the fastest method. 3. The Element Transfer Window will open as the file transfers to your local machine. 4. The file will then open into the application it’s associated with. Where does the file get transferred? The file gets transferred to your local machine into a directory called %mbcopies% located under the MediaBank directory in your home directory. On the Windows Operating System, the path is something like this: c:\documents and settings\User PIN\MediaBank\DMR.mmm.com\ User PIN\%mbcopies% On the OS X Operating System, the path is something like this: System Drive\Users\Username\MediaBank\Server\MediaBank Username\%mbcopies% The file will remain in the %mbcopies% directory until you remove it and it is perfectly OK to move the files out of there. 49 Convert and Export Assets You can easily convert assets to a variety of image formats, and export the converted files to your computer. To do this, select one of the following options: File > Export > Convert and Export Assets Element > Export > Convert and Export Assets The following table explains the options offered on the Convert and Export dialog box: OPTION DESCRIPTION Dest. File Type Antialias Scale Quality Resolution No Colorspace Change Choose the destination file type to convert the selected elements to. Set the antialias level. Set the scale. Set the export quality for JPEG conversions. Set the desired resolution. Select this if you want to keep the original colorspace of the selected elements. Choose a colorspace for exported conversions. Use ICC profiles for the conversions. Specify Colorspace Specify Colorspace Using ICC Profiles Input ICC Profile Output ICC Profile ICC Profile Intent Embed ICC Profile Select to apply an input ICC profile. Select the input ICC profile. Select to apply an output ICC profile. Select the output ICC profile. Select to apply an intent. Select the intent. Not only use the ICC profile during the conversion, also embed it in the file. 50 Chapter 5 Chapter 5: Reporting features Reports Overview There are two types of element reports that can be generated within the DMR. Both of the reports use Web technology to display the contents. If you don’t have an enabled Web browser on your work station, you will not be able to create reports. Element Thumbnail Report This report produces rows and columns of element thumbnails with fields displayed under each. 51 Steps to create a Thumbnail report: 1. Go to the “User Preferences” dialog and select the fields you would like displayed under the thumbnails. 2. Open a job jacket or perform a search. 3. Select the elements you would like to place in the report. 4. Go to Element > Reports > Generate Thumbnail Report. You can also press control+P [PC] or command+P [Mac] 5. The client will build the report and display it in your default web browser. Element Details Report The Element Details Report including element properties, history, and which jobs it linked to. 52 Steps to create an Element Details Report: 1. Select an element(s) that you want to create a report for. 2. Go to Element > Report > Generate Details Report 3. The client will create the report and display it in the default web browser. NOTE: The thumbnail and element detail reports can also be created from the “Element Properties” window. There are two buttons that will create the reports with a single click. 53 Chapter 6 Chapter 6: Preparing files for loading General DMR Digitization Specifications and Guidelines Overview Files that are placed into the DMR require preparation. The standards below are to provide a high quality file that can be reused or repurposed for a multitude of projects or outputs. Photographic Digitization Specifications Source file: Highest quality, high resolution, three-color RGB file (LZW compressed). IBM TIFF at 300ppi, 12 to 18 megabyte scan or digital photography capture. File platform: Files should be saved for the PC platform. File extensions: Utilize file extensions on all files saved (TIFF-.tif, EPS-.eps, etc.). Although the DMR has cross-platform capabilities (Macintosh and WIN/PC), file names of elements placed into the DMR must contain the dot extension of the producing software. File names should not be more than 31 characters including the dot extension at the end of the name, thus enabling Macintosh computers to utilize the file without filename truncation. The user will have a maximum of 27 characters to name the file appropriately. Files placed into the DMR without the appended extension will not flow to the GEDW; as a result, an Error Report will be generated. Color Space: Users can load image files that are CMYK (Cyan, Magenta, Yellow, Black) into the DMR if there is a business need. Many of the US business units are doing a mixture of both colors. CMYK versus RGB We recommend that photographic (Photoshop) files saved as RGB color files for the following reasons: • RGB is a smaller file size. For instance, the same photo as a 12 MB RGB file is a 16 MB CMYK file. The actual color information, i.e. The number of hues available, is larger in RGB. Although CMYK is a bigger file, it actually has less color information because of the 4th channel. • CMYK is generally “tweaked” for a particular printing press, ink and paper combination. Generally speaking, the best results are achieved on a certain press if the image separations have been custom separated for the particular press, ink and paper combination. 54 • By saving in RGB, you would be able to have each printer custom separate the file for their particular print conditions, thus giving you the highest quality image on the press. The downside to this would be that every time a file was downloaded as an RGB the printer or separation house would charge you to separate it to CMYK, which could be costly. If a lot of retouch work has been done in CMYK to make a particular hue(s) print correctly on a printing press, then that file is probably more valuable saved in the DMR in the CMYK color space. Note: We do not recommend that CMYK files be converted back to RGB for storage on the DMR, this is a sure way of destroying delicate color information! If your original file is CMYK created by a skilled professional, then the best thing is to load it to the DMR just as it is. Non-Photographic Specifications Adobe Acrobat: All complex documents, such as PageMaker and QuarkXPress, should have a companion Adobe Acrobat file created for easy distribution and viewing on computers that do not have Quark or PageMaker available. Acrobat PDF saved in the DMR can be utilized for output through PoW! (Products on the Web), DataExpress, CLIF and other downstream applications. Therefore, PDF files are an excellent document source for technical, brochure, collateral and other documents for use in e-Business. We encourage you to create a PDF document for use in these applications and distribution regardless of whether the high resolution QuarkXPress, InDesign or other originated documents uploads to DMR. PDF files need to be optimized before being uploaded to DMR for byte serving. Byte serving, also known as page-at-a-time or byte-range downloading, enables you to view a PDF file from a Web server before the entire file is downloaded. Line art: Saved as EPS in MacroMedia Freehand or Adobe Illustrator, IBM PC-compatible format, 8 bit, with dot extension. Supported characters and naming files Supported Character List for DMR All file and folder names should use alphanumeric characters only. Supported database characters are: 0-9, A-Z, a-z _- space anywhere but the beginning of a title. Unsupported database characters ? “ ' \ { } ! # $ % & ( ) * + , . / : ; < = > @ [ ] ^ | ~ carriage return, trade mark, copyright, and other special symbols not displayed in the supported characters list above. 55 File naming conventions (Important Information) File name should be descriptive of the file contents, easily understandable. Follow these general guidelines for naming: • Make sure file names and extensions are in place. • Do not use slashes or any special characters. • Files name must be limited to fewer than 31 characters. Files loaded into the Digital Media Repository and their names are longer than 31 characters will not load into the Global Enterprise Data Warehouse. • Use file extensions. This is mandatory. To help, use the following table for software version and extension list. • Each file name loaded into a Parent must be unique. Files loaded with duplicated existing file name in a Parent job jacket structure will not load. . Questions? Please contact your Corporate Marketing DMR consultant. When appropriate, please correspond the file name to the product name, a step in the process, a procedure or the file name of the collateral piece to which it is linked. We recommend teaching 3M vendors to name files appropriately as soon as possible in the creative process with names that tell the world something about that file. Utilizing product model numbers such as 8110.tif or short descriptions in the file name, such as littmann_scope_family.tif, are much more descriptive to everyone. Digital Image File Standards - New Digital Photography The following standards are for new photography that is being created for the placement into the DMR. (These minimum standards do not address beauty shots of 3M products on special backgrounds, products in use in real life or staged settings, or artistic depictions of 3M products and services that should also be put in the DMR for reuse.) However, the exposure guidelines below would still be applicable. 56 Image background: Shoot all products on a neutral midtone gray background. All image backgrounds should have a mild graduated sweep, going from light to dark. Image lighting: Product should be lit with the main light from the left side. The tonal curve for these images should remain within a four-stop range. Highlights should be placed one half stop from the zero point of the tone curve. Camera angle: Camera angle should be approximately 45 degrees above the product surface. Digital image file type: Digital image file should be RGB, PC, TIFF, LZW compressed and must be a least 12 megabytes in size. Clipping Paths: All images shot to the standard specifications will have a clipping path created around the outline of the product. These clipping paths can be created in Adobe Photoshop. With clipping paths, created and saved, users will then be able to easily modify the background. Digital image exposure guidelines: For a correctly exposed digital photographic image, you need to read the tonal information within that file. This information can be found either in the photographic digital camera supporting software or within Adobe Photoshop. In the Photoshop software, go to the View menu, and open Info Palette. By moving your mouse through the image you can assess the tonal values. A properly exposed image will have the following tonal information: Shadow tonal values: 8-12* Midtone tonal values: 126-130** White tonal values: 242-246* All images should be set to neutral on the midtone of a pristine Kodak Gray Scale. Preflighting – File Preparation for Loading *Both the shadow and the white tonal values denote the last value that will contain image detail. ** As a reference use the middle tone value from the Kodak Gray Scale. How do you ensure that the marketing literature and images you have are ready for loading to the DMR? This appendix provides the steps to follow to ensure your literature and images are complete and usable for eBusiness. These steps, known as Preflighting, provide a systematic process for checking 3M marketing communication literature files and image files for completeness and quality before uploading to the DMR. The contracted DMR service bureau or other contracted key strategic suppliers must perform this process before loading files to the DMR. . .. Assure That All Files Are Collected To prepare files for DMR, first open all digital files to check whether standards are followed, then perform the DMR file preflighting process. Open the page layout document file either in QuarkXPress or Adobe InDesign format. Review and verify that all digital files used are collected before uploading. • If linked digital files are missing, contact your 3M client who determines if the files exist elsewhere, or if a new document or linked files should be created. • If linked files exist elsewhere, the 3M client provides the missing files to the service bureau or key strategic supplier. 57 • If a new document is created, follow 3M digital photography or image and file standards. See standards later in this document. When you exit the document, make sure the “save preview box” in QuarkXPress is checked. When all files are provided, you are now ready to initiate the DMR file preparation process. . Initiate File Preparation for DMR - Step 1 1. Open Adobe Photoshop image files first. Check that images: • • • • • • Have CYMK color space. Do not change color space back to RGB. Are in one image file. If not, combine separate DCS (Desktop Color Separation) and eps (encapsulated postscript) formatted color files into one image file. Have acceptable image quality. Eliminate scratches, spots, thumbprints etc.. Crop out black edges surrounding the image. Have image resolution of at least 300dpi/ppi (dots per inch/pixels per inch). Have clipping paths. Add clipping paths when appropriate to product images in the digital scan or digital photography. Follow file naming conventions. File name should describe the image, include the product name if applicable, and correspond to the brochure name. All image files should be saved as TIF, LZW compressed PC formatted files. All file names loaded into the DMR should be unique. In addition, Mac-saved Quark documents are better than PC, because a thumbnail is generated. • Follow PC file saving conventions. To be compatible with the PC windows environment, save image files for the PC. These files also are compatible with the Macintosh operating environment. Initiate File Preparation for DMR - Steps 2 & 3 2. Open preflight illustrations or line art files. Illustrations are usually produced in Adobe Illustrator or Macromedia Freehand. Check images for: • Fonts in outline. Fonts must be converted to outline to avoid font issues between the two platforms. • File naming conventions. A file name should describe the line art or illustration. If that is not appropriate, the file name should remind the user of the product name, step in the digitization process or the collateral piece to which it is linked. • PC files saving conventions. Save as a PC 16-bit eps with a tif preview. 3. Create an Adobe Acrobat PDF file to encompass all the digital files used. This file can be viewed, downloaded, checked and printed on a laser writer. It provides access and viewing capabilities for DMR users without the native software applications. To determine appropriate distiller settings for the proper usage of the PDF file, work with your 3M clients. Recommended settings for communications output depend on the specific communication requirements: 58 Created for Screen Resolution PDF files Intranet/ Internet/Extranet Fax on Demand Resolution PDF files Fax On Demand, fax machine or desktop application Medium at 200-300dpi High Resolution PDF files Quality: Lowest at 72-96dpi Capabilities: View on screen of print to laser printer Compression Zip/jpg high Appropriate for fax machine or print to laser printer Zip/jpg medium Fonts All embedded All embedded All embedded Color RGB RGB CYMK Device Independent Independent Independent Save as Binary file Binary file Binary file Print On Demand at customer information center (CIC) Highest quality without loss of color information 600dpi Print on demand Uncompressed Initiate File Preparation for DMR- Steps 4, 5 and 6 4. Files are now ready to be loaded to the DMR. See “Cataloging elements” section in Chapter 7 of this manual. 5. PDF files should be optimized. See “Optimizing PDF Files” for use in DMR in this chapter. 6. Once uploaded, the 3M client, or at the direction of the 3M client the DMR service bureau, or the contracted supplier must review each individual file. Some possible changes may include changing metadata that supports the file. Complete all descriptive image and file information. If the digital files are to be send back to the 3M client, make sure the removable media provided can be read on both a PC and a Macintosh computer. . Optimizating PDF Files for use in DMR To use byte serving, you need to make sure your PDF files are optimized before you upload them to the DMR. Optimization works as a flag for other corporate systems and the web by indicating how the file was designed for use. For example, you have a choice of Original, Web, FAX and Offset Print. You can optimize files individually using the Save As command in Adobe Acrobat Professional 6.0, 7.0 or you can use Acrobat Professional to batch optimize all the PDF files in one folder. Each of these methods is explaining in the sections that follow. Optimizing PDF files in Acrobat for Windows 1. To optimize a PDF file in Acrobat Exchange, choose File > Save As from the main menu bar. 2. The Save As dialog box appears: Check Optimize, then single-click the Save As… button. 3. The file is optimized and ready for uploading to DMR. 59 Create PDF with Distiller in Acrobat 8.0 Professional for Windows 1. To set Distiller for file optimize start Acrobat Distiller dialog box. 2. In Job Options: > Select one of the choices. 1. From the Distiller menu, select Setting > Edit Adobe PDF Settings … 2. Click Optimize for fast web view, and single-click the OK button. Batch Optimizing PDF files for fast web view in Acrobat Professional 8.0 for Windows To optimize all PDF files within a folder: • Choose Advanced > Document Processing > Batch Processing… • Select “Fast Web View” in the next pop-up window, then click on the “Edit Sequence” button 60 • Go to “2. Run commends on:”, select “Selected Folder” then click on “Browse…” • Select the folder with the PDF files for optimize for Fast Web View, then click “OK” Checking for Optimization To check whether a PDF is optimized for Fast Web View in Acrobat 8.0 Professional or Acrobat Reader 8.0: 1. Open the PDF file 2. In Acrobat choose File > Properties …. 61 3. Note whether Fast Web View is “Yes” or “No” Microsoft Office Files Enable for DMR to generate the element thumbnail for Microsoft Office files (doc, ppt and xls), the ‘Save preview picture’ check-box must check before save the file and upload to DMR. File > Properties, in the popped up window under Summary tab, check the ‘Save preview picture’ box. 62 7 Chapter 7: Populating the DMR .Overview • A job jacket is a container for a logical collection of elements (files). • Sub job jackets are those job jackets located within job jackets which are directly located beneath the All Jobs job jacket. • Job jackets can contain pointers (aliases) to elements located in other databases. • Job jackets are used by the end user to browse, access and manipulate elements. Creating Sub Job Jackets (Modifies) Note: Sub Job jackets can only be created by the user with modifier access to the targeted catalog(s) Steps to create a new job jacket: 1. Select the job jacket you are going to create the new job jacket under it. 63 2. You have a choice of one of the following. • Go to main menu, select Job Jacket > New • Right-click [PC] or Control+click [Mac] on the job jacket and click new. • Type Control+N [PC] or Command+N [Mac] 3. The “New Job Jacket” window will open. Fill in the “Job Jacket Name” and any other fields you need to fill in. 4. Click the OK button when you are ready to create the new job jacket. If you wish to start over, click the RESET button, it will reset all the fields to blank. Click the CLOSE button to cancel the operation. 64 5. If you clicked OK, The newly created job jacket will appear in the tree. Deleting unwanted Job Jackets One of the important concepts to grasp is the fact that deleting a job jacket that contains elements will not delete the elements. Remember, the elements linked to job jackets are just aliases. If you delete a job that contains elements, you can still find the elements via an element search. Only the Modifier of catalog has ability to delete job jackets under that tree. You may or may not have the ability to perform the steps below. Steps to delete an unwanted sub jacket: 1. Purge element(s) from job jacket or move any element(s) in the job jacket to the other job jacket. The unwanted sub job jacket must be empty enable to delete. Conduct the sub jacket path search should confirm there is no element’s file still pointing to the sub job jacket. 2. Select the job jacket you wish to delete. Deleting the job jacket will delete all of its sub jacket(s). 3. You have the choice of one of the followings: • • • Go to main menu, select Job Jacket > Delete. Right-Click [PC] or Control+Click [Mac] on the job jacket and click Delete. Type Control+Delete [PC] or Command+Delete [Mac] or F9 key on both. 4. A confirmation window will open asking you to confirm the deletion. Click “Yes” or “No”. 65 Job Jacket Properties (Modifiers) Overview • Metadata is information collected in database records for each job jacket. • Must have editing privileges to modify the job jacket’s metadata. • The “Production stage” is not validated at the job jacket level, only at the element level. Editing Job Jacket Properties 1. Select the job jacket which you want to view the properties. 2. You have the choice on one of the following to open the Job Jacket Properties • Select the job jacket, go to main menu, select Job Jacket > properties…. • Right-Click [PC] or Control+Click [Mac] on the Job Jacket and click Properties… • Type Ctrl+Shift+I [PC] or Command+Shift+I [Mac] 66 3. The “Job Jacket Properties” window will open. You can add data or modify the data in one or more of the fields. If you don’t have permission to modify metadata, the text boxes will not be enabled. 4. Click the Apply or OK button to save your changes. Clicking the OK button will save the changes and close the dialog. Clicking the Apply button will save the changes and leave the window open. Clicking the Cancel button will close the window and your changes or entries will not be saved. It will not post warning before closing. If you wish to reset the entire fields click the Reset button, it will erase any data you have typed in. 67 Cataloging Element (Modifiers) Overview • The process of dragging and dropping folders and/or elements (files) into a job jacket. • A database record will be created for each cataloged element (file). • Folders and their contents can be cataloged in the DMR by dragging and dropping the top folder onto a selected job jacket in the job jacket window. The new job jackets (folders) and their elements (files) will match the original folder structure. • 100\100\100 rule – Recommend to keep the element counts to fewer than 100 under each sub sub folder and 100 sub sub folders under each sub folder. There are 2 ways to upload contents to MediaBank: Dragging and Dropping or Import > Files. Dragging and Dropping file(s) into a Job Jacket 1. Select desired job jacket by double-clicking on it in the job jackets window. 2. Drag and drop desired element(s) (files) into open job jacket. The elements will automatically be transferred and cataloged. Wait until Logging Files window dismissed before cataloging further element(s) (files). 3. After a few moments, refreshing the active job jacket Control+R, F5 [PC], Commend+R, F5 [Mac] will show the thumbnails for the newly cataloged elements. 4. The speed at which thumbnails for newly cataloged elements appear depends on the amount of activity by all users and the size of the files loaded. All files cataloged into the DMR are placed in a cue and processed individually for a thumbnail, preview and placement of the original into the database. 68 Mass loading job jackets and files into the DMR Although files and folders can be created and placed into the DMR one at a time, the ability to mass load job jacket(s) and element(s) provides an efficient process for loading entire folder structures and its contents within. Creating folder structure on your desktop Advantages to this process: • • • Can change names of folders and file names Can rearrange folder structure and file placement If the structure is located on a server, other team members can review the organization and/or make changes • Faster process for setting up and batch loading folders and files. When building a folder structure on your desktop, the following steps can be completed on the desktop, through Window Explore or on a server. In a Windows platform, right mouse click, select New > Folder and enter a desired folder name. Repeat the above process to create and organize your content targeted for loading. Because job jackets cannot be renamed or moved once loaded into the DMR, it is important to review structure and name prior to loading into the system. Suggested organization structures Top level is product category Sorted by product Then sorted by file type 69 Adding files into folder structure Files are added to the completed folder structure located on your desktop, Explorer window or server and placed in the desired location. It is much easier to move and rearrange files located on your computer then to move cataloged elements once loaded into the DMR Loading folder structure into the DMR To load your structure, drag and drop into the DMR job jacket structure. 1. Open job jacket window, select Job Jacket > Browse to open job jackets window. Control+J[PC], Commend+J[Mac] from the DMR main menu bar. 2. Expand structure to locate area for new job jacket structure. 3. Position DMR window so that the new folder structure located on your desktop and the targeted DMR structure are both visible. 4. Drag and drop structure from the desktop: highlight the job jacket name that you want the new structure to appear under and release. 5. The DMR will first create the new folders (job jackets) and then load the individual files that were located in the folders. Tips and Hints: • Use alphanumeric characters for file names (a-z A-Z 0-9 _ - .). • Files uploaded to the DMR cannot contain a forward slash (/). The DMR validation process will flag these files with an error status; therefore, these files will not flow to the Global Enterprise Data Warehouse (GEDW). For additional information regarding the validation process, please see Steps for preparing elements for the GEDW. • Prior to uploading, create short descriptive file names 31 characters or less including the file extension. • Avoid cataloging more than 80-100 files in any one job jacket. • Files cannot be dragged and dropped onto the root job jacket (parent). A folder containing files may be dragged and dropped onto the root job jacket or a sub job jacket created beneath the root job jacket and then files dragged and dropped onto the sub job jacket. • Original (high resolution) elements can be copied out of the DMR by selecting the element(s) and performing a Hold “H” key-Drag-Drop [PC], Option-Drag-Drop [Mac], onto the user’s local desktop. • A low resolution version of an element can be copied out of the DMR by selecting the element(s) and performing a drag-drop (for both the PC and the Macintosh) onto the user’s local desktop. • Cataloging folders and elements at the same time must be done by dragging and dropping the folder structure onto a selected job jacket in the job jacket window. Folders will not catalog in an “opened” job jacket window. 70 • Element(s) may appear at any level of the job jacket hierarchy. It is advisable to place elements at the lowest level job jacket to enable users to browse for elements easily. • QuarkXpress documents created on a Macintosh will generate a thumbnail. QuarkXpress documents created on a PC will not generate a thumbnail. Linking Elements (associations) The following two steps will create an “Association” or “Link” of original elements. This powerful ability allows the user to group elements together without duplicating or copying the original elements on the server’s disk. 1. Select desired element(s) in the Job Jacket or Search window. 2. Click-hold on one of the selected elements and drag and drop onto the desired opened Job Jacket window. Tips and Hints: • Image elements should be grouped or “linked” with their newly created page document elements. Example: When creating a document, search for elements within the DMR, select an element and drag a link (association) to the job jacket containing the document. This will keep the document and the associated elements together. This is very useful when having to download the document and elements to the printer, everything is in one place. Make sure to download the originals Hold “H” key-Drag-Drop [PC], Option-DragDrop [Mac] when sending to the printer. 71 Element Properties Overview • Metadata is information collected in database records for each element (file). • Descriptive metadata should be entered to enhance searching capabilities. See Metadata Fields in this chapter • User must have editing privileges to modify the element’s metadata. Editing Element Properties (Modifiers) 1. Select desired element by single-clicking on it in the Job Jacket or Search window. 2. Select Element > Properties in main menu toolbar to edit the element metadata or double-clicking on the thumbnail, or right-clicking [PC]on the thumbnail or select the element, then Control+I [PC], Commend+I [Mac]. 3. Fill in the desired fields and select Save or Apply to save your inputs. An asterisk following the field name indicated required fields. 72 Synchronizing Records • Process of changing metadata fields for multiple elements simultaneously. • For editing many elements which require identical modifications. • Elements can be gathered by queries or by job jacket and then synchronized easily. 1. Select desired elements in the Job Jacket or Search window that you want to synchronize. 2. Select Element > Synchronization > Synchronize Records… to access the Synchronize Records window. 3. Double-clicking on the “Value” for dropdown choices or type in the common value for the element you had selected to synchronize. 4. Click OK or Apply to save your input(s) to start the synchronizing process or click Reset to clear your input(s). Mass metadata loading process Listed below is a brief explanation of how this process works, along with the requirements for requesting a mass metadata load. 73 1. The user submits a request to the mass metadata extract to the contact person. 2. The contact person will extract the metadata for all elements in the specified database and create a metadata spreadsheet. 3. This spreadsheet will be send to the requester for update. All highlighted blue columns are the require fields. 4. Once the data has been updated, the spreadsheet is sent back to the contact person. 5. The spreadsheet data will be imported back into the DMR database and the metadata will be updated. 6. The requester will be notified once the DMR database has been updated. Requests should be submitted via e-mail with all required information included. The requests should be send to Andy Kwong at [email protected]. Required information: Requester name, telephone number and e-mail address. Database name. Example: Health_Care\Skin Health Products\Skin Care Products Only one database will be extracted to a spreadsheet; if you need multiple databases you may list them on one request, but a separate spreadsheet will be created for each one. These spreadsheets must remain separate – combining them will cause the update process to fail. Completion date – only if requesting a specified date that is later than the normal turnaround window. Expected turnaround time To create the extract spreadsheet for user update – one day. To run the metadata mass load process – The imports will be run either early morning or end of day to lessen both the impact on the system response time and the load times. If your updates are received between these two periods, they will be processed in an end of day run. Because the update process is an “on request” and not a scheduled process, updates will take into consideration system availability. Once the import is complete, the updated information will be available immediately. You will be notifiy once the process is complete. Users are encouraged to submit a request ahead of time and include a requested completion date. Please remember if you do this, that your updated spreadsheet will need to be returned in a timely manner in order to ensure meets your requested completion date. Please enter all of your spreadsheet updates in red or some color other than black – this will enable both you and the DMR team to determine what changes have been made. Note: Any metadata updated “manually” in the DMR after the data has been extracted to a spreadsheet will be overlaid with whatever existed at the time the extract was created. Because of this, it is highly recommended that you coordinate this process with all other team modifiers of the identified job jacket(s). If at all possible, please hold off on any metadata changes in the databases you requested a mass load for until the import is complete. 74 Please key in your changes carefully! If you enter invalid data, it will load into the DMR exactly as it was typed, unless it’s a field that uses a drop-down menu (e.g., security, media, content type, etc). In that case, the field will be populated with spaces. Please direct any questions or comments about this process to Andy Kwong at (651) 733-0520 or [email protected]. Tips and Hints: • Element metadata is added after the file(s) have been uploaded. • Metadata should be entered and used to facilitate complex searching. • Use the Synchronize Records tool to assign metadata to a set of selected elements. • The Element ID field is filled when the file(s) are uploaded. Each element will have a unique ID. Do not fill in any information in the Element ID field when performing a synchronize record. Do not change the file name because the metadata mass load is based on matching the element’s file name. DMR Metadata Fields The DMR has many fields available that when utilized property, will allow users to search and retrieve photos, documents and other elements in a very consistent manner. The following bolded fields in red with symbol “*” after the field names are require fields and must be filled out properly at a minimum for photos, line art, illustrations, Acrobat PDF files, etc. to flow to GEDW (Global Enterprise Data Warehouse) for use with PoW! (Products on the Web) and other output applications. Element Metadata Fields File Name Element Title Owner PIN* Uploaded by Element ID Description* Security* The element file name can be change but the file extension should not change. Descriptive title of the element. An element is an individual file placed into the DMR. This field is required and can be up to 31 characters in length Element owners' employee number assigned by 3M. (Eight digit PIN #) This is a required field. User who cataloged or uploaded the element. (Eight digit PIN #) Locked field containing an automatically generated unique number created during upload. Caution: Do not edit this field while synchronizing records A required field that should contain a detailed characterization of the element. Before data can be properly secured, it first has to be determined how it should be classified. At 3M, IT Security has adopted the 75 31 characters 31 characters 8 characters 8 characters 2000 characters following classification system. It is the responsibility of each Business and staff group to determine how data should be classified within their respective areas and manage it accordingly. The security options include: “Public” – also described as appropriate for external release and includes media releases, advertisements, and other 3M information that is developed specifically for distribution outside the company. “Internal” - includes all information generated within 3M that is not designated for “Public or External Release”. It is considered for internal business use only, and may be released outside of the company only with management approval. “Team” – adding the option of “team” or leaving this field blank defaults the element to “team”. This option is intended for viewing by assigned DMR teams only. “3M Confidential” - Sensitive information that warrants additional protection. It should be labeled “3M Confidential” and may be released outside of the company only when it is necessary for a specific business objective and the recipient of the information has been bound by a nondisclosure agreement. This security option is currently only used for two output tools – Sales Portal and Partner Support. Copyright restrictions or other information that may limit the use of this element. If you input anything in this field, the red “Lmt” will Limitations show under the element thumbnail. Printed literature reference number that this element appeared in. Multiple Literature numbers separated by commas are placed in this Literature Number field. This field is 64 characters in length. Language(s) that the element uses. Valid codes can be found in the Language* Global Codes. This field is a required field. See “DMR Language and Country Fields” document. Location for which the element can be displayed. Valid codes can be Country* found in the Global Codes. This field is a required field. See “DMR Language and Country Fields” document. If required metadata has net been completed, the element will be moved to the “Element Error” stage. Information on the erred Error Report metadata fields will be displayed in this field. A formal name for the element that will be visible to an external Market Place* (outside of 3M) audience. This field currently displays in the “Learn More” box in PoW! The language used in this field should match the Language code from the Language field. This field is a required field. If left blank, DMR will automatically populate the content from the Element Title into this field. The name of the Business Unit that has taken ownership of the Business Unit* element. User should use the full business name as listed in Global Codes Database. See Copyright Validation for detail Property Release ID Agency/Photographer Creator of the element. 76 255 characters 255 characters 8 characters 255 characters 64 characters 31 characters 64 characters 64 characters Model Release ID Shooting Date Shooting Place More Information Customer Center Validation Date User Defined 20 See Copyright Validation for detail Date of creation of the element. DD/MM/YYYY Location that an (element) image was taken. An open field to use as an alternative place for additional information about the element. User should list the customer center(s) that this element can be appropriately presented See Copyright Validation for detail 64 characters 64 characters Stages: Review Ready for Warehouse Element Error Archive After upload, each element will be in the stage “Review” which is the first of three stages. User will fill in and review required metadata fields. Once this is complete, users will move element to the next stage, Ready for Warehouse. This is a dropdown list. Signifies that the element is released to the GEDW (Global Enterprise Data Warehouse). If the element passes the element metadata validation, it then passes to the warehouse for publication to 3M electronic systems. This is a dropdown list. If required metadata have not been completed, the element will be moved to this stage. Users will need to complete the necessary metadata and return the element to the “Ready for Warehouse” stage. This is a dropdown list. Any element no longer in active. Set Stage to Archive will stop the element flows to GEDW. Categories (See Category Option that follows for choices): Basic form of the file. i.e. Document, Photograph, Illustration, Media* Multimedia, Presentation Fragment and Text Fragment. This is a dropdown list. A representation of the information conveyed in the file. i.e. Content Type* Brochure, Catalog, Historical Image, Illustration/Line Art, etc. This is a dropdown list. Classification of an element for which use or output it is most effective. File size, color space, and resolutions are values used as a Optimization* deciding factor for this classification. This is a dropdown list. * Fields listed above in Red/Bold with “*” after the names are required metadata fields Category Option: The three columns below are a way to categorize your material. The definition column should help in determining what content type should be used. The Media in column “C”, the Content type in column “D” and Optimization in column “E” * Rows that have gray text will be removed from the DMR * Rows that have blue text are not available in Datamart (therefore these options won’t be available in DEPS) 77 Media Content Type Document Application Guide Application Profile Article Reprint Articals (3M News Center) Auto Specification Benefits/HR Info Best Practice Brochure Bulletin Definition 3M benefits and human resource information A booklet or pamphlet A brief report, an official statement on a matter of public interest issued for immediate publication Case Study Catalog A list or itemized display, as of titles or articles for sale, usually including descriptive information or illustrations Clinicals Contact Information Corporate ID Material Corporate Identity guidelines, standards, templates and samples A single page or pages that contain factual or technical information and or product specification Data Sheet Datenblatt Discontinuation Notice Dynidocs Education Materials Fax on Demand Features and Benefits Provides a list or table of discriminating features and benefits, usually associated with a product or system Financial Flyer One page, front and back document that can feature one or more products. Contains a product picture with product information. Form Info Information Folders Instruction for Use Instruction Sheet Instructions/Manual A list or itemized display, as of titles or articles for sale, usually including descriptive information or illustrations; small reference book A written communication directed to a person or an organization Letter Mating Tables Model Release News Release * See page 119 for detail information Information of timely value distributed by an organization to promote its views or products/services. Newsletter Package Insert Patent A document or leaflet which is contained in a package 78 Media Content Type Definition Periodicals A document published at regular intervals of more than one day Poster Presentation/Demo Price Information Processes Product Change Notices Product Instructions Product Selection Guide Document that contains price information A grid or chart, which provides distinguishing features of similar or like products to enable customers to select the most appropriate product for their needs. An advertising piece such as new product introduction, coupons, etc. * See page 119 for detail information Information that is formatted as a question and answer response in a document form Information on existing governmental regulations affecting 3M industries and products. Promotional Property Release Questions and Answers Regulatory Material Sales Guide Sales/marketing Seminar Information Optimization for Documents Document containing information about meeting or conference Specifications Stock Photography Agreement Agreement issued by the stock photo seller stated 3M has the right to use the photo Success Stories Technical Definitions Technical Drawing Technical Paper Technische Definitionen Training Warranty Product warranty Fax Offset Print Original Web Graphic 3M Models Background Graphic Graph/Chart Illustration/Line Art Logo/Brandmark Multi-dimensional Illustration Packaging/Labeling Product/Application Graphic 79 A non-photographic, single-dimensional illustration including pictograms, icons, and symbols A symbol, design, distinctive lettering color, or a combination of these An illustration that has more than one dimension A finished item and or template An illustration that demonstrates a product; a product in use Media Content Type Definition Product/Group Graphic An illustration of several products together or a montage of images An illustration of a single product Product/Single Graphic Multimedia Application/Program Application/Upgrade (Patch) Catalog A list or itemized display, as of titles or articles for sale, usually including descriptive information or illustrations in a multimedia form A list or itemized display, as of titles or articles for sale, usually including descriptive information or illustrations; small reference book in a multimedia form PDF file with embedded video clip(s). Instructions/Manual Interactive PDF Presentation/Demo A format that provides presentation or a demonstration of a topic directed at a specific audience An advertising piece containing new product introduction in video, audio, etc. Clips from video, sound or other multimedia that contains information about meeting or conference Promotional Seminar Information Training Photography Background Image A photograph that is a texture or used as a backdrop Building/Location Image Photography of buildings and other architectural structures including landscapes. *Require sign release on non 3M property A photography of a skin condition such as ulcer, burn, wound, where no product is being used A photograph that documents an event such as an award ceremony or other newsworthy circumstance Photography based on or concerned with 3M events in history General photographic images of industrial or technological nature A formal or informal photograph of a person or groups. *Requires model signed release A photograph that demonstrates a product; a product in use. *Requires model sign release if the model is recongnizable A photograph of several products together or a montage of images Photography of a single product Clinical Image Event Image Historical Image Industry/Technology Image Portrait/People Product/Application Image Product/Group Image Product/Single Image 80 Optimization for Photography Fax Offset Print Original Web Presentation Fragment Application/Use Competitive Information Features/Benefits General Information Stock Photography Images purchases from stock photography provider. Requires element ID of the uploaded purchase agreement assigns to the element Limitation field Background Image A photograph that is a texture or used as a backdrop Building/Location Image Photography of buildings and other architectural structures including landscapes Catalog Image Clinical Image A photography of a skin condition such as ulcer, burn, wound, where no product is being used Photography based on or concerned with 3M events in history General photographic images of industrial or technological nature A formal or informal photograph of a person or groups Historical Image Industry/technology Image Portrait/People Product/Application Image A photograph that demonstrates a product; a product in use A photograph of several products together or a montage of images Photography of a single product Product/Group Image Product/Single Image Text Fragment A small body of text broken off or detached; an incomplete or isolated portion Features and Benefits Marketing Block Metatag Promotional Questions and Answers Optimization for Text Fax Fragment 81 Offset Print Original Web Element Security - Public, Internal, Team Only, 3M Confidential The trigger for making an element Public, Internal or Team Only can be found in an Element’s Properties under the General tab. The Security (P, I) field is the location to place the Public, Internal, Team Only or 3M Confidential information. Security Dropdown choices Please use the table below to determine what needs to be entered. Security Type Name What to Enter Description Public P Internal I Team Only 3M Confidential (blank or T) C All users will be able to view Public elements within the DMR and those applications accessing DMR information through the Global Enterprise Data Warehouse (GEDW). Business unit’s readers and modifiers can view Internal elements. Internal will eventually have meaning in the GEDW. Internal will be used in extranet sites. Business unit’s readers and modifiers can view elements. Sensitive information that warrants additional protection. Stages A stage is a way to flag an element to indicate the state of the element. The staging information that follows applies only to the element level, not the job jacket level. The three stages are described below. Stage Description 82 Review Ready for Warehouse Element Error Archive Used when an element is newly loaded and the metadata is in the review state or if an element is being modified and it must not flow to the Global Enterprise Data Warehouse (GEDW). All of the required metadata has been filled out and this information will be visible in the GEDW. A validation program is performed during the first 15 minutes at the top of the hour on all elements set to the “Ready for Warehouse” stage before it can flow to the warehouse. If the element fails the validation, the stage will switch to “Element Error.” This report can be found on the last tab of an Element Properties window. The offending items must be fixed and the Stage reassigned to “Ready for Warehouse.” This will enable the element to pass through the validation process again. Any element no longer in active. Set Stage to Archive will stop the element flows to GEDW. Stage field Stage dropdown choices 83 To enable images, documents and other elements residing in the DMR to appear on downstream applications such as PoW!, specific metadata must exist within the DMR. eBusiness publishing tools that retrieve data from the Global Enterprise Data Warehouse (GEDW), display these elements based on the reference codes. For example, each PoW! theme has a series of keys that identify and flow DMR elements to its page. Metadata Standards for Language and Country Fields in the DMR All codes for the Language and Country fields are found on the Global Codes database. Copy the following entire URL, paste onto the browser address, click Enter and follow the instructions: http://psfs.mmm.com/psp/finsrc/EMPLOYEE/ERP/c/GC_ALL.GC_CB_HOME.GBL Language Code The code placed in the Language field represents the language used within the DMR element and the language used in the Market Place name. For example, the metadata for a document containing French text would have the Market Place name entered in French. The Language code then should be FR with the appropriate language qualifier. What is Language Qualifier? Language Qualifier was set up to distinguish various major dialects of languages. Format of Language/Language Qualifier Codes The Language field must contain a two-digit language code followed by a dash and the five-digit language qualifier in all caps (e.g., Z1-NO001). Codes for Generic Images and Illustrations Images or illustrations that have no specific language referenced should use the language code “Z1” and the language qualifier is “NO001.” I.e., Z1-NO001 - used for elements that can be shared such as photography and illustrations, allowing for broad use based on the identified Country. Codes for files containing text Codes used for documents within the DMR should match the language content of the document itself. E.g., a French document to be viewed in France would have the code FR-FR001 DMR elements such as documents, marketing blocks and promotions are usually country and language specific and would be coded accordingly. Note: The Marketplace Name metadata field language should match the Language and Language Qualifier Codes (see example next page). If you are using the EN-NO001 code, the Marketplace Name should be in English. There can only be one Language and Language Qualifier per element. 84 Country Code Defining Country Code The Country code defines the countries where the particular element is appropriate for viewing. There should be at least one code set in the “Country” field. Note: It is recommended that MDUI should be used for adding additional Country values within the metadata field. “Selecting Multiple Country Codes for Media Elements” tip sheet contains additional information on entering Country codes through the DMR and MDUI interface and is available on the eLearning Modules database. Format of Country Codes Format rules for the Country metadata field are a two-digit Country code that is separated by a coma and in all caps. There is no need for spaces between Country codes. A specific Country code should be entered for each country where the element is approved for display. Country Code Samples (please see Global Codes list “Country” for a complete listing) 3M Source – Global Codes site Country Country Code Brazil Canada Finland France Germany Ireland Italy Japan Mexico Netherlands Norway Portugal Spain Sweden Switzerland United Kingdom United States BR CA FI FR DE IE IT JP MX NL NO PT ES SE CH GB US Code Samples CA,US - DMR element viewable by Canada and the United States. For additional regionally specific information please see “DMR codes for PoW!” available in the eLearning Modules. 85 This feature allows the user to translate the Market Place Name and Description to other languages. This works similar to Name and Description Translations functionality in DMR Web. Market Place Name and Description Translation Steps to translate Market Place Name and Description from DMR Desktop client: Open Element Properties window by double-click the left mouse button on an element Click on the Translation tab as show in the below screen capture 3. You may choose any “Language” and “Language Qualifier” in the drop down lists to select & see the existing translations under “From” panel as shown below. 4. Select the “Language” and “language Qualifier” that you wish to translate under the “To” panel as shown below: 5. 1. 2. Enter the market place name & description in the new language that you are translating under the “To” panel as highlighted in below picture, then click on “Add Translation” button 86 6. When you click on “Add Translation” button in the above step just add the translation to “Available Market Place Name Translations” table, the translations that are added to the “Available Market Place Name Translations” panel will be saved permanently only when “Ok” or “Save” button is clicked. Steps to edit an existing Market Place Name translation: 1. Double-click on the existing Market Place Name translation in “Available Market Place Name and Description Translations” table. 2. Do the required changes for Market Place Name & Description fields under “To” panel. 3. Click on “Add Translation” button to get the changes reflect in “Available Market Place Name and Description Translations” table. 4. Click on “OK” or “Save” button to save your translation changes Steps to remove existing Market Place Name translation(s): 1. Select the existing no longer needed translation(s) in “Available Market Place Name and Description Translations” table 2. Click “Remove Translation” button 3. Click “OK” or “Save” button to save your changes. 87 VSRM Security Group(s) Synchronization This feature allows the user to Overwrite, Append or Remove VSRM security group(s) while synchronizing the non-public (3M Confidential and Internal) elements in DMR. Steps to synchronize VSRM security group(s) for selected elements: 1. Select the elements require to assign the common VSRM Security group(s), right-click and scroll down to Synchronization > Synchronize Records … 88 2. In the Synchronize Records window, click on the “VSRM Security” tab, select one of the “Action” you are going to perform 3. To assign VSRM Security Group, select group name from “Security Groups” or “Favorites”, click move button >> to send group to the center window “Selected Groups”. 4. Click OK or Save button located at lower right corner to activate the changes. Synchronization Set Template: This function allows user to set the template for other elements require the same VSRM Security group(s) assign. Steps to create template for VSRM Security group synchronize with preset template and clear template 1. Select a element 2. Setup the VSRM Security group(s) and click “OK” or “Save” button located at lower right corner to activate the change. 89 3. Select the element you want to apply the same metadata in the template element when synchronizing. Right-click and scroll to Synchronization > Set Template *Note: The Template remains unchanged when you use the Template function on VSRM Security group synchronization until you do the Clear Template 4. 5. Select the elements require the same VSRM Security group in the template, right-click and scroll down to Synchronization > Synchronize Records … You must do these 3 steps to protect the current metadata value already in the elements’ properties before do the VSRM Security group synchronization: 1) select all metadata fields, 2) select (No Change) from dropdown and 3) left-click “Set Action”. 90 6. Click on “VSRM Security” tab, select “Overwrite” or “Append” from dropdown choices in “Action”. You can edit the current value set in the template 7. Click “OK” or “Save” button located at lower right corner to activate the changes. 91 Steps for Preparing Elements for the GEDW 1. After elements are uploaded into the DMR, the Stage will default to a blank. Blank has the same meaning as review in that the element will not flow to the Global Enterprise Data Warehouse (GEDW). 2. The element metadata will need to be added at this point. Fill in all the applicable metadata fields, especially those fields that have an asterisk at the end of the field name. These fields are required for elements to flow to the GEDW. For each element, fill in information on the General tab and the Fields tab. 3. Once metadata is entered, assign the Stage to “Ready for Warehouse” for each element. 4. A validation check will be run during the first 15 minutes at the top of the hour to ensure all the necessary fields are filled before an element can be sent to the warehouse. If a required field is missing or another validation check fails, the Stage will be set to “Element Error.” Some other examples of what this validation will check are valid field lengths and duplicate file names. 5. The following day, check for elements which may have “errored out”. 6. If the preceding search presents an element with the Stage set to “Element Error,” select the element by double-clicking on the element. The Element Properties window will appear. Click on the “Fields” tab. Scroll down to the Error Report field. This field will provide information on what needs to be fixed or what the system did to rectify the element information. If multiple errors are found, the field will scroll to the right. Click into the field then scroll right to view the remainder of the message. Modify the metadata per the Error Report field. 7. Once errors are corrected, reassign the Stage to “Ready for Warehouse.” 8. A validation check will run again in the evening. If element passes the validation, it will be sent to the warehouse. Return to number 5 to ensure there are no other “Element Errors.” Repeat steps number 6 to 8 if error persists. DMR Content Flow to GEDW For every file stored in the DMR a Thumbnail and Preview is generated. Therefore, for every DMR ID, there is an original, thumbnail and preview. During the process of loading files nightly to the GEDW, only defined file types will be transferred. The below chart will provide an overview of the files. Element Type Flows to GEDW Does Not Flow PPT, Word, Excel and PDF Thumbnails Previews Originals Thumbnails Previews Originals Originals Originals Photography/Graphics (TIF, EPS, JPEG, GIF) HTML Multimedia 92 You can create Place Holders to represent elements that do not have physical assets attached to them. This makes it easier to track and work with assets before the physical asset has been created or uploaded to the DMR. A Place Holder is a record with metadata—but no file—attached to it. Place Holders display a generic icon in the thumbnail view. Place Holders Overview • Process for Creating Place Holders with metadata to work with until files are ready. • Assigning Files to Place Holders uploads the file and converts the Place Holder into a normal element record. • Existing Elements can be converted to Place Holders. This deletes the file but keeps its metadata in a Place Holder Record. Creating Place Holders To create a Place Holder go to the Job Jacket > Create Place Holder menu. This will open the Create Place Holder dialog. You do not have to have a Job Jacket selected to create a placeholder, but it is advantageous to do so. If you choose a Job Jacket before creating a place holder, MediaBank will create the place holder with the same database and Job Jacket information. The Create Place Holder Dialog You will use the Create Place Holder dialog to fill in the place holder metadata. 93 • The most important field on the General tab is the File Name field. This where you give the Place Holder a name. • Later when a file is linked to the record, you will be given a choice to use this name or the name of the physical file being attached. • You can enter any known metadata before clicking OK to create the record. Databases Tab • This is where you select which databases to insert the Place Holder record. • You normally will only select one database. • If you selected a Job Jacket prior to launching the Create Place Holder dialog, Media Bank will automatically assign that Job Jacket’s database to the Place Holder, 94 Job Jacket Tab • Use this tab to select which Job Jackets the Place Holder should be linked to. • You normally will only select one Job Jacket. • If you selected a Job Jacket prior to launching the Create Place Holder dialog, Media Bank will automatically assign the same Job Jacket to the Place Holder Element. • Once all the required information has been entered, click the OK button to create the record. The Place Holder record will be inserted into the selected database and linked to the selected Job Jacket. Assigning Files to Place Holders A Place Holder is just a record in a database. You will need to assign a file to this record. Assigning a file to a Place Holder will transfer the file to the MediaBank server and update the Place Holder record with all of the file information, turning the Place Holder record into a normal element record. When MediaBank has finished cataloging the file, you will see the Place Holder icon turn into a thumbnail of the imported file. In order to assign a file to a Place Holder, it has to be linked to a Job Jacket that is part of a cataloger structure. Otherwise, MediaBank would have no way of determining which folder on the server the file should to be placed into. 95 Follow these steps to assign a file to a Place Holder: 1. Select the Place Holder and then select Element > Place Holder > Assign File. This opens the Assign File to Place Holder dialog. 2. Select the name to use for the new file being imported. You can choose either the file name or the Place Holder name. After the file has been imported, you can always rename the element if you are not happy with either of these choices. 3. Select the file using the file chooser. Click the button with a plus sign on it to add a file. Browse to the file you wish to assign and select it. Click the button with a minus sign on it to remove a selection. 4. You can use the General tab to make changes to the file’s metadata. 5. Click “OK” to assign the file. Converting Elements to Place Holders MediaBank can convert an element into a Place Holder record. This lets you delete physical assets that are no longer needed, yet keep the relevant metadata and history in the database. Converting an element into a Place Holder will delete the file, thumbnails, previews, and view files. The record and all of its metadata will be converted to a Place Holder record. To convert an element to a Place Holder record: 1. Select the element to be converted. This can be done from either the Job Jacket or the search results window. 2. Go to the Element > Place Holder > Convert To Place Holder Menu. This will open the Confirm Deletion window. 3. The Confirm Deletion window will list the filename that is about to be converted and warns you that the files will be deleted. Click “Yes” to convert the record or “No” to cancel. 4. The physical element components will be removed and the record will appear with the generic Place Holder icon. 96 Chapter 8 Chapter 8: Managing DMR content Overview This process can be use to update an existing file in the DMR while maintaining all elements, metadata and MDUI links. In this process, users check out an outdated file and replace it with a current version. Replacement of existing files Check Out 1. In the DMR, with a browser window open, select an element for replacement by choosing Element > Editing > Check Out. A green check mark appears in the upper margin of the thumbnail, indicating that it had checked out. The element should now be located on your hard drive. 2. Locate the file(s): • In PC folder structure:C:\Documents and Settings\user PIN\MediaBank\dmr.mmm.com\user PIN\checkout. • Windows 7: C:\Users\user PIN\MediaBank\dmr.mmm.com\user PIN\checkout • On Mac operating system: System Drive\users\username\MediaBank\dmr.mmm.com\username\checkout Note: If you are seeing the red check mark appeared in the upper margin of the thumbnail, which indicated the element checked out by other user. The green check mark indicated you checked out the element. The already checked out element cannot be check out until the element force released. The check out folder shortcut To make it easier to find the Checkout Folder, the DMR includes a shortcut to this folder in the file browser. 97 • Click the MediaBank tab to access this shortcut. • Right-click checkout, then select Open to open the checkout folder on your computer. • A file will remain checked out until you check it back in. You can open and close it as often as you need, but it must stay in the checkout directory. Check Out When you select element(s) to be checked out and select this menu option, the file(s) get checked out, transferred to your local machine, and placed in the checkout folder. The file(s) will not open into their native application. When you are ready to work on the file(s) you have to go to the checkout folder and open them. You can either go directly to the checkout folder and open them or open the menu option, the file(s) get check out, transfer to your local machine, and placed in the checkout folder. The file(s) will then automatically open into their native application. Note: When you select Open Copy, the file(s) get transferred, but not check out. Open In When you select element(s) to be checked out and select this menu option, the file(s) get checked out, transferred to your local machine, and placed in the checkout folder. You will then be prompted to choose which application you want to open the file(s) with. Check In After you have made changes to the file. You need to check it back in to DMR. 1. Rename the replacement file to match the checked-out DMR file. Importance: The filename must be the same and the creation date has to be newer than the checked out file or the system will not replace the checked out file. 2. Return to the DMR and select the checked out element by single-clicking on the element in the job jacket. Check In Options 3. Select Element > Editing and then select the Check In option you want to use. The different options are explained below. Element > Editing > Check In This option will take the file in the checkout directory on your local machine and transfer it back to the server, overwriting the original file. This overwrites the original file, making a permanent change. When you perform a Check In, you are prompted to Confirm Check In. Select “Yes” to overwrite the original file in MediaBank. 98 Element > Editing > Check in as New Revision This option will take the file in the checkout directory on your local machine and transfer it back to the server creating a revision of the original file. This creates a revision of the original file, so the original file does not get overwritten. You can cancel this at the Confirm Check In dialog box. Note: Do not perform Check in as New Revision in element search results. Check in as New Revision must done in sub job jacket level. Element > Editing > Update This option checks in the element but also keep the element checked out. An Update copies the file from your checkout directory to the server, overwriting the original file. The file will remain on your local machine in the checkout folder and the element will remain checked out in MediaBank. This was added for those users who need to keep element(s) checked out for and extended period of hours or days. You can cancel this at the Confirm Check In dialog box. Element > Editing > Release This option is use to cancel the whole check out process without saving save any changes to the file in the DMR. Choosing this option, will remove the file from your local machine and clear the checked-out status of the element 99 Moving Elements Overview There are two processes for moving elements within the DMR. • • Moving elements and files to another job jacket in the same database. Moving elements and the associated files and records (metadata) to another database. Note: Read all Move instructions completely prior to completing the following steps. Move Files/Records to another Job Jacket within the same database Moving elements to another Job Jacket within the same database will usually be done when restructuring the elements is desired or if the original Job Jacket needs to be deleted. Prior to the deletion of a job jacket, the elements must be moved to a new location. If originals, thumbnails and view files are left in the folder, the job jacket will reappear after it is deleted. 1. Start by selecting the modifier group for the elements needing to be moved. 2. Through a Job Jacket browse or Search window, select desired element(s) to move by singleclicking on them. 3. Click on the Scissors tool located in main menu toolbar Edit > Cut or single-clicking on the scissors tool in the Job Jacket menu toolbar. 4. If you clink “Yes or “Yes to all” on the “Please Confirm” pop up window the element(s) will disappear. 5. Open the job jacket in which to paste the element(s). 6. Click on the paste button located at the top of the browser window, or single-clicking on the paste button at main menu toolbar Edit > Paste. The element(s) will move to the new job jacket. 7. Select desired element(s) to move by single-clicking on them in the Job Jacket window. 8. Select Element > Move Files/Records… at main menu toolbar to access the Move Files/Records window. 9. Match the settings for “Move Options” and “Components to Move” selection on the window below and select the target job jacket in the “Move destination root folder” 100 Move Options Files only Only moves files associated with selected elements to the desired destination root folder. Only use this option when moving files within the same database (Catalog). For example, moving records out of an obsolete job jacket within the Catalog. Records Only Only moves database records of selected elements to the desired database selected in “Move to this database” window. Not used in the 3M DMR environment. Files and Records Moves both files and records associated with selected elements to desired destination root folder and element database. This option will be used by 3M to move files and records to another database (Catalog). OK: to move files and/or records to destination folder and database Cancel: to dismiss Move Files/Records window Components to Move (only available if files are being moved) All Files Moves all files associated with selected elements, including original, thumbnail and view file. Customize Only moves selected files associated with selected elements. Do not use this option. Location Options (only available if files are being moved) Moves destination root folder The Root is the actual destination job jacket path that contains the parent and sub job jacket names. Navigating the root structure mimics the tree structure found in the browse job jacket window. 1. Navigate this structure to locate the target folder in which the desired files are to be moved. 101 2. Select the targeted root (not the orig/thumb/view) folder in which to move the element. Moving the element to the root folder automatically moves the originals, thumbnails and view files to their respective folders under the root file. 3. Select Cancel to dismiss or Move to move files and/or records to the destination folder and database. Move Elements/Records to Another Database Moving elements to another database (Catalog) will usually be done when there is a change in the business unit, security team, or purpose of the database changes. Performing this function will transfer the element’s metadata, including element ID to the new Parent structure and will avoid your having to re-catalog the elements. Links in MDUI will not be affected when elements are moved. NOTE: Modifiers will only be able to move elements between databases if both databases are accessible by the Modifier. If the Modifier does not have access to both databases, please contact the Parent BU Administrator. 1. Follow steps 1-3 from the “Move Files/Records to another Job Jacket in same database” section. NOTE: Security for each element to be moved must be set to “Public” view. If this is not the case, the element can only be viewed when a Modifier is in that element’s original group. Once the Modifier has changed to the desired Modifier group and pasted the element, it won’t be visible under the new group and the move can’t be completed. If the element is not already set for Public view, change the security from Team to Public for the move, then return the security status to Team after the element is pasted into the new Job Jacket. 2. Once the elements have been cut from the old job jacket, change to the Modifier security group that is receiving the element(s). To do this without logging out of the DMR, select User > Change Group then scroll to the desired Modifier group and select OK. The lower right portion of the DMR window will indicate which Modifier group is currently selected. 3. Open the job jacket in which to paste the element(s). 4. Click on the Paste tool located at the top of the browser window. The element(s) will move to the new job jacket. 5. Select desired element(s) to move by single-clicking on them in the Job Jacket window. 6. Select Element > Move Files/Records to access the Move Files/Records window and match the settings for “Move Options” and “Components to Move” selection on the window below and select the target job jacket in the “Move destination root folder” Move Options Files and Records Moves both files and records associated with selected elements to desired destination root folder and element database. This option will be used by 3M to move files and records to another database. 102 Components to Move (only available if files are being moved) All Files Moves all files associated with selected elements, including original, thumbnail and view file. Location Options (only available if files are being moved) Moves destination root folder. Select the root (not the orig/thumb/view) folder in which to move the element. Moving the element to the root folder automatically moves the originals, thumbnails and view files to their respective folders under the root file. Move to this database User will select the database that will receive the records or metadata that belongs to the element(s) being moved. This window will display the database associated with the Modifier’s current group. Single-click on the database name to select the targeted database. Select Cancel to dismiss or Move to move files and/or records to the destination folder and database. Revisions Overview • Process for creating and working with revisions. • Process for renaming revisions. • Understanding how job jackets and search results handle revisions. MediaBank includes support for element revision tracking. As you update an element, you can keep the original file and all previous revisions intact. This means that you can revert to a previous revision of an element if you decide you do not want to use the latest one. You can also associate different revisions of an element to different jobs, so that existing jobs remain unchanged by element. Note: New revision must perform in the job jacket level and not from search results. 103 Creating Revisions There are three methods for creating a new revision of an element: • • • Duplicate the element before changing it, using Duplicate As Revision Bring an external file in as a new revision, using Import New Revision Check out the element, update the file, and then check it in as a new revision. Duplicate As Revision You can create a new revision of an existing element by using the “Duplicate as Revision” function. This is usually used to create an initial revision of an element, which can then be used as the basis for further changes. This ensures preservation of the previous revision (or original file) before you even start your alterations to the file. You will only want to perform this function on elements within a job jacket. To create a new revision of a file using Duplicate As Revision: 1. Open a job jacket and select the element(s) you want to create revisions for. 2. Select Element > Editing > Duplicate As Revision. A copy is made of the element’s currently selected revision, creating a new revision for the element. The Browse window now shows a thumbnail with a revision icon button on it, indicating that this element has revisions. Import As New Revision This function lets you use a file from your computer as a revision to an already existing element. Any external file you import this way will be given the same name as the element you are importing to. To import an external file as a new revision of an element: 1. Open a job jacket and select the element to which you want to attach the new revision. 2. Select Element > Editing > Import as New Revision. An Open dialog appears. 3. Locate the file that you want to import, then click Choose. 104 The file will now be registered in MediaBank as the latest revision to the selected element. The Browse window now shows a thumbnail with a revision icon button on it, indicating that this element has revisions. Check In As New Revision This option will take the file in the checkout directory on your local machine and transfer it back to the server creating a revision of the original file. This creates a revision of the original file, so the original file does not get overwritten. You can cancel this at the Confirm Check In dialog box. To save a checked out element as a revision of the original: 1 2 Find and select the element in the job jacket you wish to check out. You have the following options to perform a check out, as explained in the 'Check Out Menu Options' section. • • • 3 4 5 6 7 8 Go to Element > Editing > Check Out Go to Element > Editing > Open Go to Element > Editing > Open In A transfer window will open and the file will get placed into the checkout directory. Depending on the checkout method chosen, the file may or may not open into its native application. Make your edits to the file, saving frequently. If the file isn’t already open, go into the File Browser Window and click on the MediaBank tab. Browse to the file you wish to open and double click on it to open it. Remember, the file must be saved to the checkout directory. When you are finished editing the file, close it in the application you are working in. You don’t have to close the entire application. This is important, because MediaBank needs access to the file in order to check it in. Check the file back in as a revision. Go to Element > Editing > Check In As New Revision. You will be prompted with the Confirm Check In as New Revision dialog. Select the YES button to continue the check in as revision process or NO button to cancel it. If you would like to keep a copy of the file(s) in the “keep” folder, select that option. The Log Comment dialog will open next. Enter in a short description of what you did. Fill in the other options if you organization requires it. After filling in data, click the OK button to proceed with the check in or click the “Cancel” button to cancel. 105 9 The Transfer dialog will appear and the file(s) will be transferred to the server as new revisions of the original files. The element(s) will be taken out of a checked out status. The check mark will be removed from the element(s) thumbnail(s). The file(s) will be removed from the local checkout directory. 10 The thumbnail(s) of the element(s) will show the Revision icon button to indicate the revisions. NOTE: If you opened the element(s) from a job jacket. The element(s) you saved as a revision will overwrite the originally linked element(s) and become the active element(s) in this job. Convert As New Revision You can create a new revision of an existing element by using the Convert as Revision function. Choosing this option lets you use MediaBank’s convert engine to create a new revision of the selected asset. Select the asset you wish to convert and choose the Convert as Revision menu options. This will open the Convert As New Revision window where you can choose your convert options. Renaming Revisions Revisions can have different names. To rename a revision: 1. Make the revision you want to rename the active revision. 2. Go to the Element > Rename menu. 3. Uncheck the Rename All Revisions option to rename only the currently selected revision, or you can leave the option selected if you want to rename all of the revisions. Element Revision Window When an element has revisions, its thumbnail is displayed with a revision icon button on it. If you click this button, the Revisions window will open. 106 The left scroll column on the window shows thumbnails for all saved revisions of the element. The revisions appear top to bottom in order of creation. A highlighted element indicates that it is the currently active revision in the job jacket you are viewing. If you are looking at an element’s revisions from a search results window, the first element will always be highlighted. Make Current Button This is used to make the revision you have selected in the left column the active revision in the job jacket you are currently working in. This is not available in a search results window. Delete Button Used to mark which revisions should be deleted. Only available if you have permission to purge elements Revisions in Job Jackets A Job Jacket window always displays the revision of the element that was originally associated with the job. This may or may not be the most recent revision of the element. You can choose which element revision to associate with a particular job. This allows you to create and use different revisions in different jobs. To understand how this is useful, remember that you can link an element to multiple jobs. When you link and element to multiple jobs, any changes made to that element will be seen across all of those jobs. Revisions, allow you to work around this. Saving New Revisions in a Job Window When you check an element in as a revision, the new revision becomes the active revision with the current job. Any other jobs that use the element remain linked to previous revisions. 107 Changing Which Revision Is Used With a Job Jacket To change which revision is associated with a job, you need to open the Element Revisions window. 1. 2. 3. 4. 5. Open a job jacket and view its elements as medium or large thumbnails. Select the revision icon button on the element whose revision you want to change. The Element Revisions window opens. Select the revision you want to make active for the current job. Click the “Make Current” button. Select “OK” to close the revision window. That revision is now the active revision. Dragging an Element with Revisions to a Job Jacket After dragging and an element with revisions into a job jacket, you can view and change all of its revisions. Revisions in Search Result Windows A search results window shows the most recently created revision of an element if the search criteria used is found in all the revisions of an element. The simplest example of this would be a “File name is” search: All the revisions have the same name, so they all meet the search criteria. The Search Result selects a revision thumbnail based on creation date, not modification date. Since older revision files can be opened and edited, there may be a more recently edited revision than the one shown in the browser. If only one revision in an element meets the search criteria, it will be displayed in the search results window. The Element Revisions window always shows all element revisions even if some of the individual revision files do not match the search criteria you specified. For example, if you searched for elements based on file size data, but only one of an element’s revision files matches the size criteria you specified, you will still see all the element’s revisions in the Element Revisions window. Trying to change the active revision in a Search result window? You can’t do this. A search result window is just that, a search result that meets specific search criteria. If you need to select a different revision to edit or view its properties, check it out, open a copy, or link it to a job jacket first. Edit and Copy Operations on Revisions The edit and copy operations on revisions are the same as any element. You just have to make sure the revision you want to work on is the currently active revision Markups Overview • A Markup is a box that appears over the element’s preview. Markups highlight a specific area of the preview and can contain a note or a URL. • Markups can be use as a collaborative tool to conduct reviews for many types of assets. • Multiple users can view, edit, and add comments and visual references to a file. • Markup information is searchable, allowing users to quickly find and respond to other markups. • Users can search for all Markup-related information from the Markups Search window. • Only users with permission to edit an element’s information or metadata are allowed to create or edit the element’s Markups. You can place Markups anywhere on the preview. You can group Markups together and you can define their style and format as well as what components (Markup anchor, Markup Graphic, and Markup Details) display on the screen. All Markups include a pop-up window that contains the user name of the creator, 108 time created, and comment. The pop-up window also allows you to set both the priority of the Markup and its color. Creating Markups To create a markup: 1. Select an element. 2. Select Element > Preview. 3. Click the pencil icon to add a markup. 4. Use the Markup buttons to draw markups over the top of the preview. 109 Markups Toolbar The tools you use to create Markups are located on the Markup toolbar. This toolbar is displayed when you click on the Display Markups button. The Markup toolbar is where you choose the type of Markup you would like to create. When you have a particular tool selected, its button changes to a color different from the others. For example, if you have the selection tool selected, it will appear white, while the others remain black. The last button to the right is the color chooser; it displays the default color you currently have chosen for newly created Markups. The following table describes the functionality of each button Tool Show Markups Button Selection Tool Rectangle Markup Tool Oval Markup Tool Text Markup Tool URL Markup Tool Markup Color Chooser Button Description Use this button to show or hide the Markup window and toolbar. Use this tool when you want to select a Markup for resizing, editing, moving, etc... Use this tool when you want to highlight an area with a rectangle or square. Use this tool when you want to highlight an area with an oval or circle. Use this tool to create a note-based Markup. This is the most commonly used Markup. Use this tool to create a URL-based Markup. Other users can click this markup to open the URL in a browser. This can include any valid URL protocol, including http, ftp, paths to files, etc. Use this tool to choose the default transparent color for newly created Markups. NOTE: This does not change the colors of currently selected Markups. To change the colors of already existing Markups, double click on the Markup and use the color chooser provided there. Adding Markups If an element already has a markup, it will have a pencil icon in the medium and large thumbnail views. You can add markups directly from these views by clicking on the pencil icon. 110 Editing Markups 1. Choose the selection tool in the Markup toolbar. 2. Double click on the Markup anchor icon for the Markup you wish to edit, or right or ctrl click on the icon and select the Modify the Markup menu option. The Markup’s pop-up window will open. 3. Make your changes. Upon closing the pop-up window, the Markup will be saved. Deleting Markups Choose the selection tool from the Markup toolbar. 2. Select all the Markups you wish to delete. 3. Press the delete key on your keyboard, choose “Delete the Markup” from the Markup menu at the top of the screen, or right or ctrl click on the Markup anchor icon and choose Delete the Markup from the contextual menu. 4. You will be prompted with a Confirm dialog. Select “Yes” to delete selected Markups or “No” to cancel the deletions. 1. Markup Info Panel The Markup info panel is the located on the right side of the Markup window. The panel has filter tools, an area to change workflow metadata, and information about the currently selected Markup. Removing Element Overview • Process of removing elements from the DMR. • Removing selected elements from their job jackets only deletes them from the job jacket and leaves their metadata in their databases. • Purging selected elements from the system deletes them from the job jacket, removes their metadata in their databases and deletes all associated files from the server. Removing Elements from a Job Jacket Process of removing or detaching elements from job jackets, but keeping their database metadata. Usually performed on “Associated” or “Linked” elements. 1. Select desired element by single-clicking on it in the Job Jacket window. 2. You have a choice of one of the followings: • Go to main menu toolbar, select Element > Remove from Job… • Right-Click [PC] or Control+Click [Mac] on the element and go to Remove from Job…. 3. On Please Confirm pop up window, select Yes to remove (detach) element from job jacket. 111 4. The removed element will resign to the Unfiled sub-job jacket if there are no other jobs assigned Purging Elements from the System Process of deleting elements from the entire system – job jacket and database. This process can be scheduled or performed immediately. 1. Select desired elements by single-clicking on it in the Job Jackets or Search window. 2. You have a choice of one of the followings: • Go to main menu toolbar, select Element > Purge from System… • Right-Click [PC] or Control+Click [Mac] on the element and go to Purge from System…. 3. Select when to perform the purge. Then select OK to permanently delete elements from the system. If scheduled, the purge can be cancelled when accessing the Scheduled Operations window. Contact the System Administrator if such action is desired. Tips and Hints: • When removing elements from a job, the element metadata is kept in the database. If removing the last instance of the element, it will still be searchable but not viewable in Job Jacket window. When performing this, make sure it is the intended action. • Search the yet to purge element ID in MDUI for link(s) before purge the element. 112 Unfiled Folders The Unfiled folder is an automatically generated folder that is placed under the first level of the Parent job jacket. Elements found in the “Unfiled” folder are called “Orphans” and are not related to a job jacket within the parent database. Elements found in this folder may be the result of the deletion or cut of the elements’ thumbnail from a job jacket structure or an incomplete move. These files either need to be purged from DMR or cut and pasted back into an owning job jacket. 113 Chapter 9 Chapter 9: Using the VSRM Security Groups Short Instructions 1. It is now mandatory to connect VSRM Security groups with any DMR content that is marked 3M Confidential or Internal under the Security dropdown in MediaBank DMR client. If at least one VSRM Security group is not linked to each element marked 3M Confidential or Internal in the future, that element will not be available in downstream applications such as Partner Support, Sales Portal and 3M Source, etc. Once the security dropdown has been set to 3M Confidential or Internal and other pertinent metadata has been entered on the General Tab within the Properties dialog box, modifiers must then click on the VSRM Security tab and proceed to enter appropriate security groups for that element. 2. The VSRM Security tab has three main columns that provide the Security group information: • • • Click on the VSRM Security tab In the first column labeled Security Groups, highlight one or more groups by clicking or control clicking on the needed group(s) Click the right arrow button between the Security Groups column and the Assigned Groups column 3. The chosen group(s) will move to the middle column under the Assigned Groups Label 4. If you will be assigning particular groups on a regular basis for your DMR elements, you can highlight the group(s) in the Assigned Groups column and then use the right arrow button between the Assigned Groups column and the Favorites column to move these group(s) to your Favorites column. 5. You can move VSRM groups from either of the outside columns to the center Assigned Groups column. 6. The search box at the bottom of the VSRM Security Tab can be use to limit the groups shown in the first column, (the Security Groups column). • In the search box type part of the group names that you want to limit your search to, example “Industrial” 114 • Click the Search button and the Security Groups column will redraw and reveal only groups with Industrial in them 7. At the bottom right of the tab click the 'Save' button to commit to your changes. Detailed Instructions Open the Element Properties dialog in MediaBank • Under the General Tab, set the “Security” Dropdown to 3M Confidential or Internal After filling out all mandatory Metadata fields • Click on VSRM Security Tab • VSRM Security Tab opens • Notice there are three columns: Security Groups, Assigned Groups, and Favorites 115 In the first column labeled Security Groups, scroll to Security groups you are interested in linking. Highlight one or more groups by clicking or control clicking on the needed group(s) Click the right arrow button between the Security Groups column and the Assigned Groups column The chosen group(s) will move to the middle column under the Assigned Groups label. If you will be assigning particular groups on a regular basis for your DMR elements, you can highlight the group(s) in the Assigned Groups column and then use the right arrow button between the Assigned Groups column and the Favorites column to move these group(s) to your Favorites column. 116 You can move VSRM groups from either of the outside columns to the center Assigned Groups column. By moving commonly used groups to your Favorites, you will be able to more efficiently add VSRM Security Groups to your elements. • At the bottom right of the tab click the OK or Save button to commit to your changes. The search box at the bottom of the VSRM Security Tab can be used to limit the groups shown in the first column, (the Security Groups column). • • • In the search box type part of the group name(s) that you want to limit your search to, for example “Industrial” Click the Search button and the Security Groups column will redraw and reveal only groups with “Industrial” in them Clicking the Reset Button will clear your search results Note: For VSRM Security Group synchronization, please refer to page 92. 117 Chapter 10 Chapter 10: Copyright Elements in DMR Overview The copyright elements are the photos contain building and people. Those elements require validation. Wikipedia - Copyright gives the author of an original work exclusive right for a certain time period in relation to that work, including its publication, distribution and adaptation, after which time the work is said to enter the public domain. Copyright applies to any expressible form of an idea or information that is substantive and discrete and fixed in a medium. Some jurisdictions also recognize "moral rights" of the creator of a work, such as the right to be credited for the work. Copyright is described under the umbrella term intellectual property along with patents and trademarks. Copyright validation The 3M Digital Media Repository is intended to be used for the sole purpose of depositing images owned by 3M and its subsidiaries. The Digital Media Repository should NOT be used under any circumstances to deposit images or other media owned by other parties or images that are not licensed for use by 3M. The above statement is part of the splash screen when you login to the new DMR desktop client 3.1p2. It is important for all the content currently in DMR and future uploads to comply with the 3M corporate copyright policy to avoid future copyright infringement lawsuits. Each original file needs to have a ‘Validation Date’ on the elements that are categorized ‘Media’ is ‘Photography’ and 'Content Type' is 'Building/Location Image', 'Portrait/People' or ‘Product/Application Image’. The ‘Building Release ID:’ is required if the building in the photo is not one of the 3M's buildings. The ‘Model Release ID:’ is requires for all elements’ that 'Content Type' is 'Portrait/People' or ‘Product/Application Image’ if the model is recognizable. Media: Photography Content Type and the requirements: • Building/Location - Metadata fields require input: Property Release ID and Validation Date. Signed release does not require on 3M buildings. The code ‘3M’ instead of element ID must input in Property Release ID field (Figure 1) 118 • • People/Portrait - Metadata fields require input: Model Release ID and Validation Date. Multiple element IDs is acceptable separates by a punctuation mark comma. Example: 604005,634012. (Figure 2) Product/Application Image - Metadata fields require input: Validation Date. Model Release ID may not require if the model in the photo is not recognizable Figure 1 Figure 2 Sign Release – The sign release is the document signed by the model(s) in the photo or the property owner in the photo. The signed release should state that 3M has permission to copy, display, publish, distribute or print of the photo. The signed release must upload to DMR and the element metadata must populate. Because the signed release contains sensitive information, the setting on element ‘Security’ has to be ‘Internal’ and ‘Stage’ set to ‘Review”. The element ID of the signed release must input in the original. The generic sign release forms for model and property are available. The following link can get you to the DMR web album contains the forms: Model and Property sign release form Note: By filling in a validation date, you as a 3Mer are declaring that you believe that 3M owns the rights to use this image and that no photographer, model or stock agency will have the right to litigate against us for misuse of the image. 119 Stock Photography Guidelines Purchased stock photography can be store and link in DMR. The stock photography purchase agreement must be available and upload to DMR and validates with the purchased file. The purchase agreements are not the same between the stock photography providers. You must comply with the stock photography purchase agreement on the usage right. The choice ‘Stock Photography’ is available in Media type. The purchased stock images should select the ‘Stock Photography’ as Media type and select the appropriate Content Type. (Figure 1) Figure 1 Stock photography purchase agreement The purchase agreement should save in digital format (pdf, doc or jpg etc.), upload to DMR and select the Media as ‘Document’ and Content Type as ‘Stock Purchase Agreement’. (Figure 2) All metadata fields must populate. The element ‘Security’ can be set to ‘Public’ and ‘Stage’ set to ‘Ready for Warehouse’. Figure 2 Purchased stock photography The purchased file can be upload to DMR after the purchase agreement uploaded to DMR. The element ID of the purchase agreement must place in the ‘Limitations’ field and fill in ‘Validation Date (DD/MM/YYYY)’. (Figure 3) 120 Figure 3 Figure 3 shows the setting example of the ‘Element Properties’ of the purchased stock photography in DMR. Note: The proper prove on the rights to use the purchased stock photography is very important for your business and 3M to avoid the future copyright infringement lawsuits. 121 Chapter 11 Chapter 11: Exiting the DMR Logging off DMR Overview Process of exiting the DMR application. Exiting the DMR 1. Select File > Exit to exit and log out of the DMR. Control+Q [PC], Commend+Q [Mac] 2. If an element(s) has been accidentally checked out, the following Please Confirm window will appear. If there are no elements checked out, the DMR application will quit. Answer YES to the following window if you have element(s) checked out and want to review them. 122 3. If you have element(s) checked out and click 'Yes' on the Please Confirm window, the following window will appear. Release button 4. Select element(s) that are checked out and release them by selecting the Release button. 5. Answer Yes to the following Confirm Release window to dismiss any changes. 6. Select Close when all the checked out element(s) are released. The DMR will exit. 123 Appendices Add new Reader or Modifier Appendix A - AREQ The Access Request for 3M Systems and Facilities (AREQ) process is used to request the IDs for many systems in 3M, including DMR, GSDB and MDUI. You may already have the AREQ icon on your Lotus Notes workspace. If not, you may add the icon from the Notes environment. Step 1: Add the AREQ Icon to your Workspace From Notes file menu, select File>Database>Open. For server, select US-BurlIves /USCorporate/3M/US. Scroll to the folder named Groups and open, scroll to the folder name IT Sec and open, select Access Requests (AREQ). The AREQ icon then appears on your workspace. Click on the icon and view the First Time User tutorial, which steps you through the entire process for requesting access to 3M systems and/or facilities. Access AREQ Click the AREQ icon on your Notes workspace. The AREQ home page appears: 124 Step 2: Search Active 3M or Non-3Mer Lists Click Create New Request. The initiate request screen appears: To initiate a search for your requestor in AREQ, click the appropriate box. • If you find the requestor’s name, skip to Select the Name in this workbook. OR • If the requestor’s name is not listed, continue with Review On-Screen Procedures. Step 2a: Review On-Screen Procedures: 3M Employees If the requestor’s name is not found, follow the on-screen procedures to have the individual properly listed in 3M systems before attempting to request an ID and password for digitization tools. Step 2b: Review On-Screen Procedures: Non-3Mers Non-3Mers include contractors and professional services. Access must be approved through the corporate management DMR team. Click the New Non-3M button on the menu bar. The Detailed Person Information screen appears: 125 Enter the requested information. Fields marked with an asterisk (*) are required. Click OK to submit the request. Close the AREQ window. Wait a few days for processing, then try your request again. Step 3: Select the Name From the list of names, highlight the name and click OK. The access request screen displays for the requested name: 126 Step 4: Verify or Select 3M Approver Name The 3M Management Approver name approves issuing a user ID and password for your requester. The name that appears in this field is automatically selected. If the name that appears is not appropriate, you can select another name by selecting the appropriate approver, click the down arrow adjacent to Select alternate approver. A list of approver names appears. Highlight the appropriate approver and click OK. Step 5: Select DMR Systems and Services Select the desired system from the list of available 3M system resources. Under the System Request Information, click the down arrow. Click on the button to the right of Select systems or services. The 3M Systems and Services dialog box appears: Highlight the application and click OK. Note: For persons outside the United States. who have never accessed AREQ, the Personal Verification Information screen appears first before the 3M Systems and Services dialog box: The information you enter, as directed by the screen instructions, is used to verify and protect the owner of an account and protect 3M. Enter your information and click OK. The 3M Systems and Services dialog box displays. Highlight the application and click OK. 127 Step 5a: GSDB or MDUI request Once the GSDB or MDUI application has been selected, requestors will need to fill out the “Additional information” section appearing in red type. Step 6: Submit a Request Check your AREQ screen to ensure the information you have selected is correct. Make any final changes, and click the Submit Request button. Close the AREQ window. The Management Approval Process Once you have submitted the request, an e-mail is sent to the approver. If the request is granted, the request is automatically e-mailed to corporate DMR for processing. If denied, the process ends. Step 7: User ID and Password is Created The monitor on duty at the request database completes the remaining steps and notifies the user of their application user ID and password. 128 Appendix B – Digitization Request Database (Reserved for BU Admin and Modifier use only) The Request database is used to request changes to the DMR and other digitization tools that cannot be performed by the business units. You may already have the Request database icon on your Lotus Notes workspace. If not, you may add the icon from the Notes environment. The Request database is also accessible through the DMR Web site: http://us-burlives/groups/cmpa/DMRreq.nsf/DMRNav?OpenNavigator Accessing the Request database Notes Environment From Notes file menu, select File>Database>Open. For server, select US-BurlIves/US-Corporate/3M/US. Scroll to the folder named Groups and open, scroll to the folder name CMPA and open, select Digitization Request. This process will place an icon on your desktop for future access. Click on the Digitization Request Database Icon on you Notes Workspace. This takes you to the Request database. Web Environment From the web, go to the http://usburlives/groups/cmpa/DMRreq.nsf/dmrIDHome?OpenNavi gator web site. Click “Go to DMR Request”. Request Element Release You may occasionally find an element in the DMR with a check mark. If you need to modify or change the element in any way, you must first release it. To force release, click on the Request database icon on your workspace. The Request database main menu appears. Click on Force DMR Element Release. The DMR element release screen appears. Type in your 3M PIN and click Submit. The detailed DMR element release screen appears. Type in the DMR Element ID and click Submit. The Corporate Marketing DMR team will release the element for you. 129 Add New Parent Job Jackets Follow these guidelines when you need to request a new parent from corporate DMR. We recommend that you search DMR for existing parent job jackets that could be used by your business unit before you create an entirely new structure. If you find an appropriate existing parent job jacket, query the DMR for the users. If these are individuals with whom you could work, then use this parent structure. If not, request a new parent job jacket. View parent job jackets by user ID To request a new parent job jacket, click on the Request database icon on your workspace. The Request database main menu appears: Click DMR Parent Job Jacket. The DMR parent job jacket screen appears: Type in the job jacket name, owning business unit, select the business unit administrator and click Submit. The Corporate Marketing DMR team will contact you regarding to the new parent job jacket before the new DMR Parent Job Jacket can be create. Add or Remove Team Assignments Once a parent job jacket is assigned, the next step is to make the appropriate team assignments so that your DMR team may access the parent structure. To request team assignments; click on the Request database icon on your workspace. The Request database main menu appears. Click Team Assignment. The DMR team assignment screen appears. Type in your 3M PIN and the user’s PIN. Click Submit. The detailed DMR team assignment screen appears. 130 Review the user information and select the appropriate DMR action (add or remove), user role and DMR databases from the list. To see the DMR databases, scroll down the page using the elevator bar on the screen. Click Submit. Corporate DMR makes the assignments within 24 business hours. Appendix C – Hardware and Software requirements DMR Public Access Level Requirements If you choose to simply view or download DMR public elements, you need the following minimum hardware and software products: . Hardware minimum recommendations: Windows XP Pentium class 350 MHz 128 MB RAM 200 MB free disk space TCP/IP network connection Macintosh OSX Power PC, G3, G4, or G5 Processer Stuffit13 333MHz processor 256 MB RAM 200 MB free disk space MacOS 7.5.3 or later TCP/IP network connection Your computer should have at least a 17” color monitor with High Color (16-bit). 131 Hardware and Software Recommendations - DMR Power User and Business Unit Administrator Power User and Business Unit Administrator hardware and software requirements would vary, depending on external and internal creative processes. Based on the business units' process, DMR users will need to individually evaluate hardware and software requirements. For basic power users, we recommend a onegigabyte free disk space on a internal hard drive. Performance is faster when uploading and downloading DMR object files located on a local drive rather than a network drive. Hardware minimum recommendations: Windows XP or 2000 Pentium M 1.7 GHz 512 MB RAM 1 gigabyte free disk space TCP/IP network connection Macintosh Power Macintosh G3 Mac OSX or later 300 MHz processor Minimum of 512 MB RAM 1 gigabyte free disk space TCP/IP network connection Software recommendations: The “Power” User will need additional training on software programs used by desktop professionals. Software minimum requirements: Adobe™ Acrobat™ Reader, version 7.0 Recommended software packages and their uses: Word processing, spreadsheets, and presentations: MicrosoftTM Office 2003 (PC) or higher Page layout: QuarkXPressTM version 6.0 or higher AdobeTM InDesignTM version CS2 or higher Illustration: AdobeTM IllustratorTM version CS2 or higher AdobeTM Freehand version MX or higher Photo manipulation and viewing: AdobeTM PhotoshopTM version CS2 or higher Creation of PDF files that encompass all the components used in creation: AdobeTM AcrobatTM Suite version 7.0 or higher Note: All the above software and prices are located on the 3M internal Web site: 3M General Access to Insight’s web site The most common software used by digital photographers, agencies, designers/firms and printers in the creation of digital communications are: QuarkXpresTM, Adobe IllustratorTM, Adobe PhotoshopTM and Adobe AcrobatTM. You may want to check with your suppliers to see that the programs they are using are compatible with DMR standards. 132