1
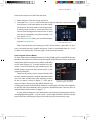
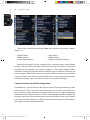
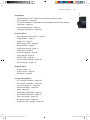
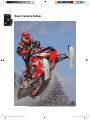
1
Basic Camera Setup
2
SnowCross Racer – Courtesy of Michael R. Goodman (mrginhop)
01_Mastering_D7000_Production.indd 2
5/19/2011 8:11:26 AM
The Nikon D7000 – A Mature Camera
3
1
The Nikon D7000 – A Mature Camera
As a writer of photography books I have a cool hobby. I buy cameras. Lots of cameras!
In fact, I’ve owned nearly every SLR camera Nikon has made in the past 30 years. All
the Nikon cameras are excellent and have personalities of their own. Once in a while,
though, I get a camera that goes out of its way to impress me.
Looking back I think of the Nikon F4, a camera that could use virtually any lens
made by Nikon, had its controls on the camera body for ease of adjustment, and
simply worked when I pressed the button.
Fast forward a few years and the Nikon D100 appeared. It was the start of my
digital life and the reason I have the nickname Digital Darrell. The D100 was so
bold and new and set so many standards that it literally changed the world. Not
long afterward the D300 came along and set the Nikon world on fire. Here was a
camera with all the image quality of the big cameras and a robust build that set new
standards for semipro digital single lens reflex (DSLR) cameras.
Then, with the suddenness of a tornado, Nikon blew me away, again! This may
sound like an exaggeration, but Nikon has now made the ultimate enthusiast’s
DSLR: the Nikon D7000. This camera combines so many things that made me love
previous Nikon cameras. The total package is professional, smooth, slick, fast, and
several other adjectives I haven’t thought of yet. Nikon has truly outdone itself with
the D7000.
Why do I make such a bold statement about a midrange, advanced enthusiast’s
camera? Why not about a much more expensive Nikon? Because the D7000 simply
has everything a photographer will need to bring home incredibly good images,
without jumping through hoops to do so. It’s what I have recently been referring to
as a mature camera. What does that mean? With the D7000, digital photography has
reached a level of maturity that will allow you to use your camera for years instead
of months.
Rather than buy a new camera every couple of years, the D7000 gives you what
you’ll need for many more years of use. With this camera we can return to the days
when we seldom bought a new camera body and instead put our money in new
Nikkor lenses. Wouldn’t you like to have some new lenses?
Sure, new Nikon cameras will come out, and, like me, you’ll be attracted to the
newest camera. However, with the D7000 you have to buy a new one only if you
really want to; you won’t need to any time soon. With this camera body—as long as
you take care of it—you are set for many years of faithful service.
Now, let’s learn how to configure and use your new D7000.
01_Mastering_D7000_Production.indd 3
5/19/2011 8:11:26 AM
1
4
Basic Camera Setup
Learning about the Nikon D7000
2
The difficulty in writing a book on a powerful camera like the Nikon D7000 is balancing it for multiple types of users and their varying levels of knowledge. With too
much technical detail, the book will read like a user’s manual. With too little technical
detail, advanced users will get no benefit from the book.
Some new users of the Nikon D7000 DSLR camera have come over from the world
of fully automated point-and-shoot cameras. On the other hand, many photographers are upgrading to the D7000 from cameras like the Nikon D3000, D3100, and
D90. Then, there are professionals who buy the D7000 to have a backup for their
pro-level and semipro-level cameras, like the Nikon D300S, D700, D3, D3S, and D3X.
Others are coming over from the film world, drawn by the siren call of immediate
image use and very high quality.
In Mastering the Nikon D7000 I’ve tried my best to balance the needs of new
and experienced users. I remember my first DSLR and my confusion about how to
configure the camera compared to my old film SLR: What’s all this white balance
and color space stuff?
The bottom line is that the Nikon D7000 is a rather complex camera, and it requires
careful study of resources like this book, and the User’s Manual, to really get a grasp
on the large range of features and functions. According to Nikon, it’s an “advanced”
camera, with features not found in lesser “consumer” models. It’s designed for people
who really love photography and have a passion for image making that far exceeds
just taking some nice pictures at a family event. The D7000 has most of the features
found in cameras like the D300S and D3S, which are considered professional cameras.
Following the publication of my books Mastering the Nikon D300/D300S and
Mastering the Nikon D90, I compared the D300S, D90, and D7000 side by side. I’m here
to tell you that the Nikon D7000 has all the critical functions found in the semipro
D300S and seriously extends the feature set of the advanced Nikon D90.
The D7000 has a full range of functions that allow you to shoot images and
post-process them in the camera instead of on your computer. If you don’t like
computers but want to take digital photographs and videos, the Nikon D7000 is
the camera for you!
I could go on for hours raving about all the cool features in the D7000. In fact, I
do go on raving about this camera for the next 11 chapters. I hope you can sense
my enthusiasm for this cool, new imaging machine as you read this book. There are
few cameras in the world with this level of capability, and you own one!
01_Mastering_D7000_Production.indd 4
5/19/2011 8:11:26 AM
First Use of the Camera
5
1
First Use of the Camera
Surprisingly, quite a few brand-new DSLR users are buying a Nikon D7000 instead of
a lower-cost, entry-level model. Even new users appreciate the robust high quality
of the camera.
The upcoming sections and chapters are best read with your camera in hand,
ready for configuration. There are literally hundreds of things to configure on this
advanced DSLR. In this chapter, I’ll give new D7000 users a place to start. Later, as
you progress through this book, we’ll look at all the buttons, switches, dials, and
menu settings in detail. That will allow you to fully master the operation of your
Nikon D7000.
Each menu in the camera has its own chapter or section. Plus, there is additional information on how to put it all together in chapters like Metering, Exposure
Modes, and Histogram; White Balance; Autofocus, AF-Area, and Release Modes;
and Speedlight Flash. Since the D7000 has several movie modes, we’ll cover movies
in their own chapter, Live View and Movie Modes.
First Time DSLR Users
Although the D7000 is an enthusiasts’ or advanced camera, many brand-new DSLR
users have purchased a D7000 as their first digital single lens reflex camera. New
users may not know how to attach and remove a lens or battery, and they may need
help with inserting, formatting, and using memory cards.
The majority of this book’s readers, however, already know how to perform these
tasks. I do not want to ask a more experienced DSLR user to read over the basics of
DSLR use, so I’ve created a document called Initial Hardware Considerations, which
you can download at:
http://rockynook.com/NikonD7000
There are also several other articles of interest to new Nikon D7000 users on this
webpage.
Now, let’s start with the initial configuration of a brand-new Nikon D7000. There
are five specific steps you must complete when you first turn on the camera.
01_Mastering_D7000_Production.indd 5
5/19/2011 8:11:27 AM
1
6
Basic Camera Setup
Five Steps for First-Time Camera Configuration
2
This section is devoted to the first-time configuration of the camera. There are certain
settings that must be set up immediately (covered in this section) and others that
should be configured before using the camera extensively (covered in the next
section, Camera Functions for Initial Configuration).
I’m not going to go into detail on all possible settings in this chapter. That is
reserved for the individual chapters that cover the various menus and functions.
Instead, I’ll walk you through five steps for first-time configuration of the camera. In
the next section I’ll refer you to the chapter sections and page numbers in this book
that provide the screens and menus for each function that should be configured
before using the camera for the first time. Later chapters will cover virtually all
camera settings.
When you first insert the battery into a factory-fresh Nikon D7000 you will notice
that the word CLOCK flashes on the camera’s upper LCD Control panel. If you don’t
see CLOCK flashing, then your camera has already been set up for initial use.
Let’s examine how to configure a new camera. You’ll see the following five
screens when you first turn the camera on, and they must be set up immediately.
Setting the Camera’s Language – Step 1
The D7000 is multilingual or multinational. As partially shown in figure 1.1, the
menus can be displayed in 22 languages. Most likely the camera will already be
configured to the language spoken in your area since various world distributors
have the camera somewhat preconfigured. The following is a list of the display
languages available in the D7000, firmware version A1.00, B1.00, L1.002 (Setup Menu
> Firmware version):
•
•
•
•
•
•
•
•
•
•
•
Czech
Danish
German
English
Spanish
French
Indonesian
Italian
Dutch
Norwegian
Polish
01_Mastering_D7000_Production.indd 6
•
•
•
•
•
•
•
•
•
•
•
Portuguese
Russian
Finnish
Swedish
Turkish
Arabic
Traditional Chinese
Simplified Chinese
Japanese
Korean
Thai
5/19/2011 8:11:27 AM
First Use of the Camera
7
1
Here are the steps to select your language:
1. Refer to figure 1.1 for the Language list the camera presents on startup.
2. Use the circular Multi Selector—with arrows
pointing left, right, up, and down—to scroll up
or down until your language is highlighted.
3. Press the OK button to select your language.
Figure 1.1 – Setup Menu
Language screen
The camera will now switch to the second screen in the setup series, the Time
zone screen.
Setting the Camera’s Time Zone – Step 2
This is an easy screen to use as long as you can recognize the area of the world in
which you live. Use the map shown in figure 1.12 to find your area, then select it.
Here are the steps to select the correct Time zone for your location:
1. Refer to figure 1.2 for the Time zone screen you’ll
use. You’ll see yellow arrows pointing to the left
and right on either side of the small black and
gray world map.
2. With the Multi Selector, scroll to the left or right
until your world location is highlighted in yellow.
Figure 1.2 – Setup Menu
You will see either a vertical yellow strip or a tiny
Time zone screen
yellow outline with a red dot. At the top of the
screen below the Time zone words, you will see the currently selected Time zone.
Mine is set to New York, Toronto, Lima (UTC-5), as shown in figure 1.2.
3. Press the OK button, and your Time zone will be locked in place.
The camera will now present you with the next screen in the series, the Date
format screen.
Setting the Camera’s Date Format – Step 3
The English-speaking world uses various date formats. The Nikon D7000 allows you
to choose from the most common ones. There are three date formats you can select
(figure 1.3):
•
•
•
Y/M/D – Year/Month/Day (2010/12/31)
M/D/Y – Month/Day/Year (12/31/2010)
D/M/Y – Day/Month/Year (31/12/2010)
01_Mastering_D7000_Production.indd 7
5/19/2011 8:11:28 AM
1
2
8
Basic Camera Setup
American residents usually select the M/D/Y Month/Day/Year format. However,
you may prefer a different format. Here are the steps
to select the date format you like best:
1. Refer to figure 1.3 for the Date format screen you
will use.
2. Using the Multi Selector, scroll up or down to the
position of the date format you prefer.
3. Press the OK button to select the format.
Figure 1.3 – Setup Menu
Date format screen
When you have the Date format selected, the camera will switch to the Daylight
saving time screen.
Setting the Camera’s Daylight Saving Time – Step 4
Many areas of the United States observe daylight saving time. In the springtime,
many American residents set their clocks forward by one hour on a specified day
each year. Then in the fall they set it back, leading to the clever saying, “spring
forward and fall back.” To enable automatic Daylight
saving time, follow these steps:
1. Refer to figure 1.4 for the Daylight saving time
screen you will use.
2. There are only two selections: On or Off. Choose
the one you prefer by scrolling with the Multi
Selector.
3. Press the OK button to select your choice.
Figure 1.4 – Setup Menu
Daylight saving time screen
If you set Daylight saving time to On, your D7000 will automatically spring forward and fall back, adjusting your time forward by one hour in the spring and back
one hour in the fall.
Now that you’ve made the Daylight saving time decision, the camera will move
on to the last screen in the series of five, the Date and time screen.
My Recommendation: If you live in an area that observes daylight saving time,
it’s a good idea to set your camera to make this adjustment automatically. I always
leave Daylight saving time set to On. Why not let the camera remember to change
the time twice per year?
Setting the Camera’s Date and Time – Step 5
This screen allows you to put in the current Date and time. It is in year, month, day
(Y, M, D) and hour, minute, second (H, M, S) format.
01_Mastering_D7000_Production.indd 8
5/19/2011 8:11:28 AM
First Use of the Camera
9
1
Here are the steps to set the Date and time:
1. Refer to figure 1.5 for the screen you’ll use.
2. Using the Multi Selector, scroll to the left or right to select the various date and
time sections. Scroll up or down to set the values
for each one. The time values use a 24-hour clock,
or military time. Use the 12- to 24-Hour Time Conversion Chart on page 242 to convert the 12-hour
time you are probably using (for example, 3:15
p.m. equals 15:15).
3. Press the OK button when you’ve finished inputFigure 1.5 – Setup Menu
ting the Date and time.
Date and time screen
Please note that the time setting uses the 24-hour military-style clock. To set 3
p.m., you would set the H and M settings to 15:00. As mentioned, there is a 12- to
24-Hour Time Conversion Chart on page 242 for your convenience.
Accessing the Camera Menus
To access the various configurable menus in the D7000, you’ll use the MENU button
found on the back of the camera near the top left of the Monitor. Please remember
the location of this button since it will be used often
in this book (figure 1.6). To avoid unnecessary repetition, I won’t mention that you need to press the
MENU button to get into the camera menus in the
upcoming chapters.
There are six primary menu systems found in the
camera, and this book has a chapter devoted to each
one. Let’s take a brief look at the opening screens
Figure 1.6 – Press the MENU
of the six menus, shown in figure 1.7. You get to
button to open the menus
these six menus by pressing the MENU button and
scrolling up or down with the Multi Selector. A selector bar with tiny icons appears
on the left side of the Monitor when you press the MENU button. You can see it at
the left of each of the menus in figure 1.7.
As you scroll up or down in the selector bar, you’ll see each menu appear with its
icon highlighted in yellow—one at a time—to the right of the bar. The name at the
top of the menu will help you figure out which one you are currently using.
01_Mastering_D7000_Production.indd 9
5/19/2011 8:11:29 AM
1
10
Basic Camera Setup
2
Figure 1.7 – Six primary camera menus
The six menus that are found in the D7000 menu system are, in order, as follows
(figure 1.7):
•
•
•
Playback Menu
Shooting Menu
Custom Setting Menu
•
•
•
Setup Menu
Retouch Menu
My Menu or Recent Settings
Notice that My Menu can be toggled with an alternate menu called Recent
Settings. These two menus can’t be active at the same time. My Menu is much more
functional for most people, so it is shown in figure 1.7. The chapter titled My Menu
and Recent Settings covers both of them in detail so you can choose which one you
want to appear most of the time on your camera. My Menu allows you to add the
most-used menu items from any of the other menus to your own personal menu,
and Recent Settings shows you the last 20 menu items you’ve changed.
Camera Functions for Initial Configuration
The following is a list of functions that you may want to configure before you take
many pictures. These set up the basic parameters for camera usage. Each function is covered in great detail on the page number shown, so I did not repeat the
information in this chapter. Please turn to the indicated page and fully configure the
function, then return here and move on to the next function. When you are done,
your camera will be ready for use. Place a bookmark here since you’ll refer back to
this chapter for each configuration item.
01_Mastering_D7000_Production.indd 10
5/19/2011 8:11:30 AM
First Use of the Camera
Setup Menu
•
•
•
•
•
•
11
1
Format memory card – Page 227 (format your memory cards)
LCD brightness – Page 232
Time zone and date – Page 240 (if not configured earlier in this chapter)
Language – Page 245
Auto image rotation – Page 247
Copyright information – Page 254
Shooting Menu
•
•
•
•
•
•
•
•
•
•
•
•
Role played by card in Slot 2 – Page 56
Image quality – Page 57
Image size – Page 67
JPEG compression – Page 68
White balance – Page 75
Set Picture Control – Page 77
Color space – Page 94
Active D-Lighting – Page 96
Long exp. NR – Page 99
High ISO NR – Page 102
ISO sensitivity settings – Page 105
Movie settings – Page 115
Playback Menu
•
•
•
Display mode – 26
Image review – Page 36
Rotate tall – Page 39
Custom Setting Menu
•
•
•
•
•
•
•
•
•
•
AF-C priority selection – Page 132
AF-S priority selection – Page 133
Live view/movie AF – Page 143
Monitor off delay – Page 160
Beep – Page 164
Viewfinder grid display – Page 167
File number sequence – Page 175
Flash sync speed – Page 185
Assign Fn button – Page 207
Assign AE-L/AF-L button – Page 207
01_Mastering_D7000_Production.indd 11
5/19/2011 8:11:30 AM
1
12
Basic Camera Setup
Personal Camera Setting Recommendations
2
All through the book I offer my personal recommendations for settings and how to
use them. Look for the My Recommendation paragraphs at the end of most sections.
These suggestions are based on my own personal shooting style and experience
with Nikon cameras. You may eventually decide to configure things in a different
way, according to your own needs and style. However, these recommendations are
good starting points while you become familiar with your camera.
Things to Know When Reading This Book
Here are a few things that you’ll need to remember as you read this book. There are
a lot of buttons and controls on the camera body. I have provided a Camera Body
Reference section in the front of the book, as well as a downloadable document
titled Camera Control Reference on this book’s downloadable resources webpage.
It is found at: http://rockynook.com/NikonD7000.
What’s the difference between the two sections? The Camera Body Reference is
a place to go when you want to locate a control, including covers and doors, while
the Camera Control Reference provides a deeper discussion of each of the buttons
and dials on the camera.
I use Nikon-assigned names for the controls on the camera, as found in the D7000
User’s Manual. For instance, I’ll say something like “press the Thumbnail/playback
zoom out button” to show you how to execute some function, so you’ll need to know
where this button is located.
I have provided User’s Manual references at the beginning of most sections in
case you want to refer to the manual for an additional view of the camera settings.
Using these references is entirely optional and not required to fully learn how to
use your camera with this book. If you have no interest in using the User’s Manual,
simply ignore the references.
Downloadable Resources Webpage
To keep this book small enough to carry as a reference in your camera bag, I have
provided some less-used information in downloadable sections at this web address:
http://rockynook.com/NikonD7000. There will be references to these downloadable sections throughout the book when they apply to the material being discussed.
01_Mastering_D7000_Production.indd 12
5/19/2011 8:11:31 AM
My Conclusions
13
1
My Conclusions
This chapter’s primary concern has been the initial setup and basic configuration of
your new camera. The next several chapters will look at each menu and setting in
a detailed way. The final chapters will cover the application of those settings as we
consider ways to use the camera most effectively.
The Nikon D7000 is an advanced camera in all respects. It is designed so you
can take it places that lesser cameras shouldn’t go. The imaging capability in this
complex but powerful DSLR could only be dreamed of a few years ago. Take the time
to work through this book with your camera in hand, changing the settings to your
best choices, and you’ll come out in the end as a master of your new Nikon D7000.
01_Mastering_D7000_Production.indd 13
5/19/2011 8:11:31 AM