1
Installing the Mounting Plate
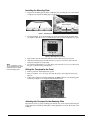
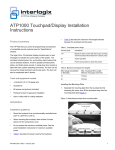
1. Separate the mounting plate from the touchpad by first loosening the screw, then lift the
touchpad away from the mounting plate (see Figure 1).
Loosen screw,
then lift touchpad.
Figure 1. Separating the Touchpad from the Mounting Plate
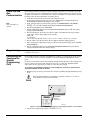
2. For wall mounting, place the mounting plate on the wall and mark the mounting holes
(see Figure 2). Be sure to leave a 3-inch clearance below for the touchpad door to open.
Mounting Holes
Mounting Holes
Figure 2. Mounting Hole Locations
Note
Do not overtighten screws or
the mounting plate may bind
and prevent the touchpad
from mounting properly.
3. Insert anchors into the wall at the marked locations where studs are not present.
4. Align the mounting plate holes with the wall or gang box screw holes and secure the
back plate using the screws provided.
5. For wall-mount installations, cut a hole in the wall in the wire access area of the mounting plate to pull the wiring cable through.
Wiring the Touchpad to the Panel
1. Remove panel AC and backup battery power.
2. Run a 4-conductor, 18- to 22-gauge wire from the panel to the touchpad location (see
Table 2).
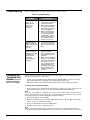
3. Connect the touchpad +12V, BUS A, BUS B, and GND terminals to the matching panel
terminals (see Figure 3 for touchpad terminal identification).
GND
BUS B
BUS A
+12V
Figure 3. Touchpad Wiring Connections
Attaching the Touchpad to the Mounting Plate
Align the tabs at the top of the mounting plate with the slots on the touchpad and swing the
touchpad bottom toward the mounting plate. Gently tighten the screw into the bottom of the
touchpad.
2
ATP1000 Touchpad/Display Installation Instructions