1
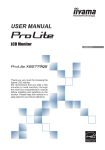
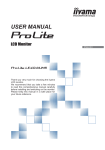
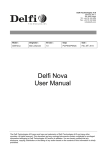
Table of Contents ■ ■ ■ ■ ■ ■ ■ ■ ■ ■ ■ ■ ■ Introduction………………………………………………….………1 Features……………………………………………………………...2 Packing Checklist……………………………………….………….3 Product Description……………………………………………..…4 Installation…………………………………………………………...5 ■ Connection Patterns….………………..…..…………………6 LED Indicators………………………………………………………8 Push-Button Control…………………………………………...…10 Video Adjustment……………………………………………....…13 ■ Video Adjustment Configuration....……..………………...14 Hotkey Control……………………………………………………..18 ■ Hotkey Commands……..…..………………………………...19 Alternative Hotkey Control………………………………………23 Cascade Configuration…………………………………………..24 ■ Mask Hotkey Switch……....…………………….……………26 Appendices…………………………………………………………27 ■ Cable Requirements……………………………………….…27 ■ Troubleshooting….…………………………..….……...……28 Specifications…………………………………………...…………29 Please read this manual thoroughly and follow the Installation procedures to prevent any damage to the unit or any connecting device * The final specifications are based on the actual product. * Features and functions may be added or changed after the manual was written. Please visit our website to download the latest version of manual for reference. * T0 prevent damages to your installation, it is important that all devices are properly grounded. RoHS ------------------------ Introduction Claxan KVM Extender (CL-KVM-EXC-2021Z and CL-KVM-EXC-3022Z) consists of a Console Unit and a Computer Unit allowing you to extend the keyboard-monitor-mouse console up to 300 meters away from a source computer or KVM Switch by using an inexpensive Category 5 / 5e / 6 UTP (unshielded twisted pair) cable. The Extender supports high video resolution up to Full HD (1920 x 1080) / WUXGA (1920 x 1200) / UXGA (1600 x 1200) / 1920 x 1440. Through the easy hotkey commands, you can conveniently adjust the video quality to compensate the cable lengths and synchronize the optimal video resolution between the attached computers, such as equalizer (sharpness), gain (brightness), and zero the skew delay for green, blue, and red. It is economical and scalable design for growth-oriented enterprises, which you can easily expand the multiple computer controls by adding additional Extender(s) or cascading the Extender(s) with KVM Switch(es) whenever you need. The dedicated Hotkey Mask feature eliminates all the hotkey control barriers caused by mixed combinations of KVM Switch(es) in cascading environments. The Extender can mask up itself through the hotkey mask, enabling you to bypass the cascaded Extender level and directly configure the cascaded KVM Switch by using the keyboard/mouse that connect to the Extender Unit, as if you were virtually sitting in front of the KVM Switch. The interface compatibility and flexibility can be simply enhanced by choosing custom-made KVM 1-to-3 (PS/2 interface) or 1-to-2 (USB interface) cable(s) for your existing USB or PS/2 computer(s), no software or DIP switches are required. It provides advanced features including dual-user access, LED indicators for real-time status monitoring, and control multiple computers by cascading KVM Switch(es), easy computer access through push button, hotkeys, and mask hotkeys. With the small footprint, the Extender can be easily installed and deliver the high definition signal over long distance, which is a perfect solution for factories or construction areas where you want to secure your computers and valuable data or manage them both in remote and local sites. The Extender Unit can be connected with 1-to-3 or 1-to-2 cable(s) as the following figure shown. For details, please proceed to the section “Specifications”. 1-to-3 cable (PS/2) connection 1-to-2 cable (USB) connection -1- ------------------------ Features Connect the KVM Extender pair via Category 5 / 5e / 6 UTP cable Remotely locate the keyboard, mouse and monitor up to 300 meters away from a computer Support high video resolution up to Full HD (1920 x 1080) / WUXGA (1920 x 1200) / UXGA (1600 x 1200) / 1920 x 1440 Support USB console Support the surge protection Support the HID standard keys Equalizer (sharpness) / gain (brightness) / RGB skew adjustment via hotkeys for optimal video quality Synchronize the video resolution between the attached computers via hotkeys Easily expand the multiple computer controls by cascading KVM Switch(es) Hotkey functions and push button for easy computer access Dedicated Mask Hotkey function simplify hotkey control in cascading environment Compatible with all PS/2 or USB computers by using 1-to-3 (PS/2 interface) or 1-to-2 (USB interface) KVM cable(s) Simple LED indication makes operation user-friendly Locate the computer away from your desk and work area, saving you valuable space Allow two users to share one or two computers locally and remotely Beep confirmation for hotkey control makes the operation easier and cross-checked Support most of mice such as M/S IntelliMouse (Pro), Explorer, Optical, etc. Compatible with most of the popular screen resolution to XGA, SXGA, UXGA, WSXGA,WUXGA ….QWXGA system -2- ------------------------ Packing Checklist 1. 2. 3. 4. 5. 6. KVM Extender Console Unit KVM Extender Computer Unit Power Adapter with necessary AC Cord or Plug-in Power Adapter User’s Manual Foot Pad Set KVM Cable (CBM-180H or CBM-180UH) x1 x1 x1 x1 x2 x 1 or 2 (option) ★Hardware Requirement 1. Computer(s) with USB port(s) and PS/2 port(s) 2. Category 5 / 5e / 6 UTP cable (EIA/TIA 568B industry standard compliant) in accordance with length limits for optimum signal integrity 3. USB keyboard / mouse for console controlling -3- ------------------------ Product Description The following figures show typical applications of Claxan KVM Extender. The model you have purchased might be slightly different from those described in the illustrations without affecting the functions. Console Unit CL-KVM-EXC-3022Z Computer Unit CL-KVM-EXC-3022Z -4- ------------------------ Installation Grounding To prevent any damage to the product or any connected device, it is important to make sure that both the monitor (and/or computer) connected to the Unit and the KVM Extender are properly grounded. Cautions: 1. Prior to the installation, ensure that all devices to be connected to this system are powered off and grounded. 2. Place cables away from fluorescent lights, air conditioners, and machines that are likely to generate electrical noise. 1-to-3 cable (PS/2) connection 1-to-2 cable (USB) connection -5- Connection Patterns The installation is as easy as dynamically connecting the computer to the Computer Unit and/or Console Unit, and connecting the Console Unit to the Computer Unit with the appropriate CAT5 cable. Please follow the guidelines below for the system connection. Use KVM 1-to-3 (PS/2 interface) or 1-to-2 (USB interface) cable for the connection between the video port on the computer side of the Unit and the video output port & KB/MS port of the connected Computer. Use Video cable for the connection between the video port on the console side of the Unit and the video input port of the connected monitor. Plug a USB keyboard and a USB mouse into the respective icon marked USB ports on the console side of the Unit. Connect the CAT5 cable to RJ45 port on the Console Unit, connect the opposite end to a terminated wall outlet (if using premises cabling), or directly to RJ45 on the Computer Unit. Power Connection In non-cascade structure, Computer Unit consumes negligible power and draws only the necessary power from the connected computer. In cascade structure, Computer Unit cascaded to KVM Switch requires sufficient power supply by connecting an appropriate power cord into an appropriate power source and plugging the opposite end into the power connector on the Computer Unit. After all device connections are completed, connect the provided power cord into an appropriate power source and plug the opposite end into the power connector on the Console Unit to power up the system. -6- CL-KVM-EXC-3022Z 2 Consoles → 2 Computers CL-KVM-EXC-2021Z 2 Consoles → 1 Computer -7- ------------------------ LED Indicators The LEDs on the KVM Extender show the real-time status indicating the linking, communication, and control between the Computer Unit and Console Unit. Users can switch control through the push-button and identify the present status through the LED indicator on the top panel as the following lists: 1. Press the push-button on Console Unit to select “Local On” or “Remote On”. 2. Press the push-button on Computer Unit to select “Local On”, “Remote On” or “Auto Mode”. LEDs on Console Unit Model LED Status Remote:Off, Local: On* CL-KVM-EXC-3022Z Remote: On, Local: Off CL-KVM-EXC-2021Z Remote: On Control Description z Console Unit controls its local PC. Console Unit is enabled to access to the Computer Unit and the remote LED will: z Emit yellow light if the Console Unit is taking control. z Emit yellow light with a bit of flash red if the Computer Unit is taking control. Users can easily identify this status from the keyboard, in which 3 LEDs (Num, Caps and Scroll Lock) on the keyboard should be flashing. z Emit yellow light if the Computer Unit is on Auto mode (the system is waiting for Console Unit or Computer Unit to take control). Users can easily identify this status from the keyboard, in which 3 LEDs (Num, Caps and Scroll Lock) on the keyboard are NOT flashing. z The Console Unit remotely controls the Computer Unit z The default status is set to Local “ON” when the Console Unit powers on z The Remote LED will flash long red light if the CATx cable disconnected -8- LEDs on Computer Unit Model LED Status CL-KVM-EXC-3022Z CL-KVM-EXC-2021Z Control Description z Computer Unit controls its local PC (or cascaded KVM Switches). In this mode, Remote:Off, Local: On the Console Unit can not take control of the Computer Unit remotely. z Console Unit can remotely taking Remote:On, Local: Off control of the Computer Unit. Remote / Local Flashes z The system is waiting for Console Unit or Computer Unit to take control. The alternately (Auto Mode) control priority is on the first come, first served basis z The default status is set to Auto when the Computer Unit powers on z The Remote LED will flash red light if the CATx cable disconnected Console Unit controls its local PC ( not applicable to CL-KVM-EXC-2021Z) Computer Unit controls its local PC 1. Remote Control applied 1. Remote Control enabled 2. CATx linking Status 2. CATx linking Status -9- ------------------------ Push-Button Control A push button on the respective top panel of Computer Unit and Console Unit can be used to select the control mode as follows: Push-Button on Console Unit ( not applicable to CL-KVM-EXC-2021Z ) The button on the top panel of Console Unit can be used to switch mode between Local and Remote in the sequence as the diagram shown below: Local On → Remote On Local On : The LED “Local” lights up, the system controls its local computer. Remote On : The LED “Remote” lights up, the system remotely controls the Computer Unit. Push-Button on Computer Unit The button on the top panel of Computer Unit can be used to switch mode among Local, Remote, and Auto in the sequence as the diagram shown below: Auto → Local On → Remote On Auto : The LEDs “Remote” and “Local” flash alternately, the system is now waiting for the Console or Computer Unit to take control. The control priority is on the first come, first served basis. For example, once the keyboard or mouse attached to the Computer Unit is active, the LED “Local” will light up and the LED “Remote” will light off. This status indicates that the Computer Unit is now taking control of the system, and vice versa for Console Unit. In Auto mode, the duration of latch time for taking control can be preset to 5, 15, 30, or 60 seconds via hotkeys, which allows the Computer or Console Unit to resume control again via any keystroke or mouse activity if the latch time is due and the status returns to the “Auto” mode. In “Auto” mode, whenever, any activity from the keyboard, mouse buttons or mouse scroll wheel is detected, the Unit (Computer Unit or Console Unit) immediately takes control of the system. Local On : The LED “Local” lights up, the system is controlled by the Computer Unit. In this case, users at Console Unit can identify this status from the 3 LEDs (Num, Caps and Scroll Lock) flashing on the keyboard attached to the Console Unit. Remote On : The LED “Remote” lights up, the system can be remotely controlled by the Console Unit. -10- The following figure indicates the control flow in which the control through Push-Button on the top panel. ( not applicable to CL-KVM-EXC-2021Z ) Console Unit Computer Unit -11- Push-Button for Alternative Hotkey Control The KVM Extender is incapable of conducting any hotkey controls when its hotkey function is masked (Hotkey Mask Switch “ON”). No matter whether the Hotkey Mask Switch is set to ON or OFF, the alternative hotkey, Press and Hold the push-button 2 seconds followed by one keystroke, can be applied instead of the leading code [ Ctrl + Ctrl ] or [ Ctrl + Ctrl + E ] for the following settings. Alternative Hotkey Control at Computer Unit: z Latch Time Selection Select the duration of Latch Time: 5, 15, 30, or 60 seconds. [BTN](2sec.) + F3 z Privacy Setting Enable Configure the Computer Unit Video Signal [BTN](2sec.) + F6 z Mouse Resynchronization Mouse resynchronized for PS/2 model [BTN](2sec.) + F12 z Video Synchronization Synchronize video resolution between the Console Unit and Computer Unit [BTN](2sec.) + v + 4-digit code Alternative Hotkey Control at Console Unit: z Video Adjustment Video quality setting [BTN](2sec.) + F11 z Mouse Resynchronization Mouse resynchronized for PS/2 model [BTN](2sec.) + F12 z Video Synchronization Synchronize video resolution between the Console Unit and Computer Unit [BTN](2sec.) + v + 4-digit code NOTE: [BTN] (2sec.) denotes that Press and Hold push button 2 seconds. -12- ------------------ Video Adjustment (Console Unit Only) The video adjustment function is required to perform before configurations begin. Please also make sure that all the system units and devices are connected properly before the video adjustment operation begin. Users at the Console Unit can adjust the video signal compensating to various cable length through hotkey commands. The video adjustment includes: z Equalizer (Sharpness) z Gain (Brightness) z Skew (for the color green, blue, and red) To compensate the lengths of CAT 5 / CAT 5e / CAT 6 cable, there 16 levels on coarse tune and up to 128/256 scales on fine tune are available for adjustment on the equalizer and gain. And, there 8 levels on coarse tune and 16/32 scales on fine tune are available for skew adjustment on green, blue, and red. To achieve the best video signal quality and details of video adjustment, please refer to the following section “Hotkeys for Video Adjustment”. *NOTE: The video adjustment is available on the Console Unit ONLY. NOTE: The video adjustment is applicable only if the CATx cable is connected and the Console Unit is remotely taking control of Computer Unit. -13- Video Adjustment Configuration (for Console Unit Only) Users can activate video adjustment on Console Unit either through hotkeys or push button. The Unit is capable of hotkey control when the Mask Hotkey is OFF. z Video Adjustment through hotkey: Users can pre-set the hotkey to either Standard Mode or Compatibility Mode Standard Mode is defined as the state of the KVM Extender without additional connection to any KVM Switch(es). By input the hotkey command [left Ctrl + left Ctrl + Alt + E ] and then one beep should be generated as the Standard Mode confirmation. Compatibility Mode is defined as the state of the KVM Extender with connection to KVM Switch(es). By input the hotkey command [left Ctrl + left Ctrl + Alt + E ] and then two beeps should be generated as the Compatibility Mode confirmation. The Alt + E hotkey command is used for the system to distinguish between the two modes, and prevent from confusions on receiving commands. Users can switch the mode alternately by repeating this hotkey command. ( Alt + E : hold Alt down and press E key ) Video Adjustment Video Adjustment Video Adjustment Activate Video Adjustment on Standard Mode (Non-Cascade Structure) Adjust Video Quality in Non-Cascade Structure: [Press left Ctrl + left Ctrl + F11 ] Activate Video Adjustment on Compatibility Mode (Cascade Structure) Adjust Video Quality in Cascade Structure: [Press left Ctrl + left Ctrl + E + F11 ] While the Video Adjustment is activated, the LED Numeric Lock and Scroll Lock on the keyboard connected to the Console Unit will flash simultaneously at the moment. Then, users can perform the video adjustment by hotkey commands as the table shown below. Be aware, the idle time-out is 30 seconds. That is, it will automatically escape from video adjustment status if no activity is detected by the keyboard within 30 seconds. To exit the video adjustment status, three simply approaches are available: 1. No activity is detected by the keyboard for 30 seconds. 2. Push once the button Esc on the keyboard attached to the Console Unit. 3. Push once the push button on the top panel of the Console Unit -14- Console Unit Hotkey Commands Function Description Equalizer / Gain Adjustment z Equalizer (Sharpness): (Num Lock LED + Caps Lock LED) Flashing 1. Press Å or Æ to coarse tune, there are 16 levels for adjusting. E 2. Press and Hold Shift + Å or Æ z Gain (Brightness): to fine tune. (Caps Lock LED + Scroll Lock LED) Flashing 1. Press ↑ or ↓ to coarse tune, there are 16 levels for skew. 2. Press and Hold Shift + ↑ or ↓ to fine tune. Green Color Adjustment G Caps Lock LED Flashing 1. Press Å or Æ to coarse tune, there are 8 levels for adjusting. 2. Press and Hold Shift + Å or Æ to fine tune. Blue Color Adjustment B Scroll Lock LED Flashing 1. Press Å or Æ to coarse tune, there are 8 levels for adjusting. 2. Press and Hold Shift + Å or Æ to fine tune. Red Color Adjustment R Num Lock LED Flashing 1. Press Å or Æ to coarse tune, there are 8 levels for adjusting. 2. Press and Hold Shift + Å or Æ to fine tune. ESC Escape from Video Adjustment Mode. -15- z Video Adjustment through Push Button: No matter whether the Mask Hotkey Switch is set to ON or OFF, users can directly Press and Hold the push button on the top panel for two seconds instead of the leading code [ Ctrl + Ctrl ] or [ Ctrl + Ctrl + E ] for Video Adjustment activation as the follows. Activate the Video Adjustment Press & Hold push button 2 Sec. + F11 Refer to the preceding table “Video Adjustment” for further video adjustment configurations. -16- ★ Two modes are available for hotkey control. (see Hotkey Control chapter) ★★ 1. 2. 3. Mask Hotkey function enable the direct control over the KVM Switch. (see Mask Hotkey Switch chapter) Make sure to connect the Unit and devices properly before the video adjustment The video adjustment function is available on the Console Unit ONLY. An alternative hotkey to enter Video Adjustment mode is available for users, in which, users can simply press the push button on the top panel followed by input the key F11 . For more detailed information, please refer to the section “Hotkey Commands” and “Alternative Hotkey Control”. -17- -----------------Hotkey Control A hotkey command is a short key sequence to select a computer, activate computer scan, and so forth. The KVM Extender interprets keystrokes for hotkeys all the time. Throughout this user manual, the following terms are used to identify the common states during hotkey configurations: Standard Mode The state of the KVM Extender without any connections to any KVM Switch(es). Compatibility Mode The state of the KVM Extender with connection(s) to KVM Switch(es). The Command for Switching Modes Users can switch mode between Standard and Compatibility through inputting the hotkey command [left Ctrl + left Ctrl + Alt + E ], and then one beep is generated as the confirmation of Standard Mode; otherwise, two beeps is generated as the confirmation of Compatibility Mode. ( Alt + E : hold Alt down and press E key) Leading Code In Standard Mode, the hotkey command start with the leading code [left Ctrl + left Ctrl ] followed by one or two more keystrokes. In Compatibility Mode, the hotkey command start with the leading code [left Ctrl + left Ctrl + E ] followed by one or two more keystrokes. The built-in buzzer generates a high-pitched beep for correct hotkey command, otherwise, one short and one long beep are generated for a bad command, in which, the bad key command won’t be sent to the extender unit or the selected computer. Mask Hotkey Switch The hotkey commands of KVM Switches vary among models, which may cause hotkey errors, unwanted configurations between the Extender Unit and mixed types of KVM Switches that connect to each other. The Mask Hotkey extremely simplifies the hotkey control in cascade architecture; through the mask ON, users can bypass the Extender Unit and directly apply the KVM Switch built-in hotkey commands to access and configure the cascaded computer(s) / KVM Switch(es). More details about this feature can be found in the following section “Mask Hotkey Switch”. Alternative Hotkey Press and Hold push button two seconds followed by one keystroke can be applied instead of the leading code [left Ctrl + left Ctrl ] or [left Ctrl + left Ctrl + E ]. The KVM Extender is incapable of conducting any hotkey controls when its hotkey function is masked (Hotkey Mask Switch “ON”), hence this alternative hotkey is especially useful in this state. For the details of hotkey commands, please check the following sections “Hotkey Commands” and “Alternative Hotkey Control”. -18- Hotkey Commands z Prior to any hotkey command input, please enable either of two modes as the following: Standard Mode by input the hotkey command [left Ctrl + left Ctrl + Alt + E ] and then one beep should be generated as the confirmation. Compatibility Mode by input the hotkey command [left Ctrl + left Ctrl + Alt + E ] and then two beeps should be generated as the confirmation; or Users can switch the mode alternately by repeating this hotkey command. z Only the key Ctrl located on the lower-left corner of the keyboard is eligible for hotkey commands. z The hotkey command will be automatically time-out, if there is no activity detected by the keyboard within 3 seconds after the leading code input. z When the mask hotkey switch is set to “ON”, the Extender Unit masks up itself in this state, users can sit in front of the Extender and directly apply the KVM Switch built-in hotkey commands to configure the computers that attached to the KVM Switch as if the user was virtually sitting in front of the KVM Switch. Console Unit Hotkey Commands Mask Hotkey: OFF Alternative Hotkey Hotkey Mask Hotkey: ON Alternative Hotkey Function Description Hotkey Ctrl + Ctrl +Alt+E N/A N/A N/A Cascading status selection One beep: enable Standard Mode Two beeps: enable Compatibility Mode, and the user at Console Unit accessing to the KVM switch that is connecting to Computer Unit. Ctrl + Ctrl +Esc N/A N/A N/A Escape from hotkey mode Ctrl + Ctrl+ T N/A N/A N/A [Leading Code]+F2 N/A N/A N/A Mode selection in Sequence switch console control between Local Computer and Remote Computer [Leading Code]+ 1 N/A N/A N/A Local mode selection enable the user at the Console Unit accessing to the computer ( KVM Switch ) that connects to the Console Unit. N/A Remote mode selection enable the user at the Console Unit exclusive accessing to computer ( KVM Switch )that connects to the Computer Unit. (only if the Computer Unit is in Remote or Auto mode). Disable Computer Unit user accessing to the Computer Unit during this mode. [Leading Code]+ 2 [Leading Code]+F11 [Leading Code]+F12 N/A [BTN]+ N/A F11 (2 Sec.) [BTN]+F12 (2 Sec.) [ Leading Code]+ V +4 [BTN]+ V +4-digit (2 Sec.) code digit code N/A N/A N/A (2 Sec.) Video adjustment entrance More video quality setting can be found here. [BTN]+F12 Mouse resynchronized (for PS/2 model only) [BTN]+ F11 (2 Sec.) [BTN]+ V +4-digit (2 Sec.) code Follow the KVM Switch User Manual (applicable in Compatibility Mode only) -19- Video synchronization Prevent the video resolution setting from exceeding the capability of the connected display (require CPU reboot); the following options for video resolution are available for selecting: Input 4-digit code with 1007 for resolution of 1024 x 0768 1210 for resolution of 1280 x 1024 1612 for resolution of 1600 x 1200 1409 for resolution of 1440 x 0900 : : : 1910 for resolution of 1920 x 1080 1912 for resolution of 1920 x 1200 1914 for resolution of 1920 x 1440 2011 for resolution of 2048 x 1152 CPU port selection of KVM Switch NOTES 1. Standard Mode denotes the state of the KVM Extender without additional connection to any KVM switch(es), and Compatibility Mode denotes the state of the KVM Extender with connection to KVM Switch(es). 2. [Leading Code] denotes in Standard Mode, the hotkey sequence [ left Ctrl + left Ctrl ] in Compatibility Mode, the hotkey sequence [left Ctrl + left Ctrl +E 3. 4. ] [BTN] denotes Press and Hold the Push Button in the top panel for two seconds. The hotkey state will be automatically time-out, if There is no activity detected by the keyboard within 6 seconds after Press and Hold the Push Button two seconds. Press the button Esc once to escape from the hotkey mode. Press the Push Button once to escape from the hotkey mode and switch to either the Local or Remote mode. By default, the Video setting on Computer Unit will follow the Console Unit setting after reboot. The following options for video resolution are available for selecting: 4 digits 1007 1208 1210 1307 1409 1410 1609 Resolution 1024x768 1280x800 1280x1024 1360x768 1440x900 1440x1050 1600x900 4 digits 1612 1610 1910 1912 1914 2011 -20- Resolution 1600x1200 1680x1050 1920x1080 1920x1200 1920x1440 2048x1152 Computer Unit Hotkey Commands Mask Hotkey: OFF Alternative Hotkey Hotkey Mask Hotkey: ON Alternative Hotkey Function Description Hotkey Ctrl + Ctrl + Alt+E N/A N/A N/A Cascading status selection One beep: enable Standard Mode Two beeps: enable Compatibility Mode, and the users at Computer Unit accessing to the KVM switch that connects to the Computer Unit. Ctrl + Ctrl +Esc N/A N/A N/A Escape from hotkey mode Ctrl + Ctrl + T N/A N/A N/A (applicable in Standard Mode only) N/A N/A N/A Mode selection in sequence Toggle switch to select Auto , Local On , or Remote On mode. [Leading Code]+ 1 N/A N/A N/A Local mode selection enable the user at Computer Unit exclusive accessing to the PC ( KVM Switch) that connects to Computer Unit. Disables the Console Unit user accessing. N/A N/A Remote mode selection enable the user at Console Unit exclusive accessing to the PC (KVM Switch) that connects to Computer Unit. Disables the user at the Computer Unit accessing to the connected KVM Switch. N/A N/A [Leading Code]+F2 [Leading Code]+ 2 [Leading Code]+ 3 [Leading Code]+F3 [Leading Code]+F6 [Leading Code]+F12 N/A N/A [BTN]+ F3 (2 Sec.) [BTN]+ F6 (2 Sec.) [BTN]+ F12 (2 Sec.) [Leading Code]+ V +4-digit [BTN]+ V +4-digit (2 Sec.) code code N/A N/A N/A N/A [BTN]+ F3 (2 Sec.) [BTN]+ F6 (2 Sec.) [BTN]+ F12 Auto mode selection Latch time selection Auto mode latch time setting, the extender generates 1 to 4 beeps to indicate the duration of latch time: 5, 15, 30, 60 seconds respectively. Privacy setting enable enable the Computer Unit stopVideo Signal Mouse resynchronized (for PS/2 model only) (2 Sec.) [BTN]+ V +4-digit (2 Sec.) code Follow the KVM Switch User Manual (applicable in Compatibility Mode only) Video synchronization Prevent the video resolution setting from exceeding the capability of the connected display (require CPU reboot); the following options of video resolution are available for selecting: Input 4-digit code with 1007 for resolution of 1024 x 0768 1210 for resolution of 1280 x 1024 1612 for resolution of 1600 x 1200 1409 for resolution of 1440 x 0900 : : : 1910 for resolution of 1920 x 1080 1912 for resolution of 1920 x 1200 1914 for resolution of 1920 x 1440 2011 for resolution of 2048 x 1152 (see the preceding page for the complete option list) CPU port selection of KVM Switch NOTES 1. Standard Mode denotes the state of the KVM Extender without additional connection to any KVM switch(es), and Compatibility Mode denotes the state of the KVM Extender with connection to KVM Switch(es). 2. [Leading Code] denotes in Standard Mode, the hotkey sequence [left Ctrl + left Ctrl ] in Compatibility Mode, the hotkey sequence [left Ctrl + left Ctrl -21- +E ] 3. [BTN] denotes Press and Hold the Push Button on the top panel for two seconds 4. There are three ways to escape from hotkey state after Press and Hold the Push Button two seconds: There is no activity detected by the keyboard within 6 seconds. Press the button Esc once to escape from the hotkey state. Press the Push Button once to escape from the hotkey state and switch to the Auto, Local or Remote mode. 5. Privacy Setting Enable: Please identify the current mode (in either Local or Auto mode) by checking the Computer Unit LED first, then, through repeating the hotkey commands for privacy setting ( [Leading Code]+F6 ), the KVM Extender generates 1 to 3 beeps to indicate the statuses of the Computer Unit as follows: A. Computer Unit in Local mode (Remote LED: Off, Local LED: On) z One beep: Reset to Factory Default z Two or three beeps: Disable the output video signal of Computer Unit. B. Computer Unit in Auto mode (Remote / Local LED flashes alternately) z z z One beep: Reset to Factory Default Two beeps: By triggering keyboard / mouse, users can disable the output video signal of Computer Unit temporarily. (The Computer Unit users protect the privacy for 5, 15, 30, and 60 seconds. See the above table: Latch time selection for more descriptions) Three beeps: By triggering keyboard / mouse, the Console Unit or Computer Unit users can disable the output video signal temporarily. (The users protect the privacy for 5, 15, 30, and 60 seconds as well) -22- -----------------Alternative Hotkey Control No matter whether the mask hotkey switch is set to ON or OFF, users can Press and Hold the push button on the top panel for two seconds instead of the leading code [ Ctrl + Ctrl ] or [ Ctrl + Ctrl + E ] for some specific hotkey control as the follows. Configuration on Console Unit 1. To enter the Video Adjustment Mode Press & Hold push button 2 Sec. + F11 Please refer to the section “Video Adjustment” for further configurations. 2. To synchronize the video resolution between Console Unit and Computer Unit Press & Hold push button 2 Sec. + V + 4-digit code Please refer to the section “Hotkey Control” for further configurations. 3. Mouse resynchronized (for PS/2 Model only) Press & Hold push button 2 Sec. + F12 Configuration on Computer Unit 1. To set the duration of latch time Press & Hold push button 2 Sec. + F3 + F6 2. To set the privacy Press & Hold push button 2 Sec. 3. To synchronize the video resolution between Console Unit and Computer Unit Press & Hold push button 2 Sec. + V + 4-digit code Please refer to the section “Hotkey Control” for further configurations. 4. Mouse resynchronized (for PS/2 Model only) Press & Hold push button 2 Sec. + -23- F12 -----------------Cascade Configuration The KVM Extender can be connected to the console port on the KVM Switch in Cascade Configuration. However, to prevent from any conflict via hotkey commands among the connected units, the hotkey commands prefixed with Compatibility mode leading code [left Ctrl + left Ctrl + E ] can be applied for directly accessing to the KVM Extender. Even better than that, instead of adding an E key for hotkey control in compatibility mode, a shortcut through Hotkey Mask totally simplifies the cascade hotkey configuration. The highly expandable cascade architecture allows easily adding additional servers / computers. Make sure the following statuses have been set up, before connecting the KVM Switch to the Console or Computer Unit, Before the Cascade Connection 1. The external power source is required to supply enough power to the Extender Unit when connecting to the KVM Switch. Users can purchase optional power adapter from your local dealers. -24- 2. To prevent from wrong keystrokes for Hotkey control to Console Unit on KVM Extender, the parameters such as the latch time and push button control should be set up before connecting to the KVM switch. 2. Enable Compatibility Mode by inputting the hotkey command [left Ctrl + left Ctrl + Alt + E ] and then two beeps should be generated as the confirmation. In the Compatibility Mode, set the control to (Local or Remote) by inputting the hotkey [left Ctrl + left Ctrl + T ]. OR Set the Mask Hotkey Switch ON or OFF according to the cascade correlation algorithm and user preference. (If the KVM Switch is directly connected to Computer Unit, switch ON the Mask Hotkey on both Units. If the KVM Switch is directly connected Console Unit, switch ON the Mask Hotkey on Console Unit.) Connect the KVM Switch to the Console or Computer Unit after above set up completed. -25- Mask Hotkey Switch A Mask Hotkey Switch located at the rear panel of both Console Unit and Computer Unit can be slid ON/OFF to switch hotkey control between the cascaded KVM Switch / connected Computer accordingly. The factory default is set to “OFF”. Mask Hotkey Switch “ON” “OFF” In cascade architecture The Extender Unit masks up itself, as if users sit in front of the KVM Switch to directly configure the computers attached to the KVM Switch by applying the KVM Switch built-in hotkey commands. The Extender Unit is mask off, users can configure the computer attached to the KVM Switch by applying the KVM Extender built-in hotkey command prefixed with the cascade leading code [ left Ctrl + left Ctrl + E ]. In non-cascade architecture The Extender Unit hotkey function is disabled. Users can configure the computer attached to the Extender Unit by applying the KVM Extender built-in hotkey command prefixed with the non-cascade leading code [ left Ctrl + left Ctrl ]. Example of Mask Hotkey set to “ON” in cascade architecture An IT administrator is sitting in front of the Console Unit, he pre-set the Console Unit to remote mode for accessing to the KVM Switch that is attached to Computer Unit, then slide “ON” the Mask Hotkey Switch on the Console Unit, after that, he can on use the Console Unit directly configuring the computer that is attached to the KVM Switch. Please also refer to the section “Hotkey Commands” for more information. OFF Hotkey Mask Off ON Hotkey Mask Up Make your hotkey controls more efficiently in the cascade structure, it is suggested that users to disable the Hotkey function of all of the cascaded Console and Computer Unit(s) by sliding the Hotkey Mask switch to “ON”. Only the cascaded KVM Switch are capable of the hotkey function after this setting and users can directly perform the KVM Switch built-in hotkey commands accessing to the cascaded KVM Switch(es) / computers as needed. LED: Remote on Mask Hotkey: on -26- -----------------Appendices Cable Requirements The cable Category 5 (CAT5) terminated with RJ45 connectors is normally used for the interconnection between Computer Unit and Console Unit. It’s easy to get from the local stores or call your dealers for help. Besides, CAT5e or CAT6 are applicable to the KVM Extender. This CAT5 cable is not provided in the standard package mainly because the cable length you required is subject to the deploying environment. However, the better the CATX cable quality, the longer the video extension, and the shorter the cable length, the higher the video resolution. CAT5 Cable The KVM Extender extends the remote access by using a piece of unshielded twisted pair (UTP) cable. The cable must be wired in compliance with the EIA/TIA 568B industry standard Note: CAT5, CAT5e or CAT6 cables are applicable to the KVM Extender pair. Above diagram shows the RJ45 connector of a CAT5 cable with its metal contacts facing up. -27- Troubleshooting If you encounter problems with the KVM Extender during the installation or operations, please check through this section for a possible solution. If your problem is not listed here and you can not resolve the issue, please contact your local dealer for the fastest assistances. Symptom No video signal Poor video quality Keyboard hotkeys are inoperable when the KVM Extender connects with the KVM Switch Computer units are inoperable Problems continue to occur checking the solutions above after Action ♦ Verify that all the cables are qualified according to the hardware requirement section. ♦ Verify that all the cables are properly connected to their ports and are firmly seated. ♦ Use an alternative CATx cable connection between the unit of console and computer. ♦ Power down the computer. Connect the monitor directly to the computer and power up again. If the monitor does not operate correctly direct to the computer, try another monitor. ♦ Use the EIA / TIA 568B industry standard CATx cable for KVM Extender connection. ♦ Unplug the CATx cable(s) from the Extender, then plug it / them back in. ♦ Perform the video quality adjustment for the length of CATx being used. ♦ Apply compatibility mode hotkey commands. ♦ Verify if the Extender has enough power. ♦ Verify if the units have enough power. If the power is insufficient for the needs, purchase a power adapter from your local dealers. ♦ Remove and reinstall each device, checking the connectors and sockets for bent pins or other damage. -28- -----------------Specifications USB + PS/2 Model CL-KVM-EXC-3022Z Maximum Video Resolution UXGA(1600 x 1200) / WUXGA(1920 x 1200) / QWXGA(2048 x 1152) / 1920 x 1440 Extension Distance 300M Connection Console Connectors Console Unit Computer Connectors LED Indicators Console Connectors Computer Unit Computer Connectors 200M CAT5-RJ45 female USB-A female HDB15 female HDB15 female Local 2 1 1 N/A On: Controls local computer N/A Remote USB-A female HDB15 female HDB15 female Local On: Controls system remotely 2 1 1 On: Controls local computer LED Indicators Remote Flash Alternately Equalizer Tune* (Sharpness) Video Adjustment CL-KVM-EXC-2021Z On: System is controlled remotely Auto mode 16 Levels (4-16 Scales) Gain Tune* (Brightness) Skew Red** Green** Blue** 8 Level (2-8 Scales) Push Button Hotkey Power Supply (Min) Weight (per pair) Dimensions (W x D x H) (per pair) Control Status Switch Yes External power adapter DC9V, 600mA 293g x 2 156 x 65 x 20(mm) x 2 * Each level contains 4~16 scales of fine tune that may differ from model to model ** Each level contains 2~8 scales of fine tune that may differ from model to model -29- Limited Warranty IN NO EVENT SHALL THE DIRECT VENDOR'S LIABILITY FOR DIRECT OR INDIRECT, SPECIAL, INCIDENTIAL OR CONSEQUENTIAL DAMAGES, LOSS OF PROFIT, LOSS OF BUSINESS, OR FINANCIAL LOSS WHICH MAY BE CAUSED BY THE USE OF THE PRODUCT EXCEEDS THE PRICE PAID FOR THE PRODUCT. The direct vendor makes no warranty or representation, expressed or implied with respect to the contents or use of this documentation, and especially disclaims its quality, performance, merchantability, or fitness for any particular purpose. The direct vendor also reserves the right to revise or update the product or documentation without obligation to notify any user of such revisions or updates. For further information, please contact your direct vendor. All the brand names and registered trademarks are the property of their respective owners. -30- Console Unit Hotkey Control Console Unit Hotkey Commands Mask Hotkey: OFF Alternative Hotkey Hotkey Mask Hotkey: ON Alternative Hotkey Function Description Hotkey Ctrl + Ctrl +Alt+E N/A N/A N/A Cascading status selection One beep: enable Standard Mode Two beeps: enable Compatibility Mode, and the user at Console Unit accessing to the KVM switch that is connecting to Computer Unit. [Leading Code]+Esc N/A N/A N/A Escape from hotkey mode [Leading Code]+ T N/A N/A N/A [Leading Code]+F2 N/A N/A N/A Mode selection in Sequence switch console control between Local Computer and Remote Computer [Leading Code]+ 1 N/A N/A N/A Local mode selection enable the user at the Console Unit accessing to the computer ( KVM Switch ) that connects to the Console Unit. N/A Remote mode selection enable the user at the Console Unit exclusive accessing to computer ( KVM Switch )that connects to the Computer Unit. (only if the Computer Unit is in Remote or Auto mode). Disable Computer Unit user accessing to the Computer Unit during this mode. [Leading Code]+ 2 [Leading Code]+F11 [Leading Code]+F12 N/A [BTN]+ N/A F11 (2 Sec.) [BTN]+F12 (2 Sec.) V +4-digit [Leading Code]+ V +4- [BTN]+ (2 Sec.) code digit code N/A N/A N/A (2 Sec.) Video adjustment entrance More video quality setting can be found here. [BTN]+F12 Mouse resynchronized (for PS/2 model only) [BTN]+ F11 (2 Sec.) [BTN]+ V +4-digit (2 Sec.) code Video synchronization Prevent the video resolution setting from exceeding the capability of the connected display (require CPU reboot); the following options for video resolution are available for selecting: Input 4-digit code with 1007 for resolution of 1024 x 0768 1210 for resolution of 1280 x 1024 1612 for resolution of 1600 x 1200 1409 for resolution of 1440 x 0900 : 1910 for resolution of 1920 x 1080 1912 for resolution of 1920 x 1200 1914 for resolution of 1920 x 1440 2011 for resolution of 2048 x 1152 CPU port selection of KVM Switch Follow the KVM Switch User Manual (applicable in Compatibility Mode only) NOTES 1. Standard Mode denotes the state of the KVM Extender without additional connection to any KVM switch(es), and Compatibility Mode denotes the state of the KVM Extender with connection to KVM Switch(es). 2. [Leading Code] denotes: in Standard Mode, the hotkey sequence [ left Ctrl + left Ctrl ] in Compatibility Mode, the hotkey sequence [left Ctrl + left Ctrl + E ] 3. [BTN] denotes Press and Hold the Push Button in the top panel for two seconds. 4. The hotkey state will be automatically time-out, if There is no activity detected by the keyboard within 6 seconds after Press and Hold the Push Button two seconds. Press the button Esc once to escape from the hotkey mode. Press the Push Button once to escape from the hotkey mode and switch to either the Local or Remote mode. 5. By default, the Video Synchronization setting between the Console Unit and Computer Unit will follow the Console Unit setting after reboot. The following options for video resolution are available for selecting: Input 4-digit code with 1007 for resolution of 1024 x 0768 1210 for resolution of 1280 x 1024 1612 for resolution of 1600 x 1200 1914 for resolution of 1920 x 1440 1307 for resolution of 1360 x 0768 1409 for resolution of 1440 x 0900 1410 for resolution of 1440 x 1050 1610 for resolution of 1680 x 1050 1910 for resolution of 1920 x 1080 1912 for resolution of 1920 x 1200 1208 for resolution of 1280 x 0800 1609 for resolution of 1600 x 0900 2011 for resolution of 2048 x 1152 -31- Video Adjustment (for Console Unit Only) To enter the Video Adjustment Mode in Non-Cascade (Standard) Structure: [Press left Ctrl + left Ctrl + F11 ] To enter the Video Adjustment Mode in Cascade (Compatibility) Structure: [Press left Ctrl + left Ctrl + E + F11 ] While entering this mode, the LED Number Lock and Scroll Lock are flashing simultaneously at the moment. Then, users can perform the video adjustment by hotkey commands as the table shown below. Be aware, the idle time-out is 30 seconds. That is, it will automatically escape from video adjustment mode if no action is detected by the keyboard within 30 seconds. To exit the video adjustment mode, three simplified approaches are available: 1. No action is detected by the keyboard for 30 seconds. 2. Push once the escape button Esc on the keyboard attached to the Console Unit. 3. Push once the push button on the top panel of the Console Unit Console Unit Hotkey Commands Function Description Equalizer / Gain Adjustment z Equalizer (Sharpness): (Num Lock LED + Caps Lock LED) Flashing E 1. Press Å or Æ to coarse tune, there are 16 levels for adjusting. 2. Press and Hold Shift + Å or Æ to fine tune. z Gain (Brightness): (Caps Lock LED + Scroll Lock LED) Flashing 1. Press ↑ or ↓ to coarse tune, there are 16 levels for skew. 2. Press and Hold Shift + ↑ or ↓ to fine tune. Green Color Adjustment G Caps Lock LED Flashing 1. Press Å or Æ to coarse tune, there are 8 levels for adjusting. 2. Press and Hold Shift + Å or Æ to fine tune. Blue Color Adjustment B Scroll Lock LED Flashing 1. Press Å or Æ to coarse tune, there are 8 levels for adjusting. 2. Press and Hold Shift + Å or Æ to fine tune. Red Color Adjustment R ESC 1. 2. 3. Num Lock LED Flashing 1. Press Å or Æ to coarse tune, there are 8 levels for adjusting. 2. Press and Hold Shift + Å or Æ to fine tune. Escape from Video Adjustment Mode. NOTES Make sure to connect the unit and devices properly before the video adjustment The video adjustment function is available on the Console Unit ONLY. An alternative hotkey approach to enter Video Adjustment mode is available for users to choose as desire, in which, users can simply press the top panel push button followed by input the key F11 . For more detailed information, please refer to the section “Hotkey Commands” and “Alternative Hotkey Control”. -32- Computer Unit Hotkey Control Computer Unit Hotkey Commands Mask Hotkey: OFF Alternative Hotkey Hotkey Mask Hotkey: ON Alternative Hotkey Function Description Hotkey Ctrl + Ctrl + Alt+E N/A N/A N/A Cascading status selection One beep: enable Standard Mode Two beeps: enable Compatibility Mode, and the users at Computer Unit accessing to the KVM switch that connects to the Computer Unit. [Leading Code]+Esc N/A N/A N/A Escape from hotkey mode [Leading Code]+ Ti N/A N/A N/A (applicable in Standard Mode only) N/A N/A N/A Mode selection in sequence Toggle switch to select Auto , Local On , or Remote On mode. [Leading Code]+ 1 N/A N/A N/A Local mode selection enable the user at Computer Unit exclusive accessing to the PC ( KVM Switch) that connects to Computer Unit. Disables the Console Unit user accessing. N/A N/A Remote mode selection enable the user at Console Unit exclusive accessing to the PC (KVM Switch) that connects to Computer Unit. Disables the user at the Computer Unit accessing to the connected KVM Switch. N/A N/A [Leading Code]+F2 [Leading Code]+ 2 [Leading Code]+ 3 [Leading Code]+F3 [Leading Code]+F6 [Leading Code]+F12 N/A N/A [BTN]+ F3 (2 Sec.) [BTN]+ F6 (2 Sec.) [BTN]+ F12 (2 Sec.) [Leading Code]+ V +4-digit [BTN]+ V +4-digit (2 Sec.) code code N/A N/A N/A N/A [BTN]+ F3 (2 Sec.) [BTN]+ F6 (2 Sec.) [BTN]+ F12 2. 3. 4. Privacy setting enable * enable the Computer Unit stopVideo Signal Mouse resynchronized (for PS/2 model only) (2 Sec.) [BTN]+ V +4-digit (2 Sec.) code Follow the KVM Switch User Manual (applicable in Compatibility Mode only) 1. Auto mode selection Latch time selection Auto mode latch time setting, the extender generates 1 to 4 beeps to indicate the duration of latch time: 5, 15, 30, 60 seconds respectively. Video synchronization Prevent the video resolution setting from exceeding the capability of the connected display (require CPU reboot); the following options of video resolution are available for selecting: Input 4-digit code with 1007 for resolution of 1024 x 0768 1210 for resolution of 1280 x 1024 1612 for resolution of 1600 x 1200 1409 for resolution of 1440 x 0900 : 1910 for resolution of 1920 x 1080 1912 for resolution of 1920 x 1200 1914 for resolution of 1920 x 1440 2011 for resolution of 2048 x 1152 (see the preceding page for the complete option list) CPU port selection of KVM Switch NOTES Standard Mode denotes the state of the KVM Extender without additional connection to any KVM switch(es), and Compatibility Mode denotes the state of the KVM Extender with connection to KVM Switch(es). [Leading Code] denotes in Standard Mode, the hotkey sequence [left Ctrl + left Ctrl ] in Compatibility Mode, the hotkey sequence [left Ctrl + left Ctrl + E ] [BTN] denotes Press and Hold the Push Button on the top panel for two seconds After Press and Hold the Push Button two seconds, the hotkey state will be automatically time-out, if There is no activity detected by the keyboard within 6 seconds. Press the button Esc once to escape from the hotkey state. Press the Push Button once to escape from the hotkey state and switch to the Auto, Local or Remote mode. -33-