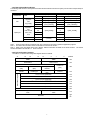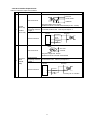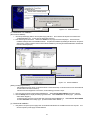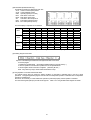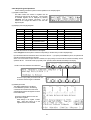
1
PCI Bus CPD Board Series
HPCI-CPD578
User’s Manual
Individual Board Information
Multifunctional High-speed NC Boards with
Circular Interpolation, Linear Interpolation, and Positioning
Hivertec Inc.
http://www. hivertec. co. jp/
This manual applies to the following Boards in the CPD Series.
CPD570 Series: PCI Bus
HPCI-CPD578
It is prohibited to reprint or copy all or any part of this manual or programs without prior written permission.
The contents of this manual are subject to change without notice to enable improvements to be made.
Please notify your sale representative for this product if you find any problems with the contents of this manual.
Windows 95, Windows 98, Windows NT 4.0, Windows 2000, WindowsXP, Visual C++, Visual Basic,
and Microsoft C/C++ are registered trademarks of the Microsoft Corporation in the USA and other countries.
Other company and product names are the trademarks or registered trademarks of the respective companies.
Hivertec Inc.
4-8-1 Sumida-Ku Ryogoku,
130-0026 Tokyo Japan
TEL. +81-3-3846-3801
FAX. +81-3-3846-3773
e-mail. [email protected]
Revision 3.2e
I
04/04/22 released
Copyright Hivertec Inc.
Extent of Warranty
1. The product warranty is valid for a period of one year from the date of purchase. If a defect is acknowledged
by Hivertec within the period of warranty, Hivertec will repair or replace the product upon return of the product to Hivertec.
2. Hivertec is not responsible beyond the purchase price of the product for any damages or loss of profit, direct, indirect,
or secondary, caused by application, delivery, or failure of a Hivertec product either within or outside of the period of
warranty.
Limitations to Liability
1. Hivertec is not responsible for any damages resulting from product installation, connections, settings, or operation
that do not follow the contents of this manual.
2. This product uses semiconductor devices manufactured for general electronics equipment, such as machine tools,
instrumentation, FA devices, OA devices, and communications equipment. They are not designed, conceived,
approved for, or warranted for application in devices for which faulty operation or failure will have a direct affect on human
life or result in personal injury or damage to property. The safety, quality, and performance of the product are not
guaranteed explicitly or implicitly beyond those given in this manual or related catalogs.
3. Hivertec is not responsible for any damages resulting from modifications or repairs made to the product without the
approval of Hivertec either within or outside of the period of warranty.
4. The contents of this manual do not guarantee or grant rights to patents, copyright, trademark rights, or any other
rights to the intellectual property of Hivertec or any third party. Hivertec is not responsible for any problems that may
occur concerning the rights to intellectual property of third parties resulting from the application of information provided in
this manual.
II
Important Safety Instructions
Thank you for choosing a Hivertec NC Board. This manual contains information that is important for the safe
and reliable operation of the NC Board. Read this section and understand the information contained before
attempting to use the NC Board.
Furthermore, save this manual and store it in an easily accessible location near the installed NC Board, so that
it can be referenced when necessary.
Safety Precautions
Always read this manual and any attached documents completely before attempting to use the product.
Be sure that you understand the information provided and are using the product correctly.
Do not use the product before having a complete understand of the product, product safety information,
and precautions.
In this manual, safety precautions are classified as either Warnings or Cautions..
Indicates a potentially hazardous situation which, if not avoided, could result in death or
Warning serious injury.
Indicates a potentially hazardous situation which, if not avoided, may result in minor or
Caution moderate injury, or property damage. .
1. Authorized For
Caution
The product and this manual are designed for those with the following knowledge.
・A basic knowledge of installing and wiring expansion boards.
・A basic knowledge of electronic control devices and personal computers.
2. Applicable Bus
Warning
The boards (products) described in this manual are applicable to PCI Local Bus
Specification Rev.2. 1 (+5 V specifications). Do not use them in any environment
where this bus is not operating.
III
3. Environmental Conditions
Warning
Store and use the board only under the following environmental conditions.
•
•
•
•
•
•
Ambient operating temperature
0 to 50 °C
20% to 85% (with no condensation)
Ambient operating humidity:
Ambient storage temperature:
-15 to 75 °C
Ambient storage humidity:
10% to 90% (with no condensation)
Atmosphere:
No corrosive gas, inflammable gas, oil mist, or dust
3,000 m above sea level max.
Altitude:
(Lower upper level of temperature ranges by 2 °C for every 300 m. )
4. Transportation and Installation
Warning
Touch a metal object to discharge static electricity from your body before touching the
board. Static electricity may cause board failure.
Do not wrap the board in any wrapping material that easily carries a static charge,
such as bubble wrap. Static electricity may cause board failure.
Do not touch the edge connector on the board. Contamination on the edge connector
may cause operating errors.
Do not place any heavy object on the board. Heavy object may damage components
on the boards, possibly causing board failure.
Set the jumpers on the board before mounting it to the computer. If the jumpers are
set with the power supply turned ON, the settings may not be recognized correctly
possibly causing operating errors.
Set the board jumpers correctly. Incorrect settings may cause operating errors.
Always turn OFF the power supply to the computer and disconnect the power supply
cable before installing the board. Installing the board without removing the power
supply cable may cause board failure. Furthermore, the device may exhibit
unexpected operation.
When installing the board in the computer, be sure the board is straight to the connector
in the computer and press in the board so that the gold-plated edge connector is deeply
inserted into the PCI connector. If the board is inserted at an angle or not inserted
deeply enough, poor contact may cause operating error or board failure.
When installing the board in the computer, use mounting brackets and mounting
screws to secure it firmly. Improper securing of the board may cause operating errors.
IV
Caution
Do not drop the board or handle it roughly. Vibration or shock may cause board
failure.
Do not touch the solder surface of the board with your hands. Sharp points on the
components may cause injury.
5. Wiring
Warning
Always turn OFF the power supply to the computer and disconnect the power supply
cable before wiring connectors to exterior lines or before connecting or disconnecting
such connectors. Performing this work without removing the power supply cable may
cause board failure. Furthermore, the device may exhibit unexpected operation.
When wiring connectors to exterior lines, check connector signal tables carefully and
wire all lines correctly. Incorrect wiring may cause board failure or burning.
Always keep external power supply within ratings. Using a power supply that is not
within ratings may cause board failure, burning, or operating errors.
Always keep circuits connected to the I/O circuits within the rated currents and voltages.
Using circuits that are not within ratings may cause board failure, burning, or
operating errors.
Use the recommended connectors for external lines. Using any other connector may
cause operating errors because of faulty contact.
Always lock connectors for external lines. A connector that is not locked may come
loose, possibly causing operating errors because of faulty contact.
Do not pull on or place heavy objects on cables for external wiring. The connector
may come loose and faulty contact may cause operating errors.
Separate cables for external wiring as far as possible from AC power cables, motor
cables, or other cables that generate excessive noise. Noise may cause operating
errors.
6. Trial Operation and Adjustment
Warning
Always debug the program completely before using the board to drive a device. Any
error in the program may cause unexpected operation.
When using sample programs provided with the product to operate a device, always
start at low speed and be sure that settings match the mechanical system before
attempting operation. Operating with settings that do not match the mechanical system
may result in unexpected operation.
V
7. Disposal
Warning
Abide by all applicable laws and ordinances when disposing of a board.
VI
Manual Configuration
The following manuals are provided with CPD-series Boards.
1. User's Manual: Individual Board Information (this manual)
This manual provides the following information for individual CPD Boards.
(1) Hardware information
(2) Installation procedures for accessory software
(3) Operating procedures for sample software
(4) Operating procedures for the Trial Tour
(5) Other specific information for individual Board
2. CPD Board Series User's Manual: Software
This manual describes the following software information for the CPD Board Series.
(1) Library functions (library function level 1: VC++, VB, and DOS)
(2) Driver functions (device driver interface library: VC++, VB, and DOS)
3. CPD Board Series User's Manual: Common Information
This manual provides information common to all of the CPD Board Series in tutorial style.
(1) Basic operating methods for CPD Boards (including samples using library functions)
(2) Descriptions of CPD Board applications (samples of using library functions as reference required for a broader
range of application)
(3) Descriptions of registers based on the PCL6045
(4) Other information
Contents
1. Introduction ............................................................................................................................ 1
1.1 About This Manual .....................................................................................................................................................................1
1.2 Provided Software......................................................................................................................................................................1
1.3 Axis Names ................................................................................................................................................................................1
2. Accessories (Sold Separately) .............................................................................................. 2
3. Hardware ............................................................................................................................... 3
3.1 Block diagram ............................................................................................................................................................................3
3.2 Port Addresses...........................................................................................................................................................................4
3.2.1 Board Addresses.................................................................................................................................................................4
3.2.2 Option Ports.........................................................................................................................................................................5
3.2.3 Board I/O and Device Drivers ............................................................................................................................................7
3.2.4 PCI configuration registers.................................................................................................................................................7
3.3 Board Settings............................................................................................................................................................................8
3.3.1 CPD578 Board ...................................................................................................................................................................8
3.4 Servo and Machine Interfaces................................................................................................................................................10
3.4.1 Command Pulse Output and Driver Connections..........................................................................................................10
3.4.2 Axis Sensor and Servo Interface Input Circuits .............................................................................................................. 11
3.4.3 Encoder Input Circuits ......................................................................................................................................................12
3.4.4 Servo Interface Output Circuits........................................................................................................................................13
3.4.5 Simultaneous Start/Stop and Match Signal Output ........................................................................................................14
3.5 Connector PIN out ...................................................................................................................................................................15
3.5.1 CPD578 connector PIN out..............................................................................................................................................15
3.6 HPCI-CPD578 Specification ...................................................................................................................................................17
4. Functions..............................................................................................................................18
4.1 Combining Operations Between Axes ...................................................................................................................................18
4.1.1 CPD578 Axis Operation Combinations...........................................................................................................................18
4.2 Interrupt Mechanisms..............................................................................................................................................................19
5. Software Startup Guide .......................................................................................................20
5.1 Overview...................................................................................................................................................................................20
5.2 Software Configuration............................................................................................................................................................20
5.3 Installing and Uninstalling the Device Drivers ........................................................................................................................22
5.3.1 Installing/Uninstalling Device Drivers in a Windows Systems........................................................................................22
5.3.2 Installing/Uninstalling Device Drivers in a DOS System.................................................................................................26
5.4 Using Two or More CPD Boards ............................................................................................................................................27
5.5 Accessing the Board................................................................................................................................................................28
5.5.1 Data Structure for Board (Device) Recognition...............................................................................................................28
5.5.2 Board Access Preparatory Procedure and End Processing..........................................................................................28
5.5.3 Verifying Each Axis is Ready for Operation.....................................................................................................................30
5.6 Sample Programs for Windows Systems..............................................................................................................................31
5.6.1 Executing the Sample Program.......................................................................................................................................31
5.6.2 Sample Program Operations ...........................................................................................................................................32
5.7 ”Let’s try to move” Program for Windows Systems ...............................................................................................................37
5.7.1 ”Let’s try to move” Operation Window .............................................................................................................................38
5.7.2 ”Let’s try to move” Settings Window ................................................................................................................................40
5.8 Sample Programs for a DOS System....................................................................................................................................41
5.8.1 Configuration of the Sample Program.............................................................................................................................41
5.8.2 Starting the Sample Program...........................................................................................................................................41
5.8.3 Sample Program Operations ...........................................................................................................................................44
Contents of Tables and Figures
1. Introduction ............................................................................................................................ 1
2. Accessories (Sold Separately) .............................................................................................. 2
Table 2-1 Accessories (Connector Boards and Cables) ..........................................................................................................2
Figure2-1 Accessories(ConnectorBoard and Cables)................................................................................................................2
3. Hardware ............................................................................................................................... 3
Figure 3. 1-1
Table 3. 2-1
Table 3. 2-2
Table 3. 2-3
Figure 3. 3-1
Table 3. 3-1
Figure 3. 3-2
Figure 3. 3-3
Figure 3. 3-4
Table 3. 4-1
Table 3. 4-2
Table 3. 4-3
Table 3. 4-4
Table 3. 4-5
Figure 3. 5-1
Table 3. 5-1
Table 3. 5-2
Table 3. 5-3
Table 3. 6-1
BLOCK DIAGRAM of CPD578 .............................................................................................................................3
Board Addresses ....................................................................................................................................................4
Board I/O and Driver Functions .............................................................................................................................7
PCI configuration register.......................................................................................................................................7
Jumper Pin Locations on the CPD578 Board.......................................................................................................8
Board ID Setting......................................................................................................................................................8
Termination setting of encoder A-phase and B-phase .........................................................................................8
Encoder Z-phase input selection ...........................................................................................................................8
“E101” jumper for setting of ‘emergency stop’....................................................................................................9
Command Pulse Output Circuits.........................................................................................................................10
Axis Sensor and Servo Interface Input Circuits .................................................................................................. 11
Encoder Input Circuit ............................................................................................................................................12
Servo Interface Output Circuits............................................................................................................................13
J1 – J3:Match signal and J3:Simultance Start/Stop Output Circuits .................................................................14
Front panel.............................................................................................................................................................15
CPD578 J1 CONNECTOR PIN OUT (Xaxis - Uaxis) .......................................................................................15
CPD578 J2 CONNECTOR PIN OUT (Vaxis - Baxis)........................................................................................16
CPD578 J3 CONNECTOR PIN OUT.................................................................................................................16
HPCI-CPD578 Specifications ..............................................................................................................................17
4. Functions..............................................................................................................................18
Table 4. 1-1 CPD578 Axis Operation Combinations...............................................................................................................18
Figure 4. 2-1 Route of Interrupts in the CPD578 Board ...........................................................................................................19
5. Software Startup Guide .......................................................................................................20
Figure 5. 2-1
Figure 5. 3-1
Figure 5. 3-2
Figure 5. 3-3
Figure 5. 3-4
Figure 5. 3-5
Figure 5. 4-1
Figure 5. 6-1
Figure 5. 6-2
Figure 5. 7-1
Figure 5. 7-2
Figure 5. 7-3
Figure 5. 8-1
Software Configurations .......................................................................................................................................21
WinXP Installations ...............................................................................................................................................22
Win2K Installations................................................................................................................................................24
WinNT Installations ...............................................................................................................................................24
Win98 Installations................................................................................................................................................25
Uninstalling the Device Drivers ............................................................................................................................26
Using Multiple Boards...........................................................................................................................................27
Sample Program Error Messages.......................................................................................................................31
The Sample Program’s Select Operation Menu.................................................................................................32
Let’s try to move Error Messages ........................................................................................................................37
Let’s try to move Operation Confirmation Window.............................................................................................38
Let’s try to move Settings Window.......................................................................................................................40
Startup Screens for the DOS Version of the Sample Program..........................................................................42
1. Introduction
This user's manual provides information for the HPCI-CPD578 CPD Board that provides 8-axis interpolation and positioning.
This board is in the CPD570-series PCI-bus Motion Control Boards.
Use this manual together with the CPD Board Series User's Manual: Common Information, which contains information common
to all of the Boards in the CPD Board Series.
In the remainder of this manual, the HPCI-CPD578 is referred to as the CPD578.
And the PCL6045 series are referred to as the PCL.
1.1 About This Manual
This manual provides the following information.
■ Software Startup Guide (for Windows and DOS)
1) Installation of the provided software
2) Explanation of the sample programs
3) Testing operation “Trial Tour”
■ Hardware Information
1) Port address
2) Board settings
3) Connector allocation
4) Servomotor interface and stepping-motor interface
5) Machine interface
■ Information on Functions Specific to the CPD578.
1) Axis combinations
2) Interrupts
1.2 Provided Software
The following software is provided with this Board. Refer to this software when reading this manual to facilitate understanding.
Device Drivers for Windows
Library Functions for Windows (Level 1)
Windows Sample Programs
“Trial Tour” for Windows
Device Drivers for DOS
There are three kinds for Windows 98, Windows NT, and Windows 2000
Provides functions necessary for basic operations.
Refer to the CPD Board Series User’s Manual: Software Information for
descriptions of the functions.
Sample software showing usage of library functions.
Enables minimal operations by simply connecting Board to computer.
Can also be used to check connections.
Request these drivers when required.
Note : In the remainder of this manual, both Windows XP Home Edition and Windows XP Professional are referred to
as Windows XP.
1.3 Axis Names
When using the 8-axis CPD578, the four axes are known as the X, Y, Z, U and V, W, A, B, axes.
1
2. Accessories (Sold Separately)
The following Connector Boards and Cables are available as accessories to simplify connections between the CPD Board and
the motor driver or machine sensors.
■ Connector Boards: The ACB-HU1004/* Boards allow each axis to be connected to motor drivers and sensors very easily
through an MIL header connector.
The ACB-DX100/* Boards connect through a terminal block. These are ideal for testing.
■ Cables:
CPD Board
HPCI-CPD578
There are two kinds of Cable available: the HCL-051W Connector Board Cable (standard length 2 m,
other lengths available by special-order) and the HCL-051 Cable (laminated).
Compatible
Cable
Pins
HCL-051W
Connector Board
Connector
style
ACB-HU1004/
*
Terminal-block
style
ACB-DX100/*
100
Table 2-1
Remarks
The asterisk at the end of
the model number
represents one of the
following codes:
DR: Right-angle connector
DS: Straight connector
DS(D): Half-pitch DIN
Track-mounting connector
Accessories (Connector Boards and Cables)
+
-
Servomotor or stepping motor
Encoder
+ELS
DLS OLS -ELS
Driver
CPD578
Board
CABLE
HCL-051W
Connector board
ACB-HU1004/*
XCWP
XCWN
XCCWP
XCCWN
XZP
XZN
XAP
XAN
XBP
XBN
GND
+24V
XSVON
CMDpulse CW
CMD
pulse
CCW
Phase Z
Phase A
Phase B
GND
Servo ON
XSVCTR
CL
Servo reset
Error counter
clear
XSVALM
Servo alarm
Terminal Block
style
Connector board
ACB-DX100/*
XINPOS
Figure2-1 Accessories(ConnectorBoard and Cables)
2
13
H041V1
XSVRST
3. Hardware
3.1 Block diagram
CW/CCW
#1
PCL
XINT
Y
YINT
ZINT
PCILOCAL
Bus
I/F
FILTER
&
BUFFER
X
PHOTO
ISOLTOR
・
・
・
・
・
・
・
Z
CW/CCW
U
UINT
BUFFER
FILTER
&
BUFFER
PCI
Bus
(X,Y,Z,U)
PHOTO
ISOLTOR
PCL
BUFFER
PHOTO
ISOLTOR
(X,Y,Z,U)
CW/CCW
#2
PCL
VINT
AINT
A
B
PHOTO
ISOLTOR
PCL
BUFFER
PHOTO
ISOLTOR
OPTION
PORT
SVON (V,W,A,B)
SVRST (V,W,A,B)
SVCTRCL(V,W,A,B)
DRIVER
CMP(X-B)
J
3
Note:<xDLS/xPCS> is selected by the OPTION port.
Figure 3. 1-1 BLOCK DIAGRAM of CPD578
3
SVON (X,Y,Z,U)
SVRST (X,Y,Z,U)
SVCTRCL(X,Y,Z,U)
SVALM(V,W,A,B)
INPOS(V,W,A,B)
open-collector
8
SVALM(X,Y,Z,U)
INPOS(X,Y,Z,U)
COMMAND PULSE
BCWP ,BCWN
BCCWP,BCCWN
LIMIT SENSOR
+/-BELS
<BDLS/BPCS>
BOLS
ENCODER
BZ,BA,BB
PHOTO
ISOLTOR
(V,W,A,B)
COMMAND PULSE
UCWP ,UCWN
CWP,UCCWN
LIMIT SENSOR
+/-UELS
<UDLS/UPCS>
UOLS
ENCODER
UZ,UA,UB
COMMAND PULSE
VCWP ,VCWN
VCCWP,VCCWN
LIMIT SENSOR
+/-VELS
<VDLS/VPCS>
VOLS
ENCODER
VZ,VA,VB
BUFFER
FILTER
&
BUFFER
(V,W,A,B)
DRIVER
PHOTO
ISOLTOR
FILTER
&
BUFFER
PCL
J
2
・
・
・
・
・
・
・
W
CW/CCW
BINT
J
1
BUFFER
FILTER
&
BUFFER
V
WINT
PHOTO
ISOLTOR
FILTER
&
BUFFER
PCL
COMMAND PULSE
XCWP ,XCWN
CCWP,XCCWN
LIMIT SENSOR
+/-XELS
<XDLS/XPCS>
XOLS
ENCODER
XZ,XA,XB
BUFFER
CMP(X-B)
STA,STP
3.2 Port Addresses
3.2.1 Board Addresses
I/O maps are used for all ports. Table 3. 2-1 shows the ports.
Knowledge of the following table is not required to use the provided software library (level 1) functions.
The following table is required when using the provided software driver functions.
Classification
PCL
X-axis
(Axis 1)
PCL
Y-axis
(Axis 2)
PCL
Z-axis
(Axis 3)
PCL
U-axis
(Axis 4)
PCL
V-axis
(Axis 5)
PCL
W-axis
(Axis 6)
PCL
A-axis
(Axis 7)
PCL
B-axis
(Axis 8)
Option
ports
I/O
Read (INP)
Content
Name
Write (OUT)
Content
Add.
Name
+0
MSTS
Main status
CMD
Command
+2
+4
SSTS
BUF0
Sub-status
I/O buffer IN (15 to 0)
OTP
BUF0
Not used (reserved)
I/O buffer OUT (15 to 0)
+6
BUF1
I/O buffer IN (31 to 16)
BUF1
I/O buffer OUT (31 to 16)
+8
MSTS
Main status
CMD
Command
+a
SSTS
Sub-status
OTP
Not used (reserved)
+c
BUF0
I/O buffer IN (15 to 0)
BUF0
I/O buffer OUT (15 to 0)
+e
BUF1
I/O buffer IN (31 to 16)
BUF1
I/O buffer OUT (31 to 16)
+10
MSTS
Main status
CMD
Command
+12
SSTS
Sub-status
OTP
Not used (reserved)
+14
BUF0
I/O buffer IN (15 to 0)
BUF0
I/O buffer OUT (15 to 0)
+16
BUF1
I/O buffer IN (31 to 16)
BUF1
I/O buffer OUT (31 to 16)
+18
MSTS
Main status
CMD
Command
+1a
SSTS
Sub-status
OTP
Not used (reserved)
+1c
BUF0
I/O buffer IN (15 to 0)
BUF0
I/O buffer OUT (15 to 0)
+1e
BUF1
I/O buffer IN (31 to 16)
BUF1
I/O buffer OUT (31 to 16)
+20
+22
MSTS
SSTS
Main status
Sub-status
CMD
OTP
Command
Not used (reserved)
+24
BUF0
I/O buffer IN (15 to 0)
BUF0
I/O buffer OUT (15 to 0)
+26
BUF1
I/O buffer IN (31 to 16)
BUF1
I/O buffer OUT (31 to 16)
+28
MSTS
Main status
CMD
Command
+2a
SSTS
Sub-status
OTP
Not used (reserved)
+2c
BUF0
I/O buffer IN (15 to 0)
BUF0
I/O buffer OUT (15 to 0)
+2e
BUF1
I/O buffer IN (31 to 16)
BUF1
I/O buffer OUT (31 to 16)
+30
MSTS
Main status
CMD
Command
+32
SSTS
Sub-status
OTP
Not used (reserved)
+34
BUF0
I/O buffer IN (15 to 0)
BUF0
I/O buffer OUT (15 to 0)
+36
BUF1
I/O buffer IN (31 to 16)
BUF1
I/O buffer OUT (31 to 16)
+38
MSTS
Main status
CMD
Command
+3a
SSTS
Sub-status
OTP
Not used (reserved)
+3c
BUF0
I/O buffer IN (15 to 0)
BUF0
I/O buffer OUT (15 to 0)
+3e
BUF1
I/O buffer IN (31 to 16)
BUF1
I/O buffer OUT (31 to 16)
+80
ELPOL
+82
DLS/PCS
+84
C4STA
+86
C5STP
Status of ELS polarity for each axis
Status of DLS/PCS input selection
STA output when CMP4 condition is
established
STP output when CMP5 condition is
established
Selected signal(3 – 5) J3 output setting status
ELPOL
DLS/PCS
ELS polarity setting for each axis
C4STA
DLS/PCS input selection
STA output when CMP4 condition is
established
C5STP
STP output when CMP5 condition is
established
+8a
J3COUT
+8c
COTSEL1
X – Z : CMP3 – 5 output selection status
COTSEL1 X – Z : CMP3 – 5 output selection status
J3COUT
+8e
COTSEL2
+90
BINTM
V – B : CMP3 – 5 output selection status
Board interrupt output mask setting status
COTSEL2 V – B : CMP3 – 5 output selection status
Board interrupt output mask setting
BINTM
+92
BINTS
+9c
BID
+c8,ca
BCOD
Board interrupt status
BINTR
Selected signal(3 – 5) J3 setting status
Not used (reserved)
Board ID (setting by DIP SW : 0 -15)
---
Not used
Board code : 57h, 8ah
---
Not used
Table 3. 2-1
Board Addresses
4
3.2.2 Option Ports
Option ports are provided with each Board. The port functions are described below.
(1) Sets or reads the ELS polarity setting for each axis (80h : ELPOL).
N. C. condition selected when bit n is set to 0. N. O. condition selected when bit n is set to 1.
N. O. : ELS detected when current to coupler is ON.
N. C. : ELS detected when current to coupler is OFF.
Bit
Function
7
BELS
6
AELS
5
WELS
4
VELS
3
UELS
2
ZELS
1
YELS
0
XELS
(2) Sets or reads the DLS/PCS input selection (82h : DLS/PCS). When the power is turned ON, the bits are set to 0 (DLS).
Selects the DLS signal input as PCS signal input for connector J1 (X to B axes).
DLS input port selected when bit n is set to 0.
PCS input port selected when bit n is set to 1.
Bit
Function
7
BPCS
6
APCS
5
WPCS
4
VPCS
3
UPCS
2
ZPCS
1
YPCS
0
XPCS
(3) Sets or reads the simultaneous start signal (STA) when the Comparator 4 (CMP4) comparison condition is established.
(84h : C4STA) When the power is turned ON, the bits are set to 0 (output disabled).
STA output disabled when bit n is set to 0.
STA output enabled when bit n is se to 1.
Bit
Function
7
B-axis
6
A-axis
5
W-axis
4
V-axis
3
U-axis
2
Z-axis
1
Y-axis
0
X-axis
(4) Sets or reads the simultaneous stop signal (STP) when the Comparator 5 (CMP5) comparison condition is
established.(86h : C5STP) When the power is turned ON, the bits are set to 0 (output disabled).
STP output disabled when bit n is set to 0.
STP output enabled when bit n is se to 1.
Bit
Function
7
B-axis
6
A-axis
5
W-axis
4
V-axis
3
U-axis
2
Z-axis
1
Y-axis
0
X-axis
(5) Sets and reads selection of coincidental output signal with Comparator 3 –5
Bit
7
6
5
4
3
2
1
0
X-U:Select coincidental output signal with CMP3 - 5
COTSEL1
U-axis
(8ch)
Z-axis
Y-axis
X-axis
00
01
10
11
CMP3
CMP4
CMP5
Output enabled
V-B: Select coincidental output signal with CMP3 - 5
COTSEL2
B-axis
A-axis
W-axis
V-axis
(8eh)
00
01
10
11
CMP4
CMP5
Output enabled
CMP3
J3COUT
(8ah)
X – B-axis
PCL
comparator
match signal
output
Selected signal(3 - 5) J3 output setting
B-axis
A-axis
W-axis
V-axis
U-axis
Z-axis
Y-axis
Select comparator
coincidental signal
output
COTSEL1,COTSEL2
COM3
coincident signal output
COM4
coincident signal output
COM5
coincident signal output
00=CMP3
01=CMP4
10=CMP5
11=xxxx
5
Select J3
output
J3COUT
Connector
J1(X,Y,Z,U)
J2(V,W,A,B)
J3(X-U,V-B)
X-axis
(6) Sets or reads the Board interrupt enable (90h : BINTM). When the power is turned ON, bit 0 is set to 0 (interrupts
masked).
Sets the interrupt mask from the Board to the PCI bus.
Interrupts masked when bit 0 is set to 0 (interrupt disabled).
Interrupts unmasked when bit 0 is set to 1 (interrupt enabled).
Bit
Function
7
0
6
0
5
0
4
0
3
0
2
0
1
0
0
BINTM
(7) Indicates the Board interrupt status (92h : BINTS). When the power is turned ON, bit 0 is set to 1 (no interrupt).
Indicates the interrupt status from the Board to the PCI bus.
There is an interrupt when bit 0 is 0.
There is no interrupt when bit 0 is 1.
Bit
Function
7
0
6
0
5
0
4
0
3
0
2
0
1
0
0
BINTS
(8) Board ID
Reading board ID by addressing 9ch. The illustrated figure shows resulted value for example.
The factory setting is all jumpered (‘0000’).
Reads setting status of board ID jumper on board.
There is an jumper when bit n is 0.
There is no jumper when bit n is 1.
Bit
Function
7
x
6
x
5
x
4
x
3
2
1
jumper : 0, no jumper : 1
8
6
ID
1
0
3.2.3 Board I/O and Device Drivers
The following table shows the correspondence between the device drivers and the I/O to option ports and each axis (PCL6045) on
the Board.
Classification
Axis specification
or Port
Axis
Argument:
Axis
0(X) to7(B)
Option port
Read (INP)
Write (OUT)
Name
Driver function
Name
Driver function
MSTS
cp530_rMstsW()
CMD
cp530_wCmdW()
SSTS
cp530_rSstsW()
OTP
--------
BUF0
cp530_rReg()
cp530_rBufDW()
BUF0
cp530_wReg()
cp530_wBufDW()
BUF1
BUF1
Argument :
Port
0x80 to 0x8e
0x9c, 0xc8,
0xca
ELPOL
CMP5
CMP5
0x90
BINTM
BINTM
0x92
ELPOL
DLS/P
CS
DLS/PC
S
cp530_rPortB()
CMP4
(Device driver
process)
BINTS
Table 3. 2-2
cp530_wPortB()
CMP4
(Device driver
---------
Board I/O and Driver Functions
Note 1. There are device drivers provided for each type of OS that can be used to operate the application programs.
Note 2. The device driver’s function names are the same for all of the OS versions.
Note 3. Refer to the CPD Board Series User’s Manual: Software Information for details on the driver functions. The various
functions are listed in this manual in 6. Driver Functions.
3.2.4 PCI configuration registers
The table 3. 2-3 sows the PCI configuration register values for CPD578.
31
24
23
Device ID
1014h
16
15
8
7
Vendor ID
14a9h
Device status
Base class
(06h)
Sub class
(80h)
Self test
Header type
Program
interface
Master latency
timer
Address
00h
Device control
Class code
Base address register
0
04h
Revision ID
(02h)
08h
Cash line
0ch
0 0 0 0 0 0 0 0 h (Reserved)
10h
x x x x x x x x h (Reserved for the board)
14h
0 0 0 0 0 0 0 0 h (Reserved)
18h
I/O address in the CPD578board
1ch
0 0 0 0 0 0 0 0 h (Reserved)
20h
0 0 0 0 0 0 0 0 h (Reserved)
24h
Card bus CIS pointer
Sub system ID
1014h
28h
Sub system vender ID
14a9h
30h
|
fch
Reserved
Table 3. 2-3
2ch
PCI configuration register
7
3.3 Board Settings
3.3.1 CPD578 Board
There are two kind of jumper settings on the CPD578 Board: a set of jumper pins for the Board ID setting and three sets of jumper
pins for the Encoder circuit format.
The Board ID setting is used to distinguish between Boards when 2 or more Boards are being used in an application
program.
ConnectorJ3
Board ID
Jumper
Jumper
P3
Connector
PCL6045
Jumper
J1
J2
P2
Jumper
P1
PCL6045
Figure 3. 3-1 Jumper Pin Locations on the CPD578 Board
(1) Board ID Setting Jumper Pins
The Board ID jumper pins can be used to set the CPD Board’s Board ID (0 to 15). The following table shows 4
example settings. (The factory setting is 0. )
Board ID setting
0
5
7
10
15
Jumper settings
8
Binary equivalent
ID
0000
1
8
ID
1
8
0101
Table 3. 3-1
ID
1
0111
8
ID
1010
1
8
ID
1
1111
Board ID Setting
(2) Encoder Circuit Format (Refer to 3. 4-3 Encoder Input Circuits for details. )
Encoder A-phase and B-phase are input in differential format. Select the termination setting by Jumper P1 and P2.
Select the appropriate input circuit for the encoder output circuit being used (differential or open-collector output).
(Refer to 3. 4-3 Encoder Input Circuits for details. )
P1
P2
UB
UA
ZB
ZA
YB
YA
XB
XA
BB
BA
AB Note : Termination is set
AA when there is the jumper pin.
WB (The factory setting)
WA
VB
VA
P3
differentia input………..when there is the jumper pin
(The factory setting)
open-collector input …. when there is no jumper pin.
B
A
W Note : When select open-collector input,
V
external power +5V are supplied.
U
Z
Y
X
Figure 3. 3-2 Termination setting of encoder A-phase and B-phase
Figure 3. 3-3 Encoder Z-phase input selection
8
(3) Emergency Stop Function
Can select the following function by cut pattern “E101” on the solder side of the board.
• Function: All axes will stop when the EMG signal is input under operation. None of the axes will operate
while the EMG signal is being input.
• Settings: The J1 connector’s XSVALM terminal or J2 connector’s YSVALM terminal is used as the EMG signal input
terminal. To connect this terminal to the EMG signal, cut the cut pattern “E101. ” This cut pattern is
displayed on the Board. When this pattern is cut, the XSVALM function and YSVALM function will be
disabled.
• Logic:
The EMG signal is a N. C. (normally closed) condition, so the EMG signal is detected when the
photo coupler current is OFF.
• Status:
When an EMG signal occurs, MSTS bit 4 (SERR) will be “1” and ERST bit 9 will be “1. ”
The input status can be confirmed by verifying that RSTS (extension status register) bit 7 is “1. ”
Solder side
Expansion of E101
Figure 3. 3-4 “E101” jumper for setting of ‘emergency stop’
9
3.4 Servo and Machine Interfaces
3.4.1 Command Pulse Output and Driver Connections
Table 3. 4-1 shows the output circuit conditions.
No
.
Electrical
conditions
1
Item
Output pulse driver
pulse width
2
Signal format
Individual pulse output
method
Contents
Differential driver (26LS31)
Command pulse frequency 50% duty width
or a pulse width of 200 microsecond when the frequency is less
than 2. 4 Kpps
xCWP terminal
xCWN terminal
(Set the direction
output logic in
Environment Setting
Register 1. )
0V
xCCWP terminal
xCCWN terminal
(Set in Environment
Setting Register 1. )
Direction and pulse train
method
0V
Pulse-train output
Direction output
xCWP terminal
xCWN terminal
0V
0V
0V
0V
xCWP
xCWN
xCCWP
xCCWN
Connection to motor driver
by differential input
CPD side
Connection to motor driver
0V
xCCWP terminal
xCCWN terminal
CPD side
3
0V
+5V
xCWP
xCWN
Connection to motor driver
by coupler input
receiver.
GND
xCCWP
xCCWN
GND
For the motor drivers
ensuring differential
connection to the coupler
input
CPD side
xCWP
receiver.
xCWN
(Only one side shown)
CPD side
Connection to motor
driver
by TTL input
xCWP
xCWP
receiver
(Only one side shown)
Note: Caution is required for speeds and cable lengths when the motor driver does not use a differential input. As guidelines, use
500 Kpps with a cable length of 3 m for coupler connections and 250 Kpps with a cable length of 1 m for TTL connections.
Always check motor driver reception circuit specifications before application.
Table 3. 4-1 Command Pulse Output Circuits
10
3.4.2 Axis Sensor and Servo Interface Input Circuits
Table 3. 4-2 shows the input circuits.
3
Circuit format
2
2
Polarity settings
1
Item
Circuit format 1
No.
Contents
4.7K Ohm
Shared by
±xELS, xDLS, and xOLS
EXTPOW1:
standard 24-V input terminal
Following Resistance Module needed to mount when using 12V
Shared by
XINPOS, xSVALM
4.7K Ohm
External connections
EXTPOW2 terminal
(+24 V input)
Input terminal: 5 mA ≤ IS ≤ 10 mA
EXTPOW2:
standard 24-V input terminal
Polarity settings
for ±xELS, xDLS, xOLS,
xINPOS, and xSVALM
N. O. (Normal Open) condition: The signal is detected when current to the photo coupler is ON
N. C. (Normal Close) condition: The signal is detected when current to the photo coupler is OFF.
For ELS, set the polarity with the option port. (See 3. 2. 2 Option Ports for details. )
For DLS, OLS, INPOS, and SVALM, set the polarity with the RENV1.
(See CPD Board Series User's Manual: Common Information for details. )
CPD side
4
EXTPOW1 terminal
(+24 V (+/- 5V) input)
+
out
EXTPOW
Photoelectric sensor input
Input terminal
+24V
CPD side
Sensor
+24V
EXTPOW
Limit switch input
Input terminal
Table 3. 4-2
Axis Sensor and Servo Interface Input Circuits
11
3.4.3 Encoder Input Circuits
Table 3. 4-3 shows the input circuit conditions.
No.
Item
Contents
33K
Termination jumper J1, J2
Encoder
format
1
input
circuit
Compatible LSI
with 26LS32
Encoder
Phase A or
Phase B
Advancement of phase
settings
33K
xAP,xBP
120
2.2K
xAN,xBN
2.2K
Jumper pins P1 and P2
Encoder circuit format setting
Note: As input circuit of A, B-phase, Connect plus terminal
to (-) side of 26LS32 for reversing internal logic.
When used differential driver, connect (+) to P, (-) to N
as above.
Set by means of software.
33K
xAP
Differential connection
2.2K
33K
120
xAN
2.2K
P3
Encoder
format
input
circuit
+5V
xZP
4.7K
2
Encoder
Phase-Z
Differential connection
Table 3. 4-3
xZN
encoder
150 220
P3
CPD side
+5V
4.7K
150
Encoder Input Circuit
12
220
P3
CPD side
+5V
4.7K
Open-collector
connection
(Supply +5V from an
external power source
and leave the jumper off)
150
220
+5V
encoder
3.4.4 Servo Interface Output Circuits
Table 3. 4-4 shows the output circuit conditions.
No.
Item
Contents
EXTPOW2
xSVON,xSVRST
Driver circuit format
xSVON
(servo ON)
1
xSVRST
(servo reset)
COMMON2
Rating load voltage: DC12 - DC24V
Allowable load current: Less than 80mA/terminal (DC12V – DC24V)
Output logic level
(The polarity cannot be The xSVON, xSVRST is ON when the port output is “1”.
changed. )
CPD side
Servo Amp
EXTPOW2
xSVON
xSVRST
External connections
COMMON2
+24V
xSVCTRCL
COMMON
Driver circuit format
Rating load voltage: DC5 - DC24V
Allowable load current: Less than 16mA/terminal
xSVCTRCL
2
(error
counter
clear)
Output logic level
(The polarity cannot be The xSVCTRCL is ON when the port output is “1”.
changed. )
CPD side
Servo Amp
xSVCTRCL
External connections
COMMON
5V – 24V
Table 3. 4-4
Servo Interface Output Circuits
13
Connecting with TTL is disabled.
3.4.5 Simultaneous Start/Stop and Match Signal Output
No.
Item
Contents
Circuit format
1
J1 / J2
Match signal output
J1:
CMP-X – CMP-U
J2:
CMP-V – CMP-B
CMPx
Compatible LSI
with 74LS07
Rating load voltage: TypDC5V
Rating load current: Less than 30mA
Output logic levels
‘HIGH’ when port output is active. (Active high)
External
connections
GND
receiver
5V
2
J3
Match signal output
CMP-X – CMP-B
Simultaneous Start
STA
Simultaneous Stop
STP
Circuit format
Rating load voltage: DC5V
Rating load current: Less than 6mA
Output logic levels
‘LOW’ when port output is active. (Active low)
External
connections
Table 3. 4-5
STA,STP,CMP-x
Compatible LSI
With 74HC04
GND
receiver
J1 – J3:Match signal and J3:Simultance Start/Stop Output Circuits
14
3.5 Connector PIN out
3.5.1 CPD578 connector PIN out
Connector J1 and J2 are placed as following figure
J1 is allotted to signal of X – U-axes,and J2 is allotted to signal of V –B-axes.
PIN
No.
Signal Name
PIN
No.
1
2
3
4
5
6
7
8
+5V power out
+5V power out
XCWP (CW pulse out +)
XCWN (CW pulse out -)
XCCWP (CCW pulse out +)
XCCWN (CCW pulse out -)
YCWP (CW pulse out +)
YCWN (CW pulse out -)
51
52
53
54
55
56
57
58
GND
GND
ZCWP (CW pulse out +)
ZCWN (CW pulse out -)
ZCCWP (CCW pulse out +)
ZCCWN (CCW pulse out -)
UCWP (CW pulse out +)
UCWN (CW pulse out -)
9
10
11
12
13
14
15
16
17
YCCWP (CCW pulse out +)
YCCWN (CCW pulse out -)
XAP(Encoder A-phase input +)
XAN(Encoder A-phase input -)
XBP(Encoder B-phase input +)
XBN(Encoder B-phase input -)
XZP(Encoder Z-phase input +)
XZN(Encoder Z-phase input -)
YAP(Encoder A-phase input +)
59
60
61
62
63
64
65
66
67
UCCWP (CCW pulse out +)
UCCWN (CCW pulse out -)
ZAP(Encoder A-phase input +)
ZAN(Encoder A-phase input -)
ZBP(Encoder B-phase input +)
ZBN(Encoder B-phase input -)
ZZP(Encoder Z-phase input +)
ZZN(Encoder Z-phase input -)
UAP(Encoder A-phase input +)
18
19
20
21
22
23
24
25
26
27
28
29
30
31
32
33
34
35
36
37
38
39
40
41
42
43
44
45
46
47
YAN(Encoder A-phase input -)
YBP(Encoder B-phase input +)
YBN(Encoder B-phase input -)
YZP(Encoder Z-phase input +)
YZN(Encoder Z-phase input -)
GND
GND
XSVCTRCL(Error counter clear output)
YSVCTRCL(Error counter clear output)
XSVALM (Sarvo alarm input)
XINPOS (Positioning completion input)
XSVON (Sarvo ON output)
XSVRST (Sarvo reset output)
YSVALM (Sarvo alarm input)
YINPOS (Positioning completion input)
YSVON (Sarvo ON output)
YSVRST (Sarvo reset output)
EXTPOW2 (+24V power input )
EXTPOW2 (+24V power input )
+XELS (Input for positive limit sensor)
-XELS (Input for negative limit sensor)
XDLS (Input for decelerate limit sensor)
XOLS (Input for origin sensor)
+YELS (Input for positive limit sensor)
-YELS (Input for negative limit sensor)
YDLS (Input for decelerate limit sensor)
YOLS (Input for origin sensor)
EXTPOW1 (+24V power input )
EXTPOW1 (+24V power input )
+5V power out
68
69
70
71
72
73
74
75
76
77
78
79
80
81
82
83
84
85
86
87
88
89
90
91
92
93
94
95
96
97
UAN(Encoder A-phase input -)
UBP(Encoder B-phase input +)
UBN(Encoder B-phase input -)
UZP(Encoder Z-phase input +)
UZN(Encoder Z-phase input -)
COMMON (Common GND for xSVCTRCL)
COMMON (Common GND for xSVCTRCL)
ZSVCTRCL(Error counter clear output)
USVCTRCL(Error counter clear output)
ZSVALM (Sarvo alarm input)
ZINPOS (Positioning completion input)
ZSVON (Sarvo ON output)
ZSVRST (Sarvo reset output)
USVALM (Sarvo alarm input)
UINPOS (Positioning completion input)
USVON (Sarvo ON output)
USVRST (Sarvo reset output)
COMMON2 (Common GND for +24V)
COMMON2 (Common GND for +24V)
+ZELS (Input for positive limit sensor)
-ZELS (Input for negative limit sensor)
ZDLS (Input for decelerate limit sensor)
ZOLS (Input for origin sensor)
+UELS (Input for positive limit sensor)
-UELS (Input for negative limit sensor)
UDLS (Input for decelerate limit sensor)
UOLS (Input for origin sensor)
EXTPOW1 (+24V power input )
EXTPOW1 (+24V power input )
GND
48
49
50
+5V power out
CMPX output (TTL ) (TTL OC output)
CMPY output (TTL OC output)
98 GND
99 CMPZ output (TTL OC output)
100 CMPU output (TTL OC output)
Signal Name
・ Connector type
Board side:HDRA-E100W
1LFDT1EC-SL
(HONDA TSUSHIN)
Cable side:HDRA-E100MA1(connector)
HDRA-E100LPWC(case)
100 50
1 51
Xaxis – Uaxis
Vaxis - Baxis
51 1
50 100
Figure 3. 5-1 Front panel
Table 3. 5-1
CPD578 J1 CONNECTOR PIN OUT (Xaxis - Uaxis)
15
PIN No.
1
2
3
4
5
6
7
8
9
10
11
12
13
14
15
16
17
18
19
20
21
22
23
24
25
26
27
28
29
30
31
32
33
34
35
36
37
38
39
40
41
42
43
44
45
46
47
48
49
50
Signal Name
Table 3. 5-2
PIN No.
1
3
PIN No.
+5V power out
+5V power out
VCWP (CW pulse out +)
VCWN (CW pulse out -)
VCCWP (CCW pulse out +)
VCCWN (CCW pulse out -)
WCWP (CW pulse out +)
WCWN (CW pulse out -)
WCCWP (CCW pulse out +)
WCCWN (CCW pulse out -)
VAP(Encoder A-phase input +)
VAN(Encoder A-phase input -)
VBP(Encoder B-phase input +)
VBN(Encoder B-phase input -)
VZP(Encoder Z-phase input +)
VZN(Encoder Z-phase input -)
WAP(Encoder A-phase input +)
WAN(Encoder A-phase input -)
WBP(Encoder B-phase input +)
WBN(Encoder B-phase input -)
WZP(Encoder Z-phase input +)
WZN(Encoder Z-phase input -)
GND
GND
VSVCTRCL(Error counter clear output)
WSVCTRCL(Error counter clear output)
VSVALM (Sarvo alarm input)
VINPOS (Positioning completion input)
VSVON (Sarvo ON output)
VSVRST(Sarvo reset output)
WSVALM (Sarvo alarm input)
WINPOS (Positioning completion input)
WSVON (Sarvo ON output)
WSVRST(Sarvo reset output)
EXTPOW2 (+24V power input )
EXTPOW2 (+24V power input )
+VELS (Input for positive limit sensor)
-VELS (Input for negative limit sensor)
VDLS (Input for decelerate limit sensor)
VOLS (Input for origin sensor)
+WELS (Input for positive limit sensor)
-WELS (Input for negative limit sensor)
WDLS (Input for decelerate limit sensor)
WOLS (Input for origin sensor)
EXTPOW1 (+24V power input )
EXTPOW1 (+24V power input )
+5V power out
+5V power out
CMPV output (TTL OC output)
CMPW output (TTL OC output)
51
52
53
54
55
56
57
58
59
60
61
62
63
64
65
66
67
68
69
70
71
72
73
74
75
76
77
78
79
80
81
82
83
84
85
86
87
88
89
90
91
92
93
94
95
96
97
98
99
100
Signal Name
GND
GND
ACWP (CW pulse out +)
ACWN (CW pulse out -)
ACCWP (CCW pulse out +)
ACCWN (CCW pulse out -)
BCWP (CW pulse out +)
BCWN (CW pulse out -)
BCCWP (CCW pulse out +)
BCCWN (CCW pulse out -)
AAP(Encoder A-phase input +)
AAN(Encoder A-phase input -)
ABP(Encoder B-phase input +)
ABN(Encoder B-phase input -)
AZP(Encoder Z-phase input +)
AZN(Encoder Z-phase input -)
BAP(Encoder A-phase input +)
BAN(Encoder A-phase input -)
BBP(Encoder B-phase input +)
BBN(Encoder B-phase input -)
BZP(Encoder Z-phase input +)
BZN(Encoder Z-phase input -)
COMMON (Common GND for xSVCTRCL)
COMMON (Common GND for xSVCTRCL)
ASVCTRCL(Error counter clear output)
BSVCTRCL(Error counter clear output)
ASVALM (Sarvo alarm input)
AINPOS (Positioning completion input)
ASVON (Sarvo ON output)
ASVRST(Sarvo reset output)
BSVALM (Sarvo alarm input)
BINPOS (Positioning completion input)
BSVON (Sarvo ON output)
BSVRST(Sarvo reset output)
COMMON2 (Common GND for +24V)
COMMON2 (Common GND for +24V)
+AELS (Input for positive limit sensor)
-AELS (Input for negative limit sensor)
ADLS (Input for decelerate limit sensor)
AOLS (Input for origin sensor)
+BELS (Input for positive limit sensor)
-BELS (Input for negative limit sensor)
BDLS (Input for decelerate limit sensor)
BOLS (Input for origin sensor)
EXTPOW1 (+24V power input )
EXTPOW1 (+24V power input )
GND
GND
CMPA output (TTL OC output)
CMPB output (TTL OC output)
CPD578 J2 CONNECTOR PIN OUT (Vaxis - Baxis)
Signal Name
PIN No.
GND
STA(Simultaneous Start)
2
4
Signal Name
GND
STP(Simultaneous Stop)
5
GND
6
GND
7
CMP-X(X-axis comparator match signal)
8
CMP-Y(Y-axis comparator match signal)
CMP-U(U-axis comparator match signal)
9
CMP-Z(X-axis comparator match signal)
10
11
GND
12
GND
13
CMP-V(V-axis comparator match signal)
14
CMP-W(W-axis comparator match signal)
15
CMP-A(A-axis comparator match signal)
16
CMP-B(B-axis comparator match signal)
Table 3. 5-3
CPD578 J3 CONNECTOR PIN OUT
16
3.6 HPCI-CPD578 Specification
Item
Axis control
Command
system
Basic Specifications
Speed Control
Specification
(1)Positioning system
(2)Linear interpolation system
2 to 4 axes simultaneously x2
(3)Circular interpolation system
2 axes simultaneously x2
(4)Pulsar feed system
1 to 8 axes
Command pulses
Pulse-train output by differential driver
Position command range
-134,217,728 to 134,217,727 pulses
Origin-returnin
g
control
Control LSI:
PCL6045 series
Command coordinate
Relative coordinate command
Reference range
at continuous feed
Unlimited (but not applicable to the position
range of the counter
Position override
Possible only in positioning system
Speed range
0. 1pps to 6. 5Mpps (Multiplication 0. 1 to 100)
Constant control of linear speed
2-axes circular, linear interpolation : :square root method
3-axes linear interpolation : cubic root method
4-axes linear interpolation : cubic root method
Speed override
Acceleration/
deceleration
control
(Acc/Dec
control)
Notes
1 to 8 axes
Available of the cyclic counting for
the position
every 360deg.
(1)Constant feed(without acc/dec.): available in all cases
Automatic Acc/Dec system
(2)Limited to the positioning, linear interpolation and continuous feed.
allowing it during acc/dec duration.
(1)Positioning and linear interpolation: Linear acc/dec system, S-curve
acc/dec system and the partial S-curve acc/dec system are available.
・Triangular drive peak prevention function available
・Asymmetrically sloped acc/dec possible.
(2)For circular interpolation: Automatic acc/dec possible except S-curve
Origin-returning method
13 returning methods for the sensor’s origin,Z-phase origin,ELS shared origin
(Each returning is done in a single process by the single command)
Origin search
Available
Getting out of origin area
Available
Command position counter (Command pulse count: length 28-bit)
Machine position counter (Encoder pulse count: length 28-bit)
Function Specifications
UP/DOWN counters
General-purpose counter (Pulse count: length 28-bit)
Comparators
(CMP)
Error counter for runaway detection (Counter: length 16-bit)
(Difference between the values of the encoder and the command. )
CMP1 and CMP2 :
Soft-limit use comparing positive and negative limits
CMP3,4 and 5: General-purpose(used for changing speed or starting another axis on
comparison of the coordinate)
Each axis has a common input terminal for the encoder/pulsar input signal.
(Encoder output is differential or open-collector output.)
Inputs for encoder or pulsar
Backlash compensation
Compensated every turn of the direction except the circular interpolation system.
Starts positioning by PCS signal during continuous feed.
(Only for positioning system)
Positioning-control-start function (PCS)
Idling pulse function
Function of improving stepping motor acceleration characteristics.
Vibration suppress at a stop
Function of vibration suppression when the stepping motor stops.
Machine interface
+/-ELS,OLS,DLS, and encoder A,B, and Z-phase per axis.
(All with photo coupler isolation)
Command-pulse output: differential output
Conditions
Servo interface
Input: Servo alarm and in-position per axis (all with photo coupler insulation)
Ambient temperature
0 to 50 centigrade (no condensation)
Current consumption
+5V 2A
Dimensions
175mm x 107mm (Short size)
Output: Servo reset, servo ON, and servo error counter clear per axis.
(all with photo coupler insulation)
Table 3. 6-1
HPCI-CPD578 Specifications
17
4. Functions
4.1 Combining Operations Between Axes
One set of the 4-axis PCL6045 LSI has three kinds of the axis operation functions: independent axis operation, linear interpolation
of a group of 2 to 4 axes, and circular interpolation of 2 axes.
The “independent axis operations” include the following functions for each axis: Positioning (PTP), continuous feed (terminate with
a stop command), origin returning, pulsar feed (handle feed), and timer operation.
In the descriptions about (Axis Operation Combinations), the followings are the meaning of “simultaneous
operations”
(1) Operating multiple independent axes at the same time.
Example: performing X-axis operation, continuing with Y-axis operation…
(2) Operating two pairs of interpolating axes at the same time.
Example: performing XY circular interpolation, and continuing with ZU linear interpolation….
(3) Operating independent axis and interpolating axes at the same time.
Example: performing XYZ-axis linear interpolation, and independent U-axis operation …
4.1.1 CPD578 Axis Operation Combinations
There are two 4-axis LSI on this board (X – U-axis and V – B-axis). Each LSI is detached.
Linear interpolation of five to eight axes is possible by using simultaneous start command exceptionally. It can be
used under constant speed operation without acceleration/deceleration.
Use simultaneous
No.
Axis operation combination
X – U-axis
V – B-axis
start command
Simultaneous operation is
1
All axes independent
possible.
5 – 8 axes
liner–interpolation
is possible.
All axes
Two – four axis linear
2
(on condition of
in linear interpolation
interpolation is possible.
constant speed
Regardless of
operation)
X -- U-axes
operation,
Liner–interpolation axes
Simultaneous operation is V -- B-axes operation
&
3
possible.
No.1 --4combination
independent axes
is possible.
Simultaneous operation of
circle–interpolation axes
Circle–interpolation axes
& the rest axes
&
4
(Liner–interpolation axes
the rest axes
or independent axes) is
possible.
Table 4. 1-1 CPD578 Axis Operation Combinations
18
4.2 Interrupt Mechanisms
MSTS bit 4 (SERR): When an error bit has been set in the error status register (REST), the SERR bit will be set and this is one
source of an interrupt output for the affected axis.
MSTS bit 5 (SINT): When a bit has been set in the event status register (RIST) and the bit is not masked, the SINT bit will be set
and this is the other source of an interrupt output for the affected axis.
These two interrupt sources from each axis’ MSTS register are logically ORed and the result is output as an interrupt from the
PCL6045. The interrupt outputs from a CPD578 Board to the PCI bus must pass through the Board’s interrupt mask (option port
BINTM bit) and then are transmitted to the CPU.
The processing of interrupt signals to the CPU are supported by the DOS device driver, but it is also possible to read the source of
the interrupt with MSTS polling and mask Board interrupts.
■ Each axis’ interrupts can be enabled or disabled with bit 29 of the axis’ environment register 1 (RENV1).
INT
X-INT
<Main Status>
Board BINTM
INT
Z
U-MSTS
SEN
SER
U-INTmask
U- MSTS
Logical OR
SIN
V-INT
W-INT
A-INT
B-INT
Interrupts of V-axis – B-axis
Legend
<Error status register>
Each bit causes an error
(None are masked)
Each bit’s interrupt status
<Main Status>
Logical AND
Mask for each bit
<Event status reg.>
Processing added
when interrupt goes to the bus.
Board section
END is not an interrupt.
U - RIRQ
U-INT
<Event mask reg.>
Y
U – RENV1
INT mask bit
Mask for each bit
<Event status reg.>
U-axis RENV1
Y-INT
Z-INT
Each bit causes an error
(None are masked)
Each bit’s interrupt status
U - REST
PCI bus interrupt signal
<Error status register>
X - RIRQ
SIN
X - REST
SER
X - RIST
SEN
X - RIST
X-INTmask
END is not an interrupt.
X-MSTS
X - MSTS
X – RENV1
X-axis RENV1
<Event mask reg.>
Range adopting by the event notification method’s status applications.
PCL section
Figure 4. 2-1 Route of Interrupts in the CPD578 Board
19
5. Software Startup Guide
5.1 Overview
This section explains the following operations.
(1) Windows Version
1.
2.
3.
4.
Installing and uninstalling drivers
Accessing the Board and the Board ID
Using the sample programs
Executing and navigating the “Let’s try to move” (an executable file)
(2) DOS Version (MS-DOS or PC DOS)
1. Installing and uninstalling drivers
2. Accessing the Board and the Board ID
3. In the software-related manuals, the CPD578 Boards are known as CPD Boards.
5.2 Software Configuration
(1) Device Drivers
1.
2.
There are 3 different device driver files for Windows, depending on the version of Windows being used.
For Windows XP
(abbreviated as WinXP)
hc530wxp. sys
For Windows 2000
(abbreviated as Win2K)
hc530w2k. sys
For Windows NT
(abbreviated as WinNT)
hicpd530. sys
For Windows 98
(abbreviated as Win98)
hicpd530. vxd
There is just one device driver file for DOS.
DOS (MS-DOS or PC DOS)
hicpd530. drv
(2) Device Driver Functions
1.
2.
The various functions included in the device driver interface library are referred to as “driver functions. ”
Driver Functions for Windows
hicpd530. dll (The same file is used for all of the Windows operating systems. )
Driver Functions for DOS (Use the same memory model used in the application being created. )
sicpd530. lib (small model)
(Code: less than 64 KB; Data: less than 64 KB)
cicpd530. lib (compact model)
(Code: less than 64 KB; Data: 64 KB or more)
micpd530. lib (medium model)
(Code: 64 KB or more; Data: less than 64 KB)
licpd530. lib (large model)
(Code: 64 KB or more; Data: 64 KB or more)
(3) Library Functions Level 1
1.
2.
A group of “library functions that perform special processing using driver functions” for application programs has been
provided in a source program. The contents of these library functions can be changed freely.
These functions are known as “library functions” in contrast to the driver functions.
Library Functions for Windows
cp530I1a. c (cp530I1a. h)
For Microsoft Visual C++ (Version 5. 0 or higher)
cp530I1a. bas
For Microsoft Visual Basic (Version 5. 0 / 6. 0)
Library Functions for DOS
cp530I1a. c (cp530I1a. h)
For MS-C (6. 0), MS-C++ (7. 0), TC++ (4. 0J), etc.
20
WinXP, Win2K, WinNT, or Win98
DOS (MS-DOS or PC-DOS)
Application program
Visual C++ (5.0 higher)
Visual Basic (5.0 / 6.0)
Application program
MS-C (6.0 higher)
TC++ (4.0J or higher), etc.
Library Functions for DOS
cp530l1a.c
cp530l1a.h
Library Functions for Windows
cp530l1a.c (for VC++)
cp530l1a.h (for VC++)
cp530l1a.bas (for VB)
Driver Functions for DOS
sicpd530.lib (small model)
cicpd530.lib (compact model)
micpd530.lib (medium model)
licpd530.lib (large model)
Driver Functions for Windows
hicpd530.dll
Device Drivers
WinXP hc530wxp.sys
Win2K hc530w2k.sys
WinNT hicpd530.sys
Win98 hicpd530.vxd
Device Driver
hicpd530.drv
HPCI-CPD578 Board (1st Board)
HPCI-CPD578 Board (16th Board)
Figure 5. 2-1 Software Configurations
21
5.3 Installing and Uninstalling the Device Drivers
5.3.1 Installing/Uninstalling Device Drivers in a Windows Systems
(1)
Windows XP Installation
1.
2.
3.
4.
5.
Verify that the computer’s power supply is OFF and install the CPD Board in an available PCI slot in the computer.
Turn ON the computer’s power supply and start Windows.
When WinXP starts up, the CPD Board will be detected by the system and a window will be displayed automatically
to guide you in the installation of the required device driver. A dialog box will be displayed requesting the installation
source directory. Insert the provided floppy disk into the computer’s floppy disk drive.
Check “Install the software automatically (Recommended)”.
Select “Hivertec HPCI-CPD530 (WinXP)”.
The warning "has not passed Windows Logo testing to verify its compatibility with Windows XP" is displayed, but
continue anyway. We have checked that this software operates on WindowsXP.
Complete the installation by following the directions in the system dialog boxes.
Next
Next
Continue Anyway
Select Continue Anyway.
Finish
Yes
Figure 5. 3-1 WinXP Installations
22
(2)
Windows 2000 Installation
1. Verify that the computer’s power supply is OFF and install the CPD Board in an available PCI slot in the
computer. Turn ON the computer’s power supply and start Windows.
2. When Win2K starts up, the CPD Board will be detected by the system and a window will be displayed
automatically to guide you in the installation of the required device driver.
3. A dialog box will be displayed requesting the installation source directory. Insert the provided floppy disk into
the computer’s floppy disk drive.
4. Check “Specify a location”.
5. Specify the directory “A:¥WIN2K”. (In this case, the floppy drive is drive A. )
Complete the installation by following the directions in the system dialog boxes.
Next
Next
A: ¥win2k
Browse
Specify a location
Next
A: ¥win2k¥hc530w2k.inf
Next
23
Hivertec HPCI-CPD530 (Win2K)
Yes
Finish
Figure 5. 3-2 Win2K Installations
(3) Windows NT 4. 0 Installation
[Device Driver Installation]
1. Insert the provided floppy disk into the computer’s floppy disk drive. Start “Windows NT Explorer” and select the file
“A:¥WinNT¥c530inst. inf”. (In this case, the floppy drive is drive A. )
2. Next click the right mouse button. Select NTLP:Install from the popup menu that is displayed. The device driver
installation will begin when NTLP:Install is selected. Complete the installation by following the directions in the system
dialog boxes. (It is also possible to start the device driver installation by executing the A:¥WinNT¥c530inst. bat batch file
from the command prompt. )
Figure 5. 3-3 WinNT Installations
[Starting and Stopping the Device]
After installing the device drivers, set the device driver to “automatic startup” so that the service for the CPD Board will
be started when Windows NT starts up.
If the device must be stopped for some reason, use the following procedure to stop it.
1. Open the Control Panel and double-click the Devices icon. Select Hivertec HPCI-CPD530 from the list of devices.
2. Click the Startup Button to display the Startup Type Button Box. Select Disabled for the Startup Type. (The device
status will be “Stopped. ”)
To restart the CPD, open the Control Panel again and double-click the Devices icon. Select Hivertec HPCI-CPD530
and select Automatic for the Startup Type. (The device status will be “Started. ”)
(4) Windows 98 Installation
1. Verify that the computer’s power supply is OFF and install the CPD Board in an available PCI slot in the computer. Turn
ON the computer’s power supply and start Windows.
24
2. When Win98 starts up, the CPD Board will be detected by the system and a window will be displayed automatically to
guide you in the installation of the required device driver.
3. A dialog box will be displayed requesting the installation source directory. Insert the provided floppy disk into the
computer’s floppy disk drive.
4. Check the appropriate boxes to select the floppy disk drive as the search location.
5. Specify the directory “A:¥Win9x”. (In this case, the floppy drive is drive A. )
Complete the installation by following the directions in the system dialog boxes.
Next
Next
Hivertec HPCI-CPD530 (Win9X)
A: ¥Win9x¥hicpd530.inf
Next
Next
Hivertec HPCI-CPD530 (Win9X)
Yes
Finish
Figure 5. 3-4 Win98 Installations
25
(5) Uninstalling the Device Driver for Windows
1.
Insert the provided floppy disk into the computer’s floppy disk drive.
2.
Start Windows Explorer and execute the program “A:¥cp530uin. exe”. (In this case, the floppy drive is drive A. )
It is also possible to start the device driver uninstallation program by executing A:¥cp530uin. exe from the command prompt.
Figure 5. 3-5 Uninstalling the Device Drivers
5.3.2 Installing/Uninstalling Device Drivers in a DOS System
(1)
DOS Installation
To register the HICPD530 drivers for the first time, copy the HICPD530. DRV file to the prescribed directory on the
computer’s hard disk and add the following line to the CONFIG. SYS file in the DOS startup drive. Specify the entire
path in the DEVICE command. In this case, the file has been copied to the directory “C:¥HICPD”.
DEVICE=C:¥HICPD¥HICPD530. DRV
Restart the computer after adding this line to the CONFIG. SYS file.
(2)
Uninstalling the Driver
Locate the line that registers the HICPD530 drivers and delete this line from the “CONFIG. SYS” file.
(It is also possible to delete the driver file itself from the computer’s hard disk. )
Restart the computer after deleting the appropriate line from the CONFIG. SYS file or deleting the HICPD530. DRV file
itself.
26
5.4 Using Two or More CPD Boards
This section explains how to install more than one CPD Board in a computer and connect the Boards to external devices.
PC
Motor drivers
CPD Board
First Board ID = 0
M
Device number (slot number) 1
This example shows how to
connect each Board to a
separate driver.
CPD Board
Second Board ID = 1
M
Device number (slot number) 2
Figure 5. 4-1 Using Multiple Boards
(1)
Board Slot Number and Board ID
The computer’s BIOS manage board addresses in the PCI bus system. The BIOS determines the slot number
allocated to the slot in which the Board is mounted. The slot number is also known as the device number.
The slot numbers are dynamically allocated by the BIOS, so the relationship between the Boards and slot numbers
cannot be tracked externally. Therefore, the CPD Boards are equipped with “Board ID Jumper Pins” to distinguish the
Boards and coordinate the Board and software processing.
(2)
Using Board IDs
The Board IDs can be set between 0 and 15. Up to sixteen CPD Boards (including CPD534, CPD532, CPD578,
CPD508 Boards) can be controlled. Refer to 3. 3 Board Settings for details on setting the Board ID.
27
5.5 Accessing the Board
It is possible to control more than one CPD Board with this function group. In order to access a particular CPD Board, it is
necessary to open the device first and obtain the device handle value used to access the Board.
To open a device, it is necessary to know the hardware resources allocated to the device being opened. Hardware
resources are resources such as the I/O port address and IRQ number, which are defined by the Windows or DOS system.
5.5.1 Data Structure for Board (Device) Recognition
(1)
Windows Version of the Data Structure for Board (Device) Recognition
The following HPCDEVICEINFO structure is provided to recognize Boards. Use the number of structures required
for the number of Boards being used (up to 16 Boards).
C language: Visual C++
typedef struct _HPCDEVICEINFO {
DWORD
dwBusNumber;
/* Bus number */
DWORD
dwDeviceNumber; /* Device number */
DWORD
dwIoPortAddress;
/* I/O port address */
DWORD
dwIrqNo;
/* IRQ number */
DWORD
dwNumber;
/* Management number */
DWORD
dwBoardID;
/* Board ID (0 to 15) */
} HPCDEVICEINFO, *PHPCDEVICEINFO
Visual Basic
Public Type HPCDEVICEINFO
dwBusNumber
As Long
dwDeviceNumber As Long
dwIoPortAddress As Long
dwIrqNo
As Long
dwNumber
As Long
dwBoardID
As Long
End Type
' Bus number
' Device number
' I/O port address
‘ IRQ number
' Management number
' Board ID (0 to 15)
Note: The “Management number” is not used in Windows 98.
An “INVALID_HPC_NUMBER (-1)” will be stored.
(2)
DOS Version of the Data Structure for Board (Device) Recognition
The following HPCDEVICEINFO structure is provided to recognize Boards. This structure is stored in the “hcpdtype.
h” header file.
typedef struct {
WORD
nBusNumber;
/* Bus number */
WORD
dwIoPortAddress;
/* I/O port address */
WORD
dwIrqNo;
/* IRQ number */
WORD
dwNumber;
/* Management number */
WORD
dwBoardID;
/* Board ID */
} HPCDEVICEINFO, *PHPCDEVICEINFO, far* LPHPCDEVICEINFO;
5.5.2 Board Access Preparatory Procedure and End Processing
(1)
Using Driver Functions
When using the driver functions, the preparatory procedure and end processing are almost the same for both the Windows
and DOS versions. Refer to the CPD Board Series User's Manual: Software Information for details on the driver functions.
When using interrupt processing in a DOS system, refer to the description of the DOS interrupt module registration function for
details.
[Preparatory Procedure]
1. Obtain the device information for all of the Boards being used.
First obtain the device information for all of the CPD Boards in the Board recognition structure area (array).
cp530_GetDeviceCount() : Confirms the number of Boards.
cp530_GetDeviceInfo()
: Obtains the device information for all of the Boards.
28
2. Open every Board.
Transfer the CPD Board’s device information to the Open Device function.
The CPD Board is opened and the Open Device function returns the device handle value that is needed to access that
Board.
When two or more Boards are being used in the computer, the processing must be performed for each individual Board.
cp530_OpenDevice()
: Opens the Board.
3. Make the initial settings for the Board’s signal processing.
From this point on, use the Board’s device handle to access that CPD Board.
Before initializing the Board, use the following function to set the Board’s device operating conditions.
Refer to the CPD Board Series User's Manual: Software Information for details on these settings.
cp530_wPortB()
: Sets each device’s operating conditions.
4. Initialize each Board and each axis.
After making the settings above, initialize each axis in all of the Boards being used.
Refer to the User’s Manuals and make the appropriate settings in each register.
It will be possible to operate the axes normally once the settings have been made properly.
[End Processing]
5. Close the devices that were opened.
When all of the required processing has been completed and the application has ended, close all of the devices that were
opened.
cp530_CloseDevice()
: Closes the specified Board (1 Board).
(2)
Using Library Functions
Refer to the CPD Board Series User's Manual: Software Information for details on the library functions.
[Preparatory Procedure]
1. Obtain the device information for all of the Boards being used.
First obtain the device information for all of the CPD Boards in the Board recognition structure area (array).
hcp530_GetDevInfo() : Confirms the number of Boards and obtains the device information for all of the boards.
This library function combines two driver functions.
2. Open every Board.
Transfer the CPD578 Board’s device information to the Open Device function.
The CPD Board is opened and the Open Device function returns the device handle value that is needed to access that
Board.
From this point on, use the Board’s device handle to access that CPD Board.
This step makes it possible to operate the axes normally, such as outputting pulses to each axis.
When two or more Boards are being used in the computer, the processing must be performed for each individual Board.
hcp530_DevOpen() :Opens the Board, makes the settings for the Board’s signal processing, and sets each axis’
operating conditions.
This library function combines the driver functions in steps 2, 3, and 4 of the Using Driver Functions procedure.
The initialization conditions are performed directly within the function. Refer to the CPD Board Series User's
Manual: Software Information for more details on this function.
[End Processing]
3. Close the devices that were opened.
When all of the required processing has been completed and the application has ended, close all of the devices that were
opened.
hcp530_DevClose() : Closes the specified Board (1 Board).
29
5.5.3 Verifying Each Axis is Ready for Operation
Verify the following points when each axis is connected to a motor and ready for operation.
1.
2.
3.
4.
Operational test of the ±ELS signals (The sensors are operated alone, with the motor stopped. )
Status of signal inputs when the servo alarm signals have been connected
Input status of the origin signal (OLS or Phase-Z)
Input status of the In-Position signal (Positioning completed: INPOS)
Proper operation may not be possible if the signals listed above are not being input properly.
The following points must be checked if the command pulse output to the motor is not operating properly.
1.
2.
Check that the command pulse output setting matches the “servo driver” input.
Check whether there is something in the “servo driver” input signal causing the motor to be stopped.
30
5.6 Sample Programs for Windows Systems
Sample programs have been provided to help explain how to use the library (level 1) functions. The following two kinds of
programs have been provided and have almost identical displays and operations. The explanation in this section is based
on the Visual C++ (5. 0) C coding sample program.
1.
Visual C++ (5. 0)
C coding
(spc53000. exe)
2.
Visual Basic (5. 0)
(spc53002. exe)
5.6.1 Executing the Sample Program
When using the sample program, copy the program to your hard disk.
The sample program can be executed by double-clicking the corresponding executable file (spc53000. exe or
spc53002. exe).
(1)
1.
2.
3.
4.
5.
6.
Precautions when Executing the Sample Program
When using the sample program for Visual C++, version 5. 0 (or higher) of Visual C++ must be installed already as
the development tool.
When using the sample program for Visual Basic, version 5. 0 (or higher) of Visual Basic must be installed already as
the development tool.
If the computer’s OS is Windows 95 or Windows NT 4. 0 and Visual Basic 6. 0 is being used as the development tool,
it may not be possible to execute spc53002. exe. In this case, spc53002. exe can be made executable by opening
the project file “spc53002. vbp” and creating spc53002. exe again.
Set one CPD Board’s Board ID to 0.
When two or more CPD Boards are being used, set a unique Board ID on each Board. If the same Board ID is set
on more than one Board, the first Board found with that Board ID will operate.
The program will not run if one of the following error messages is displayed when you execute the program.
(2)
Error Messages
The DLL file has not been installed. Install the required file.
A CPD530 Board is not installed or the Board is not recognized by the
system. The device driver is not installed.
It is the mismatching of a system. Please ask a user support.
There isn’t a Board installed with Board ID 0.
Figure 5. 6-1 Sample Program Error Messages
31
5.6.2 Sample Program Operations
There is a source program in the sample program that initializes each axis. Therefore, this source program must be
changed if you want to operate the Board with different initialization conditions.
The following selection menu will be displayed if the sample program starts properly:
[Select Operation Menu]
Figure 5. 6-2 The Sample Program’s Select Operation Menu
Select the desired operation to execute that operation example.
(With the VC++ sample program, the operations are selected with a single-click. With the VB sample program, the
operations are selected with a double-click. )
(1) Opening/Closing Devices
This sample program obtains device information and opens/closes the devices.
In order to access a CPD Board, it is necessary to first open the device and obtain the device handle that is required to
access the device. The Open Device function initializes each register and the option ports at the same time that it
opens the device and obtains the device handle.
In this sample operation, its Board ID selects the Board, the device information is obtained for the selected Board, and
that Board’s device is opened.
Also, that Board’s device is closed with the Close Device function.
For more details on device information and opening/closing devices, refer to the CPD Board Series User's Manual:
Common Information.
The following diagrams show how to perform the sample operations.
[Device Opening/Closing Dialog Box]
When you click “Get Board ID” in the dialog box, the “Select Board ID” area will display the Board IDs of the Boards that are
actually installed in the computer.
32
[Select Board ID Dialog Box]
Select Board ID
Select the desired Board ID and click the “Open Device” Button to open the device.
[Window after Open Device Button is clicked]
Device handle
obtained by Open
Device
Device information
for the device that
was opened
Click the “Close Device” Button to close the device and return to the “Select Board ID” Dialog Box.
(2) Origin Returning Operation
This sample program makes the settings for the origin returning operation and performs the origin returning operation.
[Initial Window for the Origin Returning Operation]
Polarity
Selection
Select Origin
Returning
Operation
33
[Preparations for Operation]
1.
Polarity Selection
The indicated color will change when there is an input from the sensor.
The +ELS, -ELS, and SVALM indicators will be red when there is an
input and the OLS indicator will be green.
If the SVON signal is being output, the indicator will be green.
The input polarity can be switched by clicking the “N. O. ” and “N. C. ”
Buttons.
The Servo can be turned ON and OFF by clicking the “ON” and
“OFF” Buttons.
When a stepping motor driver is being used, the “OFF” Button turns the excitation ON and the “ON” Button turns the
excitation OFF.
Note 1. Operation is disabled while +ELS, -ELS, or SVALM is being input. Start operation after checking the status of
each sensor.
It is assumed that SVON is connected as specified.
Note 2. With a normally open (N. O. ) terminal, the signal is ON (detected) when there is a current.
With a normally closed (N. C. ) terminal, there is normally a current flowing and the signal is ON (detected) when there is
no current.
2.
Setting the Operation Speed
The operation speed can be set in the range of 1 to 65,535 pps. The initial
value is 4,000 pps, so change this initial value to the desired speed when
necessary.
Also, the base speed is set to 400 pps. If the operation speed is set below 400 pps, the motor will accelerate when the
speed drops to 400 pps even if it is supposed to decelerate because the DLS or OLS signal is ON. In this case, change
the sample program and set the base speed to the appropriate value.
[Executing the Origin Returning Operation]
Any one of the following origin returning methods can be selected.
“OLS”:
Origin returning operation 1(After OLS is detected, Get out of origin, re-enter and end. )
“OLS+EZ”: Origin returning operation 2: OLS ON is detected and encoder phase-Z is detected.
“ ELS”:
Origin returning operation 6: Reverse when ELS is detected and end when ELS is exited.
Refer to the CPD Board Series User’s Manual: Software Information for more details on the origin returning operations.
After completing, the “Preparations for Operation” and specifying one of the origin returning methods, click the “Origin
Returning” Button to execute the specified origin returning operation.
Clicking the “Stop” Button can stop the operation.
The current position display indicates the command pulse count.
The current speed display indicates the pulse speed (pps) currently being output.
Note
The OLS signal detection is rising-edge detection, so the OLS signal will not be detected if the signal is already
ON when operation starts. In this case, perform continuous feed operation until the OLS signal goes OFF and
then execute the origin returning operation.
34
(3) Continuous Feed Operation
This sample program demonstrates the high-speed continuous feed and constant-speed continuous feed operations.
[Continuous Feed Operation Window]
Before starting operation, perform the same preparatory checks (such as checking sensor connections) performed for
the origin returning operation.
Click the “+High-speed”, “+Constant-speed”, “-High-speed”, or “-Constant-speed” Button to perform the
corresponding continuous feed operation.
Clicking the “Stop” Button can stop the operation.
(4) Positioning Operation
This sample program demonstrates the high-speed positioning and constant-speed positioning operations.
[Positioning Operation Window]
Before starting operation, perform the same preparatory checks (such as checking sensor connections) performed for
the origin returning operation.
Click the “High-speed”or “Constant-speed” Button to perform the corresponding continuous feed operation.
Set the distance in pulse units.
The current position can be reset to 0 by clicking the “Reset Counter” Button.
Clicking the “Stop” Button can stop the operation.
35
(5) Linear Interpolation Operation
This sample program performs linear interpolation operation at high speed. The combined speed is fixed.
[Linear Interpolation Operation Window]
Before starting operation, perform the same preparatory checks (such as checking sensor connections) performed for
the origin returning operation.
Set the end positions for the X-axis and Y-axis.
Click the “Start” Button to perform the linear interpolation operation.
Clicking the “Stop” Button can stop the operation.
(6) Circular Interpolation Operation
This sample program performs circular interpolation operation at the base speed. (Constant surface speed control with a
base speed of 500 pps)
[Circular Interpolation Operation Window]
Before starting operation, perform the same preparatory checks (such as
checking sensor connections) performed for the origin returning operation.
Set the end position and center position for the X-axis and Y-axis.
Note
The current point is the starting point, and the end position is at the end
coordinate values relative to that starting point.
When the end point value is set to (0,0), a complete circle will be
formed.
If the end point coordinates are not on the circle, end point withdrawal
will start when the operation reaches either the specified X-axis or
Y-axis end position. If the end position has been set in one of the
yellow regions
shown in the diagram on the right, the operation
will never reach the X-axis or Y-axis end position so operation will not
stop.
Y
X
(0,0)
Click the “Start (CW)” or “Start (CCW)” Button to perform the circular Interpolation operation.
Clicking the “Stop” Button can stop the operation.
36
(500,0)
Setting example
5.7 ”Let’s try to move” Program for Windows Systems
The “Let’s try to move” program software allows you to check minimal operations on the display by simply connecting Board
to computer. Execute the A:¥test¥Release¥tpc53000. exe file on the provided floppy disk. (In this case, the floppy disk
drive is drive A. )
< Caution >
When two or more CPD Boards are being used, set a unique Board ID on each Board. If the same Board ID is set on more
than one Board, the first Board found with that Board ID will operate.
For safety reasons, the display will not change with this application while the axis is operating.
The program will not run if one of the following error messages is displayed when you execute the program.
[Error Messages]
The DLL file has not been installed.
The installation is incomplete.
A CPD530 Board is not installed or the Board is not recognized by the system.
The device driver is not installed.
It is the mismatching of a system. Please ask a user support.
Figure 5. 7-1 Let’s try to move Error Messages
37
5.7.1 ”Let’s try to move” Operation Window
The following window will be shown when the “Let’s try to move” program is executed. When the program starts, it
will operate with the first Board that is found. To operate the “Let’s try to move” program with a different Board, select
the Setting Window by clicking the “X-U Setting” tab at the top of the Window.
Refer to 5. 7. 2 Let’s try to move Settings Window for details on selecting another Board.
Figure 5. 7-2 Let’s try to move Operation Confirmation Window
(1) Device Information Display
The device information for the Board that is currently selected is displayed near the top of the window, as shown below.
Note 1.The “NTLP: Management Number” will be “-1” in a Win9x or WinMe system.
Note 2.The “Board ID” is the value set with the Board’s Board ID jumper pins.
Note 3.The “Device number” (The slot number)
(2) Individual Axis Displays and Operation Commands
The operations are the same for each axis on the Board.
Each axis is initialized by a part of the source program. Therefore, this source program must be changed if you want
to operate the Board with different initialization conditions.
1.
Axis Status and Changes in Axis Operating Conditions
Resets the counter to 0.
Changes input polarity.
Turns Servo ON.
Turns SVRST ON.
2.
Axis’ Current Position and Operation Speed
Each axis’ current position and NTLP:operation speed is refreshed approximately every 0. 1 s.
The current position display can be switched between the command-output-pulse and the encoder-feedback.
The position is displayed in pulses and the speed is displayed in pps.
“Command pulse”
← Switch →
“Encoder feedback”
38
3.
Sending Start and Stop Commands to an Axis. Each axis’ operation can be set to constant/high-speed positioning
operation, constant/high-speed continuous feed operation, constant/high-speed origin returning operation, or Stop. Refer to
5. 7. 2 Let’s try to move Settings Window for details on the axis operating conditions that can be changed.
Setting Constant-speed Operation
1.
2.
3.
4.
5.
6.
7.
Positioning in “+” direction at base speed. (Set positioning amount in Settings Window.)
Positioning in “–“ direction at base speed. (Set positioning amount in Settings Window.)
Constant-speed operation in “+” direction at base speed.
Constant-speed operation in “–“ direction at base speed.
Origin returning operation in “–“ direction at base speed. When the OLS signal goes ON, operation
stops immediately and the origin returning operation is completed.
High-speed origin returning operation in “–“ direction at operation speed. When the OLS signal goes
ON, operation decelerates to base speed. When the first Z-phase input is received, operation stops
immediately and the origin returning operation is completed.
When operating at operation speed, operation is decelerated to a stop.
When operating at base speed, operation is stopped immediately.
Setting High-speed Operation
1.
2.
3.
4.
5.
6.
7.
High-speed positioning in “+” direction at operation speed.
(Set positioning amount in Settings Window.)
High-speed positioning in “–“ direction at operation speed.
(Set positioning amount in Settings Window.)
High-speed operation in “+” direction at operation speed.
High-speed operation in “–“ direction at operation speed.
Origin returning operation in “–“ direction at base speed. When the OLS signal goes ON, operation
stops immediately and the origin returning operation is completed.
High-speed origin returning operation in “–“ direction at operation speed. When the OLS signal goes
ON, operation decelerates to base speed. When the first Z-phase input is received, operation stops
immediately and the origin returning operation is completed.
When operating at operation speed, operation is decelerated to a stop.
When operating at base speed, operation is stopped immediately.
Note 1. Acceleration/deceleration operations use linear acceleration/deceleration.
Note 2. The DLS signal is enabled. If this signal is not being used, set it as an N. O. condition and set it so that it is
not input.
Note 3. The INPOS signal is enabled. If this signal is not being used, set it as an N. C. condition and set it so that it is
not normally input.
Note 4. The OLS signal detection is rising-edge detection, so the OLS signal will not be detected if the signal is already
ON when operation starts. In this case, perform continuous feed operation until the OLS signal goes OFF and
then execute the origin returning operation.
Note 5. During operation, if EA/EB error or PA/PB error occur, the“POSIT”Button, the“CONTINS”Button, and
the“ORG”Button is enabled.
39
5.7.2 ”Let’s try to move” Settings Window
The following settings window will be displayed when all axes were stopped in the Let’s try to move Operation
Confirmation Window and the “X-U Setting” tab was clicked at the top of that Window.
Figure 5. 7-3 Let’s try to move Settings Window
(1) Board Selection and Device Information
When two or more Boards have been installed in the computer, the Board used for the Let’s try to move can be
specified by selecting its device number or Board ID, as shown below.
1.
2.
Select by Board ID.
Select by device number.
(2) Changeable Axis Operating Conditions
The operating conditions can be set individually for each axis that can operate.
1. Switches between constant-speed and high-speed operation. The default setting is
constant-speed.
2. The command pulse output format can be switched between discrete and shared pulse methods.
The default setting is the discrete pulse method.
1.
2.
Sets the travel distance. (1,500)
Sets the base speed. (200)
3.
Sets the operation speed. (2,000)
4.
Sets the acceleration/deceleration time. (500)
Note. The default settings are in parentheses.
Note 1. The setting range for the travel distance is –999,999 to +9,999,999 pulses.
Note 2. The setting ranges for both the base speed and operation speed are 1 to 65,535 pps, although the full setting
range may not be usable depending on the combination of settings being used. For the same reason, it may
not be possible to use the full setting range of the acceleration/deceleration time depending on the settings
made for the operation speed and base speed.
Note 3. If the operation speed is set below the base speed, the motor will accelerate when the speed drops to 400 pps
even if it is supposed to decelerate because the Stop command is input, the DLS is ON, or the OLS signal is
ON.
Note 4. Error Message
The window shown on the right will be displayed if an invalid setting has
been input. Click OK and enter a valid setting.
40
5.8 Sample Programs for a DOS System
Sample programs written in C language have been bundled with the DOS-version software. Use the sample programs for
the following purposes.
(1) Checking the Installed Boards
After installing the device driver, turning OFF the computer’s power supply, installing the Boards, and restarting the
computer, the sample program’s executable file can be started to display the mounted Boards’ “device information” and
confirming the Boards’ operation.
(2) Demonstrating the Functions in the Driver Interface Library
The application program must perform various operations on the Board through the driver interface library and device
driver. The sample program provides examples of the operations.
5.8.1 Configuration of the Sample Program
The sample program and source files have the following configuration.
clk. bat
--- Batch file that creates executable files for MS-C (Ver. 6. 0)
|------smp530. c ----Source program
|------hicpd530. h ---- Header file "#include" by "smp530. c "
|------hcpdtype. h ---- Header file "#include" by "hicpd530. h"
|------licpd530. lib ---- Library file (the initial “l” indicates large model)
5.8.2 Starting the Sample Program
The following displays will appear when the executable “smp530. exe” file is started.
(1) Sample Program Terminated by Error
The following error message will be displayed if the device driver has not been installed in the system or the Board has
not been installed in the computer.
If this message is displayed, check whether the device driver and Board have been installed properly.
(2) Sample Program Started Normally
The following message will be displayed if the program started normally.
The Board displayed here can be selected by pressing one key.
To select operation with the interrupt function, input “I” or “i”. To select operation without the interrupt function, input “Y”
or “y”. If any other key is pressed, the displayed Board will not be selected (when 2 or more Boards are installed).
The following diagrams show the different screens displayed when “y” and “I” are input.
In the screen displayed after “y” is pressed, the Board’s interrupt function is not used. In the screen displayed after “I”
is pressed, the Board’s interrupt function is used.
41
After “y” input
The interrupt function is not used
After “I” input
The interrupt function is used
Figure 5. 8-1 Startup Screens for the DOS Version of the Sample Program
The differences in the “interrupt display” for these two screens are as follows:
The relevant interrupt displays are in the Event Status (RIST) and Error Status (REST) fields.
* Interrupts not used:
Interrupt sources are polled. When an interrupt occurs, the source is displayed in hexadecimal for a fixed time.
* Interrupts used:
When interrupts have occurred, the interrupt sources are displayed in hexadecimal as OR's.
(The display is cleared at the start of operation. )
(1) Title, Number of Boards Recognized, and Software Version
Number of Boards recognized
(2 Boards max. due to screen restrictions)
Version of driver functions
Version of device driver
(2) Board Information
(a) Display of Selected Boards (Operable Boards)
ID: This hexadecimal ID is the device handle returned to the Device Open function.
The Board ID (BID) is added to the higher word of the device ID in the Device Open function
[N]: Displays the number of enabled axes (N) that were recognized in the sample program.
(b) Board Display
Indicates the following device information that was obtained for the selected Board.
Bus: Bus number
Dev:
Device number (PCI slot number)
I/O: I/O port address
IRQ:
IRQ number
CTL: Management number
BID:
Board ID (0 to 15, set with the Board’s jumper pins)
42
(3) Board Status (Selected Board Only)
The following information is displayed for each axis.
CTR1: Current command pulse position
CTR2: Current feedback position
rSPD: Operating speed (0 to 16,383)
MssL: Main status: Lower 8 bits
MssH: Main status: Higher 8 bits
Sss
Sub-status + Encoder phase-Z
RIST: Event status (interrupt source)
REST: Error status (interrupt source)
The status display is expressed in one character.
MssL
MssH
Sss
(RSTS)
Bit
Name
Display 1
Display 0
Bit
Name
Display 1
Display 0
Bit
Name
Display 1
Display 0
b7
SSC1
o
b6
SSC0
o
b5
SINT
I
b4
SERR
E
b3
SEND
F
.
.
.
.
b15
SPDF
5
b14
SPRF
P
b13
---
.
.
b15
SDLS
D
d
b14
SOLS
O
o
.
.
b13
SMEL
-
.
b2
---
.
.
.
b1
SRUN
R
.
.
b12
SCMP5
5
b11
SCMP4
4
b10
SCMP3
3
b9
SCMP2
2
b8
SCMP1
1
.
.
.
.
.
b12
SPEL
+
b11
SALM
A
a
RSTS:b10
b1
SVRST
R
r
b0
SVON
S
s
.
SEZ
Z
z
b0
SSCM
C
Note: RSTS = Expansion status register and b10/SEZ = EZ input signal
(4) Selecting Program Commands
Input one of the following characters from the keyboard to select a command.
0: End the program
1: Initialize the specified Board. (The Board is initialized when the program starts up. )
2: Send an operation command to the specified axes on the specified board.
3: Set the register values for the axis LSI registers. (Shared by all axes. )
Other: If any other key is input, all axes will be decelerated to a stop.
(5) Using Operation Commands and the Main Status
The sample program does not confirm the startup conditions of commands to individual axes or the end of those
operations. The typical application program controls continuous independent operation to individual axes or interpolation
operation to specified axes.
At that time, it is necessary to confirm whether the operation is performed properly and the operation’s end status.
The main status register (MSTS) is provided for this purpose. Refer to 6. 2 Using the Main Status Register for details.
43
5.8.3 Sample Program Operations
Use the following procedure to perform various operations in the sample program.
(1) Register Contents Table
This table contains the contents of registers that are
shared by the axes and can be changed. The set values
of individual registers can be displayed by selecting
3:Register from the program commands. The set
values can be changed and written to the axes with
keyboard inputs.
(2) Displaying and Changing Registers
Name
0:BasS
1:MovS
2:Acc
3:Mult
4:Mode
5:AuxS
Key input
0
1
2
3
4
5
6:RENV1
7:RENV2
8:RENV3
6
7
8
Contents
Base speed
Operation speed
Acceleration rate
Speed multiplier
Operation mode
Travel distance
compensation speed
Environment 1
Environment 2
Environment 3
Name
I:INT.
C:CMP45
P:DLS/PCS
O:OLS
E:ELS
A:ALM
Key input
I
C
P
O
E
A
Contents
Event mask
Comparators 4 and 5
DLS/PCS
OLS input polarity invert
ELS input polarity invert
ALM input polarity invert
The table above lists the 15 relevant items in the register.
Select 3:Register and then input the character corresponding to the item that you want to display/change.
Input the desired value into this field to set the new value in all axes. If you press just the Enter Key alone, the operation will
end without changing the setting for the axes.
When one of the 3 kinds of input sensors is selected, the input polarity for all axes will be inverted immediately and the
operation will end. The results of this “input polarity invert “operation will be reflected immediately in the display.
The ELS of all axes detected in both directions.
As the ELS input polarity is inverted for all axes,
so the ELS status changes to undetected.
(3) Initializing the Board
This display initialized the 4-axis Board.
In the initialization operation, the following
commands are executed for the axes in the
specified Board and then all registers are reset
to their initial values.
(a) Perform Software Reset on each axis.
(b) Set data in registers.
Write settings in the register contents
table. Write fixed values (0) to the
registers that are not in the table.
44
(4) Sending Operation Commands to Each Axis
There are 11 kinds of operation commands, as shown in the table on the right, but these commands can be divided into 3
categories.
* Change operation speed:---- 0: Constant speed
*Servo signal output to all axes:--- S: Servo ON
---R: Reset ON
* Operation Command to individual axis:
All inputs other than 0, S, and R
(a) Change operation speed
Switches the speed used for operation commands to
individual axes.
”CNST” displayed ---- Base speed
(FL constant-speed start)
”HIGH”displayed ------Operation speed
(high-speed start)
(b) Servo signal output to all axes:
(c) Origin returning operations
There are three origin returning methods provided. If the operation speed is set to “high speed”,
the Board will perform high-speed origin returning with acceleration and deceleration.
1) OLS Origin Returning (After OLS is detected, get out of and re-enter the origin to complete operation. )
Stops (or decelerates to a stop) when OLS is detected, reverses and gets out of origin, and ends operation when OLS
is detected again.
The operation procedure is as follows: set SelCmd=1, specify the desired axis number (0 (X), …), and specify the
movement direction (all keys besides the “+” Key specify “–“).
OLS origin returning
X-axis
“–“ direction
2) OLS + Encoder Phase-Z
When OLS is detected (starts decelerating) and ends when phase-Z is detected.
The operation procedure is as follows: set SelCmd=2, specify the desired axis number (0 (X), …), and specify the
movement direction (all keys besides the “+” Key specify “–“).
S + phase-Z origin returning
Y-axis
“–“ direction
3) ELS Shared Origin Returning
Press Enter
Stops (or decelerates) when ELS ON signal is detected, reverses and gets out of origin
at low speed, and ends operation when ELS OFF signal is detected.
The operation procedure is as follows: set SelCmd=3, specify the desired axis number (0 (X), …), and specify the
movement direction (all keys besides the “+” Key specify “–“).
ELS dual-use origin returning
45
Z-axis
“+“ direction
(d) Positioning Operation
Performs 1-axis positioning for the specified axis.
Positioning
U-Axis
(e) Continuous Operation
Performs 1-axis continuous operation for the specified axis.
5: +direction
6: -direction
Xe: X-axis travel distance
Ye: Y-axis travel distance
Ze: Z-axis travel distance
Ue: U-axis travel distance
(Sign shows direction.)
Axis No.
(f) Linear Interpolation
Performs linear interpolation operation for the two specified consecutive axes.
Linear Interpolation
Axis No.
Axis combination
0: ( Xe,Ye )
1: ( Ye,Ze )
2: ( Ze,Ue )
3: ( Ze,Ue )
End Position
(g) Circular Interpolation
Performs circular interpolation operation for the two specified consecutive axes. (See Linear Interpolation above for
details on specifying the two axes controlled in the operation. )
When the travel distance (end position) for both axes is set to (0, 0), the Board will make a complete circle.
Circular Interpolation
0=CW
1 = CCW
Axis No.
End Position
46
Circle Center Position