1
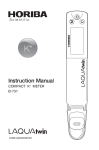
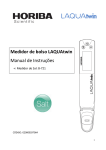
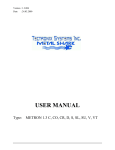
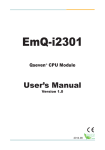
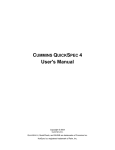
USER MANUAL Revision - 2.14 Table of Contents RAMIS Setup.............................................................................................. 5 RAMIS login ........................................................................................... 5 Logging in to RAMIS .......................................................................... 5 Registering a RAMIS Scanner ................................................................ 5 RAMIS PC Software Overview ................................................................... 6 System Requirements ........................................................................... 6 Obtaining the RAMIS PC Software ........................................................ 6 Installing the RAMIS PC Software – All Windows Versions................... 7 Installing the RAMIS Scanner – Windows XP ...................................... 10 Installing the RAMIS Scanner – Windows VISTA ................................. 13 RAMIS PC Software Usage .................................................................. 14 RAMIS PC Software initial run ......................................................... 14 Running RAMIS PC Software ........................................................... 15 Loss of Internet Connection ............................................................ 16 RAMIS Server Messages .................................................................. 16 Closing the RAMIS PC Software ...................................................... 16 RAMIS System Overview ......................................................................... 16 Changing the active Phase .................................................................. 17 RAMIS Dashboard ............................................................................... 18 Expanding the Dashboard ............................................................... 19 Filtering the Dashboard .................................................................. 20 Manually change the scan status of a material .............................. 20 Manually change the student name associate with a material ...... 21 Add a note to a material ................................................................. 21 Other parts of RAMIS .......................................................................... 21 Print Scanner Commands ................................................................ 21 Run Reports..................................................................................... 22 Change Your Password.................................................................... 22 Load More Publisher Data .............................................................. 22 Register a Scanner........................................................................... 23 Find Materials ................................................................................. 23 Print Teacher Barcodes ................................................................... 23 RAMIS Scanner Overview........................................................................ 24 RAMIS Scanner Description ................................................................ 24 Scanning a Barcode ......................................................................... 25 Resetting the RAMIS Scanner ......................................................... 25 Setting the Scan Point ..................................................................... 26 Transmitting to the RAMIS System ................................................. 26 Scanning the Scan Points .................................................................... 27 Receiving Cartons ............................................................................ 27 Receive Tests ................................................................................... 28 Tests Out ......................................................................................... 28 Associate Teacher (Alternative Test Out Function) ........................ 29 Tests In ............................................................................................ 29 Pack Cartons.................................................................................... 30 Cartons Returned to District ........................................................... 31 Ship Cartons to Scoring ................................................................... 31 RAMIS Scanner Other Functions ......................................................... 32 Associate Student ........................................................................... 32 Getting Help ............................................................................................ 32 Trouble Shooting Guide ...................................................................... 33 Contacting RAMIS ............................................................................... 34 RAMIS - User Manual RAMIS Setup RAMIS login If you are a new user or have forgotten your ID or Password, go to www.dontcount.com or call 866-99RAMIS to have your password reissued to you. For future reference record your ID and Password here; Website: User Name: Password: www.dontcount.com Logging in to RAMIS To login to RAMIS; 1. Open Internet Explorer. 2. Go to www.dontcount.com and Click the “LOGIN” button. 3. Enter you ID and password, recorded on page 5. Registering a RAMIS Scanner Before you can use RAMIS, you must register the RAMIS scanner(s). To register your scanner; 1. 2. 3. 4. Open Internet Explorer. Go to www.dontcount.com and Click the “LOGIN” button. Enter you ID and password, recorder on page 5. Click the “Register a Scanner” link near the bottom of the screen. 5. Enter your 8 digit Scanner ID located on the back side of the scanner. 6. Select your local time zone. 7. Select how your scanner will be used. This option varies depending on your logon. More than likely you will have only one option. 5 RAMIS - User Manual 8. Click the “Register Scanner” button at the bottom of the screen to complete the scanner registration. RAMIS PC Software Overview The RAMIS PC Software allows the RAMIS Scanner to connect to the RAMIS System. You will need to install this software onto the PC that you will be connecting the RAMIS Scanner. This will only need to be done once. System Requirements Windows 2000/XP/VISTA Available USB Connection Internet Explorer 6 or 7 Internet Connection You will also need administrative rights to your computer to properly install the software. If you are unsure if you have administrative rights, contact your Information Technology departments. Obtaining the RAMIS PC Software The RAMIS PC Software is available free of charge at www.dontcount.com, however you will need your ID and password to access the download. If you need your password, contact RAMIS Technical support. 1. 2. 3. 4. Open Internet Explorer. Go to www.dontcount.com and Click the “LOGIN” button. Enter you ID and password. Click the “Need software?” link at the lower right corner of the screen. 5. Under the “PC SOFTWARE” section, right click the “ramissetup.exe” link, then select “Save Target As…” 6 RAMIS - User Manual 6. When prompted, save the downloaded file to your desktop. a. Depending on your internet connection speed the download could take up to 10 minutes to download. 7. When the download is complete, if Internet Explorer did not close the download box, click “Close” Installing the RAMIS PC Software – All Windows Versions 1. Locate the “RAMIS-Setup” program that you downloaded in “Obtaining the RAMIS PC Software” on page 6. 2. Double click the “RAMIS-Setup” program to start the installation process. 3. You may get a Security Warning stating that the publisher could not be verified, as shown below. Click “Run” to continue. Figure 1 4. Click “Next” to continue as shown below. 7 RAMIS - User Manual Figure 2 5. Click on “Next” to continue as show below. Figure 3 6. Click on “Next” to continue as shown below. 8 RAMIS - User Manual Figure 4 7. The RAMIS PC Software will now complete installation. This will take a few moments. Once complete, make sure “Run RAMIS now” is checked and click “Finish” as shown below. Figure 5 8. The RAMIS PC Software will make some last system settings, when complete you will need to click “OK” as shown below. 9 RAMIS - User Manual Figure 6 Installing the RAMIS Scanner – Windows XP 1. Plug the smaller connector of the USB cable into the base of the RAMIS Scanner. 2. Plug the other end of the cable into the USB port of your computer. 3. When your computer starts the “Found New Hardware Wizard”, select “Yes, this time only” and click “Next”. (Figure 7) Figure 7 4. Select “Install the software automatically” and click “Next”. (Figure 8) 10 RAMIS - User Manual Figure 8 5. Wait a few moments while Windows downloads and installs the drivers from Microsoft®. Then click on “Finish”. (Figure 9) Figure 9 6. Windows will now install the second part of the RAMIS Scanner. 7. Select “Yes, this time only” and click “Next”. (Figure 10) 11 RAMIS - User Manual Figure 10 8. Select “Install the software automatically” and click “Next”. (Figure 11) Figure 11 9. Wait a few moments while Windows downloads and installs the drivers from Microsoft. Then click on “Finish”. (Figure 12) 12 RAMIS - User Manual Figure 12 10. The RAMIS Scanner has been successfully installed and is ready for use. Installing the RAMIS Scanner – Windows VISTA 1. Plug the smaller connector of the USB cable into the base of the RAMIS Scanner. 2. Plug the other end of the cable into the USB port of your computer. 3. When your computer starts the “Found New Hardware Wizard”, select “Locate and install driver software”. Figure 13 13 RAMIS - User Manual 4. The “Windows New Hardware Wizard” will minimize to your task bar as show below. Figure 14 5. After a few minutes, the taskbar will alert you that the hardware installation is complete as shown below. Figure 15 6. The RAMIS Scanner has been successfully installed and is ready for use. RAMIS PC Software Usage The RAMIS PC Software must be running in order to transmit data from the RAMIS Scanner to the RAMIS System. The RAMIS PC Software also delivers software updated to the RAMIS Scanner when they become available. RAMIS PC Software initial run The first time you run the RAMIS PC Software you will be shown the “RAMIS Config” screen as shown below. Click “Save” to continue. 14 RAMIS - User Manual Figure 16 Running RAMIS PC Software The RAMIS PC Software continually queries your computer looking for the RAMIS Scanner. Once found it will listen to the RAMIS Scanner for data to be transmitted to the RAMIS System. 1. 2. 3. 4. 5. Click “Start” Click “All Programs” Click “RAMIS” Click “RAMIS” The RAMIS Software will run as shown below OR Figure 17 15 1. Double click the RAMIS Icon on your desktop. 2. The RAMIS Software will run as shown below RAMIS - User Manual Loss of Internet Connection In the event that the RAMIS PC Software cannot find the internet, it will continue to download the data from the RAMIS Scanner and stage it on the PC. Once the internet connection has been restored, it will transmit all data that has not been sent to the RAMIS System. RAMIS Server Messages Occasionally the RAMIS System may send you a RAMIS Server Message. You will know if there are messages available because there will be a button for messages. To view these messages click on the “Messages” button. Closing the RAMIS PC Software When you complete scanning the materials, you can close the RAMIS PC Software by clicking the “Quit” button. You will be asked to make sure that you intentionally closed the RAMIS PC Software. RAMIS System Overview Once logged on to RAMIS, you will be presented with the RAMIS Dashboard. From here you can; Change the Phase you are currently working. Quickly see the status of all of the materials that you are your responsibility. Access other parts or RAMIS (e.g. Print Scanner Commands, Run Reports, Change Your Password, Register a Scanner…). 16 RAMIS - User Manual Figure 18 Changing the active Phase A phase is a logical group of tests. This group is defined by the publisher and varies from publisher to publisher. The active phase is shown directly above the dashboard after the label “Now Showing”. In the figure above the active phase is “WLPT II DEMO”. To change the active phase to a different phase; 1. Click the active phase name, in the case of the figure above you would Click “WLPT II DEMO”. 17 RAMIS - User Manual 2. You will be shown a list of Phases that are currently being administered. Click the Phase you want to activate. 3. If you do not see the Phase you are looking for, perhaps it has already concluded, or has not yet begun. If that is the case, you can Click the “Select from past testing phases” or “Select from future testing phase” to find the Phase. RAMIS Dashboard The dashboard is located within the grey/green box labeled “Summary”. From here you can quickly see the overall status of all of the materials that are your responsibility. The dashboard lists various scan points that are available for you to track your materials. Some of the scan points are; Cartons received by district Cartons received by campuses Materials received by district/campuses Materials out to teachers Materials in from teachers Materials packed for return Cartons packed for return Cartons returned to district Cartons shipped to publisher Cartons received by publisher Depending on your login your dashboard may have more or less scan points. The dashboard shows how many Exceptions, Unscanned, Scanned, and Total materials there are for each scan point. Exceptions are items that were scanned that RAMIS does not recognized. These may be items that were incorrectly scanned, or these may be actual materials for which RAMIS has yet to receive from the publisher. Unscanned materials are materials that are yet to be scanned by RAMIS for the corresponding scan point. 18 RAMIS - User Manual Scanned materials are materials that have been scanned into RAMIS for the corresponding scan point. Total materials are the total materials for the corresponding scan point. Expanding the Dashboard The dashboard is a hyperlinked data grid. That means that you can click on various parts of the data grid to open that subset of data into a new hyperlinked data grid. For example, using the figure on page 17, if we were to click on the number “246” for “Unscanned Materials out to teachers” we would then see; Figure 19 RAMIS then breaks the data to the next level and summarizes the data. In this case the next level was Subjects. You can now again click on one of the numbers or a subject name to go to the next level of data. Eventually if you keep drilling down you will arrive at a report similar to the figure 20 below. 19 RAMIS - User Manual Figure 20 This report shows all of the details for each material in the data set you drilled down. This will assist you in managing your materials with more information. From here you can add or remove data by clicking the green links at the top of the report. Filtering the Dashboard On the dashboard there is a section at the bottom where you can filter the dataset yet further. To do this (Figure 20); 1. Enter your search value in the “Filter by” box. 2. Select which attribute you want to filter by changing the drop box labeled “in” 3. Click the “REFRESH” button to execute the search Manually change the scan status of a material There may be a time when you need to manually change the scan status of a material (e.g. the barcode is damaged). This can be accomplished after you have located the material on the dashboard shown in the figure on page 20. Once there; 1. Click the check mark to the left of the Material ID. 2. Select the new scan stage for the item. 3. Click the “UPDATE” button to save your changes. 20 RAMIS - User Manual Manually change the student name associate with a material There may be a time when you need to manually change the student or teacher name that is associated with a material. This can be accomplished after you have located the material on the dashboard shown in the figure on page 20. Once there; 1. Click the “N” to the left of the Material ID. 2. Update the material’s information. 3. Click the “SAVE” button to save your changes. Add a note to a material You can add free form notes to any material. This can be accomplished after you have located the material on the dashboard shown in the figure on page 20. Once there; 1. Click the paper clip to the left of the Material ID. 2. Enter the notes for the material. 3. Click the “SAVE” button to save your changes. Other parts of RAMIS Below the dashboard are various functions that you will need to utilize from occasionally (Figure 18). Print Scanner Commands The “Print Scanner Commands” function created a report that you will need to print and use with the RAMIS Scanner. To create a Scanner Command sheet; 1. Click the “Print Scanner Commands” link. 2. A new window will open and you will be able to print the sheet. Each Scanner Command sheet is different for every phase. Make sure that the scanner command sheet has the correct phase name at the top of the report before you use it. 21 RAMIS - User Manual Run Reports The “Run Reports” are sets of reports for your use to quickly view the data in different views. To run a report; 1. Click the “Run Reports” link. 2. Select the desired report to run by clicking on the name of the report. 3. When you are complete, Click the “[BACK TO MAIN MENU]” link at the top of the page. Change Your Password You can change your password and modify your profile with the “Change Your Password” function. To change your password or modify your profile; 1. Click the “Change Your Password” link. 2. Enter your new password and click “CHANGE PASSWORD” button. a. If you desire to change your profile information, Click the “Want to change your name/address/phone/email/etc?” at the bottom instead of the “CHANGE PASSWORD” button. b. Update your profile and Click “UPDATE” to save the changes. 3. When you are complete, Click the “[BACK TO MAIN MENU]” link at the top of the page. Load More Publisher Data There are some instances where the Publisher is unable to give RAMIS a data file containing the materials you received from them. If this applies to you then you can acquire the data file from the publisher and submit it to RAMIS by; 1. Click the “Load More Publisher Data”. 22 RAMIS - User Manual 2. Click the “Browse…” button. 3. Locate the file you received from the publisher and click “OPEN” 4. Select the “Testing phase” that this is data file. If it is not listed, enter it in the text box below the list. Close the window 5. Click “UPLOAD”. 6. Your data file should be processed in a couple of hours after your submit it. Register a Scanner Every time you receive a new scanner you must register it with RAMIS. This process is explained in the “Registering a RAMIS Scanner” section on page 5 Find Materials The “Find Materials” function quickly helps you find a material by allowing you to search for materials with a specific attribute. To find a material; 1. Click the “Find Materials” link. 2. Enter part or all of your search value in the “Search for” box. 3. Select which attribute you want to search by changing the drop box labeled “in” 4. Click the “Find” button to execute the search 5. When you are complete, Click the “[BACK TO MAIN MENU]” link at the top of the page. Print Teacher Barcodes This function will allow you to quickly print barcodes for teacher’s names so that you can utilize the “Associate Teacher” function. To print teacher barcodes; 1. Click the “Print Teacher Barcodes” 2. Enter in the teacher(s) names. 23 RAMIS - User Manual One per line No more than 20 characters are recommended You can use Windows® copy and past feature to quickly copy and paste the names from another file or spreadsheet program. 3. When done entering the names, Click “CREATE” to generate the barcodes to be printed. 4. When you are finished, Click the “[BACK TO MAIN MENU]” link at the top of the page. RAMIS Scanner Overview RAMIS Scanner Description The scanner’s display is located on the face of the scanner. This display is used to determine what function the scanner is currently operating. The RAMIS Scanner has three buttons located below the display; Left button – Screen/Page Up Center button – Enter/Scanner On Right button – Screen/Page Down Above the display there is a LED. This LED will illuminate after a barcode has been scanned to alert you that there has been a successful read. At the bottom of the scanner is where the USB cable is plugged into, the other end is plugged into the USB port of your computer. At the top of the scanner is the laser aperture. When you press the “Scanner On” button this is where the laser will be generated from to read a barcode. DO NOT LOOK INTO THE APETURE WHEN THE LASER IS ACTIVE. 24 RAMIS - User Manual On the back top of the scanner is a label that has the Scanner ID. This ID is an eight digit number in the format of XXXX-XXXX. You will use this number to register your scanner On the back bottom of the scanner is the battery door cover. The RAMIS Scanner uses 2 AAA Batteries. It is recommended to keep an extra batteries available. Scanning a Barcode During the operation of the RAMIS Scanner you will be required to scan a barcode. To scan a barcode; 1. Press the “Scanner On” button. a. The LED will illuminate showing that the scanner is active. 2. Adjust the aim so that the thin, red laser beam covers the entire length of the barcode Figure 21 3. If the RAMIS Scanner successfully reads the barcode, the LED will turn green and beep. Resetting the RAMIS Scanner In the unlikely event you scanner starts to malfunction, you can reset the scanner by; 25 RAMIS - User Manual 1. Unplug the RAMIS Scanner from the computer. 2. Simultaneously press all three buttons on the face of the RAMS Scanner. 3. Use the right button to select “RESTART” from the menu. 4. Press the center button to restart the RAMIS Scanner. If pressing all three buttons does not cause the system menu to appear; 1. Remove the batteries from the back of the RAMIS Scanner. 2. Wait 30 seconds 3. Replace the batteries. Setting the Scan Point The scan point must be set in the RAMIS Scanner before you can scan any materials. You must first print a “RAMIS Scanner Commands” sheet as described in “Print Scanner Commands” on page 21. Remember that the “RAMIS Scanner Commands” sheet is unique for every phase. Therefore make sure that the “RAMIS Scanner Commands” sheet has the name of the correct phase at the top of the page before starting work. To set the scan point; 1. Scan the “SCANNER SETUP” barcode at the top of the “RAMIS Scanner Commands” Sheet. 2. Scan the barcode located directly abode the desired scan point Transmitting to the RAMIS System Once you have collected data on the RAMIS Scanner you must transmit the data to the RAMIS System. It is a good idea to do this regularly in case something happens to the scanner and your data is lost. To transmit your data; 1. Connect the RAMIS Scanner to your computer using the USB cable. 26 RAMIS - User Manual 2. Check to ensure that the RAMIS Software is running on your Computer. Figure 22 3. Scan the “Transmit” barcode located on the “RAMIS Scanner Commands” Sheet. 4. Once the data has been sent to the RAMIS System, the scanner will prompt you to delete the data. Unless you are having problems, you should always erase the data by pressing the left button. Scanning the Scan Points Receiving Cartons This scan point occurs at the time when you receive the materials from the publisher. To receive cartons; 1. Set the scan point as described in “Setting the Scan Point” on page 25 for “Receiving Cartons”. 2. Scan the carton barcode applied by the publisher. More than likely this is not the barcode that the shipping company applied to the barcode for their use. 3. Once a barcode has been successfully read, the counter in the RAMIS Scanner’s display will increment by 1. a. If you are ever unsure that did not scan a carton, scan it again. The RAMIS Scanner will display that you already 27 RAMIS - User Manual scanned it and there is no harm in scanning it more than once. 4. Repeat steps 2 through 3 until all of the cartons have been scanned. 5. Once complete, transmit the scans as described in “Transmitting to the RAMIS System” on page 26. Receive Tests This scan point occurs when you open the cartons to make sure that they contain all of the materials that are on the shipping manifest. To receive tests; 1. Set the scan point as described in “Setting the Scan Point” on page 25 for “Receiving Tests”. 2. Scan the material barcode located on the material that you are receiving. 3. Once a barcode has been successfully read, the counter in the RAMIS Scanner’s display will increment by 1. a. If you are ever unsure that did not scan a material, scan it again. The RAMIS Scanner will display that you already scanned it and there is no harm in scanning it more than once. 4. Repeat steps 2 through 3 until all of the cartons have been scanned. 5. Once complete, transmit the scans as described in “Transmitting to the RAMIS System” on page 26. Tests Out This scan point occurs at the time when you issue the materials to a teacher for administering to the students. To scan Tests Out; 1. Set the scan point as described in “Setting the Scan Point” on page 25 for “Tests Out”. 28 RAMIS - User Manual 2. Scan the material barcode located on the material that you are distributing. 3. Once a barcode has been successfully read, the counter in the RAMIS Scanner’s display will increment by 1. a. If you are ever unsure that did not scan a material, scan it again. The RAMIS Scanner will display that you already scanned it and there is no harm in scanning it more than once. 4. Repeat steps 2 through 3 until all of the materials have been scanned. 5. Once complete, transmit the scans as described in “Transmitting to the RAMIS System” on page 26. Associate Teacher (Alternative Test Out Function) This function will allow you to associate a teacher with the material while simultaneously issuing the material to a teacher for administering to the students. To scan Associate Teacher; 1. Set the scan point as described in “Setting the Scan Point” on page 25 for “Associate Teacher”. 2. Scan the barcode corresponding to the teacher. 3. Scan the material barcode located on the material that you are going to associate with the teacher you scanned. 4. Repeat steps 2 through 3 until all of the materials have been associated 5. Once complete, transmit the scans as described in “Transmitting to the RAMIS System” on page 26. Tests In This scan point occurs at the time when you receive the materials from a teacher. To scan Tests In; 29 RAMIS - User Manual 1. Set the scan point as described in “Setting the Scan Point” on page 25 for “Tests In”. 2. Scan the material barcode located on the material that you are receiving. 3. Once a barcode has been successfully read, the counter in the RAMIS Scanner’s display will increment by 1. a. If you are ever unsure that did not scan a material, scan it again. The RAMIS Scanner will display that you already scanned it and there is no harm in scanning it more than once. 4. Repeat steps 2 through 3 until all of the materials have been scanned. 5. Once complete, transmit the scans as described in “Transmitting to the RAMIS System” on page 26. Pack Cartons This scan point occurs at the time when you repack the materials to be shipped back to the publisher. To Pack Cartons; 1. Set the scan point as described in “Setting the Scan Point” on page 25 for “Pack Cartons”. 2. Scan the carton barcode located on the carton label. 3. Scan the material barcode located on the material you are placing in the carton you just scanned in step 3 4. Once a barcode has been successfully read, the counter in the RAMIS Scanner’s display will increment by 1. a. If you are ever unsure that did not scan a material, scan it again. The RAMIS Scanner will display that you already scanned it and there is no harm in scanning it more than once. 5. Repeat steps 3 through 4 until the carton you scanned in step 2 is full. 6. For additional cartons repeat to step 2. 30 RAMIS - User Manual 7. Once complete, transmit the scans as described in “Transmitting to the RAMIS System” on page 26. Cartons Returned to District This scan point occurs at the time when you receive the cartons back to the district. To scan Cartons Returned to District; 1. Set the scan point as described in “Setting the Scan Point” on page 25 for “Cartons Returned to District”. 2. Scan the carton barcode located on the carton label. 3. Once a barcode has been successfully read, the counter in the RAMIS Scanner’s display will increment by 1. a. If you are ever unsure that did not scan a carton, scan it again. The RAMIS Scanner will display that you already scanned it and there is no harm in scanning it more than once. 4. Repeat steps 2 through 3 until all of the cartons have been scanned. 5. Once complete, transmit the scans as described in “Transmitting to the RAMIS System” on page 26. Ship Cartons to Scoring This scan point occurs at the time when you ship the materials back to the publisher. To Ship Cartons to Scoring; 1. Set the scan point as described in “Setting the Scan Point” on page 25 for “Ship Cartons to Scoring”. 2. Scan the carton barcode located on the carton label. 3. Scan the freight company’s barcode that corresponds to their tracking number. 4. Once a barcode has been successfully read, the counter in the RAMIS Scanner’s display will increment by 1. 31 RAMIS - User Manual a. If you are ever unsure that did not scan a carton, scan it again. The RAMIS Scanner will display that you already scanned it and there is no harm in scanning it more than once. 5. Repeat steps 2 through 4 until all of the cartons have been scanned. 6. Once complete, transmit the scans as described in “Transmitting to the RAMIS System” on page 26. RAMIS Scanner Other Functions Associate Student This function will allow you to assign students to tests that were not already assigned by the publisher. To Associate Student; 1. Set the scan point as described in “Setting the Scan Point” on 25 for “Associate Student”. 2. Scan the barcode corresponding to the student. 3. Scan the material barcode located on the material that you are going to associate with the student you scanned. 4. Repeat steps 2 through 3 until all of the materials have been associated 5. Once complete, transmit the scans as described in “Transmitting to the RAMIS System” on page 26. Getting Help Common up to date help questions are located at www.dontcount.com. After you login click the “HELP” icon in the upper right corner of the screen. There is also a troubleshooting section at the end of this manual. If you are still experiencing troubles, call RAMIS Technical Support. 32 RAMIS - User Manual Trouble Shooting Guide Problem Symptom Resolution RAMIS Scanner says “Transmit OK. Delete data?” The scanner will ONLY say this if the transmission of your scans from the scanner to your PC was completely successful and your scans are safely stored on your hard drive. To transmit data from your scanner, select TRANSMIT from the scanner's main menu. If your scanner cannot communicate with the PC, after a few minutes it may display a message such as "... CODE: XPS". This is a "timeout" error which simply means that the scanner has waited a long time without getting a response from the PC. When you see this message, you may ALWAYS confidently select YES. RAMIS Scanner does not transmit. There are only a few reasons a scanner might not communicate: 1. 2. 3. 4. 33 The scanner is not connected to the PC. Check that the USB cable is firmly connected to the scanner, and to a USB jack on the PC. The RAMIS PC program is not running on the PC. This does NOT mean that you are looking at or logged into the RAMIS web site. Run the RAMIS PC program by clicking on the small Abacus icon on your desktop. You must of course have previously installed the RAMIS PC software. The scanner driver on the PC was not installed properly. Review scanner driver installation instructions carefully or have your I.S. support person review them. Other software is conflicting with the USB serial port. Programs which communicate with other hardware, such as PalmOne's HotSync, may undesirably lock all ports. Close such programs if possible or have your I.S. support person RAMIS - User Manual 5. RAMIS Scanner says “COM ERROR” or “Transmit Failed” RAMIS Scanner says “BATTERY LOW” Scanner reboots when I scan. 2 AAA Batteries are low on power 2 AAA Batteries are low on power Scanner seems locked up. Contacting RAMIS General Mailing Address Data Collection Partners 310 West Lake Street Suite 110 Elmhurst, IL 60126 Technical Support 866-99RAMIS [email protected] 34 review this advice. The scanner's "protocol" may have unintentionally been changed. Reboot the scanner. See “Resetting the RAMIS Scanner” on page 25. Check the “Transmitting to the RAMIS System” on page 26. If the scanner says "BATTERY LOW" repeatedly, replace the batteries when convenient. Don't worry about if your data is safe, it CANNOT be lost because of dead batteries. For longest life, use quality alkaline batteries. If the scanner says "BATTERY LOW" repeatedly, replace the batteries when convenient. Don't worry about if your data is safe, it CANNOT be lost because of dead batteries. For longest life, use quality alkaline batteries. See “Resetting the RAMIS Scanner” on page 25. RAMIS - User Manual Sales 866-99RAMIS [email protected] © 2007-2008 by Data Collection Partners. All Rights Reserved. Data Collection Partners reserves the right to make changes to any software or product to improve reliability, function, or design. Microsoft and Windows are either registered trademarks or trademarks of Microsoft Corporation. Other product names mentioned in this manual may be trademarks or registered trademarks of their respective companies and are hereby acknowledged. 35