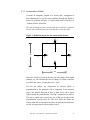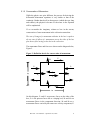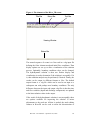
1
River2D Two-Dimensional Depth Averaged Model of River Hydrodynamics and Fish Habitat Introduction to Depth Averaged Modeling and User's Manual by Peter Steffler and Julia Blackburn University of Alberta September, 2002 1.0 INTRODUCTION TO DEPTH AVERAGED MODELLING 1.1 General Overview Advances in personal computer capability and computational software technology are making detailed analysis more routine in almost all branches of engineering. In channel and river engineering, two-dimensional (2D), depth averaged models are beginning to join one-dimensional models in common practice. These models are useful in studies where local details of velocity and depth distributions are important. Examples include bridge design, river training and diversion works, contaminant transport, and fish habitat evaluation. This introduction is intended to give a brief overview of 2D river modeling, highlighting considerations for practical applications. With possible high velocities and slopes, and relatively shallow depths, river and stream models present a particularly difficult computational challenge. This fact is likely a significant factor in the lag of application of shallow water models in rivers compared to coastal and estuarine problems. Recently, however, numerical techniques originally developed for transonic fluid mechanics problems have been successfully adapted. These techniques, referred to as shock-capturing or high-resolution schemes, allow freely intermixed subcritical and supercritical flow without the imposition of artificial eddy viscosity. The bottom line for river engineers is access to reliable and accurate solutions with a minimum of fiddling. 2D river model applications normally focus on a relatively limited extent of the channel, typically less than ten channel widths in length. In most cases, discharge variation is relatively slow compared to the water travel time through the reach, and steady state conditions are sought. Most models are designed to give transient solutions, however, and often the desired steady solution is obtained as an asymptotic transient solution after a long elapsed time. River2D - User Manual – September 30, 2002 1 1.2 Depth Averaged Models There are a number of commercial and public domain 2D models available. They are based on a variety of numerical schemes and offer a range of graphical pre and post processor modules. The fundamental physics is more or less common, however. All 2D models solve the basic mass conservation equation and two (horizontal) components of momentum conservation. Outputs from the model are two (horizontal) velocity components and a depth at each point or node. Velocity distributions in the vertical are assumed to be uniform and pressure distributions are assumed to be hydrostatic. Important three-dimensional effects, such as secondary flows in curved channels, are not included. As a rule of thumb, caution should be exercised in any attempt to resolve flow features less than about ten flow depths in horizontal extent. In many problems, the lateral extent of land covered by the channel is not known prior to the solution. In fact, for flood plain mapping problems, this may be the primary desired result. Existing 2D models take a number of approaches to handle the problem of some areas being wet while others are dry and changing between the two. Some models turn cells or elements on and off and insert no-flow boundaries between them based on a minimum depth criteria. Other models change the fluid properties at very small depths so that a very thin layer of fluid is always present. Another approach is to couple groundwater flow equations so that a common free surface is calculated, above the ground in the channel, and below the ground on dry land. 2D model schemes based on finite difference, finite volume, and finite element methods are available. Each approach has advantages and disadvantages. At the risk of grossly oversimplifying sometimes religious arguments, I would say that finite volume methods offer the best stability and efficiency while finite element methods offer the best geometric flexibility. River2D - User Manual – September 30, 2002 2 1.3 Data Requirements It may be a cliche to say that a model is only as good as its input data, but it is true. As input data, 2D hydrodynamic models require channel bed topography, roughness and transverse eddy viscosity distributions, boundary conditions, and initial flow conditions. In addition, some kind of discrete mesh or grid must be designed to capture the flow variations. Obtaining an accurate representation of bed topography is likely the most critical, difficult, and time consuming aspect of the 2D modeling exercise. Simple cross-section surveys are generally inadequate. Combined GPS and depth sounding systems for large rivers and distributed total station surveys for smaller streams have been found to be effective. In either event, you should expect to spend a minimum of one week of field data collection per study site. The field data should be processed and checked through a quality digital terrain model before being used as input for the 2D model. Bed roughness, in the form of a roughness height or Manning's n value, is a less critical input parameter. Compared to traditional one-dimensional models, where many two-dimensional effects are abstracted into the resistance factor, the two-dimensional resistance term accounts only for the direct bed shear. Observations of bed material and bedform size are usually sufficient to establish reasonable initial roughness estimates. Calibration to observed water surface elevations gives the final values. If unrealistic roughness values are required, it is likely that there are problems with the bed topography. Transverse eddy viscosity distributions are important for stability in some finite difference and finite element models and are often assigned unrealistically large values. They can be also be used as calibration factors for measured flow distributions. Stable shock capturing and high resolution numerical schemes are not sensitive to these values. In cases where accurate determination of eddy viscosity is required, a coupled turbulence model should be considered. River2D - User Manual – September 30, 2002 3 Boundary conditions usually take the form of a specified total discharge at inflow sections and fixed water surface elevations or rating curves at outflow sections. Since 2D models make no implicit assumptions about flow direction or magnitude, discharge divisions in splitting channels and the discharge given inflow and outflow elevations can be calculated directly. Locating flow boundaries some distance from areas of interest is important to minimize the effect of boundary condition uncertainties. Initial conditions are important, even for steady flow, since they are usually used as the initial guess in the iterative solution procedure. A good guess will significantly reduce the total run time and may make the difference between a stable run and an unstable one. Mesh or grid design is the black art of 2D modeling. The total number of degrees of freedom (number of computational nodes times three unknowns per node) is limited by the computer capacity and time available. For an overnight run on this week's "modern" PC, something in the order of 100,000 nodes is feasible. The challenge is to distribute these nodes in such a way that the most accurate solution is obtained for a particular purpose. Closely spaced nodes in regions of high interest or flow variation, gradual changes in node spacing, and regularity of element or cell shape are important considerations. A rough rule of thumb is that a minimum of four and preferably ten or more cells or elements in each direction are required to reliably resolve a flow field feature. To remove concerns about mesh design effects on the final solution, the solutions from more than one design should be compared. Fortunately, graphical pre-processors are available to aid the design (and later to interpret the results). Unfortunately, these require far more programming effort, and therefore may be more expensive, than the 2D hydrodynamic models themselves. River2D - User Manual – September 30, 2002 4 2.0 PRINCIPLES OF 2D HYDRODYNAMIC MODELING This section is intended to provide a brief background on the physics and numerical procedures underlying 2D depth averaged hydrodynamic models. The practical value of this background is that it helps explain the significance of the input parameters and also highlights the limitations and expected reliability of the model results. It is important to realize that there are two levels of approximation inherent in most computer models and that, according to “Murphy's Law” the errors at the two levels will tend to compound each other. The first level of approximation is in the abstraction of physical reality to a mathematical formulation. At this level, we leave out a great deal to focus on what we consider to be most important. Even for this limited subset of reality, we do not always understand the behaviour completely. Turbulence is a classic example. The second level of approximation is the transformation of mathematical statements to computer arithmetic. The essential problem here is that while our mathematics are sophisticated enough to recognize that real space is composed of an infinite number of points, our computers must work with a finite number. The approximation error decreases as we add more points, but we are limited by the computer speed and memory resources available. 2.1 Physical Formulation Depth averaged modeling is based on the basic physical principles of conservation of mass and momentum and on a set of constitutive laws which relate the driving and resisting forces to fluid properties and motions. To illustrate the abstraction process, the conservation of mass law is developed below in some detail. The more complex conservation of momentum is more briefly sketched out with the considerations for the necessary constitutive laws. River2D - User Manual – September 30, 2002 5 2.1.1 Conservation of Mass Consider an imaginary column in a stream flow, rectangular in plan (dimensions ∆x and ∆y) and extending through the depth of water, H, as shown in Figure 1. Conservation mass for this box or "control volume" states that: The rate of change of water volume with time in the box is equal to the net rate at which water flows into the box across the sides. Figure 1: Definition sketch for the conservation of mass. V4 y U1 U2 V3 x Since the volume of water in the box can only change if the depth changes, we can calculate the rate of change of volume with time as (A∆H)/(∆t), where A is the plan area = ∆x∆y. For the net inflow, the component of velocity which is perpendicular to the particular side is important. In the diagram above, the general direction of flow is from lower left to upper right, but only the perpendicular "crossing" components are shown. The rate at which water crosses any side of the box is equal to the perpendicular velocity times the side area. Since the depth can change from side to side and some flows are into the box and some are out, an expression for the net inflow rate is River2D - User Manual – September 30, 2002 6 = H 1U 1∆y − H 2U 2 ∆y + H 3V3 ∆x − H 4V4 ∆x The conservation of mass principle then can be expressed quantitatively as ∆x∆y∆H = H 1U 1∆y − H 2U 2 ∆y + H 3V3 ∆x − H 4V4 ∆x ∆t which can be rearranged a bit into ∆H (H1U 1 − H 2U 2 ) (H 3V3 − H 4V4 ) = + ∆t ∆x ∆y which can also be written as ∆H ∆(HU ) ∆(HV ) + + =0 ∆t ∆x ∆y Calculus allows us to shrink the dimensions of the box and the change in t to zero ∂H ∂ (HU ) ∂(HV ) + + =0 ∂t ∂x ∂y This is the differential equation of mass continuity. Defining discharge per unit width components qx = HU and qy = HV gives an alternate form of the continuity equation ∂H ∂q x ∂q y + + =0 ∂t ∂x ∂y The continuity equation, in either form, gives one relationship for the depth and two velocity (or discharge intensity) components at every point in the flow. In general, two more relationships are required at every point to have the same number of equations and unknowns. The other two relationships are given by the two components of momentum conservation. River2D - User Manual – September 30, 2002 7 2.1.2 Conservation of Momentum While the physics are quite different, the process for deriving the differential momentum equations is very similar to that of the continuity. Rather than dwell on that process (which does get long and tedious), the physical relevance of the terms in the equation will be emphasized. If we reconsider the imaginary column or box in the stream, conservation of water momentum in the x direction states that: The rate of change of x momentum with time in the box is equal to the net rate of inflow of x momentum across the sides of the box plus the net force acting on the box in the x direction. The momentum flows and forces are shown on the diagram below, Figure 2. Figure 2: Definition sketch for conservation of momentum. F4 M4 P1 y P2 Fb M1 M2 Pb F5 F6 M3 x F3 On this diagram, P1 and P2 are pressure forces on the sides of the box; Pb is the pressure force due to a sloping bed; M1 and M2 are momentum fluxes in the component direction; M3 and M4 are x momentum fluxes carried by the transverse velocity component; Fb River2D - User Manual – September 30, 2002 8 is the friction force of the bed; F3 and F4 are the transverse shear forces due to turbulence; and F5 and F6 are the normal forces due to turbulence. Note that surface friction due to wind and Coriolis force due to the earth's rotation have been left out. The momentum conservation principle is then ∆M x = (M 1 − M 2 ) + (M 3 − M 4 ) + (P1 − P2 ) + Pb − Fb + F4 − F3 + F6 − F5 ∆t All of these terms need to be evaluated in terms of the depth and velocity components in order to set up a solution. This is where the most serious approximations are made. Since momentum is mass times velocity and mass is volume times density, ρ, the rate of change of momentum can be evaluated as ∆M x ∆(HU ) = ρ∆x∆y . ∆t ∆t Assuming that the velocities are constant through the depth the momentum fluxes are M 1 = ρ∆yH1U 12 and M 2 = ρ∆yH 2U 22 . and the cross momentum fluxes are similarly M 3 = ρ∆xH 3U 3V3 and M 4 = ρ∆xH 4U 4V4 . For the assumption of hydrostatic pressure distributions, the pressure forces can be evaluated in terms of the depth as P1 = ρg∆y H 12 H2 , P2 = ρg∆y 2 , and Pb = ρg∆x∆yHS 0 x , 2 2 where S0x is the bed slope in the x direction. The shear on the bed and sides of the box can be expressed (for the time being) as shear stresses multiplied by areas: River2D - User Manual – September 30, 2002 9 Fb = τ bx ∆x∆y , F3 = ∆xH 3τ xy 3 , and F4 = ∆xH 4τ xy 4 . The normal turbulent forces can also be evaluated in this manner so that: F5 = ∆yH 5τ xx 5 and F6 = ∆yH 6τ xx 6 . Substitute these back into the conservation law and after some mathematical steps, the conservation of x momentum equation is obtained: ∂q x ∂ ∂ g ∂ 2 + (Uq x ) + (Vq x ) + H ∂t ∂x ∂y 2 ∂x 1 ∂ 1 ∂ = gH S 0 x − S fx + (Hτ xx ) + Hτ xy ρ ∂x ρ ∂y ( ) ( ) where Sfx = τbx/(ρgH) is the friction slope. In order to complete the formulation, relations for the bed and side shear stresses must be specified. Since these stresses arise primarily from turbulent flow interactions, there is considerable uncertainty in their evaluation. Typically, a two-dimensional form of Manning's equation is used for the friction slope S fx = n 2U U 2 + V 2 H 4/3 . and a Bousinessq type eddy viscosity is used for the transverse shear ∂U ∂V . τ xy = ν t + ∂y ∂x The parameters n and νt are not constants or fluid properties, but depend on the flow situation. As a result, they become the "tuning" or calibration parameters that may be changed to bring a model prediction into agreement with measured data. Compared to one- River2D - User Manual – September 30, 2002 10 dimensional channel modeling, Manning's n is familiar, but the eddy viscosity coefficient is new. In the y direction, the process is the same and the resulting equation is similar. With the continuity equation and two momentum equations applying at every point in the flow, we have enough information to solve for the depth and velocity components at every point. Unfortunately, finding that solution is difficult and can only be done approximately. 2.2 Numerical Modeling of Depth Averaged Flow Equations Given a set of governing equations, there are two essential steps in developing a computational model. 1. Discretization. The infinite number of equations for an infinite number of unknowns is reduced to a finite number of equations at a finite number of mesh or grid points in space and time. At this stage, calculus operations are reduced to algebraic operations. 2. Solution. A scheme or process is devised where the algebraic equations developed in the first step can be solved for the unknown nodal values. The algebra is reduced to arithmetic which can be translated into computer code. There are a number of alternatives for each step. Common discretization methods include finite difference, finite volume, and finite element methods. Solution methods include explicit and implicit solvers, the latter of which depend on a variety of iterative or direct non-linear and linear equation solution methods. 2.2.1 The Finite Element Method The basis for the finite element method is a more general technique known as the weighted residual method. The idea is that the governing equations can be solved approximately by use of a "trial function" which is specified but has a number of adjustable degrees of freedom. In a way, the process is analogous to curve fitting, say a straight line, to observed data. The straight line is a River2D - User Manual – September 30, 2002 11 specified function which has two degrees of freedom. Values for those two parameters are sought which gives the least error. The continuity and momentum equations of depth averaged flow can be written in abbreviated form as C (H , U , V ) = 0 , M x (H , U , V ) = 0 , and M y (H , U , V ) = 0 . If we introduce trial functions for the variables H, U, and V; denoted by Ĥ ,Û , and Vˆ , and substitute them into the equations, they will not exactly satisfy the equations. A "residual" will result. ( ) C Hˆ , Uˆ , Vˆ = RC , ( ) ( ) M x Hˆ , Uˆ , Vˆ = R x , and M y Hˆ , Uˆ , Vˆ = R y . The objective is now to make the residuals as small as possible. The weighted residual approach is to multiply the residual by a weighting function, integrate over the whole area and set the result to zero. For every degree of freedom in the trial function, a separate weighting function is used in order to generate the same number of equations as unknowns. The continuity equation, for example, becomes ∫ N i C (Hˆ ,Uˆ ,Vˆ )dA = 0 , where Ni is the ith weight or test function. Integration over the area serves to reduce the spatial distribution to just a quantity. The trick with the weighted residual method is to choose good trial and test functions in a general enough way that will work for different situations. The idea of interpolation becomes very useful here. If the trial function for H is set up such that there are a fixed River2D - User Manual – September 30, 2002 12 number of points with the depths at those points being parameters to be solved for, then a function which interpolates between the points can be used as a trial function. Interpolation functions can be written in the form of "influence" or "basis" functions for each point, so that the trial function is a sum of terms n Hˆ = ∑ H j N j j =1 The Galerkin weighted residual method uses the same set of functions for "basis" and for "test" functions, considerably simplifying the choices that have to be made. The finite element method takes the method of weighted residuals a couple of steps further. First, the domain is divided into discrete areas, called finite elements, which are defined by connections between nodal points. The triangulation below, in Figure 3, is an example. Figure 3: A sample triangulation. e j The nodes are at the vertices of the triangles. Simple interpolation or basis functions are easy to construct, allowing linear variations between nodes, for example. These basis functions are considered to be "local" in that they only extend from a particular node to near neighbouring nodes. Outside of that area, they are zero. The basis function for node j can be visualized as a "tent" function with the pole (of unit height) at node j, and pegs at all of the nodes which are attached to node j by a triangle edge. River2D - User Manual – September 30, 2002 13 The integration operation in the method of weighted residual is carried out as a sum of element integrals in the finite element method. Because of the local nature of the basis functions, only those functions with nodes in the particular element need to be integrated. For a linear triangle, with three nodes, a total of nine integrals are required (combination of three basis functions with three test functions), even if there are thousands of other nodes. The biggest advantage of the finite element method is geometrical flexibility. Elements can change size and shape readily, allowing complex boundaries to be traced, as well as allowing refinement of the mesh in particularly important or rapidly varying areas. 2.2.2 Discretization Error Any discretization method, being approximate, engenders some error. Having an idea of the source and magnitude of that error is important in evaluating computational results and taking steps to improving them. For the purposes of this discussion, error will be defined as the difference between the numerical value at any point (not just at nodes) and the analytical solution at that point. Note that the difference between the analytical solution and the real world is another matter! For the finite element method, there are two important sources of error related to the operations carried out. The first is interpolation error. Considering the curves below in Figure 4 and two different piecewise linear interpolations, it is obvious that the one with more pieces is better. Figure 4: Error related to piecewise interpolation. River2D - User Manual – September 30, 2002 14 The second source of error is more subtle. The weighted residual method is really a weighted average process. The nodal value at any particular point reflects conditions surrounding that point. If there is a large variation in conditions, then the point value may be biased one way or another. A simple way to interpret this is to consider the computational result at a point to be average of what that value is in the surrounding elements. There are two common examples of this problem in depth averaged flow calculations. The first is near a sloping bank. The node at the bottom of the bank reflects both channel (relatively uniform velocity) and bank (slower, decreasing velocity) conditions. The average tends to be lower than the velocity at the specific point. Another case is an isolated bar in a stream. If a node is placed on top of the bar and surrounding nodes are all in deep water, then the velocity on top of the bar will be too fast, reflecting surrounding conditions. This will cause trouble as the depth at that point will be small, resulting in an excessively high, possibly supercritical, Froude Number. The solution to both types of discretization errors is smaller elements. This means more elements and more nodes for the same physical area. The art of computer modeling is to provide enough refinement in important areas while maintaining reasonable solution times. 2.2.3 Solution Methods The result of the finite element method, or any other discretization method, is a set of nonlinear algebraic equations for all the unknown depths and velocities. The process of solving these equations is what is demanding of computer resources. Most computer models of depth averaged flow solve for transient conditions, even if steady state results are desired. This is a convenient way of providing a controlled and stable iteration scheme from an arbitrary first guess or initial condition. Two approaches are generally used, referred to explicit and implicit methods. River2D - User Manual – September 30, 2002 15 Explicit methods solve for the new variable values at any one node based on the values at surrounding nodes at the previous time. This approach has the tremendous advantage of calculating each value independently. No matrix solutions are necessary so storage is minimal and execution is fast. The disadvantage is that the time step is restricted to keep the solution stable. The Courant-LewyFreidrichs (CFL) condition is a guide to the maximum time step allowed. ∆x ∆t < min V + gH This condition is related to the time taken by a shallow water wave to travel from one node to the next. As mesh spacing is made smaller in any area, the time step for the whole solution process must be decreased. The second approach is called implicit. Here values of all the variables at the new time are considered to depend on each other as well as the values at the previous time step. Since the unknowns are interrelated, considerable effort using nonlinear and linear algebra methods is required to solve the equations. Typically, large matrices are formed. If there are N nodes in a mesh, then there are 3N unknown variables to solve for at each time step. The full matrix describing their interconnections would be 3N X 3N. If N is 10,000, then the matrix would require 7.2 Gigabytes of memory to store. Fortunately, the full matrix is not usually required. The vast majority of terms are zero. A more realistic estimate of storage is 3N X 3B where B is the bandwidth of the mesh. Roughly speaking, the bandwidth is the typical largest difference between node numbers for connected points. For the 10,000 node problem, the bandwidth will be in the order of about 100. The matrix required is then less than 100 Megabytes - large, but manageable. Computation time for matrix solution is roughly proportional to NB2. If B scales with the square root of N, then matrix size is River2D - User Manual – September 30, 2002 16 proportional to N3/2 and solution time is proportional to N2. The consequence is that adding a few more nodes to an already large problem is expensive in storage and computer time. Again, the problem of providing enough discretization to minimize errors and get a solution in a reasonable time is the central trade-off in computational modeling. River2D - User Manual – September 30, 2002 17 3.0 River2D MODEL DESCRIPTION 3.1 General The River2D model is a two-dimensional, depth averaged hydrodynamic and fish habitat model developed specifically for use in natural streams and rivers. It is a Finite Element model, based on a conservative Petrov-Galerkin upwinding formulation. It features subcritical-supercritical and wet-dry area solution capabilities. Ice covers with variable thickness and discontinuous ice covers can be modelled. It has been verified through a number of comparisons with theoretical, experimental and field results (Ghanem et al, 1995a; Waddle et al, 1996, Christison et al). A complete description of the formulation and implementation of the model is contained in Ghanem et al (1995). 3.2 Acknowledgments The River2D model was developed at the University of Alberta with funding provided by: the Natural Sciences and Engineering Research Council of Canada, the Department of Fisheries and Oceans, Government of Canada, Alberta Environmental Protection, and the United States Geological Survey. The code was written by F. Hicks, A. Ghanem, J. Sandelin, P. Steffler, and J. Blackburn. T. Waddle has provided guidance and feedback on the development of the model for real world applications. Ongoing development of the model has been facilitated and supported by C. Katopodis. Copyright is retained by these individuals and by the University of Alberta. 3.3 Conditions of Use The River2D model, in the form of a Windows (95/98/2000/ME/NT/XP) executable program, is available in the public domain. The program is supplied as is, with no warrant of completeness or applicability to any particular problem. The program and associated utilities, example data files, and documentation may be freely copied and distributed as long as this notice is included and use of the model is properly acknowledged. River2D - User Manual – September 30, 2002 18 River2D and its associated utility programs are very much "works in progress". Development of the programs and documentation is continuous but sporadic. Whenever significant functionality is added, updated programs are released. Constructive feedback, bug reports, and discussion are appreciated. Inquiries should be directed to [email protected] or [email protected]. River2D - User Manual – September 30, 2002 19 4.0 FORMULATION 4.1 General The River2D model is a two-dimensional, depth averaged finite element model. It is intended for use on natural streams and rivers and has special features for accommodating supercritical /subcritical flow transitions, ice covers, and variable wetted area. It is basically a transient model but provides for an accelerated convergence to steady-state conditions. The fish habitat module is based on the PHABSIM weighted usable area approach, adapted for a triangular irregular network geometrical description. River2D uses SI standard units (kg, m, s) for all input and output. In cases with very large spatial domain, a more detailed solution of a smaller internal area may be important for hydrodynamic or habitat reasons. The River2D model has a component that gives the user the ability to “cut out” sub-sites so that the user may treat them separately. This component allows the user to define and extract a boundary from within an existing coarsely defined mesh. This boundary can then be used in R2D_Mesh to create a detailed sub-mesh, which can be subsequently solved using the River2D model. The boundary extraction process is based on the concept of stream function, streamlines and stream tubes. 4.2 Hydrodynamic Model The hydrodynamic component of the River2D model is based on the two-dimensional, depth averaged St. Venant Equations expressed in conservative form. These three equations represent the conservation of water mass and of the two components of the momentum vector. The dependent variables actually solved for are the depth and discharge intensities in the two respective coordinate directions. Conservation of mass: ∂H ∂q x ∂q y + + =0 ∂t ∂x ∂y River2D - User Manual – September 30, 2002 (1) 20 Conservation of x-direction momentum: ∂q x ∂ ∂ g ∂ 2 + (Uq x ) + (Vq x ) + H ∂t ∂x ∂y 2 ∂x = gH (S 0 x 1 ∂ 1 ∂ − S fx ) + (Hτ xx ) + (Hτ xy ) ρ ∂x ρ ∂y (2) Conservation of y-direction momentum: ∂q y ∂t + ∂ (Uq y )+ ∂ (Vq y )+ g ∂ H 2 ∂x ∂y 2 ∂y = gH (S 0 y 1 ∂ 1 ∂ − S fy ) + (Hτ yx ) + (Hτ yy ) ρ ∂x ρ ∂y (3) where H is the depth of flow, U and V are the depth averaged velocities in the x and y coordinate directions respectively. qx and qy are the respective discharge intensities which are related to the velocity components through q x = HU (4) and q y = HV (5) g is the acceleration due to gravity and ρ is the density of water.S0x and S0y are the bed slopes in the x and y directions; Sfx and Sfy are the corresponding friction slopes. τxx, τxy, τyx, and τyy are the components of the horizontal turbulent stress tensor. 4.2.1 Basic Assumptions 1. The pressure distribution in the vertical is hydrostatic. Generally, this limits accuracy in areas of steep slopes and rapid changes of bed slopes. Roughly speaking, bed features of horizontal size less than about 10 depths (typically dune bedforms) will not be modeled accurately. Similarly, slopes in in the direction of flow in excess of about 10% will not be modeled correctly. River2D - User Manual – September 30, 2002 21 2. The distributions of horizontal velocities over the depth are essentially constant. An assumed velocity distribution may be used in the interpretation of the provided depth average velocity, but the distribution is treated as constant by the internal calculations. Specifically, information on secondary flows and circulations is not available. 3. Coriolis and wind forces are assumed negligible. For very large water bodies, particularly for large lakes and estuaries, these forces may be significant. 4.2.2 Bed Resistance Model The friction slope terms depend on the bed shear stresses which are assumed to be related to the magnitude and direction of the depthaveraged velocity. In the x direction for example, S fx = τ bx U 2 +V 2 = U, ρgH gHC s2 (6) where τbx is the bed shear stress in the x direction and Cs is a nondimensional Chezy coefficient. This coefficient is related to the effective roughness height, ks, of the boundary, and the depth of flow through H C s = 5.75 log12 ks . (7) For a given flow depth, H, Manning's n and ks are related by ks = 12 H em (8) where m is m= H 1 6 2.5n g River2D - User Manual – September 30, 2002 (9) 22 The effective roughness height was chosen as the resistance parameter because it tends to remain constant over a wider range of depth than does Manning's n. For very small depth to roughness ratios ( H e2 < ), Eq. 7 is k s 12 replaced by C s = 2.5 + 30 H e 2 k s (10) which gives a smooth, continuous, non-negative relation for any depth of flow. There is no physical basis for this formula. The effective roughness height (in m) is the resistance parameter to be specified at every node in the mesh in the input files. For resistance due primarily to bed material roughness, a starting estimate of ks can be taken as 1-3 times the largest grain diameter. The final values should be obtained by calibrating the model results to measured water surface elevations and velocities. 4.2.3 Transverse Shear Model Depth-averaged transverse turbulent shear stresses are modeled with a Boussinesq type eddy viscosity formulation. For example: ∂U ∂V τ xy = ν t + ∂y ∂x (11) where νt is the eddy viscosity coefficient. The eddy viscosity coefficient is assumed to be composed of three components: a constant, a bed shear generated term, and a transverse shear generated term. 2 H U 2 +V 2 ∂U ∂U ∂V ∂V 2 + 2 ν t = ε1 + ε 2 + ε3 H 2 2 + + (12) Cs ∂x ∂y ∂x ∂y where ε1, ε2, and ε3 are user definable coefficients. River2D - User Manual – September 30, 2002 23 The default value for ε1 is 0. This coefficient can used to stabilize the solution for very shallow flows when the second term in equation 12 may not to adequately describe νt for the flow. Reasonable values for ε1 can be calculated by evaluating the second term in equation 12 using average flow conditions (average flow depth and average velocities) for the modelled site. The default value for ε2 is 0.5. By analogy with transverse dispersion coefficients in rivers, values of 0.2 to 1.0 are reasonable. Since most river turbulence is generated by bed shear, this term is usually the most important. In deeper lakesflows, or flows with high transverse velocity outletsgradients, transverse shear may be the dominant turbulence generation mechanism. Strong recirculation regions are important examples. In these cases, the third term, ε3, becomes important. It is essentially a 2D (horizontal) mixing length model. The mixing length is assumed to be proportional to the depth of flow. A typical value for ε3 is 0.1, but this may be adjusted by calibration. 4.2.4 Wet/Dry Area Treatment In performing a two-dimensional model evaluation, the depth of flow, as a dependent variable, is not known in advance. The horizontal extent of the water coverage is therefore unknown. Significant computational difficulties are encountered when the depth is very shallow or there is no water at all over a part of the modelled area. The River2D model handles these occurrences by changing the surface flow equations to groundwater flow equations in these areas. A continuous free surface with positive (above ground) and negative (below ground) depths is calculated. This procedure allows calculations to carry on without changing or updating the boundary conditions. In addition, modelled area selection and boundary condition specification are greatly simplified. Specifically, the water mass conservation equation is replaced by: River2D - User Manual – September 30, 2002 24 ∂H T ∂ 2 ∂2 ( H z ) H z ( ) = + + + b b S ∂x 2 ∂t ∂y 2 (13) where T is the transmissivity, S is the storativity of the artificial aquifer and zb is the ground surface elevation. The transmissivity and storativity of the groundwater flow can be set by the user. The transmissivity should be set to a low value such that the actual groundwater discharge is negligible; the default is 0.1. For a given area, the storativity is a measure of the volume of water the ground will release per unit decline in the water table. The default storativity is set to 1. For accurate transient analysis or to speed up the groundwater response rate, the storativity should be reduced. 4.3 Simple Ice Cover Model River2D is equipped to model flow under a floating ice cover with known geometry, that is, one with known ice thickness and roughness. When an ice cover is present on a river, it affects the flow hydraulics in a number of ways. 1. The ice cover increases the area on which shear stress operates (up to a factor of 2 when a continuous ice cover is present). 2. The roughness on the bottom of the ice cover increases the total channel resistance by increasing the magnitude of the shear stress on the flow. 3. Both 1 and 2 result in a reduction in the average flow velocity, which causes the flow depth to increase to accommodate the discharge. 4. The water surface elevation is increased to a value equal to the new flow depth plus the submerged thickness of the ice cover. When an ice cover is input into River2D, the model changes the surface water equations to account for these ice effects. The River2D - User Manual – September 30, 2002 25 continuity equation remains the same but the momentum equations are replaced by: Conservation of x-direction momentum: ∂q x ∂ (Uq x ) ∂ (Vq x ) ∂ H2 + + + g ∂t ∂x ∂y ∂x 2 = gD(S 0 x ∂H − gt s ∂x 1 ∂ 1 ∂ − S fx ) + (Dτ xx ) + (Dτ xy ) ρ ∂x ρ ∂y (14) Conservation of y-direction momentum: ∂q y ∂t + ∂ (Uq y ) = gD(S 0 y ∂x + ∂ (Vq y ) ∂y +g ∂ H2 ∂H − gt s ∂y 2 ∂y 1 ∂ 1 ∂ − S fy ) + (Dτ yx ) + (Dτ yy ) ρ ∂x ρ ∂y (15) where H now represents the depth to the free surface while D is the depth of flow from the bed to the bottom of the ice cover. These two are related through D = H − ts (16) where ts is the submerged portion of the ice cover . The submerged thickness is related to the total ice thickness, t, using ts = ρi t ρ (17) ρi and ρ are the densities of the ice and the water respectively. U and V are still the depth averaged velocities in the x and y coordinate directions respectively but they are now related to the discharge intensities, qx and qy, through q x = DU (18) and q y = DV River2D - User Manual – September 30, 2002 (19) 26 All of the other terms in these equations are as defined previously. In fact, this is the form of the momentum equations that are present in the computational code but these equations simply reduce to the open water momentum equations when no ice is present. These equations have the same inherent assumptions as the ‘ice-free’ form including one additional assumption: the ice cover is fixed in space. Therefore the ice will not react to any shear force applied by the water on the ice. 4.3.1 Combined Ice and Bed Resistance Model When ice is present, the friction slope terms depend on the ice shear stresses in addition to the bed shear stresses. In the x direction for example, S fx = τ bx + τ ix ρgD (20) where τbx and τix are the bed and ice x direction shear stresses respectively. If we define the average stress as τ fx = τ bx + τ ix 2 (21) then S fx = 2 τ fx ρgD =2 U 2 +V 2 U gDC s2 (22) The Chezy coefficient, Cs, is related to the depth of flow under the ice cover, D, through D C s = 5.75 log 6 kc (23) where kc is a composite bed and ice effective roughness height and is evaluated using the Sabaneev equation (Ashton, 1986), which when modified for use with roughness height beomes: River2D - User Manual – September 30, 2002 27 k 14 + k 14 b kc = i 2 4 (24) Users are encouraged to read Ashton (1986) in order to fully appreciate the assumptions and limitations associated with the use of Sabaneev’s equation. When modelling ice-covered domains, some users may choose to first determine the bed roughness by calibrating the model for an open water event. Model calibration under ice conditions can then be accomplished by adjusting only the ice roughness values. However, it is important to note that bed roughness heights that have been calibrated for open water conditions may not be applicable for the ice covered case, even when depth or discharge are the same. Consequently, the values of ice roughness height that are necessary to achieve model calibration by this approach may not seem physically reasonable. In these situations, it is important to recognize that more than one combination of bed and ice roughness height will yield the same composite roughness and the user should remember that it is only the composite roughness that is actually considered in the hydraulic calculations. 4.4 Fish Habitat Model The fish habitat component of River2D is based on the Weighted Usable Area (WUA) (Bovee, 1982) concept used in the PHABSIM family of fish habitat models. The WUA is calculated as an aggregate of the product of a composite suitability index (CSI, range 0.0 - 1.0) evaluated at every point in the domain and the "tributary area" associated with that point. In River2D, the points are the computational nodes of the finite element mesh and the tributary areas are the "Thiessen polygons" including the area closer to a particular node than all other nodes. The CSI at each node is calculated as a combination of the separate suitability indices for depth, velocity, and channel index. Options for triple product, harmonic mean, or minimum value, calculation River2D - User Manual – September 30, 2002 28 of CSI are available. The suitability index for each parameter is evaluated by linear interpolation from an appropriate fish preference curve to be supplied separately. Velocities and depths are taken directly from the hydrodynamic component of the model. The channel index values may depend on channel substrate or cover for different fish species and life stages. These values are interpolated from a separate channel index file to the computational nodes. The interpolation may be linear (continuous) or nearest neighbour (discrete). 4.5 Boundary Extraction Module The boundary extraction component is based on the concept of streamlines and stream tubes. A streamline is defined as an imaginary line in the field of flow such that at any point on the line, the velocity vector is tangential to it. Therefore in theory, there can be no flow across a streamline. For steady flow, a streamline is fixed is space since there is no change in direction of the velocity vector at any point in the field of flow. For twodimensional flow, the equation of a streamline is q x dy − q y dx = 0 (25) Let us now define a scalar function such that qx = ∂ψ ∂y and qy = − ∂ψ ∂x (26) This scalar function, ψ(x, y), is called stream function. Consider the total differential of ψ, dψ = ∂ψ ∂ψ dx + dy ∂x ∂y (27) If we substitute equations 14, the above expression becomes dψ = q x dy − q y dx River2D - User Manual – September 30, 2002 (28) 29 which illustrates that the equation of a streamline (equation 25) is just a special case of equation 28 where dψ = 0. This illustrates that ψ is constant along any streamline. In Figure 5(a), we have two streamlines, ψ1 and ψ2, some distance apart in a two-dimensional flow field. Since there can be no flow across either of the streamlines, the streamlines confine the flow into what is called a stream tube. Now consider two streamlines that are infinitesimally close, ψ and ψ + dψ, also shown in Figure 5(a). From Figure 5(b), we can compute the flow or discharge in this elemental stream tube (across ds) as dQ = q x dy − q y dx (29) which illustrates that, dQ = dψ (30) Hence the change in ψ across this elemental stream tube is numerically equal to the discharge through it. Now if the above expression is integrated between ψ1 and ψ2, we find that the difference in the stream function between any two streamlines is equal to the flow between the streamlines: 2 Q1→2 = ∫ dψ = ψ 2 − ψ 1 (31) 1 In Figure 5(a), the flow is from left to right, sinceψ2 >ψ1. If ψ2 <ψ1, the flow would be from right to left. Due to this relationship between stream function and discharge, if one arbitrarily sets ψ1 = 0 at one side of a channel (assuming the side of a channel is a no flow boundary, then by definition it is a streamline), then the value of ψ2 at the other side of the channel will be equal to the total discharge across the channel. In this case, the value of the stream function at any point in the flow, ψp, will be equal to the discharge in the stream tube defined by the streamlines ψ1 and ψp. As ψp approaches the value of ψ2, the River2D - User Manual – September 30, 2002 30 discharge in the stream tube approaches the total discharge in the channel. For this reason, the value of the stream function across a channel is also called the cumulative discharge. River2D - User Manual – September 30, 2002 31 Figure 5: The relationship between stream function and discharge: (a) a schematic of a stream tube and (b) the calculation of discharge across an elemental stream tube. In order to solve the computational mesh of a sub-site that is to be treated separately from the larger site from which it came, the boundary conditions along the boundary defining this sub-site must be known. If the boundary extends across the channel then the River2D - User Manual – September 30, 2002 32 boundary conditions are known to be no flow at the sides of the channel. However, if the entire boundary is within the flow, then the problem is no longer trivial. Because streamlines by definition are no flow boundaries, they are logical paths to trace when defining a computational boundary within the flow. For this reason, the boundary extraction module in River2D uses the concept of streamlines and stream tubes when defining a computational boundary for a new small scale mesh from within a larger site. To map out streamlines, the value of stream function must be known at every node within the computational domain. If the stream function is calculated assuming that one of the no flow boundaries in the computational domain is a streamline where ψ = 0, then the stream function will also represent the cumulative discharge in the channel. Only the location of the streamlines is essential to River2D’s boundary extraction process. However, when the values of stream function represent the cumulative discharge in a channel, then the concept of stream function takes on a physical meaning. In the River2D model, calculation of the cumulative discharge is performed in two steps. The first step involves calculating an approximate solution. In the second step, the approximate solution is refined using the Finite Element Method. In the approximate solution, the equation of a streamline (28) is used in its discrete form, that is ∆ψ = q x ∆y − q y ∆x , (32) to obtain a value of ψ at all of the nodes in the domain. Equation 32 only gives the relative difference in ψ between two points separated by a distance defined by ∆x and ∆y. Therefore, in order for the values of ψ to represent the cumulative discharge across a channel, the streamline along one side of the channel should be given a value of ψ = 0. In the River2D model, equation 32 is used to ‘sweep’ or ‘march’ across the domain, using nodes of known ψ to calculate nodes of unknown ψ. The starting nodes of known ψ River2D - User Manual – September 30, 2002 33 for the sweep are obtained by setting ψ = 0 at all the nodes along one no flow boundary. The calculations then progress across computational mesh until all of the nodes in the domain have a value of ψ. The refined solution is obtained by solving the vorticity–stream function equation for the entire computational domain. In 2D flow, the vorticity vector, η, has only a z-component: η= ∂q y ∂x − ∂q x ∂y (33) Substituting equation (26) into (33) results in the vorticity-stream function equation: ∂ 2ψ ∂ 2ψ + = −η ∂x 2 ∂y 2 (34) This equation is solved for all of the nodes in the domain by using the Finite Element Method based on the Galerkin formulation. This method produces a more refined solution than the sweep method because it simultaneously solves for ψ at every node in the domain. To solve any problem using the Finite Element Method, the boundary conditions for the problem must be known. For equation 34 there are two possible boundary conditions. No flow boundaries will have a constant value of ψ while inflow and outflow boundaries will be governed by ∂ψ =0 ∂η (35) which simply means that stream lines must be perpendicular to flow boundaries. The second boundary condition is handled by the Galerkin formulation; however the first boundary condition must be known in order to obtain a solution. In the case of a simple channel, with one inflow and one outflow boundary, the values of ψ along the no flow boundaries can be set based on the total discharge, Q, in the channel. Therefore the boundary conditions become ψ = 0 along one no flow boundary and ψ = Q along the River2D - User Manual – September 30, 2002 34 other no flow boundary. If the channel contains islands that are enclosed by no flow boundaries, the boundary conditions for these boundaries must also be set. Unfortunately, obtaining the value of ψ for these boundaries is not so trivial. This is where the approximate solution is beneficial. The sweep method will calculate the values of ψ at all nodes regardless of whether or not they are along boundaries. Therefore, the boundary conditions for any nodes along internal no flow boundaries are set based on the average of the values of ψ obtained from the approximate solution. 4.6 Hydrodynamic Model Implementation 4.6.1 Finite Element Method The Finite Element Method used in River2D’s hydrodynamic model is based on the Streamline Upwind Petrov-Galerkin weighted residual formulation. In this technique, upstream biased test functions are used to ensure solution stability under the full range of flow conditions, including subcritical, supercritical, and transcritical flow. As a result, there is no need for mixed (unequal order) interpolations or artificially large transverse diffusivities. A fully conservative discretization is implemented which insures that no fluid mass is lost or gained over the modeled domain. This also allows implementation of boundary conditions as natural flow or forced conditions. A fixed elevation is imposed as an equivalent hydrostatic force, for example, and known inflow discharges are used directly. The model discretizations supported include equal order linear, quadratic, and cubic interpolation of all variables over triangular and quadrilateral elements. The mesh generator supports only linear triangles, however. These elements are the simplest possible in two dimensions and result in the minimum execution time for a given number of nodes. Although the model is actually an unsteady one, it can be used either to perform a transient analysis or to obtain a steady state solution. For steady state results, an accelerated convergence River2D - User Manual – September 30, 2002 35 procedure speeds the process to final completion by systematically increasing the time increment. 4.6.2 The Newton Raphson Method Using the Finite Element Method to solve the hydrodynamic equations results in a system of non-symmetric, non-linear equations which can be solved by explicit or implicit methods. In River2D, an implicit approach is taken which requires a simultaneous solution of the system of equations. Because the system is non-linear, the Newton-Raphson iterative method is employed. In this method, the iterative solution is achieved by using the solution of the unknown values at the previous time step, Φn, as the first guess of the solution at the new time step, Φn+1. Unless the guesses are correct, then a residual will result, such that: {f (Φ n +1, m )}= {R n +1, m } (36) where n and m denote the time step and the iteration respectively. The corrections, ∆Φ, used to obtain the next guesses in the iterative process are determined by solving the following system of equations. [J n +1, m ]{∆Φ n +1, m +1 }= {R n +1, m } (37) where [Jn+1,m] is called the ‘Jacobian’ matrix and is defined by: [J n +1, m ] = ∂∂{{ΦR }} n +1, m n +1, m (38) After each mth iteration, the values of the solution variables are updated using: Φ n +1,m +1 = Φ n +1,m + ∆Φ n +1,m +1 The Jacobian can be evaluated analytically, using equation 38, or numerically, using the following approximation: River2D - User Manual – September 30, 2002 36 { { } } { ( ) ( )} n +1, m − Ri Φ nj +1,m − δ j ∂ R n +1,m Ri Φ j ≈ n +1, m δj ∂ Φ (39) where δ is a small perturbation and the indices i and j represent the equation number and the variable number respectively. In River2D the user has the option of evaluating the Jacobian matrix analytically or numerically. The analytical Jacobian is faster to evaluate than the numerical one, but due to assumptions in the mathematical derivation, it may be less accurate than the numerical Jacobian. In particular, the analytical Jacobian does not consider changes in the upwinding matrix or the effect of changing water edge location. When performing steady state analyses, it is best to start the solution process using the analytical Jacobian. If the solution cannot attain the desired level of convergence, it is advisable to switch to the numerical Jacobian for the rest of the simulation. The analytical Jacobian should be adequate for transient simulations, as the water edge and upwinding matrix are assumed to be fixed over the time interval. 4.7 Model Equation Solvers Within each Newton-Raphson iteration, the system of linear equations described by equation 37 requires solving. In River2D, the user has the choice of two linear equation solvers: a direct solver and an iterative solver. 4.7.1 Direct Solver The first solver, which is called the active zone equation solver (Stasa 1985), employs a direct solution to the non-symmetric linear system. That is, a solver based on Gaussian elimination. In the active zone equation solver, the coefficient matrix [A] in the linear system implied by [ A]{x} = {b} River2D - User Manual – September 30, 2002 (40) 37 is decomposed into lower and upper triangular matrices [L] and [U] such that [ A] = [ L][U ] (41) Therefore, using equation 41, equation 40 can be rewritten as [ L][U ]{x} = {b} (42) which is, in effect, two systems of equations: [ L]{c} = {b} (43) and [U ]{x} = {c} (44) The system defined by equation 40 is then solved by forward substitution of equation 43 to compute {c} and then by back substitution of equation 44 to obtain the solution for vector {x}. In River2D, the coefficient matrix is a very large Jacobian Matrix with the dimension 3N by 3N, where N is the number of computational nodes. The Jacobian Matrix is typically sparse (many of its entries are 0) and banded (most non zero entries are gathered along the main diagonal). The active zone equation solver takes advantage of these properties to reduce the storage requirements by using a skyline storage method (Stasa 1985). This reduces the memory requirements significantly to 3N by 3B, where B is bandwidth of the matrix. However, unless the bandwidth is small, the storage requirements can be quite significant. The bandwidth of the matrix is a function of the geometry and node numbering of the mesh. Narrow channels will produce small bandwidths while wide channels will produce large ones. Unfortunately, the speed of the active zone equation solver is a function of the memory requirements for the Jacobian Matrix. As a result, the size limit of a problem that can be solved will be a function of the available RAM. River2D - User Manual – September 30, 2002 38 4.7.2 Iterative Solver The second solver uses an iterative method for solving the nonsymmetric linear system called the Generalized Minimal Residual method or GMRES method (Saad and Schultz 1986). This solver was incorporated into River2D because it does not have the large storage requirements of the direct solver. This therefore allows for larger meshes to be solved than can be solved using the direct solver. In the GMRES method, an initial guess of the solution to vector {x0} in equation 40 is chosen. This results in: {r0 } = [ A]{x0 } − {b} (45) where {r0} is called the residual vector. The formation of the residual illustrates why this method, like all iterative methods, requires very little storage. There is no need to store the coefficient matrix, [A] explicitly as is necessary in direct methods; it need only be stored implicitly in the product vector [A]{x}. In River2D, this product vector is obtained by summing the matrixvector products at the element level. The residual vector then is used to form an orthogonal basis (orthogonal set of vectors): Vk = {v1 , v 2 , L, v k } (46) of, what is called, a Krylov subspace Kk. Hence, Vk is called a set of Krylov vectors. The GMRES solution to the non-symmetric linear system, described in equation 40, is formed using a linear combination of these Krylov vectors. That is: {x} = {x0 } + y1{v1 } + y 2 {v 2 }L y k {v k } (47) where yi are the linear combination coefficients. For details on how the vectors and their coefficients are derived, please see the original paper on the GMRES method by Saad and Schultz (1986). River2D - User Manual – September 30, 2002 39 The iterative nature of the GMRES method arises by evaluating the residual using {x} after each new Krylov vector (and its coefficient) is calculated. Once the residual is minimized to an acceptable tolerance, then the solution is said to have converged and no more vectors are required. The number of vectors, or the number of iterations, k, that are required depends on how strict the tolerance is. However, the number of iterations cannot exceed the number of unknowns, N. This is due to the fact that the Krylov subspace is defined by N vectors. Unfortunately, the execution time of this algorithm increases geometrically with every additional iteration. This is because the calculation of vector vi is based on the vectors v1 to vi-1 inclusively. To get around issue, we can restart the algorithm after the development of m vectors, that is after m steps, using the solution vector at m steps, {xm}, to develop a new residual vector, {rm} and a new set of Krylov vectors, Vm. The algorithm is restarted as many times as required to achieve a desired level of convergence. The restarted version of GMRES, denoted by GMRES(m) is the iterative method used in River2D. In River2D, GMRES(m) is implemented so that it continues to restart until the residual is minimized to within a goal tolerance or until a maximum number of restarts, or iterations, has occurred. Currently, the goal tolerance is compared to the magnitude of the residual at the end of every iteration divided by the magnitude of the {b} vector. That is: N {rm } {b} ∑r 2 i = i =1 (48) N ∑b 2 i i =1 The number of steps until restart, m, and the maximum number of iterations, k, are also user definable parameters. The default values for these parameters are 10 restarts and 10 iterations. The default goal tolerance is 0.01. These values were chosen based on a small number of tests. The optimum values for these parameters are problem specific. In general, the greater the value of m, the fewer the number of iterations that are required to converge and vice River2D - User Manual – September 30, 2002 40 versa. Although the time per iteration increases exponentially with every additional step before restarting, every additional iteration only causes a linear increase in the total time. River2D - User Manual – September 30, 2002 41 5.0 INSTRUCTIONS FOR USE 5.1 Installation The River2D executable code is entirely contained in the file River2D.EXE. This file is about 650 KBytes in size and may simply be copied to any convenient directory. 5.1.1 Model Requirements and Performance The River2D model is written for Windows 95/98/NT/2000/ME/XP. In general, fast floating point performance and large memory (at least 256, preferably >512MB) spaces are required. Typically, a model using about 10,000 nodes and 20,000 elements takes about 100 MB of memory and will execute in less than an hour on an intermediate Pentium III class computer. 5.2 Preparation of Input Files 5.2.1 Computational Mesh - .cdg files A separate application, R2D_Mesh, is used to generate the input mesh files for the River2D model. This is an interactive, graphical, Windows (95/98/2000/ME/NT) based mesh generation program. This program operates by first reading in a bed topography file which contains digitized position, elevation, and bed roughness information for scattered points and feature lines. Another utility program, R2D_Bed, is available to aid in the development of the .bed file from field data. In R2D_Mesh, the finite element mesh boundary and layout are defined graphically by the user on an overlay to the topography map read in. A variety of mesh design tools are available which allow mesh refinement while ensuring reliability. When the user is satisfied, a complete .cdg input file is generated. This file contains default runtime parameters for the River2D model. Note that once a .cdg file is generated by R2D_Mesh, it can be read back in to R2D_Mesh for further editing. However any hydrodynamic information in the .cdg file is lost. Detailed River2D - User Manual – September 30, 2002 42 instructions for R2D_Mesh are contained in a separate user manual. 5.2.2 Ice Topography - .ice files An ice file is required by the simple ice cover module to evaluate nodal ice properties. These properties include ice thickness and ice roughness height. The structure of the .ice file is identical to the .bed file except that bed elevation and bed roughness height are replaced with ice thickness and ice roughness height respectively. The R2D_Ice utility can be used to develop an ice file from field data. 5.2.3 Channel Index - .chi files A channel index file (extension .chi) is required by the habitat module to evaluate channel index suitability indices for each computational node. The structure of the .chi file is identical to a .bed file except that the channel roughness parameter for each point is replaced by the channel index value. The R2D_Bed utility can be used to aid the generation of a channel index file from field data. As with .bed files, the points in the .chi file are usually at different locations than the computational nodes in the .cdg file so an interpolation process is required in the habitat analysis. Note that a channel index file is not required for use of the hydrodynamic component of River2D. 5.2.4 Fish Preference - .prf files Separate fish preference files (extension .prf) are required for each distinct fish species/life stage to be considered in the habitat analysis. Each .prf file contains tables representing velocity, depth, and channel index preference curves for that particular species/life stage. The tables may be interpreted as either a piecewise linear approximation between points or as a direct lookup table for discreet channel index categories. River2D - User Manual – September 30, 2002 43 5.3 Running River2D The River2D program executes as a standard Windows program and can be started by double-clicking its icon. The main River2D window will open (initially blank) and the About River2D notice window appear as well. The About River_2D window contains a brief introduction, including the conditions of use notice. The appearance of River2D once the about box is closed is shown in Figure 6. River2D - User Manual – September 30, 2002 44 Figure 6: The elements of the River_2D screen. Title Bar Menu Bar Tool Bar Viewing Window Status Bar The normal sequence of events is to first read in a .cdg input file defining the finite element mesh and initial flow conditions. Then display options are set up to allow visualization of the solution process. Optionally, boundary condition values can be changed. The hydrodynamic solution is then run. Further display and visualization is used to determine if the solution is acceptable. If it is, then a habitat analysis may be performed, if desired. Finally, the results can be output in different formats to files. The default output format is a .cdg file which can be used as an input to a subsequent run with perhaps new boundary conditions. The only difference between the input and output .cdg files is that the time and flow variables (depth and discharge components) are updated to the latest solution values in the output. If the result of the hydrodynamic solution is not acceptable, there are options available for improving the solution. If minor adjustments to the mesh are all that is needed, the mesh editing features in River2D can be used to refine the discretization or River2D - User Manual – September 30, 2002 45 modify the bed elevation or bed roughness. In some situations, it may be necessary to build an entirely new mesh, in which case, a new .cdg file must be created using the mesh editor (R2D_Mesh). In either event, the mesh is rerun. This editing process is typically continued until an acceptable solution is achieved. In line with the typical process outlined above, there are basically six groups of operations involved in using River2D. 1. Standard Windows operations. These are grouped under the standard Windows File, Edit, View, and Help menus. 2. Display operations. These operations affect what information is displayed on the screen and how it is to be displayed. Commands for extracting the displayed variable to comma delimted (*.csv) files for further analysis are also available. These operations are grouped under the Display menu. Some are also available as toolbar shortcuts. 3. Hydrodynamic model operations. These operations are available under the Flow menu. The command for calculating the cumulative discharge is also grouped under the Flow menu. 4. Mesh editing operations. These operations are for refining the mesh discretization and can be found under the Mesh Edit menu. Some of these operations are also available from the toolbar. 5. Habitat model operations. These operations are available under the habitat menu. WUA calculation is also available from the toolbar. 6. Option setting operations. These operations are for setting various options in River2D and are found in the Options Menu. Detailed descriptions of the operations available are presented in the following sections. River2D - User Manual – September 30, 2002 46 5.4 Standard Windows Operations 5.4.1 File -> New Not currently supported 5.4.2 File -> Open The standard Windows file open dialog is presented with the filter set to files with a .cdg extension. When an appropriate file is selected and the OK button is pressed, the .cdg file will be read in. Information from any previous .cdg file open will be deleted (from the program's memory, the original file will be unaffected). There is a significant amount of processing required before the .cdg file is ready to use. It may take several minutes to complete, depending on the number of nodes and breakline segments. When done, an outline of the modeled area will appear in the main part of the River2D window. 5.4.3 File -> Save The current mesh information is saved back into the original .cdg file. Normally, the newly solved depths and discharge intensities are saved. Other changes, such as boundary conditions, roughness values and bed elevation are also saved. No habitat information is saved. The newly saved .cdg file may be reopened at a later time and used to initiate further analysis. 5.4.4 File -> Save As The Save As command allows the specification of a new .cdg file for the output using the standard Windows File Save As dialog. The original file is untouched and subsequent Save commands use the new .cdg file. 5.4.5 File -> Print The Print command sends whatever is displayed in the main River2D window to the selected printer. All current display options are used for printing. The display is scaled to a single page, such that no part of the current window display is lost. Because the River2D - User Manual – September 30, 2002 47 shape and/ or orientation of the paper may be different from the screen, the output may appear smaller or may include areas not visible on the screen. Some trial and error (using Print Preview) in adjustment of the window shape may be necessary to obtain the best result on paper. Generally, setting the widow shape to match the paper shape (portrait or landscape) works the best. Output to the printer uses Windows drawing commands which will take advantage of whatever resolution the printer is capable of. Note that very high resolution printing, particularly of colour fill drawings, may be very slow. 5.4.6 File -> Print Preview Print Preview displays an image of the printer output, considering the current Display and Printer Setup options in effect. 5.4.7 File -> Print Setup Print Setup is the standard Windows dialog for setting printing options for the selected printer. 5.4.8 File -> recent documents The four most recent .cdg files opened will be listed here for convenience. Selecting one of them will open it as if it had been selected in File -> Open. 5.4.9 File -> Exit The program will cease running and the window will close. Clicking the "X" box in the top right hand corner will have the same effect. 5.4.10 Edit The standard Windows operations of Undo, Cut, Copy, and Paste are not supported in the present version of River2D. River2D - User Manual – September 30, 2002 48 5.4.11 View The two items under the view menu toggle the display of the Toolbar and the Status Bar respectively. The Toolbar provides some useful shortcuts for common operations and the Status Bar provides details of the point at the current mouse position. Neither is essential, however, and a larger display area is available if they are toggled off. 5.4.12 Help The only function currently available under the help menu is a command to display the About River2D dialog box. This box is the same as initially displayed at start up. 5.5 Additional File Operations 5.5.1 File-> Save As EMF… This command allows the user to save the current view to an Enhanced Windows Metafile. This file format saves the view in a vector based format which is excellent for presentation purposes. Currently, the EMF’s generated by this command can be imported into any Microsoft Office application that accepts image files. 5.5.2 File -> Compress Video… This command allows the user to compress any AVI video files that may have been generated as output from a transient analysis. Selecting this command will open a series of dialog boxes. The first will require the user to select a video file for compression and the second is a standard “save as” dialog box which allows the compressed file to be saved under a new name. (Note: the compressed file cannot overwrite the uncompressed file. If this is attempted, the compression process will end without compressing the file.) Once a name is chosen, the “Video Compression” dialog box opens, as shown in Figure 7 below. River2D - User Manual – September 30, 2002 49 Figure 7:The Video Compression Dialog Box. This allows for the selection of a compressor, the compression quality, data rate and the frequency of key frames. In addition, there is an “About…” button which provides information on some of the different compressors. It is also possible to preview the results by selecting the “Preview” button. Care should be taken in selecting a compressor as each compression method (codec) has its advantages and disadvantages. For example, Microsoft RLE was designed for animations and cartoons. It works well for 8 bit graphic images (256 colour) even though it gives relatively poor performance for real-life images. In contrast, compressors such as Cinepak are excellent for action sequences but less appropriate for low-motion sequences. Other options include Indeo, which is appropriate for low-motion, and Video 1, which is the standard compressor shipped with video for Windows. Since the video output produced by River2D is a low motion sequence with 8 bit graphic images, Microsoft RLE is probably the most suitable compressor, while Indeo and Video 1 are other appropriate alternatives. Cinepak and other “high action” compressors would likely not be suited to River2D videos. Note that the list of compressors in the Video Compression dialog is machine dependant. Therefore you may or may not have all of the described choices. You may also have compressors that are not described here which you might want to research before using. River2D - User Manual – September 30, 2002 50 5.6 Display Operations The River2D program is built around a single display window which shows a map of the area being modeled. When this window is active and in the foreground, the Status Bar at the bottom of the window is continuously updated with information from the current mouse pointer position. The x and y coordinates and one other parameter are given on this line. The specific parameter is the same as that selected for contour/colour fill. If none is specified, then the bed elevation is given. The Display commands, found in the Display Menu, control what and how the model information is displayed in the window. The appearance of the River_2D Display Menu is shown in Figure 8. The Display settings are also used for printing. River2D - User Manual – September 30, 2002 51 Figure 8: The River2D Display Menu. 5.6.1 Display -> Redraw The Redraw command simply redraws everything shown in the display window, updating any changes that may not yet be visible. The Toolbar button provides a shortcut to this function. 5.6.2 Display -> Scale to Fit The Scale to Fit command chooses a center point and scale factor such that the entire modeled area is displayed in the window with a small margin. The Toolbar button function. provides a shortcut to this 5.6.3 Display -> Zoom In On Rectangle The Zoom In On Rectangle command allows the user to zoom directly to a rectangle selected by clicking on one corner and dragging the cursor (holding the mouse button down) to the opposite corner (then releasing the button). The display is centered and rescaled to contain the selected rectangle. If the shape of the display window and the selected rectangle are not the same, some River2D - User Manual – September 30, 2002 52 additional area may also be displayed. The Toolbar button with the two rectangles provides a shortcut to this function. This command can also be accessed using the F2 function key. 5.6.4 Display -> Zoom In On Point The Zoom in by Point command allows the user to click on any point in the display and enlarge the view around that point. The display is centered on the selected point and the scale factor is doubled. Repeated Zooms can be used to further refine the focus. The Toolbar button with the large triangle provides a shortcut to this function. 5.6.5 Display -> Zoom Out The Zoom Out command leaves the display centered on the previously selected zoom in point and the scale factor is halved to show twice the extent. Repeated Zoom outs can be used to show ever greater extents. The Toolbar button with the small triangle provides a shortcut to this function. 5.6.6 Display -> Move Center to Point The Move Center to Point command allows the user to click on any point in the display and shift the display to center on that point with the scale unaffected. This command can be used to "pan" across the model at small scales, looking for detailed features. The Toolbar button with the dot in the rectangle provides a shortcut to this function. The “panning” command is also available using the keyboard. The arrow keys have been mapped as follows in the River2D environment: ⇐ key: shift the display to left ⇒ key: shift the display to the right ⇑ key: shift the display up ⇓ key: shift the display down River2D - User Manual – September 30, 2002 53 Letter keys on the other side of the keyboard have also been mapped with “panning”: A key: shift the display to left D key: shift the display to the right W key: shift the display up S key: shift the display down 5.6.7 Display -> Mesh The Mesh command toggles the display of the finite element mesh. The triangles shown are the finite elements and the vertices of the triangles are the computational nodes. Figure 9 shows a sample problem with the mesh displayed. Figure 9: A sample .cdg file with mesh displayed. 5.6.8 Display -> Node Numbers The Node Numbers command toggles the display of numbers of all of the computational nodes. The display may need to be zoomed in to distinguish the individual numbers, as shown in Figure 10. This option is sometimes useful to identify problem points and to get an River2D - User Manual – September 30, 2002 54 indication of the node numbering efficiency. The node numbers are also useful when editing boundary conditions. River2D - User Manual – September 30, 2002 55 Figure 10: Using node numbers to identify problem points. Zoom in on area to identify problem points River2D - User Manual – September 30, 2002 56 5.6.9 Display -> Water's Edge The Water's Edge command toggles the display of a blue line which represents the boundary between wet and dry areas in the model. As the water depth changes, this line is updated to reflect drying or inundation. As most other display options are only valid for wet areas, this line often appears as a boundary of the interesting area. Figure 11 shows a sample problem with the water’s edge displayed. This feature is displayed by default. It should be noted that the computational boundary is always displayed and cannot be “turned off”. The colours of the boundary represent the various boundary conditions. Red denotes a “no cross-flow” condition, while green and blue and orange represent inflow and two kinds of outflow conditions respectively, as shown in Figure 11. Figure 11: A sample .cdg file with the water’s edge displayed. No cross-flow boundary Inflow boundary Outflow boundary Water’s edge 5.6.10 Display -> Contour/Colour The Contour/Colour command brings up the Contour dialog box, shown in Figure 12, which controls parameter contouring and colour fill displays. The top of the dialog allows the user to select a River2D - User Manual – September 30, 2002 57 single parameter or variable a drop down list. The selected parameter is also the one that will be tracked with the mouse pointer on the Status Bar. If no habitat calculations have been done, the various habitat indices will be zero. The check boxes on the lower half of the dialog allow the user to select any, all or none of the display type options. Figure 12: The Contour dialog box. If Display Contour Lines is selected, then the Contour Interval value is used to draw a contour map of the selected variable. Since linear triangles are used for interpolation, the contour lines will be straight across each individual element. Contour values are not shown on the map, but may be found by pointing the cursor at any line and reading the parameter value from the Status Bar. Figure 13 shows a sample problem with the bed elevation contours with a 0.5 contour interval. The cursor is pointing to the contour with a River2D - User Manual – September 30, 2002 58 value of 100 as indicated by the Bed Elevation value in the Status Bar. Figure 13: A sample .cdg file with bed elevation contours displayed. If the Display Colour Shading option is selected, then a colour spectrum (red is highest, blue is lowest) will be scaled to the parameter values. Currently, there are 20 distinct colours in the spectrum. Figure 14 shows a sample problem with the velocity magnitude displayed using colour shading. The colour spectrum and parameter mapping can be shown as an option with the Display -> Annotation dialog. The scaling can be set to automatic, with the maximum and minimum values set by the maximum and minimum present in the model. Alternatively, the maximium and minimum can be set manually. Values above and below the set limits are assigned no colour (white). If Clip Colour Shading to Water’s Edge is chosen then the colour spectrum is displayed only inside the water’s edge. When the clipping feature is selected, the maximum and minimum values are set based on the maximum and minimum of the nodes that are inside the water’s edge. In Figure River2D - User Manual – September 30, 2002 59 14, the clipping feature is selected. If the clipping feature is turned off, the colour spectrum fills the entire computation domain. Figure 14: A sample .cdg file with colour contours used to display velocity magnitude. 5.6.11 Display -> Vector The Vector command brings up the Vector Plot dialog box shown in Figure 15. This dialog controls the display of velocity or discharge intensity vector arrows. The Vector display is independent from other display options and may overlay a contour or colour fill display. The combination of depth shown as a colour fill and velocity shown as vectors is a particularly effective way to visualize the overall flow field, as shown in Figure 16. River2D - User Manual – September 30, 2002 60 Figure 15: The Vector Plot dialog box. Figure 16: A sample .cdg file with bed elevation displayed using colour shading and velocity magnitude displayed using a vector plot. River2D - User Manual – September 30, 2002 61 The Vector Location option indicates where the vectors are to be plotted. The At Nodes option is most useful for evaluating the solution quality. The On Grid option usually gives a better picture of the flow field. The Scale value determines the length of the vectors drawn. For example, a scale value of 10 means that a velocity of 1 m/s will be drawn as a vector of length 10 m on the map. The grid spacing value is the distance on the map between grid points. The Minimum Depth sets the minimum flow depth for displaying the velocity vectors. In Figure 16, the vectors are displayed at the nodes with a scale value of 5 for a minimum flow depth of 0.02. 5.6.12 Display-> Bed Contours The Bed Contour command toggles the display of a contour map of the bed topography. This command is only active if a .bed file has been loaded using the Load Bed File command found under the Mesh Edit menu. This feature is displayed by default when a bed file is loaded to indicate to the user that the bed data has loaded properly. The setting for changing the contour interval of the bed topography map is found in the Mesh Edit Options dialog box which is accessible from the Options menu. 5.6.13 Display -> Annotation The Annotation command brings up the Annotation Options dialog box, shown in Figure 17. This dialog controls the display of legend and axis information on the map. By default, all annotation is turned off to allow the maximum screen area to the map itself. The annotation information may be useful, particularly when printing. Any, all, or none of the annotation options may be selected simultaneously. Figure 18 shows the sample problem of Figure 16 with all annotation options displayed. River2D - User Manual – September 30, 2002 62 Figure 17: The Annotation Options dialog box. Figure 18: A sample .cdg file with annotation displayed. River2D - User Manual – September 30, 2002 63 The Axes option simply causes the coordinates of the bounding box to be shown on the display. The Colour Legend shows the mapping of the colour spectrum to the parameter values (and gives the name of the parameter being displayed). The Distance Scale causes a specified reference horizontal distance to be printed with subdivided ticks. The Vector Scale causes a reference vector of specified value to be drawn. The Title will be printed across the top of the display if this option is selected. Selecting Inflow and/or Outflow Discharge will cause the respective value(s) to be printed at the top of the display. Finally, the Time option displays the current model time. 5.6.14 Display -> Dump nodal csv file The Dump nodal csv file command is an optional output from the River2D model. There is one line in the csv file for every node in the mesh. Each line contains the node number, the x coordinate, the y coordinate and one parameter for that particular node, delimited by commas. The parameter is the one selected in the contour/colour dialog and indicated on the status line at the bottom of the window. The .csv form of output is convenient for further processing of the results in a spreadsheet or GIS program. 5.6.15 Display -> Dump grid csv file The Dump grid csv file command is similar to the dump nodal csv file command except that the points are set on a grid. The file format is identical with one line in the csv file for every point in the grid. A dialog box prompts the user for the coordinates of the area to be gridded in terms of the lower left (x1, y1) and top right (x2, y2) values. The default values are set to be just outside the domain of the actual mesh points. Any point on the grid which is River2D - User Manual – September 30, 2002 64 not "inside" the mesh will have negative node number and a zero parameter value assigned. The point spacing value is the grid increment in both directions. The grid will start with lines at x1 and y1 and extend to the last grid lines which are less than x2 or y2. 5.6.16 Display -> Extract points to csv file The Extract points to csv file command is similar to the dump nodal csv file command except that the points are already defined in an existing .csv file. The input file format is identical to the output format of any of the .csv file options. Having defined a grid or section once, this option allows output of different variables at the same points, or the same variable at different discharges. Another possibility is to compare different meshes of the same area. A dialog box prompts the user for the input .csv file and then for the output .csv file. 5.6.17 Display -> Extract section to csv file The Extract section to csv file command is similar to the dump grid csv file command except that the points are set on a line defined by two endpoints. The file format is identical with one line in the csv file for point along the line. A dialog box prompts the user for the coordinates of the start (x1, y1) and end (x2, y2) points. Any point on the line which is not "inside" the mesh will have negative node number and a zero parameter value assigned. The point spacing value is the increment spacing along the line. The set of points will start with a point at x1 and y1 and extend to the last incremented point before the end point is reached. The line may be defined in any direction. The endpoints need not be within the mesh. A profile line can be developed by concatenating individual line segment files in a spreadsheet. Note that once defined, the concatenated file can be used with the Extract points to csv file command for other variables and discharges. River2D - User Manual – September 30, 2002 65 5.7 Hydrodynamic Model Operations The hydrodynamic component of River2D is controlled through the commands under the Flow menu, as shown in Figure 19. Figure 19: The River2D Flow Menu. Although the hydrodynamic model is in fact a transient one, at any given time, it can be run in two different modes: steady and transient. Before describing the details of the specific commands in the Flow Menu, a general overview of the solution process for each of the two modes is useful. 5.7.1 Steady Mode Solution Process In steady mode, the process used to converge the solution to steady state is actually a pseudo-transient one, and therefore the iterations are moderated by time increments and a final time is used to end the simulation. The objective is to reach steady state with as few calculations as possible while remaining stable under any flow circumstances. The basic approach is to start with a very short time step. This is because the initial condition may be very different from the final equilibrium and the rate of change of the flow response is likely to be very high. As the solution progresses toward steady state, usually the rate of change decreases and longer time steps are possible. Due to the wavelike nature of open channel flows, including moving bores and hydraulic jumps, the progress toward a final steady state may not be uniform. River2D - User Manual – September 30, 2002 66 The program logic proceeds as follows. At the end of each time step, the overall relative change is calculated and compared to the goal change. The overall relative change is defined as the square root of sum of the squares of the changes in all variables divided by the square root of sum of the squares of all of the variable values. If the actual change is less than 1.25 times the goal change, then the current iteration is accepted and the solution proceeds. The time increment for the next step is then calculated as the previous time step multiplied by the ratio of goal to actual changes. If this ratio is greater than 1.5, it is reduced to 1.5. As long as the time is less than the defined end time, another time step iteration is calculated. If the actual change is greater than 1.25 times the goal change, then the current iteration is rejected. A new time increment is calculated as half of the unsuccessful time step multiplied by the ratio of goal to actual changes and the iteration is retried. This process may repeat a few times until a small enough time step is achieved to allow the solution to progress. In most cases, the time step will eventually become large and the solution will converge quickly to steady state. The total inflow and outflow discharges are indicators of how close the solution is to the final solution. As the solution converges, these numbers will become constant and approximately equal (relative to the total discharge). In principle, these values should be exactly equal, but their calculation is approximate and depends on the degree of discretization in the vicinity of the boundary. The model time required to reach steady state varies from problem to problem. A useful scale is to estimate the time for a fluid particle to flow the length of the reach. Doubling or tripling this time will usually provide a reasonable estimate of the model time to steady state. 5.7.2 Transient Mode Solution Process In a transient simulation, the objective is to obtain accurate spatial results throughout the duration of a specific temporal event. This River2D - User Manual – September 30, 2002 67 requires an accurate solution of the governing non-linear system of equations at every time step in a simulation. In the model, the system of non-linear equations is solved by approximating it as a linear system and then iterating to a solution, with a specified level of accuracy, using the Newton-Raphson technique. The transient mode allows the user to control the amount of solution convergence at every time step, unlike the steady mode where the model is set to perform only a single Newton-Raphson at every time step. Prior to any transient simulation, boundary conditions and initial conditions must be specified. Assuming subcritical flow, the boundary conditions must be specified as discharge at inflow sections and water surface elevation at outflow sections. In a transient analysis, these conditions will typically take the form of a discharge hydrograph (graph of discharge versus time) at an inflow section and a stage hydrograph at an outflow section. If an elevation hydrograph is unavailable at any of the outflow sections, then a depth-discharge relationship is a viable alternative. Initial conditions must be specified at every point in the computation domain and should reflect the flow conditions prior to the simulation event. Initial conditions can be obtained by running the model in steady mode using constant boundary conditions that reflect that the boundary conditions at the beginning of the planned transient simulation until a steady solution is achieved. Alternatively, the model can be run in transient mode from an arbitrary initial condition with appropriate boundary conditions to the point in time when the desired simulation is to start. The choice of time step increment will depend on the speed of the phenomenon and the desired level of resolution of the results. If we desire detailed spatial resolution, then we use small elements. Similarly, if we desire detailed temporal resolution, then we should use small time steps. For a small-scale flow transients to be modelled accurately, the Courant number should be no greater than one where Courant number is defined as River2D - User Manual – September 30, 2002 68 Cr = Vw ∆t ∆x (49) where Vw is the speed of the phenomenon, ∆t is the time step increment, and ∆x is the mesh spacing. Since mesh spacing will vary across the domain, due to varying element sizes, the Courant will not be the same throughout the domain at a given point in time. In addition, the Courant will also vary at a point in space through time because the speed of the phenomenon will vary. For this reason, estimates of velocity and mesh spacing in the above equation should provide a suitable value for the time step increment. If a large scale phenomenon is being modelled, such as a flood wave, then the model can be run using a larger Courant number and hence a larger time step. However, the larger the specified time step increment, the more likely nonlinear instabilities are to arise which will result in a reduction in the time step increment until the instabilities are resolved. Once the model is running, the solution proceeds as follows. At the end of each Newton-Raphson iteration, the value of each solution variable (3 for each node) is compared to their respective values from the previous iteration. If the change in all of the variables is less than the allowable change then the time step is accepted. The time increment for the next step is then calculated as twice the previous time step (given this value does not exceed the user specified time step increment). Provided that the current time is less that the defined end time for the simulation, the solution at the next time will be evaluated. If the change in any of the variables is greater than the allowable change at the end of one Newton-Raphson iteration, then subsequent iterations will be performed until the change is less than the allowable change, and the time step will be accepted, or once the maximum allowable number of iterations is reached. If the maximum number of iterations is reached before the allowable change criterion is met, then the time step is rejected. A new time step increment is then calculated as half the unsuccessful time step. River2D - User Manual – September 30, 2002 69 In some instances, a number of time steps may be rejected until a small enough time step is achieved that will allow simulation to progress. The model time required for a transient event will really depend on the time it takes for the phenomenon to propagate through the domain (which should be determined prior to the simulation so that transient boundary conditions are defined for the length of the event) and the size of the time step increment. 5.7.3 Flow -> Run Steady The Run Steady command brings up the Run Steady dialog box shown in Figure 20. This dialog monitors and controls the execution of the hydrodynamic model in steady mode. This dialog box will remain open until it is explicitly closed by clicking the box. The hydrodynamic model runs as a background process, which means that display settings and other operations can be changed while the model is executing. The values in this dialog box are explained in general terms in the section above entitled “Steady Mode Solution Process” and their specific uses are detailed below. River2D - User Manual – September 30, 2002 70 Figure 20: The Run Steady dialog box. The "Present time" value is the point in model time at which the solution is currently running or has stopped at. This value can be reset before the start of a subsequent run. "Final time" is the time at which execution of the hydrodynamic model will be stopped. Actually, execution is halted once the present time exceeds the final time. "Time increment" is the size of the current time step. It may be set at the start of a run. If it is too long the program will automatically adjust it downward. Over the course of the iterations this value normally increases steadily. Occasionally, it will decrease dramatically and then gradually grow again. If this happens frequently, there may be a problem with the boundary conditions and/or the mesh. River2D - User Manual – September 30, 2002 71 "Max time increment" is a user specified setting for the largest time step allowed. This provides an extra measure of control on the convergence process. "Solution change" is the relative overall change in the solution variables over the latest time step. The size of this value relative to the goal solution change will govern how quickly the time increment increases. Once the maximum time increment is reached, the solution change should decrease with each subsequent iteration. When this becomes sufficiently small (approx 0.00001), the solution can be considered converged. In some cases, the solution will reach a relatively small value of solution change (of the order of 0.001) and refuse to diminish further, regardless of the number of subsequent time steps. Usually, this indicates a small, persistent, oscillation at one (or sometimes more) points in the flow field. Often, the oscillation is associated with a shallow node that alternates between wet and dry. Another possibility is periodic shedding of eddies from obstructions. Eddies forming at outflow boundaries are also unlikely to stabilize. Steps that can be taken to stabilize the solution include: change to numerical Jacobian (see below), change eddy diffusivity (see below), refine the mesh in the problem area, and relocate or revise the outflow boundary. Finally, the oscillating solution may be considered acceptable, as the size of the variation may be within the desired accuracy of the simulation. "Goal Solution change" is the user specified target relative overall solution change. The bigger this value, the bigger the time increments that will be used and hopefully the fewer the number of iterations required to reach steady state. However, nonlinear instabilities are more likely to arise, leading to more frequent episodes of time step reduction followed by gradual increase phenomenon. "Log file name" is the name of the text file to which a record of the program execution is written. This record includes the time, time increment and solution change for each iteration. If the iterative River2D - User Manual – September 30, 2002 72 solver is used, then additional information about the performance of the solver is included in the log. If an iteration is rejected, further information which may help localize the problem is also written. The log file is always appended to and never overwritten. Its default name is “steady.log” and it resides in the same directory as the current .cdg file. "Total Inflow" and “Total Outflow” represent the total discharge flowing through inflow and outflow boundaries, respectively. One characteristic of a steady state flow condition is that these two values should be equal. In practice, due to approximation errors, they will not be precisely equal. Instead, there will be a slight difference (relative to the total discharge) between the two values. The progress of the solution toward steady state can be observed by tracking these numbers. "Update display every ____ time steps" is used to set how often the display updates. As drawing the display takes some processor time away from the computations, it may be advisable to limit the number of times that the screen is redrawn. "Current step #" keeps track of the number of time step iterations since the start of the latest run. After the desired parameters are entered, the "Run" button will initiate the solution process. While the model is running, the button caption will change to "Stop". Pressing the "Stop" button while the model is running will cause it to stop after the end of the next iteration. While waiting for the iteration to finish, the caption will change to "Stopping". The solution may be resumed after a halt by pressing the “Run” button again. Stopping the solution in mid-run allows parameters to be changed. 5.7.4 Flow -> Run Transient The Run Transient command brings up the Run Transient dialog box shown in Figure 21. This dialog monitors and controls the execution of the hydrodynamic model in transient mode. This dialog box will remain open until it is explicitly closed by clicking River2D - User Manual – September 30, 2002 73 in the box. As with a steady run, a transient analysis runs as a background process. This means that display settings and other operations can be changed while the model is executing. The values in this dialog box are explained in general terms in the section above entitled “Transient Mode Solution Process” and their specific uses are detailed below. Figure 21: The Run Transient Dialog Box. The "Present time" value is the point in time at which the model is currently running or has stopped at. In contrast to steady mode, time cannot be loosely specified when using the model in transient mode. The present time is used to set the model boundary conditions based on input hydrographs (discharge and/or elevation) River2D - User Manual – September 30, 2002 74 and to generate output at appropriate times. It is recommended that the time only be reset at the beginning of a simulation. "Final time" is the time at which execution of the hydrodynamic model will be stopped. As in steady mode, execution is halted once the present time exceeds the final time. It is recommended that the any input hydrographs are defined to exceed the specified final time, otherwise any transient boundaries will be taken as the value at the maximum time in the hydrograph file (file format described below in the section on boundary conditions). "Time step increment, ∆t " is the size of the current time step. It may be set at the start of a run, provided that it does not exceed the Goal time step increment. The program will automatically adjust it downward or upward as necessary in order keep the solution within the specified tolerance after every time step. If the model is running smoothly it should remain at the value of the Goal time step increment. "Goal ∆t” is the user specified time step increment for the simulation. It is also the maximum time step which the model will allow. This value is also used in defining when file output from the analyses will be generated. For example, if the model is run with a goal ∆t = 2, then the model will ensure that a solution is produced at t = 2, 4, 6, 8…etc, even if the actual time step increment must be less than 2 to maintain stability. “# iterations per ∆t” is simply an indicator of how many NewtonRaphson iterations were required to converge at the last time step. “Max # of iterations per ∆t” is a user specified setting that limits the number of Newton-Raphson iterations for each time step. If the actual number of iterations reaches this value before the solution change is within the tolerance criterion, then the time step will be rejected and the time step increment will be reduced. "Solution tolerance" is a user specified value that controls the amount of solution convergence required at every time step. This tolerance is defined as the maximum change in any variable at River2D - User Manual – September 30, 2002 75 node in the mesh. A larger value of tolerance will result in fewer iterations per time step. However, accuracy may be compromised and numerical instabilities may occur. Reducing the tolerance will lead to more iterations per time step. As the Newton-Raphson procedure converges quadratically, each additional iteration may be associated with a tolerance reduction of several orders of magnitude. “Implicitness, θ” is a user specified value that controls the way in which the model solves the system of governing equations. A value of 0 indicates fully explicit while a value of 1 specifies fully implicit. The solution to the governing equations is most accurate when the model is run semi-implicit, that is θ = 0.5. However, the solution is more stable with θ = 1.0. The model should not be run with θ less than 0.5 as it will become unstable. The rule of thumb for setting θ is as follows. If you are modeling small flow features then you will probably want to set the goal time step increment such that the Courant number is one and set θ = 0.5. If, on the other hand, you are only interested in the general trend of the solution, that is large scale phenomenon such as a flood wave, then you can get away with using a larger goal time step increment and should set θ = 1.0. This is because the use of a larger time step increment will obscure any accuracy improvements provided by using θ = 0.5. Fully implicit solutions tend to be smoother and converge more quickly. "Log file name" is the name of the text file to which a record of the program execution is written. The record that is produced is essentially the same as the one produced in steady mode except that it includes the number of Newton-Raphson iterations performed at every time step. Its default name is “transient.log” and it resides in the same directory as the current .cdg file. "Total Inflow" and “Total Outflow” represent the total discharge flowing into and out of the model, respectively. In a transient analysis these will change according to the transient boundary conditions. River2D - User Manual – September 30, 2002 76 "Update display every ____ time steps" is used to set how often the display updates. As drawing the display takes some processor time away from the computations, it may be advisable to limit the number of times that the screen is redrawn. The “Output Options” button simply opens the Transient Output Options Dialog box. This dialog allows the user to select and customize output from the transient analysis. Details of this dialog are explained in section entitled ‘Option Setting Operations’. The desired output must be chosen prior to starting the simulation. Once all of the parameters are set appropriately, the "Run" button will initiate the solution process. While the model is running, the button caption will change to "Stop". Pressing the "Stop" button while the model is running will cause it to stop after the end of the current time step. While waiting for the time step to finish, the caption will change to "Stopping". The solution may be resumed after a halt by pressing the “Run” button again. However, if the model is stopped and then started again when the model is running at a time step that is less that the goal time step increment, subsequent transient output will not be produced at even intervals. 5.7.5 Flow Boundaries In the model, boundary conditions must be set for each boundary element in the model. A flow boundary is a convenient format for applying boundary conditions. For example, an inflow section may be comprised of multiple boundary elements. Having to set the boundary conditions at each boundary element would be very cumbersome. Not only would you have to specify the element as being an inflow element but you would also have to assign the element a portion of the total inflow discharge so that the discharge in all of the inflow boundary elements would add up to the total inflow discharge. A flow boundary allows the user to set the boundary condition along a section of the boundary rather than at each boundary element individually. They are called flow boundaries to distinguish them from no flow boundaries. The necessary information to define a flow boundary includes: a starting node (along the boundary), an ending node (also along the River2D - User Manual – September 30, 2002 77 boundary), the type of flow boundary (inflow or outflow), and information relevant to type of boundary (e.g. total discharge for an inflow boundary). Flow boundaries are always defined walking around the boundary with the computational mesh to the left. Therefore flow boundaries on the external boundary are defined in the counter clockwise direction while flow boundaries on an internal boundary are defined in the clockwise direction. There are two flow boundary commands available to the user. They are Edit Flow Boundary and Define New Flow Boundary. They are found under the Flow menu and are described below. 5.7.6 Flow -> Edit Flow Boundary This command allows the user to edit existing flow boundaries. Once selected, the user must use the mouse (single click) to select either an inflow or outflow boundary. This opens up the Edit Flow Boundary dialog box, as shown in Figure 22. River2D - User Manual – September 30, 2002 78 Figure 22: The Edit Flow Boundary Dialog. River2D - User Manual – September 30, 2002 79 The extent of the boundary can be changed in the top of the dialog by changing the flow boundary starting and/or ending nodes (in terms of node numbers. The type of boundary condition can also be modified simply by selecting the appropriate radio button. The choices are an inflow condition, an outflow condition or a no flow condition. For an inflow condition, the user must also specify either a fixed or time varying discharge. For a fixed discharge, only a single value is required while if it the discharge is varying with time, then the location of a file containing an inflow hydrograph (table of times and the corresponding discharges) must be specified. For an outflow condition, the user has four possible options: a fixed outflow water surface elevation, a time varying water surface elevation, an elevation(stage)-discharge relationship (rating curve), or a depth-unit discharge relationship. The first two options are similar to the inflow options. The fixed elevation requires a single value while the time varying elevation requires a file, containing a stage hydrograph, to be specified. Examples of discharge and stage hydrograph files are shown below to illustrate the file format in Table 1. Both are text files, differentiated by their file extension: .bcq for a discharge file and .bch for a stage file. The third option is a stage-discharge relationship also known as a rating curve. This is also in the form of a table (discharges and corresponding stages) and therefore the location of a file, containing the table, must be specified. A rating curve filename has the same format as the hydrograph files and must have a .bcr file extension. An example of a rating curve file is included in Table 1. All three files types can have any amount of descriptive text at the beginning of the file provided that there is no open bracket ‘(’ in the text. There is no length limit to the size of the table. The only requirement is that the table is enclosed with brackets as shown in Table 1. River2D - User Manual – September 30, 2002 80 Table 1: Format for Boundary Condition files discharge hydrograph for River X first column is time is seconds second column is discharge in cms ( 0 200 400 600 800 1000 1200 1400 1600 1800 ) 175 209 239 262 273 273 262 239 209 175 stage hydrograph for River X first column is time is seconds second column is water surface elevation in metres ( 0 175.0 200 209.2 400 239.3 600 261.6 800 273.5 1000 273.5 1200 261.6 1400 239.3 1600 209.2 1800 175.0 ) River2D - User Manual – September 30, 2002 81 Table 1 (continued)… rating curve for River X first column is discharge in cms second column is water surface elevation in metres ( 203.24 99.50 207.29 99.55 212.96 99.60 220.25 99.65 229.16 99.70 239.69 99.74 251.84 99.76 270 99.77 290 99.78 ) At a given point in time, all three of these outflow conditions will force the water surface elevation to be constant across the outflow boundary. In some cases, the model will have difficulties converging when the same elevation is forced across an outflow boundary. When this occurs, the forth and last option, a depth-unit discharge relationship, may help with convergence. This option forces a weir type flow through each boundary element in the outflow boundary. Because the equation is applied at the element level rather than across the whole outflow section (which would require a depth-total discharge relationship), the elements can respond individually to the flow in the domain resulting in a water surface elevation that varies across the outflow section. This type of boundary condition is particularly handy when the downstream boundary is chosen at a bend in the river where the water surface elevation across the section is unlikely to be constant. If a no flow condition is selected, then any existing flow conditions and the location of the flow boundary will be removed, as is stated in the dialog. The flow boundary can only be reinstated by redefining it using the “Define New Flow Boundary” command which is described in the following section. River2D - User Manual – September 30, 2002 82 5.7.7 Flow -> Define New Flow Boundary Selecting this command will open the Define New Flow Boundary dialog box. This dialog allows the user to define new flow boundaries in the same way as the Edit Flow Boundary dialog allows the user to edit existing flow boundaries. The starting and ending nodes must be defined in terms of node number. To determine the node numbering for a new flow boundary simply use the Display->Node Numbers command. Figure 23: The Define New Flow Boundary Dialog River2D - User Manual – September 30, 2002 83 5.7.8 Flow -> Reset Initial Conditions This command allows the user to reset the initial conditions. Initial conditions are required at every node in the domain as an initial guess in the iterative solution procedure used to obtain the steady state hydrodynamic solution. These conditions include water surface elevation and discharge intensity components (in the x and y directions). When this command is selected, a dialog box appears requesting an estimate of the inflow water surface elevation. The estimate supplied by the user is used to set up an initial water surface throughout the computational domain. Depending on the value of the inflow estimate (typically chosen to be higher than the outflow because water flows downhill), an initial water surface slope is obtained. This water surface is estimated based on a numerical solution of the Laplace equation using the same finite element mesh. Note that this initial condition is somewhat different than that provided by the mesh editor R2D_Mesh. Once the water surface slope is obtained, the discharge intensities are reset to zero. 5.7.9 Flow -> Check Memory When the direct solver is selected, the solution process for each iteration involves the formation of a very large Jacobian Matrix. This matrix represents the interaction of all of the solution variables (three per node) on all of the other solution variables. While a sparse matrix storage scheme is used (the skyline storage method), this matrix remains very large and the RAM capacity to store the matrix is the critical limitation to the number of nodes in a mesh. The size of the Jacobian Matrix depends on the complexity of the mesh as well as on the number of nodes. The memory for the Jacobian Matrix is determined and allocatedduring the first iteration. At any time after this, the Check Memory command will display an information box indicating the amount of memory allocated as well as the number of nodes and elements in the mesh, as shown in Figure 24. The information box River2D - User Manual – September 30, 2002 84 also indicates to the user which solver is currently being used in the solution process. If the memory allocated is larger than the physical RAM installed, then hard disk space will be used via the standard W95/98/2000/ME/NT/XP dynamic memory mechanism. Hard disk access is relatively slow however, and the overall solution time will be much longer. Figure 24: Check Memory information box for the direct solver. The iterative solver does not form the Jacobian Matrix. This is the main advantage of this solver, since it requires far less memory allocation. As is the case for the direct solver, the memory that is necessary for the iterative solver is determined and allocated during the first time step iteration. After the first iteration using the iterative solver, the Check Memory command will display an information box, as shown in Figure 25. Figure 25:Check Memory information box for the iterative solver. River2D - User Manual – September 30, 2002 85 5.7.10 Flow -> Cumulative Discharge This command is used for calculating the cumulative discharge, also called stream function, throughout the computational domain. When this command is selected, the cumulative discharge will automatically be displayed as a colour spectrum once the calculations are complete, as shown in Figure 26. Cumulative discharge is one of the possible display parameter in the Contour dialog box, as shown in Figure 12. Therefore, the display of this parameter can be turned off once the calculations are complete. Unlike the other flow parameters that are available for display, such as depth, velocity and discharge intensity, the stream function value at every node is not updated every time the hydrodynamic solution is updated. Therefore, if the flow solution changes, this command needs to be recalled if the cumulative discharge is to reflect the current flow solution. Although the cumulative discharge can be used as an illustrative measure of the flow distribution in a channel, its main purpose in the River2D model is in the boundary extraction process. The streamlines that are defined by the stream function are one of the possible choices that can be selected by the user to map out the no flow boundaries of a boundary being extracted. If the model has not been run to convergence, then the streamlines that result may not reflect those of the steady state solution. Therefore, if the cumulative discharge is being calculated in order to use the boundary extraction command, the user is advised to ensure that the model has been run to steady state before calculating the cumulative discharge. River2D - User Manual – September 30, 2002 86 Figure 26:A sample .cdg file with cumulative discharge displayed. Since this command is in its beta stage, in some cases, it requires user intervention to ensure that it is executed properly. These interventions are described as follows. If the problem at hand has only one inflow boundary, River2D can easily calculate the cumulative discharge for the domain. Along the external computational boundary, the required boundary conditions for calculating cumulative discharge are set by ‘walking’ around the boundary. For the boundary conditions to be set correctly, the model must start at the boundary node that marks the transition from the inflow boundary to the no flow boundary while walking around the boundary in the counter-clockwise direction. If there is more than one inflow boundary, then there is more than one node that the model could choose as a starting point. Unfortunately, not all of the inflow to no flow transition nodes will result in the correct boundary conditions if they are used as starting nodes. A transition node can only be used as a starting node if the next transition node, traversing the boundary in the counterclockwise direction, is a no flow to outflow transition node. River2D - User Manual – September 30, 2002 87 Therefore, if a domain in question has more than one inflow boundary segment, the user will be prompted to select the appropriate starting node so that the solution may progress correctly. For sites with more than one computational boundary, that is, one external plus one or more internal boundaries, the order of these boundaries in the .cdg file is crucial to the correct progress of the cumulative discharge solution. The computational boundaries are described in the list of boundary elements. For the cumulative discharge to be calculated correctly, the external boundary must appear first in the list of boundary elements. The original order of the boundaries in the boundary element list is determined by the order in which they were defined when the mesh was created. If the external boundary does not appear first in the list, a text editor can be used to relocate it. If the location of the external boundary in the list is not known, it can be ascertained by examining the list in a text editor in conjunction with displaying the node numbers in the River2D environment. 5.8 Mesh Edit Operations While most mesh editing takes place in the mesh generator, R2D_Mesh, there are some cases where it is very useful to be able to make minor changes, particularly refinements, to the computational mesh without having to back to the R2D_Mesh environment. In other cases, large sites may require sub-sites to be ‘cut out’ and treated separately. For these reasons, mesh editing capabilities have been incorporated into River2D. The mesh editing operations that are available to the user in the Mesh Edit menu, as shown in Figure 27, are described below. River2D - User Manual – September 30, 2002 88 Figure 27:The River2D Mesh Edit Menu. 5.8.1 Mesh Edit->Load Bed File… To make any changes to the computational mesh, the original bed topography that was used to create the mesh must be loaded into the River2D environment. This is achieved by selecting the Load Bed File command. A standard Open File dialog is presented with the filter set to files with a .bed extension. Loading a new bed file replaces the one currently loaded. The Load Bed File command can also be used to change bed elevations and roughnesses in the computational mesh. First, the .bed file that was used to generate the mesh is revised either manually or by use of the R2D_Bed utility. Then the Load Bed File command is used to read in the edited .bed file. The bed elevation and roughness at all computational points in the mesh are then interpolated from the revised bed points. Making changes to the bed elevations and/or roughnesses can be useful in two contexts. The first is during model calibration, where changing roughnesses locally may improve the match to measured data. The second is to investigate anticipated changes to the channel geometry. 5.8.2 Mesh Edit->Extract Boundary… Once a mesh has been run to steady state, it may become apparent that a more detailed solution in some regions would be beneficial River2D - User Manual – September 30, 2002 89 for hydrodynamic or habitat reasons. The Extract Boundary command allows the user to define and extract a boundary that can be used to develop a more detailed computational mesh of a region inside the boundary. This command uses the concept of streamlines (which are theoretical ‘no flow’ boundaries within the flow) to define the ‘no flow’ boundaries in the boundary extraction process. In order to map out streamlines in the flow, the stream function, or cumulative discharge, must be known throughout the computational domain. Therefore, before a boundary can be extracted, the cumulative discharge must be calculated. This is achieved by selecting the Cumulative Discharge command, located under the Flow menu. Once the cumulative discharge has been calculated, the Extract Boundary command will become active. Selecting this command opens the Extract Boundary Dialog box as shown in Figure 28. River2D - User Manual – September 30, 2002 90 Figure 28: The Extract Boundary Dialog Box. At this time, only simple boundaries can be extracted from the flow, that is boundaries with only one inflow segment, one outflow segment, and two no flow boundary segments (left and right boundaries). The no flow boundaries can be defined using a streamline, a depth contour, or a computational boundary. If a streamline is used to define a no flow boundary, then the value of cumulative discharge that represents the streamline must be specified as shown for the left boundary in Figure 28. Note: left and right boundaries are defined looking downstream. In cases where the discharge in the River2D - User Manual – September 30, 2002 91 domain is very low, the streamline in the flow may not be very smooth and therefore they may not make very good no flow boundaries. In this case a depth contour, such as the water’s edge (0.02m contour line), can be used as an alternate no flow boundary. If a depth contour is used to define a no flow boundary, then the value of the depth contour must be specified as shown for the right boundary in Figure 28. Since the computational boundaries are no flow boundaries, they can also be used to define the no flow boundaries in the extraction process. If a computational boundary is selected, no value is required. The inflow and outflow boundaries are determined based on points specified by the user. The location of these flow sections should be such that the features that are being used to define the no flow boundaries are continuous lines (not branching) between the inflow and outflow sections. The inflow section should be selected at a location where the majority of flow across the section is parallel to the no flow boundaries. This is to ensure that the inflow boundary condition that will be set along this boundary (direction of flow is assumed to be perpendicular to the inflow section) is representative of the actual flow. The outflow section should be selected at a location where the water surface elevation is relatively constant between the left and right boundaries so that the constant elevation boundary condition at the downstream boundary is valid The defining points must be selected along the desired location of the flow boundary such that they are spatially between the left and right no flow boundaries. In addition these points should be selected at a locations along the section where the velocity is well defined and representative of the direction of flow of the section they are defining. This is because the velocity vector of a defining point is used to determine the strike of the section being defined. The last box is used for selecting the node spacing for the new boundary. The node spacing must be set to a value greater than zero. Because the boundary extraction process is accomplished through a dialog box, the values for the no flow boundaries and the points used to determine the location of the inflow and outflow River2D - User Manual – September 30, 2002 92 boundaries must be determined before the dialog box is opened. To choose the values for no flow boundaries being defined by a streamline or depth contour, the user should set display the cumulative discharge or water depth using either a contour map or a colour spectrum. This allows the user to see where the streamlines or depth contours are located in the flow. Once the location of the left and right boundaries has been determined visually, the values of the cumulative discharge or depth contours that define these boundaries can be determined using the mouse. When the mouse is placed over one of the streamlines or depth contours, the corresponding cumulative discharge value or contour value will appear in the status bar. The mouse and status bar can also be used to determine the x and y coordinates of the points required to define the inflow and outflow boundaries. Once all of the parameters are entered into the dialog box and the OK button is selected, a standard save dialog box will open so that the boundary can be saved to file. The boundary is saved in the same format as a mesh file with the .msh extension. In addition to the nodes and boundary elements that are used to define the boundary, the mesh file contains the inflow and outflow boundary conditions. The value of the discharge at the inflow boundary segment is determined by taking the difference between the values of cumulative discharge of the end points that are used to define the inflow segment. At the outflow segment, a fixed water surface elevation boundary condition is set. The value of this boundary condition is based on the average water surface elevation between the two end points that are used to define the outflow boundary. Therefore, if the outflow segment is selected at a location where the water surface elevation is not relatively constant across the section, then the boundary condition at the downstream end may not reflect the flow conditions. (It should be noted that, if the boundary was defined to include any internal no flow boundaries (i.e. an island), these boundaries will not be included in the mesh file. If it is imperative that the internal no flow boundaries be maintained, they will have to be added manually to the mesh file.) To develop a mesh based on this boundary, the .bed file that was used to make the original mesh (from which the boundary was River2D - User Manual – September 30, 2002 93 extracted) must be opened in the mesh editor, R2D_mesh. Once the bed file opened, the new boundary can be opened and a new mesh can be developed. Once the development of the mesh is complete, a cdg file can be created and solved in River2D. 5.8.3 Mesh Edit->Mesh Merge The Mesh Merge command is used for combining information from two meshes. This command takes information from a mesh that is on file (secondary mesh), and places it in the mesh that is currently displayed (primary mesh). Meshes can be merged in two ways: 1. Region Replace: This option removes all of the nodes and breaklines (except boundary nodes) from the primary mesh that are within the computational boundary of the secondary mesh and replaces then with nodes and breaklines from the secondary mesh. All nodes from the secondary mesh are included into the primary mesh, even the boundary nodes, although the boundary conditions are not included. The type of the node (fixed, sliding, or floating) is retained when it is transferred from the secondary mesh to the primary mesh. 2. Information Transfer: This option simply interpolates all flow and bed information from the secondary mesh and transfers it to the nodes in the primary mesh that are within the computational boundary of the secondary mesh. Typically the computational boundary of the secondary mesh falls within that of the primary mesh, although this is not a necessary criterion. The secondary mesh could overlap the primary mesh or it could include the primary mesh. Selecting this command with a primary mesh in the display opens the Mesh Merge dialog box as shown in Figure 29. River2D - User Manual – September 30, 2002 94 Figure 29: The Mesh Merge Dialog box. Once the merging option is selected and the OK button is clicked, a standard open dialog box will appear so the .cdg file that defines the secondary mesh can be loaded. Once the file is selected and the OK button is clicked, the secondary mesh will be merged with the first mesh. If the Region Replace option is selected, then the changes to the primary mesh can be easily observed by displaying the element boundaries in the mesh. This is accomplished by selecting the Mesh command under the Display menu. If the meshes are merged using the Information Transfer option, the changes to the primary mesh will be more difficult to detect, and be dependent on how different the flow and bed information is between the two meshes. The Mesh Merge command is useful in conjunction with the Boundary Extraction command. Once a boundary is extracted and the resulting mesh has been run to steady state, the user can use the Mesh Merge command to combine the results of the secondary submesh with the results from the primary mesh from which the submesh was derived. 5.8.4 Mesh Edit->Add Floating Node The Add Floating Node command sets the mouse to add floating nodes mode. This is indicated by a change in the cursor to a cross hair. At every point (within the computational boundary) that is subsequently selected by clicking the left mouse button, a new River2D - User Manual – September 30, 2002 95 floating node will be generated. To exit add floating nodes mode, reselect the Add Floating Node command. The Add Floating Node command is also available by selecting the toolbar button. 5.8.5 Mesh Edit->Region Refine The Region Refine command places a single new node in each existing element within the region polygon defined by the user. To define the region, first select the Region Refine command. This sets the cursor to a cross hair. Then click the left mouse button on any point within the mesh boundary to start defining the region to be refined. Then move to the next point keeping the area to be refined to the left of the red line being generated (counterclockwise direction). Click at this location and at subsequent locations until the region is almost completely defined. Close the polygon by clicking the mouse button very close to the starting point. When the region has been closed, the red line defining the border of the region will disappear and a node will appear at the centre of every triangular element that is contained within the region. After triangulation the area will have a node density of roughly twice (actually 3 ) that previous to refinement. Figure 30 and Figure 31 illustrate the process of region refinement. River2D - User Manual – September 30, 2002 96 Figure 30: Defining a region to be refined. counterclockwise Figure 31: Nodes that are inserted once the region is defined. River2D - User Manual – September 30, 2002 97 5.8.6 Mesh Edit->Auto Refine The Auto Refine command works in a similar manner to the Region Refine command. It also refines the mesh by placing nodes at the centre of existing triangular elements but it uses variable criteria rather than spatial (in or out of the polygon) criteria. Selecting the Auto Refine command will open the dialog box shown below in Figure 32. Figure 32: The Auto Refine Dialog Box This dialog box allows the user to provide the variable criteria for refinement in the form of an inequality statement. The edit boxes are for setting the limits of the inequality statement while the two drop down list boxes at the centre of the dialog box are for selecting the variable that must fall within these limits. The left edit box is used for setting the lower bound of the inequality whereas the right edit box is used for setting the upper bound. The second list is for choosing which nodal parameter will be used for refinement. The parameter choices are the same as those available to the user is the Colour/Contour dialog box. The first list is for specifying whether an element will be targeted for refinement based on the average value of this parameter within the element or the absolute change in this parameter over the element. 5.8.7 Mesh Edit->Delete Floating Node The Delete Floating Node command sets the mouse to delete floating nodes mode. This is indicated by a change in the mouse cursor to a cross hair. Every floating node that is subsequently selected by clicking the left mouse button, will be marked with a red X. Once the mesh is re-triangulated, these nodes will be River2D - User Manual – September 30, 2002 98 removed from the mesh. The Delete Floating Node will mark floating or sliding nodes for deletion. Fixed nodes or nodes that were used to define the computational boundary cannot be deleted. The Delete Floating Node command is also available by selecting the toolbar button. 5.8.8 Mesh Edit->Clear Untriangulated Nodes The Clear Untriangulated Nodes can be used to clear the mesh of all new nodes that have not yet been triangulated. This includes the nodes that have been added by either the Add Floating Node command or the Region Refine Command. 5.8.9 Mesh Edit->Triangulate The Triangulate command retriangulates the mesh incorporating any node changes into the mesh. The command invokes a constrained Delauney triangulation routine which gives the “best” possible triangles. That is, it generates triangles which are as close as possible to equilateral. The constrained nature of the triangulation is necessary to insure that no triangle oversteps the defined domain boundary. The Triangulate command is also available by selecting the toolbar button. Note: this command is only available for use once nodes have been inserted or marked for deletion. 5.8.10 Mesh Edit->Smooth The Smooth command is used to make the triangles more regular in shape, to give a more gradual transition between triangles of different size, and to give a better representation of the underlying topography. The smoothing process moves each point to a more central position with respect to neighbouring points, as defined by the triangles and towards breaks in topographic slope. After the points have been moved, the entire mesh is re-triangulated to insure the best possible triangulation. The smoothing process may be repeated as often as desired. The mesh will become smoother and more regular, but the discretization contrast will gradually diminish. River2D - User Manual – September 30, 2002 99 The smooth command actually causes the floating and sliding nodes in the mesh to move to new positions using a combination of element shape and topographic representation as criteria. The direction of the node movement will tend to be toward the adjoining triangle with the largest elevation difference between the bed and the mesh. This difference is measured at the centre of the element. A parameter controlling the relative importance of the topographic criteria, called the Bias Smoothing Parameter, can be set in the Mesh Edit Options dialog found under the Options Menu. A value of zero indicates no topographic effect and a value of one indicates no consideration for element shape. With higher values of this parameter, larger differences in adjacent element size are allowed. The Smooth command is also available by selecting the button. toolbar 5.8.11 Mesh Edit->Mesh Information… The Mesh Information command opens an attention box, shown in Figure 33, that displays the total number of nodes, the total number of triangular elements and the Quality Index (QI) of the mesh. The QI is the minimum “triangle quality” value for all triangles generated. The triangle quality is defined as the ratio of triangle area to circumcircle area (the circle which passes through the three points defining the triangle) normalized to the corresponding ratio for an equilateral triangle. Thus, an ideal mesh (all equilateral triangles) would have a QI of 1.0. Real meshes will have a QI of less than one. Typical acceptable values may be in the order of 0.1 to 0.5. Smoothing will usually increase the QI dramatically, if it is very low. Meshes with many breaklines will have lower QI values, especially if the breaklines are closely spaced. River2D - User Manual – September 30, 2002 100 Figure 33: The Mesh Information box. 5.9 Habitat Analysis Operations Once an acceptable hydrodynamic solution is obtained, a habitat analysis may be performed, if desired, using the Habitat Analysis Operations under the Habitat Menu shown in Figure 34. The operations available are described below. Note that a .cdg file must be loaded before using any habitat functions. Figure 34: The Habitat Menu. 5.9.1 Habitat -> Preference The Preference command is used to load a preference curve file. A standard Open File dialog is presented with the filter set to files with an extension of .prf. Once a file has been selected and loaded, a check mark will appear before the Preference command in the Habitat Menu. Each .prf file contains the depth velocity and channel index preference curves for a single fish species/life stage. Each preference curve is delimited by brackets and the points on the curve are on separate lines with the point number, the parameter River2D - User Manual – September 30, 2002 101 value, and the corresponding suitability index separated by spaces. Table 1 presents a sample .prf file for Juvenile Brown Trout. If more than one species/life stage is to be analyzed, then the preference files may be loaded sequentially and a WUA calculated for each of them. Table 2: A sample .prf file. Kaninaskis River 97/01/07 Fish Preference Curves for Brown Trout - Juvenile Velocity ( ) Depth ( 1 2 3 4 5 6 7 8 9 0 0.08 0.23 0.37 0.52 0.67 0.83 0.98 100 1 1 0.5 0.1 0.1 0.1 0.1 0 0 1 2 3 4 5 6 7 8 9 10 11 0 0.08 0.22 0.37 0.52 0.67 0.82 0.97 1.12 3.05 100 0 0 0.5 0.5 1 1 1 1 1 0.5 0.5 1 2 3 4 5 6 7 0 7 21 35 49 63 100 0.1 0.1 0.1 0.5 0.5 1 1 ) Channel Index ( ) River2D - User Manual – September 30, 2002 102 5.9.2 Habitat -> Channel Index The Preference command is used to load a channel index file. A standard Open File dialog is presented with the filter set to files with a .chi extension. Once a file has been selected and loaded, a check mark will appear before the Channel Index command in the Habitat Menu. Channel index files have the same format as .bed files except that the channel index value replaces the bed roughness height. Loading a new channel index file replaces the one currently loaded. Table 2 shows a few lines from a sample .chi file. Table 3: A section from a sample .chi file. Node Number x coordinate y coordinate 9 10 11 12 13 14 15 16 17 18 19 20 21 22 23 24 5023.629 5027.854 5028.133 5029.339 5029.342 5030.814 5031.653 5030.541 5026.543 5020.711 5009.677 5001.159 4992.345 4979.924 4965.825 4956.073 5055.417 5048.185 5037.883 5029.443 5019.357 5008.098 4997.251 4983.261 4969.127 4954.302 4937.6 4933.663 4927.675 4913.866 4897.613 4876.482 Bed Elevation Channel Index 199.223 199.102 199.024 199.137 198.945 198.817 198.94 199.231 198.824 199.301 199.472 199.496 199.599 199.592 199.65 199.722 6.2 6.2 4.9 4.9 4.9 4.9 4.9 4.9 5.25 5.25 5.25 4.95 4.95 4.95 4.95 4.95 5.9.3 Habitat -> Weighted Usable Area The Weighted Usable Area command computes the weighted usable area for the current hydrodynamic solution, preference file and channel index file. The WUA result is presented in an information box, as shown in Figure 35, along with the total mesh area for reference. Once the WUA calculation is performed, then display of the various habitat indices is possible. River2D - User Manual – September 30, 2002 103 Figure 35: The Weighted Usable Area information box. 5.9.4 Habitat -> Save Node Attribute File The Save Node Attribute File is an output option which saves habitat as well as hydrodynamic information for each node. Note that the WUA calculation must be performed first so that all the habitat indices are defined at each node. The format of the Node Attribute File is two information lines followed by one line for each node in the mesh. The first information line holds the names of the mesh file(.cdg), the channel index file (.chi), and the preference curve file (.prf) that was used to generate the most recent WUA. The second information line contains column headings for the node attributes. Each line contains the node number, the x coordinate, the y coordinate, the depth, the velocity, the channel index, the depth suitability index, the velocity suitability index, the channel index suitability index, the composite suitability index, and WUA associated with that node. Commas are used for delimiters. 5.9.5 Habitat -> Save Physical Attributes The Save Node Attribute File is an output option which saves hydrodynamic information for each node. The WUA calculation need not be performed. The channel index file may or may not be set. The format of the Node Attribute File is three information lines followed by one line for each node in the mesh. The first information line holds the names of the mesh file(.cdg) and the channel index file (.chi), if defined. The second line contains the current total inflow discharge and the number of nodes in the file. River2D - User Manual – September 30, 2002 104 The third information line contains column headings for the node attributes. Each line contains the node number, the x coordinate, the y coordinate, the depth, the velocity, the channel index, and tributary area associated with that node. Commas are used for delimiters. 5.10 Ice Cover Operations River2D has the ability to simulate flow under an ice cover. The Ice Cover Menu provides the user with two commands: one for incorporating an ice cover into the computational domain, and one for removing it once it is no longer required. These commands are described in detail below. 5.10.1 Ice Cover-> Load Ice File Before simulating flow under an ice cover, the geometry of the ice cover must be defined throughout the computational domain. That is, ice thickness and ice roughness must be specified at every computational node. These values must be interpolated from a separate ice topography file. An ice topography file is similar in format to a bed topography file except that bed elevation and bed roughness are replaced with ice thickness and ice roughness. For a description of the construction of ice topography files please refer to the R2D_Ice User Manual. Selecting the Load Ice File command launches a standard Open File dialog box with the filter set to files with an .ice extension. Once a file is selected and the OK button is clicked the ice topography is interpolated to the computational nodes as follows. 1. A TIN is generated from the nodes in the ice file. 2. The location of each node in the computational mesh is checked. If it falls spatially within an ice covered element in the ice TIN then nodal ice parameters (thickness and roughness) are linearly interpolated from the element. If it falls within an ice-free element, then the nodal ice parameters are set to 0. Ice covered and ice-free elements are distinguished by their nodal values of ice thickness. If any of the nodes in an River2D - User Manual – September 30, 2002 105 element have an ice thickness of 0, then the entire element is ice free, otherwise it is ice covered. After the ice parameters are interpolated, the ice thickness value for the domain will automatically be displayed using a colour map as shown in Figure 36. Ice covered elements (all nodes must have and ice thickness greater than 0) are coloured varying shades of blue dependent on the nodal ice thicknesses while ice-free elements are coloured dark blue to represent the open water areas in the domain. Figure 36: A sample cdg file with ice thickness displayed. If a new ice file is loaded when one is present, then the existing ice TIN will be replace with a new one based on the nodes in the new ice file. Also nodal ice parameters will be updated to reflect the new ice TIN. 5.10.2 Ice Cover -> Remove Ice As the name suggests, this command removes any ice from the model. The ice TIN is removed and all of the nodal ice thickness values and ice roughness values are reset to 0. River2D - User Manual – September 30, 2002 106 5.11 Option Setting Operations There are a number of parameters that the user can set in the River2D environment. These include options related to the flow calculations, the mesh edit commands, and the habitat analysis calculations. These option-setting operations are described as follows. 5.11.1 Options -> Habitat Options The Habitat Options dialog box, shown in Figure 37, allows the setting of Channel Index Interpolation and WUA calculation Method options for the habitat analysis. Figure 37: The Habitat Option dialog box. Channel Index values need to be evaluated at all computational nodes in the mesh. They are specified at another set of points, however, in the .chi file. The Channel Index Interpolation from specified to computational points may be either continuous or discrete. Continuous means that the channel index variable can vary continuously over a range. Percentage cover might be an example. In the model the channel index for any point will be evaluated by linear interpolation from the values at surrounding points. A discrete channel index, on the other hand, represents a River2D - User Manual – September 30, 2002 107 specific class or category. If the discrete option is selected, then the channel index at any point is taken to be equal to the channel index at the nearest specified point. The WUA Calculation Method refers to the procedure for calculating the composite suitability index from the three separate suitability indices (for depth, velocity, and channel index). Product multiplies the three indices together. Geometric mean is the cube root of the product. Minimum is the smallest of the three. 5.11.2 Options->Mesh Edit Options The Mesh Edit Options command opens a dialog box that allows the user to set two parameters. The first is the Bias Smoothing Parameter which must be set to a value between 0 (no topographic effects) and 1 (no consideration for element shape) inclusively. By default, this value is set to 0.5. The second is the contour interval for the bed topography contour map. This value is set to 0.5 by default. The Mesh Edit Options dialog box is shown in Figure 38. Figure 38:Mesh Edit Options dialog box. 5.11.3 Options->Flow Options The Flow Options command opens a dialog, shown in Figure 39, which allows the user to set various parameters that affect the computational solution. These parameters appear at the top of the .cdg input file. As a result, they can be changed by manually River2D - User Manual – September 30, 2002 108 editing the .cdg file as well as being changed in the River2D environment. The default values for these parameters are set when a .cdg file is first created in the mesh editor, R2D_Mesh. The first parameter is the upwinding coefficient of the PetrovGalerkin finite element scheme used to solve the hydrodynamic equations. The upwinding coefficient, ω, should be between 0 and 1 inclusively. Hicks and Steffler (1992) recommended a value of ω = 0.25 for transient problems and a value of of ω = 0.5 when using the model to converge to steady state. This is also the default value. To avoid the computational difficulties associated with very shallow flow or dry elements, the equations change from the surface flow equations to groundwater flow equations in these problem areas. The second, third, and fourth user parameters are associated with the way in which the groundwater flow is handled in the model. The second parameter is the minimum depth for groundwater flow. This is the depth at which the transition is made in the model from the surface water flow equations to the groundwater flow equations. By default this has been set to 0.01. The third parameter is the groundwater transmissivity, which is found in equation 13. Although the user is free to enter any positive value for the transmissivity, using a low value is recommended to ensure that the groundwater discharge is negligible compared to the surface flow. By default, this is set 0.1. A larger value may be used temporarily to speed up the water surface elevation adjustment of large dry areas. The fourth parameter is the groundwater storativity, also found in equation 13. The storativity is defined as the volume of water the ground will release from storage per unit surface area of the ground per unit decline in the water table. For unconfined groundwater (non-compressed) as assumed in the model, the storativity can range from 0 (ground with 0% porosity) to 1.0 (value for surface water). The default value has been arbitrarily set River2D - User Manual – September 30, 2002 109 to 1.0. Lowering the value of storativity will allow the groundwater surface elevation to react faster to changes in net groundwater flow. The last three parameters are used to define the eddy viscosity coefficient, νt, defined in equations 11 and 12. In the .cdg file ε1, ε2, and ε3 are named eddy viscosity constant (may be labelled Mimimum Depth for Diffusive Wave Calculation in older .cdg files), eddy viscosity bed shear parameter (may be labelled as DIF), and eddy viscosity horizontal shear parameter (may be labelled as Groundwater Flow Artificial Diffusion). The default value for ε1 is 0 (but it will be 0.01 in files made with older versions of the River2D programs). This coefficient can used to stabilize the solution for very shallow flows where the second term in equation 12 may not be adequate to describe νt for the flow. Reasonable values for this coefficient can be calculated by evaluating the second term in equation 12 using average flow conditions (average flow depth and average velocities) for the modeled site. The default value for ε2 is 0.5. By analogy with transverse dispersion coefficients in rivers, values of 0.2 to 1.0 are reasonable. Since most river turbulence is generated by bed shear, this term is usually the most important. In deeper lakesflows, or flows with high transverse velocity outletsgradients, transverse shear may be the dominant turbulence generation mechanism. Strong recirculation regions are important examples. In these cases, the third term in equation 12, ε3, becomes important. It is essentially a 2D (horizontal) mixing length model. The mixing length is assumed to be proportional to the depth of flow. A typical value for ε3 is 0.1, but this may be adjusted by calibration. The default value for is ε3 0 (but it will be 0.1 in files made with older versions of the River2D programs). River2D - User Manual – September 30, 2002 110 Figure 39: The Flow Options dialog box. 5.11.4 Options->Solver Options The Solver Options command opens the dialog box shown in Figure 40. This dialog allows the user to choose the linear solver that is used in the solution process. The user has the choice of either a direct solver that is called the active zone equation solver (Stasa 1985) or an iterative solver based on the GMRES(m) method (Saad and Schultz 1986). The direct solver is faster for small (<10K nodes) but requires large memory allocations. The GMRES solver is faster for large meshes and requires much less memory. The GMRES solver is limited to relatively small time step lengths. The iterative solver has three user definable parameters. The first is the number of steps before the algorithm is restarted, the second River2D - User Manual – September 30, 2002 111 is the maximum allowable number of restarts or maximum number of iterations, and the last is the goal convergence tolerance. These values are set to 10, 10 and 0.01 respectively. These values were chosen based on a small number of tests such that the time per time step using the iterative solver is comparable to that for the direct solver. The optimum values for these parameters are problem specific and should be treated as such. In the future, after more extensive tests are performed, more guidelines will be available as to how to choose appropriate values for these parameters. This dialog also allows the user to select the method of evaluating the Jacobian matrix: analytical and numerical. Both methods have tradeoffs. The analytical method is faster while the numerical method is more accurate. The model is set to use the analytical Jacobian by default. The advice to the user upon selecting a method of evaluating the Jacobian is as follows. For steady state analyses, start by using the analytical Jacobian. If the solution reaches a relatively small value of solution change (of the order of 0.001) and refuses to diminish further regardless of the number of subsequent time steps, switch to the numerical Jacobian. The analytical Jacobian is adequate for transient simulations. River2D - User Manual – September 30, 2002 112 Figure 40:The Solver Options dialog box. 5.11.5 Options -> Transient Output Options This command opens the Transient Output Options Dialog, as shown in Figure 41 below. This dialog enables the user to specify and to format of any desired transient output when the model is running in transient mode. This dialog box can also be accessed by clicking the Output Options button on the Run Transient dialog. There are three possible types of transient output available to the user: video output, point output, and cdg output. River2D - User Manual – September 30, 2002 113 Figure 41: The Transient Output Options Dialog River2D - User Manual – September 30, 2002 114 The upper section of this dialog box allows the user to output video to file in the AVI (Audio Visual Interface) file format. The resulting video animation will be a compilation of sequential frames captured directly from the display window. Therefore, the appearance of the display window (% zoom, display parameter, annotations, etc) during the transient simulation will be identical to the appearance of the frames in the video file. The option “Output frame every ___ goal time steps” makes it possible to specify the frequency of this output. For example, if a goal time step of 5 and a present time of 0 are specified in the Run Transient Dialog prior to a simulation, then frames will be output will be output to the AVI file at t = 0, 5, 10, 15…until either the simulation is stopped or the final time is reached. The user can also stipulate a playback rate and resolution for the video. The middle section of the dialog box allows the user to output transient data at specified points in the domain. This point output is in csv (Comma Separated Values) file format. These points, which can be in an arrangement (e.g. scattered, cross-section(s), and/or grid), must be specified in a separate csv file. The csv file commands in the Display Menu offer an effective way to obtain the desired output points. To illustrate the input csv file format, sample file is provided in Figure 42. Figure 42: A sample input point csv file. 1058,101.9089 1058,101.8977 1058,101.8864 1058,101.8752 1068,101.909 1068,101.8979 1068,101.8868 1068,101.8756 1078,101.9093 1078,101.898 1078,101.8867 1078,101.8757 River2D - User Manual – September 30, 2002 115 1088,101.9089 1088,101.8978 1088,101.8866 1088,101.8756 The user has a choice of four output variables. They are depth, water surface elevation, x discharge intensity, and y discharge intensity. If selected, each one of the variable choices will produce a separate csv file. These files are named according to an abbreviation for variable name and a user defined output file prefix. For example, if “Fortress” was chosen as the prefix, then the generated files would be Fortress_h.csv, Fortress_wse.csv, Fortress_qx.csv and Fortress_qy.csv corresponding to depth, water surface elevation, x discharge intensity, and y discharge intensity, respectively. In addition to the file prefix, the user must also specify the location of the folder where the point output files will be written and the frequency at which to output to the files. The format for the output csv files is shown in Figure 43. Figure 43: A sample output point csv file shown in MS Excel. River2D - User Manual – September 30, 2002 116 The first four rows of the file show the path of the cdg file that was used to generate this transient data, the parameter (here it is water surface elevation) that was output at the specified points, the date when this csv file was created, and the time when this csv file was intialized. The fifth and sixth rows are the x and y coordinates of the specified points respectively. Each subsequent row contains the model time in the first cell followed by the values of the output parameter at that time for the specified points. For example, at t = 30s the water surface elevation at the point x = 4998 and y = 5066 is 199.219. The bottom section of the dialog box allows the user output transient data in the .cdg file format. This means that, if desired, River2D input files can be generated throughout the transient analysis. As is the case for the video and point output, the frequency at which this output is generated can be specified in terms of the goal time step. Generated cdg files are named according to a user defined file prefix and the current model time (e.g. Fortress500.cdg) and are written to a user specified folder. After specifying all desired output, pressing the Initialize Output button will accept the output choices and initialize the output files that are appended to throughout the transient simulation such as point output files and video output files. Once the Initialize Output button has been pressed, the dialog can be closed using the Close button. If the close button is pressed without first pressing the Initialize Output button, then any selected output will be disregarded. 5.11.6 Options->Ice Options When ice is present, this command will open the Ice Options dialog box as shown in the Figure 44. River2D - User Manual – September 30, 2002 117 Figure 44: The Ice Options Dialog Box. Currently, this dialog has only one ice parameter that the user can set: the specific gravity of the ice. The value that appears in this box will correspond to the value of specific gravity at the bottom of any ice file that has been saved using the ice file editor, R2D_Ice. However, River2D will accept ice files that have been created with a text editor that do not have a value assigned to this parameter. If the current ice file does not contain a value for the specific gravity of ice, then the value that appears in this box will be the default value of 0.92. It should be noted any changes to this value will be applied to subsequent computational runs within the same River2D session but they will not be saved to either the current .ice file nor the current .cdg file. River2D - User Manual – September 30, 2002 118 6.0 REFERENCES Ashton, G.D., Editor (1986). River and Lake Ice Engineering. Water Resources Publications, Littleton, Colorado, 485pp. Bovee, K. D., 1982. “A Guide to Stream Habitat Analysis Using the Instream Flow Incremental Methodology.” Instream Flow Information Paper No. 12. U.S. Fish and Wildlife Service. FWS/OBS-82/26. Ghanem, A. H., P.M. Steffler, F.E. Hicks and C. Katopodis. 1996. "Two dimensional finite element flow modeling of physical fish habitat", Regulated Rivers: Research and Management, Vol. 12, pp. 185-200. Ghanem, A., P.M. Steffler, F.E. Hicks and C. Katopodis, 1995a, "Dry area treatment for two-dimensional finite element shallow flow modeling", proc. of the 12th Canadian Hydrotechnical Conference, Ottawa, Ontario, June, 10 pp. Ghanem, A., P.M. Steffler, F.E. Hicks and C. Katopodis, 1995b, "Two dimensional finite element model for aquatic habitats", Water Resources Engineering Report 95-S1, Dept. of Civil Engineering, University of Alberta, 189 pp. Hicks, F.E., and P.M. Steffler, 1992, “Characteristic Dissipative Galerkin scheme for open-channel flow”, ASCE Journal of Hydraulic Engineering, Vol 118, No.2, pp. 337-352. Saad, Y., and M.H. Schultz, 1986, “GMRES: A generalized minimal residual algorithm for solving nonsymmetric linear systems”, SIAM J. Sci. Statist. Comput., Vol 7, No. 3 (July), pp. 856-869. Stasa, F.L., 1985. “Applied Finite Element Analysis for Engineers”, Holt, Rinehart and Winston, New York, N.Y. 657 pp. Waddle, T., Steffler, P.M., Ghanem, A., C. Katopodis, and A. Locke, 1996, "Comparison of one and two dimensional hydrodynamic models for a small habitat stream" Ecohydraulics 2000 Conference, Quebec City, June, 10 pp. River2D - User Manual – September 30, 2002 119