1
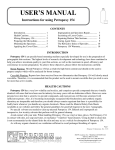
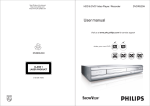
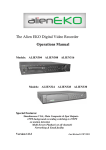
CDR 825E USER MANUAL 1 | P a g e Record your Ride ©2015 Cobra Electronics Corporation Part No. 480-‐1060-‐P Version A Table of Contents INTRODUCTION ................................................................................................................................................... 3 CAMERA FEATURES ............................................................................................................................................. 3 ADDITIONAL FEATURES ...................................................................................................................................................... 4 PRODUCT SERVICE AND SUPPORT ....................................................................................................................... 4 YOUR DEVICE ....................................................................................................................................................... 5 WHAT’S IN THE BOX ........................................................................................................................................................... 5 CONTROLS AND CONNECTIONS .......................................................................................................................................... 6 INSTALLATION .................................................................................................................................................................... 7 BASIC OPERATION .............................................................................................................................................................. 8 OPERATION MODES ........................................................................................................................................................... 9 VIDEO MODE ........................................................................................................................................................................... 9 VIDEO MODE MENU .............................................................................................................................................................. 10 Video resolution: ..................................................................................................................................................................................... 10 Movie clip time: ....................................................................................................................................................................................... 10 Power off delay: ....................................................................................................................................................................................... 10 Motion detector: ..................................................................................................................................................................................... 10 G-‐Sensor: ................................................................................................................................................................................................. 11 Volume: ................................................................................................................................................................................................... 11 Microphone: ............................................................................................................................................................................................ 11 Backlit keys: ............................................................................................................................................................................................. 11 Screen flicker: .......................................................................................................................................................................................... 11 Auto power off: ....................................................................................................................................................................................... 11 Screen Protector: ..................................................................................................................................................................................... 11 TV Out: ..................................................................................................................................................................................................... 11 GPS: ......................................................................................................................................................................................................... 11 Timezone: ................................................................................................................................................................................................ 11 Custom Watermark: ................................................................................................................................................................................ 12 Watermark Set: ....................................................................................................................................................................................... 12 Date/Time Stamp: .................................................................................................................................................................................... 12 Date/Time: ............................................................................................................................................................................................... 12 Languages: ............................................................................................................................................................................................... 12 Format SD Card: ....................................................................................................................................................................................... 12 Restore Defaults: ..................................................................................................................................................................................... 12 Version: .................................................................................................................................................................................................... 12 PHOTO MODE ....................................................................................................................................................................... 12 PHOTO MODE MENU ....................................................................................................................................................... 13 Photo Size: ............................................................................................................................................................................................... 13 Self Timer: ................................................................................................................................................................................................ 13 Burst: ....................................................................................................................................................................................................... 13 VIDEO AND PHOTO PLAYBACK MODES ................................................................................................................................. 13 CONNECTING TO A COMPUTER OR TV ............................................................................................................... 14 FIRMWARE UPDATE INSTRUCTIONS .................................................................................................................. 14 CAMERA SPECIFICATIONS .................................................................................................................................. 15 TROUBLESHOOTING .......................................................................................................................................... 16 TRADEMARK ACKNOWLEDGEMENT ................................................................................................................... 16 2 | P a g e INTRODUCTION Congratulations! You’ve made a smart choice by purchasing a Drive HD Dash Cam from Cobra. Drive HD Dash Cams provide peace of mind by continuously recording the road ahead of you in beautiful 1080P Full HD video. With cutting edge features, phenomenal video quality, and an industry-‐leading focus on user experience, Drive HD Dash Cams are the best solution to Record Your Ride. This User Manual describes the simple steps for mounting, setting up, and using your dash camera. CAMERA FEATURES 1080P Full HD Records the road ahead in resolutions up to 1080P Full HD. The Ambarella™ chipset ensures the industry’s best image quality, nighttime performance, and advanced dynamic range 2.7” LCD Screen Large LCD Display with video playback directly on the device or on your TV or computer 140° Viewing Angle Wide-‐angle view gives you a full view of the road without any edge distortion Continuous Loop Recording Footage is stored in 3, 5, or 10 minute segments. When the memory card fills up, the camera automatically deletes the oldest segment to make room for new ones. File Lock -‐ Automatic or Manual If you don’t want a clip to be overwritten, simply click the File Lock button and the clip will be protected. Clips are automatically protected if an impact is detected. G-‐Sensor 3-‐axis accelerometer senses sudden accelerations and collisions and automatically protects footage surrounding the incident. Motion Sensor While in motion sensor mode, Drive HD cameras will only record video when motion is detected. This feature is helpful for applications where SD card storage is critical. Dynamic Range Optimized to automatically maximize video clarity in daylight or nighttime conditions. Simple Installation Mount the unit on the windshield, apply power, and forget about it. Drive HD cameras will automatically start recording without the need for complex configuration Ready to Use Includes an 8GB MicroSD memory card, vehicle power adapter, adhesive window mount, and suction cup windshield mount so the unit is ready to use out-‐of-‐the-‐box 3 | P a g e ADDITIONAL FEATURES Built-‐in Microphone & Speaker Auto-‐Record and Auto-‐Power Off Screen Protector Customizable Watermark Built-‐in Lithium Ion Battery Supports 11 Languages: o English o Spanish o French o German o o o o Dutch Portuguese Simplified Chinese Traditional Chinese o Japanese o Russian o Korean PRODUCT SERVICE AND SUPPORT For any questions about operating or installing this new Cobra product, PLEASE CONTACT COBRA FIRST…do not return this product to the retail store. The contact information for Cobra will vary depending on the country in which you purchased and utilize the product. For the latest contact information, please go to www.cobra.com/support. For products purchased in the U.S.A. you may also call 1-‐800-‐262-‐7212 (1-‐800-‐COBRA-‐12). For products purchased in the U.S.A., if your product should require factory service, please go to www.cobra.com/support and follow the instructions for returning your product to the Cobra Factory Service Department. 4 | P a g e YOUR DEVICE WHAT’S IN THE BOX CDR 825E Dash Cam 12V Vehicle Power Adapter 8GB Micro SD Card (pre-‐installed in dash cam) USB to Mini USB Cable (for connection to computer) 2 Adhesive Windshield Mounts or Suction Cup Windshield Mount 5 | P a g e Quick Start Guide CONTROLS AND CONNECTIONS 6 | P a g e INSTALLATION MOUNT There are two mounting options included with the CDR 825E. Fixed Adhesive Windshield Mount To install the Fixed Adhesive Windshield Mount, remove the adhesive backing and press the mount FIRMLY onto the windshield. (Note: The fixed adhesive mount is a semi-‐permanent mount and the adhesive will be destroyed if it is removed from the windshield). The camera bracket slides in and out of the mounting slot. Suction Cup Windshield Mount Or To install the Suction Cup Windshield Mount peel the plastic film off of the suction cup. Press the suction cup FIRMLY onto the windshield. Depending on the suction cup style either twist the locking ring or flip the locking lever 90° to secure the suction cup in place. The suction cup can be moved freely by disengaging and re-‐engaging the locking lever. The camera bracket slides in and out of the mounting slot. 7 | P a g e POWER Plug one end of the supplied 12V Vehicle Power Adapter into your vehicle’s cigarette lighter, and the other end into the mini USB port labeled DC IN located near the top of the unit. The unit should power on automatically. If it does not, PRESS AND HOLD the On/Off button until the display activates. When power is applied the unit will automatically start recording. BASIC OPERATION QUICK START Press the Record button to stop and start recording. Press the File Lock button to lock the current file so that it won’t be recorded over. POWERING ON THE DEVICE The device will power on automatically when plugged in and can also be powered by PRESSING AND HOLDING the On/Off button until the display activates. NAVIGATING MENUS When in a settings menu, press Up/Mute or Down/Exposure to navigate to the setting you want to change and then press the Record/Select button on the top of the unit to change the setting. Pressing the Menu/Back button at any time will save changes and exit the menu. THE SD MEMORY CARD The device comes with a pre-‐installed 8 GB micro SD memory card. To remove the SD card, press firmly on the SD card to push it further into the slot. There will be a click and the SD card will pop out on release. Extract the card and replace as necessary by inserting a card into the slot and pressing until it locks in place. Note: This device supports Class IV or higher micro SD cards with a capacity up to 32GB. CHARGING THE DEVICE You can charge the device with the included car charger or with a mini USB cable. This unit is intended to be powered using the mini USB port marked DC IN, located near the top of the unit. There is another mini USB port on the side of the unit marked USB, which is intended for connection to a computer. Note: When the car charger is connected to the DC IN port, the device will automatically power on and start recording video. It will not auto record when power is connected to the USB port. The battery in this unit is intended to operate the unit after power loss due to an accident or crash. Note that, while recording may continue, the device is not intended for long-‐term recording on battery power. 8 | P a g e OPERATION MODES The two Arrow keys at the top left corner of the device, called the Mode Switches, allow you to cycle between the device’s four distinct modes. You will not be able to switch modes while recording video. Video Record Mode Photo Capture Mode Video Playback Mode Photo Playback mode Note that pressing the Menu/Back button will take you to a different set of menu options depending on which mode you are in. VIDEO MODE Video Mode is the default mode for the device, and allows you to easily record HD video of the road ahead of you. When first powered on, the device will start in video mode and automatically begin recording. To start/stop recording press the Record/Select button at the top of the device. Continuous Loop Recording: Once the memory card is full, the camera will continuously overwrite the oldest footage recorded. To protect a clip so that it will not be overwritten, press the File Lock button. The lock icon will show on the screen. Files can also be locked from the playback menu in Video Playback Mode. G-‐Sensor: The G-‐Sensor is an accelerometer that can detect an impact caused by an accident. If the G-‐Sensor is triggered, the current video segment will automatically be locked so that it is not overwritten by continuous loop recording. Note: Setting proper G-‐Sensor sensitivity is important for proper operation of the product. If the G-‐Sensor is too sensitive it will unnecessarily lock files and can result in the memory card filling up quickly. If it’s not sensitive enough, then it may not lock a file in the event of a legitimate collision. Shortcuts: While in video mode, you can use the following buttons as shortcuts: • Up/Mute button enables or disables the audio input on the device. • Down/Exposure button adjusts the brightness of your recorded video image. • Menu/Back button turns off the screen. Recording will continue but the screen will be dark until you press any button. • File/Lock button automatically starts a recording and locks the current video. To unlock the video press the File/Lock button again. To stop recording, press the Record/Select button at the top right of the device. 9 | P a g e VIDEO MODE MENU Pressing the Menu/Back button in video mode allows you to access the video mode menu. To navigate the menu, use the Up and Down buttons on the right side of the device. Once you have highlighted a menu item, use the Record/Select button at the top of the device to change the option associated with that item. Video resolution: This setting allows you to set one of four available video recording resolutions: Higher resolutions will give you a sharper image, but take up more memory on the card. The available resolutions are: 1080P Full HD 1920x1080 30 Frames per Second 720P HD 60fps 1280x720 60 Frames per Second 720P HD 30fps 1280x720 30 Frames per Second 480P SD 640x480 30 Frames per Second RECORDING TIME Capacity 1080P Full HD 720P HD 60fps 720P HD 30fps 480P SD 4 GB 1hr 18min 1hr 5min 2hr 8min 4hr 10min 8 GB 2hr 37min 2hr 10min 4hr 16min 8hr 20min 16 GB 5hr 14min 4hr 20min 8hr 33min 16hr 21min 32 GB 10hr 27min 8hr 40min 17hr 6min 32hr 42min Movie clip time: This setting allows you to control the default duration of each individual movie clip on the device. Movie clips can be set to durations of 3 minutes, 5 minutes, or 10 minutes. Turning the movie clip time setting off lets the device record one uninterrupted movie clip, but disables continuous loop recording. Power off delay: When Power off delay is ON the unit will continue recording for 10 seconds after power is removed and then will turn off. If Power off delay is OFF, the unit will not turn off based on power being removed. Motion detector: Enabling this setting will allow the device to automatically begin recording if any motion is detected within the camera’s field of view. If there is no motion detected the recording will stop and restart when motion is detected. 10 | P a g e G-‐Sensor: The Drive HD Dash Cam includes a built in G-‐Sensor which allows the device to determine when the car has been in a collision. If it detects a collision, it automatically locks the recording being made at the time of the accident. You can use this setting to set the sensitivity of the G-‐Sensor from low to high or turn it off. The default G-‐Sensor value is medium. At High sensitivity the G-‐ Sensor may lock files due to smaller bumps like potholes and the SD card may fill up with protected files. Volume: Allows you to raise and lower the volume of sound playback on the device. Microphone: Allows you to turn the microphone on or off. You can also do this via the up/microphone button while video is being recorded. When the microphone is off, the camera will record video only, and no sound. Backlit keys: Allows you to enable or disable the backlight of the keys on either side of the screen. Screen flicker: Optimizes video depending on how your country’s electrical systems work. Select 50Hz if the power voltage of the country is 220V. Select 60Hz if the power voltage is 110V Auto power off: Automatically powers the unit off after a set time if the unit is NOT recording. This setting has no effect while the unit is recording. Screen Protector: Allows you to set a duration after which the device’s display will go dark. This setting is useful to avoid distracted driving and having a bright LED screen when driving at night. Select 1 minute or 3 minutes. TV Out: Allows you to set the device to your regional television standard for proper output of the video signal to your TV. The options are NTSC and PAL. GPS: Allows you to enable or disable GPS functions on the device. The GPS accessory for this product is not currently available. Timezone: Allows you to adjust your device’s clock to the proper offset from GMT. 11 | P a g e Custom Watermark: Allows you to enable or disable the imprinting of a custom watermark on your videos and images. This mark will be embedded on the bottom right of all videos you record. Watermark Set: Allows you to enter a string of numbers and letters that will be your custom watermark. Date/Time Stamp: Allows you to enable or disable the imprinting of a date and time on your images and videos. Date/Time: Allows you to set the date and time on the device and for use with the timestamp. Languages: Allows you to set the language for the device from among the 11 supported languages. Format SD Card: Allows you to format the inserted SD Card. This action will permanently delete all data on the card. Restore Defaults: Resets the device to factory settings. Note that restoring defaults will NOT erase data on your memory card. Version: Displays the device software version. PHOTO MODE This device can be used to capture high-‐resolution still photos using its built-‐ in camera. The images are stored on the removable SD Card memory. To take a photo, press the Record/Select button. Photos can be digitally zoomed in or out using the up and down arrow keys. Photos will be saved to the device’s onboard SD card. The remaining number of photos that can be taken is displayed at the bottom of the screen. 12 | P a g e PHOTO MODE MENU Pressing the Menu/Back button in photo mode allows you to access the photo mode menu. To navigate the menu, use the Up and Down buttons on the right side of the device. Once you have highlighted a menu item, use the Record/Select button at the top of the device to change the option associated with that item. Photo Size: Here you can choose between a default 3 megapixel (2304x1296) or smaller 2 megapixel (1920x1080) photo size. The size you chose will be displayed in the upper left hand portion of the screen. Self Timer: Here you can set a self timer to take an automatic photo after 3, 5 or 10 seconds. Burst: You can set the camera to take a series of quick consecutive photos in sets of 2 or 3. VIDEO AND PHOTO PLAYBACK MODES This device stores video and pictures on its removable SD Card Memory. These playback modes will allow you to review the saved video and photos, and play back the video with sound. To select a video or photo for playback use the up and down arrow keys. Once selected use the Record/Select button to view a photo or video. If viewing a video, press the Record/Select button again to begin playback. Pressing the Menu button in VIDEO PLAYBACK MODE, while the grid of items is on the screen, will allow you to delete one or all of your videos. Pressing the Lock button will lock the selected video clip. Pressing the Lock button in PHOTO PLAYBACK MODE, while the grid of items is on the screen, will allow you to delete one or all of your photos 13 | P a g e CONNECTING TO A COMPUTER OR TV This device can connect to a computer or television via the USB or HDMI ports located on the side of the unit. Use the USB port on the side of the device to connect the device to your computer. When connected you will be given three options: PC MODE, CHARGE or POWER ON. Select PC mode to access the device via your computer. By default, your device connects to your computer in Mass Storage mode, and acts like a flash drive. Videos can be viewed with any standard video player that supports .mov files. Select Charge to charge the internal battery Select Power On to turn the unit on for normal operation Use the HDMI Port to connect the device to a TV or monitor using a mini HDMI cable (not included). FIRMWARE UPDATE INSTRUCTIONS For optimal performance, check www.cobra.com periodically for software updates. • Connect the CDR 825E Dash Cam to your computer using the included USB to Mini-‐USB cable. Note: You must plug the Mini USB cable into the Mini USB port labeled USB on the side of the unit. The Mini USB port labeled DC IN on the Mounting Base is for power only and cannot be used for the computer connection. • Power on the CDR 825E and select PC MODE using the record/select button. • The camera will be listed as Removable Disk in Windows Explorer or No Name in Finder. • Download an updater file from www.cobra.com. Note: You do not need to double click or open this file on the computer. • Copy/paste or drag the updater file (ehd68.bin) into the root directory of the Removable Disk or No Name folder. Note: the file name must be ehd68.bin in order to update the firmware. 14 | P a g e FIRMWARE UPDATE INSTRUCTIONS continued • Wait for the file to transfer and then safely disconnect the CDR 825E from the computer. The CDR 825E will turn off. • Plug the Mini USB cord into the Mini USB port labeled DC IN on the Mounting Base. The CDR 825E will turn on and automatically boot into the Firmware Update Menu. • Use the Up/Down arrows to highlight YES and then select it with the Record/Select Button. The unit will update for 10-‐15 seconds and then turn off. • Power the unit on. You will again be automatically booted into the Firmware Update Menu. You can now select DELETE to delete the update file off of your unit. Alternatively, you can connect to your computer using PC MODE and manually delete the ehd68.bin file from the Micro SD card. This will prevent the unit from booting into the Firmware Update Menu in future power cycles. Your CDR 825E is now updated. CAMERA SPECIFICATIONS 15 | P a g e TROUBLESHOOTING If your unit does not appear to be operating properly, please follow these troubleshooting steps: • • • • Make sure the power cord is properly connected. Make sure the socket of your vehicle’s cigarette lighter is clean and free of corrosion. Make sure the power cord’s cigarette lighter adapter is firmly seated in your cigarette lighter, and the Status LED is on. Check the power cord fuse. (Unscrew the ribbed end cap of the cigarette lighter adapter and examine the fuse. If required, replace it with a 2-‐amp fuse only.) For detailed and up-‐to-‐date FAQ’s, please visit www.cobra.com/support/faqs. TRADEMARK ACKNOWLEDGEMENT Cobra, the snake design, Drive HD™, the d design, and Record your ride™ are proprietary trademarks of Cobra Electronics Corporation, USA. Other trademarks and trade names are those of their respective owners. Cobra Electronics Corporation™ is a trademark of Cobra Electronics Corporation, USA. HDMI, the HDMI logo, and High-‐Definition Mutilmedia Interface are trademarks or HDMI registered trademarks of HDMI licensing LLC in the United States and other countries. NOTE: This device complies with part 15 of FCC rules: Operation is subject to the following two conditions: (1) This device may not cause harmful interference, and (2) This device must accept any interference received including interference that may cause undesired operation. CAUTION: Modifications or parts not approved by Cobra Electronics Corporation may violate FCC Rules and void authority to operate this equipment. This device complies with RSS-‐310 of Industry Canada. Operation is subject to the condition that this device does not cause harmful interference. CAN ICES-‐3B/NMB-‐3B. DISPOSAL OF ELECTRONICS EQUIPMENT: This product may contain hazardous substances that could impact health and the environment if not disposed of properly. The crossed out wheeled bin symbol indicates that the product should not be disposed of along with household waste. It should be handed over to an applicable collection point for the recycling of electrical equipment. By ensuring that this product is disposed of correctly you will help/prevent potential negative impact on the environment. If you need more information on the collection, reuse and recycling systems, please contact your local civic office or the shop where it was originally purchased. WARNING: This product contains chemicals know to the State of California to cause cancer and birth defects or other reproductive harm. 16 | P a g e