1
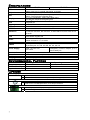
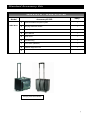
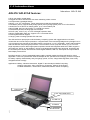
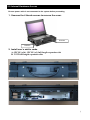
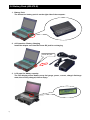
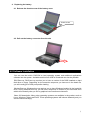
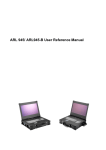
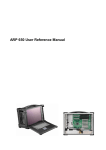
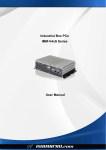
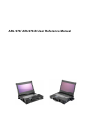
ARL 970/ ARL970-B User Reference Manual
Specifications
Model No
CPU
ARL970
ARL970-B
Intel Core i5-2510E, 3M Cache, 2.50GHz Processors
(Option: Intel Core i7-2710QE, 6M Cache, 2.10 GHz)
Intel QM77 Express Chipset
1 PCI-E (x16), 1 PCI-E (x1) Full-length expansion slots
Option: 2 PCI full-length expansion slots
17.3” TFT LCD Monitor, 1920x 1080, 262K colors,
Anti-reflection tempered strengthen glass
LVDS, 3rd Generation Intel Core i7 / i5 / i3 QC/DC mobile processor
integrated Gfx
2x 4GB DDR3
1x 500GB 2.5", 7200 rpm SATA HDD, support 1x 2.5” removable SATA
1x Slim DVD-RW
2x DB9 for COM1, COM2, DVI-D + DVI-I connector, 2x USB 3.0 connector,
4x USB 2.0 connector, DP connector, 2x Gbit LAN RJ-45, RCA Jack 3x1 for
HD audio
Inte® 82579LM Gigabit LAN PHY
Inte® 82583V Gigabit LAN
Intel® QM77 built-in high definition audio controller with
Realtek ALC892 for 7.1 CH audio
Built-in amplified 2x 3W speakers
104-key industrial keyboard with touchpad
Keyboard layout: CH, FR, GR, KR, RU, SP, UK, US
2x 95W Li-ION battery Packs (Hot250W, 100~240 VAC,
Swappable), 100W AC Adapter, up to 4
Auto switch
hours battery life
Rugged Aluminum Construction with shock absorbing rubber corners
428.6x 100.5x 367.5 mm (Wx Hx D)
6.8 kgs
Padded carrying case with wheels
Chipset
Slot
Display
VGA
Memory
HDD
CDROM
Interfaces
LAN
Audio
Speaker
KB/MS
Power Supply
Construction
Dimension
Weight
Carrying Case
Environmental Factors
Temperature
Relative Humidity
Approval
Operating
Non-Operating
0°C~50°C
10%~90%
CE, FCC, RoHS
-20°C~60°C
10%~95%
Options
Power Supply
ARL970: 250W, 100~240 VAC, Auto switch
ARL970-B: 2x 95W Li-ION battery Packs (Hot-Swappable)
Processor
● Intel Core i5-2510E (3M Cache, 2.50 GHz) Processors
Intel Core i7-2710QE (6M Cache, 2.10 GHz) Processors
Expansion slot
●
1 PCI-E (x16), 1 PCI-E (x1) full-length slots
2 PCI full-length slots
2
Standard Accessory Kits
ARL970 / ARL970-B
Model
Accessory Kit SKD
Qty
1
ARL970 Portable Computer system
1
2
Carrying Case with wheels
1
3
Driver CD
1
4
User’s Manual
1
5
Power Cord
1
6
Anti-Static Bag
1
7
Screw Pack (stabilizer)
1
8
Stabilizer Supports Pack
1
ARL970
9
Carrying Case with Wheels
3
1.0 Introduction
Version: 2012.09
ARL970/ ARL970-B features:
● All-in-one design rugged laptop
● Rugged Aluminum Construction with shock absorbing rubber corners
● Compact Size Lightweight Design
● Built-in 17.3" TFT LCD display, 1920x 1080 with anti-reflection tempered glass
● Intel QM77 (Gen3), support Sandy bridge (Gen2) and Ivy bridge (Gen3) core i7/ i5/ i3 Processors.
● 250W PSU or 2x 95W Li-ion battery packs, up to 4 hours battery life
● Mini-ITX MB, Intel Core i5-2510E or i7-2710QE Processors
● Industrial Keyboard multi-language with touchpad
●1PCI-E (16x), 1PCI-E (1x), or 2 PCI full-length expansion slots
● Built-in 500GB HDD 7200 rpm, support 1x 2.5” removable SATA
● Dual Gigabit Ethernet Support
● Carrying case to manage portable PC with ease
The ARL970-B is a laptop-style multi-slot battery computing system with rugged aluminum chassis
construction and corner bumper protection. It supports both of the Intel sandy Bridge and Ivy Bridge Core i7
or i5 processors with ultra fast 2x 4G DDR3 memory and built-in a 17.3" LCD display, 1920x 1080 resolution
with anti-reflection tempered glass protection. The unit offers 1PCI-E (x16) and 1PCI-E (x1) or 2 PCI fulllength expansion slots for latest high speed acquisition boards and integrates 500G SATA HDD, support a
removable 2.5” SATA, 2x 3W speakers, 104-key multi-languages keyboard and touchpad. Interfacing with
the unit takes place further with the built-in dual Gigabit Ethernet, USB 3.0, Serial ports and output feature
both Display Port and DVI.
Dual high capacity Li-ion hot-swappable battery totaling 190WHr makes the ARL970-B ideal for critical
application. It also can operate with 100W AC adapter for AC operation and recharging, and the LCD panel
for battery capacity shows battery array fuel gauge, power, current, charge/ discharge state, time to fully
charged and time to empty.
Applications: Military, Industrial automation, Digital TV test & analysis, Mobile Computing,
Outdoor Computers, video conferencing, E-learning, Speech Technologies,
Portable Workstation, Telemedicine, Multimedia, Mission Critical Computing
Power on/off
1x 2.5” removable SATA
2x USB 2.0
2x RS232
Slim DVD-RW
4
2.0 Internal Hardware Access
Be sure power cable is not connected to the system before proceeding
1. Unscrew the 4 thumb screws to remove the cover.
Unscrew
Unscrew
2. Install user’s add-in cards.
A: 1PCI-E (x16), 1PCI-E (x1) full-length expansion slot
B: 2 PCI full-length expansion slots
5
3.0 Battery Pack (ARL970-B)
1. Battery Pack
The lithium ion battery pack is on the right side of the computer.
2. AC Operation / Battery Charging
Insert the adapter cord into the Power DC jack for recharging
Power DC jack
3. LCD panel for battery capacity
The LCD display shows battery array fuel gauge, power, current, charge/ discharge
state, time to fully charged, time to empty.
6
4. Replacing the battery
4.1 Release the thumb screw of the battery cover
Thumb screw
4.2 Pull out the battery connector from the slot
4.0 Software Installation
You can use the built-in DVD-RW to load operating system and additional applications
software into the system. Available medium from USB or download can also be possible.
DOS Boot up: DOS boot up requires you to have a version of the DOS installed on hard
disk drive or floppy. Depending on the execution sequence you have set in the batch file,
you will usually get a DOS prompt after loading.
Window Boot up: Windows boot up requires you to have Windows installed in the hard disk
drive. During Windows boot up, you will see a sequence of access to your hard disk drive
which will eventually take you into a graphical user interface environment.
Other O/S description: Many other operating systems are available in the market, such as
Linux, Windows, Solaris and DOS. These operating systems will behave differently and you
should react accordingly.
7
5.0 Troubleshooting
1. Installation problem:
1. Normally problem with a fail start up is due to installation problem.
2. Double check all the peripheral cards or items you have added to the ARL.
3. Are all the items seated properly?
4. Are all the cables connected back to its original or correct position?
5. Are the items you have added compatible?
6. Before you check for these, turn the computer off and unplug the power cord.
7. Check for 1 thru 5 and then re-power up the computer.
8. Remove all items that were added and re-try system power up.
9. If the system starts now, try inserting 1 new item in at a time and try powering up.
10. Repeat this step until you get the desired result.
2. BIOS Beep Code:
The BIOS beep code indicates error in system initialization. The BIOS of the system board
will associate with video and memory error. Please check your video card is properly
seated and your memory is installed properly.
3. System Fails to power up:
1. Check you power connection first.
2. Check the main power switch is in the ON positions (I) *If cold switch is available.
3. Press the power button located on the machine.
4. No display (LCD):
1. Check all the proper power up procedure has been taken.
2. Hook up an external LCD to the VGA port, to check if video is present.
3. If video is present on external LCD, check the internal LCD cable connection.
4. Or check your VGA setting to make sure LCD video is enabled.
5. If there is no video on external, check your system to make sure everything is seated
properly.
6. If everything is seated properly and still no video, call us for further assistance.
5. External LCD no display:
1. Check to see if you have internal LCD video.
2. Check if your LCD is functioning properly.
3. Check your VGA setting to make sure external video is enabled.
6. Keyboard fails:
1. Make sure the keyboard plug is inserted completely into the portable.
2. Make sure you do not have another keyboard connected to the side I/O PS/2 port.
7. TOUCHPAD fails:
1. Make sure the keyboard plug is inserted completely into the portable.
2. If you have an external PS/2 mouse hook up on the side I/O PS/2 port, the touch pad
will not function simultaneously.
3. If your operating system requires and does not load the mouse driver automatically,
make sure you have the proper mouse driver loaded.
8. DVD-RW fails:
1. Make sure the CD/DVD is readable.
2. If DVD-RW fails to be recognized during POST, check internal cable fit.
8