1
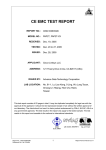
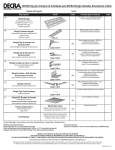
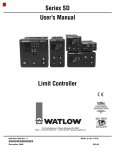
Installation
Guide
www.decra.com
General Instructions
Failure to use these guidelines may void the product warranty. Local
building codes may require additional application techniques beyond
these instructions. In such cases, the local codes must be followed.
Note: Do not use lead or copper with this steel roofing system.
Do not use pressure treated lumber (i.e. decking or battens).
Safety
Adhere to safe roofing practices, wear appropriate clothing, use safety
equipment, such as protective eyewear and light, soft-soled shoes. Use
proper tools and keep the roof clear of debris.
Starter/Eave
Use the Shingle Starter Clip w/ Drip Edge along the eave and paint the
Drip Edge before installing. Prior to fastening the Shingle Starter, cut the
top clip where it meets the rake/gable, valley, and roof-to-wall to allow for
installation of the channels and valley. Cut back top clip approximately
3” for Shingle Rake/Gable Channel & Shingle Roof-to-Wall. For Shingle
Valley, cut back clip enough to accommodate Shingle Valley. All channels
and valleys must be installed over the Starter Clip and extend 1” over
the fascia. Notch and overlap Starter pieces 1” when joining two pieces
together. Fasteners should be spaced 6” on center.
1
Tools
DECRA panels may be cut using a circular saw or tin/aviation snips. An
impact drill will provide for easier panel installation.
2
1”
Roof Slope
Install on roof slopes of at least 4:12. Roof slopes less than 4:12 are
considered decorative and panels must be applied over a roof system
complying with local codes.
Underlayment
NOTE: Strike a straight
line to ensure Starter
Clip w/ Drip Edge is
straight.
3
It is required that a layer of underlayment (one layer Type 15 or Type 30
felt) be used before applying the DECRA Shingle panels. See local code
for underlayment and ice and water shield requirements.
Deck Preparation
The deck must be level and square for proper installation. If it is not,
shim to make any adjustments. It is required that a layer of underlayment
(one layer Type 15 or Type 30 felt) be used before applying the DECRA
Shingle Panels.
OPTION #1
Shingle Panel
Starter Clip w/ Drip Edge
New Construction: Prepare roof deck to meet local building codes. Fire
retardant plywood is NOT an approved decking substrate.
Rafter
Short Course Clip
Panels may be installed over existing asphalt shingles or applied over
existing spaced sheathing provided the space between the boards is filled
as necessary to provide a base for fastening.
Fasteners
Screws: Use a minimum of at least 4 corrosion resistant screws
not smaller than a No. 9 hex head. Use fasteners of sufficient length to
penetrate through the sheathing (deck) by at least 1/2”. Recommended
length is 1-1/2” long. High Wind details, see last page or website.
1
3
4
Cover Length 49”
Fastening Position
that locks tabs joint
Approximate fastening positions
End
Tab
Overlap
Edge
Water
Channel
Front Lock
28” Half Shingle cut line
Fastener
Detail
No. 9 Screw
DO NOT USE DRYWALL SCREWS.
Fascia Board
OPTION #2
Offset
1/16”
past
drip
edge
Drip
Edge
In the event that the Shingle Short Course Clip is used in place of the
Shingle Starter Clip w/ Drip Edge and the underlayment is under the drip
edge a bead of polyurethane sealant is required between the Short Course
Clip and the existing drip edge. Offsetting the Short Course Clip 1/16”
over the drip edge will alleviate any water penetration between the two
materials. Follow notching and installation instructions above.
Rake/Gable Channel
2
Clip Lock
Cover
Width
19-3/4”
ng
cki
De
Un
Re-roof Tear-off (Skip/Spaced Sheathing) or Over Asphalt Shingle: If
tearing off old roof, clean and prepare deck to meet local building codes.
If installed over existing asphalt shingles, cut shingles back from the
eaves and rake/gable edges approximately 8” or enough to allow for the
Shingle Starter Clip w/Drip Edge and Shingle Rake/Gable Channel to be
installed properly. Remove existing hip and ridge material. In situations
where code allows re-roofing over 2 layers of asphalt shingles, follow
the local code.
w
Ply
nt
me
lay
der
ood
Clip-Lock and
Fastening
Position
Standard metal drip edge should be installed along all rake/gable edges.
Position and fasten the Shingle Rake/Gable Channel directly to the drip
edge allowing it to extend 1” minimum beyond the fascia. Install channels overlapping pieces 1”. Screws should be spaced 6”.
In areas where debris is present, install DECRA Low-Profile Debris
Guard prior to installing Shingle panels. Roll the Low-Profile Debris
Guard into the Shingle Rake/Gable Channel. Remove the white paper
while unrolling to expose the adhesive dots and press into place. See
Low-Profile Debris Guard wrapper for detailed instructions.
Where the Shingles fit into the Rake/Gable Channel, proper drainage will be
attained by removing 2” from the front and back Clip-Locks on each panel.
The Rake/Gable Channel provides a finished channel/cover for the panels at
the roof’s edge.
Rake/Gable Channel (cont.)
Chimneys, Skylights & Dormers (cont.)
Next, cut a piece of the Shingle Short Course Clip to fit the length
of the top of the chimney with an added 6” on either side. Attach the
Shingle Short Course Clip on either side of the top of the chimney so
the clip will allow the Shingle panel to engage into the clip as close to
the top of the chimney as possible.
2”
Rake/Gable Channel
Shingle Panel
Drip
Edge
Underlayment
Plywood Decking
For brick and stucco, counter flash over the top of the chimney saddle.
For siding, tuck the chimney saddle up under the siding.
Fascia Board
Roof Penetrations
Roof penetrations should be finished by installing standard roof
jacks over the corrosion resistant Shingle/XD® Underpan which drains
over the panel immediately below. A 2” wide notch must be cut out of
the front Clip-Lock of the Shingle panel covering the jack. This will
allow water drainage from the Underpan onto the Shingle panel below.
Underpan
Shingle
Panel
Polyurethane
Sealant
Jack
(shown in red)
oo
Notch Lower
Lip of Panel
to Allow for
Drainage
The Shingle Valley must be positioned along the center line of each
valley area. Overlap valley a minimum of 6” over the valley piece below.
Fasteners should be positioned outside the last turn-up on each side.
In areas where debris is present, install DECRA Low-Profile Debris
Guard prior to installing Shingle panels. Roll the Low-Profile Debris
Guard into both sides of the Shingle Valley. Remove the white paper
while unrolling to expose the adhesive dots and press into place. See
Low-Profile Debris Guard wrapper for detailed instructions.
Cut Shingle panels to length and notch where they fit into the Valley
piece. Shingle Valley Cap (stone coated) can be installed by snapping
or sliding into place (as shown below). Fasten Cap to Valley where
required.
Fastener Outside of Valley
nt
me
lay
der
Un
w
Ply
ng
cki
e
dD
Valley Application
Valley
Rafter
gle
Plyw
ood
Roof-To-Wall
Install the Roof-To-Wall Channel overlapping pieces 4”. Channel
must extend 1” beyond the fascia or onto the panel below. Cut the
shingle panel to length. Make a 2” notch at the front and back
Clip-Locks where the panel fits into the Channel. Lock the panel
into place and screw down.
Shingle Edge
Slot into Valley
Valley Cap
Shin
Dec
t
men
rlay
e
Und
king
To notch the panels, cut 4” off of the front and back Clip-Locks of each
panel on the side that fits into the Shingle Valley. The figure below
shows the areas that must be notched.
Wall Sheathing
Roof-to-Wall
Cut 4”
notch
at back
Clip-Lock
Slide into Roof-to-Wall
Wall Framing
4”
Underlayment
Plywood Decking
2”
Rafter
Panel cut diagonally
to fit into valley
Chimneys, Skylights & Dormers
Measure the full panel below the chimney. Cut panels to fit this area and
install like at roof to headwall.
Use the Shingle Roof-to-Wall along the left and right side of the
chimney and counter flash with Side Flashing. Extend the Shingle
Roof-to-Wall 4-6” out over the top of the first panel below the chimney.
See Roof-to-Wall.
Panels to fit the left and right sides of the chimney will be measured, cut
and fit into the Shingle Roof-to-Wall. Be sure to notch the front and back
clips as noted in the Roof-to-Wall section.
The area directly above the chimney must be flashed and counter flashed.
Measure the width of the chimney. Use a chimney saddle (Do not use
lead or copper) or a piece of flat sheet metal can be cut and bent to fit
around the chimney.
In the case of a cricket above the chimney, finish like valley. See
Valley Application.
4”
Cut 4” notch at
front Clip-Lock
Venting Options (Panel Vents or Ridge Venting)
See Ventilation Calculator at decra.com for calculating the number of
Shingle Panel Vents or amount of Ridge Venting material needed.
DECRA Shingle Panel Vents
Determine the number of Shingle Panel Vents and estimate the
approximate location. Install the Shingle panels up to the approximate
panel vent location. Carefully measure, mark and cut a rectangle hole
29” x 5” in the roof deck to match the opening of the underside of
the DECRA Shingle Panel Vent. Install the panel vents as you would
normal DECRA Shingle panels.
Field Panels
DECRA Shingle Installation PATTERN uses full and 1/2 panels. The
first course of panels lock into the Starter Clip w/Drip Edge. Subsequent courses of panels simply lock into place by sliding the nose of
each panel onto the clip that is formed at the top edge of each panel.
The right side of each panel must be compressed and pushed into position to engage the Side-Lap locking mechanism. This will secure the
right Side-Lap and provide a clean appearance. Stagger Shingle panels
and install from right to left. Make sure the front Clip-Lock at the nose
of each panel is not bent.
Cut 1/2 offset Panel at 28”
Field Panel Installation (suggested)
1.Set the panel into the top Clip-Lock of the panels on the course below. Firmly push (by hand or foot) at the front edge of the panel in the area that overlaps the joint of the two panels below.
2.After positioning the panel in Step #1, firmly push (by hand or foot) on the left side of the panel until it is locked firmly into the Clip-Lock of
the panels on the course below. Install fastener j straight down into the upper left portion of the panel as shown.
3.Firmly push (by hand or foot) on the right side of the panel and make sure
it is locked into the previously installed panel. Install a fastener in the upper right portion of the panel. Placing this fastener k at an upward angle (45°)
will help draw the Shingle panel into the proper locking position.
4.Install the remaining fasteners lm straight down into the panel.
Left edge on Panel
5. When installing panels, the Clip-Lock on the left will drop down approximately 1/16” to 1/8” below the Clip-Lock on the right panel. The maximum allowable gap between panels should be 3/16” to allow proper coverage of the panel’s water channel and support rib on the center course.
CUT THE PANELS
USING A CIRCULAR
SAW WITH A TENRYU
STEEL PRO BLADE OR
FERROUS METAL
CUTTING BLADE.
(clean all debris from
roof especially any
metal shavings)
1
4 Fasteners
3
4
Left panel Clip-Lock
drops down approx.
1/16” to 1/8”. Make
sure overlap is tight.
2
3
2
Use Predrilled Holes
1.FIRST COURSE: Start at the rake edge, valley or hip and continue
course with full panels locking into the Starter Clip w/Drip Edge.
2.SECOND COURSE: Start at the rake edge, valley or hip with a panel
that is 28” in length (panel exposure is 25”). Measure from the left
side of the panel 28” to make the cut. See diagram above.
3. THIRD COURSE: Start at the rake edge, valley or hip and continue
course with full panels.
4. FOURTH AND SUBSEQUENT COURSES: Continue application,
repeating second and third course instructions.
Full Panel
Maximum
Gap 3/16”
Overlapping
Panel
1
Firmly push in
Firmly push
Firmly push
this direction
in this
on the front
on the front edge direction on
edge and
and left side
the front edge Side-Lap Area
of the panel
of the panel
of the panel
Right Adjacent
Panel
5
Hips & Ridges
Overlap Shingle panels at hips/ridges and cut along a parallel line
beyond the crest of the hip or ridge overlap that provides adequate
protection. Install a 1 x 2 batten (optional) directly over the Shingle
using fasteners sufficient to penetrate the roof deck.
Ply
Shingle panels are
cut and overlapped
at hips and ridges
wo
25”
o
dD
The DECRA Shingle Hip & Ridge should be attached
eck directly to the
ing
RafterEach Hip/Ridge piece should
battens or panels and deck.
clip together
by inserting the return at the nose of each piece into the clip that is
located at the top of the Hip & Ridge piece. Fasten through back clip of
Hip & Ridge, the fasteners are concealed by next piece of Hip & Ridge.
Shingle Hip & Ridge
Care should be taken to
avoid stepping in the
Side-Lap Area after panels
are installed.
NOTE: Fasten Hip &
Ridge through back clip,
fasteners are concealed.
No. 9 Screw
25”
Rafter
NOTE: Do
Not Rack
Panels
1 x 2 Battens
(optional)
Ply
wo
Shingle
od
Dec
king
Hip & Ridge (fastened
through the back clip)
Ridge Venting
Full Panel
1/4” from Side
NOTE: In situations where the Side-Lap
disengages, use one or two stitch screws
(3/4” maximum) to pull panels together
and eliminate gapping.
THIS SHOULD ONLY BE DONE IF THE
PANELS BECOME DISENGAGED.
Cover Screw Heads Using Touch-Up Kit.
Hip & Ridge
(fastened through
back clip with
No. 9 Screw)
DECRA
Ridge Vent
material
Ply
wo
od
Rafter
Shingle
Dec
king
For detailed installation instructions on DECRA Ridge Vent,
see the DECRA Ridge Vent wrapper.
98090185 05/12
DECRA Shingle Field Panel Installation Helpful Hints
1
2
Overlap of
prior course
Top Clip-Lock
Using the recommended offset, the center of each field panel will
be placed directly above the overlap of the panels on the previous
course.
3
Position the next panel into the top Clip-Lock of the panels on the
course below.
4
Center of panel:
first course
Top Clip-Locks
When installing panels, the Clip-Lock on the left will drop down approximately 1/16” to 1/8” below the Clip-Lock on the right panel.
The maximum allowable gap should be 3/16”.
5
Once the panel is in position, firmly push (by hand or foot) on the
panel in the area that overlaps the joint of the two panels below.
This will help position the panel for fastener placement.
6
Clip-Lock
Screw in at
a 45˚ angle
After positioning the panel, firmly push (by hand or foot)
on the left side of the panel until it is locked firmly into the
Clip-Lock of the panel on the course below. Install a fastener in
the upper left corner straight down through the panel.
Firmly push (by hand or foot) on the right side of the panel and
make sure it is locked into the previously installed panel. Install
a fastener in the upper right portion of the panel. Placing this
fastener at a 45° angle will help draw the Shingle panel into
the proper locking position. Complete the installation with 2
additional fasteners.
DECRA Shingle System
Panel
Product Size
Hip & Ridge
21” x 52”
27”
19-¾” x 49”
25-¾”
Pieces / Bundle
5
n/a
Bundles / sq. ft.
3 / 100 sq. ft.
n/a
Squares / Pallet
18
n/a
125 lbs. / 100 sq. ft.
n/a
Exposure
Weight
Warranty
Colors
50-Year Limited Warranty
Fawn Grey / Canyon Brown / Midnight Eclipse /
Vintage Slate / Woodland Green
See www.decra.com for latest
updates and installation details.
High Wind
In areas prone to hurricanes and high winds (in
excess of 100 mph 3 second gust), installation
must meet local standards and codes. As a
general guide, a minimum of four No. 9 1-1/2”
hex head screws must be used in the field of
the roof. Panels around the perimeter at rakes,
directly along the hips and gables, on the top
two courses and bottom two courses should
be fastened with eight No. 9 1-1/2” hex head
screws at eight evenly spaced locations. For
further information, DECRA installation
instructions and an updated list of evaluation
reports can be found at www.decra.com and
should be reviewed before installation begins.
Pitch Change
See Shingle Install Presentation
at www.decra.com.
Shingle Panel Vent
Shingle Short
Course Clip
[ 10’ Length ]
Shingle Rake /
Gable Channel
[ 6’6” Length ]
Shingle/XD® Underpan
[ 24.44” x 30” ]
© DECRA Roofing Systems, Inc.
Shingle Panel
Shingle Starter Clip
w/ Drip Edge
[ 10’ Length ]
Shingle
Hip & Ridge
Shingle Roof-To-Wall
[ 10’ Length ]
Shingle Valley & Cap
[ 6’6” Length ]
Low-Profile Debris Guard
2” W x 3/8” H x 50’ L
Side Flashing
Ridge Vent
2-1/2” W x 1” H x 20’ L
DECRA Roofing Systems, Inc., Corona CA
877.GO.DECRA [463.3272] | www.decra.com
98090185 04/13