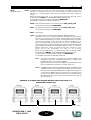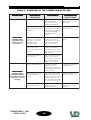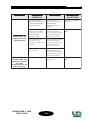
1
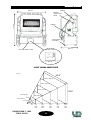
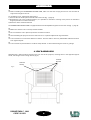
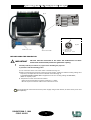
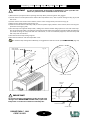
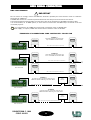
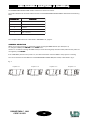
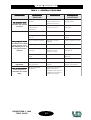
User ’s manual:
product code: 991251
INDEX
INTRODUCTION............................................................................................... page 2
SAFETY PRECAUTIONS.................................................................................. page 3
TECHNICAL FEATURES.................................................................................. page 4
ASSEMBLING.................................................................................................. page 6
•4-LEAF BARNDOORS......................................................................... page 6
CONNECTION TO THE POWER SUPPLY....................................................... page 7
MOUNTING AND REPLACING THE LAMP..................................................... page 8
DMX SIGNAL CONNECTION.......................................................................... page 9
CONFIGURATION AND CONTROL................................................................. page 10
PROGRAMMING FUNCTIONS........................................................................ page 11
USING DOWNTOWN COLORS 1800 IN DMX (5 CHANNELS)...................... page 16
TROUBLESHOOTING...................................................................................... page 17
•TABLE 1 - GENERAL PROBLEMS....................................................... page 17
•TABLE 2 - PROBLEMS TO THE CONNECTION DATA LINK.............. page 18
•ELECTRICAL DIAGRAM..................................................................... page 20
MAINTENANCE............................................................................................... page 21
APPENDIX “A” - 5 CHANNELS CONFIGURATION......................................... page 21
DOWNTOWN
COLORS 1800
DOWNTOWN C. 1800
CODE 991251
1
INTRODUCTION
We thank you for choosing the DOWNTOWN COLORS
1800.
Characterized by an attracting design and an incredible
optic system, together with an uniform colors mixing, the
DOWNTOWN COLORS 1800 is suitable for any kind of
outdoor ambient.
A modern and reliable electric circuit gives stability and
functioning safety for long time.
To make the most of this unit and to make it work correctly
in the years, before connecting it to its source and using
it, we suggest you to carefully read this manual.
In this way you could be more familiar with its commands
and connections so to easily use it.
All the sections of this manual have been studied to make as easy and complete as possible the use of the DOWNTOWN
COLORS 1800.
To make the manual more clear and easy to consult, we have used the following symbols and conventions:
!
IMPORTANT
!
very important warnings, to be read with the maximum attention;
important parts of the text that give details and/or explanations on the use of
the DOWNTOWN COLORS 1800;
practical advices for an efficient use of the DOWNTOWN COLORS 1800.
The safety of the unit is guaranteed only strictly following the instructions, so it is recommended to
accurately preserve them.
DOWNTOWN C. 1800
CODE 991251
2
SAFETY PRECA
UTIONS
PRECAUTIONS
!
IMPORTANT
READ ALL CAUTIONS AND WARNINGS PRIOR TO OPERATE THIS EQUIPMENT.
INSTRUCTIONS TO PREVENT INJURIES OR DAMAGES DUE TO FIRE, ELECTRIC SHOCKS, MECHANICAL
HAZARDS AND UV RADIATIONS HAZARDS.
•PROTECTION AGAINST FIRE
1) This unit has been made to work only with the Lamp:
HMD 1800W / MHN-SA 1800 (PHILIPS).
! ABSOLUTELY NEVER USE OTHER KIND OF LAMPS.
2) Keep a minimum distance of 0,5 mt. from walls or any inflammable surface.
3) Keep a minimum distance of 5 mt. from lighted objects.
4) Do not install the projector close to heat sources. Do not lay the connection cables on the projector when it is hot.
•PROTECTION AGAINST ELECTRIC SHOCKS
1) This projector must be earthed.
2) Class I equipment. The protection conductor must be part of the power supply cable.
3) For the connection to the main power supply proceed as in fig. 3/a, page 7.
4) Disconnect the power supply before the Lamp replacement or before opening the unit.
5) Do not install the projector outdoors, exposed to rain or moisture.
•PROTECTION AGAINST MECHANICAL HAZARDS
1) To avoid explosion risks, open the projector only after 15 minutes after the lamp is off.
2) The temperature of the projector can reach 100°C. Wait for almost 15 minutes before operating on it.
3) Replace the Lamp if it is damaged or deformed by the heat.
•PROTECTION AGAINST UV RADIATIONS HAZARDS
1) Do not start on the projector without the protecting screen or if the dichroic filters are damaged.
2) The protecting screen and the dichroic filters must be replaced if visibly damaged and if their efficiency has
been reduced, for example by slits or deep cuts.
3) Do not directly look at the Lamp when it is on.
•WARNINGS
1) Do not dismantle and modify the unit.
2) To avoid any inflammable liquids, water or metal objects entering the unit.
3) Do not install the projector in places subject to vibration and large shocks.
DOWNTOWN C. 1800
CODE 991251
3
SAFETY PRECA
UTIONS
PRECAUTIONS
YOUR REFERENCE
Cite the model and the serial number on the identification label (fig. 3, page 7) anytime you contact your retailer to
ask for information or assistance.
STANDARD PACKAGE
The standard package of the DOWNTOWN COLORS 1800 contains:
1) Projector
2) Industrial socket 220V 16A (IP 44)
3) DMX XLR5 signal connectors (pc. 2)
4) User’s manual
5) Guarantee
ON REQUEST:
* Lamp (code 063565)
* 4 Leaf barndoors (code 040104)
* Flight Case with wheels (code 194981)
!
IMPORTANT
Make sure that the unit has not been damaged during the transportation.
In case it has happened or in case the unit does not work correctly, immediately contact the Retailer.
If the unit has been directly sent to you , immediately contact the Freight Company.
Only the final receiver (the person or the Company that receive the unit) is in the position to
complain for the above inconveniences.
TECHNICAL FEA
TURES
FEATURES
LAMP
Discha rge la mp HMD 1 8 0 0 W / MHN-SA 1 8 0 0 W (PHILIPS)
Colour tempera ture: 5 .6 0 0 ° K
MO VEMENT
4 Stepper motors
T ha n ks to a sophistica ted system of micro-steps of the stepper motors, the movemen t is
extremely lin ea r a n d a ccura te.
VERT ICAL
MO VEMENT
+ 90° / - 10°
Ma n ua l orien ta tion ( fig. 1 , pa ge 5 ).
CO LO URS
BLACKO UT / DIMMER
CO NT RO L SIGNAL
LIGHT BEAM
AMPLIT UDE
INPUT PO WER
WO RKING
P O S IT IO N
DIMENSIO NS
(W x D x H )
WEIGHT
BO DY
REF ERENCE NO RMS
T hree-colour prin tin g CYM (Cya n , Yellow, Ma gen ta ) + WHIT E.
T he SHUT T ER ca n be used a s a DIMMER too.
• DMX 5 1 2 sign a l con trol (5 cha n n els).
• Automa tic mode (MAST ER a n d SLAVE fun ction s with in n er progra mmed scen es).
4 3 .6 ° x 3 6 .9 ° (fig. 1 /a , pa ge 5 ).
• Nomin a l opera tin g volta ge: 2 3 0 Va c; 5 0 Hz. (6 0 Hz on request)
• Ra ted power supply: 2 0 0 0 W.
• Nomin a l curren t: 9 ,5 A (2 3 0 Va c).
Sta n din g on suita ble surfa ce.
mm. 6 8 0 x 3 8 0 x 7 3 0 (Fig. 1 , pa ge 5 ).
Kg. 6 1
Ga lva n ised steel. Epoxy pa in t fin ish.
Degree of protection : IP 4 4
CE Norms
DOWNTOWN C. 1800
CODE 991251
4
TECHNICAL FEA
TURES
FEATURES
fig. 1
HINGES
680 mm.
MANUAL
ORIENTATION
KNOB
730 mm.
HANDLE
ADJUSTABLE
SUPPORTS
380 mm.
CONTROL PANEL COVER
CONTROL PANEL
fig. 1/a
LIGHT BEAM AMPLITUDE
fig. 1/b
43.6°
2000 x 1666 cm.
1600 x 1333 cm.
1200 x 1000 cm.
400 x 333 cm.
36.9°
800 x 666 cm.
240 x 200 cm.
3m
DOWNTOWN C. 1800
CODE 991251
5m
10 m
15 m
20 m
25 m
7200
LUX
1800
LUX
800
LUX
450
LUX
288
LUX
5
ASSEMBLING
!
Before installing the DOWNTOWN COLORS 1800, make sure that the carrying structure is safe and able to
support the weight of the unit.
To orientate the unit, follow these instructions:
1) Unscrew the two knobs placed at both sides of the unit (fig. 1, page 5);
2) Orientate the unit in the preferred position; it is possible to orientate it referring to the picture of orientation
degrees placed on one side of the unit;
3) Screw the above mentioned knobs.
The DOWNTOWN COLORS 1800 is equipped with 4 manual adjustable supports to level the unit (fig. 1, page 5).
!
!
!
!
!
Make sure that the unit is correctly fixed and stable.
Do not install the unit in places exposed to excessive moisture.
Avoid installing the projector close to heat sources or in places subjected to large vibrations.
The unit must be at a minimum distance of 50 cm. from the walls or from any inflammable material and 5 mt.
from lighted objects.
The unit must be placed where it could be easily aerated. To avoid obstructing the in/out air gratings.
4 LEAF BARNDOORS
Assemble the 4 leaf barndoors placed on the rear side of the projector, inserting them in the apposite support
hooks, activating the two locking devices (fig. 2).
LOCKING
DEVICES
SUPPORT
HOOKS
fig. 2
DOWNTOWN C. 1800
CODE 991251
6
CONNECTION T
O THE POWER SUPPL
Y
TO
SUPPLY
fig. 3
ITALY
S.R.L.
DOWNTOWN COLORS 1800
230
Hz
2200
Amp.
SPECIAL
Lamps
61
Max. Temp. 100°C
50
9,5
MHN-SA 1800
15/02
INDUSTRIAL SOCKET 220V 16A (IP44)
fig. 3/a
POWER SUPPLY INPUT
IDENTIFICATION LABEL
L = PHASE (Brown)
N = NEUTRAL (Blue)
= EARTH (Green - Yellow)
BEFORE USING THE PROJECTOR
!
IMPORTANT
!
The unit must be connected to the earth. The inobservance of these
instructions automatically makes the guarantee expiring.
Carefully read the precautions on page 3 before installing the projector.
In particular read the following points:
1) The connection of the unit to the mains is described in fig. 3/a.
2) Before connecting the projector to the main power supply, make sure that the working voltage and
frequency correspond to the values indicated on the label (fig. 3).
The DOWNTOWN COLORS 1800 is supplied to work at a working voltage of 230V 50Hz;
(60Hz on request); 9,5A.
3) Temperature on the unit’s external surface:
• when the thermic balance has been reached Tc = 100°C.
• Do not lay the connection cable on the unit when it is hot.
It is suggested to connect the unit to the power supply using its own switch, so that it can be put on and
off separately.
DOWNTOWN C. 1800
CODE 991251
7
MOUNTING AND REPLA
CING THE LAMP
REPLACING
!
IMPORTANT
In case of replacement of the Lamp or maintenance, never open the unit
unless are passed at least 15 minutes after it went off.
1) Disconnect the projector before replacing the lamp. Wear protective gloves and goggles.
2) Loosen the four screws placed at the sides of the lamp-holder cover, with a 2,5 mm hexagonal key (fig. 4) and
take it out.
3) Loosen the the two screws of the reflector, with a 3 mm hexagonal key and remove it (fig. 4) .
4) Open the two lamp locking tongues (fig. 4/a) .
5) Undo the lateral bushes of the lamp and put the two power supply cables in the rheofores, after removing the
protective covering (fig. 4/b).
6) Put the lamp in the apposite lamp-holder, making sure that the metallic flange placed on one side of the lamp
(fig. 4/a) is inserted in either one of the two slots placed on both sides of the reflector and with the bulb protuberance
up. Avoid touching the lamp bulb with the nude hands; in case it accidentally happens, clean the lamp bulb
with a dry cloth and alcohol.
7) Put back the two lamp locking tongues.
8) Put back the reflector and the lamp holder cover.
To check the lamp average time efficiently, it is suggested to reset the counter (see LAMP OPTION, page 15).
fig. 4/a
fig. 4
LAMP-HOLDER
COVER SCREWS
REFLECTOR
SCREWS
LAMP LOCKING TONGUES
METALLIC
FLANGE
!
LAMP
IMPORTANT
To avoid performance degradation of the unit and optic
damage of the DOWNTOWN COLORS 1800, replace the
lamp when it reaches its estimated total lamp-life.
fig. 4/b
POWER SUPPLY CABLE
LATERAL BUSH
DOWNTOWN C. 1800
CODE 991251
8
DMX SIGNAL CONNECTION
DMX LINE TERMINAL
!
IMPORTANT
Do not connect or wrongly connect the DMX line terminal is probably the most common cause of a defective
functioning of a DMX line.
The DMX line terminal is a resistance placed between the two data pin 2 and 3 at the end of the line.
The terminal resistance should ideally have the same value of the impedance of the DMX connecting cable.
It is recommended, for all DMX system, to insert the line terminal into the DMX output connector of the last
connected projector .
It is suggested to use a DMX line terminal with a resistance value of 100/120 Ohm.
We supply, on request, a DMX line terminal with a resistance value of 120 Ohm.
EXAMPLES OF CONNECTIONS: DMX CONTROLLER - PROJECTOR
EXAMPLE 1
Controller-projector connection with
only one DMX 512 OUTPUT LINE
LINE < 100mt. (with microphonic or audio cable)
LINE TERMINAL
DMX CONTROLLER
DMX 1 output line
EXAMPLE 2
Controller-projector connection with
two or more DMX 512 OUTPUT LINE
DMX 2 output line
LINE < 100mt. (with microphonic or audio cable)
LINE TERMINAL
DMX CONTROLLER
LINE < 100mt. (with microphonic or audio cable)
LINE TERMINAL
EXAMPLE 3
Controller-projector connection with only one
DMX 512 OUTPUT LINE long more than 150mt.
SIGNAL
AMPLIFIER
LINE > 150mt. (with microphonic or data transmission cable)
LINE TERMINAL
DMX CONTROLLER
EXAMPLE 4
Controller-projector connection with only one
DMX 512 OUTPUT LINE long more than 150mt.
SIGNAL
AMPLIFIER
LINE > 150mt. (with microphonic or data transmission cable)
LINE TERMINAL
DMX CONTROLLER
DOWNTOWN C. 1800
CODE 991251
9
DMX SIGNAL CONNECTION
fig. 5
P IN
WIRE
SIGNAL
1
SHIELD
GROUND/RET URN/OV
2
INNER CONDUCT OR
DATA COMPLEMENT ( -, INVERT ED)
3
INNER CONDUCT OR
DATA T RUE ( +, NON INVERT ED)
4
N.C.
5
N.C.
fig. 5/a
DMX SIGNAL CONNECTION
The DMX signal connection to the DOWNTOWN COLORS 1800 must be done through the input signal connectors
XLR 5 pins (fog. 5), placed on the rear panel of the projector (fig. 1/a, page 5).
The nomenclature of the pins of the DMX input connectors is listed in the table reported in fig. 5/a.
To avoid any problem in the transmission of the signal it is recommended to use a cable for very fast data
transmissions.
A normal audio cable is suitable only for lines long not more than 100 mt.
The best performances and the maximum stability are obtained using a shielded microphonic cable which section
must be of at least 2x0,25mm, or, a data transmission cable.
In case of lines long more than 150/200 mt. it is recommended to use a DMX Repeater Amplifier.
CONFIGURA
TION AND CONTROLS
CONFIGURATION
On the DC 1800 control panel (fig. 1/a, page 5 and fig. 6) besides the display there are some led and buttons which
allow the projector correct configuration.
LED
• “MANUAL CHANNEL CONTROL”
on (red):
off:
the DMX values are being changed;
there is not change;
• “PROGRAMMING MODE”
Not available at the moment.
• “AUTOMATIC MODE”
on (red):
off:
Demo or Test is working;
there is not change.
• “DMX”
on (green):
off:
The DMX signal is on;
The DMX signal is off.
BUTT
ONS
BUTTONS
There are four buttons which allow the complete programming and management of the projector:
• MENU/ESC
allows to enter the programming
options or exit from them;
• -
allows to run the selected options
back;
• +
allows to run the selected options
forward;
• ENTER
confirms the options selected.
fig. 6
DISPLA
Y
DISPLAY
It shows the different configuration menu and the options selected.
DOWNTOWN C. 1800
CODE 991251
10
PROGRAMMING FUNCTIONS
CHAN
MASt
SLAV
FVAL
USEr
brIG
rdSP
LAMP
dIAG
When the projector is put on the display will show the word LEd (factory name), the projector executes a reset
routine, after this step the display will show the DMX address which has been given (for default C 1).
The DOWNTOWN COLORS 1800 is provided with WATCHDOG SYSTEM.
WATCHDOG SYSTEM:
When the projector is switched on, the electronics perform a reset, this function
allows the microprocessor to control the system and register the position of all
the motors.
When the lamp strikes and fires up it can cause a certain amount of electrical
noise within the projector that can disturb the microprocessor.
The DOWNTOWN COLORS 1800 is provided with an electronic WATCHDOG
system that monitors the microprocessor and executes a reset if the funcioning
of the microprpcessor has been disturbed.
To enter the menu, press MENU/ESC button and press the + or - buttons as many times as needed to reach the
desired option.
The options available are as follows:
• CHAN
allows to select the DMX address
• MASt
allows to set up the projector as master (first projector)
• SLAV
allows to set up the projector as slave (second projector)
• FVAL
allows to use the projector without any DMX controller
• USEr
NOT AVAILABLE AT THE MOMENT
• brIG
allows to change the display light when the menu is not working
• rdSP
allows to reverse the display visualization
• LAMP
allows to visualize the lamp working hours
• dIAG
allows to set up many options for the projector diagnostic programming
To select one of the options above said press the ENTER button, the display will show all functions referring to the
option selected, press + or -, press ENTER to confirm, press MENU/ESC buttons to leave the menu.
DOWNTOWN C. 1800
CODE 991251
11
PROGRAMMING FUNCTIONS
CHAN
(DMX channel)
To change the DMX address press ENTER.
To change the address press + or - buttons (for a fast advancing keep the
button hold) and when the desired option is selected press ENTER.
To go back to the options without any change, press MENU/ESC button.
MASt
(Projector Master)
To set up the projector as Master press ENTER.
Move the sub-menu with + or - buttons and when the desired option is reached press
ENTER.
It is possible to activate the following functions:
AUtO: automatic mode, the Master unit executes its own sequence and sends to the DMX
bus the control values for the Slaves (up to three Slave projectors).
Move the sub-menu with + or - buttons and when the desired option
is reached press ENTER., the lamp and the AUTOMATIC MODE LED will light.
To get back to the options without change press MENU/ESC.
It is possible to activate the following options:
SLOU: slow automatic sequence, the display shows AUtO_SLOU_rUN.
To stop the execution press MENU/ESC.
FASt: fast automatic sequence, the display shows AUtO_FASt_rUN.
To stop the execution press MENU/ESC.
USEr: No function.
MUSI: No function.
LINI:
No function.
SYNC: No function.
SLAV
(Projector Slave)
!
To set up the projector as Slave press ENTER.
Move the sub-menu with + or - buttons and when the desired option is reached press
ENTER.
It is possible to activate the following functions:
SL-1:
first slave program, the DMX LED will light.
Select YES using + or - buttons, press again ENTER button to confirm. In this
mode the projector will execute the same sequence as the Master unit.
To stop the execution press MENU/ESC.
SL-2:
second slave program, the DMX LED will light.
Select YES using + or - buttons, press again ENTER button to confirm. In this
mode the projector will execute a sequence stored in its own memory, but the step
will be controlled always by the Master unit.
To stop the execution press MENU/ESC.
SL-3:
third slave program, the DMX LED will light.
Select YES using + or - buttons, press again ENTER button to confirm. In this
mode the projector will execute a second sequence stored in its own memory, but
the step will be controlled always by the Master unit.
To stop the execution press MENU/ESC.
When the functions SL-1, SL-2, e SL-3 are activated, the projector lose the DMX address that has been set up,
so that when you leave the menu the display sows C 25, C 49, C 73.
So that it is suggested to take a note of the DMX address before activate one of the above said options.
DOWNTOWN C. 1800
CODE 991251
12
PROGRAMMING FUNCTIONS
SLAV
(Projector Slave)
AUtO: automatic mode, the Slave unit is still controlled by the Master unit, but the
sequence it executes is stored in its own memory, so that the Slave unit
will wait for a synchronization signal from the Master unit before advancing
a step.
Move the sub-menu with + or - buttons and when the desired option
is reached press ENTER., the AUTOMATIC MODE LED will light.
To get back to the options without chang press MENU/ESC.
It is possible to activate the following functions:
SLOU: slow automatic sequence, the display shows AUtO_SLOU_rUN.
To stop the execution press MENU/ESC.
FASt: fast automatic sequence, the display shows AUtO_FASt_rUN.
To stop the execution press MENU/ESC.
USEr: No function.
tYPE: this option sets the synchronization between Master and Slave.
The Slave units can be synchronised with the Master in two different
way. You can choose to have all units synchronised on the same step,
so for example if the Master is on step1, the Slaves will also be on step 1
of whichever sequence they were set to, when the Master is on
step 2, the Slaves will also be on step 2 and so on. Or alternatively,
you can choose to have only the changing of a step to another synchronised,
which means that it does not matter which step any unit is on: when the
Master advances a step, the Slaves will also advance a step,
which will be not necessarily the same for all of them.
Move the sub-menu with + or - buttons and when the desired option
is reached press ENTER., the AUTOMATIC MODE LED will light.
To get back to the options without chang press MENU/ESC.
It is possible to activate the following functions:
CH 1: The signal on channel 1 is usually zero, when the Master unit
advances a step in the selected auto sequence, it sends a level
of 255 on channel 1 for a period of 500ms.
When the Slave units receive this signal, they will advance 1 step
of their selected auto sequence, no matter which one.
CH 2: The DMX signal on channel 2 is slightly different. The Master sends
a DMX level which corresponds to the number of the step in the
sequence, so for example if the Master is on step10 of its sequence,
it will send the DMX level10 on channel 2. So the Slave units
set up on this channel will execute the step corresponding to
the DMX level received, in this case will execute the step 10
of their sequence.
EXAMPLE OF CONNECTION BETWEEN MASTER AND SLAVE UNITS OF 4
DOWNTOWN COLORS 1800
MASTER
SLAVE
DMX CABLE
DOWNTOWN C. 1800
CODE 991251
SLAVE
DMX CABLE
13
SLAVE
DMX CABLE
DMX LINE TERMINAL
PROGRAMMING FUNCTIONS
FVAL
(Fixed DMX values)
With this option you can set manually the DMX values for each channel and save them (The
complete list of DMX values is in APPENDIX “A”, page 21).
To set the fixed values press ENTER, move the sub-menu with + or - buttons and when the
desired option is reached press ENTER to confirm, the MANUAL CHANNEL CONTROL LED
will light.
To get back to the options without change press MENU/ESC.
It is possible to change the DMX values of the following channels:
CH 1: CYAN filter.
CH 2: YELLOW filter.
CH 3: MAGENTA filter.
CH 4: DIMMER / BLACK OUT.
CH 5: LAMP control.
To change the fixed values press ENTER on the desired channel, the display will show
d 0 (for default), to change the values press + or - buttons (for a fast advancing keep the
button hold) and when the desired option is selected press ENTER to confrm. The display
will show again the channel on which the change of values has been set. To save these new
settings press + or - buttons until the word SAVE is selected, press ENTER to confrm, The
display will show NO, press + button to select YES and then press ENTER to save the new
settings.
To get back to the options without change press MENU/ESC.
After saving, if you turn the projector off and the MANUAL CHANNEL CONTROL LED will
light, the fixed values which have been set will be reloaded automatically when you turn on
the projector again. If, on the contrary, after saving, you exit the option FVAL and turn
the projector off you have to press ENTER on option FVAL in order to reload the saved fixed
values.
It is also possible to have more colors matching the values of the 5 channels, as the following tabel shows:
OPTIONS OF MATC HING
CH 5 (lamp at d255) + CH 4 (Di mmer at d255) + CH 1 (cyan fi lter at d255) + CH 2 (yellow fi lter at d255)
C OLOR OBTAINED
GREEN
CH 5 (lamp at d255) + CH 4 (Di mmer at d255) + CH 1 (cyan fi lter at d255)+ CH 3 (mag enta fi lter at d255)
BL UE
CH 5 (lamp at d255)+ CH 4 (Di mmer at d255) + CH 2 (fyellow fi lter at d255) + CH 3 (fmag enta fi lter at d255)
RED
Moreover, always with the lamp ON and the dimmer opened, lowering or increasing the DMX values of channels
CH 1, CH 2 and CH 3, it is possible to obtain more shades of color.
USEr
NOT AVAILABLE AT THE MOMENT
To get back to the options without change press MENU/ESC.
brIG
(Display brightness)
To change the display brightness press ENTER.
The display will show 5 (for default), to change the value press + or - buttons and when the
desired option is selected press ENTER to confirm.
It is possible to select a value from 0 up to 10. If you set 0 value the display will be off when
the menu is not working.
When you enter the menu the display has the highest brightness and it get back to the value
which has been set up when you exit the menu list.
To get back to the options without change press MENU/ESC.
rdSP
(Reverse display)
To change the display press ENTER.
The dispaly will show NO, press + button to select YES and then press ENTER to reverse
the display.
To get back to the options without change press MENU/ESC.
To stop this function you have to select NO and press ENTER.
DOWNTOWN C. 1800
CODE 991251
14
PROGRAMMING FUNCTIONS
LAMP
(Lamp timer)
To show the lamp operating life in hours press ENTER.
To reset the counter press ENTER again (it is suggested to effect this operation everytime
the lamp is replaced, ref. page 8), the display shows CANC, press again ENTER, the
display shows NO, press + to select YES and then press ENTER to confirm.
The lamp time meter is also cleared every time you restore the factory settings (see option
dIAG).
To get back to the options without change press MENU/ESC.
dIAG
(Diagnostic)
To effect diagnostic programming press ENTER.
Move the sub-menu with + or - buttons and when the desired option is reached press
ENTER.
It is possible to activate the following functions:
rESE:
press + button to select YES and then press ENTER to confirm (the projector
performs a reset). To get back to the options without change press MENU/ESC.
FACt: press + button to select YES and then press ENTER to confirm (the projector
performs a factory settings restore). During the restore time the display shows
VAIt_LEd. To get back to the options without change press MENU/ESC.
dEMO: the projector executes a demo sequence in order to check that all functions are
working. The AUTOMATIC MODE LED will light and the display shows the word
dEMO_rUN. To exit the demo mode press MENU/ESC button.
CALb: press + button to select YES and then press ENTER to confirm (the projector
executes the calibration and the motors go to their zero position).
To stop the calibration choose NO and press ENTER.
UPGr: connect the projector to the serial port of a PC via a DMX connector in order
to upgrade the software of the unit. Press + button to select YES and then press
ENTER to confirm. During the upgrading time the display shows the word
rEC, the PC tells you when finished.
After the upgrading, turn the projector off, wait for the lamp cooling (if it was lit)
and restart the projector. To get back to the options without change
press MENU/ESC.
tESt:
the projector executes a test sequence. The AUTOMATIC MODE LED will light
and the display shows the word tESt_rUN. To exit the test mode press
MENU/ESC.
OFFS: no function.
VErS: this option allows to check the version of the electronic boards.
Press + or - buttons of the sub-menu and when the desired option is
selected press ENTER to confirm.
It is possible to select the following options:
MAIN: to see the projector main board number.
tAbL: to see the specific projector control board number.
SEqU: to see the stored sequence identification number.
MOdU: no function.
DOWNTOWN C. 1800
CODE 991251
15
DMX CHANNELS FUNCTIONS (5 CHANNELS)
The DOWNTOWN COLORS 1800 needs 5 channels to check its functions.
The relation between the channels and the functions of the DOWNTOWN COLORS 1800 is described in the following
table:
CHANNEL No.
FUNCT ION
1
CYAN
2
YELLOW
3
MAGENTA
4
DIMMER / BLACK-OUT
5
LAMP CONT ROL
The complete DMX values list is described in APPENDIX “A”, page 21.
ADDRESS SELECTION
When you turn the projector on, the display shows the assigned DMX address (for default, C 1).
To change the DMX press ENTER on the CHAN menu.
Use the - or + buttons to change the DMX value (for a fast advancing keep the button hold) and when the preferred
one appears press ENTER.
If the “LED DMX” placed on the panel is on, the data transmission from the DMX to the projector is working.
The correct channels for the DMX use of 4 DOWNTOWN COLORS 1800 (5 channels) is described in fig. 7.
fig. 7
Projector n° 1
Channels 1-5
DOWNTOWN C. 1800
CODE 991251
Projector n° 2
Projector n° 3
Projector n° 4
Channels 6-10
Channels 11-15
Channels 16-20
16
TROUBLESHOO
TING
TROUBLESHOOTING
TABLE 1 - GENERAL PROBLEMS
PROBLEMS
T he projector does
not start, the fans do
not work.
PROBABLE
REASONS
CONT ROLS
T he power supply is
missing.
Measure the power
supply tension on the
principal connector.
Supply the projector with
the right power.
Defective power supply
cables and/or
connectors.
Check cables and
connectors status.
Replace cables and
connectors.
Defective lamp.
Check the lamp status.
Replace the lamp.
T he lamp is too hot to
turn on.
-
Too low power supplied.
T he projector works
correctly but the lamp
Defective igniter.
does not turn on or
intermittently turns off
or its light intensity
T he inside temperature is
reduces.
too high.
T he head fans do not
work.
Halo effect around the T he lamp bulb is in the
light beam.
wrong position.
Wrong CYAN filter
movement.
DOWNTOWN C. 1800
CODE 991251
Wait for the lamp
cooling.
Measure the power
supplied.
Check the power source.
Check the igniter status.
Replace the igniter.
Check that the thermic
protection on the
projector is open.
Wait for the cooling of
the projector.
Check the fans status.
Replace the fans (if
defective).
Obstructed air gratings.
One of the functions
of the projector is
defective (ex. CYAN
filter).
SUGGEST ED
SOLUT IONS
Check the lamp bulb
position.
Disconnect the power
supply cable and
manually check that the
CYAN filter movement is
flowing and regular.
17
Clean the air gratings.
Put the lamp in the right
position (ref. page 8 )
-
TROUBLESHOO
TING
TROUBLESHOOTING
TABLE 2 - PROBLEMS TO THE CONNECTION DATA LINK
PROBLEMS
Non e of the
D O WN T O WN
COLORS 1800
respon d to the
con troller .
On e or more
D O WN T O WN
COLORS 1800 do
n ot respon d to the
con troller or do it
wron gly.
PROBABLE
REASONS
CONT ROLS
SUGGEST ED
SOLUT IONS
Wrong configura tion.
Ma ke sure tha t
OPT IONS M A S t ,
S L A V , F V A L and
d I A G a re disa bled.
Disa ble OPT IONS
M A S t, S LA V , F V A L
and d I A G .
DMX controller
disconnected from the
projectors.
Check if the
Connect properly the
connection of the DMX DMX controller.
controller to the first of
the DOWNT OWN
COLORS 1 8 0 0 is
correct.
Interrupted connection
ca ble from the DMX
controller to the first
DOWNT OWN
COLORS 1 8 0 0 .
Use a n a lrea dy tested
ca ble a nd connect
one projector per time,
until the interrupted
ca ble is found out.
Pin 2 a nd 3 of the
connector of the
connecting ca ble a re
inverted.
Use a n a lrea dy tested
ca ble a nd connect
one projector per time,
until the ca ble in short
is found out.
Connecting ca ble in
short circuit.
Use a n a lrea dy tested
ca ble a nd connect
one projector per time,
until the interrupted
ca ble is found out.
Wrong DMX a ddress.
Check if the DMX
a ddress of the
projector corresponds
to the DMX cha nnel of
the controller.
Configure properly the
DMX a ddress.
One projector ha s a
defective DMX pc
boa rd.
Use a n a lrea dy tested
ca ble a nd exclude one
projector per time from
the line, until the one
with the defective DMX
pc boa rd is found out.
Repla ce the defective
DMX pc boa rd.
T he DMX line ha s not
a DMX termina tor.
Check if on the la st
projector there is a
DMX termina tor.
Put a DMX termina tor
on the la st projector
(pa ge 9 ).
DOWNTOWN C. 1800
CODE 991251
18
Repla ce the DMX
ca ble.
TROUBLESHOO
TING
TROUBLESHOOTING
PROBLEMS
In MAST ER an d
SLAVE mode, the
projectors are n ot
syn chron ized.
In MAST ER an d
SLAVE mode, the
projectors execu te
the same
programme bu t do
differen t thin gs.
PROBABLE
REASONS
CONT ROLS
SUGGEST ED
SOLUT IONS
T he first projector is
disconnected from the
others DOWNT OWN
COLORS 1 8 0 0 .
Check that the
connection of the first
DOWNT OWN
COLORS 1 8 0 0 is
correct.
Connect properly the
projectors.
Interrupted connection
cable from the DMX
controller to the first
DOWNT OWN
COLORS 1 8 0 0 .
Use an already tested
cable and connect
one projector per time,
until the interrupted
cable is found out.
Replace the DMX
cable.
Pin 2 and 3 of the
connector of the
connecting cable are
inverted.
Use an already tested
cable and connect
one projector per time,
until the defective
cable is found out.
Connecting cable in
short circuit.
Use an already tested
cable and connect
one projector per time,
until the cable in short
circuit is found out.
OPT ION F V A L on.
Check that OPT ION
F V A L is off.
DOWNTOWN C. 1800
CODE 991251
19
Disable OPT ION
F V A L.
TROUBLESHOO
TING
TROUBLESHOOTING
GENERAL ELECTRICAL DIAGRAM
DOWNTOWN C. 1800
CODE 991251
20
MAINTENANCE
For operating a correct maintenance of the DOWNTOWN COLORS 1800 follow these instructions:
1) periodically clean the in/out air gratings;
2) periodically clean the lenses and the dichroic filters using antistatic cloths and products.
To do this operation on the diachroic filters room, unhook the 4 hinges placed on both sides of the projector
head cover (fig. 1, page 5).
! The protective screen and the dichroic filters must be replaced if damaged. Deep slits and cuts greatly reduce
their performance.
! Do not absolutely use solvents or abrasive products.
APPENDIX “
A”
“A
5 CHANNELS CONFIGURATION
The DOWNTOWN COLORS 1800 needs 5 channels to control its functions.
DMX channels functions complete list (ref. page 16).
D MX
CHANNEL
FUNCT ION
1
CYAN
2
YELLOW
3
MAGENTA
4
SHUT T ER
DIMMER
LAMP CONT ROL
5
DOWNTOWN C. 1800
CODE 991251
DESCRIPT ION
WHIT E
CYAN
CYAN FILT ER
DECIMAL
PERCENTAGE
0 0 0 ..0 1 0
0 1 1 ..2 5 5
0 0 %..0 4 %
0 5 %..1 0 0 %
0 0 0 ..0 1 0
0 1 1 ..2 5 5
0 0 %..0 4 %
0 5 %..1 0 0 %
0 0 0 ..0 1 0
0 1 1 ..2 5 5
0 0 %..0 4 %
0 5 %..1 0 0 %
SHUT T ER DIMMER
CLOSED
ADJUSTABLE
OPEN
0 0 0 ..0 1 0
0 1 1 ..2 4 0
2 4 1 ..2 5 5
0 0 %..0 4 %
0 5 %..9 4 %
9 5 %..1 0 0 %
LAMP
KEEP T HE PREVIOUS STAT US
LAMP OFF AFT ER 1 0 s.
KEEP T HE PREVIOUS STAT US
LAMP ON
0 0 0 ..0 2 4
0 2 5 ..0 6 3
0 6 4 ..1 9 1
1 9 2 ..2 5 5
0 0 %..0 9 %
1 0 %..2 4 %
2 5 %..7 5 %
7 6 %..1 0 0 %
WHIT E
YELLOW
WHIT E
MAGENTA
YELLOW FILT ER
MAGENTA FILT ER
21
NO
TES
NOTES
DOWNTOWN C. 1800
CODE 991251
22
Rev. 12/2005
Working to make its products always more perfect, LED reserves the possibility to make technical changes during the production.
on this manual are not binding for LED and they could be changed at any time without notice. LED it is not responsible for any
different use of the unit respect to the one for what it has been made.
The technical features and the drawings
inconvenience caused by an improper or