1
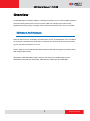
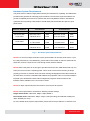
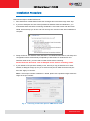
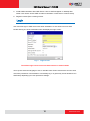
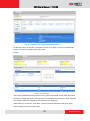
ACTi Central Management System User’s Manual Version 1.1.05.06 2012/10/12 CMS User’s Manual 1.1.05.06 Table of Contents 1 Overview 5 Software Architecture .................................................................... 5 2 Installation 6 Requirements ................................................................................. 6 Operating System .......................................................................... 6 Hardware System Requirements ................................................... 7 Upgrading ...................................................................................... 8 NVR Servers..................................................................................... 8 Installation Procedure .................................................................... 9 Login ............................................................................................. 10 Licensing ....................................................................................... 11 How does activation work ............................................................ 11 Activation Flow ............................................................................. 11 Online Registration....................................................................... 13 Offline Registration (Through ACTi website) ................................ 13 3 Setting up CMS 16 Importing NVRs and Cameras as Media Sources .......................... 16 Setup Cameras .............................................................................. 18 Setup Events ................................................................................. 19 Set the Event Rules ..................................................................... 20 Copy the Event Rules .................................................................. 22 Delete the Event Rules ................................................................ 22 Live view PTZ 24 Switch among Channels 24 Turn On / Mute the Audio 24 Setup User Groups and Users ....................................................... 24 User Groups................................................................................. 24 Users............................................................................................ 25 Setup Groups ................................................................................ 26 Setup Layouts ............................................................................... 27 2 www.acti.com CMS User’s Manual 1.1.05.06 Setup Joystick ............................................................................... 28 Setup View Tours .......................................................................... 29 Setup Language ............................................................................ 30 Setup System ................................................................................ 31 Setup Map .................................................................................... 32 4 Live View 33 Full Screen ................................................................................... 34 Manual Snapshot ......................................................................... 34 Manual Record ............................................................................. 34 Disconnect Channel / Disconnect All Channels ........................... 34 Manual Trigger DO1 ..................................................................... 35 Talk and Broadcast ...................................................................... 35 Audio Control ............................................................................... 35 PTZ Panel .................................................................................... 35 Preset Layout ............................................................................... 37 Layout Tour................................................................................... 37 System Monitor ............................................................................ 38 Exporting logs .............................................................................. 40 Hotkeys ........................................................................................ 40 5 Playback 41 Layout Styles................................................................................ 41 Time Based Search Bar ............................................................... 42 Searching Recorded Files ............................................................ 43 Snapshot Search ......................................................................... 44 Playback by Directly Opening File ................................................ 45 Full Screen ................................................................................... 45 Manual Snapshot ......................................................................... 46 Disconnect Channel / Disconnect All Channels ........................... 46 Audio Control ............................................................................... 46 Playback Control Panel ................................................................ 46 Synchronous Playback ................................................................. 48 Open file/Drag-drop channel ........................................................ 48 Finding your time and Synchronize .............................................. 49 Sync Main and Sync Follower ...................................................... 50 3 www.acti.com CMS User’s Manual 1.1.05.06 6 eMap Viewer 51 Overview ...................................................................................... 51 Full Screen ................................................................................... 52 Map Link ...................................................................................... 52 4 www.acti.com CMS User’s Manual 1.1.05.06 Overview Central Management System (CMS) is a software that allows user to control multiple Network Video Recording (NVR) servers for an overview. CMS can manage large scale security deployments involving many recording servers. This manual will show you how to use CMS. Software Architecture CMS consists of server, workstation and Web Client. Server and Workstation can be installed on the same or separate PCs. Web Client is hosted on the server and can be accessed from any PC with Internet Explorer 8.0 or 9.0. Server: CMS server provide authentication and direct data flow throughout the network along with multiple NVR servers. Workstation: CMS Workstation allows users to view video from multiple NVR servers. Workstation is divided into CMS Setup, CMS Monitor, CMS Player and CMS Map. 5 www.acti.com CMS User’s Manual 1.1.05.06 Installation Requirements Operating System OS Version Windows Vista 32 bit 64 bit Ultimate sp1 Y Y Enterprise sp1 Y Y Business sp1 Y Y Standard sp2 Y N/A Enterprise sp2 Y N/A Professional sp3 Y N/A Standard Y Y Enterprise Y Y Professional Y Y Windows Server 2003 Windows XP Windows Server 2008 Windows 7 Fig. 1 Operating System Requirements Notes: 1. Please be sure to apply all service packs and OS patches. 2. For 64 bit CMS systems, 64 bit Internet Explorer is not supported. Please use 32 bit Internet explorer. 3. Windows XP SP2, Windows Vista Home and Windows 2000 are not supported 4. Only 32 bit IIS server is available for Windows 2003 64 bit version. If you need to install CMS on Windows 2003 64-bit, please contact our Customer Helpdesk through http://www.acti.com/support/case/index.asp for support on the settings. 5. CMS supports Internet Explorer 8.0 or 9.0 . 6. User must first install IIS Server before installing CMS server. 6 www.acti.com CMS User’s Manual 1.1.05.06 Hardware System Requirements The performance of CMS is largely determined by the hardware PC capability. The table below provides basic guideline for selecting proper hardware. The minimum required hardware will provide acceptable performance for systems that use mostly MPEG4 streams. Surveillance systems that use primarily H.264 streams should satisfy Recommended PC Spec for good performance. Channel numbers 1-16 channels 17-64 channels PC Spec CPU Memory CPU Memory Server PC with Local Client Intel Core 2 Duo 4GB Intel Core i7-920 6GB 2.66 GHz 32-bit RAM 2.67 GHz 64-bit RAM Server PC without Local Client Intel Core 2 Duo 4GB Intel Core 2 Duo 4GB 2.4 GHz 32-bit RAM 2.4 GHz 32-bit RAM Remote Client PC Intel Core 2 Duo 4GB Intel Core i7-920 6GB 2.66 GHz 32-bit RAM 2.67 GHz 64-bi RAM Fig. 2 Hardware System Requirements NOTE: Live view for multiple channels require good hardware for smooth performance. If your live view performance is not satisfactory, please reduce the number of channels viewed at the same time, and use Layout Tour to scan through all the channels instead. NOTE: When CPU power is not enough to provide smooth live view, CMS will decode only one frame per second to save computing power. This is done to ensure that recording is always properly processed. In extreme cases, like when viewing 64 Megapixel H.264 video streams at the same time, PC will be overloaded and CMS will stop operation. This is a common limitation imposed upon all Windows based video management programs. Enhancement for this limitation will be available in the next version of CMS. NOTE: PC Spec requirements are the same for 32-bit and 64-bit systems. NOTE: These specifications are based on following camera settings: Single stream mode: 1280x1024, 3Mbps, 18fps, MPEG-4 Dual stream mode: 1280x1024, 3Mbps, 18fps, H.264 (recording) and 640x480, Quality100, 18fps, MJPEG (live view) For more details about system requirements, please refer to Project Planner on www.acti.com 7 www.acti.com CMS User’s Manual 1.1.05.06 Upgrading If your PC has previously installed CMS, please follow these steps: For CMS 1.0 or earlier, please uninstall both CMS Server and Microsoft SQL 2005. Your Old database will be cleaned and no previous data will be kept. If you are installing a newer version of CMS 1.1, you can just install the newer version over the existing one. The files will be automatically updated, and the existing data will be kept in the database. NVR Servers Only NVR Enterprise server 2.3.05.11 or later versions are compatible with CMS 1.1.05. Please upgrade your NVR Enterprise server program to 2.3.04.07 then install the 2.3.05.11 patch. NVR Professional and NVR Enterprise older versions are not compatible. If you are not sure or your NVRs’ current version, please go to www.acti.com to download the latest version of NVR, including patches. CMS uses a separate workstation client. NVR workstation cannot connect to CMS. CMS and NVR servers can coexist on the same PC except for Windows XP. CMS and NVR Servers located on the same computer must use different HTTP ports, as configured during the installation. Be sure to correctly configure all port forwarding and firewalls to allow both servers proper network access. Because Microsoft Windows XP can host only one website in IIS, CMS and NVR cannot be installed on the same computer. 8 www.acti.com CMS User’s Manual 1.1.05.06 Installation Procedure Follow these steps to install CMS server: 1. Run CMS Server Install Shield. Follow the messages and click next through each step. 2. If you have UAC(User Access Control) enabled in Windows Vista and Windows 7, you must disable UAC first before continuing. TweakUAC is a tool that comes with the install shield, which will help you to turn UAC off. You may turn it back on later after installation is complete. 3. Setup IIS Server. For Windows Vista, Windows 7 and Windows 2008 Server, IIS Setup and configuration will be automatically completed by install shield. For windows XP and Windows 2003 server, you will need to install IIS first before continuing. Please follow the document “How to Setup IIS server” before continuing install. 4. If your default HTTP port 80 is already in use, either by a copy of NVR Server or other website, a dialogue will pop up for you to select a new port for CMS. Enter the new port and click “Apply” to continue. Note: A normal port number is between 1~65535, please use a positive integer within this range as the port number. Fig. 3 Choosing a new HTTP port for CMS Server in IIS 9 www.acti.com CMS User’s Manual 1.1.05.06 5. Install CMS workstation after CMS Server. Links to CMS will appear on desktop after install. User need to access CMS via either workstation or web client to continue setup. 6. Register License (See Licensing section. Login User must first login to CMS server with either workstation or web client to access CMS. Double clicking one of the workstation links will display the login screen: Fig. 4 Login Screen The default login User Account and Passwords are: Admin/123456 You may also select the language to use on interface here. Please note that the account used must have permission in that module to successfully log in. A guard may not be allowed to use CMS setup depending upon user permission settings. 10 www.acti.com CMS User’s Manual 1.1.05.06 Licensing CMS Server is licensed per number of NVR servers (sources) managed. Each additional NVR server requires one license. License codes are purchased through our sales representatives. Contact your distributor for purchase info. How does activation work During license activation, your license key is matched against the MAC address on the Network Interface Card (NIC) on your computer. This MAC address is used as the Machine Key. This matching record will be stored on the ACTi web server. If your computer has more than one network card, only the network card with the smallest MAC address will be used. If your Server PC has multiple network cards, you will need to disable the extra network cards which you do not intend to activate. Please refer to the support document “How to Disable and Enable Multiple Network Cards” on ACTi Knowledge base website for more information. Activation Flow You may activate this license either online or offline. Online Activation Requires Internet access from CMS Server. ACTi Website CMS Setup Membership ID in ACTi Member Center is required for activation. Register one for free at http://member.acti.com/ Go to Setup System License. Select “Online Registration”. Enter your license key, member ID and password, click “Apply”. Done! 11 www.acti.com CMS User’s Manual 1.1.05.06 Offline Activation: Does not require Internet access from Server. It is used when Server is located in network not connected to public internet. ACTi Website CMS Setup Membership ID in ACTi Member Center is required for activation. Register one for free at http://member.acti.com/ Go to CMS Server PC and log in via CMS Setup. Setup System License. Select “Offline Registration”. Record the MAC address shown. ACTi Website Connect to www.acti.com. Go to Support Customer Services License Registration. Select your product to register. ACTi Website Enter your License Key and the MAC Address (Machine Key). Click “Submit” to generate activation code. Mailbox CMS Setup An email with activation code file (.lic) will be sent to your registered email. Transfer this license file to the Server PC. Go to CMS Server PC and log in via CMS Setup. Setup System Offline Registration click “Import Activation Key” and select the license file. Click “Apply” to activate this license. Done! 12 www.acti.com CMS User’s Manual 1.1.05.06 Online Registration This is the recommended and easiest way to activate CMS on your PC. You will need to have Internet connection to activate this way. Please log into CMS with CMS Setup, click on the Setup System symbol and then click on the license tab. Fig. 5 License Registration Click the Online Registration on the horizontal menu under the tabs. Make sure your computer is connected to internet and enter the License Key. Click Apply to connect to Registration Center. Your License Key and MAC address (CMS automatically reads the Network card with the smallest MAC Address number on your PC) will be recorded. You will need to enter your ACTi Member ID for successful registration. Offline Registration (Through ACTi website) If your PC cannot connect to the Internet (e.g. in a high security military base), then you should activate offline. You may obtain an activation key from ACTi website with another PC that has internet connection, and activate your CMS license on the server PC off-line. 1. If you do not have one yet, you must register a Member ID in the Member Center for successful registration. http://member.acti.com/ 2. Go to ACTi Website, Support and enter License Registration to find “CMS Software Registration” page under the Support tab. 13 www.acti.com CMS User’s Manual 1.1.05.06 Fig. 6 CMS Registration Website 3. Enter your license key and MAC address (you need to record the MAC address you’re your server PC beforehand) 4. Make sure the MAC address shown is correct. 5. Click “Submit” to generate your Activation code file. It will be emailed to your member email as an attachment. 6. Download the activation code file and transfer it to the CMS server PC. (Via USB disk or other channels.). Fig. 7 Loading the .lic activation key file 7. Go to CMS Setup -> License tab. Select “Offline Registration” and click “Import Activation Key”. Load the .lic file from the email attachment into CMS Server. 8. Click “Apply” to finish registration 14 www.acti.com CMS User’s Manual 1.1.05.06 Fig. 8 License added to CMS Server 15 www.acti.com CMS User’s Manual 1.1.05.06 Setting up CMS Importing NVRs and Cameras as Media Sources CMS is about managing NVR servers (Sources). The first thing you should do after you have registered license is to setup your NVR connections in CMS Setup. Fig. 9 CMS Setup – Setup Source Screen 1. Click New to add another NVR as new media source. 2. Input the information of the NVR you wish to add. Type in the IP address, port number, user account and password. All this information is fundamental for CMS to access the NVR. 3. Confirm the information by clicking the “Get NVR Setting” button below. 4. CMS system will detect and obtain other settings from NVR server automatically. If the information that shows up is correct, click “Apply” to finish. 16 www.acti.com CMS User’s Manual 1.1.05.06 Fig. 10 NVR Source info 5. If the information is correct, you will see the button “Sync with NVR” appear to the right of “Get NVR Setting”. That means your CMS has established connection with this NVR and imported the device list already setup in NVR server. Later on, when you need to sync with an existing NVR, simply click “Sync with NVR”. Note: Whenever you change the data in an NVR’s Basic Settings, including Name, IP, HTTP Port, User Account or Password, you need to click “Get NVR Setting” to rebuild the connection. 6. You will see a message notifying if the device has been successfully imported. The imported devices will be listed in your device tree. Fig. 11 Camera Import Success 17 www.acti.com CMS User’s Manual 1.1.05.06 Fig. 12 Camera listed in Device list 7. Repeat for all NVR servers. Please note you may need to add more licenses to gain access to more NVR servers via CMS. 8. You may also delete the NVR server by selecting one NVR then clicking “Delete” button on the tab. Setup Cameras Cameras are managed and configured in NVR Servers. CMS refers to settings in NVR but does not change them. To perform detailed changes, please go to NVR workstation / webclient or use the web configurator to directly connect with camera devices. The following measures are available for CMS: 1. Browse Camera Basic settings 2. Synchronize the selected camera from NVR with CMS. 3. Configure Dual Stream Settings for Default Live View 4. Configure PTZ settings To access individual cameras, you should first sync with NVR: 1. Select the NVR you wish to access, click “Sync with NVR” then select individual camera. 18 www.acti.com CMS User’s Manual 1.1.05.06 Fig. 13 Camera Setting through CMS Setup 2. Click on “Get Device Setting to see camera live view”. For PTZ settings, it is necessary that you first import and perform “Get Device Setting”. Then you can enable or disable PTZ from CMS Setup afterwards. Using PTZ file is restricted to Workstation, CMS Web Client does not allow for PTZ setup in CMS. 3. For cameras that support dual stream, the Dual Stream Settings will appear under the Device Description Setting area. Selecting the Live View Stream will determine which stream to receive from NVR Server. Selecting a smaller live stream has the benefit of reducing bandwidth requirement, while keeping high quality video recording on NVR. Setup Events As each NVR server individually manages the events on the site, the triggered responses would take place to notify NVR clients in various forms of actions. Under CMS management, an event detected by a single device can be additionally notified to CMS clients. For example, once a camera detects a motion, both NVR client and CMS client would be altered by a pop-up live view window. To have CMS be notified with the events from cameras, please set up event rules in CMS Setup page. The event rules set here will be independent from those you set for NVR clients. 19 www.acti.com CMS User’s Manual 1.1.05.06 NOTE: Event responses will only be triggered when the trigger time falls within either the “Scheduled” Recording or the “Event with Streaming” Recording period. There must be video stream from device when the event happens for event responses to work. Please configure the device’s schedule on NVR side, so that the event rules set on NVR or CMS would take place. Set the Event Rules 1. Before editing the event rules on CMS, it is suggested that you first sync with NVR to retrieve the current devise settings. Go to CMS Setup page → Setup Source. Select the NVR you wish to access, click “Sync with NVR”. 1 2 3 Fig. 14 Camera Setting through CMS Setup-sync with NVR 2. In Server Tree, select the individual device, then enter Event Manager tab. 5 4 1 Fig. 15 Camera Setting through CMS Setup-sync with NVR 20 www.acti.com CMS User’s Manual 1.1.05.06 3. Having synced with NVR, CMS server now gets the current properties of each device. On Event List will display the available event rules this device supports, and the event names you set on NVR. The Action column displays the active status of each event rule. Since the event rule entries provided here are separate from those for NVR, they are by default unchecked since you haven’t assigned a response to any of them. After selecting the event rule entry, check the Action box to enable the response items. When finish the settings, click “Apply” on the top to save them. 9 6 7 8 Fig. 16 Camera Setting – Event Manager Below are the descriptions of each item: 1. Action: Check this box to enable the following responses. Existing settings are still kept if you disable action responses by clearing the checkbox. The settings will be grayed out as a result. 2. Beep for __ Seconds (1-999) __ times (1-999): Click to setup CMS to beep upon event. User can also select how many times does it beep and the duration of each beep. 3. Play Audio File for __ times (1-999): Click to setup CMS to play your desired audio file for a number of repetitions. User can enter the path of the audio file on the CMS Workstation computer to be played. Please note that you may either beep or play audio file, but cannot do both at the same time. NOTE: Please make sure the path of audio file is correct. NOTE: Play Audio File function only works on CMS Workstation computer with the audio file, not on Web Client. 21 www.acti.com CMS User’s Manual 1.1.05.06 4. Don’t beep: Click to disable beep function of NVR. 5. Hot-Spot Window Dwell Time __ Seconds(1-999): Click to display video from the camera on Hot-Spot window upon event. (The upper left main preview window in CMS monitor). You may also select the duration for the video to display on the Hot-spot window. 6. Pop-up Window Dwell Time __ Seconds(1-999): Click to display video form the camera on the event pop-up window upon trigger. You may also select the duration for video to be displayed in the Pop up window. Please note that you may activate either the Hot Spot window or the Pop-up window, but not both at the same time. 7. None: Click here to disable both Pop-up and Hot-Spot windows. Copy the Event Rules You may apply an event rule setting to all the devices managed under the CMS server. 1. Go to CMS Setup page → Setup Source. In Server Tree, select the individual device, enter Event Manager tab, and click Copy Setting. Fig. 17 Camera Setting– Copy Event Settings 2. A Copy Setting window will pop up for you to set the target devices. You may first select the target NVRs, then the target cameras. By default, the Target NVR and Target Camera fields will select all. When finished, click “Apply” to save the settings. Delete the Event Rules To delete a rule, simply select it from the Event List, and then click “Delete” on the top. 22 www.acti.com CMS User’s Manual 1.1.05.06 Pop-up Event Window If you have enabled the “Pop-up Window” response for a device’s event rule, an instant live window will pop up upon the event’s occurrence. As your Internet Explorer Pop-up Blocker will take it as a normal unwanted Ad, please choose “Always allow” to allow the pop-ups from your CMS client window when Pop-up Blocker prompts to ask. Or you may add the CMS server site to Pop-up Blocker’s allowed sites: On Internet Explorer, go to Tools → Pop-up Blocker → Pop-up Blocker settings, then add the CMS server IP address to Allowed sites list. Fig. 18 Windows Pop-up Blocker settings The pop-up event window displays the NVR server name, Device name, Event name, Dwell Time, and current live view. As the dwell time countdown timer is over, this window will close. Fig. 19 Pop-up Event Window 23 www.acti.com CMS User’s Manual 1.1.05.06 Live view PTZ If this device supports PTZ function, you may execute mouse PTZ over the live view. Put the mouse cursor over live view to bring up the on-screen PTZ buttons. Fig. 20 Pop-up Event Window - PTZ Switch among Channels If other events occur before this pop-up window event’s dwell time is over, they will be listed below the first event entry. You may click any entry to see the channel live view. An entry will be removed from the list once its dwell time is over. A selected entry can be removed manually by your clicking “Close” button. Turn On / Mute the Audio By default, the audio signal streamed with live view video is disabled. You may click “Mute Off” button to enable it or “Mute” to disable it. Setup User Groups and Users User Groups User Groups are the roles where different levels of permissions are defined. User Group only defines the functions available. You may define which servers these functions apply to in both the “Users” and the “groups” section. There are four default User groups representing four different access levels. They are Administrator, Supervisor, Standard User and Guest. 24 www.acti.com CMS User’s Manual 1.1.05.06 Fig. 21 Setting access Rights for Administrator To add new groups, click “New” on the top of screen. Click “Apply” once you’ve selected all functions you wish to enable for this user group. Users Fig. 22 User Screen Users are the individual accounts used for every person who would access CMS. Each User belongs to a single User Group, and has access to multiple Groups of servers. Each User has one Default Layout that is displayed automatically when logging in. When setting up a new user, Click “New”, enter the required information then click “Apply”. Select existing User from the list to edit. 25 www.acti.com CMS User’s Manual 1.1.05.06 Setup Groups CMS system manages multiple NVRs and multiple users. Group is a unit that contains the NVRs and Users that may interact with each other. All NVR Servers must belong to at least one group. All NVRs belong to the default group when first added into CMS system. You may select additional groups for this NVR server to belong to. We should first create a new group. 1. Go to CMS Setup -> Setup System -> Group. 2. Select “New” and type in group name and description. Click “Apply”. Fig. 23 Adding new group After the new group is added, it will be shown in the Group List below. Fig. 24 Group List (Scroll Down to find) ❶ ❷ Fig. 25 Sources and Users 26 www.acti.com CMS User’s Manual 1.1.05.06 On the group list, you can highlight certain group and start configuring the group setting. ❶ Source List The Source List will display all the connected NVRs. When highlighting certain NVR, the cameras in that NVR server will be shown in “Device in Source”. You can select NVRs that this group is allowed to access by checking their boxes, and also select which cameras in that NVR can be seen. ❷ All Users Display all the users created in the CMS. Users available in this group may be added by selecting the target source or user and clicking the “Add to Group” button. You may remove the users by selecting the already added ones on the right and click “Remove from group”. Admin is always added in the User section by default. Click “Apply” to confirm settings. Setup Layouts This section describes how to setup view layouts. View layouts are predefined arrangements of cameras in a single screen. Each screen may contain multiple cameras, and the location of each camera in each layout can be configured. Users can select cameras from different NVR servers to use in a single layout. Fig. 26 View Layouts Setup Screen Click on the “New” button to create new layout. Enter the Layout name and choose the number of channels to view in the Layout Style. The drop down list of layout styles will include 1, 4, 9, 16, 36, 49, 64, 6 (1+5), 8 (1+7), 6 (3x2) and 12 (4x3). Default will be 4. 6 (3x2) and 12 (4x3) are layout styles provided for widescreen monitors. 27 www.acti.com CMS User’s Manual 1.1.05.06 Setup Joystick Joystick Setup is available only via CMS workstation, and not allowed through Web Client. Two brands of joysticks are supported by CMS. Logitech and IP Desktop. Both are configurable with short cuts in the 12 buttons available. Fig. 27 Setup Joystick 28 www.acti.com CMS User’s Manual 1.1.05.06 Setup View Tours View Tours are a predefined sequence of view layouts that will be displayed in the CMS Monitor. It is useful when you need to monitor a large number of channels and also want enough detail in each view. Make sure you configure View Layouts correctly before setting up View Tours. Fig. 28 Setting up View Tours Create a new tour by clicking the “New” button. Add each Layout to view in sequence, and define the number of seconds in that view in “Dwell Time” field. View tours are Tied to Groups. A single view tour cannot have layouts that extend beyond one Group. To have wider access, define a larger group to include more NVRs, and control access to this super-sized group in user settings. 29 www.acti.com CMS User’s Manual 1.1.05.06 Setup Language This section describes how to translate and modify the embedded texts through the language section of CMS. Fig. 29 Setup language This section describes how to translate and modify the embedded texts through the language section of CMS. The default will be English. The functions include: 1. Language Support Setting: Select which language to use in CMS system 2. Translate and Modify Language: Provide interface for translating and modifying language file contents. 3. Import and Export Language: System also provide user with an interface to import and export language files. This function is not available to Web Clients. 30 www.acti.com CMS User’s Manual 1.1.05.06 Setup System This section includes some additional detail settings. Fig. 30 Setup System 1. Enabling OSD-[FPS] will display the frame per second on each channel screen. 2. Enabling OSD-[Identification Name] will show the name on each channel screen. 3. Show Motion Region in CMSMonitor will enable the area with motion settings to be marked by a red frame in live view. 4. Decode I setting section allows user to customize the level at which lower frame rate is adopted to keep PC from overloading with multiple video stream workload. 5. Workstation Setting concerns the export path where video, snapshots or logs either manually or automatically exported from CMS are stored. 6. Title Display determines the format to show each channel in CMS view. 31 www.acti.com CMS User’s Manual 1.1.05.06 Setup Map This section is available only to workstation run on the same PC as CMS server. Fig. 31 Adding Map Click Add Map to add more map to CMS eMap Viewer. Each map must belong to one NVR. You may upload image file to use as background. You must first have a map in your system to see add camera / delete camera functions. Map image must be .JPG or .PNG. Each NVR site can have more than one map. Images larger than 1920 x 1080 may not display properly due to Internet Explorer limitation. You may add cameras onto the map area by clicking the add camera button. A list of cameras will be shown, and you can check the checkboxes to select which ones to add. An icon will be placed over the map image, which you may drag and drop to desired location. You may also add map links to open another map in eMap Viewer. 32 www.acti.com CMS User’s Manual 1.1.05.06 Live View CMS Monitor provides live view, PTZ control and Event Panel from which to control the whole surveillance system. Fig. 32 Live View in CMS Monitor To the left of Live View section is the Server Tree, where you can see the NVR servers and individual cameras while to the right is the live view area. The main difference between CMS Monitor and Active Monitor from NVR is the Event Panel. In CMS the Event Panel has been moved down to allow for more detailed display. Fig. 33 Event Panel Fig. 34 Layout Selection User may select the desired layout style in CMS Monitor. The two yellow-tabbed layouts are specially designed for wide screen panels. The upper left window in the layout is always the hotspot window. If CMS needs to send one video to hotspot, that channel will take this display 33 www.acti.com CMS User’s Manual 1.1.05.06 position. You may drag cameras from the server tree and drop it on the window you prefer. You may also first click on the preferred view window then double click on the camera you wish to display. The tile bar over each channel displays useful basic information concerning the video. Full Screen Clicking on this button or press CTRL-F12 brings the video to full screen mode. Press ESC or press CTRL+F12 again to restore to original mode. Preview Tour and Mouse PTZ can still operate freely in full screen mode. Digital Zoom is disable in full screen mode. Manual Snapshot Click on this button or press CTRL-F7 to take a manual snapshot of the current channel. The snapshot file will be saved to local PC where the workstation is currently running from. Default file path is: $Desktop\CMS_Data\Manual Snapshot\Source<source id>_Channel<NVR camera id>_<YYYYMMDDHHMMSS_MS>_M.jpg/bmp A message stating “Snapshots saved to location:[destination path]” will be displayed at the bottom of window. Manual Record Click on this button to start Manual Recording. Recording will stop when you click the manual record button again, or the pre-defined manual record duration on NVR server is up. You can configure manual record duration in NVR -> Active Setup -> System Setup -> Storage Management. The video is recorded on NVR server, not CMS server or client. Both NVR and CMS will be able to search for this recording. A red indicator will light up on the top right video title bar when under recording. Disconnect Channel / Disconnect All Channels 34 www.acti.com CMS User’s Manual 1.1.05.06 Clicking on the single camera button will disconnect the currently selected channel. Clicking the button on the right will disconnect all video channels. Manual Trigger DO1 Clicking this button will trigger the Digital Output of currently selected camera. Click again to change the DO status back. Talk and Broadcast Clicking the button on the left enables the talk mode. Clicking it again ends the audio transmission. This is one to one only. Click the button on the right to broadcast to all audio transmissions. Broadcast is one to many. Audio Control Click this button to enable, disable or tune volume of audio from device. Default is mute on. PTZ Panel Fig. 35 Active Monitor - PTZ Panel 1. OSD: Click here to open On Screen Display for devices that use OSD menus. 2. Digital Zoom: Enable the Digital Zoom function for this device. You may zoom in, zoom out and perform digital pan/tilt with this channel. You must zoom in first with Digital zoom to 35 www.acti.com CMS User’s Manual 1.1.05.06 perform digital PTZ. 3. Mouse PTZ: Enable PTZ control by mouse on the preview screen. Available only for PTZ cameras. When you perform Mouse PTZ, your cursor icon will change with your position in view. Depending upon its position on screen, the PTZ camera will Pan/Tilt with different speed or zoom in/out. The below overlay image shows some of the possible cursor images. Fig. 36 PTZ Panel - Mouse PTZ 4. Tour: Select PTZ Preset Tour from this drop down list. You can setup the Preset tour for each camera in Camera Setup. 5. Control Pad: Click on this wheel to control PTZ movements. 6. Zoom In/Out: If the camera has controllable zoom, this will zoom the lens in or out. 7. Focus In/Out: If the camera has controllable focus, this will shift the focus of the camera. Please note that if you use manual controlled focus, then auto-focus has to be disabled on the camera side via web configurator. Otherwise the camera will return to the auto-focus value once you finished the focus command. 8. Iris In/Out: If the camera has controllable iris, this will modify Iris level. 9. Pan: Set the Pan speed of the control pad. 10. Tilt: Set the Tilt speed of the control pad. 11. Goto: Go to a preset point. Just select the target from the drop down list. You must first setup the preset point through NVR to use this. 12. Action: If you have special PTZ commands entered here, you may select from the drop down list to issue that particular command. 36 www.acti.com CMS User’s Manual 1.1.05.06 Preset Layout Select the layout you wish to view from the drop down list on the top right corner. You must define the layout in setup before using this function. Layout Tour Click this button to select Layout Tour sequence to run. You can select cancel to stop current layout tour. You must first define layout and layout tour before using this function. Event Panel Fig. 37 Event Panel CMS keeps track of events logged by NVR servers it connects to. The events must be configured on each NVR server to be recorded. Whenever an event happens, an additional line will appear at the top of the Event list. You can filter incoming events by Event source or Event type. Just select from the drop down list and click “Filter”. Events already in the Event list are not affected. Clicking on an event entry will bring up the event dialogue window for that instance. 37 www.acti.com CMS User’s Manual 1.1.05.06 Fig. 38 Event Dialogue Window The event dialogue window will initially show the live view. Click either Live View or Playback button above the image to see related video. Note: Since this event dialogue window appears as an auto-popup window, please make sure your Internet Explorer allows pop-ups from your CMS site. There are two methods to do so: 1. Turn off the Pop-up Blocker of Internet Explorer Open Internet Explorer, go to Tools ->Pop-up Blocker, and click “Tune Off Pop-up Blocker”. 2. Make your CMS site one of the Pop-up Blocker’s allowed sites Open Internet Explorer, go to Tools ->Pop-up Blocker, and click “Pop-up Blocker Settings”. Input the address of your CMS site into the column “Address of website to allow:” and click “Add”. System Monitor Click on this button to see the system logs recorded. 38 www.acti.com CMS User’s Manual 1.1.05.06 Fig. 39 System Monitor On the top there are two tabs for CMS and NVR. You may choose to see logs in CMS or in more detailed search in each NVR. Searching the NVR log will provide file paths in that NVR for related entries. There are many filters you may apply to narrow down the choice to what you need. There are many types of logs recorded. You can get better detail by selecting the target type in the Catalog drop down menu before clicking “Search”. Fig. 40 System Monitor CMS Log Catalog choices 39 www.acti.com CMS User’s Manual 1.1.05.06 For NVR, you may select Record, event or user operation as your log type filter. Fig. 41 NVR Log type filter Exporting logs For CMS Logs, you may export them to your local drive by clicking on the Export button beside Search button after searching. The default export log path will be $Desktop\CMS_Data\System Monitor\Exportlog.xls Hotkeys CMS provides many keyboard shortcuts. Here’s a list of the available hotkeys. Keyboard Shortcut F5 Description Refresh. This will restart the application session, and starts from login page. Ctrl+F6 Toggle Video display stretch Ctrl+F7 Create snapshot Ctrl+F8 Toggle start / stop tour. Ctrl+F9 Show / hide camera tree panel Ctrl+F10 Cancel auto-login mode during login Ctrl+F11 Show / hide title bar Ctrl+F12 Toggle full-screen mode ESC Cancel full-screen mode; return to normal mode. This function is only valid in full-screen mode 40 www.acti.com CMS User’s Manual 1.1.05.06 Playback CMS Player is the module that processes recorded clips. You may search, playback and export video through CMS Player. You may search by time period, by snapshot, by time bar and by event. Playback may include up to 4 channels synchronized playback or up to 36 individual clips. Video clips may also be exported in either RAW or AVI formats. To view the playback of certain channel, you can start by: 1. Dragging the channel into one of window view or 2. Double-click on this channel Then tap the “Search” button to start searching. You may select different event types on the Time Based Search Bar to define the type of video record you want to search. By default, all the types are already selected. Fig. 42 CMS Player Overview Layout Styles User may switch to different display layout styles in CMS Player. Many arrangements are possible for user to select from. 41 www.acti.com CMS User’s Manual 1.1.05.06 Time Based Search Bar Fig. 43 Time Based Search Bar 1. Camera ID: Shows the camera currently being displayed. To select the camera, click the camera name on the device tree. Click on to see the camera info. The camera info will include camera name, NVR name, camera id, channel No. and camera IP like the figure below. 2. Search time: Select the time for time bar starting point. Default will be current date/hour. 3. Search event: Choose the types of recordings to include in the search. User can search schedule record, event record (DI and Motion/PIR) and manual record. 4. View-by-hour button: Change the scale of the time bar to one hour. 5. View-by-day button: Change the scale of the time bar to 24 hours (1 day). 6. Search button: Search for video with the above filter and display below. 7. Time bar: The video clips found by the above filter will be displayed here. You can see the time and type of recording available at a glance. Each type of recording is represented in a different color. Check below figures for color display. 8. Show previous section: Go to the previous section. If the time scale is hour, the time bar will go back one hour. If it is day, it will go back by one day. 9. Show next section: Go to the next section. If the time scale is hour, the time bar will go forward one hour. If it is day, it will go forward one day. 10. File Information: Shows the recorded, date and time of the recording file. Note that: 1. If system is playing back a certain channel, clicking another channel will initiate a search about that new channel’s records 2. Move mouse to time track in time based search bar to display date/time, source file path and playback duration 42 www.acti.com CMS User’s Manual 1.1.05.06 Searching Recorded Files Go to CMSPlayer and click on “Search” button Fig. 44 Search Video Screen Select the search criterion in each section, then click “Search” button on the lower left to find records. Fig. 45 Search Results 43 www.acti.com CMS User’s Manual 1.1.05.06 In the search result page, you may click on the file location link to view video. Click on the download link to download video to your workstation PC. Snapshot Search Click on the snapshot search button to search video via snapshots. The search can be customized with several criterions. Fig. 46 Snapshot Search Screen Fig. 47 Snapshot Search Results 44 www.acti.com CMS User’s Manual 1.1.05.06 1. Thumbnail List: You may see the thumbnail image of the snapshots from the search results. In each thumbnail the type of event is listed at the top left. Beside the event type there is a small “Play” icon. You may click on the “Play” icon or double click on the thumbnail to playback that video. The video playback will start from the time of snapshot. The time of snapshot within that video is shown below the thumbnail. 2. Snapshot View: When you click on one thumbnail, a preview image the original snapshot will be displayed below in the Snapshot view area. You may see the physical file location below the snapshot, and click the link to the right to download snapshot file. Playback by Directly Opening File User may also manually browse file in PC to open a raw file in CMS Player. The title bar will display the file path and location instead of NVR server info. Full Screen Click to bring the video into full-screen mode. To bring the controls back, press ESC or press CTRL+F12 again. Press CTRL-F12 may also enable full screen mode. 45 www.acti.com CMS User’s Manual 1.1.05.06 Manual Snapshot Click on the Manual Snapshot button to take snapshot. The snapshot taken will be the same size as the original video feed received by CMS Workstation. The image will be saved to the local pc of CMS Workstation. Disconnect Channel / Disconnect All Channels Clicking on the single camera button will disconnect the currently selected channel. Selcing the button on the right will disconnect all video channels. Audio Control Click this button to enable, disable or tune volume of audio from device. Default is mute on. Playback Control Panel 1. Start Time: Displays video clip start time 2. Current Time: Displays the date / time of the current video playback. 3. End Time: Displays end time of the video clip 4. Playback scroll bar: Shows the time bar of current video clip. Click and drag to change video segment to view. 5. Previous recording: Click this button to go to the recording file according to the selected filter on Search Bar (Schedule/DI/Motion and PIR/Manual) before the current one. 46 www.acti.com CMS User’s Manual 1.1.05.06 6. Play backward: Click this button to play backward. 7. Local Record: Click this button to record from the playback file. Click again to stop recording. This file is located in local PC, and cannot be search from CMS. When local record is in effect, the playback speed is automatically locked into 1x normal. Click on the Local Record button again to finish local record. This is a useful way to retrieve a segment out of a long video archive clip. 8. Stop: Click this button to stop playback. 9. Pause: Click this button to pause playback. 10. Play: Click this button to play forward. 11. Next recording: Click this button to go to the recording file according to the selected filter on Search Bar (Schedule/DI/Motion and PIR/Manual) after the current one. 12. Speed bar: This bar shows how fast this recording is being played. User can click the button on this bar to change playback speed. F to the left means frame-by–frame. 47 www.acti.com CMS User’s Manual 1.1.05.06 Synchronous Playback 4-channel synchronous playback function allows user to review what happened at a give time from four different cameras. Synchronized playback works by first finding the time you wish to investigate from a “Sync Main” channel. Then you may add up to three other reference channels that will synchronize with the Sync Main channel. These other channels are called Sync Follower. Open file/Drag-drop channel There are two ways to start a sync playback, first you need to define a “sync main” for other channels to sync with. In the Playback player, in any kind of layout style, you can 1. Drag or Double-click: From the device list, you may drag a channel into the window view or directly double-click on it. 2. Open: You can open a file from archive to sync with By these methods, you make the focused channel the “sync main” Note: You may sync to a maximum of 4-channels at one time. 48 www.acti.com CMS User’s Manual 1.1.05.06 Finding your time and Synchronize Fig. 48 Finding Sync Main start point Here are the steps to prepare for synchronized playback. 1. Choose Video Screen: Open a recording in the view window to use as Sync Main. 2. Playback Time: Find the time you want to sync/view from Playback Control Panel 3. Time Bar: Or find the time you want to sync/view from Time Based Search Bar 4. Synchronize Button: Then click on the synchronize button to confirm the current channel as Sync Main. Please be sure that original NVR time is well synchronized. Otherwise videos will sync with each other in the wrong time spot. 49 www.acti.com CMS User’s Manual 1.1.05.06 Sync Main and Sync Follower Fig. 49 Sync Main and Sync Follower 1. Sync Main: This is the Main channel/file that the other channels would synchronize to. 2. Sync Follower 1: Drag/add the channel you want to synchronize with Sync Main here. 3. Sync Follower 2: Drag/add the channel you want to synchronize with Sync Main here. 4. Sync Follower 3: Drag/add the channel you want to synchronize with Sync Main here. If the channel you drag into Sync Follower view windows does not have recording at the time selected, then it will show as “Sync Fail”. You will need to find another channel with recording at the same time to do Sync Playback. Note: You may only have one channel acting as Sync Main. Once a channel is defined as Sync Main, you need to first click “Cancel” below to exit Sync Playback mode before disconnecting the Sync Main channel. 50 www.acti.com CMS User’s Manual 1.1.05.06 eMap Viewer EMap viewer shows live video overlaid upon area maps. It can help you get a much better visualization of your surveillance system. You can also navigate between several maps. This section describes how to operate the e-Map system via CMS Map. Overview Fig. 50 CMS Map 1. Map Tree: The cameras are shown in camera groups here. Select each NVR to show the map linked to that particular group. 2. Camera: Icons representing each camera is shown here on the map. Arrows indicating the direction they point to may also be shown if it is configured in the map setup section. Double click on camera icon to show mini-preview. 3. Live View Window: These windows display the live view from cameras. If an event is currently active, the bar at the top will turn red. Related event symbol will appear beside it, and red rectangle will appear for Motion Detection or PIR events. 4. Camera Info: if your mouse hovers over the camera, then a popup text box will show up with information on this camera. 5. Event Panel: If an event is currently being triggered for a certain camera, it will be shown in the Event Panel. 6. Event Symbol: When event is happening to a certain camera, small symbols of the event 51 www.acti.com CMS User’s Manual 1.1.05.06 type will show beside the camera and the camera live view. This allows the user to identify what happened to the camera swiftly. Users can also click camera icon to have small live view window and monitor the live video for the camera in the map. To cancel the function, user can click the camera icon again. Additionally, you can also click on the icon to pop up live view window. The live view window will show camera id, NVR name, camera name, time and time zone. Note that, mouse PTZ function can be used automatically while click to live view if the device can execute PTZ and PTZ protocol has been set. Full Screen Click to bring the map monitor into full-screen mode. To bring the controls back, press ESC or press CTRL+F12 again. Press CTRL-F12 may also enable full screen mode. Map Link Map links may be added onto the map from CMS Setup. After adding map link, you will see map link icons showing on the map. Click the map link to link to another map. 52 www.acti.com