1
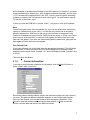
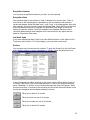
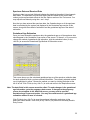
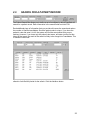
 User Guide © Lilac Medicare (P) Ltd. Chapter I
Introduction to
PregSafe
1
Disclaimer of
Warranty
The PregSafe Warranty
Lilac Medicare warrants to the original purchaser that the Website
(http://www.epra.ca/Pregsafe) on which the programs is made available will be free of
defects in material and workmanship under normal use for a period of subscription.
This manual and associated software services are sold ‘as is’,
Windows and SQLServer are registered trademarks of Microsoft Corporation. All other
brand and product names are trademarks or registered trademarks of their respective
owners.
PregSafe User Manual
All rights reserved. No part of this document may be photocopied, reproduced, or
translated by any means whatsoever without the prior written consent of Lilac Medicare
PregSafe
Lilac Medicare
All rights reserved.
2
Table of Contents
Table of Contents ................................................................................................. 3
1 How This Manual Is Organized ........................................................................... 4
2 Welcome to PregSafe ......................................................................................... 4
3 Navigating in PregSafe ....................................................................................... 5
3.1 The main screen ......................................................................................... 5
3.1.1 The Status Bar (A) ............................................................................... 5
3.1.2 The Menu Bar (B) ................................................................................. 5
3.1.3 The Screen Sensitive Shortcut Bar (C) ................................................ 6
3.1.4 The Patient Search Bar (D) ................................................................ 6
3.1.5 The Shortcut Bar (E) ............................................................................ 6
3.1.6 The Working Area (F) .......................................................................... 8
3.2 Tips for working with PregSafe .................................................................. 8
3.2.1 View...................................................................................................... 8
3.2.2 The Cursor ............................................................................................ 8
3.2.3 Cursor Movement.................................................................................. 8
3.2.4 Data Entry ............................................................................................ 8
3.2.5 Focus .................................................................................................... 9
3.2.6 Cancel, Back, Next, and Finish, Update and Add buttons ................... 9
3.2.7 Using Drop-down Selection Lists ......................................................... 9
3.2.8 Deleting Records ................................................................................ 10
3.2.9 Working with Tree menus .................................................................. 10
3.2.10 Error and Warning Messages ........................................................... 10
3.2.11 Date Fields ..................................................................................... 11
4 Default Data and Unknown Data ................................................................... 12
5 How Patient Files are Organized ..................................................................... 13
6 PregSafe Shortcuts ......................................................................................... 14
7 Closing PregSafe ............................................................................................. 15
3
1 How This Manual Is Organized
Many people read their user’s manual only as a last resort. If you are one of those, the
following paragraphs tell you where to find information when you need it.
Chapter I
Teaches you how to navigate in the PregSafe system.
Chapter II
Details the interactions with each screen display of the program. This section serves as
a reference source that goes beyond the information and instructions contained in the
screen prompts, the help screens, and general human intuition.
2 Welcome to PregSafe
PregSafe is a state-of-the-art computer program that interprets both maternal serum and
amniotic fluid alpha-fetoprotein results, with the optional use of other serum and
ultrasound markers in the first and second trimester of pregnancy. PregSafe calculates
a patient’s individual risk of carrying a pregnancy affected with either an open neural
tube defect or Down Syndrome, and issues an interpretive report. If assay results are
present for AFP, hCG and uE3, PregSafe will also indicate whether the patient is at
increased risk for Trisomy 18 or Smith Lemli Opitz syndrome (SLOS), if the user has
configured it to do so. Other markers, such as Dimeric Inhibin A or Nasal Bone may be
added to improve the detection and false positive rates.
PregSafe interpretation logic is based on an artificial intelligence, developed using an
expert system software language which is ideally suited for interpreting medical
diagnostic tests. Artificial intelligence is a branch of computer programming that was
first developed over thirty years ago. An expert system is one type of artificial
intelligence that codes the judgments and decisions of experts into rules or decision
trees, identical to the thought processes of the experts. In effect, the consensus of the
experts is cloned in the software for widespread use.
The expert knowledge used in PregSafe was derived from Clinical Biochemists,
Geneticists, Pathologists, Obstetricians, Statisticians, and from published scientific
literature on the subject of interpreting serum marker results specific to prenatal
screening for Down Syndrome, OSB, Trisomy 18 and SLOS. Expert systems can be
modified easily to reflect changing medical opinions. PregSafe is no exception. As new
knowledge becomes available and gains acceptance, it will be incorporated into
PregSafe, and new versions will be issued to licensed users.
The process of getting started is simple. Read the following section on “Installing
PregSafe” to determine if you meet the system requirements, to determine the desired
Application and Database setup, to install the Application, and to finally initialize the
software. If you have any problems or questions with the installation, do not hesitate to
contact Lilac Medicare.
4
3 Navigating in PregSafe
This section describes the menus, screens and pop-up windows in PregSafe and how
to interact with them.
3.1 THE MAIN SCREEN
The Main screen is divided into six main areas:.
A
B
C
D
F
E
3.1.1 The Status Bar (A)
The screen header or Status Bar displays the name of the program, the software
version, the database name and the name of the working screen currently in use.
3.1.2 The Menu Bar (B)
PregSafe has five pull down menus.
The Patient Menu
The Screening Menu
The Tools Menu
The Reports Menu
The Help Menu.
5
Whenever a pull down menu is selected (either by pointing and clicking or by pressing
<Alt>+ first letter of the menu item), the menu options will appear.
A specific menu item can now be selected by clicking the item with the mouse or by
using the ↑ and ↓ keys to scroll through the items and by pressing <Enter> to choose
the item. A quicker way to access the menu items is to press the key which corresponds
to the underlined letter for each selection.
Once a menu is selected, you can also use the → and ←keys to move between menus.
3.1.3 The Screen Sensitive Shortcut Bar (C)
At all times this shortcut bar displays shortcut buttons to the Medians menu, the Site
Options Screen and the Conditions Screen. When the Patient Add/View Screen is open,
more buttons are added to enable actions associated with the Add/View Screen:
Interpret Current Report, View interpretation, Suspend/Unsuspend sample, View
Provisional Report, View Risk Screen, Display database records for this sample.
3.1.4 The Patient Search Bar (D)
To use the Patient Search Bar, type information in one or more of the fields and click the
Find button. See the Searches section in Chapter 3 for complete information on
performing searches.
3.1.5 The Shortcut Bar (E)
The window at the left side of the screen replaces the screen sensitive tool bar. The
push-buttons on this toolbar perform the same functions as are accessible through the
drop-down menu items. Any time you want to see any one of the four shortcut bars –
Patient Entry, Screening, Tools, or Reports – simply move the cursor over its title with
the mouse and the shortcut bar will appear. The Patient Entry Shortcut bar is visible
upon opening the program.
6
The Patient Entry Shortcuts
Opens the Add/View Patient Screen and brings focus to the Patient
Code field, to start the input of a new patient record.
Opens the patient search screen, showing the results of the most
recent search.
Opens the result entry function, to allow entry of assay results for
multiple patients.
Starts batch interpretation function, to allow automatic interpretation
and printing of reports for all samples that are in pending status.
Opens the function for recording pregnancy outcome data.
Opens the Loadlist functions screen, to allow creation and printing of
test worklists.
Starts creation of provisional reports. All samples in pending status
will have a provisional report printed.
7
3.1.6 The Working Area (F)
The content of the working area will change depending on what function you are using.
You may have several working windows open at once, and use the tabs at the bottom of
the working area to move between them. You may close the uppermost window in the
working area using the inner X button. In this manual, this will be referred to as a Close
Window button
If you prefer to navigate around PregSafe without using the mouse, you can use the
regular drop-down menus, pressing and holding the Alt key while you key the underlined
letter in the selection you want.
3.2 TIPS FOR WORKING WITH PREGSAFE
3.2.1 View
You can change the appearance of PR A by using the View Item in the Tools menu. The
Status Bar, Windows Toolbar, Shortcut Bar and/or Patient Search Bar may be made to
disappear (and re-appear) by toggling these items on or off. Closing these sections,
particularly the Shortcut bar and the Search bar, will increase the size of the Working
area. The Shortcut bar may also be hidden by clicking the x button in its upper right
corner and the Search bar by clicking the x in its upper left corner.
3.2.2 The Cursor
Whenever the system is ready to accept data entry, the cursor will appear on one of the
fields on the screen as a blinking line, which marks the cursor location. When a key is
pressed, the character will appear at the cursor location, and the cursor location will
move one space to the right, or to the next field if the previous field is now filled.
3.2.3 Cursor Movement
Moving within a field or from field to field can be performed quickly with the keyboard.
To move from field to field, press <Tab>or <Enter> to move forward or <Shift + Tab> to
move back. If this field is the last one on the screen, pressing <Tab> or <Enter> will
automatically bring you to the next screen.
To move within a field, the ↓ or → key will move the cursor forward one space and the
↑ or ← key will move the cursor back one space. Press <Home> to go to the beginning
of the field and <End> to go to the end of the text in the field.
3.2.4 Data Entry
Highlighted characters will be overwritten by any new typing. If no characters are
highlighted, the new characters will simply be inserted at the cursor location, moving all
the remaining characters in the field one position to the right. Once a field is full, further
data cannot be entered.
If the text in a field is highlighted, pressing <Delete> will remove the entire highlighted
text. If the text is not highlighted, pressing <Delete> will delete the character at the
cursor location, and move the remaining characters to the left. In contrast, pressing
8
<Backspace> will remove the character to the left of the cursor and move the cursor one
space to the left –<Backspace> serves as a rub-out feature.
3.2.5 Focus
The <Tab> key (and <Shift + Tab>) is also used to change the focus throughout a
screen. A selection, or button has focus when it is outlined by a dotted line. Pressing
<Enter> while something has focus will usually invoke the function or choose the
selection.
A checkbox that has focus can be checked by pressing the <Spacebar> or using the
mouse.
Once you are familiar with the idea of focus, it is possible to maneuver most of the
system by just using the keyboard.
3.2.6 Cancel, Back, Next, and Finish, Update and Add buttons
It should be noted that the data entered or changed on a data entry screen is not saved
until Finish has been clicked. Data entered on screens with the Next button will not be
saved until Finish is clicked on the last screen in the sequence, generally the Patient
Add/View screen. Pressing <Enter> in the last field of a screen, will do the same as
clicking Next.
To abandon any changes or exit a screen, you can click Cancel or press <Esc>. This
negates all changes made to all fields on the screen, and returns control to the previous
screen. The original data is restored.
Clicking Back allows you to go back to the previous screen without losing changes that
you have made to the current screen. Remember however, that changes or entries will
not be permanently saved until Finish has been clicked.
When editing certain screens, you will notice that the Next button is replaced with an
Update button. Clicking the Update button will record the changes you have made, close
the screen and return you to the previous screen. You must still Finish to save these
changes permanently.
3.2.7 Using Drop-down Selection Lists
For fields that require the contents to be chosen from a limited number of pre-defined
options, PRA uses drop-down selection lists. There are several ways to interact with
these lists:
• Type the first letter of the selection you want and the selection will appear in the field.
If there is more than one item with the same first letter, repeatedly entering the first
9
letter will cause the items starting with that letter to scroll through the field in order of
their second letter; or
• Press the <↓> key to make the items in the list scroll through the field one by one; or
• Mouse-click the down arrow at the end of the field (or <Alt+↓>) to open the list,
displaying at least part of its content. Then use the mouse and scrollbar (or <↓> ) to
scroll through the list to find the selection you want.
Once the item you want is highlighted, either in the field or in the drop-down list, press
<Tab> or <Enter> to accept the selection and move to the next field.
3.2.8 Deleting Records
<Ctrl + F3> will delete the current patient and all pregnancy and sample data
associated with that patient
<Ctrl + F5> will delete the highlighted pregnancy and all associated requisition and
sample data
<Ctrl + F6> will delete the highlighted requisition and all associated sample data
<Ctrl + F7> will delete the highlighted sample and associated results.
<Ctrl + F8> will delete all results
<Ctrl + F9> will delete the highlighted result.
NOTE You can always delete a patient record (which deletes all associated records), but since a patient
must have at least one pregnancy record, and a pregnancy at least one sample, you can delete a
pregnancy or a sample only if there are two or more of them.
3.2.9 Working with Tree menus
There are two areas in PregSafe where the menus are sufficiently complex that they are
presented in a Tree structure. These are the Markers and Medians menu and the Edit
Message menu.
These menus work in a very similar way to Windows Explorer. Upon opening the menu,
a list of items is displayed, each of which has a plus sign to its left. Clicking on the plus
sign next to one of these items (or double-clicking on the name of the item) expand a
branch of items, some of which may also have their own plus signs. Those items that do
not have plus signs are associated with functions. Double-clicking on them will cause the
screens for the associated functions to open in the working area. If a branch is open,
double clicking on the item at its base will collapse the branch.
3.2.10 Error and Warning Messages
If an error has been detected by the system during data entry, a message box will
appear. Error messages can appear both because an invalid entry has been typed, or
because a seemingly valid entry contradicts some previously entered data. The system
will warn you with the pop up window, and you will be asked to rectify the situation.
Warning messages also appear in message boxes and generally ask you if you want to
proceed with a function.
10
3.2.11 Date Fields
The date fields in patient data entry are collapsed when you first encounter them. These
date fields can be left blank if you do not have the required information at the time.
To expand the field, when the checkbox has focus, press the space bar, or use the
mouse to check the checkbox. When the field expands, it will show the current date.
There are several different ways to adjust the date. If the current date does not appear
immediately, click the → arrow until it appears.
a) Type <Alt+↓ > or mouse-click the down arrow at the right side of the field to show the
month-view calendar and use the mouse to select the day of the month and adjust
the month.
This method is handy for selecting the LMP or ultrasound date or for selection criteria in
the reports menu.
b) With the field expanded, use the → key or the mouse to highlight the first element,
change it by overtyping it, use any date separator ( /,.,- ) or mouse click to move to
the next element, etc. You can use the numeric keypad and the decimal point, once
11
you have used the → key to move to the first element. This method is convenient for
date of birth entry.
c) In the Sample date and received date fields, and in the Assay date fields, when the
whole field has focus, use the plus and minus keys to change the date one day at a
time.
d) In all date fields, instead of overtyping, you can use the mouse to select an individual
element and then use the plus (+) and minus (-) keys to adjust each element of the
date one step at a time.
If you want to remove the date from any date field and leave it blank, you can do so by
unchecking the checkbox, or by using the delete key or spacebar to remove each
element of the date.
There is another type of date field that is used in the reports menu for report selection
criteria. These date fields are not collapsed when you first see them, and a date entry in
these fields is required and cannot be deleted. When you tab to this kind of date field,
the first element has focus already, and you can change it by overtyping or using the
plus or minus keys, then use the data separator or → key to move to the next element,
etc. Or use the month view calendar to select the date.
4 Default Data and Unknown Data
Setting up Default Data can speed up the data entry process, by having the most
common entries already appear in certain fields. For instance, most patients are not
diabetic, and therefore a default entry of No can be set for the IDDM field, through the
Set Default Data screen (see Chapter 2, Section 4.1.1). A default data entry is NOT an
appropriate response if the data is unknown. Unknown entries are entered as blanks (as
long as this is a valid entry for the field). A null-entry or blank entry can be entered by:
Pressing <Tab> or <Enter> with nothing in the field
OR by erasing the existing entry with <Delete> or <Backspace>
OR by pressing <Spacebar> to blank out the existing entry.
Though some fields may not allow <Spacebar> as a legal character during data entry, a
field can always be left blank by using <Del>, or by pressing <Enter> when the field is
empty. The only field which will not accept blank data is the Specimen Type.
The distinction between default data and unknown data is very important.
PregSafe will accept unknown (or blank) fields as a response to almost any data field,
and still print a patient report; the exception is any data that is required for calculations.
If data for a particular field is entered as unknown, the printed report will indicate this,
and the interpretation will be based on pre-determined assumptions (e.g. if the IDDM
status is unknown, the sample will be interpreted as if the patient was not diabetic).
Knowing this, you might be tempted to accept a default entry of N for IDDM. In doing so,
you would cause a report that overstates the known clinical information. The laboratory
12
might be considered responsible if this assumption by you caused a problem. It is
important that the printed report, and the data stored in the database, reflects the extent
of knowledge on each sample.
5 How Patient Files are Organized
The data entered into the system is stored in tables. There are tables for patient data,
pregnancies, sample data, physicians, and decision criteria (such as medians and
factors). Storing the data in separate tables means that the data for a given patient need
only be entered once, even if that patient has had several pregnancies, and several
samples submitted for interpretation with each pregnancy. Similarly, the information for
a physician, once entered, can be linked with any number of samples without having to
be re-entered. Each patient can be linked to several pregnancies, and each pregnancy
to several samples.
For example, if two requisitions were received for a new patient, one a serum sample
and the other an amniotic fluid sample, the following procedure would apply:
Add New Patient would be selected from the Patient pull down menu for the first
sample, and the full patient demographic information, pregnancy information, and
sample data would be entered.
For the second requisition, when the same Patient Code is entered, the Add/View
Screen for this patient will appear. You can confirm that the patient and pregnancy
information is consistent with the new requisition, and then add a new sample by
double clicking in the blank row below the existing requisition record. Only the
requisition and sample data need to be entered, and this data will be linked
automatically to the existing patient and pregnancy.
13
6 PregSafe Shortcuts
The following shortcuts are used with the Add/View screen
<Ctrl+F3> delete the current patient
<Ctrl+F5> delete the highlighted pregnancy
<Ctrl+F6> delete the highlighted requisition
<Ctrl+F7> delete a sample if it is the second sample of a composite panel
<Ctrl+ F8> delete all results
<Ctrl+F9> delete the highlighted result.
Interpret the selected pending specimen <Ctrl+I>
Preview Interpretation for the selected sample <Ctrl+P>
Suspend/Unsuspend the selected sample <Ctrl+S> to suspend, <Ctrl+Alt+S> to unsuspend
View provisional report for the selected pending sample <Ctrl+W>
View the Risk screen for the selected sample <Ctrl+R>
Reprint the report for the selected sample <Ctrl+K>
<Ctrl+1,4,5,7,8 or 9> View the report for the selected sample in one of the available
report formats
<Ctrl+Q> Change the patient code
<Ctrl+O> Print the outcome letter for this patient only
<Ctrl+Z> Change the status of the selected sample from Interpreted to Pending.
<Ctrl+A> Takes you to the first record in the record set
<Ctrl+L> Takes you to the last record in the record set
<Ctrl+B> Takes you back one record in the record set
<Ctrl+F> Takes forward one record in the record set
<ALT+0013> When editing a message, generates carriage return so the following text
moves to a new line
14
7 Closing PregSafe
There are three ways to close PregSafe.
1. Using the mouse, click on the close (x) button in the upper right corner of the screen.
2. Using the mouse, from the menu bar select File > Exit.
3. Using the keyboard, open the file menu by typing <Alt+F> and then select Exit by
typing x.
15
Chapter II
Working with PregSafe
1
Table of Contents
Table of Contents.................................................................................................. 2
1. The Add/view screen ..................................................................................... 3
2. The Patient Entry Menu ................................................................................. 5
2.1. Add New Patient ..................................................................................... 5
2.1.1. Patient Information .......................................................................... 6
2.1.2. Contact Information ......................................................................... 7
2.1.3. Pregnancy Information .................................................................... 8
2.1.4. Requisition and Specimen Information .......................................... 15
2.1.5. Adding a new pregnancy/requisition to an existing patient. ........... 20
2.1.6. Repeat OSB Screening ................................................................. 21
2.2. Assay Results Entry using the Add/View Screen.................................. 22
2.3. Search for a patient record ................................................................... 23
2.3.1. Editing a Patient Record ................................................................ 26
2.3.2. Editing Critical Data ....................................................................... 28
2.3.3. Terminating a Search/Edit Session ............................................... 28
2.4. Interpret Reports ................................................................................... 29
2
This chapter of the Manual deals with how to interact with the menus, screens and popup windows in PregSafe, and the significance of each field within a screen. This chapter
serves as a reference source for the operation of PregSafe.
1. The Add/view screen
The Add/View Screen summarizes all the information about the patient. Patient
Demographics, Pregnancy, Requisition/Specimen and Assay Results each has its own
section of this screen. To open any of these records, select the row of interest inside the
section and press Enter or double click. You may now add new information or edit the
existing data. Remember to save the changes by clicking the Update button. If there are
multiple records in a section, for example two specimens for a pregnancy, select the
particular one you want before double clicking. If there are two pregnancies, the data
shown in the remaining sections will apply to the pregnancy record that is highlighted.
Likewise for the remaining sections.
To add a new record in any of the sections, select a blank field in that section and
double click or press Enter. This will bring up a blank Add New Record screen
appropriate to the section selected. Remember that the new record will be attached to
the highlighted record in the level above it.
If the Add/View screen was opened as the result of a search, the navigation buttons at
the upper right allow you to move to other records that were produced by the search.
The test status is displayed in the lower left part of the screen. These are the possible
statuses.
3
Not Saved: the data entered has not been saved to the database.
Incomplete: some part of the data necessary to perform an interpretation is missing.
Suspended: The operator has suspended this sample. If it has not been interpreted, it
will not be, nor will it be included in any statistical reports or median calculations.
Pending: all the data needed to perform an interpretation is present but interpretation
has not yet been performed.
Provisional: A provisional report has been issued. The interpretation has not been saved
to the database, nor transmitted via the interface if an interface exists.
Interpreted: The risk calculation has been performed, the interpretation assigned and the
report printed.
If the status is Interpreted, the numbers shown refer to the interpretive messages that
have been assigned, in the order: OSB, Down Syndrome, Trisomy 18, SLOS. A zero will
appear in the space of any condition for which risk has not been calculated, either
because it was not included in the panel ordered, or for any other reason (for example,
Trisomy 18 risk is not calculated in twin pregnancies).
At the bottom of this section is a summary of the interpretation for the selected sample.
If the patient’s gestational age as of the sample date is outside your acceptable range,
then no interpretation is shown.
The presence of an icon under the Close button indicates the presence of notes in the
requisition screen.
4
2. The Patient Entry Menu
The patient menu includes functions for the entry and review of
patient-related information:
• adding new patients,
• searching for existing patient,
• adding test results,
• interpreting patient reports,
• recording outcome data,
• creating and working with test load lists and
• creating provisional reports.
2.1.
ADD NEW PATIENT
To add a new patient, choose Add New Patient from the Patient menu or click
the Add New Patient button on the Patient Entry shortcut bar. The Add/View
screen will appear.
5
2.1.1.
Patient Information
The patient information identifies the patient, and includes some of the data used in the
risk calculation.
Patient Code
The Patient Code is a unique identifying number, sequence of letters, or combination of
numbers and alphabetic characters that will identify a particular patient, and ONLY that
patient. The construction of the Patient Code is defined by the user, typically from
information that is provided with a patient requisition, or from a combination of
information items. Blank characters (e.g. using <Spacebar>) are permitted, except in the
first position. An example might be the patient’s insurance number combined with some
letters of the first name, or the unique patient number used by a hospital. Permitted
characters in patient code are upper case letters and numerals. If you enter lower case
letters they will be converted to upper case.
The Patient Code is the key method of separating different patients in the database, and
you should adhere strictly to the formula for its construction in order to maintain the
separate identity of patient files. Therefore, the Patient Code should be composed of
information that is always available, rarely subject to change over time, and never
duplicated.
If you enter a code that belongs to a patient that already exists in the system, that
patient’s record will appear. Check the patient information to see if it is the same patient.
If not, enter a different patient code for the new patient. The code field holds up to 19
characters. If you type a space at the start of the patient code, the system will delete the
space.
Entering the Patient Code enables the remaining fields.
If you start entering a patient and then realize that you do not want this patient in your
database after all, if you have entered information only in the patient information section
of the Add/View screen, you can delete the patient code, which will blank out the rest of
the patient information and it will not be saved to the database. If you have opened one
of the second level screens, such as the Pregnancy screen, and you decide that you do
not want to save the patient record, hit the Cancel button. This will take you out of that
screen without saving the entered data, and return you to the Add/View screen where
you can delete or change the patient
Patient Name
Use either the Tab or Enter key to move to the next field. Enter the patient’s last name
and first name. The last name and first name fields each hold up to 80 characters. Tab
to the Date of Birth field.
DOB
Press the spacebar to open the Date of Birth field. Today’s date will show in the field.
Use the → key to highlight the first element of the date and enter the correct information
in numeric form. Move to the next element of the date using either a period, comma,
slash or hyphen, or the → key. Type in the second and third parts of the date, using
numeric characters, and <Tab> or <Enter> to move to the next field. The date display
6
will be changed to the date format defined in your Site Options. For example, if your date
format has been set to ddmmmyyyy, with a hyphen as the date separator, and you enter
1/1/75, the date will be displayed as 01-Jan-1975. You only need to type the necessary
numbers in the date field. For example to enter June, type 6. You don’t need to type 06.
For the first of the month, type 1.
If when you open the DOB field, it is blank, hit the → key once or twice until it appears.
Race
Choose the patient’s race from the selection list. If you have a default race, and need to
change to a different race, press <Alt>+↓ or click the arrow at the end of the field to
show the selection list. With focus on the list, type the first letter of the patient’s race.
That race will appear at the top of the list. Select it with the mouse or <Enter> and Tab or
Enter to move to the next field. You may also just type the first letter of the race in the
field and it will appear. If you have two races starting with the same letter, typing the first
letter again will make the second one appear.
User Defined Field
If you have defined a use for this field, enter the appropriate information. This field holds
40 characters. If data is entered in this field it will be displayed on the patient report,
depending on the report format. Formats 1,4 7 and 8 will display this field, Formats 5 and
9 will not.
Tab to the More Info Button.
2.1.2.
Contact Information
If you wish to record contact information for the patient, click the More Info button or
press <Enter> when it has focus.
Record the patient’s mailing address, phone, and insurance numbers for your records if
you wish. The patient’s address information appears on some of the report formats.
When you are finished, click the Next button to enter pregnancy information. Click
Cancel to close this window without saving the data entered, or Finish to close this
window, save the data and return to the Add/View screen.
7
If you wish to skip this step, after you have finished the race entry (or user defined field if
used), press <Tab> to move to the pregnancy section and <Enter> to open the
pregnancy window. Or with the mouse, double-click in the first empty field in the
pregnancy window.
If you are adding a pregnancy to an existing patient who already has at least one
pregnancy, double click in the blank pregnancy fields below the existing pregnancy(ies)
to open a new pregnancy screen.
2.1.3.
Pregnancy Information
This screen is used to record patient information specific to this pregnancy.
Para and Gravida
Para refers to the number of live infants that the patient has already borne. Gravida is
the number of times the patient has been pregnant, including the current pregnancy.
These numbers are not used in the risk calculation. This information is provided to the
physicians for their convenience, but on only some of the patient report formats. If the
response is unknown, leave the fields at zero.
8
Multiple
Choose from the selection list whether the pregnancy is singleton, twins, triplets or
multiple (i.e. more than triplets, or more than one but actual number unknown). If you
have not been given this information, select Unknown. If Unknown is selected, the
program will calculate the risk based on a singleton pregnancy, and the report will state
that this assumption has been made and that the risk is calculated based on partial
information. You may use the keyboard to type U for unknown, S for singleton, T for
Twins, and T a second time for triplets, or M for multiple, which means either more than
3 or more than 1 but you don’t know how many.
IDDM, IVF, Smoker, Rh
Choose from the selection list whether each of these conditions applies to this patient
during the current pregnancy. The choices are Yes, No or Unknown. You may type Y, N
or U. You may also leave the IVE, Smoker and Rh fields blank. If blank, the fields are
taken as unknown.
Median adjustment factors for each of these conditions can be entered in the marker
configuration screen for the markers that are affected, as noted below (see section 3.2.2
of this chapter). The default adjustment factors are 1.0 (no adjustment), except for serum
AFP in IDDM patients. If adjustment factors are modified to be other than 1.0, they will
be applied to those samples for which these items are positive. If median adjustment
factors are used, then the medians themselves should be established for populations
that are negative for the respective conditions. If the median adjustment factors are not
modified, no adjustment will be made.
If you wish to remove the Smoker and/or Rh fields from this screen , you can do so by
instituting the customization keys AFPX_SUPSK and AFPX_SUPRH respectively.
Please see chapter 3, section 2 for more information.
IDDM
Choose Yes only if the patient is an insulin dependant diabetic. IDDM patients have a
different prevalence for Down Syndrome and OSB, and also their AFP medians differ
from the non-diabetic population. The default median adjustment factor in PRA is 0.80,
i.e. theAFP median is multiplied by 0.80 in the MoM calculation. If the patient is nondiabetic or has pregnancy-induced diabetes, choose No.
IVF
Choose Yes if this pregnancy was the result of in vitro fertilization. A field will open for
the birth date of the donor mother, and it will default to the birth date of the patient. If
there is a separate donor mother, enter her birth date in this field. It will be used in the
risk calculation. Pregnancies that result from IVF have higher levels of hCG, free beta
hCG and uE3.
If you have a Donor age, but not the date of birth, then use the mouse to uncheck the
Donor DOB field, and another field will appear that will allow you to enter the Donor Age.
The program will estimate the Donor DOB as the current date minus one year more than
the patient age, ie the earliest birthdate the donor can have, assuming that she saw the
physician at least one day before the sample collection. When you return to this screen
in the future the estimated donor DOB will appear in the Donor DOB field.
9
Smoker
Choose Yes if the patient is a smoker. Although other markers do not appear to be
affected by smoking, HCG levels are on average 24% lower and Inhibin A levels 58%
higher in smokers than in non-smokers. These levels tend to counter-balance each other
in Quad screening but experts recommend that screening is more accurate if these
differences are corrected using correction factors.
Rh
Choose Yes if the patient has an Rh negative blood type. Rh negative mothers tend to
have somewhat reduced levels of uE3. (Median about 0.85 MoMs)
DS History
The DS History field will appear only if the Use Family History checkbox is checked in
the Down Syndrome page of the Conditions section of the Screening menu. The
possible entries for this field are Yes, No, Unknown and Do not use. You can select your
response from the drop-down list by
• using the mouse to open the list and make your selection
• typing <Alt+↓> to open the list, using the ↑ and ↓ keys to move to your selection
and pressing <enter> to record the selection
• typing the first letter of your selection.
Choose Yes only if there is a first degree family history, ie either the patient or the father
of the fetus has Down syndrome, or this patient has had a previous pregnancy where the
fetus was affected with Down syndrome.
If you choose No, Unknown or Do not use, the calculated risk will be the same but if you
choose Unknown, the phrase “Based on partial information supplied” will appear on the
patient report.
If Yes is the choice in the DS history field, and the patient is 35.5 years of age or more,
then the patient’s age-based risk is multiplied by a factor of 2. This factor can be
amended using site customization AFPX_C650. See Section 3.1.5 of this chapter for
instructions on implementing customizations and Chapter 3, Section 2, Customizations,
for a list of customizations.
The allowed range of values is 1 to 5.
If the patient is less than 35.5 years of age, her age-based risk will be set at 1in 200,
regardless of her exact age.
The statement on the report that normally gives the age-related risk will state the risk
“based on age and family history” if family history is in use.
OSB History
The OSB History field will appear only if the Use Family History checkbox is checked in
the OSB page of the Conditions section of the Screening menu. The possible entries for
this field are No, 1,2,3, Unknown and Do not use. You can select your response from the
drop-down list by
• using the mouse to open the list and make your selection
• typing <Alt+↓> to open the list, using the ↑ and ↓ keys to move to your selection
and pressing <Enter> to record the selection
• typing the first letter of your selection.
The meanings of the available choices are as follows:
10
No No family history of Neural Tube Defects
1 First degree family history, ie either the patient or the father of the fetus was born
with a neural tube defect, or this patient has had a previous pregnancy where the
fetus was affected with a neural tube defect.
2 Second degree family history. One of the parents of the fetus has a sibling or parent
that was born with a neural tube defect.
3 Third degree family history. Either of the parents of the fetus has a more distantly
related family member who was born with a neural tube defect.
Unknown – the family history of the patient is not known
Do not use – family history is not to be used in calculating this patient’s OSB risk.
If you choose No, Unknown or Do not use, the calculated risk will be the same but if you
choose Unknown, the phrase “Based on partial information supplied” will appear on the
patient report.
If you enter 1,2 or 3 the OSB prevalence denominator will be divided by a factor,
resulting in an adjustment of the MoM cut-off for this patient.
The default factors for OSB are given below, along with the limits to which they may be
amended:
1st degree
14
(must be less than 15)
nd
2 degree
4
(must not be greater than 1st degree factor)
2
(must not be greater than 2nd degree nor less than 1).
3rd degree
These factors can be amended using site customizations AFPX_C601,602 and 603
respectively. See Chapter 3, section 2 for more information on Site Customizations.
Gestational Age Information
This window allows you to record gestational age at the date of estimation. You may
record gestational age estimation by various methods, and the program will recommend
the best one. The column labeled Weeks +Days is the GA at the date of estimation.
11
LMP Date
<Tab> to the LMP Date and open the date field either by pressing the space bar or
clicking the checkbox. Click the arrow at the end of the field or key <Alt+↓>. A month
view calendar will appear.
Use the left arrow button on the calendar to change to the appropriate month, and select
the appropriate day of the month using the mouse. Then click outside the calendar to
record the selected date. Alternatively, you may enter the date by typing over the current
date as described in Date of Birth entry.
If you enter a future date, the program will assume that this is the estimated date of
delivery, will calculate an LMP date and will give you the opportunity to accept or reject
this date.
The gestational age at the date of sample collection will be computed once the specimen
date has been entered.
Ultrasound Data
The Ultrasound date is selected in the same way as the LMP date. If you have an
ultrasound gestational age estimation, enter the weeks in the weeks field and tab to
enter the days.
If you have a gestational age estimated by ultrasound, but you do not have the
ultrasound date, open the ultrasound date field. Note that doing so enables the
ultrasound gestational age fields. Then close the ultrasound date field. The gestational
age fields remain enabled. Enter the gestational age by ultrasound. The system will
assume that the ultrasound date is the same as the sample date, and will show you a
message to that effect when you leave the pregnancy screen.
12
The allowed range of Gestational Age is 5 to 30 weeks. If the gestational age as of the
ultrasound date is less than 6 weeks, when you leave the pregnancy screen you will not
see the message box recommending a method of estimation. When you get to the
requisition screen you will not see any gestational age information in the Gestational age
section. Click the calculator button to open the Calculate Gestational Age window and
select Ultrasound by clicking the button marked U/S on the right side of the window.
Please ensure that the gestational age as of the ultrasound date is correct.
If you have an NT measurement, enter it in millimeters, to one decimal, and select the
sonographer from the selection list of sonographer codes. If you have specified Twins in
the Multiple field above, a second NT field will appear, allowing you to record the NT
values for each twin. In this case, when the report is issued, the risk of the twin with the
higher risk will be reported for the pregnancy.
CRL, BPD and HC
Enter the Crown Rump Length (CRL), Bi-Pariental Diameter (BPD) to one decimal or
Head Circumference (HC) for the fetus if you have it. The acceptable ranges for these
measurements are:
CRL 2-84 mm
BPD 15-72 mm
HC 100-220 mm
The gestational age as of the date of the ultrasound will be computed and displayed. For
fetuses at less than 12 weeks gestation, the CRL measurement gives the more accurate
estimation of gestational age. The CRL at 12 weeks is 54mm. At greater than 13 weeks,
BPD or HC is preferred. The BPD at 13 weeks is 23 mm. Between 12 and 13 weeks,
accuracy of CRL and BPD is equivalent.
If you enter a CRL greater than 72, upon leaving this screen you will see a warning
message stating that for fetuses over 13 weeks gestation, BPD will give more accurate
gestational age estimation. You will be given the opportunity to accept what you have
entered (OK) or to go back and make changes (Cancel). Likewise, if you enter a BPD of
less than 19mm, you will be warned that CRL would give a more accurate estimation for
fetuses under 12 weeks, and given the opportunity to accept or change it.
If you enter both the BPD and CRL, the program will compare the calculated gestational
ages, and if they differ by more than 7 days, a warning message will be displayed, and
you will be given the opportunity to accept or change the entry.
There are two additional method of GA estimation, physical examination (Exam) and
Estimated Date of Delivery (EDD).
Please see the note below regarding the entry of EDD as determined by ultrasound.
Exam Date
To enter an examination date, tick the checkbox and enter the date as noted above for
LMP. Ticking the date checkbox enables the GA date fields, allowing you to enter the
estimated GA at the time of the examination.
13
EDD
To enter an estimated date of delivery, tick the checkbox and type in the EDD or choose
it using the month view calendar. If you know for certain that the EDD was estimated
based on ultrasound measurement, check the Determined by U/S checkbox so that the
calculation parameters appropriate to ultrasound dated gestational age will be applied in
the risk calculation.
When you have finished entering GA information, click the Next button or key <Alt +N>
to save the record and move to the requisition screen, or the Finish button or <Alt+i> to
save the pregnancy information and return to the Add/View patient screen. A Dialog box
will appear, suggesting the best GA estimation method from among the information you
have entered. Click OK to accept the recommendation or click Cancel to choose the GA
estimation method later.
Note: If you wish to remove entries from any of the GA estimation fields, do so by using
the spacebar or mouse to remove the tick from the associated checkbox.
Nasal Bone
If you are doing first trimester screening and if you have entered both NT and CRL
measurements, the field for entry of Nasal Bone will be enabled. The possible entries for
this field are Unknown, Present, Absent Black and, Absent Not Black. Black or Not Black
refers to the race of the fetus. The absence of Nasal Bone indicates increased risk of
Down Syndrome in both Black and non-Black fetuses, but the increase in the risk is
greater in non-Black fetuses.
Twins
For a twin pregnancy, you may enter
chorionicity and separate NT and CRL
values and Nasal Bone for each fetus.
• For chorionicity, you may enter
dichorionic, monochorionic or unknown.
If you enter unknown, the calculation of
risk will be as for a dichorionic pregnancy.
• The NT MoM of each fetus is
calculated based on the respective CRL
of the fetus.
• The GA for the pregnancy is
calculated based on the CRL of Fetus
A, so it is very important always to enter
the larger fetus as fetus A.
• It is assumed that both fetuses will be
either Black or Non-Black.
• For Twin pregnancies, the calculated
risk is the risk for the pregnancy, not for
each individual fetus.
14
2.1.4.
Requisition and Specimen Information
The requisition allows you to do different test panels on different patients, and still have
these patients all interpreted at once in a batch interpretation. Please see the Panels
section in the Tools menu (section 4.6 of this chapter) for more information on test
panels.
Each sample you receive for a patient should be entered under a separate requisition,
with one exception. PregSafe generally has a one-to-one–to-one relationship between
requisitions, test panel records and patient reports. Each requisition relates to one test
(Panel) and one patient report. If you are doing first trimester screening for Down
syndrome and second trimester screening for OSB, you would enter two requisitions for
the patient, one for the first trimester Down syndrome panel and a second for the second
trimester OSB panel. Each would have its own sample and there would be two reports
issued.
The exception is composite screening. The composite screening panel includes tests on
samples drawn in both the first and second trimesters. In this case there are two
samples for one requisition, and only one report is generated which includes risks for
both Down syndrome and OSB (and Trisomy 18, SLOS and whatever other conditions
may be included in the panel definition).
15
Requisition Number
You may enter a requisition number if you wish. Its use is optional.
Requisition Date
The requisition date is also optional. If used, it defaults to the current date. <Tab> to
move focus to this field and press <Spacebar> to tick the checkbox and make the
current date appear. Adjust this date using – and + keys, or by bringing down the month
view calendar. If you do not wish to enter a requisition date, simply tab through this field.
Some administrative reports in PregSafe use Requisition Date range as one of the
options for selection criteria. If there are samples in the database that do not have
requisition dates entered, those samples will not be included in any reports that are
based on Requisition Date range.
Lab Work Code
If you have defined Lab Work Codes in the User Defined section of Site Options in the
Tools menu (see Section 4.1.2 of this chapter), you may enter a work code.
Doctors
You may enter up to four doctors for a patient. To open the Doctors list, click the Doctor
button with the mouse, or press <Spacebar> or <Enter> when the button has focus.
In the field labeled Last Name at the top of the screen, enter the first letter or letters of
the doctor’s last name. Click on the Search button or <Tab> to the Search button and
press <Spacebar> or <Enter>. A list of doctors that meet the criteria will appear. When
there are more than 15 records in the record set, all the records cannot be shown in one
window and navigation buttons appear beside the window.
Takes you to the first 15 records
Takes you back one set of 15 records
Takes you forward one set 15 of records
Takes you to the last 15 records.
16
<Tab> or use the mouse to bring focus to the list of doctors and select the doctor’s name
by one of these two methods
•
•
Use the mouse.
Use the ↓ (and ↑) keys to scroll through the list and highlight the doctor you want.
When the name you want is highlighted, select it either by using a double mouse click or
pressing <Enter>. This will place the Doctor’s name in the Selected Doctors box. When
you have selected all the Doctors, click the Add button, or key <Alt+A>.
Panel
Choose a test panel for this patient from the selection list. You may
• bring down the selection list by mouse clicking the arrow at the left of the field, (or
<Alt+↓>).
• type the first letter of the panel you want to make it appear in the window, or
• use the ↓ and ↑ keys to make the selections scroll through the window.
When you have selected the panel you want, <Tab> to the next field. Choosing a panel
enables the specimen information section of the screen.
You may define a default selection for the Panel field in the Default Data screen in the
Site Options section of the Tools menu. In addition, the Physician entry screen (Tools >
Physicians)allows the definition of a default panel for a physician. If the physician has a
default panel that is different from the general default panel, the Physician’s panel takes
precedence.
If you select an amniotic fluid panel, a checkbox will appear for the Klinehauer test.
Check this checkbox ONLY if the Klinehauer test indicates contamination of the fluid
sample with fetal blood. In this case no interpretation will be given and the message
“Klinehauer test positive” will be printed on the patient report. This message is message
number 888 and can be edited by the user.
Status
The system will search the database to determine the screening status of the patient
sample within the current pregnancy, eg Initial screening, Previous screen positive etc.,
and will display it automatically. If you are doing first trimester screening for Down
syndrome and second trimester screening for OSB, you could encounter a situation
where your first sample was screen negative for Down’s , and your second sample was
too early for OSB. When the third sample is entered, the program will look for the most
recent sample that had risk calculation. If it finds one, it will take the status from the
associated interpretation. If there is no sample with a risk calculation, it will give the
status of the most recent other sample. So in the case described, the status would be
Previous screen negative. Check your requisition to ensure that the status given agrees
with the information you have. The automatic selection can be overwritten if necessary.
17
Internal and Printable Notes
These free text fields allow the user to enter comments. The Internal Notes field is for
comments that are intended for internal use only, and they will not appear on the patient
report. The Printable Notes are intended to be printed on the patient report, however,
they will only appear on formats 1 or 4. Each of these notes fields holds 1150
characters. You can expand the field to show the entire content by bringing focus to the
field and pressing F5. If a patient has a note entry in either note field, when the
requisition in selected in the Add/View screen, an icon will appear below the Close
button.
AChE Field
If the panel you have ordered is an amniotic fluid panel, the AChE checkbox will appear.
Check it if an AChE test has been done. Two additional checkboxes will appear, one to
check if the AChE test was positive and the other if the sample was bloodstained.
Checking the AChE checkbox and not the Positive checkbox indicates that AChE was
negative. If you check the AChE checkbox, when your report is printed, risk will not be
reported, since AChE is a confirmatory test. The AChE result is printed only on Report
format 7. If the AFP and AChE do not agree, ie if one is positive and the other negative,
the report will state “Screening Ambiguous.”
Specimen Information
The Specimen section allows you to record information about the specimen and about
the patient at the time of the specimen draw.
Weight
A heavier patient has a larger blood volume, which results in a dilution of the analytes in
the patient’s bloodstream. PregSafe performs weight correction to adjust the MoM
calculations to compensate for this dilution effect. To do this, the program needs the
patient’s weight at the time the specimen was drawn. Type in the patient’s weight, and
change the weight units if different from the default . Use the mouse or the ←or→ key to
change the weight unit selection. If you want to calculate the risk without weight
correction, leave the patient weight field blank.
Note: Because the patient’s weight does not affect the volume of amniotic fluid, there is
no weight correction to the MoM for amniotic fluid samples, therefore the patient’s
weight is not needed when calculating amniotic fluid risk.
Collection Centre
If you wish to record the collection centre for the sample, choose it from the list, or type
in a new centre if it is not on the list already. If you open the selection list and type the
first letter(s) of the collection centre you want, the list will scroll to that point.
Specimen Numbers Assigned
By Referring Lab – If you wish to track the lab number assigned to the specimen by the
lab that referred the specimen to you, enter it here. It will appear on certain patient report
formats.
By Assaying Lab – This is a required field. Enter your lab’s specimen number, or let the
program assign it automatically by setting the default auto-numbering function in the Site
Options section of the Tools menu.
18
Specimen Date and Received Date
Specimen date is a required field and indicates the date that the patient’s blood sample
was drawn. The Specimen and Received Date fields will default to the current date,
unless you have preset date offsets in the Site Options section of the Tools menu. You
may adjust these dates by using the + and – keys.
Now that you have entered the specimen date, the Gestational age as of the specimen
date is calculated by the system and displayed in the Gestational age section of this
screen, along with the method of estimation and the gestational age as of the date of
estimation.
Gestational Age Estimation
Once you have entered the specimen date, the gestational age as of the specimen date
should appear in the Gestational Age section of the screen. If it doesn’t, or if you want to
change the method of gestational age estimation, click the calculator button (or key
<Alt+S>) to access the Gestational Age Method of Estimation screen.
This screen shows you the calculated gestational age as of the specimen collection date
for each method for which you have entered information. The currently selected method
row is highlighted in yellow. Choose the method you want by clicking the button at the
left of its row. Click Finish (or key <Alt+F>) to save and return to the Requisition screen.
Note: The data fields in this screen cannot be edited. To make changes in the gestational
age information, go to the pregnancy data screen. If changes to the pregnancy
screen do not appear in the Add/View screen, you may need to open the
Gestational age screen and update . You may also need to select a gestational age
estimation method if none is selected.
Click Finish (or key <Alt+F>) to save the specimen information and return to the
Add/View Patient screen. Click Next (or key <Alt+N>) to proceed to the Assay Results
Entry Screen.
19
2.1.5.
Adding a new pregnancy/requisition to an existing
patient.
To add a new pregnancy or requisition to an existing patient, bring up the patient record
by using the search function. If you use a patient code that is consistent over time, rather
than one that changes with each new sample, then when you enter that patient code in
the Add New Patient function, the system will retrieve the existing patient record. Check
the patient information to ensure that it is really the correct patient.
Add a new pregnancy
To add a new pregnancy, double-click in the first blank line in the pregnancy section of
the Add/View screen. The Pregnancy record will open and you can proceed to enter the
pregnancy and requisition/sample information as previously described.
Add a new sample to an existing pregnancy
When you receive a new sample for an existing pregnancy, check to see if there is any
new information about the pregnancy, such as new gestational age information, twin
pregnancy, etc. If the pregnancy information is different, open the pregnancy screen and
update the information there. If any of the critical data has changed, when you update
the record, it will go to Not Saved status. Save the changes by closing the record or
clicking the Save button and a new interpretation will be printed for the original sample. It
is essential that the pregnancy information be updated before entering the second
sample, because new gestational age information may put the original sample into too
early status. If the original sample was within GA range, and was DS negative, then for
the second sample, DS risk will not be calculated or reported. However, if the original
sample was too early after re-interpretation, then the second sample will have a DS
interpretation done.
Note: If there is a repeat sample for a pregnancy that has a previous screen positive for
Down Syndrome, the calculation of risk for the second sample takes into account
the first sample markers in addition to the second sample markers.
To add a new sample to an existing pregnancy, with the current pregnancy selected,
double click in the first blank line in the requisition section of the Add/View screen. The
requisition/sample screen will open. Record the doctor, panel ordered, patient weight,
assaying lab sample number and sample collected and received dates, and other
information as appropriate.
In the Gestational Age section of the screen, note that there is no gestational age as of
the sample date shown. Because the sample information has not been added directly
after the pregnancy information, the link between the gestational age information and the
sample date has not been created. This must now be done manually.
Click the calculator button in the upper right corner of this section. The Gestational Age
Method Calculation screen will open. Please note that no gestational age information
can be entered in this screen. Its only purpose is to allow the user to choose the method
of gestational age estimation.
20
Note that this screen
shows both the
gestational age as of the
estimation date and as of
the sample date.
For each method of
estimation for which there
is information entered, the
associated button on the
right side of the screen
will be activated. Choose
the method of estimation
to be used by clicking on
its associated button. This
creates the link between
the gestational age and
the sample date.
Click Finish.
When you return to the
requisition screen, you
will now see that the
gestational age as of the
sample date is displayed.
Click Finish to save the
record, or Next to go on to
the assay result entry
screen.
2.1.6.
Repeat OSB Screening
For singleton pregnancies only when a repeat sample is screened for OSB,
the calculated risk for that sample should include the MoM values from both the
initial sample and the repeat sample. With the implementation of the Wald 2000
OSB algorithm, PregSafe can now do that. However, the panel definition for the
repeat sample must use the Wald 2000 OSB algorithm. For these repeat
samples, as for all OSB serum screening, PregSafe uses a fixed risk cut-off for
OSB. However, since the risk is based on the MoM values from 2 samples, we
cannot calculate an equivalent MoM cut-off. Please see Chapter 4 for
information on OSB cut-offs with the Wald 2000 algorithm.
If you are using the Wald 2000 algorithm and either report format 1, 5 or 9, you
must edit the interpretive messages that apply to repeat OSB screens,
messages 410, 420, 440 and 450. These messages should indicate that the
calculated risk for a repeat OSB screen is based on the MoM values from both
the current and previous samples.
21
2.2.
ASSAY RESULTS ENTRY USING THE ADD/VIEW
SCREEN
The Assay Results Entry screen includes a summary of the patient and sample
information.
All the information required for interpretation appears on this screen:
•
•
•
The patient’s date of birth
The gestational age as of the specimen collection date
The assay results for the panel ordered.
The Assays listed will depend on the test panel chosen for this patient.
When this screen opens, focus is on the first assay result field. Type the result, then
press <Tab> or <Enter> to go to the Assay date field. This will open the field, and insert
the current date. Use the – and + keys to adjust the date, or use the month view
calendar. <Tab> or <Enter> to go to the next assay result field. When you have finished,
click the Finish button to close the screen and save the entries, click Back to go back to
the Requisition/Specimen screen, or Cancel to close the screen without saving the
entries.
Note :If you have proceeded from screen to screen using the Next button, none of the
information you have entered has yet been added to this patient’s record. If you
have reached the result entry screen, but have no results to enter, clicking the
Finish button without entering results will save the data you have entered to the
patient’s record. If you click Cancel at this point, none of the data you have
entered will be saved.
This completes the steps in patient data entry and returns you to the Add/View screen.
At this point, you may click the Close button to terminate patient entry, or the Add Pat
button to clear the Add/View screen and start adding another patient.
.
22
2.3.
SEARCH FOR A PATIENT RECORD
The Patient Search Bar allows you to define a set of conditions by which PregSafe will
search for a patient record. Enter information in the search fields and click Find.
Each additional piece of information that you provide will narrow the search and reduce
the number of qualified candidates. Since the patient code is unique, if you know the
patient’s code and enter it in full, the system will find the exact patient that you are
seeking. However, if you know only the patient’s last name, and enter just the first few
letters of that name, the result of the search is likely to be a large list of candidates. This
is called the record set.
If you know only roughly when the sample came to the lab, you can use the Advance
search to limit the time period for the search. Click the Advance button
23
Choose either the Requisition,
Specimen or Receive date and
the associated field will be
enabled. Specify how many
months back from the present
you wish to search, and click OK
to start the search.
The Advance Patient Search also
allows you to choose the sample
status for the search. The default
is all statuses. Uncheck the
appropriate check-boxes (using
the mouse or <Tab> and
<spacebar>) to eliminate those
statuses you don’t want to see
If you
• leave all the search fields blank and click the Find button,
• click the Search button on the Patient Entry Toolbar,
• or select Search Existing Patient Data from the Patient drop-down menu,
the record set produced by the search will include all the patient records in the database.
Use the scroll bar on the right to scroll down and see all the records. When the record
set first appears, it is sorted by Patient Code. You can click on the column headers to
sort the records by Last Name, First name, Birth date, LMP , Requisition date or
assaying lab specimen number.
24
Note that there may be duplicate records in the list. For example, Eliza Alonzo (patient
code ALIELI) appears three times because she has three specimen records. Choosing
any one of the lines for her will open the same patient record, with all specimens
displayed, and the specimen from the record selected in the search screen will be
selected.
Use the mouse to select and open the record you want, or use the ↑ and ↓ keys to
select and <Enter> to open it.
When opened from a record set produced by a search, the Add/View screen will include
navigation buttons. The navigation buttons on this screen allow you to move among the
records in the record set.
Takes you to the first record in the record set (<Ctrl+A>)
Takes you back one record in the record set (<Ctrl+B>)
Takes you forward one record in the record set (<CTRL+F>)
Takes you to the last record in the record set(<Ctrl+L>)
25
2.3.1.
Editing a Patient Record
When you have found the patient you wish to edit, use the mouse or <Tab> to select the
part of the record you want to change. The content of each section of the screen reflects
the selected record in the previous section. For example, if there are two pregnancy
records, the requisition information will pertain to the pregnancy that is highlighted; if
there are two requisitions within a pregnancy, the specimen section will display
information related to the highlighted requisition and if there are two specimens, the
results section will display the results for the highlighted specimen. Using the mouse,
you can go straight to the record you want to edit and double click to open the
appropriate screen. If you prefer not to use the mouse, <Tab> to the record you want to
open and when it is highlighted <Enter>.
Once the appropriate screen is open, you may tab to the field you wish to edit. If you do,
the content of the field will be highlighted, and you can replace it by typing new
information or making a new selection. Or you may select the field to edit using the
mouse. In this case, if it is a text field, you will need to use the mouse to highlight the
part of the entry that you wish to overwrite.
Deleting Records
The following shortcuts may be used to delete records.
<Ctrl + F3> will delete the current patient and all pregnancy and sample data
associated with that patient
<Ctrl + F5> will delete the highlighted pregnancy and all associated requisition and
sample data
<Ctrl + F6> will delete the highlighted requisition and all associated sample data
< Ctrl + F7> will delete a sample, but only if it is the second sample of an integrated
panel
< Ctrl + F8> will delete all results
< Ctrl + F9> will delete the highlighted result.
NOTE You can always delete a patient record (which deletes all associated records), but
since a patient must have at least one pregnancy record, and a pregnancy at least
one requisition and a requisition at least one sample, you can delete a pregnancy,
requisition or a sample only if there are two or more of them. Since, except for
integrated screening, each requisition has only one sample , if you want to delete
a sample, you must delete the requisition. For integrated screening, only the
second sample can be deleted without deleting the requisition.
26
The Edit record screen sensitive toolbar
When you are working in the patient Add/View screen, this toolbar appears above it,
providing shortcuts for commonly used operations.
Interpret the selected pending specimen (<Ctrl+I>)
Preview Interpretation for the selected sample (<Ctrl+P>)
Suspend/Unsuspend the selected sample (<Ctrl+S>) to suspend, (<Ctrl+Alt+S> to
unsuspend)
View provisional report for the selected pending sample (<Ctrl+W>)
View the Risk screen for the selected sample (<Ctrl+R>)
Reprint the report for the selected sample (<Ctrl+K>)
In addition to these functions, there are some
additional shortcuts available from the Add/View screen:
<Ctrl+1,4,5,8 or 9> View the report for the selected sample in one of the available
alternative report formats
<Ctrl+Q> Change the patient code
<Ctrl+Z> Change the status of the selected sample from Interpreted to Pending.
<Ctrl+T> View the first trimester report for a sequential screening patient when the
second trimester report has been interpreted.
<Ctrl+O> Print an outcome letter for the selected sample
<Ctrl+E> Reprint the labels for the selected sample (for those labs that have label
printing enabled)
<Ctrl+F> Go forward one patient in the search screen
<Ctrl+B> Go back one patient in the search screen
<Ctrl+A> Go to the first patient in the search screen
<Ctrl+L> Go to the last patient in the search screen.
27
2.3.2.
Editing Critical Data
Certain data, if changed, may change the patient’s risk for one or more conditions. This
includes:
• Patient date of birth
• Patient race
• Patient weight
• Information used to estimate gestational age
• Method of gestational age estimation
• Sample collection date
• Assay results
• Assay result date
When any of these pieces of data is changed, the sample will go to “Not Saved” status
and a Save button will appear at the bottom of the screen. (If you have your screen
resolution set to less than 1024 by 768, you may have to scroll down to see it.) Click the
Save button and a dialog box will appear asking you to click OK to save the change, or
Cancel to close the record without saving the change. When you click OK, another
dialog box will appear asking if you want the report to say Amended or not. Once you
have clicked either Yes or No, a new report with the re-calculated risk will be printed.
There is one exception to this behavior. If there is more than one requisition in a
pregnancy and new gestational age information is added that would normally
invoke a change in the method of estimation, the user must manually select the
new method of estimation for each requisition that needs to be re-interpreted.
Adding a new doctor to a requisition is treated as a critical change, since it is assumed
that you will want a report printed for the new doctor.
If there is more than one pregnancy for a patient, and the critical data related to the
patient record is changed (ie the patient date of birth or race) all samples in the most
recent pregnancy will be re-interpreted. The samples for the previous pregnancy(ies) will
go to suspended status. In order for this to work properly, the pregnancies must be in
the correct most-recent-first order on the screen. They will always appear this way on
the screen except when a new pregnancy has just been added and the record has not
been closed. If you have just added a new additional pregnancy and realize the either
the patient DOB or race needs to be changed, please close and re-open the patient
record before making the change.
2.3.3.
Terminating a Search/Edit Session
When you have finished editing a patient record that you have found as the result of a
search, click the Close button (<Alt+C>) to close the patient screen and bring you back
to the Search Patient screen.
∀ If you have made a critical change and have not saved the changes, the
program will prompt you to save or cancel.
To terminate this editing session, click the Close Window (x) button at the upper right of
the search window.
28
2.4.
INTERPRET REPORTS
All samples in Pending status can be interpreted and printed at once (in a batch)
by selecting Interpret Pending Reports from the Patient pull down menu or
Shortcut bar. The system scans the database and sequentially selects each sample that
is in Pending status. You may select the sort order of the batch in Tools>Site
Options>Report options. Please see section 4.1.4 of this chapter for more information.
As each pending sample is located, it is interpreted, and a report is automatically printed.
The process of interpretation assigns message numbers to each sample according to
the decision trees within the program. The patient report is constructed, the interpretive
messages are appended, and the final report is printed. All samples that are interpreted
will then be assigned a status of Interpreted. An interpretation summary report is
generated for the interpreted samples showing the Specimen code, Specimen date,
Patient code, Patient Name, and MoM values for each patient. If there are some
samples in pending status that are not interpreted, this report indicates the reason.
The interpretation of pending reports is a relatively quick process, so that once the print
job has been sent to the printer, you can continue to perform operations in PregSafe. If
you have an interface connecting PregSafe to either your Laboratory or Hospital
Information System, please see section 2.8 below for information on Provisional
Reports.
29