1
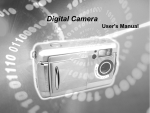
English
European Regulatory Information
Declaration of Conformity
We, the undersigned,
Company:
Address:
Country:
Telephone number:
Fax number:
Internet:
KYE SYSTEMS Corporation
No. 492, Chung Hsin Rd., Sec. 5, San Chung, Taipei
Hsien, Taiwan
R.O.C.
886-2-2995-6645
886-2-2995-5302
http://www.geniusnet.com.tw
certify and declare under our sole responsibility that the following equipment:
Product Description,
Intended use:
Information technology equipment, personal computer
peripheral input device, for home and office use
EU/EFTA member
states intended for
EU: Austria, Belgium, Denmark, Finland, France,
use:
German, Greece, Ireland, Italy, Luxembourg, The
Netherlands, Portugal, Spain, Sweden, United
Kingdom, EFTA: Switzerland, Iceland, Liechtenstein,
Norway
Manufacturer:
Brand:
Model Designators:
KYE SYSTEMS Corporation
Genius
G-Shot PalmDV310
are tested to and conform with the following standards:
EN 55022
EN 55024
and therefore complies with the essential requirements and provisions of the
Electromagnetic Compatibility Directive 89/336/EEC.
English
Welcome
This is a high-quality yet affordable Digital Video Camera that allows you to create, edit,
share and send photos to your friends and family.
This Digital Video Camera is also not just a Digital Camera. It lets you record short
segments of movies or voice. What's more, it can be used as a Web camera when you
connect it to a computer.
This easy-to-follow manual shows you how to use your new Digital Video Camera and install
all the softwares included in the software CD-ROM. You'll find clear instructions on how to
take pictures, record movies and voice, and use your Digital Video Camera as a PC camera.
Guidelines on how to use the software to transfer photos and movie segments from the
Digital Video Camera into your computer are also provided.
Whenever you want to send snapshots or short video clips via mails, create exciting photo
albums, produce movies, or even chat with your friends or family face to face over the
Internet, this Digital Video Camera gives you all the tools that you need.
-1-
English
Contents
1.Attention
Safty Precautions
Before Using Your Digtial Video
Camera
Operational Cautions
Package Contents
Pictures
Digital Zoom
Snapshot Menu
White Balance Setting
Image Size Setting
Image Quality Setting
Exposure Value Setting
Self-Timer Setting
To Take a picture with
self-timer
Date Stamp setting
Flash Function
3
3
3
4
4
2.Getting to Know Your Digital
Video Camera
5
Digital Video Camera
Controls
5
Front side View
Left Side View
Right Side View
5
5
5-6
Top View
6
Date /Time setting
Formatting the
Memory Card
GAME
Movie Mode
Status Identifier
Recording Video
Recording Video with
Self-Timer
Status Identifier
Image Playback
Movie Playback
Voice Playback
Album Function
Playback Menu
Deleting a Single Photos
Deleting All Photos
Image protect
Slide Show
DPOF Function
8
8
9
5.Installing Driver
28
10
10-12
6.Connecting Your
Computer
28
12
Using the Digital Video Camera as
a Web camera or a Mass Storage
drive
29
Connecting to Your TV/VCR
30
Downloading Images/Video clips 30-31
13
13
13
14
Status Identifier
Record Voice
14
14
Status Identifier
Shooting Photos
To take Close-up pictures
To take portrait and distant
20
20
21
21
21-22
22
22
23
24-25
25-26
26-28
9
Voice modes
Capture modes
18
19
19
Photo/Movie/Voice Playback
Mode
20
3.Getting Started
7
Preparing Your Digital Video
Camera
7
4.Start Using Your Digital
Video Camera
Function Tree
Setup Mode
16
16
16
16-17
17
17
18
18
7.Installing the Applications
for PC
31-32
14-15
15
15-16
16
Appendix: Digital Video Camera
Specifications
32-33
-2-
English
1. Attention
Please read through this manual carefully before using the Digital Video Camera and follow
the instructions to avoid damages caused by improper operations.
Safty Precautions
●The software CD-ROM packaged with the Digital Video Camera is for PC only. Playing this
CD-ROM on a stereo or CD player may cause damages to it.
●This Digital Video Camera is a precision electronic device. Do not attempt to service this
Digital Video Camera yourself, opening or removing covers may expose you to dangerous
voltage points or other risks.
Do not expose this Digital Video Camera under direct sunlight to avoid causing a fire.
Before Using Your Digital Video Camera
●Try to take some pictures before you perform the formal recording.
Before taking pictures with this Digital Video Camera in any important occasion (such as a
wedding ceremony or an overseas trip), do test the Digital Video Camera beforehand to
ensure that it functions well. Any additional loss caused by the malfunction of this product
(such as costs of photography or any loss of benefit generated by the photography) is not
the responsibility of our company and no compensation will be given for it.
●Copyright information
Unless agreed by the right owner, all the pictures taken with this Digital Video Camera
cannot be used in violation of copyright law. Moreover, when "No Photography" restriction
is placed on site, you cannot record any live performance, improvisation or exhibits even
for personal purpose. Any transfer of pictures or memory card with data must be conducted
under the constraints of copyright law.
●Notes on the LCD (Liquid Crystal Display) monitor
1.If the liquid contacts the skin:
Please wipe dry the skin with a cloth and wash with large amount of water.
2.If the liquid gets in the eye:
Please immediately rinse with fresh water for at least 15 minutes and then consult with a
doctor to receive treatment as soon as possible.
3.If anyone accidentally swallows the liquid:
Please rinse the mouth with water, drink large amount of water and receive treatment as
soon as possible.
-3-
English
Operational Cautions
This product consists of intricate electrical parts. To ensure the photography normally, do
not drop or hit the Digital Video Camera when taking pictures.
●Avoid to use or place the Digital Video Camera in the following locations:
1.Damp and dusty places.
2.Sealed vehicles or places exposed to direct sunlight or places subject to extremely high
temperatures or heat.
3.Violently turbulent environment.
4.Locations full of smoke, oil fumes or steams.
5.Locations subject to strong magnetic field.
6.Raining or snowing environment.
●Do not open the battery cover when the power is on.
●If water has entered the Digital Video Camera, immediately turn the power off and remove
the batteries.
●How to maintain your Digital Video Camera:
1.If lens or LCD monitor surface is dirty, please use lens brush or soft cloth to wipe clean
instead of touching them with your fingers.
2.Do not use any solid object to hit the Digital Video Camera to avoid scratching the lens,
or LCD monitor surface.
3.Do not use any detergent or volatile solution, which will subject the Digital Video Camera
case and paint to solving or distortion. Use soft cloth only.
Package Contents
Please check if the following items are in the package when purchasing this product.
● CD-ROM
(Driver & Application Software)
● Pouch
● Wrist Strap
● 2 x “AA” Alkaline Batteries
● USB Cable
● AV OUT Cable
● User's Manual
● Quick Installation Guide
Note:
Accessory and components may vary by different retailer.
-4-
English
2. Getting to Know Your Digital Video Camera
Digital Video Camera Controls
Front Side View
Shutter-Press the Shutter button to take
pictures in Capture mode, and to start & stop
recording movies(voice) in Movie(Voice) mode.
Self-timer LED
Flash
Lens
Microphone
Left Side View
Set Button-Press the button to get into the
Setup mode.
Mode Switch-You can select the following
modes by sliding this Mode switch:
1. Capture Mode
2. Movie Mode
3. Voice Mode
Battery Cover and SD Card slot
Right Side View
Macro Switch-The switch is used for
“Normal” and “Macro” modes switching.
icon will appear on LCD display when the
Macro mode is selected.
Terminal Compartment
Located on the left side of the Digital Video Camera are the two ports for attaching the
-5-
English
following cables: Audio/Video Output, USB. These ports will
enable you to attach the appropriate cables from the Digital Video Camera to your
computer or TV/VCR.
Audio/Video Output Port- Used to connect your Digital Video Camera to a TV/VCR for
viewing images/movies stored in your Digital Video Camera.
USB Port - Used to connect your Digital Video Camera to the computer via the USB
cable. You can then transfer photos and recorded movies(voice) from the Digital Video
Camera to your computer, or use the Digital Video Camera as a Web camera.
Top View
Speaker
Color Liquid Crystal Display
Strobe LED-When the strobe is charging, this
LED blinks, it will light on when the strobe is
ready, and turns off when the strobe is turned off.
Power LED-As the Digital Video Camera power
turned on, the power LED will light . It blinks and
goes off when batteries exhaust.
Power Button-Press the button one second,then
the Digital Video Camera will power on/off.
Enter Button- The multi-function key set
performs different operations in each mode, e.g. set , select , ok.
Playback Button-Press the button to get into the playback mode. The playback button
can be performed in “Capture”,”Movie”and”Voice” modes. Simply press the button again
to leave playback mode and enter the mode selected by mode switch.
Display Button - The Display button provides 3 display types of the LCD (such as
Normal / Full Screen / Off ) in" Capture", "Playback" and "Movie" modes.
Menu Button-You can enter detail Menu functions in "Capture" , "Playback" and "Movie"
modes.
Battery power level
Full battery power
Medium battery power
Low battery power
Battery exhausted
-6-
English
3. Getting Started
Preparing Your Digital Video Camera
●Step 1 Insert two "AA" batteries into the battery compartment .
●Step 2 When inserting SD/MMC memory card, follow the icon shown in the compartment
to insert or remove the card push-and-pull.
Then, push the memory card all the way into the memory compartment and close the
battery door, push the battery door down and then slide it closed.
NOTE
y
When memory card is inserted, internal 16MB flash memory will be disabled no matter card is full
or not.
●Step 3 Attach the wrist strap to the strap holder at the side of the Digital Video Camera
as illustrated in the picture below.
-7-
English
4. Start Using Your Digital Video Camera
●Step 1 Press Power button to turn on the Digital Video Camera. And Power LED will light
on.
●Step 2 The LCD Display will be turned on automatically.
NOTE
y
The LCD Display will be turned off automatically if you do not operate Camera over 30 seconds, the
Camera will be turned off automatically if you do not operate it over 90 seconds.
Function Tree
-8-
English
Setup Mode
Press the Set button to enter the setup menu.
You can configure the basic settings for Digital Video Camera:
1.Beep-Sound effect On/Off.
2.Date/Time-Date & time settings.
3.Language-Language setting: English/Italiano/Francais/Deutsch/Espanol/日本語/繁體中文
/简体中文.
4.Format-Formatting the internal memory or memory cards.
5.Default-Reset to preliminary settings.
6.TV-TV output format setting : NTSC/PAL
7.Frequency-Fluorescent frequency : 50Hz/60Hz
8.GAME-Tetris/Racing
Date /Time setting
●Step 1 Press
to move to the Date/Time option.
●Step 2 Press Enter button to bring up the menu.
●Step 3 Press
to adjust Date/Time; press
minute.
to select year, month, day, hour or
●Step 4 Press Enter button to save your settings and then exit.
-9-
English
Formatting the Memory Card
You are suggested to format your SD/MMC memory card before using it to store pictures.
●Step 1 Press
to move down to the Format option.
●Step 2 Press Enter button to bring up the"Cancel/OK" Menu.
●Step 3 To format the memory card, select “ok” on the screen and then press the Enter
button. You will hear a ring sound when you press it.
●Step 4 The Digital Video Camera then begins formatting the memory card. Wait for the
formatting process to finish.
●Step 5 After the memory card has been formatted; all the pictures and datas in the memory
card will be deleted. And there is a message showing: No Picture.
GAME
●Step 1 Press
to move down to the GAME option.
●Step 2 Press Enter button to bring up the"Cancel/OK" Menu.
●Step 3 Press
to select “Tetris” or “Racing”.
●Step 4 Select the “Tetris” and press ENTER button to come in “Tetris”.
●Step 5 Select the “Racing” and press ENTER button to come in “Racing”.
-10-
English
Game Manual
一. Tetris operation manual
Operation:
Display button
Left button
Right button
Down button
Menu button:Pause the game and display the game menu
Start the Tetris
Come in the Tetris menu
Start: Select the “start” and press OK button to start the new game
Level: In the level menu have three type level for the player
Mode:MODE0 have eight type object, MODE1 have twelve type object and MODE2 have
fifteen type object in the game
Score: High score
Pause the tetris
-11-
English
Press the Menu button to pause the game and display the game menu CONTINUE:Select
the “Continue” and press OK button to the continue the game.
NEW GAME: Select the “NEW GAME” and press OK button to the restart the game.
ESC: Quit the game and return to the Setup menu.
If the game is over the player can select the “NEW GAME” to start the new game or select
the “ESC” to quit the game.
二. Racing operation manual
Operation:
Up button
Right button
Left button
Down button
Menu button:Pause the game and display the game menu
Start the Racing
Select the “start” and press OK button to start the new game ,The Racing game have six
grade,the one grade have two minute to complete.Some time in the game playing will
appear a gold car , if player touch the gold car then add a life.
Pause the tetris
Press the Menu button to pause the game and display the game menu
Start: Start the new Racing Car game
TopScore: The highest Score.
Control: Intruduce the control .
Level: Select the game level
Movie Mode
Slide the Mode switch to select Movie Mode
-12-
English
Status Identifier
Movie Mode Indicator
Movie recording time
Image Number
Battery Status Indicator
Memory Indicator
Recording Video
With your Digital Video Camera, you can record short sequences of video at a rate of 15
frames per second. The Digital Video Camera stores video in AVI format.
●Step 1 Press once the Shutter button to start recording video. You will see
live views of the subjects or scenes you are recording on the
LCD Display.
●Step 2 And while recording, a red icon
blinks on the upper left side of the LCD Display
and the recording time counts up. The icon stops blinking and becomes green
after you terminate the recording process.
●Step 3 To stop recording, press the Shutter button again.
Recording Video with Self-timer
You can use Self-timer function for recording video clips, press Menu button to switch
Self-timer on or off. When Self-timer set on, the icon
will appear on center of LCD panel.
Self-timer function is same as in Capture Mode.
Image quality setting
Its operating is same as Capture Mode.
-13-
English
Voice mode
With your Digital Video Camera,you can record voice just as a recorder. It can record music
or dialog if you like. The file of voice is standard Microsoft WAV format. The file can be
broadcasted on the Digital Video Camera or PC, and you can broadcast on TV but it must
connect to TV through AV cable first.
Status Identifier
Voice Icon
Record Length
Image Number
Memory Indicator
Battery Indicator
Record Voice
Slide modes switch to the Voice
●Step 1 Press once the Shutter button to start recording voice.
●Step 2 And while you are recording, an red icon ● blinks on the upper left side of the LCD
Display. And the icon disappear after you terminate the recording process. And the
recording time counts up as you continue shooting.
Step 3 Press Shutter button to stop the voice recording.
The voice playback function is in Playback mode.
Capture Mode
-14-
English
Slide Mode switch to Capture Mode
Status Identifier
Date Stamp (Default is not displayed).
Battery Status Indicator:
(Full)
Half
Low
Empty
Memory Card Status:
Use Internal Memory
Internal Memory Full
Use SD Card
SD Card Full
Image Number.
Self-timer Indicator.
EV Level
White Balance:
Auto,
Sunny,
Tungsten,
Fluorescent.
Image Quality:
Fine,
Normal,
Basic.
Image Size: 5.5M(2720x2040), 3M(2048x1536), 2M(1600x1200), 1.3M (1280x960).
Zoom Lever:
(Normal), (4.0x Zoom).
Macro Indicator
Capture Mode Indicator
Flash Mode:
(OFF),
(Auto),
Warning:
Card Lock , the sign shows up blinking as the Shutter Button pressed with the
memory card locked physically.
Memory Full , the sign shows up blinking when the internal memory or the
inserted memory card is full. Please notice that the capturing functions will not access when
the Warning signals appear.
Shooting Photos
-15-
English
Taking pictures with your Digital Video Camera is a snap. Just point and shoot!
●Step 1 Make sure the Digital Video Camera is turned on.
●Step 2 Use the LCD display to frame the subjects you want to photograph.
●Step 3 Press the Shutter button to take a picture.
The LCD will turn off until it is stored in the memory. When the LCD Display resume, you
may focus your next target to take the next picture.
To take close-up pictures
●Step 1 Push the Macro switch downwards to select Macro mode .
The Macro indicator
on the LCD display will show , allowing you to
take pictures at a closer range (between 25~30cm).
●Step 2 To take pictures, follow the steps in the "Shooting Photos"
section.
To take portrait and distant pictures
●Step 1 Push the Macro switch upward. This sets the Digital Video Camera to normal mode,
and the icon
on the LCD panel will disappear, allowing you to take pictures of people or
sceneries which distance 1.2m~infinity.
●Step 2 To take pictures,follow the steps in the "Shooting Photos "section.
Digital Zoom
The Zoom Lever hides normally, press
to enter Zoom in / Zoom out functions, the
framed image can be zoomed between 1.0X ~4.0X.
Snapshot Menu
In Capture mode, press Menu button to enter Snapshot Menu:
White Balance Setting
●Step 1 Use
to select WB on the menu bar.
-16-
English
●Step 2 Press Enter button to enter White Balance setting menu.
●Step 3 You can use
to select Auto, Sunny, Tungsten, and Fluorescent.
●Step 4 Press Enter button to confirm your selection, or press Menu button to cancel it.
Image Size Setting
●Step 1 Use
to select the image size icon on menu bar.
●Step 2 Press Enter button to enter Image Size setting menu.
●Step 3 You can use
to select: 1.3M : Fine quality, 1280*960 pixels, 2M : Best
quality, 1600*1200 pixels, 3M : 2048*1536 pixels, 5.5M : 2720*2040 pixels(firmware
interpolation)
●Step 4 Press Enter button to confirm your selection, or press Menu button to cancel it.
Image Quality Setting
●Step 1 Use
to select
on the menu bar.
●Step 2 Press Enter button to enter Image Quality setting menu.
●Step 3 You can use
to select Fine, Normal and Basic
●Step 4 Press Enter button to confirm your selection, or press Menu button to cancel it.
-17-
English
Exposure Value Setting
●Step 1 Use
to select EV on the menu bar.
●Step 2 Press Enter button to enter Exposure Value setting menu.
●Step 3 You can use
to set -2EV, -1.5EV, -1EV, -0.5EV, 0EV, +0.5EV, +1EV,
+1.5EV,and +2EV.
●Step 4 Press Enter button to confirm your selection, or press Menu button to cancel it.
Self-Timer Setting
●Step 1 Use
to select
on the menu bar.
●Step 2 Press Enter button to enter Self-Timer setting menu.
●Step 3 You can use
to select ON, Off.
●Step 4 Press Enter button to confirm your selection, or press Menu button to cancel it.
To Take a picture with self-timer
When the Self-timer function set On , a Self-timer icon
appears.
at center of the LCD display
When shutter button pressed, the self-timer icon disappears while a number appears
counting down from 10 with beep sounds and the self-timer LED blinks.
-18-
English
After count down to zero, the Digital Video Camera will take one picture.
Date Stamp setting
●Step 1 Use
to move to
on the menu.
●Step 2 Press Enter button to enter Date Stamp setting menu.
●Step 3 You can use
to select ON, Off.
●Step 4 Press Enter button to confirm your selection, or press Menu button to cancel it.
NOTE
y
After setting date stamp on, the date will display on LCD panel, and stamped on captured
pictures later.
Flash function
Flash function is active Only in Capture Mode, the Flash has two status, if press Right
button , it can sequence into Auto and OFF status.
Right button
Off
Auto
-19-
English
Photo/Movie/Voice Playback Mode
Press the Playback button to Playback Mode
Status Identifier
Image Number.
Image Total.
Movie file Indicator.
Movie play Length
Locking Indicator
Battery Indicator
Image Playback
Press
to playback the previous image or the next image.
Press Enter button to the image zoom mode
Press Up button
Press Down button
to zoom in the image
to zoom out the image
In this mode press the menu button into the pan modes
In this mode , you can press [ ]、[ ]、[ ]、[ ] to preview the any partly image.
Press Enter button to quit the zoom mode or pan mode.
-20-
English
Movie Playback
When it comes to movie file , the movie indicator appears on
the up-left corner of screen , by pressing the Enter button you
can start playing the movie.Press Enter button to stop playing
movie.
In movie playback you can press Up button
or Down
button
to adjust volume,the volume indicator will appears
on down-right corner of screen,and press Menu button to pause.
Voice playback
When it cames to voice file,the voice icon indicator appears on screen,by pressing the
Enter button you can start playing the voice.Press Menu button to pause play process.
Press Enter button to stop playing voice.
In voice playback process, press the [ ] 、[ ] button to adjust volume and then the volume
appears on screen left side ,but press [ ]、[ ] button to adjust the play time
Album Function
●Step 1 Enter Playback Mode.
●Step 2 Press Left button
to enter 3-frame Album function , which shows 3 images per
page with a mid-size preview window. Use
to change previewing images . (Pressing
ENTER can return to Playback Mode which displays selected image with full screen.)
-21-
English
●Step 3 Press Left button
images in a page, then use
again to enter 3x3 Album, which supports to playback 9
to select image.
●Step 4 Press ENTER to playback selected image with full screen .
Playback Menu
Deleting Photos
You can choose to delete a single photo or all the photos stored in the Digital Video Camera.
Deleting a Single Photo
●Step 1 Make sure that the Digital Video Camera is in playback mode.
Example: Move to the picture which is going to be deleted.
●Step 2 Press the Menu button to enter Playback Menu and then move to DEL with
If press Menu button, the screen will return to step 1.
●Step 3 Press the Enter button to bring up Delete menu: Delete One and Delete All.
If press Menu button, the screen will return to step 2.
-22-
English
●Step 4 Press Enter button to confirm Delete One, then bring up current picture with Delete
menu: Cancel and Photo Number.
If press Menu button, the screen will return to step 2. Press
can select the photo of you
would to delete.
●Step 5 Press Enter to confirm your deleting operations. The
image shown on the display will then be deleted and the
previous image comes up.
If press Menu button, the screen will return
to step 2.
●Step 6 Select Cancel to stop deleting operation and go back
to the Playback Menu.
Deleting All Photos
You may also choose to delete all the photos if the memory is already full and you want to
free up the space to take more photos. But before you remove all photos, remember to
transfer them to your computer.
●Step 1 Make sure that the Digital Video Camera is in playback mode.
●Step 2 Press the Menu button to enter Playback Menu.
If press Menu button, the screen will return to step 1.
●Step 3 Press the Enter button to bring up Delete menu: Delete One and Delete All, If
press Menu button, the screen will return to step 2.
●Step 4 Press
to select the Delete All option on the menu screen.
-23-
English
If press Menu button, the screen will return to step 2.
●Step 5 Press Enter button to confirm Delete All, then bring up current picture with Delete
menu: Cancel and Delete All.
●Step 6 Press
to select the Delete All option on the menu screen, and then press
Enter button to confirm the erasing operation again.
If you change your mind and do not want to continue deleting all the pictures, press
to
select Cancel on the menu screen. Then press the Enter button. All your pictures will be
retained.
●Step 7 After all the pictures have been deleted, there is a message showing: No picture
Image protect
Perhaps, you hope some images will not be deleted by accident; you can choose to protect
specific photos taken in the Digital Video Camera.
●Step 1 Press the Menu button to enter Playback Menu.
If press Menu button, the screen will return to step 1.
●Step 2 Use
to select
-24-
English
●Step 3 Press Enter button to bring up Protect Menu.
If press Menu button, the screen will return to step 3.
●Step 4 Press
to select one image for protection.
●Step 5 Press the Enter button to protect current image, then icon
will appear on right
top corner of the image that you selected. This means the image has been protected.
●Step 6 If current image had been protected, you can press the Enter button to
unprotect it, and then icon
will disappear on right top corner of the image that you
selected. This means the image protection had been disabled.
If press Menu button, the screen will return to step 3.
Slide Show
You can slide show all pictures previously taken with the Digital Video Camera.
●Step 1 Use
to move to
●Step 2 Press Enter button to bring up Slide Show Menu: Cancel and Start.
If press Menu button, the screen will return to step 1.
●Step 3 Press
to select the Start on the menu screen, and then press Enter button
to slide show all of your pictures.
●Step 4 Press Enter button to stop slide show.
-25-
English
DPOF Function
Selecting DPOF option in Playback Menu can directly send your selected photo to the
compatible printers that read DPOF (Digital Print Order Format) files.
●Set All Pictures to DPOF file
●Step 1 Press the Menu button to enter Playback Menu.
If press Menu button, the screen will return to step 1.
●Step 2 Use
to move to DPOF
If press Menu button, the screen will return to step 1.
●Step 3 Press Enter button to bring up DPOF Menu: Set All and Set One.
If press Menu button, the screen will return to step 2.
●Step 4 Press
to select Set All on the menu screen, and then press Enter button to
set all of your pictures, which would indicate print number 1 only, to DPOF files unless
specific picture marked from following Set Single Picture process
-26-
English
NOTE
y
All pictures, which had not been set to DPOF file, will be set to DPOF file, and print number
is 1
You can reset all DPOF pictures by select Reset All and then press Enter Button.
Set Single Picture to DPOF file
●Step 1 Press the Menu button to enter Playback Menu.
If press Menu button, the screen will return to step 1.
●Step 2 Use
to move to DPOF
If press Menu button, the screen will return to step 1.
●Step 3 Press Enter button to bring up DPOF Menu: Set All and Set One.
If press Menu button, the screen will return to step 3.
●Step 4 Press
to select Set One option on the menu screen, and then press Enter
button to enter menu for setting single picture to DPOF file.
●Step 5 Press to select single picture, use
to adjust print number, number zero
will return to
means this picture is not set in DPOF file.If come to the last file press
the first file.
●Step 6 After setting single picture to DPOF file, press Enter button to return to Step 3.
-27-
English
5. Installing Driver
You can use the PC Camera and Mass Storage functions of the
camera via PC. To install the proper camera driver, perform the
following:
●Step 1 Insert the software CD-ROM supplied with the package
into the CD-ROM drive.
●Step 2 The Auto-run program will be executed and the welcome screen appears:(If your
CD-ROM drive doesn't support the auto-run function. Please double press on the
"My Computer" icon on the desktop. Double press the CD-ROM drive icon and
press the InstallMgr.exe file in the root directory.
●Step 3 Press on the drivers to install them, and the following screen will appear :
●Step 4 Press Next to continue the setup program. After the camera driver installed
successfully, a message will appear on the screen as following:
●Step 5 Press Finish to restart the computer and finish the driver installation.
6. Connecting Your Computer
You need to connect the Digital Video Camera to your computer's USB port to transfer
photos into your computer. This section shows how you can connect the Digital Video
Camera to your computer.
You must install the Digital Video Camera Driver from the software CD-ROM before
connecting to ensure your computer functions properly with USB. See the section
"Installing Software" for details on how to install the driver.
-28-
English
System Requirements (Windows)
Pentium 200 MHz or higher
Windows 98SE/Me/2000/XP
64MB RAM
128MB hard disk space
24X CD-ROM drive
Available USB port
Using the Digital Video Camera as a Web camera or a Mass
Storage drive
When you connect Digital Video Camera to your computer, you can use it as a Web camera
or a Mass Storage drive. You can then join video conferencing sessions on the Internet with
your Digital Video Camera. You need to install the Digital Video Camera Driver and
required application softwares from the software CD-ROM before you can start using it as a
Web camera. See the section "Installing Software" for installation instructions.
Using the Digital Video Camera as a Web camera, it also lets you capture video directly into
your computer and editing or enhancing your videos. See the section
"Installing Software" for installing instructions.
●Step 1 Make sure the Digital Video Camera loads two ”AA” batteries in
the compartment.
●Step 2 Connect the smaller end of the USB cable into the USB port of
your Digital Digital Video Camera.
NOTE
y
Make sure to plug-in USB cable in right direction gently to avoid possible damage to USB connector.
●Step 3 Connect the other end of the USB
cable to the USB port located on the back of
your computer.
The Digital Video Camera’s LCD Panel will turn
on and enter
PC Connection Menu
-29-
English
●Step 4 Press
to select Mass Storage or PC Camera option on the menu screen, and
then press Enter button to enter menu for Using the Digital Video Camera as a Web
camera or a Mass Storage drive.
Connecting to Your TV/VCR
Connect your Digital Video Camera to a television if you want to have a larger view of your
photos.
●Step 1 Connect the black colored plug of the Audio/Video output cable into the
Audio/Video out port in the Terminal Compartment on the left side of the Digital Video
Camera.
●Step 2 Connect the other end of the audio(the white plug) and video(the yellow plug)
output cable to the Audio-in and Video-in plug on your TV/VCR.
●Step 3 On your television, select the channel for auxiliary Audio/Video input.
NOTE
y
y
Locate the Audio/Video ports on your individual TV/VCR and insert the video output
connector into the Video port.
Channels may vary by manufacturers; refer to your VCR's operating manual.
Downloading Images/Video clips
When the camera is turned on and connected to
your computer, it is considered as a disk drive,
just like a floppy disk or CD. You can download
(transfer) images/video clips by copying them
from the “removable disk” (“untitled” disk on a
Macintosh) to your computer hard drive or to
another kind of disk.
WindowsOpen the "removable disk" and subsequent folders by double clicking on them. Your images
-30-
English
are inside these folder(s). Select the images that you want, then choose "Copy" from the
"Edit" menu. Open the destination location (folder) and choose "Paste" from the "Edit" menu.
You may also drag and drop image files from the camera to a desired location.
NOTE
y
Memory card users may prefer to use a memory card reader (highly recommended).
y
Before playing Video Clips(*.AVI file) ,make sure your PC has been installed with
DirectX8.0 or higher, and installed sound effective card into you computer
7. Installing the Applications for PC
Install Arcsoft Software (Take Photo Impression Installation for example)
●Step 1 Insert the software CD-ROM supplied with the package into the CD-ROM drive.
●Step 2 The Auto-run program will be executed and the welcome screen appears:
(If your CD-ROM drive doesn't support the auto-run function. Please double press on the
"My Computer" icon on the desktop. Double press the CD-ROM drive icon and press the
InstallMgr.exe file in the root directory.
●Step 3 Press the Arcsoft PhotoImpression to
install, and the screen will appear as following:
●Step 4 Select the language for installation. press Enter button to confirm your
selection.
●Step 5 You will see the Welcome screen. Press Next to continue.
●Step 6 Enter Software License Agreement window. Please press Yes to continue
installation.
-31-
English
●Step 7 Please follow the instructions of installation Wizard to select a destination folder
and components you need.
●Step 8 Please select the program folder you want to install.
●Step 9 When the installation is completed, the window below will appear. Press Finish
to end the installation.
Appendix: Camera Specifications
●Lens : f=9.6 mm
●Image Sensor : 3.0 mega pixels CMOS sensor
-32-
English
●Aperture: F/3.0
●Sensitivity : ISO 100
●White Balance : Auto, Sunny, Tungsten, Fluorescent.
●Shutter: Electrical
●Shutter Speed : 1/4 sec. ~ 1/2000 sec.
●Storage Media : 16MB Internal Flash Memory and SD / MMC Card Slot (supports max.
512MB card)
●Image File Format : JPEG for Still Image; AVI for Motion Image
●Image Resolution :
2720x2040(Firmware Interpolation Technology)
2048 x 1536
1600 x 1200
1280 x 960
●Digital Zoom : 10-Step 4X Digital Zoom
●Focal Range : Standard: 1.2m ~ Infinity Macro: 25 ~ 30cm
●Self-timer : 10 sec. delay
●PC-CAM Mode : 20~30 fps. (320 x 240) ;15~25 fps. (640 x 480)
●Flash Mode : Auto,Off
●AV-OUT : NTSC / PAL options
●PC Connection : USB (Ver. 1.1)
●Movie File : Recording continuous movie file with 320 x 240 format:
Internal 16MB
memory
Fine
Normal
Basic
80 Seconds
120 Seconds
200 Seconds
● Voice File: 61 Minute
●Recordable Image Numbers (16MB) :
1280 X960
16MB
1600X1200
2048X1536
2304X1728
Fine
24
16
9
6
Normal
32
22
14
9
Basic
44
28
19
11
●Power Supply : 2 x “AA” alkaline Batteries
●Dimensions : 82 x 82 x 32 mm
●Weight : About 120g (batteries excluded)
* Design and specifications are subject to change without notice.
-33-