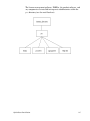
1
Parametric Technology Corporation
®
Pro/ENGINEER 2001
Installation and
Administration Guide
DOC-U0134-EN-320
Copyright © 2001 Parametric Technology Corporation. All Rights Reserved.
User and training documentation from Parametric Technology Corporation (PTC) is subject to
the copyright laws of the United States and other countries and is provided under a license
agreement that restricts copying, disclosure, and use of such documentation. PTC hereby grants
to the licensed user the right to make copies in printed form of this documentation if provided on
software media, but only for internal/personal use and in accordance with the license agreement
under which the applicable software is licensed. Any copy made shall include the PTC copyright
notice and any other proprietary notice provided by PTC. This documentation may not be
disclosed, transferred, modified, or reduced to any form, including electronic media, or
transmitted or made publicly available by any means without the prior written consent of PTC
and no authorization is granted to make copies for such purposes.
Information described herein is furnished for general information only, is subject to change
without notice, and should not be construed as a warranty or commitment by PTC. PTC assumes
no responsibility or liability for any errors or inaccuracies that may appear in this document.
The software described in this document is provided under written license agreement, contains
valuable trade secrets and proprietary information, and is protected by the copyright laws of the
United States and other countries. UNAUTHORIZED USE OF SOFTWARE OR ITS
DOCUMENTATION CAN RESULT IN CIVIL DAMAGES AND CRIMINAL PROSECUTION.
Registered Trademarks of Parametric Technology Corporation or a Subsidiary
Advanced Surface Design, CADDS, CADDShade, Computervision, Computervision Services,
Electronic Product Definition, EPD, HARNESSDESIGN, Info*Engine, InPart, MEDUSA,
Optegra, Parametric Technology, Parametric Technology Corporation, Pro/ENGINEER,
Pro/HELP, Pro/INTRALINK, Pro/MECHANICA, Pro/TOOLKIT, PTC, PT/Products, Windchill,
and the InPart logo.
Trademarks of Parametric Technology Corporation or a Subsidiary
3DPAINT, Associative Topology Bus, Behavioral Modeler, BOMBOT, CDRS, CounterPart, CV,
CVact, CVaec, CVdesign, CV-DORS, CVMAC, CVNC, CVToolmaker, DesignSuite,
DIMENSION III, DIVISION, DVS, DVSAFEWORK, EDE, e/ENGINEER,
Electrical Design Entry, e-Series, Expert Machinist, Expert Toolmaker, Flexible Engineering,
ICEM, Import Data Doctor, Information for Innovation, i-Series, ISSM, MEDEA, ModelCHECK,
NC Builder, Nitidus, PARTBOT, PartSpeak, Pro/ANIMATE, Pro/ASSEMBLY, Pro/CABLING,
Pro/CASTING, Pro/CDT, Pro/CMM, Pro/COMPOSITE, Pro/CONVERT, Pro/DATA for PDGS,
Pro/DESIGNER, Pro/DESKTOP, Pro/DETAIL, Pro/DIAGRAM, Pro/DIEFACE, Pro/DRAW,
Pro/ECAD, Pro/ENGINE, Pro/FEATURE, Pro/FEM-POST, Pro/FLY-THROUGH,
Pro/HARNESS-MFG, Pro/INTERFACE, Pro/LANGUAGE, Pro/LEGACY,
Pro/LIBRARYACCESS, Pro/MESH, Pro/Model.View, Pro/MOLDESIGN, Pro/NC-ADVANCED,
Pro/NC-CHECK, Pro/NC-MILL, Pro/NCPOST, Pro/NC-SHEETMETAL, Pro/NC-TURN,
Pro/NC-WEDM, Pro/NC-Wire EDM, Pro/NETWORK ANIMATOR, Pro/NOTEBOOK, Pro/PDM,
Pro/PHOTORENDER, Pro/PHOTORENDER TEXTURE LIBRARY, Pro/PIPING,
Pro/PLASTIC ADVISOR, Pro/PLOT, Pro/POWER DESIGN, Pro/PROCESS, Pro/REPORT,
Pro/REVIEW, Pro/SCAN-TOOLS, Pro/SHEETMETAL, Pro/SURFACE, Pro/VERIFY,
Pro/Web.Link, Pro/Web.Publish, Pro/WELDING, Product Structure Navigator, PTC i-Series,
Shaping Innovation, Shrinkwrap, The Product Development Company,
Virtual Design Environment, Windchill e-Catalog, Windchill e-Series, Windchill ProjectLink,
CV-Computervision logo, DIVISION logo, and ICEM logo.
Third-Party Trademarks
Oracle is a registered trademark of Oracle Corporation. Windows and Windows NT are
registered trademarks of Microsoft Corporation. Java and all Java based marks are trademarks
or registered trademarks of Sun Microsystems, Inc. Adobe is a registered trademark of Adobe
Systems. Metaphase is a registered trademark of Metaphase Technology Inc. Baan is a
registered trademark of Baan Company. Unigraphics is a registered trademark of EDS Corp.
I-DEAS is a registered trademark of SDRC. SolidWorks is a registered trademark of Solidworks
Corp. Matrix One is a trademark of Matrix One Software. SHERPA is a registered trademark of
Inso Corp. AutoCAD is a registered trademark of Autodesk, Inc. CADAM and CATIA are
registered trademarks of Dassault Systems. Helix is a trademark of Microcadam, Inc. IRIX is a
registered trademark of Silicon Graphics, Inc. PDGS is a registered trademark of Ford Motor
Company. SAP and R/3 are registered trademarks of SAP AG Germany. FLEXlm is a registered
trademark of GLOBEtrotter Software, Inc. Rational Rose 2000E, is copyrighted software of
Rational Software Corporation. RetrievalWare is copyrighted software of Excalibur Technologies
Corporation. VisualCafé is copyrighted software of WebGain, Inc. VisTools library is copyrighted
software of Visual Kinematics, Inc. (VKI) containing confidential trade secret information
belonging to VKI. HOOPS graphics system is a proprietary software product of, and is
copyrighted by, Tech Soft America, Inc. All other brand or product names are trademarks or
registered trademarks of their respective holders.
UNITED STATES GOVERNMENT RESTRICTED RIGHTS LEGEND
This document and the software described herein are Commercial Computer Documentation and
Software, pursuant to FAR 12.212(a)-(b) or DFARS 227.7202-1(a) and 227.7202-3(a), and are
provided to the Government under a limited commercial license only. For procurements
predating the above clauses, use, duplication, or disclosure by the Government is subject to the
restrictions set forth in subparagraph (c)(1)(ii) of the Rights in Technical Data and Computer
Software Clause at DFARS 252.227-7013 or Commercial Computer Software-Restricted Rights
at FAR 52.227-19, as applicable.
Parametric Technology Corporation, 140 Kendrick Street, Needham, Massachusetts 02494 USA
2 April 2001
Contents
About This Guide .................................................................................... xi
How to Use This Guide ...............................................................................................xii
Related Documentation ..............................................................................................xii
Resources and Services .............................................................................................xii
Documentation for PTC Products ...............................................................................xii
PTC Documentation Conventions.............................................................................. xiii
Overview ................................................................................................1-1
What You Received .................................................................................................. 1-2
Before You Proceed.................................................................................................. 1-3
Receiving Your License Pack Online ........................................................................ 1-3
New Software Orders, Reconfigurations ............................................................. 1-3
Maintenance Shipments...................................................................................... 1-4
Storing Your License Pack Online ............................................................................ 1-5
Graphical Installation Utility....................................................................................... 1-6
Creating Shortcuts (Windows Only) .......................................................................... 1-7
Setting Foreign Language Defaults .......................................................................... 1-7
Quick-Start Installation.........................................................................2-1
Installing License Management and Product Software ............................................. 2-2
Installing Software on the License Server................................................................. 2-2
Installing FLEXlm on the License Server ............................................................ 2-2
Installing Pro/ENGINEER on the License Server ................................................ 2-3
Installing Software on a License Client ..................................................................... 2-3
Installing Software on a Node-Locked Machine........................................................ 2-4
Where Your Software Is Installed........................................................................ 2-4
v
Installing License Management Software...........................................3-1
Before You Proceed ................................................................................................. 3-2
Separating Multiple Licenses.................................................................................... 3-2
Finding the PTC Host ID........................................................................................... 3-2
Displaying PTC Host ID Information ................................................................... 3-3
Understanding the PTC Host ID Information....................................................... 3-3
Windows Requirements............................................................................................ 3-3
UNIX Requirements.................................................................................................. 3-4
Starting PTC.Setup................................................................................................... 3-4
Windows ............................................................................................................. 3-4
UNIX ................................................................................................................... 3-5
Installing License Management Software ................................................................. 3-5
Supplying Your License Information ......................................................................... 3-9
Importing Your License File .................................................................................... 3-10
Verifying License Server Activity....................................................................... 3-12
Entering Your License File Information Manually ................................................... 3-13
Using the FLEXlm License Editor ..................................................................... 3-13
Installing and Starting Pro/ENGINEER................................................4-1
Installing Pro/ENGINEER ......................................................................................... 4-2
Upward Compatibility .......................................................................................... 4-2
Defining the Installation Components ................................................................. 4-2
Specifying the Location of the License Server or File ......................................... 4-6
Creating Startup Commands .................................................................................... 4-9
Supplying Optional Input Fields ........................................................................ 4-11
Configuring a Windows Installation......................................................................... 4-12
Configuring the PTC OLE Server...................................................................... 4-12
Creating Windows Shortcuts............................................................................. 4-13
Configuring Your Remote Batch Settings ......................................................... 4-13
Specifying the Location of Your Help Information ............................................. 4-14
Specifying Your Default Web Browser .............................................................. 4-14
Configuring a UNIX Installation............................................................................... 4-15
Creating Links ................................................................................................... 4-15
Completing the Pro/ENGINEER Installation ........................................................... 4-16
Installing Pro/ENGINEER on Windows................................................................... 4-16
Defining the Installation on Windows ................................................................ 4-17
Completing the Pro/ENGINEER Installation on Windows ................................. 4-17
Configuring Pro/ENGINEER on Windows......................................................... 4-18
Starting Pro/ENGINEER ......................................................................................... 4-19
Windows ........................................................................................................... 4-19
UNIX ................................................................................................................. 4-19
vi
Pro/ENGINEER Installation and Administration Guide
Removing Pro/ENGINEER (Windows Only) ........................................................... 4-19
Installing Pro/MECHANICA and ICEM Interactive..............................5-1
Installing Pro/MECHANICA Foundation.................................................................... 5-2
Defining the Installation Components.................................................................. 5-2
Specifying the Location of the License Server or File ......................................... 5-4
Creating Startup Commands .................................................................................... 5-8
Supplying Optional Input Fields......................................................................... 5-10
Configuring a Windows Installation......................................................................... 5-10
Configuring Context-Sensitive Help .................................................................. 5-11
Configuring a UNIX Installation............................................................................... 5-11
Completing the Pro/MECHANICA Installation......................................................... 5-11
Starting Pro/MECHANICA ...................................................................................... 5-12
Windows............................................................................................................ 5-12
UNIX.................................................................................................................. 5-12
Removing Pro/MECHANICA (Windows Only) ........................................................ 5-12
Installing ICEM Interactive ...................................................................................... 5-13
Installing the PTC Application Manager and Pro/Web.Publish ........6-1
Installing the PTC Application Manager .................................................................... 6-2
Configuring the PTC Application Manager Settings.................................................. 6-3
Completing the PTC Application Manager Installation.............................................. 6-4
Installing Libraries ..................................................................................................... 6-5
Installing Pro/Web.Publish ........................................................................................ 6-7
Configuring Your Apache Web Server ................................................................ 6-7
Configuring a Microsoft Internet Information Server.......................................... 6-10
Configuring a Netscape Server ......................................................................... 6-11
How to Install Pro/Web.Publish ......................................................................... 6-12
Updating and Modifying an Installation..............................................7-1
Updating Pro/ENGINEER ......................................................................................... 7-2
Modifying Pro/ENGINEER ........................................................................................ 7-2
Obtaining A New License Pack ........................................................................... 7-2
Updating License Codes........................................................................................... 7-3
Updating and Modifying Pro/Web.Publish ................................................................ 7-4
Installing PTC Help and Reference Information.................................8-1
Overview of the Help System.................................................................................... 8-2
What Is the Reference Documentation? ................................................................... 8-2
How Is the Context-Sensitive Help Organized? ........................................................ 8-2
Overview of Help Installation............................................................................... 8-3
Installing Help Topics and Reference Documentation onto a Hard Disk............. 8-5
Accessing the Reference Documentation ........................................................... 8-6
vii
Accessing the Help Topics.................................................................................. 8-6
Postinstallation Considerations ........................................................................... 8-6
License Management Software........................................................... A-1
Overview of PTC Licensing ......................................................................................A-2
FLEXlm License Management Software.............................................................A-2
Downward Compatibility Using FLEXlm ...................................................................A-3
Running FLEXlm with Other Applications .................................................................A-3
Understanding Timeout Parameters .........................................................................A-3
Using the Ptcflush Utility ...........................................................................................A-6
Benefits of Using FLEXlm.........................................................................................A-7
Additional Information .........................................................................................A-7
System Administration Information ................................................... B-1
Temporary Directories ..............................................................................................B-2
System Management Utilities ...................................................................................B-2
Pro/ENGINEER Utilities ......................................................................................B-2
FLEXlm Utilities...................................................................................................B-4
Lmtools Utility......................................................................................................B-4
Ptcstatus Command Output......................................................................................B-5
Machine-Specific Configuration ................................................................................B-6
Compaq Computer Corporation ..........................................................................B-6
Hewlett-Packard Company ...............................................................................B-10
Silicon Graphics, Inc. ........................................................................................B-12
Sun Microsystems, Inc. .....................................................................................B-13
Pro/ENGINEER in X-Windows..........................................................................B-13
Graphics Configuration ...........................................................................................B-15
Pro/ENGINEER Fonts ............................................................................................B-16
Special Symbols ...............................................................................................B-19
General Plotter Information.....................................................................................B-23
Loading and Mounting the CD-ROM on UNIX ........................................................B-23
Determining the SCSI ID of the CD-ROM Drive................................................B-24
How to Load and Mount the CD-ROM Locally ..................................................B-25
How to Load and Mount the CD-ROM Remotely ..............................................B-26
Troubleshooting Tips .......................................................................... C-1
General Debugging Hints .........................................................................................C-2
Online Information ....................................................................................................C-2
Troubleshooting List .................................................................................................C-2
Failure to Launch the Software ...........................................................................C-3
Server Fails to Start ............................................................................................C-3
Out of Environment Space on Windows 98/95 ...................................................C-3
viii
Pro/ENGINEER Installation and Administration Guide
Xtop Icon Appears in the Taskbar and Quickly Disappears ............................... C-4
Inaccurate Ptcstatus Command Information ...................................................... C-4
Invalid Licenses.................................................................................................. C-4
Help Fails To Start ............................................................................................. C-5
FLEXlm Fails to Start (Triad Configurations)...................................................... C-5
Glossary
Index
ix
About This Guide
About This Guide describes this guide's purpose, how information is
presented, and general information on how to contact PTC (Parametric
Technology Corporation).
This guide is designed to meet two goals:
·
To help you install and set up your license management software
·
To help you install and maintain Pro/ENGINEER 2001
As a system administrator or an end user, you should be familiar with
your workstation and have a good understanding of your operating
system.
Topic
Page
How to Use This Guide ........................................................................xii
Related Documentation .......................................................................xii
Resources and Services ........................................................................xii
Documentation for PTC Products........................................................xii
PTC Documentation Conventions ......................................................xiii
xi
How to Use This Guide
This guide supplements the online instructions that are provided when
you install Pro/ENGINEER and other PTC products, such as the PTC
Application Manager. To aid you in the installation process, complete
step-by-step procedures are provided here.
Postinstallation instructions and reference information are also given.
Related Documentation
The following document may be helpful as you use the Pro-ENGINEER
Installation and Administration Guide:
·
FLEXlm End Users Guide, which discusses the third-party license
management software that is used to distribute Pro/ENGINEER
licenses. Available online at
http://www.globetrotter.com/manual.htm
Resources and Services
For resources and services to help you with PTC (Parametric
Technology Corporation) software products, see the PTC Customer Service
Guide. It includes instructions for using the World Wide Web or fax
transmissions for customer support.
Documentation for PTC Products
PTC provides documentation in the following forms:
·
Online context-sensitive Help
·
Printed books
·
HTML books
·
PDF books
When your PTC software has been installed, you can right-click on any
menu or dialog box to get Help. You can also choose a command from
the Help menu.
All books are available in HTML and PDF formats on the
documentation CD-ROM. You can view HTML books with your Internet
browser. To view and print PDF books, you must have the Acrobat
Reader installed.
PTC welcomes your suggestions and comments on its documentation.
You can send feedback in the following ways:
·
xii
Send comments electronically to [email protected].
Pro/ENGINEER Installation and Administration Guide
·
Fill out and mail the PTC Documentation Survey located at the end
of the PTC Customer Service Guide.
PTC Documentation Conventions
PTC documentation uses the following conventions:
Convention
Item
Example
Bold
Menu paths, dialog box options,
buttons, and other selectable
elements from the user
interface.
Click File > Save.
Assignee check box.
Click OK.
Courier
User input, system messages,
directories, and file names.
Processing
completed.
Courier with lessthan and greaterthan symbols
(< >)
Variables for which the user
substitutes an appropriate
value
output=<LOADPOINT>.
xiii
1
Overview
This chapter describes your distribution materials and the installation
utility, PTC.Setup, for Pro/ENGINEER 2001. The chapter also tells you
what steps to take before you install the license management and
product software.
Topic
Page
What You Received .............................................................................1-2
Before You Proceed .............................................................................1-3
Receiving Your License Pack Online..................................................1-3
Storing Your License Pack Online .....................................................1-5
Graphical Installation Utility.............................................................1-6
Creating Shortcuts (Windows Only) ..................................................1-7
Setting Foreign Language Defaults ...................................................1-7
1-1
What You Received
PTC (Parametric Technology Corporation) sends you the following
material:
·
Shipment Confirmation Letter—Before receipt of your PTC
software, you receive the shipment confirmation letter via fax or
e-mail. This correspondence introduces you to the software
distribution process. The Sales Order Number (SON) is included
here for new software orders.
·
License Pack (Maintenance Release only)—This documentation
provides introductory information and the license codes necessary
to install the software at your site.
·
Packing Slip—The packing slip references the Sales Order Number
(SON) and lists the items that were sent with your software
shipment.
·
READ THIS FIRST—This document notifies you of any changes
you must make, such as machine settings and recommended
operating system patches.
·
Software CD-ROM—Your order contains one or more software CDs
for each product you ordered and for each platform on which you
intend to run the software. Check the labels of your software CDs to
verify that you have the correct CDs for your platforms.
·
Hardware/Software Configuration Notes—To provide the most
recent information, PTC provides these notes on each product
CD-ROM and at the following Internet sites:
Online Hardware Configuration Notes for Enterprise Partners
http://www.ptc.com/partners/index.htm
Online Software Configuration Notes for Enterprise Partners:
http://www.ptc.com/cs/doc/software.htm
Note: To access the online Software Configuration Notes, a customer
support account is necessary.
Refer to the READ THIS FIRST document for steps on how to access
information on the CD-ROM.
1-2
Pro/ENGINEER Installation and Administration Guide
Before You Proceed
Be certain you obtain your License Pack, which is documentation that
contains the license codes that are required to install your software.
Note: Although not required, it is highly recommended that you have
an online copy of your License Pack. Maintaining your license
information in file format allows you to import your license codes using
the installation utility, PTC.Setup. Importing the file ensures accuracy
and eliminates the need to supply the data manually.
Receiving Your License Pack Online
Both new customers and customers who are updating their software
receive their PTC License Packs by electronic mail. If you do not have
an e-mail address, the License Pack is sent by fax.
New Software Orders, Reconfigurations
After your order has been processed and shipped, you should receive a
shipment confirmation letter by electronic mail or fax. At that time, you
are asked to contact the PTC License Management Group to configure
the purchased products.
Rand Worldwide customers are asked to contact Rand. Rand contact
information is located on the Web at http://www.rand.com. Since 1998
Rand has distributed Pro/ENGINEER Solutions within North America
and Europe to small enterprise businesses within these regions.
Note: Before contacting PTC License Management or Rand, it is
important that you gather some critical information for configuring and
licensing your PTC products. Use the Software Configuration
Worksheet, provided on the World Wide Web and in the forms section
of the PTC Customer Service Guide, as a guide for gathering the
appropriate information. This worksheet contains a checklist of the
information that you must supply to License Management.
To review the form or to download a copy of the worksheet, visit PTC
License Management at http://www.ptc.com.
Overview
1-3
The worksheet includes the following information request:
·
·
·
·
·
License Information
-
Sales Order Number (SON) for a newly purchased license
-
Configuration ID
Contact information for all shipping, billing, administrative, and
technical contacts
-
Name
-
E-mail address
-
Telephone and fax numbers
Address Information
-
Installation Address—Physical location of your PTC license
server or client machines executing PTC software
-
Maintenance Shipping Address—Location to which PTC will
ship your software for major release updates
-
Software Correction Address—Location to which PTC will ship
your software corrections
Hardware Information
-
Host ID of the license server or servers for floating licenses and
floating optional modules. Three unique Host IDs are required
for a Triad configuration
-
Host ID of the independent workstation on which a locked
license will run
-
Client and file server information (optional) to ensure
appropriate media is shipped with software updates and
maintenance releases
Software Information
-
Licensing Information—Includes license type, languages
requested, platform, product action (software upgrade, for
example)
-
Configuration Information—Includes product type, number of
licenses, Host ID or Ethernet address
Maintenance Shipments
Users who receive maintenance shipments receive hard copies of their
License Packs with their software. You can obtain an identical
electronic copy of your License Pack via e-mail or by visiting PTC on
the Web.
1-4
Pro/ENGINEER Installation and Administration Guide
A License Pack for a maintenance release shipment contains all
qualifying licenses for the site specified. Depending on your site's
requirements, one License Pack might contain license information for
multiple servers.
Through E-mail
To receive a copy of the License Pack through e-mail, customers with
maintenance shipments contact the following address and provide the
Install Site Number, Maintenance Shipment Number (MSN), and year
in the subject line:
Send to:
[email protected]
Subject:
[Year]
[Install Site Number] [Maintenance Shipment Number]
Example:
1234 112233445566 2000
Where:
1234 = Install Site Number
112233445566 = Maintenance Shipment Number
2000 = Year
Through the World Wide Web
Maintenance Release users who are updating their existing PTC
software can also request electronic copies of their License Packs using
the PTC Maintenance Release Pack Request Tool (General Services:
Maintenance Release License Packs at http://www.ptc.com/olm). You
are asked to supply the Install Site Number, the MSN, the year the
software was shipped, your name, your phone number, and a return
e-mail address. You can find the Install Site Number and the MSN on
the first page of the hard copy version of your License Pack.
Note: The License Pack information reflects the information presented
in the customer order. If your configurations have changed since the
maintenance release was shipped, contact the License Management
Group for a new License Pack.
Storing Your License Pack Online
PTC sends electronic License Packs via e-mail to customers. Upon
receipt, perform one of these steps:
·
Use your Web browser to download the file.
a. In Netscape, for example, click Save As from the File menu.
You see the Save Message As dialog box.
Overview
1-5
b. Save the file as plain text (*.txt).
c.
·
Specify a file name and directory.
Copy the mail message and save the text to disk in ASCII format.
On Windows systems, for example, you can use Notepad or
WordPad as a text editor. On UNIX, you can use vi.
Note: The license file must be in ASCII or plain text.
Graphical Installation Utility
You install Pro/ENGINEER and its software components, including
license management software, using PTC.Setup. PTC.Setup is a
graphical installation utility that uses common menus, dialog boxes,
and screen icons. PTC.Setup Help provides either explanatory or
procedural text or both in your Web browser.
Navigation in PTC.Setup is easy to use. Use the Next button to
proceed. Use the Back button to return to previous windows to make
changes.
Click Help to view PTC. Setup online Help. PTC.Setup Help can only
be viewed in Netscape Navigator 4.0 or later.
PTC.Setup Wizard
The PTC.Setup installation utility uses a wizard to prompt you for the
required installation information. At a minimum, you use the following
standard windows when you install your PTC product software.
Introductory Window—displays the default software products to be
installed from the CD-ROM.
Define Installation Components—sets the installation directory and
lets you choose optional locations. Depending on the product, you are
prompted for additional setup information. Depending on the hardware
platform, a prompt screen may appear and present additional
installation options.
Note: The default installation directories are <drive>:\Program
Files\<product name> on Windows and opt/ptc/<product
name> on UNIX systems.
Optional Configurations—allows you to create shortcut preferences
on Windows systems or symbolic links on UNIX systems.
Installation Progress—(final window) monitors the installation
process and displays the progress graphically. A green check mark
appears after an installation step is completed. If the PTC.Setup
1-6
Pro/ENGINEER Installation and Administration Guide
installation utility cannot proceed, a red X appears. A graphical bar
displays the current stage of the installation.
Creating Shortcuts (Windows Only)
You can configure Windows shortcuts for each application.
In the Windows Preferences dialog box that opens after you define
the installation components, you can create Windows shortcuts and
configure path settings for Pro/ENGINEER (Windows NT only). The
locations of your shortcut icons can be either systemwide or for an
individual user.
Note: UNIX shortcuts cannot be configured using PTC.Setup.
Specify the following Windows settings:
Shortcut Location—Choose where you want your shortcut icon to
appear. The icon can be displayed on the desktop, in the Start menu, or
in Start > Programs.
Desktop—Creates the shortcut icon and adds it to your desktop.
Start menu—Defines the location from which the application starts
(for example, C:\users\default). Specify the full path or click the
folder icon and use the directory browser to specify the directory.
Program folder (default)—Creates command shortcuts. PTC.Setup
adds them to the Start > Programs. You specify the name of the new
folder.
NT Path Setting Preferences—The Add to system path for all
users (default) option makes the path setting available to all users on
your system. The Add to current user's path only option makes the
path setting only available to the machine of the current user.
Administrator privileges are necessary to make these system changes.
Setting Foreign Language Defaults
Pro/ENGINEER supports English, French, Italian, German, Spanish,
Chinese (simplified and traditional), Korean, and Japanese characters,
with English as the default.
To run the installation utility and Pro/ENGINEER in a language other
than the default, you must set your language environment variable
(LANG) on your system before you start the installation process.
For Windows systems:
set LANG=<language>
Overview
1-7
where <language> is the language specification for your platform.
Note: On Windows 2000 and Windows NT systems, you can also set the
language environment variable by choosing Start > Settings >
Control Panel > System. In the System Properties dialog box,
choose the Environment tabbed page. In the Variable field, enter LANG.
In the Value field, enter the appropriate language variable (for
example, French).
For UNIX (C-Shell):
setenv LANG <language>
where <language> is the language specification for your platform.
UNIX settings are case-sensitive.
Note: Pro/ENGINEER and Pro/INTRALINK, manufacturing code
98289 or later, must be run in the same language.
1-8
Pro/ENGINEER Installation and Administration Guide
2
Quick-Start Installation
This chapter provides a quick-start approach for experienced users who
are installing license management and product software on license
server, license client, and node-locked machines. For step-by-step
installation instructions using the PTC.Setup utility, read Chapter 3,
Installing License Management Software, and Chapter 4, Installing
and Starting Pro/ENGINEER. See Chapter 4 for information on how to
install Pro/ENGINEER on Windows 2000 and Windows NT 4.0, Intel
only, using the Windows Installer Service.
Topic
Page
Installing License Management and Product Software ....................2-2
Installing Software on the License Server.........................................2-2
Installing Software on a License Client.............................................2-3
Installing Software on a Node-Locked Machine................................2-4
2-1
Installing License Management
and Product Software
As a system administrator or an end user, you would typically
configure license management software on the license server machine,
and then install and configure Pro/ENGINEER on each machine,
including the license server machine.
Note: Each time you update your software to a newer release, you must
update your FLEXlm license codes.
Installing Software on the License Server
License management software is always the first component to be
installed. Installation of the license management software allows
subsequent components to locate and use the license information.
Installing FLEXlm on the License Server
Using the PTC.Setup installation utility, follow these basic steps to
install FLEXlm license management software and Pro/ENGINEER on
the license server machine:
1. Obtain an electronic copy of your License Pack, which contains your
license codes.
2. Save your License Pack information in a text file, ASCII format
only.
Note: This step is highly recommended but not required.
3. Start PTC.Setup, the installation utility.
4. Install FLEXlm, the license management software, into its own
directory.
5. Define the hardware platforms, languages, and components that
the FLEXlm license management software uses.
6. Import the license file from step 2 into PTC.Setup. Note that
PTC.Setup starts the FLEXlm server after installation is complete.
Note: Although the procedure is longer, you can manually enter the
license information listed in your License Pack. If you type your
license information into PTC.Setup's FLEXlm license editor, you
must replace two generic variables, __HOSTNAME__ and
__PCTD_PATH__. You must replace the __HOSTNAME__ field with
the name of the license server machine. For servers running on
Windows 98/95, the hostname must be the fully qualified domain
2-2
Pro/ENGINEER Installation and Administration Guide
name. Triad installations require three unique hostnames. You
must replace the __PCTD_PATH__ field with the proper path to the
PTC daemon executable (ptc_d). For complete details, see Using
the FLEXlm License Editor on page 3-13.
7. Optionally, provide a user-defined name or alias for a floating
license-to-run PTC product application.
8. Supply optional configurations (for example, Windows shortcuts).
9. Install FLEXlm. The license server starts automatically.
For triad configurations, repeat these steps for Triad Partners 2 and 3.
Installing Pro/ENGINEER on the License Server
1. Start PTC.Setup, the installation utility.
2. If the license server machine is also a license client machine, install
Pro/ENGINEER into its own directory.
3. Define the hardware platforms, languages, and components that
the product software uses.
4. Specify the location of the license file (that is, the server hostname).
Provide the hostname, an IP (Internet Protocol) address, or a fully
qualified hostname, which is required on Windows 98 and
Windows 95. Hostname restrictions are dependent on the operating
system. Alternatively, specify the location of the license.dat file
(that is, the full path to the license file.)
5. Define the command to run Pro/ENGINEER (for example,
proe2001). No extension is necessary.
6. Attach or associate the licenses listed within your license
information file to the startup command so that the product
software can read the license data on the server specified. Multiple
licenses can be attached to a single command name.
7. Supply optional configurations (for example, Window shortcuts).
8. Install the optional applications, such as PTC Application Manager
and Pro/Web.Publish.
9. Start and run Pro/ENGINEER.
Installing Software on a License Client
When you are installing Pro/ENGINEER and any of its components on
a license client machine, you do not install the License Management
software. Instead, you specify from which server this license client
machine should access to obtain available licenses.
Quick-Start Installation
2-3
1. Start PTC.Setup, the installation utility.
2. Install the product software into its own directory.
3. Define the hardware platforms, languages, and components that
Pro/ENGINEER will use.
4. Specify the hostname of the server that maintains the license
management software. Provide either the IP address or the fully
qualified hostname, which is required on Windows 98 and Windows
95.
5. Define the command to run Pro/ENGINEER (for example,
proe2001). No extension is necessary.
6. Attach or associate the licenses listed within your license
information file to the startup command so that your product
software can read the license data on the server specified. Multiple
licenses can be attached to a single command name.
7. Supply optional configurations (for example, Window shortcuts).
8. Install any optional applications, such as PTC Application Manager
and Pro/Web.Publish.
9. Start and run Pro/ENGINEER.
Installing Software on a Node-Locked Machine
License management software is required on node-locked machines
(independent workstations) that use counted locked licenses. Using the
PTC.Setup installation utility, install FLEXlm license management
software and Pro/ENGINEER.
Repeat the steps listed in Installing Software on the License Server on
page 2-2.
Where Your Software Is Installed
The PTC.Setup installation utility defines and installs software into a
default installation directory that you can modify for your environment
during installation.
The default directory is as follows:
/system_directory/ptc
where system_directory is platform-specific.
2-4
Pro/ENGINEER Installation and Administration Guide
The license management software, FLEXlm, the product software, and
any components are installed into separate subdirectories within the
ptc directory (see the next flowchart).
Quick-Start Installation
2-5
3
Installing License Management
Software
This chapter explains how to start the installation utility and how to
install your license management software so that you can control usage
of licenses for PTC software products.
PTC uses FLEXlm, from GLOBEtrotter Software, Inc., as its license
management software. Unless an uncounted node-locked license is
used, you must install FLEXlm before you install your PTC product
software. FLEXlm license management software is included on your
CD-ROM. For the latest information about which version of FLEXlm is
appropriate for your installation, see the Release Notes that are
included with your shipment.
Topic
Page
Before You Proceed .............................................................................3-2
Separating Multiple Licenses.............................................................3-2
Finding the PTC Host ID....................................................................3-2
Windows Requirements ......................................................................3-3
UNIX Requirements ...........................................................................3-4
Starting PTC.Setup.............................................................................3-4
Installing License Management Software .........................................3-5
Supplying Your License Information .................................................3-9
Importing Your License File.............................................................3-10
Entering Your License File Information Manually.........................3-13
3-1
Before You Proceed
Before you begin, perform the following steps:
·
Check the READ THIS FIRST document for any required machine
setting changes.
·
Obtain an online copy of your License Pack.
·
Review your License Pack to make sure your license information
accurately reflects your order.
Note: The FLEXlm End Users Guide is available on the
Pro/ENGINEER Reference Documentation CD-ROM and on the
Internet at http://www.globetrotter.com.
Separating Multiple Licenses
Because PTC sends the License Pack in a single source file for
maintenance shipments, your License Pack may contain license files for
multiple host machines. Unique Host IDs or CPU IDs (that is, Ethernet
addresses) identify these host machines.
If your site ordered multiple licenses for different host machines, save
the license file of each host machine in a separate text file. This step is
recommended but not required because FLEXlm only validates features
that are associated with the machine as identified by CPU_ID.
You can easily identify the start and finish of a license file in your
License Pack by searching for #START: License File for CPUID
xxx…and #END: License File for CPUID xxx, where xxx
represents the host machine's identification number. The Host ID is a
series of alphanumeric characters (for example, 00-60-97-E4-91-B7).
Finding the PTC Host ID
PTC.Setup identifies your machine through its HOST ID or Ethernet
address. The Ethernet address is physically bound to the network card.
If you do not know the HOST ID or CPU_ID of your machine, you can
obtain the identification number by starting PTC.Setup from any PTC
CD-ROM. When PTC.Setup is started, the HOST ID of the machine is
automatically displayed in the lower right-hand corner of the main
window.
The PTC License Management Group uses the CPU_ID or machine
address to assign license codes. You supply this information in the
Ethernet address/hostid field in the Software Configuration Worksheet.
Note: A PTC Host ID is necessary only when a feature is locked to a
specific machine or to multiple machines.
3-2
Pro/ENGINEER Installation and Administration Guide
Displaying PTC Host ID Information
To display and then review the Host ID information using PTC.Setup,
complete these steps:
1. Place your cursor on the Hostname/PTC HostID field and click once
to display the HostID Information pop-up box.
2. Review the information that appears in the HostID Information
pop-up box.
3. Displaying the CPU_ID from the command prompt provides the
following output:
C:\revs\flexlm\bin>cpu_id
PTC CPU_ID = 00-80-5F-9B-0E-CC
FLEXlm CPU_ID = 00805f9b0ecc
Understanding the PTC Host ID Information
The PTC Host ID or CPU_ID identifies machines that use PTC product
software. The PTC Host ID is considered nonstandard because it
contains PTC proprietary code. The FLEXlm CPU_ID identifies
machines that use PTC's Computervision software products, such as
Optegra. The FLEXlm CPU_ID is considered standard because
FLEXlm license management software does not contain PTC
proprietary code.
You also can use the PTC CPU_ID utility or run machine-specific
commands to determine the CPU_ID or Host ID. To download a copy of
the PTC CPU_ID utility and to view online instructions on how to run
this tool, visit the PTC Web site at http://www.ptc.com/olm. Select the
hypertext link, Determining a Machine’s CPU ID, which is located on
the PTC Global Services: Order & License Management page. Platformspecific instructions are given.
Windows Requirements
For Windows 2000 and Windows NT 4.0, a user with administrative
privileges must install FLEXlm license management software.
Your Windows 2000 and Windows NT 4.0 systems must use the
Windows NTFS (Windows NT File System).
For license servers running on a Windows 98 or a Windows 95 machine,
networked or not, GLOBEtrotter Software, Inc., requires the use of a
fully qualified host name or IP address (for example, 111.222.333.444).
A fully qualified host name has the machine name and the domain (for
example, test.ptc.com, where test represents the machine name).
Installing License Management Software
3-3
You must have TCP/IP (Transmission Control Protocol/Internet
Protocol) installed and configured correctly on your Windows system
before installing the software.
Note: If the CD-ROM drive you are using is located on a remote system
on your network, the CD-ROM drive needs to be connected as a shared
drive to your workstation before you can access the CD-ROM. See your
Windows system administration documentation for instructions.
UNIX Requirements
For Release 20 and later, PTC.Setup lets you install the software with
either root- or user-level privileges. For maximum security,
GLOBEtrotter Software, Inc. recommends that you install the FLEXlm
license server with root privileges but execute the server with user
privileges. PTC.Setup provides the FLEX configuration options
dialog box to enable this functionality.
Starting PTC.Setup
If your Windows or UNIX system has autorun enabled for your
CD-ROM drive, PTC.Setup starts automatically on Windows. If your
UNIX system automatically mounts the CD-ROM, you only need to
load the CD-ROM, change to a directory with write permissions, and
execute <cdrom>/setup where <cdrom> is the mounted CD-ROM
location of the workstation.
If PTC.Setup does not start automatically, use the procedures listed in
the following sections.
Windows
To start PTC.Setup on Windows, choose one of these methods:
·
Start Windows Explorer, browse to the CD-ROM drive, and doubleclick on the icon for the setup.exe (
·
).
At an MS-DOS prompt, type the following command:
<cdrom>:\setup.exe
where <cdrom> is the CD-ROM drive letter.
·
3-4
From the taskbar, select Start > Run, and enter or browse to
<cdrom>:\setup.exe.
Pro/ENGINEER Installation and Administration Guide
UNIX
To start PTC.Setup on UNIX, follow these steps:
1. Change to a directory where you have write permissions (for
example, /tmp).
2. At a command prompt, type the following command:
<cdrom>/setup
where <cdrom> is the location of the CD-ROM. In UNIX systems,
you mounted the CD-ROM to this directory.
3. If a /cdrom directory does not already exist, create one using the
following command:
mkdir /cdrom
If your UNIX system does not automatically mount the CD-ROM, see
Loading and Mounting the CD-ROM on UNIX on page B-23 for step-bystep instructions.
Installing License Management Software
You must install FLEXlm license management software on at least one
machine to control usage of floating licenses. This machine might not
have an installation of the product software.
Note: License client machines with Release 20 software can obtain
licenses from a license server machine installed with either FLEXlm
5.12 or higher.
Note: License management software is not required for a license client
machine. This machine requests a license from the server.
To install FLEXlm, perform the following steps:
1. Obtain an online copy of your License Pack and save your license
file as an ASCII file. For more information, see Receiving Your
License Pack Online on page 1-3.
2. Start the PTC.Setup installation utility. The main window (next)
opens. Click Help to open PTC.Setup Help in your Web browser.
Note: Hardware and graphics limitations can cause delays for some
users of Windows 98 and Windows 95 machines.
Installing License Management Software
3-5
3. Keep PTC License Management as your default. If you plan to
install the software components immediately after installing
FLEXlm, keep the other defaults, Pro/ENGINEER and PTC
Application Manager. Installing Pro/Web.Publish, online Help,
Pro/MECHANICA Foundation and ICEM Interactive is optional.
4. Click Next. You see the Define Installation Components dialog
box, with the default FLEXlm installation directory.
3-6
Pro/ENGINEER Installation and Administration Guide
5. Define the following parameters:
a. Installation Directory (new)—Accept the license
management installation directory for the license
management software. PTC.Setup creates the installation
directory for you. Or, click the folder icon, navigate the
folder hierarchy, and select a different installation
directory. No spaces are allowed in the pathname or the
directory name.
Note: The FLEXlm directory should be new or empty.
b. Platforms—Keep the default hardware platform (for
example, sun4_solaris). This field defines the machine type
of the workstation where the FLEXlm installation directory
resides. PTC.Setup detects your machine's architecture and
lists that platform as the default.
c.
Languages—Keep English as your only language (English
is always the default). Or, check the box next to the
language(s) you wish to add.
d. Components—Keep the following default components:
FLEXlm License Server—Keep this component to install
the files necessary to run the license management software.
PTC.Setup (Pro/ENGINEER default)—Keep this
component to install the PTC.Setup command line utility.
This script enables you to reconfigure your FLEXlm
Installing License Management Software
3-7
installation from your workstation, without running
PTC.Setup from the CD-ROM.
Uninstaller (Windows Only)—Keep this component to
install the Uninstall utility, which enables you to quickly
remove FLEXlm using the GUI.
e.
Disk Space—This field displays the available disk space
and the amount of disk space that is required to install the
selected components.
6. Click Next. A message tells you that the installation directory
(Windows NT example, Program Files/flexlm) does not exist
and asks you if you want to create it.
7. Click OK. PTC.Setup creates the FLEXlm installation directory.
You see the PTC License Management dialog box.
Note: To proceed, you need the licensing information supplied in your
PTC License Pack. Although you can either import your license
information or type the information, it is highly recommended that you
import your license file to save time and promote efficiency.
If you have not obtained your PTC License Pack, see Receiving Your
License Pack Online on page 1-3 for specific instructions.
In general, if you received your shipment as a software maintenance
release, you can obtain an online copy of your license codes from the
PTC Web site or via electronic mail. Via the Internet, connect to
http://www.ptc.com/olm and click Maintenance Release License Packs
Software Confirmation Worksheet. Complete the form. Via e-mail,
contact PTC at [email protected]. In the subject line, provide release
information (Site Number) (Maintenance Shipment Number). Your
license codes will be sent to you.
8. Click Next. You see the PTC License Management dialog box.
3-8
Pro/ENGINEER Installation and Administration Guide
Supplying Your License Information
You can use one of the following three methods to supply the license
information that is specific to your site or individual workstation.
·
Import the license information from disk
(RECOMMENDED).
·
Manually enter the license information using a text editor.
After you import or enter your license information, PTC.Setup
automatically saves this file within the FLEXlm installation directory.
Restriction: Do not combine your PTC license file with license files of
other software vendors on the same FLEXlm license server machine.
Although FLEXlm can handle combined license files, the PTC CPU_ID
routine requires PTC licenses to be located in their own file. The
PTC.Setup utility reads combined vendor license files as invalid.
Installing License Management Software
3-9
Importing Your License File
To import the license information from your License Pack that you
saved electronically, keep Import license information from disk
(RECOMMENDED) as the default in the PTC License
Management dialog box.
1. Enter the full path to your license file (including file name).
Alternately, click the folder icon and use the Directory Browser to
specify the location of the ASCII file you saved (for example,
C:\TEMP\LICENSE.TXT).
2. Click Next to create optional FLEXlm configurations.
Note: The Checking Flex License File dialog box opens if the
PTC.Setup utility detects an invalid license. Click Modify and
correct your license information. You cannot proceed until all the
licenses are listed in the valid license column. For further
information, see Appendix C, Troubleshooting Tips.
3. To skip this step and begin the installation process, clear the check
box in the Optional Configuration Steps window and click Next
to advance to the Installation Progress window. See the
Completing the FLEXlm Installation section.
Supplying Optional Configurations
On Windows systems only, you can create shortcuts for each
application. See Creating Shortcuts (Windows Only) on page 1-7.
On Windows and UNIX systems, you can configure the FLEXlm
license server.
3-10
Pro/ENGINEER Installation and Administration Guide
In the FLEXlm configuration options, you can choose to start the
license server on reboot, customize lmgrd arguments, and run the
FLEXlm server process under an alternate user ID.
1. To start the license server on reboot, check the appropriate box.
Alternative methods to start the license server include executing
the ptcstartserver command and choosing Start in Control
Panel > Services > FLEXlm server for PTC on Windows
systems.
2. To customize lmgrd arguments, enter the Custom Lmgrd
Arguments in the text box.
For example, you can disable the FLEXlm lmdown or lmremove
commands to prevent a user from shutting down the license server.
-x lmdown | lmremove
3. (UNIX only) To run the FLEXlm server process using an alternate
user ID, supply the Server process owner field (UNIX systems
only). For maximum security, GLOBEtrotter Software, Inc.,
recommends that you execute the FLEXlm license server with user
privileges after you have installed the server with root privileges
Enter the user name in the Server process owner text box.
4. After setting the optional configuration settings, click Next to
advance to the Installation Progress window.
Installing License Management Software
3-11
Note: If you want to manually enter your license file one line at a time
or if you want to type your license file information, choose Back. For
detailed information, see Entering Your License File Information
Manually on page 3-13.
Completing the FLEXlm Installation
1. Click Yes in the Install files dialog box to start the installation
process.
If you click No, you have three choices. You can:
a. Go Back and review information.
b. Click Install to begin installation.
c.
Click Exit, respond to a confirmation prompt, and close
PTC.Setup.
2. Click OK.
During the installation process, you can click Exit at any time.
Upon completion, PTC.Setup starts the license server.
Exception: Triad installations require that you configure two other
license server machines.
Repeating Steps for Triad Installations
To configure the two other license server machines, repeat the
aforementioned steps in the Installing License Management Software
and Importing Your License File sections.
Note: PTC recommends that the Triad license server machines be at
the same geographical site. Refer to the FLEXlm End Users Guide,
Chapter 5, Selecting Server Nodes,
http://www.globetrotter.com/manual.htm for further details.
Verifying License Server Activity
Before configuring your product software, verify that PTC.Setup has
started the FLEXlm license server by running the ptcstatus
command on the license server machine. PTC.Setup installed the
ptcstatus command in the /bin directory of the FLEXlm installation
directory (for example, on Windows NT:
C:\ptc\flexlm\bin\ptcstatus). For Triad installations, two of the
three partner machines must be configured before the information is
displayed in the ptcstatus output.
To run the FLEXlm server, you must have Windows NT administrator
or UNIX user privileges. Windows NT and 98/95 users must run
3-12
Pro/ENGINEER Installation and Administration Guide
ptcstatus from the MS-DOS command prompt. For additional
information, see Ptcstatus Command Output on page B-5.
Output from the ptcstatus utility displays the feature name (for
example, PROE_38265), a user-defined name or alias if one was
supplied, the number of licenses in use, the number of available
licenses, and any restrictions (for example, the license is locked to a
particular machine).
Note: FLEXlm status commands are useful but not recommended.
These utilities, such as lmstat, might not display all pertinent PTC
information.
Entering Your License File Information Manually
If you do not have an electronic copy of your License Pack, you can
enter your license file information manually. To do so, you must type
your license information into the License File Editor directly.
Using the FLEXlm License Editor
To enter your license codes manually, follow these steps:
1. In the PTC License Management dialog box, select Manually
enter license information using a text editor.
2. Click Next. The Open File and the FLEXlm license editor
dialog boxes open. The FLEXlm license editor appears empty.
You can either import the file or enter each line of your license file
in the FLEXlm license editor. From the File menu, you can
Import your license file from another location, Append the
Installing License Management Software
3-13
contents in the FLEXlm license editor with a file on your system,
Save your license information, and use Save As to create a copy.
3. Use the Open File dialog box to import or append your license file
if your license information (ASCII format) is on your system.
4. Alternatively, type each line of your license information exactly as
it appears in your PTC License Pack, replacing generic text where
appropriate. Start with the line that begins after #Start:
License File for CPUID… Format the text exactly as shown in
the License Pack, with justification indents. The text is casesensitive.
Note: You do not have to type any lines that begin with crosshatch
signs (#). This text in your License Pack is strictly informational.
5. Replace two generic strings, __HOSTNAME__ and __PTCD_PATH__,
including the underscore characters.
In your License Pack, the default server line format is as follows:
SERVER
__HOSTNAME__ PTC_HOSTID=(Your CPUID)
7788
6. Replace the variable __HOSTNAME__ with your license server's
hostname (for example, dinos) and enter your license server's CPU
ID and communications port number. For example,
SERVER
dinos PTC_HOSTID=00-60-97-E4-91-B7
7788
Note: For license server machines running on Windows 98/95, the
hostname must be the fully qualified domain name (for example,
dinos.ptc.com). For Triad installations, replace the
__HOSTNAME__ field for all three server lines.
In your License Pack, the default daemon line format is as follows:
DAEMON ptc_d
__PTCD_PATH__
7. Replace the variable __PTCD_PATH__ with the appropriate path
(including file name) to the ptc_d daemon executable, and the path
to the PTC options file (ptc.opt). For example,
DAEMON ptc_d /opt/ptc/flexlm/sun4_solaris/obj/ptc_d
/opt/ptc/flexlm/licensing/ptc.opt
Note: The lines in the example above should be on one line in the
license editor.
To install your license management software, note that only one
vendor daemon line is needed per license server machine.
When you are finished, the FLEXlm license editor should look
similar to the next screen shot.
3-14
Pro/ENGINEER Installation and Administration Guide
You advance to the Checking FLEXlm License File dialog box.
8. PTC.Setup checks to verify the entered information is correct. If an
invalid license is listed, click Modify and correct your license
information. You cannot proceed until all the licenses are listed in
the valid license column. For further information, see Appendix C,
Troubleshooting Tips.
9. If you have no errors, click Next. You see the Optional
Configuration Steps window.
On Windows systems only, you can create shortcuts for each
application. See Creating Shortcuts (Windows Only) on page 1-7.
On Windows and UNIX systems, you can configure the FLEXlm
license server. See Supplying Optional Configurations on page 3-10.
Note: To skip this step and begin the installation process, clear the
check box in the Optional Configuration Steps window and click
Next to advance to the Installation Progress window.
Completing the FLEXlm Installation
1. After setting the optional configuration settings, click Next to
advance to the Installation Progress window.
2. Click Yes in the Install files dialog box to start the installation
process.
If you click No, you have three choices. You can:
Installing License Management Software
3-15
a. Go Back and review information.
b. Click Install to begin installation.
c.
Click Exit, respond to a confirmation prompt, and close
PTC.Setup.
3. Click OK.
During installation, you can click Exit at any time.
PTC.Setup copies files and sets file permissions. Upon completion,
PTC.Setup starts the license server.
Exception: Triad installations require that you configure two other
license server machines.
Note: On Windows systems, the PTC License Managment tools
program is added to the Start > Programs menu. This utility replaces
the FLEXlm License Manager in the Control Panel. For more
information, see the Lmtools Utility section on page B-4.
.
3-16
Pro/ENGINEER Installation and Administration Guide
4
Installing and Starting
Pro/ENGINEER
This chapter explains how to install your newly purchased software.
The procedures are for new installations only. The first part of the
chapter explains how to install Pro/ENGINEER for all platforms except
Windows NT 4.0 Intel. If you plan to install Pro/ENGINEER on this
system, you must use a separate CD-ROM. Separate instructions are
provided in Installing Pro/ENGINEER on Windows that begin on
page 4-16. If you are updating or modifying an installation, refer to
Chapter 7, Updating and Modifying an Installation.
You may need to change some machine settings before installing a
particular software component. This information is located in the
READ THIS FIRST document, which is included with your software
package.
Topic
Page
Installing Pro/ENGINEER .................................................................4-2
Creating Startup Commands .............................................................4-9
Configuring a Windows Installation ................................................4-12
Configuring a UNIX Installation .....................................................4-15
Completing the Pro/ENGINEER Installation .................................4-16
Installing Pro/ENGINEER on Windows ..........................................4-16
Starting Pro/ENGINEER .................................................................4-19
Removing Pro/ENGINEER (Windows Only) ...................................4-19
4-1
Installing Pro/ENGINEER
You install Pro/ENGINEER after you have installed the license
management software. You can install your product software on a
license server machine, a license client machine, a node-locked
machine, or on any combination of these machines.
Note: Usage of uncounted node-locked licenses does not require license
management software.
Four major steps are required for successful installation of your product
software:
·
Defining your installation components, including the installation
directory
·
Specifying the location of the license servers or license file
·
Defining the command names and attaching available features
·
Starting the software
Upward Compatibility
Pro/ENGINEER is upward compatible. That is, Pro/ENGINEER files
(parts, assemblies, drawings) created in a previous release can be
retrieved and saved using Release 2001. Pro/ENGINEER files created
in Release 2001 are not downward compatible. They cannot be
retrieved using an earlier version of Pro/ENGINEER.
Defining the Installation Components
1. Insert the product software CD-ROM on your Windows operating
system. Insert and mount the product software CD-ROM on your
UNIX system. For step-by-step instructions, see Loading and
Mounting the CD-ROM on UNIX on page B-23.
4-2
Pro/ENGINEER Installation and Administration Guide
The main window opens. Click Help to open PTC.Help in your Web
browser.
2. Keep Pro/ENGINEER as the default.
3. Clear License Management (the default). At this point, you have
installed FLEXlm either on the license server or on a node-locked
machine.
Note: When you perform an update or install a new Release of a
PTC product you must update your license information.
4. Click Next. You see the Define Installation Components dialog
box.
Installing and Starting Pro/ENGINEER
4-3
5. Define the following parameters:
a. Installation Directory (new)—Enter an installation
directory or keep the default value. PTC.Setup creates the
installation directory for you. Or, click the folder icon, navigate
the folder hierarchy, and select a different installation
directory. No spaces are allowed in the pathname or directory
name.
For new installations, the directory you enter must be a new
directory.
b. Platforms—Select the hardware platforms (for example,
sun4_solaris). Use this parameter to define the machine types
that access the installation directory. PTC.Setup detects your
machine's architecture and lists that platform as the default.
c.
Languages—Keep English as your only language (English is
always the default). Or, check the box next to the languages you
wish to add.
To view Pro/ENGINEER in a language other than English, you
must set the language variable, LANG, before installing your
software. For more information, see Setting Foreign Language
Defaults on page 1-7.
d. Components—Select or clear the components that you want to
install by selecting the check box next to the appropriate
component. The available components are as follows:
4-4
Pro/ENGINEER Installation and Administration Guide
Pro/ENGINEER (default)—Keeping this component installs
the files necessary to run the software product for Release 2001.
Pro/ENGINEER Help Files (default)—Keeping this
component installs the Pro/ENGINEER Help Files in the
product installation directory. To view context-sensitive Help,
you must install these HTML files. If you install the Help files
in the Pro/ENGINEER loadpoint, you do not have to specify
their location. Pro/ENGINEER automatically detects their
location when the program is in use.
Note: To install the online Help files in a common Help
directory, go back and select PTC Help in the introductory
window. Selecting PTC Help enables you to install the online
Help and the online books in the same directory (for example,
/opt/ptc/ptchelp2001). The online book files are on a
separate CD-ROM, which accompanies your product software.
You define the common Help directory during the installation of
Pro/ENGINEER in the Help Location window.
PTC.Setup (default)—Keeping this component installs
PTC.Setup for future configuration of the product software after
the installation. This utility allows you to make configuration
changes without running PTC.Setup from the CD-ROM.
Uninstaller (default)—(Windows only) Keep this component
to install the Uninstall utility, which enables you to quickly
remove Pro/ENGINEER using the GUI.
Options—Selecting this component lets you optionally install
ModelCHECK, Design Animation, Pro/Plastic Advisor,
Pro/NC-GPOST, and Vericut for Pro/ENGINEER.
API Toolkits—Selecting this component lets you optionally
install the files necessary to run the Application Program
Interfaces Pro/J.Link, Pro/Web.Link, and Pro/TOOLKIT.
Interfaces—Selecting this component allows you to install
various interface tools, specifically the files for
Pro/INTERFACE for CADDS 5, Pro/INTERFACE for CATIA,
and Pro/CDT.
e.
Disk Space—This field displays the available disk space and
the amount of disk space that is required to install the selected
components.
6. Click Next after you have selected your components.
A message asks you if you want PTC.Setup to create the
installation directory.
7. Click OK. You see the Specify License Servers dialog box.
Installing and Starting Pro/ENGINEER
4-5
Specifying the Location of the License Server or File
The PTC.Setup installation utility can access your license information
if it is on a remote license server or on a local machine. Your next task
is to tell PTC.Setup the locations of the license servers or license files
that you want this installation of your product software to read.
If you attempt to access your license information from a machine that
does not have the minimum version of FLEXlm required, an error
message tells you to update your license management software. Consult
the Release Notes that accompany your order for the most recent
information on which version of FLEXlm meets your installation
requirements.
Note: Pro/ENGINEER 2000i used FLEXlm 5.12 as its license
management software. Update your license management software
unless you intend to use the license server only for previous versions of
Pro/ENGINEER.
Server Machine
If the license management software resides on the same machine on
which you are installing the product software and you have used the
default communications port for the license server machine, you do not
have to tell this installation where to obtain its licensing data.
PTC.Setup detects the hostname of the server machine and populates
the Specify License Servers table (see the following figure).
If the license management software resides on a different machine, you
must specify where this installation can obtain its licensing
information. See the following sections, Obtaining a License from a
Server or Servers and Obtaining a Locked License from an Individual
License File.
Note: The Info button displays the available features and floating
optional modules.
4-6
Pro/ENGINEER Installation and Administration Guide
Client Machine
If you are installing the product software on a license client machine
that does not have FLEXlm installed, the Specify License Servers
table initially appears blank. To enable this installation to obtain
floating licenses from a remote server, you must define the servers that
is distributing the licenses. See Obtaining a License from a Server or
Servers. If this installation is to read a license file for locked licenses,
you must specify the full path to and the name of the license file. See
Obtaining a Locked License from an Individual License File on
page 4-9.
Note: You cannot run the product software without checking out a
license. This means that Pro/ENGINEER cannot be installed alone.
Pro/ENGINEER 2001 uses FLEXlm as its license management
software.
Obtaining a License from a Server or Servers
To obtain a license from a server or servers:
1. Click Add in the Specify License Servers dialog box (see the
previous window). The Specify License Server dialog box
displays the Single license server option as the default.
Installing and Starting Pro/ENGINEER
4-7
2. Enter the hostname and communications port number, if it is
different than the default. This information identifies the server
machine that this installation is to access to obtain its license codes
(for example, aberdeen).
Triad Configurations: If this client machine is accessing a Triad
configuration, choose the Triad license server (fault tolerant)
option and define all three servers. Each Triad partner is required
to have the same license file.
Note: The order of the server list is important (Triad Partner 1,
Triad Partner 2, Triad Partner 3). The sequence must be the same
in each license file on all three license server machines.
PTC recommends that the Triad license server machines be at the
same geographical site. For further information on redundant
license servers, refer to the FLEXlm End Users Guide, Chapter 5,
Selecting Server Nodes, at
http://www.globetrotter.com/manual.htm.
Note: Do not specify the hostname of the client nodes, only the
license server that controls usage of the licenses. You can use the
Specify License Servers dialog box several times to configure the
client machines to access multiple servers or license files across
your network.
Note: On Windows 98/95 systems, either the fully qualified server
name or the IP address must identify the server machine.
3. Click OK to add the server and communications port information to
the Specify License Servers table (for example, Single Server
7788@aberdeen).
4-8
Pro/ENGINEER Installation and Administration Guide
4. Click Next to open the Create and Configure Commands dialog
box. See the section, Creating Startup Commands.
Obtaining a Locked License from an Individual License File
To obtain a locked license from an individual license file:
1. Click Add in the Specify License Servers dialog box. The
Specify License Server dialog box opens.
2. To obtain your license from a specific license file that can exist on
your local machine or on the network, choose the Locked license
file (no server running) option (see previous dialog box).
3. Specify the full path to your license file on your local or NFSmounted disk (for example,
C:\Program Files\flex\license.dat).
or,
Click the folder icon, navigate the folder hierarchy, and select the
correct license file.
4. Click OK to add the license file path information to the Specify
License Servers dialog box.
5. Click Next. You see the Create and Configure Commands
dialog box. See the next section, Creating Startup Commands.
Creating Startup Commands
Now that you have identified where the client machine can locate the
license information, you must create or edit startup commands or
command names to execute the licenses of your PTC software. For new
installations, PTC.Setup creates a default command name provided
sufficient licensing information is available.
Command names are the script names that PTC.Setup uses to enable
you to start the software from your workstation. These scripts maintain
the relationship between licensing on the server and your client
software command. On Windows, for example, the default command
name, proe2001, results in the creation of a batch file and, optionally,
a shortcut icon. This icon is linked to the executable that starts
Pro/ENGINEER.
Note: You can also assign a command name to Pro/NC-POST.
1. If you want to create your own commands, click Add in the Create
and Configure Commands dialog box. The Command
Configuration dialog box opens.
Installing and Starting Pro/ENGINEER
4-9
To create a command name, you must specify a unique name and
attach or associate the licenses to that command name. You can
attach multiple licenses to a command name.
2. In the Command Configuration dialog box, enter the command
name in the Command Name field. No spaces or slashes are
allowed.
3. From the drop-down menu, choose the Command Type.
4. If you want to modify which licenses are attached to the command,
click Modify. The Select Licenses dialog box opens.
PTC.Setup detects the license file you imported earlier and displays
the feature names available for that server or license file location in
the FLEXlm Licenses text box. For example, Pro/ENGINEER
licenses have a PROE_ prefix.
5. Attach the licenses to the command by highlighting the desired
license and moving it to the Selected Licenses column using the
left-pointing arrow (<) button (see the next figure).
4-10
Pro/ENGINEER Installation and Administration Guide
Note: PTC.Setup configures the command to execute the licenses
selected. If multiple licenses are selected, Pro/ENGINEER executes
the first available license it finds. To change the sequence of the
licenses in the Selected Licenses pane, highlight the license and use
the Up and Down buttons.
6. After you have finished attaching the licenses, supply the optional
input information in the Locate Other Installation Directories
(Optional) fields (see the next section, Supplying Optional Input
Fields).
7. Click OK. You return to the Create and Configure Commands
window. The table is populated with the command name and type
(for example, proe2001 and Pro/ENGINEER, respectively).
8. Click Next. The Optional Configuration Steps window opens.
These optional steps vary for Windows and UNIX systems. See
either Configuring a Windows Installation or Configuring a UNIX
Installation.
Supplying Optional Input Fields
The following input is optional.
1. Define Pro/ENGINEER command information in the Command
Configuration dialog box:
Locate Other Installation Directories (Optional)—Directory
paths are required only if you run PTC Application Manager,
Pro/INTRALINK, and Pro/PDM on this license client machine in
conjunction with Pro/ENGINEER. If none of these optional modules
are attached to the command you assigned to start
Pro/ENGINEER, you can leave the lines blank or configure them
later by rerunning PTC.Setup. If Pro/PHOTORENDER has been
Installing and Starting Pro/ENGINEER
4-11
purchased as an optional module, enter the full path to the Graphic
Library directory.
Note that you cannot access the workspace library using
Pro/ENGINEER 2001 and Pro/INTRALINK 1.2.
Optional Input—If Pro/NC-POST has been purchased as an
optional module, complete the Pro/NC-POST Command field to
configure a startup command. (Windows Only) If you plan to make
Pro/ENGINEER a PTC Object Linking and Embedding (OLE)
server and you want to use this command with the PTC OLE
server, choose the PTC OLE Server option.
2. After you entered your optional input, click OK. You return to the
Create and Configure Commands window. The table is
populated with the command names and products.
3. Click Next. You see the Optional Configuration Steps window.
The steps, which are optional, vary for Windows and UNIX
systems.
Configuring a Windows Installation
The following input is optional when you configure your installation on
Windows systems. You can:
·
Configure Pro/ENGINEER as an Object Linking and Embedding
(OLE) server
·
Create Windows shortcuts to start Pro/ENGINEER
·
Configure your Remote Batch Server
·
Specify the full path to your Help installation directory (specifying
the loadpoint and installing the Help files are necessary steps to
enable the users of client machines to view online Help)
·
Specify the location of your Web browser executable file
Configuring the PTC OLE Server
By keeping the default OLE settings check box, you can configure
Pro/ENGINEER as an OLE server. This allows the user of the client
application to import Pro/ENGINEER files (parts, assemblies, and
drawings) into Microsoft documents (Word, Excel, and PowerPoint).
Pro/ENGINEER is not an OLE container; that is, you cannot import
Microsoft files into Pro/ENGINEER. In the PTC OLE Server dialog
box, you can:
4-12
·
Specify the command used to start Pro/ENGINEER.
·
Specify the default startup directory for Pro/ENGINEER. Typically,
this is the Pro/ENGINEER working directory.
Pro/ENGINEER Installation and Administration Guide
·
Keep the language default unless you plan to run Pro/ENGINEER
in a language other than English.
·
Specify the startup directory of the PTC OLE Server. The Microsoft
application program (that is, a PTC OLE container) starts
searching for PTC objects (for example, Pro/ENGINEER parts) in
this directory.
·
Keep the language default unless you plan to run the PTC OLE
Server in a language other than English.
Creating Windows Shortcuts
By keeping the default Windows shortcut preferences check box, you
can configure the Windows shortcut preferences and path settings for
Pro/ENGINEER. You can start Pro/ENGINEER from a desktop icon,
the Start menu, from the Start > Programs menu, and from any
combination of these three options. The Program Shortcut Preferences
are for Windows NT and 98/95 operating systems. The Path Setting
Preferences are for Windows NT only. For more information, see
Creating Shortcuts (Windows Only) on page 1-7.
Configuring Your Remote Batch Settings
By keeping the default Remote Batch Settings check box, you can
configure this Pro/ENGINEER installation for use as a Remote
Toolpath Computation Server. This enables remote batch jobs to be
issued to this machine. You start the Remote Batch Server after the
installation process by running the rbm_startup script.
Supply the following information to configure the rbm_startup script:
·
The Pro/ENGINEER startup command that is used to run remote
batch jobs (for example, proe22)
·
The maximum number of Pro/ENGINEER sessions to be started on
this machine for processing jobs
·
The frequency of communication (in seconds) between
Pro/ENGINEER and the Remote Batch Server
·
The RPC communications port number that is used to communicate
with machines that are using this installation as a Remote Batch
server
·
The directory in which Pro/ENGINEER runs when processing batch
jobs
Specifying the Location of Your Help Information
Note: Identifying the location of your Help files is not necessary if you
installed the Pro/ENGINEER Help files within the product installation
directory.
Installing and Starting Pro/ENGINEER
4-13
By choosing PTC Help in the Introductory window, you can install the
Pro/ENGINEER Help files in a location other than the Pro/ENGINEER
installation directory. In the Help Location window, specify the
directory that contains or will contain your product Help files. This
option lets you specify a common master Help directory, such as
/opt/ptc/ptchelp2001.
Note: This procedure identifies the location of the HTML files. It does
not install the context-sensitive Help or the online manuals. In order
for the online Help and the online reference documentation to be visible
from a Web browser, the Help search paths to the Help installation
directory must be supplied here. The Help files on the Pro/ENGINEER
Reference Documentation CD-ROM cannot be installed in the
Pro/ENGINEER installation directory. See the Installing PTC Help and
Reference Documentation chapter for details.
1. Add the Help installation directory by clicking Add in the Help
Location dialog box.
2. Enter the URL to the Help installation directory on your Web
server (for example,
http://<servername>/<path>/ptchelp2001). Or, browse to or
enter the full path to the loadpoint of a local machine that contains
or will contain the product Help files (for example,
C:\ptc\user\ptchelp2001).
3. Click OK and Next. You can Edit and Delete this location.
Note: Context-sensitive Help for Pro/ENGINEER products is only
available on the product CD-ROM.
Specifying Your Default Web Browser
By keeping the default HTML Help Browser Settings check box, you
can use the GUI to specify the Web browser that will be used to view
the context-sensitive Help and the online books. The Pro/Web.Link
utility also requires a Web browser.
Note: This step is optional on Windows systems because the
Pro/ENGINEER application can locate your Netscape Navigator or
Internet Explorer Web browser through the Registry settings.
Enter the full path or browse to the executable file of the Web browser.
For the must current information on supported browsers, review the
Read This First document that accompanies your product software.
Configuring a UNIX Installation
The following input is optional when you configure your installation on
UNIX systems. You can:
4-14
Pro/ENGINEER Installation and Administration Guide
·
Create a symbolic link to the commands that start your software
·
Configure your Remote Batch Server
·
Specify the full path to your Help installation directory (specifying
the loadpoint and installing the Help files are necessary steps to
enable client machines to view online Help)
·
Specify the location of your Web browser executable file
·
Configure dCAD settings
Creating Links
By keeping the default Create links to product startup commands check
box, you can create a link from the /bin directory in your installation
directory to another directory on your UNIX system. (If this other
directory is in your path environment setting, then simply entering the
command name starts Pro/ENGINEER.) To create a link, use the
Startup Command Links dialog box to enter the full path or browse
to the directory in which you want the link created.
Specifying Your Remote Batch Settings, Help Files Directory, and Default
Web Browser
See the previous sections, Configuring Your Remote Batch Settings,
Specifying the Location of Your Help Information, and Specifying Your
Default Web Browser.
Installing and Starting Pro/ENGINEER
4-15
Completing the Pro/ENGINEER Installation
After you have configured the installation, follow these steps:
1. Click Next. You see the Installation Progress window.
2. Click Yes in the Install files dialog box to start the installation
process.
If you click No, you have three choices. You can:
a. Go Back and review information.
b. Click Install to begin installation.
c.
Click Exit, respond to a confirmation prompt, and close
PTC.Setup.
3. Click OK.
During installation, you can click Exit at any time.
PTC.Setup copies files and sets file permissions. During copying, you
may be prompted to insert another CD-ROM. Either insert the
CD-ROM or provide the path to the CD-ROM.
Installing Pro/ENGINEER on Windows
You can install Pro/ENGINEER 2001 on Microsoft Windows 2000 and
Windows NT 4.0, Intel only, using the Windows Installer Service. This
Pro/ENGINEER installation is certified under Microsoft's Certified for
Windows Logo program. All PTC products on the CD-ROM are certified
and supported by PTC for Windows 2000 and Windows NT 4.0. You can
also use the PTC.Setup Wizard to install and configure the application
on Windows 2000 and Windows NT 4.0 Intel.
The Windows Installer Service provides a quicker method of
installation. For greater flexibility, you can reconfigure your
installation using PTC.Setup after the Windows Installer Service has
installed Pro/ENGINEER.
To start the Windows Installer Service, choose one of these methods if
autorun is not enabled:
·
Start Windows Explorer, browse to the CD-ROM drive, and doubleclick on the icon for the setup.exe (
·
).
At an MS-DOS prompt, type the following command:
<cdrom>:\setup.exe
where <cdrom> is the CD-ROM drive letter.
4-16
Pro/ENGINEER Installation and Administration Guide
·
From the taskbar, select Start, Run, and enter or browse to
<cdrom>:\setup.exe.
Defining the Installation on Windows
In the introductory screen, keep Pro/ENGINEER as the default, and
click Next.
Choose from among three different types of installations.
·
Typical (default)—installs the default application features.
·
Complete—installs all application features.
·
Custom—installs the application features you specify in the
installation directories you choose.
Note: Custom installation lets you select an alternative installation
directory by clicking Browse and using the Directory Browser. The
default installation directory is C:\Program Files\proe2001.
The default language is English. By default, the Windows Installer
Service creates shortcuts in a Pro_ENGINEER Programs folder and
makes Pro/ENGINEER an Object Linking and Embedding (OLE)
server. The Microsoft Installer also registers all PTC file types.
Completing the Pro/ENGINEER Installation on Windows
Before you begin, close all other Windows applications.
Typical and complete installation procedures do not require additional
user input.
Customizing the Installation
A custom installation enables you to choose which applications and
optional modules you want to install.
By default, Pro/ENGINEER is installed on your local hard drive.
From the application pull-down list, you can further specify that
·
The application is to be installed on the local hard drive
·
The entire feature is to be installed on the local hard drive
·
The feature is to be installed when required
·
The entire feature is to be unavailable
1. Choose the modules you want to install:
-
Pro/ENGINEER (default)—Keeping this component installs
the files necessary to run Pro/ENGINEER Release 2001.
-
Options—To install a component, expand the Options List and
select the software components. The following components are
Installing and Starting Pro/ENGINEER
4-17
available: Design Animation, ModelCHECK, Pro/Plastic Advisor,
Pro/NC-GPOST, and VERICUT for Pro/ENGINEER.
-
API Toolkits—To install a component, expand the API
(Application Program Interface) Toolkit list and select the
software. The following features are available: Pro/J.Link,
Pro/Web.Link, and Pro/TOOLKIT.
-
Interfaces—Selecting this component allows you to install
Pro/INTERFACE for CADDS 5, Pro/INTERFACE for CATIA,
and Pro/CDT.
Note: Click Disk Cost to review your current selections and to
verify that you have enough disk space. Reset reinstates the
defaults.
2. After you have made your selections, click Next. If you want to
further customize your installation using the PTC.Setup
Installation utility upon completion of the installation, check the
Launch PTC.Setup for post configuration box. See the next
section, Configuring Pro/ENGINEER on Windows 2000 Intel.
3. Click Next to install the software you selected. Click Back to make
any necessary modifications.
Note: There is no installation confirmation prompt. To escape, click
Cancel.
The Windows Installer Service copies files and sets file permissions.
Configuring Pro/ENGINEER on Windows
If you checked the Launch PTC.Setup for post configuration box,
PTC.Setup automatically starts after Pro/ENGINEER has been
installed.
Using PTC.Setup enables you to
·
Add, change, and remove FLEXlm license servers
·
Create startup command names to launch Pro/ENGINEER and
Pro/NC-POST
·
Configure remote batch settings
·
Reconfigure dCAD settings
·
Specify the full path to your Help installation directory (specifying
the loadpoint and installing the Help files are necessary steps to
enable client machines to view online Help)
·
Specify the location of your Web browser executable file
For procedures, see Specifying the Location of the License server or
File, Creating Startup Commands, and Configuring a Windows
Installation earlier in this chapter.
4-18
Pro/ENGINEER Installation and Administration Guide
Starting Pro/ENGINEER
After your license management and product software has been
installed, start Pro/ENGINEER.
Windows
Execute Pro/ENGINEER using the shortcut defined in the
ProENGINEER program group by double-clicking on the associated
icon (for example, proe2001).
UNIX
From a UNIX prompt, navigate to the Pro/ENGINEER installation
directory and execute the command name that you defined during the
installation process. For example,
/opt/ptc/proe2001/bin/proe2001
Removing Pro/ENGINEER (Windows Only)
You can remove your Pro/ENGINEER software application through the
Control Panel on Windows systems only.
How to Remove Pro/ENGINEER from Your Computer
To remove Pro/ENGINEER after it has been installed using PTC.Setup,
follow these steps:
1. From the Start task bar, click Settings > Control Panel.
2. Double-click the Add/Remove Programs icon to select it. The
Add/Remove Programs Properties dialog box opens.
3. Click the Install/Uninstall tabbed page.
4. In the program application list, highlight the specific release of
Pro/ENGINEER you want to remove.
5. Click Add/Remove. You see the PTC Uninstall dialog box.
6. Click Uninstall or Cancel to escape. You are presented with a
series of confirmation statements asking permission to remove files.
7. Click Uninstall to proceed. Upon completion, Pro/ENGINEER is
removed.
Installing and Starting Pro/ENGINEER
4-19
5
Installing Pro/MECHANICA
and ICEM Interactive
This chapter explains how to install Pro/MECHANICA and ICEM
Interactive. The procedures are for new installations only. You may
need to change some machine settings before installing a particular
software component. This information is located in the READ THIS
FIRST document, which is included with your software package. For
further information see the Pro/MECHANICA documentation set.
Topic
Page
Installing Pro/MECHANICA Foundation..........................................5-2
Creating Startup Commands .............................................................5-8
Configuring a Windows Installation ................................................5-10
Configuring a UNIX Installation .....................................................5-11
Completing the Pro/MECHANICA Installation ..............................5-11
Starting Pro/MECHANICA ..............................................................5-12
Removing Pro/MECHANICA (Windows Only) ................................5-12
Installing ICEM Interactive .............................................................5-13
5-1
Installing Pro/MECHANICA Foundation
You install Pro/MECHANICA Foundation after you have installed the
license management software. You can install your product software on
a license server machine, a license client machine, a node-locked
machine, or on any combination of these machines.
Note: Usage of uncounted node-locked licenses does not require license
management software.
Four major steps are required for successful installation of your product
software:
·
Defining your installation components, including the installation
directory
·
Specifying the location of the license server or servers or license file
·
Defining the command names and attaching available features
·
Starting the software
Defining the Installation Components
1. Insert the product software CD-ROM on your Windows operating
system. Insert and mount the product software CD-ROM on your
UNIX system. For step-by-step instructions, see Loading and
Mounting the CD-ROM on UNIX on page B-23.
The main window opens. Click Help to open PTC.Help in your Web
browser.
2. Clear PTC License Management (the default) and
Pro/ENGINEER. At this point, you have installed FLEXlm either
on the license server or on a node-locked machine.
Note: When you perform an update or install a new Release of a
PTC product you must update your license information.
3. Choose the Pro/MECHANICA Foundation check box and click
Next. You see the Define Installation Components dialog box.
5-2
Pro/ENGINEER Installation and Administration Guide
4. Define the following parameters:
a. Installation Directory (new)—Enter an installation
directory or keep the default value. PTC.Setup creates the
installation directory for you. Or, click the folder icon, navigate
the folder hierarchy, and select a different installation
directory. No spaces are allowed in the pathname or directory
name.
For new installations, the directory you enter must be a new
directory.
b. Platforms—Select the hardware platforms (for example,
sun4_solaris). Use this parameter to define the machine types
that access the installation directory. PTC.Setup detects your
machine's architecture and lists that platform as the default.
c.
Languages—Keep English as your only language (English is
always the default). Or, check the box next to the languages you
wish to add.
To view Pro/MECHANICA in a language other than English,
you must set the language variable, LANG, before installing your
software. For more information, see Setting Foreign Language
Defaults on page 1-7.
Installing Pro/MECHANICA and ICEM Interactive
5-3
d. Components—Select or clear the components that you want to
install by selecting the check box next to the appropriate
component. The available components are as follows:
Pro/MECHANICA Foundation (default)—Keeping this
component installs the files necessary to run the software
product for Release 2001.
PTC.Setup (default)—Keeping this component installs
PTC.Setup for future configuration of the product software
after the installation. This utility allows you to make
configuration changes without running PTC.Setup from the
CD-ROM.
Uninstaller (default)—(Windows only) Keep this
component to install the Uninstall utility, which enables
you to quickly remove Pro/MECHANICA using the GUI.
Interfaces—Selecting this component allows you to install
various interface tools, specifically the files for
Pro/INTERFACE for CADDS 5,
Pro/INTERFACE for CATIA, Pro/CDT, Pro/FEMPOST, and
Pro/PDGS.
e.
Disk Space—This field displays the available disk space and
the amount of disk space that is required to install the selected
components.
5. Click Next after you have selected your components.
A message asks you if you want PTC.Setup to create the
installation directory.
6. Click OK. You see the Specify License Servers dialog box.
Specifying the Location of the License Server or File
The PTC.Setup installation utility can access your license information
if it is on a remote license server or on a local machine. Your next task
is to tell PTC.Setup the location of the license servers or license files
that you want this installation of your product software to read.
If you attempt to access your license information from a machine that
does not have the minimum version of FLEXlm required, an error
message tells you to update your license management software. Consult
the Release Notes that accompany your order for the most recent
information on which version of FLEXlm meets your installation
requirements.
5-4
Pro/ENGINEER Installation and Administration Guide
Server Machine
If the license management software resides on the same machine on
which you are installing the product software and you have used the
default communications port for the license server machine, you do not
have to tell this installation where to obtain its licensing data.
PTC.Setup detects the hostname of the server machine and populates
the Specify License Servers table (see the following figure).
If the license management software resides on a different machine, you
must specify where this installation can obtain its licensing
information. See the following sections, Obtaining a License from a
Server or Servers and Obtaining a Locked License from an Individual
License File.
Note: The Info button displays the available license features and
floating optional modules.
Client Machine
If you are installing the product software on a license client machine
that does not have FLEXlm installed, the Specify License Servers
table initially appears blank. To enable this installation to obtain
floating licenses from a remote server, you must define the server that
is distributing the licenses. See Obtaining a License from a Server or
Servers. If this installation is to read a license file for locked licenses,
you must specify the full path to and the name of the license file. See
Obtaining a Locked License from an Individual License File on
page 4-9.
Note: You cannot run the product software without checking out a
license. This means that Pro/MECHANICA cannot be installed alone.
Obtaining a License from a Server or Servers
To obtain a license from a server or servers:
1. Click Add in the Specify License Servers dialog box (see the
following figure). The Specify License Server dialog box displays
the Single license server option as the default.
Installing Pro/MECHANICA and ICEM Interactive
5-5
2. Enter the hostname and communications port number, if it is
different than the default. This information identifies the server
machine that this installation is to access to obtain its license codes
(for example, aberdeen).
Triad Configurations: If this client machine is accessing a Triad
configuration, choose the Triad license server (fault tolerant)
option and define all three servers. Each Triad partner is required
to have the same license file.
Note: The order of the server list is important (Triad Partner 1,
Triad Partner 2, Triad Partner 3). The sequence must be the same
in each license file on all three license server machines.
PTC recommends that the Triad license server machines be at the
same geographical site. For further information on redundant
license servers, refer to the FLEXlm End Users Guide, Chapter 5,
Selecting Server Nodes, at
http://www.globetrotter.com/manual.htm.
Note: Do not specify the hostname of the client nodes, only the
license server that controls usage of the licenses. You can use the
Specify License Server dialog box several times to configure the
client machines to access multiple servers or license files across
your network.
3. Click OK to add the server and communications port information to
the Specify License Servers table (for example, Single Server
7788@aberdeen).
4. Click Next to open the Create and Configure Commands dialog
box. See the section, Creating Startup Commands.
5-6
Pro/ENGINEER Installation and Administration Guide
Obtaining a Locked License from an Individual License File
To obtain a locked license from an individual license file:
1. Click Add in the Specify License Server dialog box. The Specify
License Server dialog box opens.
2. To obtain your license from a specific license file that can exist on
your local machine or on the network, choose the Locked license
file (no server running) option (see previous dialog box).
3. Specify the full path to your license file on your local or NFSmounted disk (for example,
C:\Program Files\flex2001\license.dat).
or,
Click the folder icon, navigate the folder hierarchy, and select the
correct license file.
4. Click OK to add the license file path information to the Specify
License Server dialog box.
5. Click Next. You see the Create and Configure Commands
dialog box. See the next section, Creating Startup Commands.
Creating Startup Commands
Now that you have identified where the client machine can locate the
license information, you must create or edit startup commands or
command names to execute the licenses of your PTC software. For new
installations, PTC.Setup creates a default command name provided
sufficient licensing information is available.
Command names are the script names that PTC.Setup uses to enable
you to start the software from your workstation. These scripts maintain
the relationship between licensing on the server and your client
software command. On Windows, for example, the default command
name, promech, results in the creation of a batch file and, optionally, a
shortcut icon. This icon is linked to the executable that starts
Pro/ENGINEER.
Note: You can also assign a command name to Pro/NC-POST.
1. If you want to create your own commands, click Add in the Create
and Configure Commands dialog box. The Command
Configuration dialog box opens.
To create a command name, you must specify a unique name and
attach or associate the licenses to that command name. You can
attach multiple licenses to a command name.
Installing Pro/MECHANICA and ICEM Interactive
5-7
2. In the Command Configuration dialog box, enter the command
name in the Command Name field. No spaces or slashes are
allowed.
3. From the drop-down menu, choose the Command Type.
4. If you want to modify which licenses are attached to the command,
click Modify. The Select Licenses dialog box opens.
PTC.Setup detects the license file you imported earlier and displays
the feature names available for that server or license file location in
the FLEXlm Licenses text box.
5. Attach the licenses to the command by highlighting the desired
license and moving it to the Selected Licenses column using the
left-pointing arrow (<) button.
Note: PTC.Setup configures the command to execute the licenses
selected. If multiple licenses are selected, Pro/MECHANICA
executes the first available license it finds. To change the sequence
of the licenses in the Selected Licenses pane, highlight the license
and use the Up and Down buttons.
6. After you have finished attaching the licenses, supply the optional
input information in the Locate Other Installation Directories
(Optional) fields (see the next section, Supplying Optional Input
Fields).
5-8
Pro/ENGINEER Installation and Administration Guide
7. Click OK. You return to the Create and Configure Commands
window. The table is populated with the command name and type.
8. Click Next. The Optional Configuration Steps window opens.
These optional steps vary for Windows and UNIX systems. See
either Configuring a Windows Installation or Configuring a UNIX
Installation.
Supplying Optional Input Fields
The following input is optional:
1. Define Pro/MECHANICA command information in the Command
Configuration dialog box:
Locate Other Installation Directories (Optional)—Directory
paths are required only if you run PTC Application Manager,
Pro/INTRALINK, and Pro/PDM on this license client machine in
conjunction with Pro/MECHANICA. If none of these optional
modules are attached to the command you assigned to start
Pro/MECHANICA, you can leave the lines blank or configure them
later by rerunning PTC.Setup. If Pro/PHOTORENDER has been
purchased as an optional module, enter the full path to the Graphic
Library directory.
Optional Input—If Pro/NC-POST has been purchased as an
optional module, complete the Pro/NC-POST Command field to
configure a startup command.
(Windows Only) If you plan to make Pro/MECHANICA a PTC
Object Linking and Embedding (OLE) server and you want to use
this command with the PTC OLE server, choose the PTC OLE
Server option.
2. After you entered your optional input, choose OK. You return to the
Create and Configure Commands window. The table is
populated with the command names and products.
3. Click Next. You see the Optional Configuration Steps window.
The steps, which are optional, vary for Windows and UNIX
systems.
Configuring a Windows Installation
The following input is optional when you configure your installation on
Windows systems. You can
·
Configure Pro/MECHANICA as an Object Linking and Embedding
(OLE) server
·
Create Windows shortcuts to start Pro/MECHANICA
Installing Pro/MECHANICA and ICEM Interactive
5-9
·
Configure your Remote Batch Server
·
Specify the full path to your Help installation directory (specifying
the loadpoint and installing the Help files are necessary steps to
enable the users of client machines to view online Help)
·
Specify the location of your Web browser executable file
For step-by-step instructions, see Configuring a Windows Installation
in the previous chapter.
Configuring Context-Sensitive Help
Pro/MECHANICA context-sensitive Help is integrated with
Pro/ENGINEER Help. To install the HTML files, you must select PTC
Help from the product selection window and proceed with the
installation steps. When you install Pro/MECHANICA, you must
specify the location of your Help installation directory and specify the
location of your Web browser executable file.
Configuring a UNIX Installation
The following input is optional when you configure your installation on
UNIX systems. You can:
·
Create a symbolic link to the commands that start your software
·
Configure your Remote Batch Server
·
Specify the full path to your Help installation directory (specifying
the loadpoint and installing the Help files are necessary steps to
enable client machines to view online Help)
·
Specify the location of your Web browser executable file
For step-by-step instructions, see Configuring a UNIX Installation in
the previous chapter.
Completing the Pro/MECHANICA Installation
After you have configured the installation, follow these steps:
1. Click Next. You see the Installation Progress window.
2. Click Yes in the Install files dialog box to start the installation
process.
If you click No, you have three choices. You can:
a. Go Back and review information.
b. Click Install to begin installation.
c.
5-10
Click Exit, respond to a confirmation prompt, and close
PTC.Setup.
Pro/ENGINEER Installation and Administration Guide
3. Click OK.
During installation, you can click Exit at any time.
PTC.Setup copies files and sets file permissions.
Starting Pro/MECHANICA
After your license management and product software have been
installed, start Pro/MECHANICA.
Windows
Execute Pro/MECHANICA using the shortcut defined in the program
group by double-clicking on the associated icon (for example,
promech2001).
UNIX
From a UNIX prompt, navigate to the Pro/MECHANICA installation
directory and execute the command name that you defined during the
installation process. For example,
/opt/ptc/mechfound2001/bin/promech
Removing Pro/MECHANICA (Windows Only)
You can remove your Pro/MECHANICA software application through
the Control Panel on Windows systems only.
How to Remove Pro/MECHANICA from Your Computer
To remove Pro/MECHANICA after it has been installed using
PTC.Setup, follow these steps:
1. From the Start task bar, click Settings > Control Panel.
2. Double-click the Add/Remove Programs icon to select it. The
Add/Remove Programs Properties dialog box opens.
3. Click the Install/Uninstall tabbed page.
4. In the program application list, highlight the specific release of
Pro/MECHANICA that you want to remove.
5. Click Add/Remove. You see the PTC Uninstall dialog box.
6. Click Uninstall or Cancel to escape. You are presented with a
series of confirmation statements asking permission to remove files.
7. Click Uninstall to proceed. Upon completion, Pro/MECHANICA is
removed.
Installing Pro/MECHANICA and ICEM Interactive
5-11
Installing ICEM Interactive
ICEM Interactive is a default component product on the
Pro/ENGINEER CD-ROM.
Similar to Pro/ENGINEER and Pro/MECHANICA, you use the
following standard windows when you install your PTC product
software:
·
Product-selection window—Keep ICEM Interactive, a default
component, to be installed after license management software.
·
Define Installation Components—Set the installation directory,
the hardware platforms, and choose your installation components.
·
Specify License Server—Specify where the client machine can
obtain a license to run the software.
·
Create and Configure Commands—Create the command name
or names that are to be used to start the software.
·
Windows Preferences (Windows-only)—Allows you to create
shortcut preferences (NT) and lets you specify whether these
preferences are to be set systemwide or for the current user.
Preferences include defining the location of your online Help.
·
Installation Progress (final window)—Monitors the installation
process and displays the progress graphically.
For step-by-step procedures, see the Installing Pro/MECHANICA
section earlier in this chapter.
5-12
Pro/ENGINEER Installation and Administration Guide
6
Installing the PTC Application
Manager and Pro/Web.Publish
This chapter explains how to install the PTC Application Manager and
application libraries of models and textures. The PTC Application
Manager utility installs a toolbar that gives you easy access to your
desktop applications while using Pro/ENGINEER.
This chapter also explains how to install the Pro/Web.Publish
component software. Pro/Web.Publish enables you to set up your Web
server so that you can publish objects you created using
Pro/ENGINEER. Installing Pro/Web.Publish is optional.
Topic
Page
Installing the PTC Application Manager...........................................6-2
Configuring the PTC Application Manager Settings ........................6-3
Completing the PTC Application Manager Installation ...................6-4
Installing Libraries .............................................................................6-5
Installing Pro/Web.Publish.................................................................6-7
6-1
Installing the PTC Application Manager
The PTC Application Manager is a utility that appears as a toolbar on
your UNIX system. Similar to the Windows Start menu, the PTC
Application Manager includes a menu that enables you to easily start
and close applications on UNIX systems. The menu can be configured
to include any application, including applications that are not
developed by PTC (Parametric Technology Corporation). One key
benefit is that the Application Manager can be configured to activate
Pro/ENGINEER from Pro/INTRALINK.
The PTC Application Manager includes a menu selection for each
application started by the PTC Application Manager, giving you easy
access to those applications on your desktop.
How to Install the PTC Application Manager (UNIX Only)
1. Click PTC Application Manager from the main PTC.Setup
window.
2. Click Next. The Define Installation Components dialog box
opens.
3. Define the following parameters:
a. Installation Directory (new)—Keep the default installation
directory (for example, /opt/ptc/appmgr). PTC.Setup creates
the installation directory for you. Or, click the folder icon,
navigate the folder hierarchy, and select a different installation
directory.
For new installations, the directory you enter must be new or
empty.
b. Platforms—Keep the default hardware platform (for example,
hp8k). Use this parameter to define the machine types that
access the installation directory. PTC.Setup detects your
machine's architecture and lists that platform as the default. To
add more machine types, check the box next to the appropriate
machine type.
c.
Languages—Keep English as your only language (English is
always the default). Or, check the box next to the languages you
wish to add.
To view Application Manager in a language other than English,
you must set the language variable before installing your
software. For more information, see Setting Foreign Language
Defaults on page 1-7.
6-2
Pro/ENGINEER Installation and Administration Guide
d. Components—Keep PTC Application Manager as your default
to install the files necessary to run the utility.
Disk Space—Check to make sure that you have enough disk space for
your installation before continuing.
4. Click Next.
A message asks you if you want PTC.Setup to create the
installation directory.
5. Click OK. The Installation Configuration window opens.
Configuring the PTC Application Manager Settings
The following input is optional when you configure your installation of
the PTC Application Manager.
Each PTC.Setup tabbed page lets you configure a different aspect of
your Application Manager installation.
Note: This configuration can also be done dynamically after the PTC
Application Manager is started.
Creating Start Menu Commands
You can add the program startup commands that you want the
Application Manager Start menu to execute (for example, proe2001).
This enables you to start and close applications easily using the
Application Manager.
1. To choose the product for which you want to create a startup
command, click Add in the Configure Application Manager
Settings dialog box. The Application Manager Configuration
dialog box opens.
a. In the Type field, keep Pro/ENGINEER (default) or choose
another product from the drop-down list.
b. In the Label field, enter the text you want to appear in the
Start menu of the Application Manager.
c.
In the Command line, browse to or enter the full path and the
name of the command that you want the label to execute (for
example, C:\ptc\proe2001\bin\proe2000i.bat). This
command executes the specified license and product type.
Installing the PTC Application Manager and Pro/Web.Publish
6-3
2. To change selections, select the product and Add a command. You
can Edit, or Delete existing commands.
Note: After installation, new commands can be added and existing
commands can be modified and deleted from the PTC Application
Manager's Start > Preferences menu.
Customizing the Application Manager Settings
You customize the appearance of the Application Manager in the
Position dialog box.
1. Click the Position tab to customize the position of the Application
Manager.
2. Specify where you want the Title Bar (toolbar) to appear on your
desktop: horizontal top, horizontal bottom, vertical left, or vertical
right.
Note: You can also activate Auto Hide. The auto hide feature lets
you display the Application Manager as a thin line. The Application
Manager reappears when the mouse is scrolled over the thin line.
Completing the PTC Application Manager Installation
After you have configured the installation, follow these steps to
complete the installation:
1. Click Next. The Installation Progress window opens.
2. Click Yes in the Install files dialog box to start the installation
process.
6-4
Pro/ENGINEER Installation and Administration Guide
3. If you click No, you have three choices. You can:
a. Go Back and review information.
b. Click Install to begin installation.
c.
Click Exit, respond to a confirmation prompt, and close
PTC.Setup.
During installation, you can click Exit at any time.
PTC.Setup copies files and sets file permissions.
Note: After installation, the optional settings can be reconfigured
from the PTC Application Manager's Start > Preferences menu.
Installing Libraries
Some applications come with libraries of models or textures that can be
used in models of your own.
For Pro/ENGINEER, all libraries except the Electrical Symbol, the
Piping and Heating Symbol, and graphic libraries must be installed
under the Pro/ENGINEER installation directory. The following
subdirectories are automatically created in this common installation
directory for each of the following libraries:
·
Objlib—Basic Library
·
Connlib—Connector Library
·
Fittinglib—Pipe Fitting Library
·
Hmflib—Human Factors Library
·
Mfglib—Tooling Library
·
Moldlib—Moldbase Library
Note: The Graphic Library must be installed in the Pro/ENGINEER
installation directory. The Electrical Symbol Library and the Piping
and Heating Symbol Library must be installed into a directory called
library_syms in the symbols directory of your Pro/ENGINEER
installation directory.
If you are updating your installation, make sure that the installation
directory you have chosen does not contain any models that you want to
save. During an update installation, any library files you enter in the
installation directory are deleted and replaced with the current version
of the library you install. You might want to back up your existing
library installation before updating it. For further information, see the
Pro/ENGINEER Introduction to the Libraries, which is available as a
PDF file on the documentation CD-ROM.
Installing the PTC Application Manager and Pro/Web.Publish
6-5
How to Install Libraries
1. After starting PTC.Setup with the appropriate library CD-ROM,
choose the library name from the list of available software
components.
2. Click Next to confirm that you are installing that library.
3. Click Next.
4. Enter the following information:
-
Installation Directory—A default installation directory has
been specified.
Note: For new installations, the directory you enter must be a
new directory. If you specify an existing installation directory,
PTC.Setup updates the software in that directory. A
subdirectory under the main installation directory is
recommended (for example, C:\ptc\libraries).
-
Components—Select the components that you want to install
by clicking the check box next to the component. A check in the
box indicates that a component has been selected.
-
Subcomponents—Some components, when selected, have a
set of subcomponents that you can choose to install. If you have
selected a component that has subcomponents, select the
subcomponents that you want to install. Select subcomponents
in the same manner as components.
-
Disk space—As you select and clear various components for
your installation, the amount of disk space required for your
installation changes. Check to make sure that you have enough
disk space for your installation before continuing.
5. Click Next. You are asked to confirm the creation of the directory
you specified.
6. Click Next.
Note: If you need to change any of the choices you made, use the
Back button to return to the appropriate dialog box. Modify the
information as needed.
7. When you are satisfied that your choices are correct, click Yes in
the Install files dialog box to begin installation.
Further configuration is required to access the Install library files.
See the Pro/ENGINEER Introduction to the Libraries manual,
which is available as a PDF file on the documentation CD-ROM.
6-6
Pro/ENGINEER Installation and Administration Guide
Installing Pro/Web.Publish
With Pro/Web.Publish, you can export assemblies, process assemblies,
and manufacturing processes to a directory that is visible in a Web
browser.
Installation of Pro/Web.Publish involves two procedures:
1. Configuration of your existing Web server. The procedures differ
depending on what kind of Web server you have:
-
Apache Web Server (UNIX)
-
Microsoft Internet Information Server (Windows NT)
-
Microsoft Peer Web Services (Windows NT)
-
Netscape Enterprise and FastTrack servers (UNIX and
Windows NT)
2. Installation of Pro/Web.Publish as a user with write permission to
the Web server.
Locate the configuration procedure for your Web server in the following
sections and, after configuration, install Pro/Web.Publish.
Note: For all configuration procedures in this section, the variable
<path> represents the full path to the installation directory for your
Web server.
Note: Pro/Web.Link requires Netscape Navigator or Communicator 4.0
or later. Do not use Netscape 3.0.
Configuring Your Apache Web Server
1. After downloading the Apache Web Server (http://www.apache.org),
create the following directories in the apache_x.x.x directory:
-
server_root
-
home
where apache_x.x.x is the directory downloaded from the Apache
Web site.
2. Copy the conf directory from the apache_x.x.x directory into the
server_root directory created in the previous step.
3. In the server_root/conf directory, create copies of the
configuration files as indicated in the following table. The original
file and the copy should both reside in the server_root/conf
directory.
Installing the PTC Application Manager and Pro/Web.Publish
6-7
File to Copy
Name of Copied File
httpd.conf-dist
http.conf
access.conf-dist
access.conf
srm.conf-dist
srm.conf
4. If you are running the Apache Web Server as the root user, use a
text editor to edit the http.conf file and locate the following lines:
User nobody
Group #-l
5. Replace nobody with root and replace #-l with sys for the
previous lines.
6. If you are running the Apache Web Server as a nonroot user,
change the communications port number in the http.conf file to a
free port number greater than 1023.
7. Use a text editor to edit the http.conf file and locate the following
line: Port 80
8. Replace 80 with a free communications port number that is greater
than 1023.
9. Use a text editor to replace configuration lines in your http.conf
file as indicated in the following table. Save the file when you have
finished editing it.
Line
Text to Replace
Replace With
ServerAdmin [email protected]
[email protected]
the administrator’s electronic
mail address
ServerRoot /usr/local/etc/httpd
/usr/local/etc/httpd
the full path to your
server_root directory
(.../apache_x.x.x/server
_root)
#ServerName new.host.name
new.host.name
the server machine hostname
Also remove the crosshatch (#)
sign.
10. Use a text editor to replace configuration lines in your
access.conf file as indicated in the following table. Save the file
6-8
Pro/ENGINEER Installation and Administration Guide
after you have finished editing it.
Line
Text to Replace
Replace With
<Directory>
/usr/local/etc/httpd/htdocs>
/usr/local/etc/httpd/htdocs
the full path to the
home directory created
in Step 1
<Directory /usr/local/etc/httpd/
cgi-bin>
/usr/local/etc/httpd/cgi-bin
the full path to the cgibin subdirectory in the
Apache Web Server
directory
11. Use a text editor to replace configuration lines in your srm.conf
file as indicated in the following table. Save the file when you have
finished editing it.
Line
Text to Replace
Replace With
<Directory>
/usr/local/etc/httpd/htdocs
/usr/local/etc/httpd/htdocs
the full path to the home
directory created in Step 1
#ScriptAlias /cgi-bin/
/usr/local/etc/httpd/cgi-bin/
/usr/local/etc/httpd/cgi-bin
the full path to the cgi-bin
subdirectory in the Apache
Web Server directory
Also remove the crosshatch
(#) sign.
12. Use a text editor to add the following line to the mime.types file
located in the server_root/conf directory:
image/cgm cgm
13. Save the file after you have finished editing it.
14. Change directory to the Apache Web Server directory and start the
Web server by entering the following command:
<path>/src/httpd-<platform>
<path>/server_root/conf/httpd.conf
where <platform> is the platform on which you are running the
Web server (for example, /disk1/apache_1.2.0/src/httpd-irix -f
/disk1/apache_1.2.0/server_root/conf/httpd.conf).
Installing the PTC Application Manager and Pro/Web.Publish
6-9
Configuring a Microsoft Internet Information Server
The following section describes how to configure the Microsoft Internet
Information Server and Microsoft Peer Web Server.
1. Rename the ...\InetPub\wwwroot directory to
...\InetPub\home
2. Create a directory called cgi-bin and a file called mime.typ in
the <path>\InetPub directory.
3. From the Windows NT desktop, select:
-
Start
-
Programs
4. From the IIS, select:
-
Microsoft Internet Server (Common)
-
Internet Service Manager
For Peer Web Services:
-
Microsoft Peer Web Services (Common)
-
Internet Service Manager
5. In the Internet Service Manager dialog box, double-click the
server name on the line where www appears under the Service
option. The WWW Service Properties dialog box opens.
6. Select the Directories tab from the WWW Service Properties
dialog box.
7. Change the value of Default Documentation from Default.htm to
index.html and select the Enable Default Document and
Directory Browsing Allowed check boxes.
8. Change the location of the document root directory by double
clicking the ...\InetPub\wwwwroot listing.
9. In the Directory Properties dialog box, change the directory from
...\InetPub\wwwroot to ...\InetPub\home and click OK.
10. Choose Add from the WWW Service Properties dialog box. A new
Directory Properties dialog box opens.
11. Select the Virtual Directory and Execute check boxes and enter
cgi-bin for the Alias and <path>\InetPub\cgi-bin for the
Directory.
12. Click OK.
6-10
Pro/ENGINEER Installation and Administration Guide
13. Click Apply in the WWW Service Properties dialog box.
14. Click OK.
15. If necessary, install plug-ins for your Web browser to allow viewing
of CGM and VRML files.
Configuring a Netscape Server
The following sections describe how to configure the Netscape
Enterprise and FastTrack Servers on UNIX and Windows NT.
UNIX and Windows NT
During installation of the Netscape server, take note of the server
username and password as well as the communications port number
assigned to the Admin server. This information is needed for
configuration.
1. After installing your Netscape server, create the following
directories in the <path>/docs directory:
-
cgi-bin
-
home
Note: On Windows NT, you must change the name of the Primary
Document directory from the default docs to home, and complete
the following steps.
2. Make sure that there is no index.html file in the home directory.
If this is not done, the Web publications is not listed when the Web
server is accessed.
3. Access the Admin server by starting Netscape and opening the
following URL:
servername>:<Admin_server_port_number>
where <servername> is the machine name of the server and
<Admin_server_port_number> is the communications port number
assigned to the Admin server during installation.
4. Access the configuration settings for the server by clicking the link
to the server, which is located on the left side of the HTML page.
5. Click Programs from the menu at the top of the configuration
settings page and select CGI Directory from the topics list.
6. Enter cgi-bin in the URL Prefix field and enter
<path>\docs\cgi-bin in the CGI Directory field.
Installing the PTC Application Manager and Pro/Web.Publish
6-11
7. Click OK and apply the changes.
8. Click System Settings from the menu at the top of the
configuration settings page and select View System Settings from
the topics list.
9. Verify that the Primary Document Directory is the
<path>\docs\home directory and that the URL prefix and path to
the <path>\docs\cgi-bin directory are correct.
10. Click On/Off from the System Setup list to restart the server.
11. After the server has restarted, select the link to access the server as
a client machine. The contents of the home directory should appear.
12. Select the link to the Web publication. The publication begins
loading in the Web browser.
13. Add the following entry to the mimes.types file:
image/cgm exts=cgm
The file is located in the directory <path>\Server\https<servername>\config, where <servername> is the name of the
Web server machine.
14. If necessary, install plug-ins into your Web browser for viewing
CGM and VRML files.
How to Install Pro/Web.Publish
1. Choose Pro/Web.Publish from the list of available software
components on the main PTC.Setup window.
2. Click Next. You see the Define Installation Components dialog
box.
3. Define the following parameters:
a. Installation Directory (new)—Keep the default installation
directory. PTC.Setup creates the installation directory for you.
Or, click the folder icon, navigate the folder hierarchy, and
select a different installation directory.
For new installations, the directory you enter must be new or
empty.
b. Platforms—Keep the default hardware platform (for example,
i486_nt). Use this parameter to define the machine types that
access the installation directory. PTC.Setup detects your
machine's architecture and lists that platform as the default. To
6-12
Pro/ENGINEER Installation and Administration Guide
add more machine types, check the box next to the appropriate
machine type.
c.
Languages—Keep English as your only language (English is
always the default). Or, check the box next to the languages you
wish to add.
To view Pro/Web.Publish in a language other than English, you
must set the language variable before installing your software.
For more information, see Setting Foreign Language Defaults
on page 1-7.
d. Components—Keep PTC Application Manager as your default
to install the files necessary to run the utility.
e.
Disk Space—Check to make sure that you have enough disk
space for your installation before continuing.
4. Click Next.
A message asks you if you want PTC.Setup to create the
installation directory.
5. Click OK.
6. Define the following parameters if the PTC.Setup utility cannot
detect this information:
a. Cgi-bin Directory—This is the directory from which your
server has permissions to execute programs. Your Web server
must be configured to recognize this directory when referenced
as http://<server>/cgi-bin. Enter the full path to the
directory you want to use. Or, click the folder icon, browse the
folder heirarchy, and specify the directory.
b. Web Server MIME file—Enter the location of the MIME type
file on the Web server. Or, click the folder icon and browse to
and specify the file. This file, which is usually called mime.typ
on Windows and mime.types on UNIX platforms, is located in
the configuration directory of the Web server. PTC.Setup adds
the following lines to this file:
c.
image/cgm
cgm
x-world/x-vrml
wrl vrml
Document Root Directory—Enter the location of the
directory where your HTML files are stored on your Web server
Or, click the folder icon, browse, and specify the directory. This
is the directory from which your Web server reads documents
when they are referenced as http://<server>/. This
directory was specified during configuration of your Web server.
Installing the PTC Application Manager and Pro/Web.Publish
6-13
7. Click Next. The Installation Progress window opens.
8. Click Yes in the Install files dialog box to start the installation
process.
If you click No, you have three choices. You can:
-
Go Back and review information.
-
Click Install to begin installation.
-
Click Exit, respond to a confirmation prompt, and close
PTC.Setup.
9. Click OK.
During installation, you can click Exit at any time.
PTC.Setup copies files and sets file permissions. Upon completion, the
Installation Progress window tells you that the installation was
successful.
6-14
Pro/ENGINEER Installation and Administration Guide
7
Updating and Modifying an
Installation
This chapter explains how to update or modify PTC software that has
been installed onto your system.
The procedures in this chapter are for update and modification
installations only.
Note:
·
Because FLEXlm license management software was implemented
in Release 20.0, you can update Release 20.0 and later of
Pro/ENGINEER with Release 2001.
·
Each time you update your software to a newer release, you must
update your license file. New license codes are not required if you
are updating to a new build of Pro/ENGINEER within the same
release.
Topic
Page
Updating Pro/ENGINEER..................................................................7-2
Modifying Pro/ENGINEER.................................................................7-2
Updating License Codes .....................................................................7-3
Updating and Modifying Pro/Web.Publish ........................................7-4
7-1
Updating Pro/ENGINEER
An update installation is needed only when you upgrade your PTC
software to the next major release (for example, Release 2000i to
Release 2001) or when you upgrade your current release with a later
version.
In general, update installations overwrite the files in your existing
Pro/ENGINEER installation directory with files from the most recent
release.
Before updating an installation, load and mount the software CD-ROM
and start the PTC.Setup installation utility. New license information is
required when you upgrade to the next release.
To update the product software on remote servers, node-locked
machines, or license client machines, repeat the steps outlined in
Chapter 4, Installing and Starting Pro/ENGINEER.
Modifying Pro/ENGINEER
No new license information is required when you modify an
installation. You can create new startup commands and reconfigure
any existing software components.
If you are modifying an existing installation of Pro/ENGINEER, you
can start PTC.Setup by using the ptcsetup command, located in the
bin directory of your installation directory (C:\Program
Files\proe2001\bin). You can also rerun the PTC.Setup installation
utility from the CD-ROM and make modifications.
Obtaining A New License Pack
If you are installing a new release of Pro/ENGINEER, you must update
your license management software before you install your new product
software.
It is highly recommended that you obtain an electronic copy of your
new PTC License Pack. Using PTC.Setup, you can quickly and easily
import either the new license file or append the existing license file
with your new license codes.
For information on how to obtain your License Pack online, see
Receiving Your License Pack Online on page 1-3.
7-2
Pro/ENGINEER Installation and Administration Guide
Updating License Codes
You update FLEXlm license management software with your new
license file when updating your PTC software.
Note: If the license server also has Pro/ENGINEER installed, the
installed ptcsetup utility can be used to update licensing information.
Perform the following steps:
1. Start the PTC.Setup installation utility. The main window opens.
Click Help to open PTC.Setup Help in your Web browser.
2. Click Next. The Define Components dialog box opens.
3. Keep the default installation directory for the license management
software if this is where your FLEXlm software resides.
4. Click Next. The PTC License Management dialog box opens.
Note: To proceed, you need the new licensing information supplied
in your PTC License Pack. If you have not already done so, request
a new License Pack. For detailed information, see Receiving Your
License Pack Online on page 1-3.
There are several ways to update an existing license file. However,
it is strongly recommended that you import the new license file. The
new license file contains all of your new license codes as well as any
that are still in effect. Note that importing the new license file
overwrites the existing file.
You can also import and append the existing license file with your
new license data. For information on how to append a license file or
manually enter your license codes by typing in the information or
by using the License Wizard, see Chapter 3, Installing License
Management Software.
5. To import the new license information from your License Pack that
you saved electronically, keep Import license information from
disk (RECOMMENDED) as the default in the PTC License
Management dialog box.
6. Enter the full path (including file name) or click the folder icon and
use the Directory Browser navigational tool.
7. Specify the file location of the ASCII file you saved by selecting the
license file that you want to import.
8. Click Next. The Optional Configuration Steps window opens.
Note: The Checking FLEXlm License File dialog box opens if
the PTC.Setup utility detects an invalid license(s). Click Modify
Updating and Modifying an Installation
7-3
and correct your license information. You cannot proceed until all
the licenses are listed in the valid license column. For further
information, see Appendix C, Troubleshooting Tips.
9. To skip this step and begin the installation process, clear the check
box in the Optional Configuration Steps window and click Next
to advance to the Installation Progress window. Configuration
procedures vary for Windows and UNIX systems. For details, see
Supplying Optional Configurations on page 3-10.
10. Click Next. The Installation Progress dialog box opens.
11. Click Yes in the Install files dialog box to start the installation
process.
If you click No, you have three choices. You can:
-
Go Back and review information.
-
Click Install to begin installation.
-
Click Exit, respond to a confirmation prompt, and close
PTC.Setup.
12. Click OK.
PTC.Setup copies files and sets file permissions.
PTC.Setup restarts the FLEXlm license server. For Triad
configurations, two of the three partner machines must be running
before licenses can be distributed.
Updating and Modifying Pro/Web.Publish
Updating Pro/Web.Publish requires only that you update your existing
Pro/Web.Publish installation. You do not have to reconfigure your Web
server.
Note: To update or modify Pro/Web.Publish, you must have write
permissions to the Web server.
To update an installation of Pro/Web.Publish, start PTC.Setup using
the Pro/ENGINEER CD-ROM or the ptcsetup command if you
installed this utility. To update the product software, repeat the steps
outlined in Chapter 5, Installing the PTC Application Manager and
Pro/Web.Publish.
To modify an installation of Pro/Web.Publish, start PTC.Setup and
change the configuration information you specified during installation.
7-4
Pro/ENGINEER Installation and Administration Guide
8
Installing PTC Help and Reference
Information
This chapter provides an overview of the Help information you receive
with your software purchase. The Help documentation consists of two
components: context-sensitive Help, which is distributed on the product
CD-ROM, and online reference documentation in book format, which is
on a separate CD-ROM. This chapter also explains how to install both
types of Help.
Topic
Page
Overview of the Help System .............................................................8-2
What Is the Reference Documentation?.............................................8-2
How Is the Context-Sensitive Help Organized? ................................8-2
8-1
Overview of the Help System
The Help system features:
·
Context-sensitive Help, which is integrated with your PTC product.
·
PTC Reference Documentation, which distributes online PTC
books, such as the installation guide. These manuals are in PDF
and HTML formats.
Context-sensitive Help is integrated with Pro/ENGINEER,
Pro/INTRALINK, and CDRS. Pro/MECHANICA information is
integrated with the Pro/ENGINEER Help topics.
With Help, you can do the following:
·
Install Help files on your local workstation, a network file server,
your company's intranet, or on a remote Web server.
·
View the contents of PTC online books and context-sensitive Help
with your Web browser.
What Is the Reference Documentation?
Pro/ENGINEER Reference Documentation consists of HTML and PDF
files that correspond to the PTC printed material, including hard copy
user's and task guides. The Reference Documentation is distributed on
separate CD-ROMs for each PTC product.
With the Reference Documentation, you can do the following:
·
Print copies of several PTC manuals with Adobe Acrobat Reader.
·
Print the table of contents, chapters, or page ranges of PTC
manuals.
How Is the Context-Sensitive Help Organized?
Help topics are organized by product. There are four main categories
the PTC Help table of contents: Welcome, Pro/ENGINEER Foundation,
Using Foundation Modules, and Using Additional Modules.
Pro/ENGINEER Foundation, for example, includes information on Core
and Part Modeling.
With the Help system, you can do the following:
8-2
·
Search each product for relevant Help topics or scroll through the
table of contents or the alphabetical index.
·
Navigate between related topics.
·
Print individual topics using your Web browser.
Pro/ENGINEER Installation and Administration Guide
Overview of Help Installation
Using PTC.Setup you can install the Pro/ENGINEER Help files into
either the product installation directory or elsewhere on your system.
When you install Pro/ENGINEER, you can install the context-sensitive
Help files into the product installation directory by default (for
example, /opt/ptc/proe2001). Those steps are listed in Chapter 4,
Installing and Starting Pro/ENGINEER.
You also can install the Pro/ENGINEER Help files into a common Help
directory that is compatible with the default Reference Documentation
installation directory (for example, /opt/ptc/ptchelp2001). Those
steps are described in the next section. Because the Reference
Documentation is distributed on individual CD-ROMs by product, a
common Help installation directory is advantageous when multiple
PTC products are used.
A shared installation directory that contains context-sensitive Help and
Pro/ENGINEER Reference Documentation is supported on a network
file server and on an intranet or internet Web server.
Note: Only the context-sensitive Help files can be installed in either
the product installation directory or elsewhere. The Reference
Documentation files cannot be installed in the product loadpoint.
How to Install Context-Sensitive Help Locally from the CD-ROM
To install Pro/ENGINEER context-sensitive Help files into a common
Help directory, follow these steps:
1. Change to a directory where you have write permission or
administrative privileges.
2. Start PTC.Setup using the steps outlined in Starting PTC.Setup on
page 3-4.
3. Choose PTC Help on the introductory window. This component is
optional and not selected by default.
4. Click Next. The Define Installation Components dialog box
opens. The Pro/ENGINEER Help Files is the only default
component.
5. Define the installation directory:
Installation Directory (new)—Keep the default installation
directory (for example, /opt/ptc/ptchelp2001) listed or enter
the full path to the desired location. If this is a new installation,
(new) appears next to the directory path. PTC.Setup creates the
new directory for you. If this is an update to an existing PTC Help
installation directory, (update) appears next to the directory path
Installing PTC Help and Reference Information
8-3
field. You also can click the folder icon, navigate the folder
hierarchy, and select a different installation directory.
For new installations, the directory you enter must be new or
empty.
6. After you have selected your components, click Next. A message
asks you if you want PTC.Setup to create the installation directory.
7. Click OK.
8. Click Next. The Installation Progress window opens.
9. Click Yes in the Install files dialog box to start the installation
process.
If you click No, you have three choices. You can:
-
Go Back and review information.
-
Click Install to begin installation.
-
Click Exit, respond to a confirmation prompt, and close
PTC.Setup.
PTC.Setup copies files and sets file permissions.
How to Install Reference Documentation Locally from the CD-ROM
To install the reference documentation, follow these steps:
1. Change to a directory where you have write permission or
administrative privileges.
2. Start PTC.Setup using the steps outlined in Starting PTC.Setup on
page 3-4.
3. Click Next. The Define Installation Components dialog box opens.
4. Define the installation directory:
Installation Directory (new)—Keep the default installation
directory (for example /opt/ptc/ptchelp2001) listed or enter the
full path to the desired location. If this is a new installation, (new)
appears next to the directory path. PTC.Setup creates the new
directory for you. If this is an update to an existing PTC Help
installation directory, (update) appears next to the directory path
field. You also can click the folder icon, navigate the folder
hierarchy, and select a different installation directory.
For new installations, the directory you enter must be new or
empty.
8-4
Pro/ENGINEER Installation and Administration Guide
5. Click Next. A message asks you if you want PTC.Setup to create
the installation directory.
6. Click OK.
7. Click Next. You see the Installation Progress window.
8. Click Yes in the Install files dialog box to start the installation
process.
If you click No, you have three choices. You can:
-
Go Back and review information.
-
Click Install to begin installation.
-
Click Exit, respond to a confirmation prompt, and close
PTC.Setup.
PTC.Setup copies files and sets file permissions.
Installing Help Topics and Reference Documentation onto a Hard Disk
To easily administer many client machines, install the Help topics and
the online books onto a network file server's hard disk. To service
remote client machines not on the local network, install the files onto a
Web server's hard disk.
When installing Pro/ENGINEER Help topics and Reference
Documentation onto a Web server, you must place the files within the
Web server's document root directory (as specified during the Web
server's installation).
How to Install Help Topics and Reference Documentation on Your Web
Server
To install Pro/ENGINEER context-sensitive Help and Reference
Documentation for use with your Web server, repeat the steps listed in
the preceding section, How to Install Reference Documentation Locally
from the CD-ROM.
Configure your Web server to distribute files from the installation
directory as described in the previous section. For example, if you
installed the Help files in the /opt/ptc/ptchelp2001 directory, then
point the Web server to that directory and set an alias of your choice.
For example, if you configure a Web server named Titan to distribute
/opt/ptc/ptchelp2001 with the alias /help, then enter the
following address in the Help path field: http://titan/help in the
Help Location window.
Installing PTC Help and Reference Information
8-5
Accessing the Reference Documentation
You can view the Pro/ENGINEER online books directly from the
Pro/ENGINEER Reference Documentation CD-ROM, on your local
network, or on a Web server.
Note: Unlike the context-sensitive Help files, you cannot install the
reference documentation in the Pro/ENGINEER installation directory.
You can install the files in a common master Help directory (for
example, /opt/ptc/ptchelp2001) or in a separate directory. In
either case, your must specify your Web browser during
Pro/ENGINEER installation. For each product Reference
Documentation CD-ROM, you must configure installation so that the
path to the HTML content is defined during installation or during
reconfiguration using ptcsetup.
To use the Help system to view the reference documentation, install
and start a local version of Netscape Navigator 4.06 or later or
Microsoft Internet Explorer 4.0 or later. Use the Web browser to point
to the files.
To view the reference documentation directly from the CD-ROM,
browse to <loadpoint_or_cdrom>/html/usascii/products.htm
(for example, C:\ptc\prohelp\22\html\usascii\products.htm)
Note: Help information, delivered on the Pro/HELP CD-ROM for
Release 20 and earlier, may not work correctly using Netscape
Navigator 4.06. Pro/HELP Release 20 and earlier does not support
Microsoft Internet Explorer.
Accessing the Help Topics
To access context-sensitive Help in Pro/ENGINEER, you can select an
active object and obtain Help with a right-click of the mouse. Using the
mouse, you also can choose Get Help from a menu or click Help from
the toolbar.
Postinstallation Considerations
Be certain Java and JavaScript support is turned on in Netscape
Navigator 4.06. To enable these features used by Help and Toolkit
Wizard documentation, follow these steps:
1. From the Options menu, click Network Preferences.
2. Click the Languages tab in the pop-up window.
3. Select the Enable Java and Enable JavaScript options.
8-6
Pro/ENGINEER Installation and Administration Guide
Note: IBM RS6000 only—After installing Help, verify that the
environment variable MOZILLA_HOME is set to the complete path to
the MOZILLA_HOME directory, which contains the Netscape executable.
If this environment variable is not set correctly, Netscape does not find
all the files it needs to operate correctly.
Installing PTC Help and Reference Information
8-7
A
License Management Software
This appendix discusses license management software in general terms
and describes the benefits of FLEXlm, the license management
software of PTC applications.
Topic
Page
Overview of PTC Licensing ............................................................... A-2
Downward Compatibility Using FLEXlm......................................... A-3
Running FLEXlm with Other Applications ...................................... A-3
Understanding Timeout Parameters ................................................ A-3
Using the Ptcflush Utility.................................................................. A-6
Benefits of Using FLEXlm................................................................. A-7
A-1
Overview of PTC Licensing
PTC software and PTC optional modules must be licensed before they
can be used. Licensing authorizes the installed software to run
normally.
PTC supports the following types of licenses:
·
Commercial—Commercial licenses are not time-sensitive licenses.
·
Evaluation—Evaluation licenses limit your use of the software to
a specified time.
·
Educational—Educational licenses, which are used at educational
institutions, are time-sensitive licenses (also known as student
licenses).
Depending on the product, the licenses can be either locked or floating.
·
Node-locked licenses—A node-locked license restricts the use of
the software to a particular machine (independent workstation).
Note: Node-locked licenses are not available for all PTC products, such
as Pro/INTRALINK.
·
Floating licenses—A floating license or a license-to-run can be
used on any one of a group of machines that are on your network.
·
Triad licenses—Triad license servers are a configuration of three
license servers on the same network that work together to manage
a pool of floating licenses. An identical license file is used for each
Triad partner.
FLEXlm License Management Software
FLEXlm, license management software developed by GLOBEtrotter
Software, Inc., was integrated into PTC software starting with Release
20. For more information, visit the GLOBEtrotter home page at
http://www.globetrotter.com.
Changing to FLEXlm license management software produced three key
changes:
A-2
·
FLEXlm replaced Pro/SERVER in Release 20.0 as the license
management software for PTC applications.
·
Configuration identification numbers have replaced the PTC
licensing scheme, based on serial numbers, making the system
simpler and more flexible. Since Release 20, PTC has assigned
Configuration IDs to your existing serial numbers. The conversion
does not impact the number of your licenses.
·
License codes are now distributed electronically, enabling
PTC.Setup to import your license information.
Pro/ENGINEER Installation and Administration Guide
Downward Compatibility Using FLEXlm
FLEXlm license servers have downward compatibility with PTC
applications using FLEXlm. For example, a Pro/ENGINEER Release
2000i license can run Pro/ENGINEER Release 20.0 software because
they both use FLEXlm licensing.
FLEXlm cannot serve licenses to an installation using Pro/SERVER
(Release 19 and earlier). However, Pro/SERVER and FLEXlm license
management software may run on the same machine in parallel.
Pro/ENGINEER object files remain upward compatible only.
Running FLEXlm with Other Applications
It is important to know that you can use FLEXlm to run PTC products
as well as other applications.
Each vendor application that uses FLEXlm has its own lmgrd or
FLEXlm daemon. The FLEXlm daemon starts the vendor daemon (for
example, ptc_d), which controls the usage of licenses. Globetrotter
strongly recommends that the lmgrd daemon program be run as a
nonprivileged (not root) user on UNIX systems.
Note that you cannot combine a PTC license file with a license file of
another vendor. Do not, for example, combine PTC feature lines with
those of other vendors in a single license file. This action causes the
licenses to be invalid.
If all applications and vendor daemons are FLEXlm 6.1 or later, lmgrd
can process multiple license files. This is true even when the Host IDs
are different (as long as the license files refer to the same node). Refer
to the chapter on multiple license files in the FLEXlm End Users Guide
at http://www.globetrotter.com/manual.htm.
Understanding Timeout Parameters
Timeout parameters enable the license client machine and the license
server to communicate with one another so that licenses are free and
available upon request.
You can reconfigure the Inactivity Timeout parameter within a
specified range, as described in the next section, How to Change the
Inactivity Timeout Parameter.
License Management Software
A-3
Timeout Parameters
Parameter
Value
Description
Inactivity timeout
120
minutes
(default)
This parameter prevents a license from remaining
idle. If the license client machine is inactive for a
specific period, the license can be reclaimed by the
license server and used by another license client
machine. In Pro/ENGINEER, the inactivity timeout
default is 120 minutes.
You can change the default of 120 minutes so that
the parameter ranges from between 20 minutes
(minimum value) and infinity (maximum value).
Validation that
the license is
available
1 minute
After each one-minute interval, the next time the
user makes a menu selection, the license client
machine communicates with the license server. The
license client machine queries the server whether
the license is still available. The application has a
minimum of 1 minute to validate the license.
Validation retries
None
The first time a license client machine cannot
validate its license the application's graphical user
interface will freeze. The customer is immediately
given the following three options:
Click Retry to request a license from an active
license server
Click Save File(s)
Click Exit to close the application without saving
the file(s)
Startup
10
seconds
Upon starting a session, the license client machine
requests a license and has 10 seconds in which to
have the request validated.
How to Change the Inactivity Timeout Parameter
You can set the parameter that determines how long the system allows
a license to remain idle before it is reclaimed by the license server
machine.
To change the default inactivity timeout parameter, you must update
the FLEXlm option file, ptc.opt. The default is 120 minutes. The
ptc.opt file resides in <ptc loadpoint>/flexlm/licensing.
Edit the default parameter
A-4
Pro/ENGINEER Installation and Administration Guide
TIMEOUTALL 7200
by changing 7200 seconds (120 minutes) to another value represented
in seconds.
The minimum value you can set is 20 minutes (or 1200 seconds) and
the maximum value you can set is infinity. To make infinity the
default, remove the TIMEOUTALL parameter from the ptc.opt file. If
you set a minimum value to less than 20 minutes, the system defaults
to a minimum value of 20 minutes.
Suppressing the Regained Network License Dialog Box
Beginning with Pro/ENGINEER 2000i, you can disable the Regained
Network License dialog box using a config.pro option. In the
config.pro file set the suppress_license_loss_dialog option to
yes. The default is no. If you lose or regain your network license to run
Pro/ENGINEER, a status message displays but no dialog box appears.
Using the Ptcflush Utility
The ptcflush utility is necessary when a license client application shuts
down in a way that does not break the TCP/IP connection between the
license server machine and the client machine. This situation most
commonly occurs when a client machine crashes or hangs or when the
network connection between the license server and the license client is
interrupted.
You are allowed to use the ptcflush utility once every 10 minutes. The
syntax is as follows:
%
ptcflush
feature_name
hostname
port
handle
Execute the ptcstatus command to list the <feature host port
handle> information and copy and paste this listing at the command
prompt to run ptcflush.
To flush a license in use, for example, type
%
ptcflush
PROE_2
titan
7788 101
using the feature name and not the user-defined name if you assigned
an alias.
Note: On UNIX systems, you can use root privileges to flush user
licenses; however, it needs to be done individually. You cannot flush
multiple licenses simultaneously.
License Management Software
A-5
Benefits of Using FLEXlm
Using FLEXlm to control usage of licenses offers the following key
advantages.
·
Single-Server Solution—FLEXlm can manage PTC software and
other vendor applications without conflict. Note that the PTC
license file cannot be combined with the license files of other
vendors.
·
Immediate License Recovery—If there is a premature exit of the
license software (for example, the system shuts down), the FLEXlm
license server automatically reclaims the PTC license.
·
Increased Flexibility—System administrators can reserve or
deny licenses based on user name, hostname, display name, or IP
address. For more information refer to Chapter 5, The Options File,
in the FLEXlm End Users Guide at
http://www.globetrotter.com/manual.htm.
·
Centralized License Storage—PTC customers can store all PTC
licenses for all PTC products in a single file for each license server.
·
Multiple Licenses for a Single Command—One command can
be used to execute multiple licenses of PTC software based on
availability.
Additional Information
The FLEXlm end-user manual is located on the GLOBEtrotter
Software, Inc. Web site at http://www.globetrotter.com. Answers to
FLEXlm frequently asked questions can be found at
http://www.globetrotter.com/faq.htm.
A-6
Pro/ENGINEER Installation and Administration Guide
B
System Administration Information
This appendix describes general system administration information,
including system management utilities and machine configuration
settings.
Topic
Page
Temporary Directories ....................................................................... B-2
System Management Utilities........................................................... B-2
Ptcstatus Command Output .............................................................. B-5
Machine-Specific Configuration ........................................................ B-6
Graphics Configuration ................................................................... B-15
Pro/ENGINEER Fonts ..................................................................... B-16
General Plotter Information ............................................................ B-23
Loading and Mounting the CD-ROM on UNIX .............................. B-23
B-1
Temporary Directories
Pro/ENGINEER uses the temporary directory as defined by your
system environment to store Pro/ENGINEER parts. You can modify the
location of the temporary directory by setting the temporary directory
environment variable in the Pro/ENGINEER startup window before
executing the Pro/ENGINEER command name. On UNIX systems, this
environment variable is TMPDIR. On Windows 2000, NT, and 98
systems, this environment variable is TMP.
System Management Utilities
This section briefly describes Pro/ENGINEER and FLEXlm utilities.
The files listed in the next two tables, Pro/ENGINEER Utilities and
FLEXlm Utilities, are installed into the bin directory of your
installation directory. On UNIX systems, symbolic links may have been
made to these files from a user-specified directory. Further information
can be found at http://www.globetrotter.com/manual.htm in the
FLEXlm License Administration Tools chapter.
Pro/ENGINEER Utilities
You execute the Pro/ENGINEER commands, listed next, from the
\<proe loadpoint>\bin directory when the license server is
running. The loadpoint is the directory where the software is installed.
Note: You must execute the ptcmonitor command from the license
server machine. If you are using a Triad configuration, you must
execute the command from the Master license server.
Command
Function
cpu_id
Returns the PTC Host ID with required formatting used for
FLEXlm license codes.
pro2001
Run Pro/ENGINEER. Can be user-defined.
proigsutil
Start script to convert IGES files into drawings and parts (UNIX
only).
protab
Run the Pro/ENGINEER table editor (Pro/TABLE).
pro_batch
Start script to generate interface files in batch mode.
pro_from_feas
Convert a supported FEA solver file to a format acceptable to
Pro/FEM-POST.
B-2
Pro/ENGINEER Installation and Administration Guide
Command
Function
pro_ncl_cvt
Remove continuation characters from manufacturing NCL files
(Pro/MFG).
pro_mcs_comp
Compile the menu tree for user-defined Pro/MFG commands.
ptcflush
Free licenses. This may be necessary if there are network problems.
Formerly called proflush.
ptcmonitor
Determine how much each license is used over a given period.
Command output allows you to gather statistics on license usage.
Formerly promonitor.
ptcsetup
Run PTC.Setup from disk. Allows you to reconfigure an existing
installation without running PTC.Setup from the CD-ROM.
Command, located in the bin directory, is created during
installation. Ptcsteup is used for modifications or reconfigurations
only. It cannot install your PTC product software.
ptcshutdown
Shut down a license server process for administrative maintenance
of the license server machine (UNIX only). On Windows systems,
you can also use the FLEXlm Control Panel to stop a license server
process.
ptcstartserver
Start a license server process. On Windows systems, you can also
use the FLEXlm Control Panel to start a license server process. See
Chapter 6, License Administration Tools, FLEXlm End Usesr
Guide, at http://www.globetrotter.com/chap6.htm.
ptcstatus
Display information on the current usage and availability of
licenses.
purge
Start script to remove old versions of Pro/ENGINEER files.
System Administration Information
B-3
FLEXlm Utilities
You execute the FLEXlm commands, listed next, from the \<flexlm
loadpoint>\flexlm\bin directory when the license server is
running.
Command
Function
Lmtools
A batch file, lmtools.bat, runs the PTC License Management
tools utility on Windows systems only. Functionality includes
customer configuration of the FLEXlm service, starting and
stopping the lmgrd license server(s), server and licensing status,
as well as diagnostic tools. On Windows systems, the shortcut
icon created in Start > Programs > PTC License
Management tools starts the Lmtools graphical user interface.
The lmutil script provides the same information in text-based
format for UNIX users
Lmutil
A single executable, lmutil, provides optional arguments to
check the server and licensing status. Refer to the FLEXlm End
Users Guide.at http://www.globetrotter.com/manual.htm.
Lmtools Utility
In FLEXlm 7.0, a lmtools.bat program is added to the FLEXlm
installation directory on Windows platforms only. The lmtools program
runs the PTC License Management tools utility that is started from the
Start > Programs > PTC License Management tools menu.
Functionality includes starting and stopping the FLEXlm license server
from the Start/Stop/ReRead tabbed page.
Note: The PTC License Management tools utility replaces the FLEXlm
License Manager. This applet is removed from the Control Panel when
you update your FLEXlm software.
The Lmtools utility has two modes: configuration using the license file
and configuration using Windows Services.
When operations are performed on a specific license file, you cannot
start the lmgrd processes but you can perform all other available
functions. In the first tabbed page, Service/License File, select the
appropriate license file.
When operations are performed on a Windows Service, you can start
the lmgrd processes. In the first tab, Service/License File, you must
select a service.
B-4
Pro/ENGINEER Installation and Administration Guide
Through the interface, you also can choose to do the following things:
·
Start the license management server on boot
·
Determine which version of FLEXlm is in use
·
Direct the FLEXlm server to read a new license file
·
Display the statuses of licenses
·
Run a diagnostic test if there is a problem with license distribution
Ptcstatus Command Output
For pre-release 2000i and later, user-defined names are displayed in
ptcstatus command output.
Example 1: Ptcstatus command output with no user-defined name
Displaying status for license file:
License
Feature
Version
Expire Date
In Use
Free
PROE_FOUNDATION
21.0
31-dec-1999
1
4
In example 2, pro_common is the user-defined name given to the
license with feature name: PROE_FOUNDATION. The actual feature
name is displayed in the in-use line.
Example 2: Ptcstatus command output with a user-defined license
name
Displaying status for license file:
License
Feature
Version
Expire Date
In Use
Free
PRO_COMMON
21.0
31-dec-1999
1
4
(smith
prism)
PROE_FOUNDATION
prism 7788
102
In use:
System Administration Information
B-5
Machine-Specific Configuration
The sections that follow describe machine configuration procedures so
that you can take full advantage of Pro/ENGINEER features.
Compaq Computer Corporation
For best performance, configure machines running Compaq's Digital
UNIX to run the overlay plane enabled window manager. For some
versions of Compaq's Digital UNIX, there is a potential for a fatal X
Server crash that can be triggered unexpectedly by some specific
Pro/ENGINEER functionality. Compaq recommends users of
Pro/ENGINEER Release 2000i install or upgrade to Compaq's Digital
UNIX V4.0D and Open 3D 4.8 or later. The crash has been fixed in
these versions and later.
For users of earlier versions of the Operating System, there is an Open
3D ECO available from Compaq. Call your local Compaq customer
support hotline. The ECO is available for systems with the following
requirements.
·
An Alpha workstation with a PCI bus based graphics adapter
·
Compaq's Digital UNIX 4.0B with Open 3D 4.5 or 4.6
Or,
·
Compaq's Digital UNIX 4.0D with Open 3D 4.6 or 4.7 (4.0D users
are urged to just upgrade to the latest Open3D kit and skip the
ECO).
This ECO is not compatible with
·
Compaq's Digital UNIX 4.0A or C. For users running either of these
machines, Compaq recommends upgrading to UNIX 4.0D and Open
3D 4.8
·
Older DEC 3000 workstations with TurboChannel bus based
graphics adapters. There is no fix for these machines.
To avoid the potential fatal crash, Pro/ENGINEER Release 20 and
higher performs a runtime check for any of the aforementioned
configurations. If found, use of overlay planes is enabled if the overlay
window manager is set up correctly as described in the next section. If
not found, overlay plane usage is disabled (even if the window manager
is configured as per instructions below) and a performance penalty is
seen due to an increased number of window repaint operations.
B-6
Pro/ENGINEER Installation and Administration Guide
Overlay Planes
Machines from Compaq Computer Corporation require a graphics
adapter with at least four overlay planes. If your graphics adapter has
four or fewer overlay planes, you may need to configure your window
manager to use two colors in the overlay planes (for Compaq's Digital
4.0 without CDE) or in the borders (for Compaq's Digital UNIX 4.0 with
CDE). This leaves enough color resources for Pro/ENGINEER.
In addition, you should use an overlay window manager. The following
procedures describe how to set up different window managers to use
overlays.
How to Set Up Overlays for Compaq's Digital UNIX 4.0 With Common
Desktop Environment
1. Configure your workstation to use graphics overlay planes with
Pro/ENGINEER Release 2000i under the Common Desktop
Environment (CDE).
To make the change for an individual user:
2. Edit the user's $HOME/.Xdefaults file.
3. Add (or change) the following entries.
Dtsession*wmStartupCommand:
/usr/dt/bin/dtwm_overlay -Overlay
4. If you have a graphics card with only 4 overlay planes, you need to
also set:
Dtwm*0*overlayColorUse: B_W
(The PowerStorm 4D60T graphichs card has more than 4 overlay
planes.)
5. Save the file.
6. Log off and on again. The overlay window manager is now enabled
for the user account to which these changes were made.
To make the change global for all users of the workstation:
1. Become a root user.
2. Create the directory /etc/dt/app-defaults/C
3. Copy /usr/dt/app-defaults/C/Dtsession to /etc/dt/app-defaults/C
System Administration Information
B-7
4. Edit the /etc/dt/app-defaults/C/Dtsession file and remove the
exclamation (!) from the following line:
!#Dtsession*wmStartupCommand:
/usr/dt/bin/dtwm
5. Change the window manager command to the command above in
the individual user instructions. So, it looks like:
Dtsession*wmStartupCommand:
/usr/dt/bin/dtwm_overlay -Overlay
6. Save the file.
7. Copy /usr/dt/app-defaults/C/Dtwm to /etc/dt/app-defaults/C
8. Edit /etc/dt/app-defaults/C/Dtwm file and add the line
Dtwm*0*overlayColorUse: B_W (this is only necessary for cards
with 4 overlay planes).
9. Save the file.
10. Log out and log on again.
The above directory name, C, in the directory path assumes the default
language locale. If you are running a foreign language, there is an
equivalent directory for your locale in which the same changes should
be made. See the Common Desktop Environment Administration Guide
in the Digital UNIX documentation set.
Under the DECWINDOWS/Motif Window Manager, make the change
for an individual user by performing these steps:
1. Click the Options menu from the Session Manager.
2. Click the Window Options.
3. Click Other under the Window Manager label and change the
command in the text box to say /usr/bin/X11/mwm -Overlay.
4. Select OK.
5. Select the Save Current Settings from the Options menu.
6. Copy /usr/lib/X11/app-defaults/Mwm_bw to $HOME/Mwm.
7. Save your original Mwm resource file if you have one.
8. Log out and log on again. The change will be in effect for the user
account these changes were made to when logging into the
workstation on the console screen.
B-8
Pro/ENGINEER Installation and Administration Guide
To make the change global for all users of the workstation:
1. Become the root user.
2. Edit the file /usr/lib/X11/app-defaults/Dxsession.
3. Search for the entry that says *Mwm.command.
4. Change the window manager command to 4 above in the individual
user instructions.
5. Save the change to the file cd to /usr/lib/X11/app-defaults.
6. Rename Mwm to Mwm_color with the mv command.
7. Do ln -s Mwm_bw Mwm to make a symbolic link to the black and
white Motif resource file.
8. Log out and log in again. The change will affect all users of the
workstation.
X Windows Backing Stores and Save Unders
X Windows Backing Stores and Save Unders must be disabled for
Pro/ENGINEER to function correctly and to perform at its best. In most
cases, this should be the default. To check whether they are disabled,
do the following:
1. Use the xdpyinfo command. In the output, about 10 lines after the
line that says screen #0:, you should see a line saying: options:
backing-store NO, save-unders NO.
2. If it says Yes instead of No, you will need to disable Backing-Stores
and Save-Unders manually. To do so, edit the file
/usr/lib/X11/Xserver.conf using a text editor. You need to have
root privileges to do so. Look for lines near the end of the file that
look something like:
! you specify command line arguments here
args < -pn >
X Windows Server arguments are specified by placing them between
the < > characters. To disable backing stores and save unders, add bs -su to any existing X Server arguments and save the file. For the
options to take effect, you need to log out and restart the X Server. The
X Server can be restarted from the CDE Login screen by clicking
Options->Reset Login.
System Administration Information
B-9
Special Configuration for ZLX-E3, ZLXp-E3 and PowerStorm 4D20 graphics
cards
For ZLX-E3, ZLXp-E3 or PowerStorm 4D20 graphics cards to function
correctly with Pro/ENGINEER, two additional X Windows server
arguments must be specified to the X server at start up. As above for
Backing Stores and Save Unders, edit the
/usr/lib/X11/Xserver.conf file and add the following X Server
arguments -I -ffbforceDepth 12. to the section of the file
discussed in the previous section.
Save the file, log out, and restart the X Server.
Using the Correct Version of the Netscape Browser
The 4.06 Netscape browser shipped does work with Java. The 3.0
Netscape Navigator browser does not.
Digital UNIX 4.0B and later ships with a version of Netscape Navigator
that works correctly with Java. When installing Pro/ENGINEER, the
installation program gives you the option of specifying an existing or
alternate Netscape browser. In the installation utility, specify
/usr/bin/X11/netscape if your workstation is running Digital Unix
4.0B or later.
Hewlett-Packard Company
This section discusses machine configuration changes that may be
necessary to run PTC software on Hewlett-Packard machines. For
complete details, go to the technical support area of
http://www.hp.com/go/ptc and view PTC Frequently Asked Questions
and Tuning HP-UX for Pro/Engineer.
HP 9000/700 Series with HP-UX 10.0 and Above
On these systems reconfiguration of your operating system kernel may
be required. Refer to the HP-UX System Administration manuals for
more information or contact your local HP support personnel for
assistance. As a courtesy, the following kernel reconfiguration
information is provided.
Determine the amount of swap space configured on your system. The
value for maxdsiz should be 90% of swap size, with the number
expressed in bytes. For example:
Swap = 100Mb, maxdsiz = 90Mb = 90000000b
Swap = 150Mb, maxdsiz = 135Mb = 135000000b
B-10
Pro/ENGINEER Installation and Administration Guide
HP 9000/700 Series With Starbase Graphics
Pro/ENGINEER supports dynamic spin and pan/zoom of shaded images
on HP 9000/700 Series Workstations that have a hardware graphics
accelerator such as the HCRX8Z, HCRX24Z, CRX24Z or CRX48Z. HP
Powershade may be used for software emulation of hardware graphics
functions on the CRX and Integrated color graphics devices.
On newer workstations—specifically, any 712, 715/64, 715/80, 715/100
XC with integrated graphics or any 715, 725, B, C, or J model with
HCRX -8, Visualize-EG, or Visualize-8 graphics—Powershade uses
Color Recovery to generate high quality pictures on 8-plane graphics
systems.
On older 8-plane systems—specifically, any 710, 715/50, or 75/75 with
integrated color graphics or any 720; 730, 735, 755, or 755 with CRX
graphics—the quality of the shaded image with Powershade is less good
than when you run Pro/ENGINEER under X-Windows. For these
systems, which do not support Color Recovery, evaluate the images and
determine which is more important: the image quality provided by XWindows or the ability to spin shaded images.
Enabling Starbase for Pro/ENGINEER
Pro/ENGINEER uses Starbase as the default graphics for all HP
9000/700 graphics systems. Some changes may need to be made to
enable the capabilities of Starbase with Pro/ENGINEER.
On older systems that do not support Color Recovery, it is necessary to
set SB_X_SHARED_CMAP before starting the X-Window system.
Note: If HP-VUE is being used, contact HP for assistance in setting
this environment variable.
If you use x11start and Bourne or K shell, you must add the following
lines to $HOME/.profile:
SB_X_SHARED_CMAP=true
export SB_X_SHARED_CMAP
If you use x11start and C shell, you must add the following line to
$HOME/.login:
setenv SB_X_SHARED_CMAP true
HP 9000/700 Series in HP-VUE Environment
Running Pro/ENGINEER in the HP-VUE environment may decrease
performance due to a higher demand on system resources. In addition,
System Administration Information
B-11
the resource Vuelogin*sb_710_shared_cmap can be set to true for
systems with hardware graphics capabilities.
Using HP-VUE With the Application Manager
HP-VUE users should add the following settings to their HP-VUE
resources:
Mwm*clientAutoPlace: false
Vuewm*clientAutoPlace: false
Setting these resources in the RESOURCE_MANAGER improves the
display of the PTC Application Manager on systems using HP-VUE.
These updates can be made manually or you can use the script called
Mwm-setup in the <loadpoint>/install/unix directory to have
Pro/ENGINEER make the appropriate changes for you.
Overlay Planes
To avoid colormap flashing, your system may need a graphics adapter
that allows more than one hardware colormap.
Silicon Graphics, Inc.
This section discusses machine configuration changes that may be
necessary to Silicon Graphics, Inc. machines.
Silicon Graphics 4Dwm Window Environment
Pro/ENGINEER supports the 4Dwm windowing environment on Silicon
Graphics machines. Certain resource files may need to be updated in
order to use this windowing environment. These updates can be made
manually or you can use the script called 4Dwm-setup in the
<loadpoint>/install/unix directory to have Pro/ENGINEER make
the appropriate changes for you.
Resources are to be specified in the /usr/lib/X11/appdefaults/4DWm and /usr/lib/X11/app-defaults/Toolchest
files. Updates can also be made in the $HOME/.Xresources file as well
as for individual users.
Overlay Planes
Systems from Silicon Graphics should be equipped with a graphics
adapter with at least four overlay planes, and the 4DWM windowing
environment should be used. To avoid unnecessary damage to the
underlying graphics windows, Pro/ENGINEER uses the overlays for
B-12
Pro/ENGINEER Installation and Administration Guide
the user interface. SGI systems with four or more overlay planes can
support the user interface in the overlay.
Sun Microsystems, Inc.
This section discusses machine configuration changes that may be
necessary to Sun Microsystems machines. For complete details, visit
http://www.sun.com/technical-computing/isv/ptcfaq.html.
Overlay Planes
A Creator3D or Elite3D graphics adapter is required for the use of
overlay planes.
In addition, the overlay visual should be the default visual. Use the
command:
ffbconfig -propt
to determine if overlay is the default visual. If overlay is not your
default visual, you need to set overlay visual as the default visual.
How to Set Overlay Visual as the Default Visual
1. In a command window, log in as root on the machine to be set.
2. Enter the command:
ffbconfig -defoverlay true
3. Log out as root from the command terminal and restart the
session manager.
Pro/ENGINEER in X-Windows
The following sections provide information on using Pro/ENGINEER in
a UNIX X-Windows environment.
Display Devices Supported
Pro/ENGINEER operates in an X-Windows environment on the
following computers:
·
Compaq Computer Corporation (and former Digital Equipment
Corporation)
·
Hewlett-Packard
·
SGI
·
Sun Microsystems, Inc.
System Administration Information
B-13
Using the Node-locked License Option, the display device must be the
same machine as the license (the X-client Pro/ENGINEER and the Xserver must be running on the licensed machine).
However, for those who use floating licenses, the display device and the
computer running Pro/ENGINEER can be different. It is possible, for
example, to use an IBM RS/6000 as a server running Pro/ENGINEER
and an SGI as the display device. Each separate display device used at
the same time counts as a user against the total number of licenses
available.
It is also possible to use an X-terminal as the display device. In this
case, you are cautioned to make sure that the display terminal has
sufficient resources to properly display Pro/ENGINEER.
Running on a Remote Computer
In a floating license configuration, all the computers listed previously
may be used as X display devices. To enable the ability to run
Pro/ENGINEER on one machine and the X-server on another, follow
the instructions from the manufacturer.
How to Start Pro/ENGINEER on a Remote System
1. On the X-server machine, open a window and set xhost ".
2. From the X-server, log in remotely to the machine on which you
want to execute Pro/ENGINEER.
3. On the remote machine, type
if using csh:
setenv DISPLAY <xserver_machine_name>:0
if using sh:
DISPLAY=<xserver_machine_name>:0
export DISPLAY
4. Run Pro/ENGINEER.
X Term Path
When running in an X-Windows environment, Pro/ENGINEER needs
to know the X-Windows terminal emulator command used to open
system windows for editing relations, entering datum point arrays, and
so on. The full path name and the command must be provided for your
system. For example, the SOLARIS command is shelltool. Enter the
path and name /bin/shelltool.
Use the configuration file option:
B-14
Pro/ENGINEER Installation and Administration Guide
terminal_command path and name
UNIX Window Decorations
Several platforms that have X_WINDOWS are supported.
Pro/ENGINEER operates properly under proprietary window managers
such as:
·
Motif (mwm)
·
Open look (olwm)
·
4Dwm
·
HP VUE (vuewm)
Note: Certain configuration resource options must be changed if you
are using 4Dwm. Refer to the section Silicon Graphics 4Dwm Window
Environment for more information.
It is possible to customize the amount of default decorations that Motif
(mwm) X-Window manager places on Pro/ENGINEER windows to more
closely resemble the standard decorations. For new installations (not
updates) installation of the constraints can be done automatically
during Pro/ENGINEER Client installation (affecting all users of the
client machine), or later to constrain the decorations for only specific
users.
Per-User Instructions
How to Install the Decoration Constraints Manually for Selected Users
Append the contents of /usr/lib/X11/app-defaults/ProE to the
.Xdefaults file in the user’s home directory, for example:
cat /usr/lib/X11/app-defaults/ProE >>
~user/.Xdefaults
Graphics Configuration
For Pro/ENGINEER graphics support information, refer to the PTC
Hardware Configuration Notes. Connect to the PTC home page at
http:/www.ptc.com.
Pro/ENGINEER Fonts
For Release 2000i, PTC has added 41 third-party true type fonts in
addition to the default PTC fonts you receive with your software. Most
true type fonts can be used in Pro/ENGINEER 2000i. This includes any
true type font available on Windows NT and Windows 98/95 machines.
System Administration Information
B-15
These fonts, supported throughout Pro/ENGINEER, include 13
different font styles, each containing plain, bold, and italic variations.
The new fonts appear in the current pull-down list in Pro/DETAIL and
Sketcher. PTC fonts are listed first, followed by the third-party fonts
supplied by Agfa Corporation. Note that only fonts provided by PTC are
supported in Sketcher for the creation of features.
These true type fonts are stored in the
<loadpoint>/<machine_type>/text directory. Any additional
purchased fonts should be installed in this directory.
To make the fonts accessible when you run Pro/ENGINEER, you must
use the PTC aux_font utility. For complete instructions, see the
Pro/ENGINEER Drawing User's Guide.
The available new true type fonts and their corresponding file names
are listed in the following table.
True Type Fonts Added in 2000i
B-16
Font name
File name
Blueprint MT
bluprnt
Blueprint MT Bold
bluprntb
CG Century Schoolbook
schlbk
CG Century Schoolbook Bold
schlbkb
CG Century Schoolbook Bold Italic
schlbkbi
CG Century Schoolbook Italic
schlbki
CG Omega
cgomg
CG Omega Bold
cgomgb
CG Omega Bold Italic
cgomgbi
CG Omega Italic
cgomgbit
CG Times
cgtime
CG Times Bold
cgtimebd
CG Times Bold Italic
cgtimebi
Pro/ENGINEER Installation and Administration Guide
Font name
File name
CG Times Italic
cgtimeit
CG Triumvirate
trium
CG Triumvirate Bold
triumb
CG Triumvirate Bold Italic
triumbi
CG Triumvirate Condensed Bold
triumcb
CG Triumvirate Italic
triumi
Garamond
garamd
Garamond Bold
garamdb
Garamond Italic
garamdi
Garamond Kursiv Halbfett
garamdbi
Garth Graphic
gargra
Garth Graphic Black
gargrabl
Garth Graphic Bold Italic
gargrabi
Garth Graphic Italic
gargrai
Grotesque MT
grotesq
Grotesque MT Bold
grotesqb
Microstyle Extended
microex
Microstyle Extended Bold
microexb
Neographik MT
neograph
Sackers English Script
sackengs
Shannon
shanno
System Administration Information
B-17
Font name
File name
Shannon Bold
shannob
Shannon Extra Bold
shannoeb
Shannon Oblique
shannoo
Spartan Four MT
sparton4
Spartan One Two MT
sparton12
Spartan One Two MT Bold
sparton12b
Triumvirate Inserat
triin
If you need additional true type fonts, you can purchase more fonts. For
information, contact the Agfa Corporation at
http:\\www.agfadirect.com.
When you work with Pro/ENGINEER, you use two categories of fonts:
·
Pro/ENGINEER fonts
·
Hardware fonts
Pro/ENGINEER fonts appear in Pro/ENGINEER graphics windows.
They define alphanumeric characters and special symbols in text files.
You can edit these files by:
·
Modifying the look of existing characters and symbols
·
Adding new symbols to the files
·
Creating completely new fonts
Hardware fonts appear in window headers and menu items. They are
machine-and language-specific.
Available System Fonts
To specify the font for menu items, set the configuration file option
menuitem_font. The value for this option is the name of the font file,
supported by the X-server running Pro/ENGINEER. To obtain the list
of available fonts on UNIX machines, use the xlsfonts command. On
Windows systems, the available fonts are listed in the Control Panel
under Fonts. The font for text in Pro/ENGINEER window headers is
determined by the current setting of your window manager.
B-18
Pro/ENGINEER Installation and Administration Guide
Extended ASCII Set
ASCII is the default font in all Pro/ENGINEER modules. You can
modify ASCII characters. You can also replace ASCII with your own
font as the default.
The extended ASCII character set used in the United States and
Western Europe is supplied by Pro/ENGINEER through a combination
of two font files—ascii.src and latin_1.src.
Note: Characters up to number 146 are defined in ascii.src. The
remaining characters are defined in latin_1.src.
To use the European LATIN_1 characters, do one of the following
procedures:
·
Make sure your keyboard is set up for the appropriate language. A
specific set of LATIN_1 characters is available with each keyboard
language setting.
·
Use a key sequence specific to your machine type to produce the
desired character. If necessary, contact your hardware vendor for
additional information.
Special Symbols
To display the Special Symbol Palette, create a note:
DETAIL>Create>Note. Select the location of the note and the
Special Symbol Palette dialog box opens. Click on the symbol in the
palette.
Alternatively, you also can create a new symbol. Pro/ENGINEER
represents special symbols with standard ASCII characters.
To use special symbols in drawing notes, follow these steps:
Enter the sequence <CTRL-a>.
Enter the ASCII character that represents the special symbol.
Enter the sequence <CTRL-b>.
When you create a new symbol, you should either redefine an existing
character to the new symbol or create a new special symbol font. You
can add new special symbols to the font file, special.src, by defining
the graphic representation.
Exporting Special Symbols to IGES
Special symbols and their corresponding ASCII characters map to the
IGES font table 1001. Only two symbols (Total Runout and the Least
System Administration Information
B-19
Material Condition) do not map to the 1001 table. They are supported
by the 1003 font table. The configuration file option
use_iges_font_1003 determines which IGES font table outputs data
to IGES.When you assign an ASCII character to a new symbol, select a
character from either the 1001 or 1003 font table. Use 1001 or 1003
exclusively when you anticipate that a drawing will be exported in an
IGES file. (Refer to your IGES documentation for more information on
IGES font tables.)
How to Edit Pro/ENGINEER Fonts or Create New Fonts
1. Edit an existing or create a new .src file, which resides in
<loadpoint>/text/<language>.
2. Compile the font file by using the compile_font command.
3. Make the new font available locally or for all users.
How to Modify a Pro/ENGINEER Font File
1. Copy the appropriate .src font file into your working directory. The
.src files reside in <loadpoint>/text/<language>.
2. Modify the font file.
3. From the <loadpoint>/text/<language> area, copy the
appropriate index file to your working directory.
4. Copy the compile_font command to your working area. If you are
working on a UNIX machine, copy the executable compile_font to
your working directory. The executable is in the following directory:
<loadpoint>/<machine_type>/obj.
5. To compile the font, enter the following command for each font file
you modify: compile_font fontfilename.src
fontfilename.fnt
Note: If you modify the ASCII font definitions, it alters the appearance
of the default font in every Pro/ENGINEER module.
How to Create a User-Defined Font File
1. Define a new font in a file with the extension .src. Store the new
font in your working directory.
2. Create an index file that includes the new font file. Make sure the
index file contains fonts with unique codesets.
3. Copy the compile_font command to your working area. If you are
working on a UNIX machine, copy the executable compile_font
from <loadpoint>/<machine_type>/obj into your working
directory.
B-20
Pro/ENGINEER Installation and Administration Guide
4. Enter the following command for each font file you create:
compile_font fontfilename.src fontfilename.fnt
5. Recompile user-defined fonts whenever you install a new major
release of Pro/ENGINEER.
You can include user-defined fonts as default or auxiliary fonts in
drawings.
How to Store a New Font
1. Store the updated index file with the .src and .fnt files in your
local directory if the new font is for your personal use.
2. To make a new font available to all users, reference the font in the
index and store the index and source files in the directory
<loadpoint>/text/<language>. Store the .fnt file in the following
directory: <loadpoint>/<machine_type>/text/<language>.
How to Set Your Font as the Default
1. Rename your file to ascii.src.
2. Recompile the ascii.src file using the compile_font command
to produce a local ascii.fnt file.
How to Create or Customize a Font
1. Copy or create font source files in the local working directory. In
this example, the default primary ASCII and special symbol fonts
are copied and renamed.
cp /usr/pro/text/usascii/ascii.src custom.src
(primary font with codeset 0)
cp/usr/pro/text/usascii/special.src symbols.src
(special symbols font with codeset 4)
2. Edit the source files to include all the required definitions and
changes.
vi custom.src
vi symbols.src
3. Copy the compile_font script from the directory
<loadpoint>/<machine_type>/obj into the same local working
directory.
cp /usr/pro/sgi/obj/compile_font
4. Compile the font files.
System Administration Information
B-21
compile_font custom.src custom.fnt
compile_font symbols.src symbols.fnt
5. Create a new index file to reference the compiled font files. Note
that the index file name does not need to be the same as the
primary font name. If the custom font created is not a primary font
(codeset 0), be sure to include a font with a codeset of 0 in the index
file. In this example, the new font index file references both
customized font files (primary and special symbols).
myfont.ndx (new customized .ndx file)
custom (new custom primary font (codeset 0))
latin_1 (system extended ASCII font(codeset 2))
symbols (new special symbols font (codeset 4))
This font index file references the new customized special symbols
font only. It uses the system default primary font.
myfont2.ndx (new customized .ndx file)
ascii (system default primary font (codeset 0))
latin_1 (system extended ASCII font (codeset 2))
symbols (new special symbols font (codeset 4))
You can use the new font in the following ways:
·
For personal use of the new font, leave the .src, .fnt, and .ndx
files in your local directory. Then reference the new font index file
name in the detail setup file as an auxiliary font.
aux_font # myfont
In this command, # is the auxiliary font number (1 to 8).
·
To use the font as a global auxiliary font, place the .src and .ndx
files in the <loadpoint>/text/<language> directory. Then put
the compiled .fnt files in the directory
<loadpoint>/<machine_type>/text/<language>.
mv custom.src symbols.src myfont.ndx
/usr/pro/text/usascii
mv custom.fnt symbols.fnt /usr/pro/sgi/text/usascii
·
B-22
To set the new font as the system default, rename the primary
source and compiled font (codeset of 0) files to ascii.src and
ascii.fnt, respectively. The system font.ndx file already
references the ASCII font file and, therefore, does not need to be
modified. Locate the new ascii.src and ascii.fnt files in the
appropriate directories (see the section above that describes how to
use the font as a global auxiliary font). Note that the system
overrides the original ascii.src and ascii.fnt files, unless you
first rename them.
Pro/ENGINEER Installation and Administration Guide
The next time you start Pro/ENGINEER, it uses the new custom
font as the system default font.
mv custom.src /usr/pro/text/usascii/ascii.src
mv custom.fnt /usr/pro/sgi/text/usascii/ascii.fnt
General Plotter Information
PTC supplies software that writes plot files in plotter format. It is
possible to specify a plot command in the config.pro. The physical
connection, however, is the responsibility of the computer and plotter
vendors since they are hardware and system software experts.
Depending on the hardware configuration, the system software may
require a different setup.
In general, connection to the plotter is by RS232 cable with null modem
configuration (pins 2 and 3 reversed, pin 7 ground). If this is the
connection, the computer and plotter communicate using xon and xoff.
It is usually necessary on UNIX to establish an entry in
/etc/printcap to let UNIX know the characteristics of the
connection. A typical printcap entry is as follows:
hp7585|plotter|hp:\
:lp=/dev/ttyb:sd=/usr/spool/lpd:br#9600:\
:sf:pl#0:pw#0:mx#0:sh:lf=/usr/adm/lpd-errs:
If you have difficulty in setup, contact the customer support
department of your hardware vendor.
Note: Pro/ENGINEER does not support any HPIB interfacing.
Loading and Mounting the CD-ROM on UNIX
Most UNIX systems mount the CD-ROM after it is loaded into
the CD-ROM drive. For users whose machines do not mount
automatically, the following instructions explain how to load and
mount the CD-ROM locally and remotely.
Note: Sun Solaris 2.x has automatic CD mounting. For information
specific to how PTC products run on Sun Microsystems hardware, visit
http://www.sun.com/technical_computing/isv/ptcfaq.html. This site also
discusses how to edit the config.pro file to adjust Pro/ENGINEER
fonts
Determining the SCSI ID of the CD-ROM Drive
You specify the SCSI identification number of your CD-ROM drive
when you mount the CD-ROM file system to your UNIX workstation.
System Administration Information
B-23
If you already know the SCSI ID of your CD-ROM drive, proceed to the
next step, How to Load and Mount the CD-ROM Locally.
For external CD-ROM drives, the SCSI ID can be found on the back of
your CD-ROM drive. Look for a single-digit switch. The displayed
number is the SCSI ID number.
For internal CD-ROM drives, use the following table to find the
command or commands you need to enter to determine the SCSI ID of
the CD-ROM drive (the bold # is the ID).
Commands Used to Find the SCSI ID of the CD Device
Platform
Command and Output
SCSI ID
Compaq's
Digital
UNIX
grep RRD /var/adm/messages | tail -1
5
(date & time) (computer) vmunix: rz5 at scsi0 bus 0
target 5 lun 0 (DEC RRD43 (C) DEC 1084)
(target #)
HP-UX
10.20 ACE
Insert the CD-ROM into the drive and use the
command.
Become root user.
For each file in the /dev/rdsk directory, at the
command line type
/etc/diskinfo /dev/rdsk/<device file
a
name>
for the device file identified as type:CD-ROM. The
SCSI ID is to the right of the letter t in this example
of a device file name, c0t3d0. Note that the identified
devise file name is the same file name that is used in
the command to mount the CD-ROM.
IBM
SGI
lsdev -C -c cdrom -H
4
cd0 Available 00-08-00-40 CD-ROM Drive
(in the string
00-08-00-#0)
hinv | grep CDROM
3
CDROM: unit 3 on SCSI controller 0
(unit #)
a. <device> should be replaced with each item in the /dev/dsk directory.
Note: The inclusion of a platform in this table does not indicate support
for that platform. This information is included to help you determine
B-24
Pro/ENGINEER Installation and Administration Guide
the SCSI ID for CD-ROM drives that is remotely mounted to your
workstation. See the Hardware Configuration Notes for information on
supported systems and platforms.
How to Load and Mount the CD-ROM Locally
1. Turn on the CD-ROM drive and insert the CD-ROM.
2. If the /cdrom directory does not already exist, create it using the
following command:
mkdir /cdrom
3. Use the next table to find your UNIX workstation platform. Enter
the command listed for your platform to mount the CD-ROM drive.
Substitute the pound sign (#) with the SCSI ID of your CD-ROM
drive (see Determining the SCSI ID of the CD-ROM Drive).
CD Device Mounting Commands
Workstation
CD Device Mounting Commands
Compaq's
Digital UNIX
mount -t cdfs -o ro,nodefperm,noversion /dev/rz#c /cdrom
HP
/etc/mount -F cdfs -o ro,cdcase /dev/dsk/c?t#d0 /cdrom
IBM RS/6000
mount -v cdrfs -o ro /dev/cd0 /cdrom
SGI
mount -t iso9660 -o ro /dev/scsi/sc0d#l0 /cdrom
a
b
c
a. The pound sign (#) must be replaced with the SCSI ID of the CD drive.
b. The question mark (?) should be replaced with the Interface Card Instance Number and the pound sign (#)
should be replaced with the device’s SCSI ID number.
c. The SGI device name uses the lowercase alpha character L, not the numeric 1.
How to Load and Mount the CD-ROM Remotely
Note: The CD-ROM drive should be mounted using NFS version 2. In
machines that support NFS 3, an extra argument needs to be added to
the mount command to force the use of NFS 2.
1. Load and mount the CD-ROM on the remote UNIX system to which
the CD-ROM drive is connected. Use the procedure outlined in the
section, How to Load and Mounting the CD-ROM Locally.
2. Before a remote UNIX system can allow access to the CD-ROM
from your local UNIX workstation, the CD-ROM file system needs
System Administration Information
B-25
to be exported. A line needs to be added to a file on your local UNIX
workstation and, in some cases, a command needs to be executed.
3. Use the following table to look up the platform of the remote UNIX
system and add the line in the Line to add row to the file in the File
to edit row. You need the correct write permissions to edit the files.
4. After you have made the changes, if necessary, execute the
command listed in the Command row.
Exporting the CD File System
Platform
File to Edit
Line to Add
Command
Compaq's
Digital UNIX
/etc/exports
/cdrom
HP-UX
/etc/exports
/cdrom -ro
exportfs /cdrom
IBM RS/6000
/etc/exports
/cdrom
/usr/sbin/exportfs
/cdrom
SGI
/etc/exports
/cdrom
exportfs /cdrom
SUN
/etc/dfs/dfstab
share -F nfs -o ro
/cdrom
shareall
5. If the /cdrom directory does not already exist on your local UNIX
workstation, create it using the following command:
mkdir /cdrom
6. You mount the CD-ROM mount directory from the remote UNIX
system to your local workstation. Use the following table to look up
the platform of your local UNIX workstation and execute the
command for your UNIX platform. In the command you execute,
substitute <node> with the name of the remote UNIX system to
which the CD-ROM drive is connected and substitute <cdmount>
with the CD-ROM mount directory used on the remote UNIX
system.
B-26
Pro/ENGINEER Installation and Administration Guide
CD Device Remote Mounting Commands
Platform
Remote Mounting Command
Compaq's Digital
a
UNIX
mount -o ro,hard <node>:<cdmount> /cdrom
HP
/etc/mount -o ro,hard <node>:<cdmount> /cdrom
IBM RS/6000
SGI
a
a
/usr/sbin/mount -o ro,hard <node>:<cdmount> /cdrom
mount -o ro,hard <node>:<cdmount> /cdrom
a
SUN
mount -o ro,hard <node>:<cdmount> /cdrom
a. If you experience problems using PTC.Setup from a remote-mounted CD-ROM, you can try remounting
the remote CD-ROM using the command:
mount -o ro,hard,vers=2 <node>:<cdmount> /cdrom
for Compaq's Digital UNIX, SGI, and Sun systems or the command:
/usr/sbin/mount -o ro,hard,vers=2 <node>:<cdmount> /cdrom
for IBM RS/6000 machines.
System Administration Information
B-27
C
Troubleshooting Tips
This appendix documents common problems that users have when they
install PTC software and FLEXlm license management software. This
appendix also provides general debugging techniques and cites other
sources of information.
Topic
Page
General Debugging Hints .................................................................. C-2
Online Information ............................................................................ C-2
Troubleshooting List .......................................................................... C-2
C-1
General Debugging Hints
The log file, ptclmgrd.log, records license server activities and can be
found in ptc/flexlm/licensing/ptclmgrd. This file has useful
information that you should check when you have a problem.
Online Information
Valuable information is easily accessed at the PTC Customer Service
home page at http://www.ptc.com/support/.
The Customer Service Web area within the PTC home page provides a
wealth of how-to information for new and experienced users. The Read
This First document, as well as other general installation information,
can be found online on the PTC Customer Service home page.
Links are provided to hardware and software configuration notes,
licensing information, and technical documents. Technical Application
Notes, or TANs, discuss software issues and provide alternate solutions
with step-by-step procedures, and the specific build of the software that
resolves the issue. Technical Points of Interest, or TPIs, describe the
intended functionality of the software for specific tasks and may
provide alternate solutions. These documents are not specific to a
particular release.
For information on FLEXlm diagnostic environment variables, consult
the FLEXLm End Users Guide. The FLEXlm End Users Guide can be
found on the Pro/ENGINEER Reference Documentation CD-ROM or on
the GLOBEtrotter Software Inc. Web site at
http://www.globetrotter.com/manual.htm.
Troubleshooting List
Scan through the following list of problems to find any that appear to
be the same as the one you are experiencing. The information is
presented in the following format.
Symptom: Describes the problem.
Cause: Lists the cause of the problem.
Solution: Provides steps on how to resolve the problem.
Failure to Launch the Software
Symptom: On Windows systems, when you attempt to start your PTC
software, you see an MS-DOS window that contains the message:
Cannot find <Installation_Directory>\<mc_type>\filename
C-2
Pro/ENGINEER Installation and Administration Guide
Cause: The system PATH, an environment variable, is either not set to
the <Installation_Directory>\bin or it is improperly set due to a
syntax or spelling error.
Solution: Check the system PATH. On Windows NT, from the Start
Menu, choose Settings > Control Panel > System. In the
Environment tab window, set the system variable. On Windows 98/95
machines, this path needs to be set in the autoexec.bat. The
workstation must be restarted for the change to take effect.
Server Fails to Start
Symptom: Installation is successful. The lmgrd or FLEXlm server
daemon starts, but the ptc_d or the PTC server daemon does not.
Cause: The location of the FLEXlm installation directory has changed
from the first installation.
Solution: Stop the process. On Windows NT, go to Settings > Control
Panel > Services, select FLEXlm server for PTC, and choose Stop.
You can also use the ptcshutdown or a kill -6 utilities. Restart the
server with the ptcstartserver command. Additionally, look at the
ptclmgrd.log file for errors. These are good techniques to use if the
server fails to start.
Out of Environment Space on Windows 98/95
Symptom: You receive the error message, Out of environment space,
which may be followed by several other messages.
Cause: The environment space allocated to your DOS command session
is inadequate.
Solution: Right-click on either the <command_name>.bat or the
shortcut. Select the #Memory tab and change the Initial Environment
from Auto to 4096.
Xtop Icon Appears in the Taskbar and Quickly Disappears
Symptom: An Xtop icon appears and quickly disappears in the taskbar
for a few seconds and disappears.
Cause: Network configuration settings are not properly set.
Solution: Make sure that the network settings are in accordance with
the Suggested Technique for Configuration of a Windows (NT and
98/95) Workstation for executing Pro/ENGINEER (found at:
http://www.ptc.com/cs_20/cs/howto/win515/win515.htm)
Troubleshooting Tips
C-3
Look for a file in the startup location called std.out and see if there
are references to network errors. If there is a line that states Exception
Code Was -1073741819, make sure the latest graphics driver is
installed. The most recent graphics driver can be downloaded from the
manufacturer's Web site, An alternative is to set the config.pro
option graphics win32_gdi.
Inaccurate Ptcstatus Command Information
Symptom: On Windows systems for Release 20 and later, the
ptcstatus command returns the following message, Displaying status
for license file 77880@ptc Warning (-15): Cannot connect to license
servers (-15, 10; 10061).
Cause: The license server is not running or the license client machine
cannot reach the server.
Solution: Verify that the lmgrd and ptc_d daemons are running. A
network problem exists if a license client machine attempts to ping the
server by hostname and the ping fails.
Invalid Licenses
Symptom: You receive the error message, Invalid license.
Cause: Licensing information is inaccurate.
Solution: Return to the License File Editor and verify that the
information entered is exactly as it appears in your License Pack. If no
licenses are listed, return to the License File Editor and ensure no text
is highlighted.
If all licenses are listed as invalid, verify that the PTC Host_ID in the
License Pack corresponds with what you see in the License File Editor.
For example, one server line and one daemon line represent a single
server. Three server lines and one daemon line represent a faulttolerant or Triad configuration. Remove all the lines that do not pertain
to the PTC HOST_ID.
Your increment lines should have no blank lines. Verify that all
continuation characters \ are at the end of each line, except for the last
line. If some licenses are valid while others are invalid, find the invalid
feature name lines in the License File window and correct the text.
If you received your license codes via e-mail, remove any extraneous
text such as the header and footer. Another option is to delete the
invalid license in the License File Editor window.
C-4
Pro/ENGINEER Installation and Administration Guide
Help Fails To Start
Symptom: When you try to use Help, the following error message
appears:
/usr/lib/dld.sl: Unresolved symbol: fpsetmask (code)
from {netscpe_instal_dir}
/usr/lib/dld.sl: Unresolved symbol: fpsetmask (code)
from (dns helper)
Cause: Pro/ENGINEER is configured to use a local installation of
Netscape Navigator, however, that installation of Netscape Navigator
is not running.
Solution: Either start a local installation of Netscape Navigator or
reconfigure Pro/ENGINEER so that the application does not use a local
installation of Netscape Navigator.
FLEXlm Fails to Start (Triad Configurations)
Symptom: License management software does not start after a Triad
server is installed and configured.
Cause: The following requirement has not been met: two of the three
partners of the Triad configuration must be running (Quorum) before
licenses can be distributed.
Solution: Go to a shell window or a command prompt (UNIX and
98/95) and change into the
<FLEXlm_Installation_Directory>\bin. Type in
pctstartserver. For Windows NT systems, open Control Panel >
Services and highlight FLEXlm server for PTC. Choose the Start
button and then choose OK to complete the installation.
Troubleshooting Tips
C-5
Glossary
Application Program Interface (API)
A set of standards or conventions by which programs can call specific
operating system or network services.
Configuration ID
This identification number is used to determine the software licenses
that are used in a particular installation. It is also the number used to
identify and track your PTC product software.
Counted locked license
Although a locked license is managed by a FLEXlm license server, its
usage is restricted to the machine(s) for which it is licensed. The license
server allows customers to use up to the number of licenses purchased
at one time.
CPU Information
Information about your hardware (for example CPU or Host ID,
platform, and operating system).
Datecode
A unique number used to identify a specific version of PTC software.
For Release 2000i and higher, the number has been expanded from four
to seven digits. The datecode can be found along the spine of the
CD-ROM case.
Glossary - 1
Daemon line
An entry in the license file that defines
· the name of the PTC daemon, which is a customized software
program that grants/denies floating PTC licenses by reading the
license file
· the path where this executable resides, that is in the FLEXlm
installation directory
· the path to the FLEXlm options file, which contains various
operating parameters
Design Animation
A software option that enables users to create animation sequences of
parts and assemblies, from within Pro/ENGINEER.
FLEXlm
The license management software that is used to distribute licenses.
Feature line
The feature or increment line is an entry in the license file that
describes the product that the user is allowed to use, as well as any
optional software products that are associated with that license.
Feature name
The feature name is the name of the license that the application
requests. It is composed of a Product Prefix and a Configuration ID (for
example, PROE_3655).
Evaluation license
An evaluation license allows use of a software product for a trial period.
Floating license
A floating license can be used on more than one system. Floating
licenses are distributed by a license server process that runs on a
machine. This machine is also called the license server machine. See
License-to-run.
Globetrotter, Inc.
Developers of FLEXlm, license management software. Further
Globetrotter information can be found at http://www.globetrotter.com.
Glossary - 2
Pro/ENGINEER Installation and Administration Guide
Hardware reconfiguration
The process of changing any aspect of the machines currently mapped
to the Configuration ID.
Increment line
See Feature line.
Installation directory
The directory in which PTC software is installed. Also call the
loadpoint.
Install number
A number used by PTC's order management system before October20,
1997 to identify a single software installation.
License
A license grants a user permission to run a PTC product.
License client
A machine or software session that requests a license from another
machine or software session. For example, if you start Pro/INTRALINK
on machine A and it requests a license from license server machine B,
then machine A is a license client.
License file
The file (license.dat) that is saved onto the user's disk when
FLEXlm is installed and configured. This file contains the information
used by FLEXlm to authorize the use of software.
License information
The information that is used by FLEXlm to authorize the use of
software. Also used to describe the information that is contained in the
PTC License Pack, particularly before a customer has imported or
entered that information into the FLEXlm license file. (for example,
Enter the license information into the editor).
License-locked
Refers to an optional module that has been purchased for use with a
specific licensed product, which may be either floating or node-locked. If
an optional module is license-locked to a node-locked license, it may
only be used on the specifically authorized machine. If an optional
module is license-locked to a floating license, it may be used on any
machine in the network (in conjunction with that license).
Glossary - 3
License-locked option
An optional module of PTC software that is locked to a license of PTC
software. When the license is successfully started, all license-locked
options associated to the licenses are available.
License Management
The PTC organization responsible for all installation-based activities.
License Management Software
See FLEXlm.
License Pack
The packet sent to a customer (either by e-mail, fax, or U.S. mail) that
contains the license codes necessary to run your software.
License-to-run
A license-to-run invokes the license of a specific PTC application, such
as Pro/ENGINEER. Floating licenses are available for use on any host
machine on the network at any particular site. See Floating License.
License server
A machine or system process that distributes licenses to license clients.
For example, if you start Pro/ENGINEER on machine A and it requests
a license from machine B, then machine B is the license server
machine. The license server machine keeps track of the number of
licenses in use. A system administrator can use a license server
machine to control licenses by placing restrictions on a particular
feature.
Loadpoint
Directory where the software is installed. An example of the
Pro/ENGINEER loadpoint on UNIX systems is /usr/local/proe22).
Lmgrd daemon
The FLEXlm license manager daemon (lmgrd) runs on the license
server and works with the PTC vendor daemon. It does not manage
license usage. The lmgrd daemon starts vendor daemons, refers
applications to the appropriate vendor daemon, and communicates with
other lmgrd daemons on the network (for Triad installations).
Glossary - 4
Pro/ENGINEER Installation and Administration Guide
Maintenance Release request
A request for postproduction PTC software, which features
enhancements after a major new revision.
Maintenance Shipment
An update to the next major release of PTC software.
ModelCHECK
A software productivity tool for Pro/ENGINEER, ModelCHECK
analyzes parts, drawings and assemblies, and recommends proper
Pro/ENGINEER modeling techniques.
Name_service daemon
The daemon that permits the Pro/ENGINEER and Application
Manager applications to communicate with each other.
Node-locked license
A license that can be used on only one specific machine or node. Nodelocked licenses are restricted to a specific Host ID, or CPU ID. If the
node-locked license does not match the CPU ID of the machine running
the software, then the license cannot be used on that machine. Nodelocked licenses can be counted or uncounted.
Part file
A file that contains Pro/ENGINEER part information (for example,
object dimensions).
Product prefix
This standard prefix corresponds to a particular product. For example,
the product prefix for Pro/ENGINEER is PROE_. This product prefix
might be used as a prefix within a feature name, such as PROE_12345,
where 12345 is the Configuration ID; or for an environment variable,
such as PROE_FEATURE_NAME, which designates the feature that
Pro/ENGINEER requests on startup.
Pro/BUNDLE
A type of floating optional module that is comprised of several existing
existing optional modules. PTC licensing recognizes the bundled
software as a single licensed entity.
Glossary - 5
Pro/ENGINEER
A 3-D mechanical design automation suite, Pro/ENGINEER provides
associative and interoperable product design and an engineering
modeling system.
Pro/J.Link
A Java-based toolkit, Pro/J.Link allows developers to create Java
applications that access a Pro/ENGINEER session.
Pro/Plastic Advisor
Pro/Plastic Advisor simulates mold filling for injection molded plastic
parts and provides designers with immediate, easy access to reliable
manufacturing feedback and advice.
Pro/TOOLKIT
An API, Pro/Toolkit enables customers and third parties to add
functionality to Pro/ENGINEER using the C programming language.
Pro/Web.Link
An API, Pro/Web.Link extends the capabilities of the Netscape browser
so it can communicate with Pro/ENGINEER.
PTC Application Manager
A utility that appears as a toolbar that enables the user to start and
close other applications during a Pro/ENGINEER session.
PTC.Setup
A graphical installation utility that uses common menus, dialog boxes,
and screen icons to help customers install PTC product applications.
PTC.Setup Help
Online user installaiton instructions displayed in a Web browser.
PTC daemon
The PTC vendor daemon (ptc_d) runs on the license server and works
with the FLEXlm daemon. It manages license usage by reading the
PTC license file. The PTC daemon also contains the authentication
information for PTC license security.
Glossary - 6
Pro/ENGINEER Installation and Administration Guide
PTC Host ID
The number used to uniquely identify your machine. This is the same
number used in PTClm, called the CPU ID. Also referred to as the
machine address.
PTC License Management
The license distribution and maintenance software and concept that
was used prior to FLEXlm. Also known as PTClm. Before FLEXlm,
PTC's proprietary software (Pro/SERVER) used a serial number-based
licensing scheme to manage PTC products.
Reconfigurations
The process of modifying the configuration of software (moving modules
from one license to another).
Server line
An entry in the license file that identifies the server or servers that
distribute the software.
Startup command
The command that is used to start an installed software product. The
startup command is created during installation and is associated with
at least one license from the license management component. Modules
that are in separate feature lines can also be associated with the
startup command. When a startup command is executed, the associated
licenses and modules are automatically licensed for use by the user who
executed the startup command.
Trail file
A trail file records the procedures the end user performed while
running a Pro/ENGINEER session.
Triad servers
A configuration of three license servers on the same network that work
together to manage a pool of floating licenses.
Uncounted node-locked license
A node-locked license whose permission to use the license is managed
by the PTC application, not the license server. Unlimited number of
uncounted node-locked license sessions can be run on a single machine
at one time.
Glossary - 7
Web.Link
A Pro/ENGINEER feature, Web.Link lets you interact with
Pro/ENGINEER through a Netscape browser. With this feature, you
can create a customized Web page, which you can then use to automate
and streamline aspects of your engineering process.
Glossary - 8
Pro/ENGINEER Installation and Administration Guide
Index
A
API Toolkits
Application Manager
installing
D
4-5
6-2
C
Command names
Commands
kill -6
lmstat
proflush
ptcflush
ptcsetup
ptcshutdown
ptcstartserver
ptcstatus
table listing
config.pro
editing
suppressing dialog box
Configuration Notes
hardware
software
CPU ID
Customer Service
documentation
conventions
sending comments to PTC
Documents
online support
B-23
A-5
1-2
1-2
See Host ID
xii
C-2
F
4-9, 5-7
C-3
3-13
A-6
A-5, A-6
7-2
C-3
C-3
3-12, B-5
B-2
xiii
xii
FLEXlm
administration tool
benefits of using
downward compatability
installing
log file
online manual
restrictions
timeout parameters
Triad installations
Floating licenses
B-4
A-6
A-3
3-5
C-2
C-2
A-3
A-3
3-12
A-2
G
Graphics Systems
B-15
H
Hardware Configuration Notes
Help topics
accessing
1-2
8-6
Index - 1
organization
Hewlett-Packard
HP-VUE
Starbase Graphics
with HP-UX 9.0
Host ID
displaying information
finding
8-2
B-11
B-10
B-10
3-3
3-3
I
Installation
API toolkits
Application Manager
configuring
defining components
license management software
ModelCHECK
Pro/ENGINEER
Pro/MECHANICA
Pro/NC-GPOST
quick-start
TCP/IP on Windows systems
using ptcsetup
Vericut for Pro/ENGINEER
Interface tools
installing
4-5
6-2
4-15
4-2
3-5
4-5
4-2
5-2
4-5
2-1
3-4
3-8
4-5
Language
setting environment variable
1-7
Libraries
installing
6-5
installing Electrical Symbol
6-5
installing Graphic Library
6-5
installing Piping and Heating Symbol
6-5
License codes
updating
7-3
License file
importing
3-10, 7-3
license.dat
3
restriction
3-9
specifying location
4-6
License management software
installing
3-5
License Pack
requesting
1-3
A-6
4-6
A-2
A-2
A-2
A-2
3
A-2
3-9
A-4
A-2
A-3
B-4
M
ModelCHECK
installing
Models
backing up
Modifying
Pro/ENGINEER
4-5, 5-4
L
Index - 2
License recovery
License server
specifying location
License types
commercial
educational
evaluation
node-locked
license.dat
Licenses
floating
invalid
validating
License-to-run
Lmgrd daemon program
running as nonprivileged user
Lmtools utility
4-5
6-5
7-2
N
Network connection
troubleshooting
Node-locked licenses
A-5
A-2
O
Online information
customer service
FLEXlm manual
Hardware Configuration Notes
Software Configuration Notes
C-2
C-2
1-2
1-2
P
Packing Slip
1-2
Path
X-Term path
B-14
Plotters
B-23
Pro/ENGINEER
configuring X-Windows
B-14
Pro/ENGINEER Installation and Administration Guide
creating startup command
fonts
graphics systems
installing
installing Help
installing online books
modifying
OLE server configuration
removing installation
running remotely
starting
using Windows Installer Service
using X-Windows
utilities
Windows Configuration
Pro/ENGINEER Help Files
Pro/J.Link
installing
Pro/MECHANICA
creating startup command
removing installation
starting
Pro/NC-GPOST
installing
Pro/SERVER
using with FLEXlm
Pro/TOOLKIT
installing
Pro/Web.Link
installing
Pro/Web.Publish
installing
modifying
PTC
customer service Web site
PTC distribution materials
PTC e-mail address
License Pack request
PTC Help
installation
postinstallation considerations
PTC Licensing
overview
PTC OLE Server
configuring
PTC Web site
4-9
B-23
B-15
4-1
4-5
4-5
7-2
4-12
4-19
B-14
4-19
4-16
B-13
B-2
4-12
4-5
4-5
5-7
5-11
5-11
4-5
A-2
4-5
4-5
6-6
7-4
C-2
1-2
1-5
4-5
8-6
License Pack
PTC.Setup
browser requirements
graphical user interface
standard screens
starting
PTC.Setup Installation Wizard
ptcflush
syntax
ptcstatus
output
verifying server activity
1-4
1-6
6
1-6
3-4
1-6
A-5
B-5
3-13
Q
Quick start
installation procedures
2-1
R
Reference documentation
accessing
overview
Regained Network License
suppressing dialog box
Remote batch jobs
8-6
8-2
A-5
4-13
S
Scripts
remote batch jobs
Server
name, fully qualified
Silicon Graphics
4DWm
Software Configuration Notes
Special symbols
creating
Startup commands
creating
System management
utilities
A-2
T
4-12
TCP/IP
installation requirement
4-13
4-8
B-12
1-2
B-19
4-9, 5-7
B-2
A-5
3-4
Index - 3
Technical Application Notes
C-2
Timeout parameters
A-3
Triad servers
defining
4-8, 5-6
troubleshooting
C-5
Troubleshooting
FLEXlm for Triad servers fails to start
C-5
invalid licenses
C-4, C-5
network connection failure
A-5
Out of environment space
C-3
server fails
C-3
software execution
C-2
tips
C-1
U
Uninstall
Pro/ENGINEER
Pro/MECHANICA
UNIX
language environment
temporary directory
UNIX configurations
Pro/ENGINEER
Pro/MECHANICA
Update Installation
Utilities
Pro/ENGINEER
Index - 4
4-19
5-11
1-8
B-2
4-14
5-10
7-2
B-2
V
Vericut for Pro/ENGINEER
installing
4-5
W
Windows
creating program shortcuts
Windows 98/95
language environment
temporary directory
Windows configurations
Pro/ENGINEER
Windows Installer Service
Pro/ENGINEER on Windows
Windows NT
language environment
temporary directory
4-13
1-7
B-2
4-12
4-16
1-7
B-2
X
X-Term path
Xtop icon
troubleshooting
X-Windows
configuring for Pro/ENGINEER
remote display
supported display devices
B-14
C-3
B-13
B-14
B-14
B-13
Pro/ENGINEER Installation and Administration Guide