1
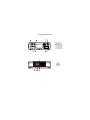
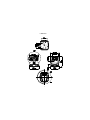
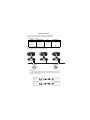
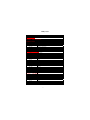
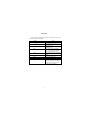
72 40mm ( )
4R - 10
USER MANUAL
Table of content
1.Ooen the box and checking
2.Safety instructions
≉≉≉≉≉≉≉≉≉≉≉≉≉≉≉≉≉≉≉≉≉≉≉ 1
≉≉≉≉≉≉≉≉≉≉≉≉≉≉≉≉≉≉≉≉≉≉≉ 1
3.Operating determinations≉≉≉≉≉≉≉≉≉≉≉≉≉≉≉≉≉≉≉≉≉≉≉
2
4.Rigging the fixture
3
≉≉≉≉≉≉≉≉≉≉≉≉≉≉≉≉≉≉≉≉≉
5.Description of the device
6. Dimension
≉≉≉≉≉≉≉≉≉≉≉≉≉≉≉≉≉≉≉≉≉≉ 5
≉≉≉≉≉≉≉≉≉≉≉≉≉≉≉≉≉≉≉≉≉≉ 6
7.DMX-512 connection
8.DMX protocol
≊≊≊≊≊≊≊≊≊≊≊≊≊≊≊≊≊≊≊≊≊
9.Control menu map ≉≉≉≉≉≉≉≉≉≉≉≉≉≉≉≉≉≉≉≉≉
10.Operation
7
≉≉≉≉≉≉≉≉≉≉≉≉≉≉≉≉≉≉≉≉≉≉ 8
13
≊≊≊≊≊≊≊≊≊≊≊≊≊≊≊≊≊≊≊≊ 14
11. Electric equipment specification
≊≊≊≊≊≊≊≊≊≊≊≊≊≊≊≊≊≊≊≊≊ 15
12.Maintenance and cleaning ≊≊≊≊≊≊≊≊≊≊≊≊≊≊≊≊≊≊≊≊≊ 16
1. Open the box and checking
Congratulations on choosing our products! Please carefully read this instruction m anual in
its entirety and keep it well for using reference. This m anual contained about the installation
and the relative using information of this products. Please according to this m anual's
relative speaking when using this equipm ent.
This equipm ent was made of new style, high intensity plastic . It fully shows the m odem
times light characteristic with beauty structure. And it was made according to CE standard.
Fully up the international standard of DM X512 agreem ent. M aster or slave in phase
control.Can be use in large entertainm ent, theater, performing and playing hall, etc.
This product uses MSR 700SA PHICIPS ectrical arc lam p. W hen receiving this
product please carefully bring and put; and check that whether this equipm ent has been
dam aged or not during transportation. And please also check the following thing was
enclosed:
Signal line ------------------- one piece
User M anual ------------------ one set
Safety string ------------------one piece
2. Safety instructions
Every person involved with installation and maintenance of this device have to:
- be qualilfied
- follow the instructions of this manual
CAUTION!
Be careful with your operations.
With a high voltage you can suffer
a dangerous electric shock when touching the wires!
This device has left our premises in absolutely perfect condition. In order to maintain this
condition and to en-sure a safe operation, it is absolutely necessary for the user to follow the
safety instructions and warning notes written in this manual.
Important:
ƹThe manufacturer will not accept liability for any resulting damages caused by the
non-observance of this manual or any unauthorized modification to the device.
ƹPlease consider that damages caused by manual modifications to the device are not
subject to warranty.
ƹNever let the power-cord come into contact with other cables! Handle the power cord and
all connections with the mains with particular caution!
ƹMake sure that the available voltage is not higher than stated on the rear panel.
ƹAlways plug in the power plug least. Make sure that the power-switch is set to off-position
before you connect the device to the mains. The power plug has to be accessable after
installing the device.
ƹMake sure that the power-cord is never crimped or damaged by sharp edges. Check the
device and the power-cord from time to time.
.1.
ƹAlways disconnect from the mains, when the device is not in use or before cleaning it.
ƹOnly handle the power-cord by the plug. Never pull out the plug by tugging the power
cord.
ƹ This device falls under protection class I. Therefore it is essential to connect the
yellow/green conductor to earth.
ƹ The electric connection, repairs and servicing must be carried out by a qualified
employee.
ƹDo not connect this device to a dimmer pack.
ƹDo not switch the fixture on and off in short intervals as this would reduce the lamp’s life.
ƹDuring the initial start-up some smoke or smell may arise. This is a normal process and
does not necessarily mean that the device is defective.
ƹDo not touch the device’s housing bare hands during its operation (housing becomes hot)!
ƹFor replacement use lamps and fuses of same type and rating only.
CAUTION ! EYEDAMAGES !
Avoid looking directly into the light source
(meant especially for epileptics) !
. Operating determinations
ƹThis device is a moving-head for creating decorative effects and was designed for
indoor use only.
ƹ If the device has been exposed to drastic temperature fluctuation (e.g. after
transportation), do not switch it on immediately. The arising condensation water might
damage your device. Leave the device switched off until it has reached room
temperature.
ƹNever run the device without lamp!
ƹDo not shake the device. Avoid brute force when installing or operating the device.
ƹNever lift the fixture by holding it at the projector-head, as the mechanics may be
damaged. Always hold the fixture at the transport handles.
ƹWhen choosing the installation-spot, please make sure that the device is not exposed to
heat, moisture or dust. There should not be any cables lying around. You endanger
your own and the safety of others!
ƹThe minimum distance between light output and the illuminated surface must be more
than 1.5 meters.
ƹMake sure that the area below the installation place is blocked when rigging, derigging
or servicing the fix-ture.
ƹAlways fix the fixture with an appropriate safety rope. Fix the safety rope at the correct
holes only.
ƹoperate the fixture after having checked that the housing is firmly closed and all screws
are tightly fas-tened.
ƹThe lamp must never be ignited if the objective-lens or any housing-cover is open, as
discharge lamps may explose and emit a high ultraviolet radiation, which may cause
burns.
.2.
ƹThe maximum ambient temperature 40°C must never be exceeded.
ƹOperate the device only after having familiarized with its functions. Do not permit
operation by persons not qualified for operating the device. Most damages are the
result of unprofessional operation!
ƹPlease use the original packaging if the device is to be transported.
ƹPlease consider that unauthorized modifications on the device are forbidden due to
safety reasons!
ƹIf this device will be operated in any way different to the one described in this manual,
the product may suffer damages and the guarantee becomes void. Furthermore, any
other operation may lead to dangers like short-circuit, burns, electric shock, burns due
to ultraviolet radiation, lamp explosion, crash etc.
The lamp used in this projector is a discharge lamp.After
switching off don't attempt to restart the projector until la
mp has cooled,this will require approx 15 minutes.Switc
hing the lamp on and off at short intervals will reduce the
life of both the lamp and the projector.But occasional bre
aks will prolong the lamp and projector.
4.Rigging the fixture
DANG ER TO LIFE Please consider the respective national norm s during the
Installation! The installation must only be carried out by an authorized dealer!
Ø The installation of the projector has to be built and constructed in a way that it can hold
10 times the weight for 1 hour without any harming deformation.
Ø The installation must always be secured with a secondary safety attachment, e.g. An
appropriate catch net. This secondary safety attachment must be constructed in a way
that no part of the installation can fall n if the main attachment fails.
ØW hen rigging, derigging or servicing the fixture staying in the area below the installation
place, on bridges, under high working places and other endangered areas is forbidden.
Ø The operator has to make sure that safety-relating and machine-technical installations
are approved by an expert before taking into operation for the first time and after changes
before taking into operation another time.
.3.
Ø The operator has to make sure that safety-relating and machine-technical installations
are approved by an expert after every four year in the course of an acceptance test.
Ø The operator has to make sure that safety-relating and machine-technical installations
are approved by a skilled person once a year.
Ø The projector should be installed outside areas where persons m ay walk by or be
seated.
Ø IM PO R TA N T! OVERHEAD RIGGING REQUIRES EX TEN SIV E EX PERIEN CE,
including (but not limited to)calculating working load limits, installation material being used,
and periodic safety inspection of all installation material and the projector. If you lack these
qualifications, do not attempt the installation yourself, but instead use a professional
structural rigger. Improper installation can result in bodily injury and or damage to
property.
Ø The projector has to be installed out of the reach of people.
Ø If the projector shall be lowered from the ceiling or high joists, professional trussing
system s have to be used. The projector must never be fixed swinging freely in the room .
Ø Caution Projectors may cause severe injuries when crashing down! If you have doubts
concerning the safety of a possible installation, do NOT install the projector!
Ø Before rigging make sure that the installation area can hold a minim um point load of 10
times the projector s weight.
Ø The projector can be placed directly on the stage floor or rigged in any orientation on a
truss without altering its operation characteristics.
Ø For overhead use, always install a safety-rope that can hold at least 10 times the weight
of the fixture. You must only use safety-ropes with screw –on carabines. Pull the
safety-rope through the two apertures on the bottom of the base and over the trussing
system etc.
Insert the end in the carabine and tighten the fixation screw .
.4.
5.Description of the device
1. power switch
2. Insurance seat
3. power-in
4. Insurance seat
5. 3-pin XLR female
6. 3-pin XLR male
7. 5-pin XLR male
8. 5-pin XLR female
1
1.LED
2.MODE
3.UP
4.DOWN
5.ENTER
.5.
6. Dimension
.6.
7.DMX-512 connection
If you wish to change the power supply settings, see the chapter Appendix.
Connect the fixture to the mains with the enclosed power cable and plug.
The earth has to be connected!
Cable(UE)
Cable(US)-208V
Pin
Brown
Black
Live
International
L
Liht blue
white
Neutral
N
Yellow/Green
Green
Earth
DM X-512 connection/connection between fixtures
Only use a stereo shielded cable and 3-pin XLR-plugs and connectors in order to connect
the controller with the fixture or one fixture with another.
'0;287387
~
~
DMX512
'0;,1387
3
3
2
1
1
2
Caution:
A t the last fixture, the DM X-cable has to be terminated with a terminator. Solder
a 120 resistor between Signal (-) and Signal (+) into a 3-pin XLR-plug and plug it in the
DMX-output of the last fixture.
~
1:GND(SCREEN)
2:Signal(-)
3:signal(+)
4:N/C
5:N/C
~
Pin
Pin
Pin
Pin
Pin
Pin 1:GND(SCREEN)
Pin 2:Signal(-)
Pin 3:signal(+)
.7.
Pin 1:GND(SCREEN)
Pin 2:Signal(-)
Pin 3:signal(+)
Pin
Pin
Pin
Pin
Pin
1:GND(SCREEN)
2:Signal(-)
3:signal(+)
4:N/C
5:N/C
8.DMX protocol
Channel 1 - PAN movement 8bit :
Channel 2 – Pan fine
Channel 3 - TILT movement 8bit :
Channel 4– Tilt fine
Channel 5 - Speed pan/tilt movement
0-225
max to min speed
226-235
blackout by movement
236-245
blackout by all wheel changing
246-255
no function
Channel 6 - Color Wheel 1:
0-8
Open / white
9-17
Color 1
18-26
Color 2
27-35
Color 3
36-44
Color 4
45-53
Color 5
54-62
Color 6
63-71
Color 7
72-80
Color 8
81-89
Color 9
90-98
Color 10
99-107
Color 11
108-116
Color 12
117-127
Color 13
128-187
Forwards rainbow effect from fast to slow
188-193
No rotation
194-255
Backwards rainbow effect from slow to fast
Channel 7 - Color Wheel 2:
0-8
Open / white
9-17
Color 1
18-26
Color 2
27-35
Color 3
36-44
Color 4
45-53
Color 5
54-62
Color 6
63-71
Color 7
.8.
72-80
Color 8
81-89
Color 9
90-98
Color 10
99-107
Color 11
108-116
Color 12
117-127
Color 13
128-187
Forwards rainbow effect from fast to slow
188-193
No rotation
194-255
Backwards rainbow effect from slow to fast
Channel 8 - Rotating gobos, cont. rotation :
0-9
Open
10-19
Rot. gobo 1
20-29
Rot. gobo 2
30-39
Rot. gobo 3
40-49
Rot. gobo 4
50-59
Rot. gobo 5
60-69
Rot. gobo 6
70-79
Rot. gobo 7
80-99
Gobo 1 shake slow to fast
100-119
Gobo 2 shake slow to fast
120-139
Gobo 3 shake slow to fast
140-159
Gobo 4 shake slow to fast
160-179
Gobo 5 shake slow to fast
180-199
Gobo 6 shake slow to fast
200-219
Gobo 7 shake slow to fast
220-255
Rot. gobo wheel cont. rotation slow to fast
Channel 9 - Rotating gobo index, rotating gobo rotation :
0-127
Gobo indexing
128-187
Forwards gobo rotation from fast to slow
188-193
No rotation
194-255
Backwards gobo rotation from slow to fast
Channel 10 - Gobos :
0-9
Open
10-19
Gobo 1
20-29
Gobo 2
30-39
Gobo 3
40-49
Gobo 4
50-59
Gobo 5
60-69
Gobo 6
.9.
70-79
Gobo 7
80-89
Gobo 8
90-99
Gobo 9
100-109
Gobo 1 shake slow to fast
110-119
Gobo 2 shake slow to fast
120-129
Gobo 3 shake slow to fast
130-139
Gobo 4 shake slow to fast
140-149
Gobo 5 shake slow to fast
150-159
Gobo 6 shake slow to fast
160-169
Gobo 7 shake slow to fast
170-179
Gobo 8 shake slow to fast
180-189
Gobo 9 shake slow to fast
190-255
Rot. gobo wheel cont. rotation slow to fast
Channel 11- 3 facet rotating
prism, Prism / Gobo macros:
0-3
closed
4-127
Forwards rotation from fast to slow
128-135
No rotation
136-255
Backwards rotation from slow to fast
Channel 12- Effect Scene :
0-15
No Function
16-31
Macro 1
32-47
Macro 2
48-63
Macro 3
64-79
Macro 4
80-95
Macro 5
96-112
Macro 6
112-127
Macro 7
128-143
Macro 8
144-159
Macro 9
160-175
Macro 10
176-191
Macro 11
192-207
Macro 12
208-223
Macro 13
224-239
Macro 14
240-255
Macro 15
Channel 13 –Frost
0-191
Frost 0~100%
192-223
Pulse opening fast to slow
224-254
Pulse closing slow to fast
.10.
255
Max. Frost
Channel 14 – Iris:
0-191
Max. diameter to Min.diameter
192-223
Pulse opening fast to slow
224-255
Pulse closing slow to fast
Channel 15 – Zoom
0-255
Zoom adjustment from big to small
Channel 16 – Focus:
0-255
Continuous adjustment from near to far
Channel 17 - Shutter, strobe:
0-31
Shutter closed
32-63
No function (shutter open)
64-95
Strobe effect slow to fast
96-127
No function (shutter open)
128-159
Pulse-effect in sequences
160-191
No function (shutter open)
192-223
Random strobe effect slow to fast
224-255
No function (shutter open)
Channel 18- Dimmer (intensity):
0-2
Shutter closed
3-255
Intensity 0 to 100%
Channel 19– Internal Programs:
0-19
colour change normal
20-39
colour change to any position
40-51
No Function
52-77
Internal program 1
78-103
Internal program 2
104-129
Internal program 3
130-155
Internal program 4
156-181
Internal program 5
182-207
Internal program 6
208-233
Internal program 7
234-255
Internal program 8
Channel 20– Lamp on/off, Reset:
0-39
No Function
.11.
40-59
60-79
80-84
85-87
88-90
Lamp switch off
No function
All motor reset
Scan motor reset
Colors motor reset
91-93
Gobo motor reset
94-96
Shutter & Dimmer motor reset
97-99
100-239
240-255
Other motor reset
No function
Lamp on
.12.
9.Control menu map
0
ADDR
1
TEST
2
SET
3
LAMP
A001---Axxx
T-01~T-XX
RUN
MSTR/ALON
AUDI
STAT
ON/ OFF
MSTR/ALON
Clos/Hold//Auto/Audi
ALL
SCAN
4
REST
COLR
GOBO
SHTR
OHTR
FIXT
0000~9999
LAMT
0000~9999(hours)
5
TIME
6
RPAN
CLET
ON/OFF
7
RTLT
ON/OFF
8
MIC
M-XX
9
POHT
10
11
DISP
CONT
P ON
ON/OFF
P OT
P-XX(50-999)
VALU
D–XX
D ON
ON/OFF
REVE
ON/OFF
LAAU
RDMX
ON/OFF
ON/OFF(10.10/11.XXX)
DLOF
ON/OFF
DLAY
D–XX D-05
FOCU
ON/OFF
INIT
ON/OFF
FEED
ON/OFF
VER
ADJU
D-00 (DXXX)
V1.0~V9.9
CODE
CXXX
CH01~CH30
XXXX(-128~127)
.13.
10.Operation
turn on the light, reset, LED display show the website, model, software version , after
reset display show the below information
display
status
“Axxx”
light is normal, but no DMX ,"XXX" show
the value between 1-512
“A.xxx”
light and DMX is normal ,"XXX" show the
value between 1-512
“Dxxx”
Light is normal ,no DMX ,"XXX" show the
value between 1-512
D.xxx
Light is normal, under control of DMX
controller ,"XXX" show the value between
1-512. To check whether the connection
between light and controller is OK
A.U-M
Light is normal, autorun, can't controlled by
controller
A.U-A
light is normal, autorun
S.O-M
Light is normal, music control
S.O-A
light is normal, single light music control
“Erxx”
Channel mistake, "XX" show the failed
channel,"Er01,Er03,Er06,Er07,Er08,Er09,E
r10,Er11,Er14,Er15,Er16," reset twice to
confirm the light is normal, but the fail
channel is still out of controlled
.14.
11 . Electric equipment specification
Input voltage:220v 50-60Hz
Power consumption:850W__
Approved model:MSR 700SA PHILIPS
Lamp Base:DX-124A HID GY9.5
GOBO Rotation wheel
Gobo rotation wheel consisted of 7Gobos+open located by magenatic-sensing. More
accurate locating.
Fix gobo wheel
Fix gobo wheel composed of 9gobos+open located by magenatic-sensing.More accurate
locating
Color wheel
Two same color wheel located by magenatic-sensing.each color wheel composed by
7color+open.
prism
Triple prism rotation
Iris:electronic
Frost
Independent,variable
zoom
Motorized
linearity
Strobe
variable stobe effect(0—10tiems/seconds)
Dimmer
Dimmer(0-100%)
Pan/Tilt
Pan540
Tilt270
.15.
12.Maintenance and cleaning
It is absolutely essential that the fixture is kept clean and that dust, dirt and smoke-fluid
residues must not buildup on or within the fixture. Otherwise, the fixtures light-output will
be significantly reduced. Regular cleaning will not only ensure the maxim um light-output,
but will also allow the fixture to function reliably throughout its life. A soft lint-free cloth
moistened with any good glass cleaning fluid is recommended, under no circum stances
should alcohol or solvents be used!
DANG ER : Disconnect from the mains before starting any maintenance work
The front objective lens will require weekly cleaning as smoke-fluid tends to building up
residues, reducing the light-output very quickly. The cooling-fans should be cleaned
monthly.
The gobos m ay be cleaned with a soft brush. The interior of the fixture should be cleaned
at least annually usinga vacuum -cleaner or an air-jet.
The dichroic colour-filters, the gobo-w heel and the internal lenses should be cleaned
monthly.
To ensure a proper function of the gobo-w heel , we recom m end lubrication in six month
intervals. The quantity of oil must not be excessive in order to avoid that oil runs out when
the gobo-w heel rotates.
There are no serviceable parts inside the device except for the lam p and the fuse. Please
refer to the instructions under "Fitting/Exchanging the lamp ".Maintenance and service
operations are only to be carried out by authorized dealers.
Replacing the fuse
If the lam p burns out, the fine-w ire fuse of the device might fuse, too. Only replace the
fuse by a fuse of same type and rating. Before replacing the fuse, unplug mains lead.
.16.