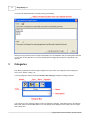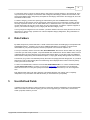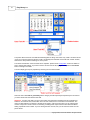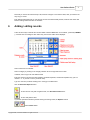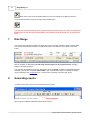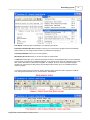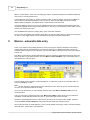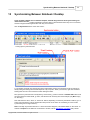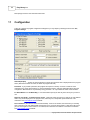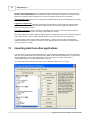
1
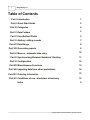
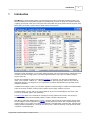
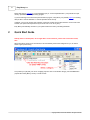
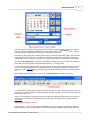
Copyright 2005, Clintonville Software. All rights reserved.
I
Easy Money 6.x
Table of Contents
Part I Introduction
1
Part II Quick Start Guide
2
Part III Categories
4
Part IV Data Folders
5
Part V User-Defined Fields
5
Part VI Adding / editing records
7
Part VII Date Range
8
Part VIII Generating reports
8
Part IX Macros - automatic data entry
10
Part X Synchronizing Between Notebook / Desktop
11
Part XI Configuration
12
Part XII Miscellaneous Functions
13
Part XIII Importing data from other applications
14
Part XIV Ordering information
15
Part XV Conditions of use - disclaimer of warranty
15
Index
0
Copyright 2005, Clintonville Software. All rights reserved.
Introduction
1
1
Introduction
Easy Money is a quick and easy means to record where all your money comes from and where it goes. If you
have ever talked to a financial planning expert, they probably told you this is the single most important first step
in getting your finances under control. The good news is that unlike many other personal finance programs, Easy
Money does not assume or require that you speak in bean-counter jargon!
Operation is quick and painless. You can easily start the program, enter in several expenses, and get back out in
a matter of seconds. This high speed, no nonsense approach makes it easy to get in the habit of using the
program every day.
Records are organized according to user-defined categories. For example, you might set up categories for
"work", "food", "shelter", "utilities", etc... Whenever you make or spend any money, make an entry under the
appropriate category. If you keep this up on a regular basis, you will be rewarded with some genuinely useful
composite information.
In addition to the category system, you may further organize records according to a couple of user-defined fields.
These can be check numbers, vendors, project numbers, payment types; whatever you need!
To help find things, you may click on any column header at any time to sort the display by that column. Click
once to sort ascending, again to sort descending.
The Macro utility allows you to automate the recording of recurring expenses and income, such as payroll
checks. Running a macro file automatically makes a number of entries at the same time.
Easy Money creates four different types of reports. All reports have a summary section showing the sub-totals
for each category, the percentage of the grand total, and the grand total. There is also a simple bar graph in the
summary section. At your option, the summary is followed by a complete listing of each line item, grouped under
category headers and divided into "money IN" and "money OUT". Either the summary or full type may be made
in "portrait" or "landscape" style.
Copyright 2005, Clintonville Software. All rights reserved.
2
Easy Money 6.x
Report data may be exported in "comma-delimited" (.txt) or "comma separated value" (.csv) formats for import
into any spreadsheet or word processing program.
If you are switching over from another personal finance program, Easy Money can probably import your existing
data (in either "comma-delimited" or "comma separated value" format).
If desired, you may set up pass code protection, where the program will not start unless the correct code is first
entered. (The pass code requirement may be turned "off" or "on" at any time.)
Easy Money automatically conforms to your system's date and currency formatting standards.
2
Quick Start Guide
Nobody likes to read help files; fair enough! But to avoid confusion, please read at least this section,
OK?
When Easy Money starts up for the first time, it will automatically create a few categories for you, to make it
easier to get up and running.
Let's pretend you just paid your rent or mortgage payment. Click on the Shelter category, then the New button
(top left side of Easy Money screen). You will see this:
Copyright 2005, Clintonville Software. All rights reserved.
Quick Start Guide
3
Type in the amount of the payment in the amount box (no currency character or plus or minus sign required).
Then type a short note describing the expense in the note field, and click the Save Expense button. The new
expense entry will be displayed in the line item list on the left side of the screen.
Now let's say you got a paycheck. Click the Wages category, and then the New button. Again, type the amount
in the amount field, and a note in the note field. This time though, click the Save Income button. Taxes were
probably taken out of your salary by your employer, so make another new entry showing that expense as well.
Now click the All Categories bar at the top of the category list. All three of your new line items are displayed on
the left side of the screen. Note that the expenses are shown in red, income in black.
For recurring things like paychecks, where you might have quite a few regular, predictable line items each time
such as: salary, expense reimbursement, federal tax, state tax, local tax, health insurance, retirement, dues,
(whatever), create a macro file that you run each payday. Macro files automatically enter a series of records for
you.
Continuing with the introductory lesson, click on one of the Report buttons (middle of the tool bar).
In a nutshell, these are Easy Money's primary, day-to-day functions. Now that you have a good idea of how the
program works, go back and revise or delete the sample categories and entries, and build your own category list
that makes sense for you!
Finally, if you are thinking of moving from another personal finance application to Easy Money, there is a good
chance that you can import your existing data from the other program into Easy Money! Please look at the
Import Utility.
Upgrading from an earlier version?
Version series 3.x, 4.x and 5.x data is fully compatible with version 6.x, however 6.x keeps data in a different
folder than before and so you must transfer it over. But there is a utility included to make this easy! Select the
Copyright 2005, Clintonville Software. All rights reserved.
4
Easy Money 6.x
menu item File, Data Restoration (complete) to bring up this dialog:
Clicking the Copy all Source Files to Target should update your new installation with your existing data. Note that
you can also use this utility later on to recover backup data from floppy disk should your computer fail or be
replaced.
3
Categories
Easy Money organizes records according to categories that you create. The categories can be anything you
want: "food", "shelter", "hobby", etc.
To set up categories, click the menu item: Records, New Category to display the Category Edit Box:
Type a short (up to ten character) category code in the Category Code field, a descriptive name in the Category
Name field, and then click the Save button. Your new category will be displayed in the category list on the right
side of the screen.
Copyright 2005, Clintonville Software. All rights reserved.
Categories
5
To change the name or code of an existing category, first select it by double-clicking it in the category list. Once
only it's line items are displayed, click the menu item: Categories, Edit Category. Revise the name and/or code
and click the Replace button. Easy Money will replace the old category name/code in the category file, and in all
associated records as well.
To delete a category, proceed as if replacing (as outlined above), but click the Delete button instead. Easy
Money will remove the category from the category file, and then prompt you for instructions on what to do with
the newly "orphaned" records. You can either delete them, or leave them there. If you chose not to delete, the
records will still exist, but they will not ever show up on any printed reports. To make the "orphans" reappear on
reports, just recreate the category (or any category with the same category code).
You may merge two categories into one as follows: 1) Edit the obsolete code to be exactly the same as the one
with which you wish to merge. 2) Delete one of the two duplicate category designations, being careful NOT to
delete the records too!
4
Data Folders
By default, Easy Money creates data files in a folder named C:\Documents and Settings\(your name)\Clintonville
Software\Easy Money\ . If needed, you may set up additional data folders. For example, you might use the
default folder for your personal expenses, and set up a separate one for business expense, etc.
To set up a new folder, click the menu item: File, Select Data Folder. Now click on the new folder icon, and type
in the name you wish where prompted, and press ENTER. Now double-click on the new folder's name, so that it
is displayed at the top of the dialog box, then click the Open button. (Note: you may also create your additional
folders outside of Easy Money with the Windows Explorer, or simply pick already existing folders and use them.)
The first time you go to the new folder Easy Money will create new (empty) data and category files, so you will be
starting from scratch. Note that the path to the folder being used is displayed at the bottom of the Easy Money
screen, just to the left of the date.
To return to the default folder, select the menu item File, Default Data Folder. To re enter an alternate folder,
use File, Select Data Folder. If you wish, you can go into configuration and "hard wire" up to two alternate
folders as menu items. You may also specify which folder Easy Money should start up in on the configuration
form.
Each different folder has its own data, categories, user-defined field lists, and note file, and is completely
independent of any other folder. Note that this means you must back them up separately!
5
User-Defined Fields
In addition to the main category system, Easy Money records may be further classified by two user-defined data
fields. These fields can be used for anything you want, such as payment type, vendor name, check number,
actual / projected; whatever you need.
Copyright 2005, Clintonville Software. All rights reserved.
6
Easy Money 6.x
The picture above shows the user-defined fields being filled in during new record entry. Field 1 has been named
"Type" (as in payment type) and the item "Cash" has already been selected. Field 2 has been named "Vendor",
and we are in the process of selecting one in the picture.
The names and behavior of the two fields can be adjusted - please see the configuration section for details on
how to change their settings. If you wish to remove an item from the list, highlight it and press the little Delete
button to the right of the field.
The main display grid may be populated by searching the user-defined fields.
Select the menu item Search, [user field] and the category list will temporarily be replaced by the list of items
you have saved under the selected user field.
Important - If a given user field is set up to save entries, then that field is excluded from full or partial word
searches. On the other hand, if the field is set to not save entries, then it is included in word searches. The
reason for this behavior is as follows: If the field is not saved in a list, then each thing you are entering there
must be unique, like a check number or something. Including these unique entries in word searches allows
finding a particular check number. If you are saving the items in a list, then you can search for them as in the
picture above.
Copyright 2005, Clintonville Software. All rights reserved.
User-Defined Fields
7
Note that you can first set a field to keep a list, and then change it to not save the items, after you have the list
they way you want it.
Each different data folder that you use will have It's own user-defined field pick lists, however their names and
behavior settings will be the same in all folders.
6
Adding / editing records
There are three ways to activate the Line Item Editor. Click the New button on the toolbar, press F2 (or INSERT
), or double-click an existing line item. Either way, the line item editor will be displayed:
Select a date from the calendar.
Select a category by clicking on the category selection list on the right side of the screen.
If desired, select or type new user-defined fields.
Enter the amount in the Amount Field. Numbers, thousands separator, and decimal separator only. (Do not
indicate + or - or provide a currency character here).
Type in a new note (or edit the existing one if "cloning") in the Note Field.
Click the Save New Expense button:
... to save the new entry with a negative value, the Save New Income button:
... to save with positive value.
If you have opened the edit box by double-clicking an existing record, the Replace buttons:
and the Delete button:
Copyright 2005, Clintonville Software. All rights reserved.
8
Easy Money 6.x
will be active. Click one of the Replace buttons to correct an existing record, Delete to remove it.
To quit record edit without saving any changes click the Close button:
Tip: Once you are up and running, the very quickest way to add a new entry is to "clone" an existing one.
Double-click it on the main grid, click the today on the calendar, revise the amount, etc. if required, and
Save.
7
Date Range
At any given time, Easy Money displays and works with only records which fall within a certain range of dates.
The currently selected range is shown in the bottom left section of the status bar at the bottom of the main
screen:
With the exception of data backup, the date range selection applies to all program functions, including
searches and report generation.
The range may be adjusted at any time by selecting the menu item Range. In addition to the predefined range
selections, you may also use the item Select Dates to pick a specific period of time. The default (or startup)
range is specified on the configuration form, as are the start / stop limits of the fiscal year ranges.
8
Generating reports
To make a report, click on any of the four Report buttons at any time.
When a report is displayed, additional functions become active:
Copyright 2005, Clintonville Software. All rights reserved.
Generating reports
9
Print Report sends the report immediately to your default system printer.
Edit Report with Word Processor attempts to start up your word processor program with the report already
loaded, where you can change it around however you please before printing it.
Close Report Window returns you to normal operation.
Write Report to Text File allows you to save the report as a plain text file.
The Export functions allow you to write the report DATA to either a comma-delimited (txt) or comma separated
value (csv) file, for import into a spreadsheet program, or any other program which can read these types of data
files. Use this technique to create charts and graphs, for example. Tip: If you have a spreadsheet program
installed, use .CSV format and Easy Money will probably be able to start it up for you immediately after the
export is complete.
If you wish to tailor a report to include only certain categories and/or certain line items, change the List Mode
from "Category/Search Result Only" to "Free Selection - Add/Subtract".
Copyright 2005, Clintonville Software. All rights reserved.
10
Easy Money 6.x
While in "Free Selection" mode, the main display grid shifts to a light blue background, and behaves differently
than normal, in several important ways.
The first difference is that when you perform a search function, or select a category, the results are ADDED to
the list, without the list first being cleared. In this way you can make the grid display records from several
different selected categories, user defined fields, or word searches at the same time.
The second difference is that you can remove individual items from the list without actually deleting them from
the data file (highlight the item and press the delete key). In this way you can selectively exclude certain records
which do not belong in the report.
Click the Clear button (above the category list) to get a "clean slate" if desired.
Once you have put together a list containing all the items you wish to include, select one of the four report types
as usual. You may toggle between the two List Modes by clicking the blue/white square button.
9
Macros - automatic data entry
Some of your expenses are probably identical (or nearly so) at regular intervals; perhaps the most obvious
example being all those payroll deductions your employer makes for you. Rather than making a number of
individual entries each time you get a paycheck, you can make a Macro File which will do most of that repetitive
work for you.
Easy Money macro files are actually small data files which are created and edited almost exactly the same way
as the main data. To get started, click the menu item Macro, Create / Edit Macro. Type a descriptive name in
the File Name box, and click Open.
The main display screen will shift to a yellow background. To add an item to the file, click the New button (or
press F2 or INSERT) as usual.
Note - the date selection is irrelevant during macro edit because macro items are given a new date each time
the macro is run (the date created is not used).
Once you have all the items you want included, select the menu item: Macro, Quit Macro Edit to return to
normal operation.
Test your new macro by selecting the menu item: Macro, Play a Macro. Select the file you just created and
click Open. A small date selection box will come up - get the date right and then click OK.
Review the newly displayed records to make sure they are correct. If you need to make changes, select the
menu item: Macro, Create / Edit Macro and pick the same file. Make your changes and quit.
Since macro files really are small data files, you may use the deleted record purge, restore, and internal backup
items with them, just like with a normal data file.
Copyright 2005, Clintonville Software. All rights reserved.
Synchronizing Between Notebook / Desktop
10
11
Synchronizing Between Notebook / Desktop
If you use both a desktop and a notebook computer, the data merge function allows synchronizing line
items between the two. It makes it possible to enter line items on both machines when they are not connected,
and then merge their data together later when they are connected.
Click the Synchronize button on the main screen...
...to bring up the synchronize form:
To get started, first make sure that the Easy Money data folders on both of the machines is set for sharing. Do
this by finding the folder(s) with Windows Explorer / "My Computer". When you find them, right click and select
Sharing from the menu. Check the box to allow sharing the folder.
Next, open the synchronize form in Easy Money, and click the [...] button to the left of "Remote Data:" label. Find
the other machine's shared folder, go into it, and select the file "ezmoney.dat" and click Open (may show simply
as "ezmoney").
Now click either the "Pull", "Push", or "Push Pull" buttons, depending on which way the transfer needs to go. If it
works, then this machine is set up. Repeat the same process on the other one if needed (you can do all the
synchronizing from a single machine).
Note: This utility only transfers line items - it does not transfer categories, user-defined labels, or other items. To
transfer a complete set of data from one machine to another, use the Data Backup (complete) utility. Set the
Copyright 2005, Clintonville Software. All rights reserved.
12
Easy Money 6.x
backup target to be the other machine's data folder.
11
Configuration
There are a number of program configuration settings that you may adjust by selecting the menu item: File,
Program Settings.
At Startup Display... - Select one of these buttons to specify what period of time is displayed when the program
starts. (Note that the lower the value, the faster the program will load)
Password - If you provide a password, the program will require it on startup. It can be a maximum of ten
characters long, and is case-sensitive. To remove password protection, clear the password field and save the
configuration. Note that this is not particularly strong protection - it's only intended to hinder casual intruders.
FY Starts Month ? and FY Starts Day ? - Use these fields to specify the first day of the fiscal year you wish to
use.
Name for User Field 1 and Name for User Field 2 - These are simply the names you wish for the user-defined
fields. They will be displayed on the program menu, data entry box, and printed reports. Maximum of ten
characters. See User Defined Fields for details.
Save List Items? (Checkbox for each user defined field) - If the box is checked, then each time you manually
type a new item in the user defined field and save the record, the item will be saved in a drop-down list so that
you can use it again for other records. If not checked, items entered in the field are not saved for re-selection.
See User Defined Fields for details.
Copyright 2005, Clintonville Software. All rights reserved.
Configuration
13
Editor - To keep notes, and to edit reports, Easy Money calls a separate word processing program (editor). On
most Windows installations this will be either Microsoft Wordpad or Word. This optional setting allows you to
specify a different third-party programs to be called instead. Click the [...] button to select a different program.
Start-Up Folder - If desired, you may specify a different data folder to be used upon start-up. The most likely use
for this would be where you have the program installed on two different computers on a home network, and wish
to access the same data all the time. CAUTION - this does NOT mean the program can be used by two different
people at the same time - it's not designed for that, and data corruption is likely if attempted!
Alt. Folder 1 and Alt. Folder 2 - Easy Money is able to keep data sets in an unlimited number of folders. These
two configuration items allow saving two alternate locations for quick access from the File menu item. Click the
[...] button(s) to select folders, or click the Use Current button(s) to "lock in" a folder you are already working in.
Prompt for Confirmation... - by default, Easy Money prompts for confirmation before you either delete or
replace a record. This can be turned off by unchecking the Prompt for Confirmation box.
Use Windows Calculator... - determines which calculator for Easy Money will call.
To save changes to the settings, click the Save button. To quit without saving click the Quit button.
12
Miscellaneous Functions
Keeping Notes: Maintain a free form journal for each fiscal year by clicking the Notes button. Easy Money
employs the default Windows word processing program for this purpose. You can change to a different program
in configuration.
Calculator: Select the menu item: Help, Calculator to popup the very simple "TinyCalc". To use the calculator,
type numbers in the two upper boxes, then click an operator button, and the whole little math problem is
displayed. The calculator can add, subtract, multiply, and divide. If you double-click on the result box, it is placed
in the Windows Clipboard, which is handy for pasting the figure into the record edit amount field. You can use
the Windows calculator instead, if desired (see configuration).
Data Backup (complete): Someday, your computer is going to get old and crash, and if you fail to do regular
data backups you will be sorry... Please, at least once a month select the menu item: File, Data Backup
(complete) to run the backup utility. Use the standard Windows drive and directory selection items to specify a
target for the backup. Your Easy Money data, note, macro, and user -defined list files will be copied for
safekeeping. Should your hard disk files be destroyed somehow, you may restore the backup files.
Data Restoration (complete): This essentially runs the backup routine in reverse. If you have had a hard disk
failure and/or bought a new computer, use this to restore data from your backup floppy disk. Note that you can
also use this as an easy way to migrate Easy Money 3.x or 4.x data to your new 5.x installation (see the Quick
Start Guide).
Manual Internal Data Backup: Easy Money also incorporates a much less secure, but very convenient internal
data backup utility as well. If you run this right before doing a data import operation, heavy editing of categories,
restoration of deleted records, or any other operation that you just might want to "undo", then you will indeed be
able to restore your data to its previous state. These functions are under the menu items: File, Create Internal
Backup File and File, Restore Internal Backup File. These functions will NOT protect you from a hard disk
failure!
Automatic Internal Backup: With version 6.0.05, Easy Money silently keeps 5 copies of the main line-item data
file. It creates one of these copies each time you start up the program on a new day. The files are named in the
format "00000.autobak", and are located in the start-up data directory. If your main data file somehow becomes
corrupted, you can restore it by renaming the latest of these .autobak files "ezmoney.dat" (the main line-item
data file is named "ezmoney.dat").
Deleted Records: When a record is "deleted", it is really only marked as such until you run the menu item:
Copyright 2005, Clintonville Software. All rights reserved.
14
Easy Money 6.x
Records, Purge Deleted Records. If you accidentally delete something and want it back, run the menu item:
Records, Restore Deleted Record. It is advisable to purge from time to time, because the restoration function
restores ALL marked records, including ones you may have forgotten about and do not want back!
Change Display Order: Press F9 to cycle through several different layouts for the main display grid. The setting
is saved between sessions.
Toggle Bold / Regular Font: While many users have reported that they love the bold fonts that Easy Money
uses, others have said it would be nice if they could be turned "off". Click this to toggle back and forth. The
setting is saved between sessions.
Turn off /on "Tool Tips": Click the menu item under Help to turn off (or turn back on) those little notes that
show up next to the mouse pointer. The setting is saved between sessions.
Clintonville Software may release slightly changed versions of programs from time to time, without changing the
main Version Number. To find out which Release Number you have, click the menu item: Help, About.
To make it easier to check and see what the latest release is, click the menu item: Help, Visit Clintonville
Software Website while your internet connection is active, and Easy Money will activate your web browser for
you and go directly to our site!
13
Importing data from other applications
If you have been using some other personal finance or general spreadsheet application to track your spending,
there is a good chance that all or at least part of the old data can be imported into Easy Money. Look around in
the other application and try to find a data export or "save as" function. You need to create either a
comma-delimited (txt) or a comma separated values (csv) file.
Also, many banks offer online services in which you can download history files in .csv format.
Copyright 2005, Clintonville Software. All rights reserved.
Importing data from other applications
15
Once you have obtained the export file run the Easy Money menu item: File, Comma-Delimited or CSV Import
to bring up the import form (pictured above). Click Select File and find the file you just created.
Once the file is loaded, CAREFULLY look at the content listing on the left side of the import form - there should
be a clearly readable list of the first five records in the file. Each numbered record should have the same number
of fields shown. For example, in the picture above, note that record #3 has 6 fields, record #4 has 6 fields, etc. If
the five records Don't have the same number of fields then Easy Money Can't import the data correctly, and the
operation should be canceled!
If the data looks good, then use the mouse to match the import record field numbers with the correct Easy
Money data fields, as follows: Click on an import field (on the left) to highlight it, then click in the appropriate
Easy Money field number box (in the middle). If you can match up all six fields, great! If only some of them seem
to match up, or if there are more than six fields in the import data, That's fine too, but only the matched fields will
be imported, so choose wisely.
Once the fields are matched up, click Import to start the operation. The status bar on the form will indicate
progress.
When complete, close the import form and return to the main Easy Money screen to CHECK THE DATA, as
follows: Set the date range to encompass all possible dates that the imported data might contain. Scroll up and
down through the list looking at the records, to make sure they really contain the correct information, in the
correct fields. If not, then the entire import operation can be discarded by using the menu item: File, Restore
Internal Backup File. Try again!
Note: the import operation does not automatically add to either the category list or the user-defined field lists this you must do manually after the import.
14
Ordering information
In order to use Easy Money beyond the 30 day trial period, you must purchase the program from Clintonville
Software. It costs only $19.95 US. When you buy, we will generate for you a matching Registration Name and
Registration Key, which you will then enter into the appropriate boxes on the opening screen. Once registered,
all program functions are restored, plus the opening dialog clears without your having to click "OK!".
Each $19.95 registration fee entitles one person to use Easy Money on up to two computers.
To purchase, use one of the following methods:
1) Click here and use one of the order processing services listed. They will process the transaction and then
notify us via email, and we will email you your registration info within a few hours.
2) If you wish to use surface mail, send a check, money order, or cash (US funds only please) for $19.95 to
Clintonville Software, 277 W. Brighton Road, Columbus Ohio 43202, United States. Be sure to include a return
address (either surface or email) so we can send you your registration info! There is a handy "print order form"
item under the menu item: Help, Print Order Form.
Upgrading from an earlier version? There is a substantial discount available - look here for details!
15
Conditions of use - disclaimer of warranty
Great care has been taken to make sure that Easy Money is a solid and dependable computer program.
The program is written in Microsoft Visual Basic version 5 (SP3), the trial use and registration systems are
handled by Armadillo, and the installation is performed by Inno Setup version 3.0.7. The program, installation,
and un-installation have been extensively tested on several in-house machines and also independently by a
number of volunteer "beta testers". However, it is simply not possible to test on every conceivable
Copyright 2005, Clintonville Software. All rights reserved.
16
Easy Money 6.x
hardware/operating system combination, and so therefore it is impossible to say for sure that Easy Money will
function flawlessly on your system.
License - disclaimer of warranty:
Prior to installing Easy Money (hereinafter referred to as the SOFTWARE) you agreed to the license terms and
other provisions contained herein:
The SOFTWARE and accompanying documentation are protected by United States copyright law and also by
international treaty provisions. In exchange for the purchase price, Clintonville Software grants you a limited
license to install and use the SOFTWARE on a single computer. You are explicitly prohibited from copying,
renting, leasing, selling, modifying, decompiling, disassembling, or transferring the program license to others.
Any such unauthorized use shall result in immediate and automatic termination of this license. All rights not
expressly granted here are reserved to Clintonville Software.
NO WARRANTY - THE SOFTWARE IS PROVIDED ON AN "AS IS" BASIS. CLINTONVILLE SOFTWARE
DISCLAIMS ALL WARRANTIES RELATING TO THE SOFTWARE, WHETHER EXPRESSED OR IMPLIED,
INCLUDING BUT NOT LIMITED TO ANY IMPLIED WARRANTIES OF MERCHANTABILITY OR FITNESS FOR
A PARTICULAR PURPOSE. NEITHER CLINTONVILLE SOFTWARE NOR ANYONE ELSE WHO HAS BEEN
INVOLVED IN THE CREATION, PRODUCTION, OR DELIVERY OF THE SOFTWARE SHALL BE LIABLE FOR
ANY INDIRECT, CONSEQUENTIAL, OR INCIDENTAL DAMAGES ARISING OUT OF THE USE OR INABILITY
TO USE THE SOFTWARE, EVEN IF CLINTONVILLE SOFTWARE HAS BEEN ADVISED OF THE POSSIBILITY
OF SUCH DAMAGES OR CLAIMS. THE PERSON USING THE SOFTWARE BEARS ALL RISK AS TO THE
QUALITY AND PERFORMANCE OF THE SOFTWARE.
Clintonville Software's maximum liability under this Agreement for all damages, losses, costs and causes of
actions from any and all claims (whether in contract, tort, including negligence, quasi-contract, statutory or
otherwise) shall not exceed the actual dollar amount paid by you for the software.
This agreement shall be governed by the laws of the State of Ohio (USA) and shall inure to the benefit of
Clintonville Software and any successors, administrators, heirs and assigns. Any action or proceeding brought
by either party against the other arising out of or related to this agreement shall be brought only in a STATE or
FEDERAL COURT of competent jurisdiction located in Franklin County, Ohio. The parties hereby consent to in
personam jurisdiction of said courts.
Copyright 2005, Clintonville Software. All rights reserved.