1
USER MANUAL
Easy Analysis
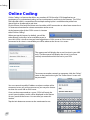
Live Coding
Detailed Information
Statistics Generator
Contents
Preface� � � � � � � � � � � � � � � � � � � � � � � � � � � � � � � � � � � � � � � � � � � � � � � � � � � � � � � � � � � � � � � � � � � � � � 4
Current iCODA Version � � � � � � � � � � � � � � � � � � � � � � � � � � � � � � � � � � � � � � � � � � � � � � � � � � � � � � � � � � � 4
Navigation between iCODA screens� � � � � � � � � � � � � � � � � � � � � � � � � � � � � � � � � � � � � � � � � � � � � � 5
Gestures� � � � � � � � � � � � � � � � � � � � � � � � � � � � � � � � � � � � � � � � � � � � � � � � � � � � � � � � � � � � � � � � � � � � � 6
Single tap � � � � � � � � � � � � � � � � � � � � � � � � � � � � � � � � � � � � � � � � � � � � � � � � � � � � � � � � � � � � � � � � � � � � � � 6
Slide� � � � � � � � � � � � � � � � � � � � � � � � � � � � � � � � � � � � � � � � � � � � � � � � � � � � � � � � � � � � � � � � � � � � � � � � � � � 6
Double tap � � � � � � � � � � � � � � � � � � � � � � � � � � � � � � � � � � � � � � � � � � � � � � � � � � � � � � � � � � � � � � � � � � � � � 6
Resize� � � � � � � � � � � � � � � � � � � � � � � � � � � � � � � � � � � � � � � � � � � � � � � � � � � � � � � � � � � � � � � � � � � � � � � � � � 6
Objects� � � � � � � � � � � � � � � � � � � � � � � � � � � � � � � � � � � � � � � � � � � � � � � � � � � � � � � � � � � � � � � � � � � � � � 7
Event Button� � � � � � � � � � � � � � � � � � � � � � � � � � � � � � � � � � � � � � � � � � � � � � � � � � � � � � � � � � � � � � � � � � � � 7
Popup Tag Button � � � � � � � � � � � � � � � � � � � � � � � � � � � � � � � � � � � � � � � � � � � � � � � � � � � � � � � � � � � � � � � 7
Tag Button� � � � � � � � � � � � � � � � � � � � � � � � � � � � � � � � � � � � � � � � � � � � � � � � � � � � � � � � � � � � � � � � � � � � � � 7
Dummy Button� � � � � � � � � � � � � � � � � � � � � � � � � � � � � � � � � � � � � � � � � � � � � � � � � � � � � � � � � � � � � � � � � � 7
Text Box� � � � � � � � � � � � � � � � � � � � � � � � � � � � � � � � � � � � � � � � � � � � � � � � � � � � � � � � � � � � � � � � � � � � � � � � 7
Link� � � � � � � � � � � � � � � � � � � � � � � � � � � � � � � � � � � � � � � � � � � � � � � � � � � � � � � � � � � � � � � � � � � � � � � � � � � � 7
List Mode� � � � � � � � � � � � � � � � � � � � � � � � � � � � � � � � � � � � � � � � � � � � � � � � � � � � � � � � � � � � � � � � � � � � 8
Open a Form� � � � � � � � � � � � � � � � � � � � � � � � � � � � � � � � � � � � � � � � � � � � � � � � � � � � � � � � � � � � � � � � � � � � 8
Create a new Form� � � � � � � � � � � � � � � � � � � � � � � � � � � � � � � � � � � � � � � � � � � � � � � � � � � � � � � � � � � � � � � 8
Remove a Form or a Timeline� � � � � � � � � � � � � � � � � � � � � � � � � � � � � � � � � � � � � � � � � � � � � � � � � � � � � � 9
Edit a Form or Timeline Name � � � � � � � � � � � � � � � � � � � � � � � � � � � � � � � � � � � � � � � � � � � � � � � � � � � � � 9
Receive a Form by Email� � � � � � � � � � � � � � � � � � � � � � � � � � � � � � � � � � � � � � � � � � � � � � � � � � � � � � � � � 10
Design Mode� � � � � � � � � � � � � � � � � � � � � � � � � � � � � � � � � � � � � � � � � � � � � � � � � � � � � � � � � � � � � � � � 11
Insert a new object � � � � � � � � � � � � � � � � � � � � � � � � � � � � � � � � � � � � � � � � � � � � � � � � � � � � � � � � � � � � � 12
Move an object� � � � � � � � � � � � � � � � � � � � � � � � � � � � � � � � � � � � � � � � � � � � � � � � � � � � � � � � � � � � � � � � � 12
Resize an object� � � � � � � � � � � � � � � � � � � � � � � � � � � � � � � � � � � � � � � � � � � � � � � � � � � � � � � � � � � � � � � � 12
Create a link to an object � � � � � � � � � � � � � � � � � � � � � � � � � � � � � � � � � � � � � � � � � � � � � � � � � � � � � � � � 12
Delete a link to an object � � � � � � � � � � � � � � � � � � � � � � � � � � � � � � � � � � � � � � � � � � � � � � � � � � � � � � � � 13
Modify an object’s properties � � � � � � � � � � � � � � � � � � � � � � � � � � � � � � � � � � � � � � � � � � � � � � � � � � � � 13
Arrange objects � � � � � � � � � � � � � � � � � � � � � � � � � � � � � � � � � � � � � � � � � � � � � � � � � � � � � � � � � � � � � � � � 13
Remove an object � � � � � � � � � � � � � � � � � � � � � � � � � � � � � � � � � � � � � � � � � � � � � � � � � � � � � � � � � � � � � � 13
Inspector � � � � � � � � � � � � � � � � � � � � � � � � � � � � � � � � � � � � � � � � � � � � � � � � � � � � � � � � � � � � � � � � � � � 14
Code� � � � � � � � � � � � � � � � � � � � � � � � � � � � � � � � � � � � � � � � � � � � � � � � � � � � � � � � � � � � � � � � � � � � � � � � � � 14
Caption � � � � � � � � � � � � � � � � � � � � � � � � � � � � � � � � � � � � � � � � � � � � � � � � � � � � � � � � � � � � � � � � � � � � � � � 15
Shape� � � � � � � � � � � � � � � � � � � � � � � � � � � � � � � � � � � � � � � � � � � � � � � � � � � � � � � � � � � � � � � � � � � � � � � � � 15
Event Time Tweaks� � � � � � � � � � � � � � � � � � � � � � � � � � � � � � � � � � � � � � � � � � � � � � � � � � � � � � � � � � � � � � 15
Exclusive Link Cluster � � � � � � � � � � � � � � � � � � � � � � � � � � � � � � � � � � � � � � � � � � � � � � � � � � � � � � � � � � � 15
Fill� � � � � � � � � � � � � � � � � � � � � � � � � � � � � � � � � � � � � � � � � � � � � � � � � � � � � � � � � � � � � � � � � � � � � � � � � � � � 15
Stroke� � � � � � � � � � � � � � � � � � � � � � � � � � � � � � � � � � � � � � � � � � � � � � � � � � � � � � � � � � � � � � � � � � � � � � � � � 16
Popup Tag Mat� � � � � � � � � � � � � � � � � � � � � � � � � � � � � � � � � � � � � � � � � � � � � � � � � � � � � � � � � � � � � � � � � 16
Geometry � � � � � � � � � � � � � � � � � � � � � � � � � � � � � � � � � � � � � � � � � � � � � � � � � � � � � � � � � � � � � � � � � � � � � 16
Tag Group � � � � � � � � � � � � � � � � � � � � � � � � � � � � � � � � � � � � � � � � � � � � � � � � � � � � � � � � � � � � � � � � � � � � � 16
Tag Mode� � � � � � � � � � � � � � � � � � � � � � � � � � � � � � � � � � � � � � � � � � � � � � � � � � � � � � � � � � � � � � � � � � � � � � 16
Link� � � � � � � � � � � � � � � � � � � � � � � � � � � � � � � � � � � � � � � � � � � � � � � � � � � � � � � � � � � � � � � � � � � � � � � � � � � 17
Text & Attributes � � � � � � � � � � � � � � � � � � � � � � � � � � � � � � � � � � � � � � � � � � � � � � � � � � � � � � � � � � � � � � � 17
Document Background� � � � � � � � � � � � � � � � � � � � � � � � � � � � � � � � � � � � � � � � � � � � � � � � � � � � � � � � � � 17
Code Mode� � � � � � � � � � � � � � � � � � � � � � � � � � � � � � � � � � � � � � � � � � � � � � � � � � � � � � � � � � � � � � � � � � 18
Start a Coding Session � � � � � � � � � � � � � � � � � � � � � � � � � � � � � � � � � � � � � � � � � � � � � � � � � � � � � � � � � � 18
Coding History� � � � � � � � � � � � � � � � � � � � � � � � � � � � � � � � � � � � � � � � � � � � � � � � � � � � � � � � � � � � � � � � � 19
Saving your Coding� � � � � � � � � � � � � � � � � � � � � � � � � � � � � � � � � � � � � � � � � � � � � � � � � � � � � � � � � � � � � 20
Stop the coding session � � � � � � � � � � � � � � � � � � � � � � � � � � � � � � � � � � � � � � � � � � � � � � � � � � � � � � � � � 21
Online Coding� � � � � � � � � � � � � � � � � � � � � � � � � � � � � � � � � � � � � � � � � � � � � � � � � � � � � � � � � � � � � � � 22
The Coding Session� � � � � � � � � � � � � � � � � � � � � � � � � � � � � � � � � � � � � � � � � � � � � � � � � � � � � � � � � � � � � 23
Creating a New Session� � � � � � � � � � � � � � � � � � � � � � � � � � � � � � � � � � � � � � � � � � � � � � � � � � � � � � � � � � 24
Connect to (Join) or Reconnect to a Session� � � � � � � � � � � � � � � � � � � � � � � � � � � � � � � � � � � � � � � � 24
Start a Session � � � � � � � � � � � � � � � � � � � � � � � � � � � � � � � � � � � � � � � � � � � � � � � � � � � � � � � � � � � � � � � � � 25
Start Coding � � � � � � � � � � � � � � � � � � � � � � � � � � � � � � � � � � � � � � � � � � � � � � � � � � � � � � � � � � � � � � � � � � � 25
Session Timer and Synchronization � � � � � � � � � � � � � � � � � � � � � � � � � � � � � � � � � � � � � � � � � � � � � � � 26
Disconnect from / Stop a Session� � � � � � � � � � � � � � � � � � � � � � � � � � � � � � � � � � � � � � � � � � � � � � � � � 26
Data Transfer and Storage � � � � � � � � � � � � � � � � � � � � � � � � � � � � � � � � � � � � � � � � � � � � � � � � � � � � � � � 26
Timeline Share� � � � � � � � � � � � � � � � � � � � � � � � � � � � � � � � � � � � � � � � � � � � � � � � � � � � � � � � � � � � � � � 27
Email a Timeline� � � � � � � � � � � � � � � � � � � � � � � � � � � � � � � � � � � � � � � � � � � � � � � � � � � � � � � � � � � � � � � � 27
Preface
iCODA is an application exclusive to the Apple iPhone, iPad and iPod Touch. iCODA will link to
the CODA Command Centre and vica versa, and iCODA will also link directly with SportsCode
for Timeline exports. This manual describes the principles and techniques you need when using
iCODA. For a more detailed description of CODA functions, consult the CODA User Manual.
ICODA supports the operating Sysytem for iPhone 3GS, iPhone4, iPod Touch and iPad. iCoda
supports the following screen sizes :
320 x 480 (iPhone 3GS, iPhone 3G)
640 x 960 (iPhone 4)
768 x 1024 (iPad)
iCODA supports portrait and landscape screen orientation & auto orientation rotation.
Your iCODA application is downloadable from the iTunes App Store. The application must be
activated by a CODA Command Centre license before it can be used as an iCODA device.
Once an iCODA device has been activated by its host CODA application, it is able to be linked to
any licensed CODA Command Centre and to share Forms and Timeline files.
For a detailed description of the coding process please refer to the CODA manual.
Current iCODA Version
The current version of iCODA which this Manual applies to is Version 1.3.1
Navigation bet
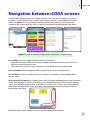
Navigation between iCODA screens
In the iCODA application there are 4 Mode windows. These are the List Mode (Lists Forms or
Timelines) ; Design Mode (which includes the Inspector window) ; Code Mode and Timeline
Share. (see Figure 1) You can navigate between them at any time by using relevant the
navigation bar at the top of the screen. or by using the tab bar at the bottom of the screen
Figure 1 (L to R) List Mode ; Design Mode ; Code Mode ; Timeline Share
In List Mode, you may “toggle” between Forms and Timelines.
• From the Timelines screen you may only navigate to the Send Email function. There is no
facility to email any other screen.
• From the Forms screen you may navigate to Design Mode and to the Code Mode.
In Design Mode you may navigate to the Inspector functions and to Code Mode.
In Code Mode you may navigate to the Forms screen in List Mode , to Design Mode and to
Online Coding.
In Design and Code Mode, for a Coding Form which has been uploaded from a Coda Command
Centre (refer to page 53 of the CODA Manual) and the dimensions of which are larger than the
screen size, the form display will be scrollable in the X and Y axis. There is also a bar display at
the bottom and right of the screen to display what proportion and which part of the form is
displayed on the screen.
When you Stop & Save a coding session you will be returned to List Mode.
5
ures
Gestures
iCODA employs the following gestures: single tap, slide, double tap, resize. Each of these
gestures performs a particular action on the target object.
Single tap
The single tap gesture is what you use to select buttons. It is performed by tapping an object
once without moving your finger before you release it.
In Design mode a single tap is used to select an object allowing you to “arrange” links etc. in
Code mode use a single tap to activate/deactivate coding objects.
Slide
The slide gesture begins by placing your finger on the target object, the finger slides into
another location and then is released.
Use the slide gesture to move an object on the screen in Design mode or to delete a Form or
Timeline in List mode.
Double tap
The double tap is a gesture that consists of two single taps, one after the other.
Use double tap to open the Inspector view for an object in Design mode.
Resize
The resize gesture is performed with two fingers touching the screen when at least one of them
slides.
Use this gesture to change the bounds of the selected object. The bounds of the selected object
will follow the fingers.
An object must not be locked to be moved with slide or resized with the resize gesture.
6
Objects
The following objects can be created in iCODA.
See CODA Principles in the CODA manual for a detailed description of the objects and the coding process.
Event Button
An Event Button is a coding object that opens and marks the log of Events in the Edit List when it
is activated and closes the log after it has been deactivated.
An Event Button can be both the initiator and target of a Link.
Popup Tag Button
A Popup Tag Button is a tag (see below) that is exclusively linked to its target Event. It appears in
the screen on the Popup tag mat only when its target Event is active.
A Popup Tag Button can be the initiator of a Link only to an object outside of its Popup tag mat.
Tag Button
A Tag Button is a coding object that is able to describe coding instances in the timeline. A Tag
can mark instances in two ways: by activating outbound Links and passing its tag information
down the Link chain or by marking all open instances if the Tag is global. A Tag Button can be
both the initiator and the target of a Link.
Dummy Button
A Dummy is a decorative graphical object that helps you to create your visual scene on the
coding form. It can be turned into any picture you need, like any code button.
However, a Dummy is not a coding object, i.e. it cannot affect the coding process.
Text Box
A Text box is a decorative object that allows you to create an artistic text on the Form.
A Text Box is not a coding object, i.e. it cannot affect the coding process.
Link
A Link is a coding object that links an initiator with a target. This means that a Link has direction.
Depending on the defined properties, a Link can activate and/or deactivate its target code
button, reactivate lag time of the target event and/or pass tag information from the initiator to
the target.
These actions are activated when the initiator becomes activated if the link is an Activation Link
or deactivated if the initiator becomes activated when the link is a Deactivation Link.
7
Mode
List Mode
In List Mode you may toggle between Forms and Timeline Lists by tapping the relevant tab in
the tab bar at the bottom of the screen.
The Forms List contains all the coding Forms previously created in iCODA or uploaded
from CODA using the Command Centre function. (Refer to page 53 of the CODA User
Manual) Importing Forms into iCODA cannot be initiated by iCODA. The Form Name is
preceded by the Form icon
The Timeline List contains all the Timelines previously created in iCODA when you stop
and save a Coding session. The Timeline Name is preceded by the Timeline icon.
In List mode you can open an existing Form or create a new one You may also remove
or change the name of a Form or Timeline.
Open a Form
To begin working with a Form just select it in the list
by a single tap. The screen will slide to the right going
directly to the Code mode.
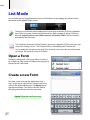
Create a new Form
To create a new Form tap the Add button, (the +
sign,) in the upper-right corner. Type the new Form
name in the opened dialog box (see Figure 2) and
tap the Save button. The screen will then slide to
the right going directly to the Design mode.
Figure 2 Type the new Form name
8
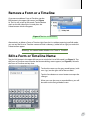
Remove a Form or a Timeline
If you want to delete a Form or Timeline, tap the
Edit button in the upper-left corner (see Figure
3). The list will switch to Edit mode Tap the delete
mark on the left side of the List and press the
Delete button which will appear.
Figure 3 The Lists in Edit mode
Alternatively, to delete a Form or Timeine right from the List without entering into Edit mode,
you can tap the Form or Timeline name and slide it sideways, (either left or right,) to make the
Delete button appear.
Warning! You cannot undo deletion of a Form or Timeline.
Edit a Form or Timeline Name
Tap the Edit button in the upper-left corner to switch the List to Edit mode (see Figure 3). Tap
the Form or Timeline name to make the Rename dialog screen appear (see Figure 4). Rename
the Form or Timeline and tap Save.
To clear the name use the grey round button, (with
an x sign,) on the right side of the text field.
Tap the Save button or return button to accept the
changes.
When you save the new or amended form, you will
be taken to the Design Mode Screen
Figure 4 The Rename Form screen
9
Mode
Receive a Form by Email
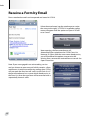
Forms attached to emails can be opened and stored in iCODA.
Select the attachment (tap the attachment or swipe
the arrow to the right), if iCODA is installed a popup
menu will appear with the option to “Open in iCoda”
or to Cancel.
Upon opening, the form attachment will
automatically be copied into the iCODA Form List.
However, if a form with the same name already exists,
you will be offered the options to overwrite the
existing form, rename the received form or cancel the
Open instruction.
Note: If you are engaged in an active coding session
and you choose to open an email which contains a form
attachment, in order to avoid losing coding data, iCODA
will not open the form but will save it to the Form List. If
the form attachment has a name which already exists in
the Form List, then the new form will be renamed with a
sequentially numeric suffix.
10
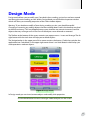
Design Mode
Design mode allows you to modify your Form both when a coding session has not been started
and during the active coding session. Within Design Mode you will find the Inspector window
which will allow you to modify properties of the Code window objects.
Warning “ If you decide to modify a Form during a coding session, you should be careful.
Changing or removing any coding objects that have already been used in the timeline may lead
to data inconsistency. This may happen because your timeline may contain instances from the
objects that may no longer exist in the Form if the objects were removed or renamed.
The Toolbar at the bottom of the screen contains two popup menus - Insert and Arrange. The far
right button with the trash icon will help you to delete objects.
The Navigation bar in the upper part of the screen contains the button, (Code) that switches the
application into Code Mode. In the upper right corner there is an Undo button which helps you
undo operations made on objects.
Figure 5 Design Mode
In Design mode you can insert/remove objects and modify their properties.
Use the Undo button to reverse changes made to objects on the screen.
11
gn Mode
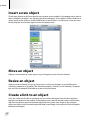
Insert a new object
To add new objects to the Form tap the Insert button on the toolbar. In the popup menu, refer to
the list of objects on page 7 & 8, tap the type of desired object. A new object will be created on a
vacant space in the screen or in the middle of the screen if there is no free space. Once you have
finished tap the Insert button again to close the popup menu.
Move an object
Objects can be moved to a new space using a slide gesture (see Gestures chapter).
Resize an object
Objects can be resized by using a resize gesture (see Gestures chapter) or by modifying the
Geometry properties in Inspector. The Geometry property “Locked”, on the Geometry Inspector
bar, must be switched off to be able to resize or move an object.
Create a link to an object
Links are useful to add a link to an object you must select the object from the form and then
tap the Insert button on the toolbar. In the popup menu, tap link and the button will flash blue.
Tap the insert button again to close the popup up menu, place your finger on the selected
object and slide it to the wanted target and release your finger at this point the link will appear
between each object.
12
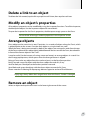
Delete a link to an object
To delete the link created, tap the link a purple hue will show, then tap the trash icon.
Modify an object’s properties
All an object’s properties can be modified by using the Inspector functions. To call the Inspector ,
double tap the object. See the Inspector chapter for more details.
To open the Inspector for the Form’s properties, double tap an empty space on the Form.
You can Undo all changes made to properties in the Inspector screen.
Arrange objects
Every object on the screen has its own Z-position, i.e. an order of objects along the Z-axis, which
is perpendicular to the screen. Consider each object as a single sheet in a stack.
When the Form is being constructed, by default, the objects are arranged in order from the top
of the Form with each new object being added beneath the last one on the Form, but ahead or
in front of the former object in the Z-axis.
It may be useful, (in the interests of saving screen real estate,) to arrange objects in a stack. Use
the Arrange popup menu, which opens when the Arrange button is tapped..
Bring to Front. takes any object from the stack and puts it at the fore-front position.
Bring Forward swaps the object with the closest object forward of it, if any.
Send to Back puts the object to the furthest position rearward.
Send Backward swaps the object with the closest object rearward of it, if any.
Please note that Z-ordering for Popup tags behaves opposite to that of Event Buttons
Popup tags always follow their target Event when the Event’s Z-order is changed.
Remove an object
Select an object and tap the trash icon in the lower-right corner of the screen.
13
ector
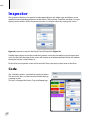
Inspector
The Inspector displays an Inspector window depending on the object type and allows you to
modify the corresponding properties of the object. The Inspector Screen for the iPad is a single
display which contains all the Inspector functions. Scroll up or down by swiping the screen.
Figure 6 Inspector screen for the Player Event illustrated in Figure 7b.
Double tap an object on the form and the Inspector screen for that object type will rotate into
view. For the iPad, the edge of the screen will contain an arrowhead pointer which will indicate
the object that the screen relates to.
For the iPad, the Inspector screen will “auto-hide” when you tap any blank area on the form.
Code
The Code bar contains a text field to name the object.
The text in this bar is written into the timeline during
a coding session.
This bar is displayed for Events, Tags and Popup tags.
14
Caption
The Caption bar allows you to manipulate the visible
representation of the object’s code name on the
screen. You can switch it on/off and shift it horizontally
and/or vertically from the object’s center.
Even if the caption’s visibility is switched off, it will not
affect the coding process, coding objects will mark
coded instances with their Code Name.
This bar is displayed for Events, Tags and Popup tags.
Shape
The Shape bar allows you to specify the shape of the
object. It can be a rectangle, a rounded rectangle, an
oval shape or turned into a more sophisticated shape
of the image, assigned in the Fill function in the Inspector bar. This bar is displayed for Events,
Tags, Popup tags and Dummies.
Event Time Tweaks
The Event Time Tweaks bar is used to modify the lead
and lag time of a selected Event.
This bar is displayed for Events only.
Exclusive Link Cluster
The Exclusive Link Cluster bar is used to include
an Event into an exclusive link cluster. You can also
remove the Event from a cluster using this bar. This bar is displayed for Events only.
Fill
The Fill bar manages the internal style of an object’s
appearance.
None - the object will have no fill.
Color - select any color to fill the object’s shape.
Image - fill the object’s shape with an image.
Alternatively the image’s shape (different shapes made by using transparent zones in the image)
can become the shape of the object. See Shape’s bar description.
This bar is displayed for Events, Tags, Popup tags and Dummies.
15
ector
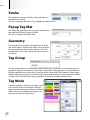
Stroke
The Stroke bar manages visibility, color and thickness
of the object’s outline.
This bar is displayed for Events, Tags, Popup tags and Dummies.
Popup Tag Mat
The Popup Tag Mat allows you to specify the color and
the width of the Event’s Popup Tag Mat.
This tab is displayed for Events only.
Geometry
The Geometry bar manages the coordinates and the
size of the object’s frame. It also allows you to lock the
frame, preventing it from further changes. This tab is
displayed for Events, Tags, Popup tags, Dummies and
Text boxes.
Tag Group
The tag group property sets the parent group for the tag. A tag button can only belong to one
group, but a group can contain as many tags as required. Using tag groups is recommended as
it helps organize and sort tags when using the Matrix, Sorter and Find windows in SportsCode.
When using the tag groups, try to avoid using tags that belong to the same group when coding
a single event. This can create sorting problems in the Sorter window of SportsCode.
Tag Mode
A global tag button, when pressed down, will
insert into all active event buttons. With this
option turned off, the tag can be passed down
a link, making it possible to exclusively insert
the tag into only one linked event.
16
Link
The Link bar contains the properties for linking objects. This tab is displayed for links only.
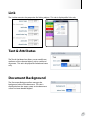
Text & Attributes
The Text & Attributes bar allows you to modify text
attributes of the selected object, such as color and
alignment. This tab is displayed for linked text boxes
only.
Document Background
The Document Background bar manages the
background color of the document. This tab is
displayed when the empty space on the document
screen has been double tapped.
17
e Mode
Code Mode
Use this mode for coding, i.e. to create a timeline. Only the single tap gesture is used in Code
Mode.
iCODA supports multi-task and fast app-switch on iOS4.1
During a coding session, if you choose to answer a telephone call or respond to other
notifications, your coding session will automatically be suspended.
iCODA will save your coding and will return you to the Coding Form and current coding session
as soon as you terminate your call. You will be returned to the coding session in real time. ie. the
timeline will be advanced by the duration of the call.
If you do not wish to be interupted during your coding session, we recommended you to switch
your iPhone into the Airplane Mode before starting your coding session.
Switch your iPhone into Airplane Mode before coding.
To activate Airplane Mode tap the Settings icon on your iPhone screen. In the popup Settings
view, Airplane Mode is located on the first position. Slide the switch to ON. In this mode your
iPhone cannot receive any incoming calls or text messages.
Start a Coding Session
The Navigation bar in the upper part of the screen allows you to go back to the Form list or
switch to the Design mode (see Figure 1).
Before you start a coding session all the coding objects on the form are displayed “opaque”.
A
B
Figure 7 Code mode awaiting start of coding session (a) and the coding session in progress (b).
18
To start a new coding session with the opened Form tap the Start button on the baseline and a
timeline will be activated. To code, simply tap the relevant button(s).
A coding session timer will appear at the right hand side on the baseline toolbar (see Figure 7b)
and begin recording the elapsed time.
During the coding session you may return to the Design Mode by tapping the Design button in
the navigation bar at the top of the screen. Important: Refer to the Design Mode section of this
manual before adding, amending or deleting objects from your Form during a coding session.
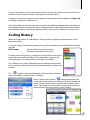
Coding History
When you begin coding in Code Mode, a “History” button will appear in the footer bar at the
base of the screen
As you are coding, the following coding history will be recorded, saved and available for display
and edit.
EDIT Buttons
- Start and End time of each instance
- Tag Buttons attached to each Event
To display the Coding History, just tap the History button and a History
screen will rotate with the coding history information relative to the
coding file open. This coding history is available to be edited.
The Coding History will be displayed in the chronological order of the
Event start times with the most recent Event displayed at the top of the
window.
If a
graphic is displayed alongside and to the left of the Event
name, this indicates that the Event is still open.
There is a blue arrow graphic
displayed alongside and
to the right of the Event name. Tapping this arrow graphic will
rotate a screen which displays the Start and End times of the
Event. This display has a “pin-wheel” which can be scrolled to
edit the Event start and end times in the Timeline.
19
e Mode
An Event may be deleted from the History by either swiping the Event name from right to left
and then tapping the Delete button or Tap the Edit button at the top left of the screen. Red
minus graphics will be displayed alongside and to the left of the Event names in the History. Tap
the minus graphic alongside the Event you wish to delete.
NOTE : Caution - This delete function is not reversible
Tags attached to an Event may be added and/or deleted.
To Add a Tag, tap the “Add a Tag ...” bar and select the Tag you wish to add from the list displayed.
To delete a Tag, swipe the name of the Tag from right to left and tap the delete button.
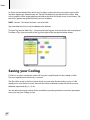
Saving your Coding
iCODA has an auto-save feature which will save your .coda file and also the related .xml file.
These are updated and saved every 5 seconds.
The file will be saved as the Form Name which you have open for the coding session. If a file
already exists with the form name, then the file will be saved and named with the form name
followed sequentially by (1) , (2) etc
You are able to change the name of the saved file by specifying another name when prompted
when you stop your coding session.
20
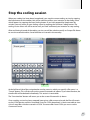
Stop the coding session
When your coding has been done (completed), you stop the current coding session by tapping
the Stop button on the toolbar. You will be asked to confirm your intention in the dialog sheet
which appears by tapping the Stop Coding button. If you have tapped the Stop button by
mistake, you may return to your coding screen by tapping the Continue Coding button. The
coding session timer will still be active until you have confirmed your intention to stop coding.
After confirming the end of the coding session you will be asked to specify an Output File Name
to save the created timeline. Saved timelines are stored in the memory.
A
B
Figure 8
At the left hand side of the navigation bar on the screen in which you specify a file name, is a
”Cancel” button. This will take you to the screen illustrated in b) above. If you select Remove, the
timeline file will be deleted immediately. This action is irretrievable.
The “Save timeline” button will return you to the screen illustrated in a) above
Once a coding session has been stopped, been given a file name and saved; the file will remain
on the iCODA device until the Command Centre in CODA downloads it. You are not able to view
a list of saved files which are stored in iCODA. To remove files from iCODA you must use the
Command Centre.
21
ne Coding
Online Coding
Online Coding is a feature that allows any number of CODA and/or iCODA applications to
participate in a synchronized coding session simultaneously and live via the internet. The CODA
XML data file which is created from the multiple coding inputs is available to be pulled into
SportsCode or Studiocode in real time.
For the iPhone, iPod and iPad, there must be either a WiFi connection to a local area network or a
3G internet connection for remote connection to the server.
At the bottom right of the iCODA screen is a button
titled “Online Coding”.
When you tap this button, by default, you will be
taken directly to the first server available to you in
your LAN. If this is the first time you have logged into a CODA server or if the server you
connected to last time is unavailable you will be taken to the Servers List screen
The upper panel will display the server(s) active in your LAN
only. The lower panel will display the server(s) you have
recently connected to which are not in your LAN.
To connect to another network or computer, slide the “Other”
name in the panel to the right. The “Other Server” screen will
be presented..
You must enter the public IP address and port number of the
computer/server you wish to connect to, you may also choose
to enter the server URL or DNS name.
Once you have connected to a server, CODA will retain the
server name & address and it will be displayed in the “Recent
Servers” panel of the Servers List next time you enter this
routine.
Tap the Join button to connect to the nominated server.
22
If , (by default,) you have been taken to the first available server in your Server List, (which will
automatically list all the sessions available at that time on that server,) but this is not the server
you wish to connect to, tap the “Servers” button at the top left of the screen and you will be
returned to the Servers List
Tap the server you wish to connect to. This will take
you to the Session List screen which will list the
sessions (if any) which are created and are available to participate in. If there are no sessions
active / available you may choose to create a new session.
Note: When you select “Online Coding”, iCODA will automatically search its memory for servers
which it has previously connected to. Each of these servers which are available will be displayed
for you to choose from. If only one server is available, iCODA will bypass the Server List screen
and take you immediately to the Session List screen to display the sessions (if any) which are
created and available for connection to.
The Coding Session
The coding session may be joined by any number of participants. Access to a session may be
restricted to participants by password. A participant may join and/or leave a session at any time
between when a session is created and when it is stopped.
When a participant joins a session after a coding
session has been started, the participants coding
timer will display the time elapsed from the start
of the coding session (not from the time the
participant joined the session.)
The session will be stopped on the CODA Server
only when the last participant disconnects.
The Session Owner
The person / device which creates a session is the
“Owner” of the session. The key function which
the owner must perform is to “Start” a coding
session. No other participant is able to start a
session.
23
ne Coding
Creating a New Session
From the ‘Session List” tap the “New Session”
option. The device which creates a new session
will become the owner of the session and will be
required to start the session.
It is mandatory when creating a session to provide
a session name. You may also choose to establish
a password, without which other participants may
not join the session.
Tap “Done” to create the session. If the session is
successfully created, you will be taken directly to
the Code Mode screen where CODA will wait for
you to Start the session.
Connect to (Join) or Reconnect to a Session
From the Session List Screen, tap the session you
wish to join. If a password is required, input the
password and tap “ Join”. If the password is correct,
you will join the session and you will be taken
directly to the Code Mode.
If the session has not been “Started”, the Code Mode
screen will be “greyed out” which will prevent you
from activating any code button(s), but you will
still be connected to the session. A spinning wheel
symbol will indicate that you are connected and
that you are waiting for the session to start.
24
There is an Online Coding status indicator located on the Coding Session Timer which indicates
that you are connected to the server if it is green. When the connection is broken it turns red.
Start a Session
If you are the device which has created a session, you will be required to “Start” the session. No
coding of the session can take place by any device connected to the session until the session is
started. The creator of a session will have the “Start” button at the bottom left of the “Session
Name” screen. When this button is tapped, the Code screen will become clear and you may begin
coding. The Code screens on all other devices connected to the session on the server will change
from “greyed out” to clear to indicate that the session has been started, and the session timer will
be activated.
Start Coding
Once the session owner has started the session, the Code Mode screen will become clear and
you may begin coding. If the session is in progress when you join, the Code Mode screen will be
clear and immediately available for coding.
25
ne Coding
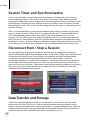
Session Timer and Synchronization
Once a session has been started, all the session participants, (including the Session Owner,)
become equal participants as far as the CODA server is concerned. At the bottom right of a
participants coding screen a timer displays the server time elapsed since the session was started.
All participants will display the time elapsed since the start of the session irrespective of when
they joined the session. This ensures that the coding from all participants is synchronized with a
common timeline.
Note: It is conceivable that an event could be coded live from devices located in varying time
zones. In such an instance, CODA uses UTC as a reference time. (UTC is Coordinated Universal
Time which replaced Grenwich Mean Time {GMT} as the world standard time. For CODA
purposes, UTC and GMT may be considered as being the same.) For synchronization purposes,
the CODA server is concerned only with time synchronization between itself and all the session
participants. If there is to be any third party application pulling the timeline data from the CODA
server they must ensure that these computers are also synchronized with their network time.
Disconnect from / Stop a Session
You may deliberately disconnect from the session at any time by tapping the “Disconnect”
button at the bottom right of the Code Mode screen. If the Online Coding status indicator which
is located on the Coding Session Timer changes from green to red during an online coding
session, this indicates that the connection to the server has been broken. CODA will
automatically attempt to re-establish the connection. A disconnection which is not deliberate
will not affect your coding records because CODA saves your coding data at your device and
sends it to the server at intervals. Coda records what data has been transmitted to and saved by
the server and as soon as the reconnection is established, CODA will “catch up” on the data
coded during the period of disconnection.
Data Transfer and Storage
CODA stores the data coded by each device on that device and it also transmits the stored
data at intervals to the CODA Server. If the connection between the device and the server is
broken, the device will continue to save the coding data. It is recommended that you retain the
complete timeline file after you have deliberately disconnected from the server until you have
confirmed that your entire timeline file has been received by the server.
26
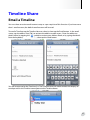
Timeline Share
Email a Timeline
You must have an active email account setup as a pre-requisite of this function. If you have more
than 1 email account, the default email account will be used.
To email a Timeline, tap the Timeline Name to select it, then tap the Email button. In the email
screen, tap the address line ( To: ) to activate the addressee edit screen. Enter the addressee
details either by tapping the
symbol to activate your Address Book, or by typing the details
from the keyboard ,
..........then tap the Send button.
You will be returned to the Timelines list. The Timeline which has been emailed will display an
envelope within the Timeline icon adjacent to the Timeline Name.
27