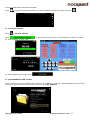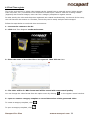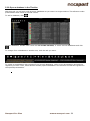
1
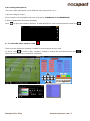
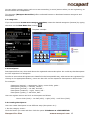
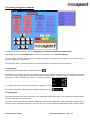
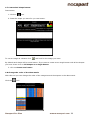
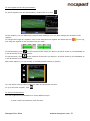
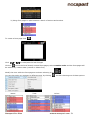
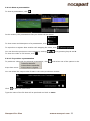
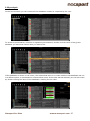
User’s manual
Scout Plus
Version 2.200
MANUAL DE USUARIO NAC SPORT ELITE
ÍNDEX
0.System requirements
1. Keyboard shortcuts
1.1
1.2
1.3
1.4
Video player
Timeline
Category template
General
2. Quick guide
2.1. Real-Time register
2.2 Viewing and recording from file
2.3 Register without Video Source
2.4 My analysis
3. Categories template
3.1 Categories template icons
3.2 Creating categories templates
4. Viewing and registering
4.1 Register from file
4.2 Real-Time register
4.3 Registering without Video Source
5. Timeline
5.1 Timeline icons
5.2 Timeline tools
6. My analysis
7. Tools
7.1
7.2
7.3
7.4
Merge and convert video files
Import/Export .XML Files
Import databases from Tag&Go
Import OPTA databases
8. Annex
Nacsport Pro Plus
wwww.nacsport.com 1
0.System requieriments
Minimum requirements
Operating System
Windows VISTA with Service Pack 2 (32 or 64bits)
Windows 7 with Service Pack 1 (32 or 64bits)
Windows 8 (32 or 64bits)
Hardware
RAM Memory: 2GB
Processor: Intel© Core 2 Duo 2 GHz or similar
Video memory: 256MB dedicated memory (not share with general RAM)
Screen resolution: 1366 x 768
At least 300MB free hard disk space to install software
Recommended requirements
Operating System
Windows 7 with Service Pack 1 (32 or 64bits)
Windows 8 (32 or 64bits)
Hardware
RAM Memory: 4GB
Processor: Intel © Core i7 or equivalent
Video memory: 512MB dedicated memory (not share with general RAM)
Screen resolution: 1920 x 1080
At least 300MB free hard disk space to install software
Minimum requirements necessary to…
Capture and register actions in real time
Using video cameras via FireWire:
1x FireWire port (IEEE1394) or 1x PCMCIA (Expresscard) free Slot to add external FireWire Port
Using hard disk video camera and USB Digitizer (e.g. Hauppauge USB Live-2):
1x USB2 or USB3 port
Overhead projector or secondary monitor
1x HMDI (recommended) port or 1x VGA port
Video storage
Computer hard disk or external hard drive USB2 or USB3 can be used to store videos.
Useful links
FireWire: http://en.wikipedia.org/wiki/IEEE_1394
CPUs: http://www.cpubenchmark.net/
HDMI: http://en.wikipedia.org/wiki/HDMI
VGA: http://en.wikipedia.org/wiki/VGA_connector
External Hard Drive:
http://www.amazon.com/External-Hard-Drives-Storage-Add-Ons/b?ie=UTF8&node=595048
Nacsport Pro Plus
wwww.nacsport.com 2
1. Keyboard shortcuts
1.1 Video player
1.2 Timeline
1.3 Category template
1.4 General shortcuts
Nacsport Pro Plus
wwww.nacsport.com 3
1.1 Video player
M: Play frame by frame. Press once to advance just one frame. Keep pressed to play the video
continuously.
N: Rewind frame by frame. Press once to rewind just one frame. Keep pressed to rewind the video
continuously.
B: Play at 3X speed. Press once to play.
V: Rewind at 3X speed. Press once to rewind.
Left/right arrow keys: Short jump through video with configurable time.
Up/down arrow keys: Medium jump through video with configurable time.
Shift + left/right arrow keys: Long jump through video with configurable time.
Spacebar: Play/pause video.
Shift + Enter: Full screen video playback.
Esc: Return to previous video play size from full screen. To switch between full screen and previous video
play size, double click on the title bar of the respective window.
L: Continue the video after playing a record.
Note: You can also see the video player short cuts while registering in the Video Opt tab in the
register control window.
1.2 Timeline
1: Play next register (action) in the selected register.
2: Play previous register (action) in the selected register.
3: Add selected register to a selected list from the presentation.
Insert: Add a selected register to the selected list from a presentation.
C: Create register in a selected category.
Del: Delete selected register/s.
A: Go to the following category.
Q: Go to the previous category
Control+T: Hide/ show Timeline
Note: whilst the Timeline is hidden, registers can be only viewed by categories and not in
chronological order.
Nacsport Pro Plus
wwww.nacsport.com 4
1.3 Category template
Click + drag: Move selected buttons
Alt + click + drag the bottom-right corner of a button: Change size of a button.
Hold Ctrl + click: Select multiple buttons individually.
Click on the background and drag: select multiple buttons at once
Control+Z : Undo changes.
Double click: Create a button which behaves as a category
Ctrl + double click: create a button which behaves as a descriptor
1.4 General shortcuts
Shift + P: Show all opened windows. If you close Nacsport Scout Plus with one or several windows on
a secondary monitor or projector, those windows will not be shown if you open the program again without
connecting the secondary monitor or projector. This combination of keys fixes this problem.
I: Sets the START for the selected register to the current video position. (Timeline and presentations)
O: Sets the END for the selected register to the current video position. (Timeline and presentations)
Ctrl: Open window for independent text notes while registering
Nacsport Pro Plus
wwww.nacsport.com 5
2. Quick guide
2.1 Real-Time register
2.2 Viewing and recording from file
2.3 My analysis
Nacsport Pro Plus
wwww.nacsport.com 6
2.1. Real-Time register
Real-Time register is the environment where videos can be viewed from an external source (video
camera, video converter, etc.) connected to the FireWire port of the computer. While a video file is being
created (digitized) with external images, user can use a category template to register actions.
In other words, both video and actions register are created simultaneously. At the end of the event, user
will have all the actions in a Timeline, where they can be easily analysed and managed.
1.- Click on ‘Real-Time Register’ on the main menu.
2.- Enter the name of the video file to be captured. Then click on ‘Save’.
3.- The video will be in .MP4 format and compressed quality.
4.- Open or create a category template to record the actions of the generated video.
To create a category template, click on
To open a category template, click on
Nacsport Pro Plus
.
.
wwww.nacsport.com 7
With this version of the program, you can configure your button template on two levels:
A primary level (4.1 Categories) and other secondary level (4.2 Descriptors).
You can relate a primary action with one or two (or more) secondary actions when you are registering, as
all buttons are independent.
This program (Nacsport Scout Plus) offers unlimited buttons to distribute between categories and
descriptors.
4.1 categories
If you have selected ‘Create new category template’, users should insert the desired categories (buttons)
by typing the name on the New Name box by clicking
.
Template example:
4.2 Descriptors:
Descriptors define how, when and where the registered actions take place. We could say that descriptors
are like 'adjectives' to categories.
In order to ensure that all registers are classified in the best possible way, when actions are registered (by
clicking on the appropriate button), users can also click respective descriptors which are defining them.
For example:
Categories (actions) = possessions, faults, corner kicks, goals...
Descriptors (players) = Lehman, Jansen...
Descriptors (periods) = 1st half, 2nd half...
Descriptors (locations) = right, centre, left...
Descriptors (quality) = well done, bad...
User can register actions and click descriptors as follows:
Corner kick (click) + 1st half (click) + right (click) + well done (click).
Nacsport Pro Plus
wwww.nacsport.com 8
4.3 Creating descriptors:
User can create descriptors in two different ways (See picture 4.1):
1-On the category screen:
Click a button in the template and then click option It behaves as a DESCRIPTOR.
2-As an independent descriptor template:
Click
to open the following window. To add descriptors, enter the desired name and click
5.- To start the video capture, click
.
.
Then click the categories (buttons) created for that purpose as they arise.
To pause, click
. In order to play, compare, classify or change the recorded actions, click
open the record editing environment (Timeline).
Nacsport Pro Plus
wwww.nacsport.com 9
to
6.- This environment contains all the recorded actions which are shown by categories (rows)
in an intuitive Timeline.
These are all the available Timeline options:
- Zoom
: To maximise or minimise the Timeline. To show the entire Timeline, click
.
- Change the start or end of a record: Place cursor on the left (start) or right (end) of the record and
when it changes to
, then left click and drag it in one of the two possible directions.
- Temporary displacement of record (without affecting its length): Place cursor in the middle of the
record and when it changes to
, then left click and drag it in one of the two possible directions.
- Add category (row): Right click on the name of a category (row) and select Add row. Then enter a
name and click Ok. Timeline would have a maximum of 50 categories or rows (depending on the number
of categories previously created in the buttons template)
- Edit category name (row): Right click on the name of the category to be edited, select Edit category
name and click
.
- Delete category (row): Right click on the name of the category to be deleted, select Delete row and
click on Yes.
- Duplicate category (row): Right-click on the name of the category to be duplicated and select
Duplicate row.
-Timeline's tools: See section 5.2
Nacsport Pro Plus
wwww.nacsport.com 10
2.2 Viewing and recording from file
This is the environment where a video file can be seen and actions are recorded in the category template
created by the user.
1.- Click on Register from File on main menu.
2.- Select the video file you wish to watch and click Open.
3.- Open or create a category template to record the actions of the generated video
To create a category template, click
.
To open a category template, click
With this version of the program, you can configure your button template on two levels:
One primary level (3.1 Categories) and other secondary level (3.2 Descriptors).
Nacsport Pro Plus
wwww.nacsport.com 11
You can relate a primary action with one or two secondary (or more) actions when you are registering, as
all the buttons are independent.
This program (Nacsport Scout Plus) offers unlimited buttons to distribute between categories and
descriptors.
3.1 categories
If you have selected Create new category template, insert the desired categories (buttons) by typing
the name on the New Name box clicking
.
Template example:
3.2 Descriptors:
Descriptors define how, when and where the registered actions take place. We could say that descriptors
are like 'adjectives' to categories.
In order to ensure that all registers are classified in the best possible way, when actions are registered (by
clicking on the appropriate button), users can also click on the respective descriptors to define them.
For example:
Categories (actions) = possessions, faults, corner kicks, goals...
Descriptors (players) = Lehman, Jansen...
Descriptors (periods) = 1st half, 2nd half...
Descriptors (locations) = right, centre, left...
Descriptors (quality) = well done, bad...
User can register actions and click on descriptors as follows:
Corner kicks (click) + 1st half (click) + right (click) + well done (click).
3.3 Creating descriptors:
User can create descriptors in two different ways (See picture 4.1):
1-On the category screen:
Click the button you want and then click the option It behaves as a DESCRIPTOR.
Nacsport Pro Plus
wwww.nacsport.com 12
2-As an independent descriptor template:
Click
to open the following window. To add descriptors, enter the desired name and click
.
4.- To record actions
Click
or Record actions, then click the video to play and finally click categories (buttons) created
for that purpose, as they arise.
To pause, click the video image. To play, compare, classify or change the recorded actions, click
open the record editing environment (Timeline).
Nacsport Pro Plus
wwww.nacsport.com 13
to
5.- This environment contains all the recorded actions which are shown by categories (rows)
in an intuitive Timeline
These are all the available Timeline options:
- Zoom
: To maximise or minimise the Timeline. To show the entire Timeline, click
.
- Change the start or end of a record: Place cursor on the left (start) or right (end) of the record and
when it changes to
, then left click and drag it in one of the two possible directions.
- Temporary displacement of record (without affecting its length): Place cursor in the middle of the
record and when it changes to
, then left click and drag it in one of the two possible directions.
- Add category (row): Right click on the name of a category (row) and select Add row. Then enter a
name and click on Ok. Timeline would have a maximum of 50 categories or rows (depending on the
number of categories previously created in the buttons template).
- Edit category name (row): Right click on the name of the category to be edited, select Edit category
name and click
.
- Delete category (row): Right click on the name of the category to be deleted, select Delete row and
click Yes.
- Duplicate category (row): Right-click on the name of the category to be duplicated and select
Duplicate row.
Nacsport Pro Plus
wwww.nacsport.com 14
2.3 Register without Video Source
Actions from a sport event can be registered without a video opened or a capture device connected to the
computer. For example: while one person is recording a sport event, another one can be on the other side
of the pitch registering actions.
Once the event is over, the database can be linked to and synchronized with the registered actions on the
respective video.
1.- Click Register without Video Source
2.-Choose the name of the file to generate and click
.
3.- Open or create a category template to record the actions of the generated video.
To create a category template, click
To open a category template, click
.
.
With this version of the program, you can configure your button template on two levels:
One primary level (3.1 Categories) and other secondary level (3.2 Descriptors).
You can relate a primary action with one or two secondary (or more) actions when you are registering, as
all the buttons are independent.
This program (Nacsport Scout Plus) offers unlimited buttons to distribute between categories and
descriptors.
Nacsport Pro Plus
wwww.nacsport.com 15
3.1 categories
If you have selected Create new category template, insert the desired categories (buttons) by typing
the name on the New Name box clicking
.
Template example:
3.2 Descriptors:
Descriptors define how, when and where the registered actions take place. We could say that descriptors
are like 'adjectives' to categories.
In order to ensure that all registers are classified in the best possible way, when actions are registered (by
clicking the appropriate button), user can also click respective descriptors to define them.
For example:
Categories (actions) = possesions, faults, corners, goals...
Descriptors (players) = Lehman, Jansen...
Descriptors (periods) = 1 time, 2 time...
Descriptors (locations) = right, centre, left...
Descriptors (quality) = good, bad...
User can register actions and click on descriptors as follows:
Corners (click) + 1 time (click) + right (click) + good (click).
3.3 Creating descriptors:
Users can create descriptors in two different ways (See picture 4.1):
1-On the category screen:
Click the button you want and then click option It behaves as a DESCRIPTOR, or keeping pressed the
Control key and double clicking the category template's background.
Nacsport Pro Plus
wwww.nacsport.com 16
2-As an independent descriptor template:
Click
to open the following window. To add descriptors, enter the name and click
.
4.- To record actions
Click
or Record actions.
Click
for that purpose, as they arise.
To stop registering the event click
to start registering and then click categories (buttons) created
.
5.- Link databases with a video
When registering a event without video source it is necessary to link the created databases with a video
in order to get access to the Timeline. To do this click My analysis.
Nacsport Pro Plus
wwww.nacsport.com 17
Select database you want to link with (it will be shown in red due it has no video).
Double click the database and click on
Select the video and click Open.
To play, compare, classify or change the recorded actions, click
environment (Timeline).
to open the record editing
6.- This environment contains all the recorded actions which are shown by categories (rows)
in an intuitive Timeline.
Nacsport Pro Plus
wwww.nacsport.com 18
These are all the available Timeline options:
- Zoom
: you can maximise or minimise the Timeline. To show the entire Timeline, click
.
- Change the start or end of a record: position the cursor on the left (start) or right (end) of the record
and when it changes to
. Left click and drag it in one of the two possible directions.
- Temporary displacement of record (without affecting its length): place the cursor in the centre of
the record and when it changes to
, left click and drag it in one of the two possible directions.
- Add category (row): Right-click a category (row) and select Add row. Then enter a name and click
Ok. Timeline can stand a maximum of 50 categories or rows (Depending on the number of categories
previously created in the buttons template).
- Edit category name (row): Right-click the category to be edited, select Edit category name and click
.
- Delete category (row): Right-click the category to be deleted, select Delete row and click Yes.
- Duplicate category (row): Right-click the category to be duplicated and select Duplicate row.
Nacsport Pro Plus
wwww.nacsport.com 19
2.4 My analysis
In this environment, you can consult all the Nacsport databases created or imported by the user.
To access presentations, timeline or the viewing and record environment, double click to database (green
means available) and select your preferred option.
You can also open several databases at once by selecting the databases you want and then clicking
If the database is in red, this means the associated video is in a different location than the last time it was
used, it has a different name or the video has been deleted. If the video is still available, it can be
associated by double clicking the red database and searching for it.
Following actions can be performed:
- Create subfolders: click the desired folder and then click
.
- Delete folders (and the databases they contain) or databases: click the desired folder and then
click
.
- Assign favourite folder: click the desired folder and then click
- Select folder directory: click
Nacsport Pro Plus
.
and select directory.
wwww.nacsport.com 20
3. Categories template
3.1 Categories template icons
3.2 Categories template creation
Nacsport Pro Plus
wwww.nacsport.com 21
3.1 Categories template icons
A) Button properties
Create a new category (button).
Create a customized button.
Delete all categories created in actual template.
Open window to rename and save category template.
Add properties of the blue highlighted category to other selected categories.
Clones selected category (button).
Make a window with independent descriptors
Order the data matrix
Make a dashboard
Export the template to Tag&Go
Open an already created template
a) Interface
Open the window to customize font and colour of the category.
Open the window to add an image to a category (button).
Fit the size of the image to the size of the category.
Nacsport Pro Plus
wwww.nacsport.com 22
B) Categories window properties
Lock categories template with password.
Delete password
Nacsport Pro Plus
wwww.nacsport.com 23
3.2 Creating categories templates
This program version allows user to configure your button template on two levels:
One primary level (4.1 Categories) and other secondary level (4.2 Descriptors).
You can relate a primary action with one or two secondary (or more) actions when you are registering, as
all the buttons are independent.
This program offers unlimited buttons to distribute between categories and descriptors.
1. Categories
Insert categories (buttons) you wish by clicking
By default, created categories are automatic (a preset time will be recorded before and after the moment
you click on the button), but you will also be able to create manual categories (so you will have to click on
the button to start recording and then at the end of the action to stop registering).
To change the preset time of the automatic categories, click
To change automatic categories into manual categories, click
.
.
2. Descriptors:
Descriptors define how, when and where the registered actions take place. We could say that descriptors
are like 'adjectives' to categories.
In order to ensure that all registers are classified in the best possible way, when actions are registered (by
clicking on the appropriate button), user can also click on the respective descriptors with to define them.
Nacsport Pro Plus
wwww.nacsport.com 24
For example:
Categories (actions) = possessions, faults, corner kicks, goals...
Descriptors (players) = Lehman, Jansen...
Descriptors (periods) = 1st half, 2nd half...
Descriptors (locations) = right, centre, left...
Descriptors (quality) = well done, bad...
Users can register actions and click on descriptors as follows:
Corners (click) + 1 time (click) + right (click) + good (click).
You can also add descriptor to already registered action by click on the register and then on the descriptor
you want.
3. Create descriptors:
Users can create descriptors in two different ways:
1-On the category screen:
Click the button you want and then click option It behaves as a DESCRIPTOR
2-As an independent descriptor template:
Click
to open the following window. To add descriptors, enter the desired name and click
.
Descriptors can also be added automatically, without clicking them, if you select
. This option can be changed from the register window by
right-button click on the descriptor.
4. Other options for creating categories templates
4.1 Graphical options (size, color , pictures, etc.) of the buttons.
To change the place of a button, click and drag it .
To change the order of the button, right click with the mouse on the button and select Send to the back
or Send to the front, with this option, user will be able to bring buttons to front or send them to back as
if they were layers.
To change the size of a button, keep pressing the ALT key and drag the lower right corner of the button
To change the color of the button click
To add an image (picture) to a button, click
button.
.
and then click
To change the font and text colour of a button, click
Nacsport Pro Plus
to fit the size of the image to the
.
wwww.nacsport.com 25
To undo last change, press Ctrl+Z.
To show/hide a button during action's registering click
From Window Properties tab:
To show/hide the background grid click
To adjust the button to a line of the background grid click
You can change the size of the lines od the background grid by setting a number in the
box
To Create templates with predefined Nacsport Tag&go size select Tag&go dimensions
4.2 Equalize properties and clone buttons
To equalize properties of buttons (categories or descriptors), choose buttons that you want, click
and choose the properties to equalize.
To clone a button (all the properties of the new button will be the same than the original one) choose a
button, click
and select the amount of buttons you want to create.
4.3 Add hot keys
Select a button and then choose one of the keys in the list shown below.
4.4 Exclusion property for manual categories
This property is conceived to avoid opposite manual categories being opened at the same time.
Example:
Categories such as Home Team Possession and Away Team Possession cannot be opened at the
same time as they are opposite conditions. Including the exclusion property between these categories,
when clicking on Home Team Possession, then Away Team Possession will be automatically closed.
If you want to do what is explained before, follow these steps:
1- Choose Home Team Possession category.
2- Click exclusions tab and look for Away Team Possession category in the list and check it.
Nacsport Pro Plus
wwww.nacsport.com 26
4.5 Lock category templates with a password
Follow these steps :
Click on Windows properties tab.
Type the password you want in the box under Protect the template with a password.
Type the same password in the box under Repeat password.
Click
to check that both passwords are the same.
If you want to delete the password to set a new one or leave it without password, click
4.6 Search and replace text in buttons:
Follow these steps:
a) Click
icon.
b) Insert text to be searched. Coincidences will appear as text is typed.
c) Insert new text to replace searched one.
d) Click
icon.
Nacsport Pro Plus
wwww.nacsport.com 27
.
4.7 Customized shape button:
Instructions:
1- Click on
icon.
2- Draw the shape you want for you new button.
To use an image as a button click
and look for the image you want.
By default each shape will be a new button. If you want to create a new single button with all the shapes
you have drawn click on All shapes as a single button.
3- click on Create new button
4.8 Change the order of the data matrix
With this tool you can change the order of the categories and descriptors in the data matrix.
Click the
icon
Nacsport Pro Plus
wwww.nacsport.com 28
Select the category or descriptor you want to replace, then drag and drop it where you want.
4.9 Export templates to Nacsport Tag&go
Click
and select Export template to Nacsport Tag&go
4.10 Category rating.
With this property you can give a rating (from 1 to 5) to the category you click, this will help you to find
in a better way the registered actions once you are in the Timeline.
To use this property follow these steps:
1- Select a button and click on the Activate rating option in the behaviour tab.
2- During the register of actions select the rating of each category by clicking on the category and
then on the rating that will pop up.
3- Once in the Timeline click on
and choose the rating which categories you want to show.
Note: You can use the keyboard to add a rating using the number keys from 1 to 5. In the case you
are using keyboard shortcut for you categories and they are any number key between 1 and 5 you
should activate the “Rating using keyboard (1,2,3,4,5)” property. With this property you can use
the keyboard for both, registering actions and adding ratings. Please follow these steps
1- Pres the number key (1,2,3,4,5) to register the category with the corresponding shortcut
The category rating will be automatically opened.
Nacsport Pro Plus
wwww.nacsport.com 29
2- Set the rating you want by pressing the corresponding key (1,2,3,4,5) o close the rating by
pressing Esc.
Register with a rating:
Register without a rating:
4.11 Groups of buttons
With this property you will be able to make groups of different buttons. To do this clic on the tab "Groups",
choose the button you want and clic on
and type the name of the group.
Example:
To make a group of player choose the players (John, Bob, James)
name for the group
clic on
and type a
. Now those 3 players are part of the same group
4.12 Dashboards
Charts
The charts will allow you to see a graphical representation of the actions happened
easier to understand what happened during the event
To create a dashboard click
in the event, making
on and select "make a new chart"
Choose the kind of chart you want to make and then click on the categories and descriptors you want to
show. The pie and donut charts can only contain a single category in the case of adding descriptors, the
lines chart can contain only categories or only descriptors
To change the colour of any element in the chart click on it and choose the color you want. To add the
same color to all the elements you are adding to the chart clic on "Same colour for each series"
Nacsport Pro Plus
wwww.nacsport.com 30
To show the amount of time during an action took place instead of the amount of action happened click on
Amount of actions happened:
Amount of time during the actions took place:
To create a chart relative to a group select any of the pie or donut charts and click on the categories or
descriptors you want to see, then click on "Relative to a group" and choose the group which contains the
categories or descriptors you selected before. Now the chart show the value of the action selected in
relation to the total amount of the group
Example:
If you select a player relative to a group which contains the total amount of players you can see
participation of a player in relation the participation of the rest. To do this select the player you want,
select "Relative to a group" and select the group which contains all the players.
To creat a chart which works as a filter click on the category you want, then on the descriptors you want
and lastly on "Filtered mode", when this option is active you will only see the categories which contains all
the descriptors selected
Example:
To see all the shot on the right in the area select the category shots, the descriptor right and the descriptor
in the area. Select "Filtered mode". Now you will only see in the chart the shot which contains both the
descriptors right and the descriptor in the area
Labels
Labels will able you to see a numerical representation of actions happened in a event, making easier to
understand what happened during the event
Nacsport Pro Plus
wwww.nacsport.com 31
You can make 3 different kinds of labels, the simple label, the time label and the data label
To make a simple label click on
and set a name for the label, to change the colour of the label click
this label shows only text and can be use to organize the dashboard
To make a time label click on
and set a name for the label, to change the colour of the label click
, this label shows a timer which is the time of the actual video .
To make a data label click on
and select the categories and descriptors you want to show.
Example:
To make a label which show the total amount of actions made by a player on the right of the field click on
the name of the player and on the descriptor right
To change the colour of the label click
To set a nickname for a label type the nickname on the corresponding box and select
the label will you the text you set for it
Label without nickname:
now
Label with nickname:
To hide the text of a label and only show the numeric value of it click on
To show the amount of time during an action took place instead of the amount of action happened click on
Amount of actions happened:
Amount of time during the actions took place:
To create a label relative to a group select the categories or descriptors you want to see, then click on
"Relative to a group" and choose the group which contains the categories or descriptors you selected
before. Now the label show the value of the action selected in relation to the total amount of the group as
a percentage, to see it as a absolute value click on
Percentage
Absolute value
To make a label which behaves as a sum of elements click on the category you want, then on the
descriptor you want and lastly on " behave as sum" , when this option is active the label will show the total
amount of the categories containing one of the descriptor summed to the total amount of categories
containing the other descriptor.
Nacsport Pro Plus
wwww.nacsport.com 32
Example:
To show all the shots on the right and all the shots in the area select the category shot, the descriptor right
and the descriptor in the area. Select "behave as sum". Now you will see all the shot on the right and all
the shots in the area as a single value.
To set an alarm set the value the label must reach to activate the alarm.
Example:
To set an alarm by goals make a label, select the category goals, set the value you want for each alarm
level, for example 1,3,5. Now when the label reaches the value 1 the first alarm will activate, when the
label reaches the value 3 the second alarm will activate and when it reaches value 5 the last alarm will
activate.
Alarm 1:
Nacsport Pro Plus
Alarm 2:
Alarm 3:
wwww.nacsport.com 33
4. Viewing and registering
Now the three options to view and record an event will be explained.
4.1 Register from file
4.2 Real-Time register
Nacsport Pro Plus
wwww.nacsport.com 34
4.1 Register from file
This is the working environment in which a video file is seen and the actions are recorded by a category
template created by the user.
Follow the steps below to work with this environment:
1.- Click on Register from File on main menu.
2.- Select the video file you wish to watch and click Open.
3.- Open or create a category template to record the actions of the generated video.
To create a category template, click
.
To open a category template, click
Nacsport Pro Plus
wwww.nacsport.com 35
4.- To register actions.
Click
or check the option Register actions.
Click the video image to play and then click on the categories (buttons) created for that purpose, as they
arise.
Click the video to pause the playback.
To order registers History Click
History by creation.
and select
Order registers History by time or Order registers
1- Order registers History by time: last action shown will be the last moment of the video registered.
2- Order registers History by creation: last action shown will be the last moment of the video registered
in the current actions register.
Example: An analyst is reviewing a game for the second time and then he registers new actions in the
middle of that event. With this new tool he will be able to choose how the registers are listed in the register
control: whether the last one shown in the list is the last of the event or the last one clicked. The purpose
of this feature is so that you can easily check the last registers created regardless of where they appear
chronologically in the video.
Options for descriptors: Click
and select Last descriptor sets the end time for the category.
With this option, if a user registers a descriptor beyond the time set for a category, this category will
change its final time to include this descriptor within the time of the category.
To draw onto the image, click
Nacsport Pro Plus
. This drawing will be saved in you database. .
wwww.nacsport.com 36
To go to a specific moment in the video, click
and click
, then select the time you want to go
.
To add an independent text note press the Ctrl key ( see annex 8.2 part 1.2)
Click
and the register control window will be minimized.
To quickly modify buttons, right click the button you want and choose what you want to modify on the
drop-down menu.
Categories' menu :
Descriptors' menu:
To add a descriptor on an already registered category, click the register in the box on the left of the
register control window and click the descriptor you want to add.
Now the category contains the descriptors Good and Visitor player 2.
To add a note to an already registered category, click right the register which is in the box on the left of
the register control window and add a note. By default, notes are equal to category descriptors.
To save the note, click
.
To play, compare, classify or change the recorded actions, click
environment (Timeline).
Nacsport Pro Plus
to open the record editing
wwww.nacsport.com 37
4.2 Real-Time register
This is the environment in which video images can be viewed from an external source (video camera,
video converter, etc.) connected to the computer's FireWire port. While a video file is being created
(digitized) with external images, users can use a category template to register actions.
In other words, the video and the action registered are created simultaneously. At the end of the event,
user will have all the actions in a Timeline, where they can be easily analysed and managed.
Follow the steps below to work with this environment:
1.- Connect the camera to the PC
2.- Click Real-Time Register on the main menu.
3.- Enter the name of the video file to be captured. Then click on Save.
4.- The video will be in .MP4 format and will be stored with compressed quality.
You can change the video format from the option menu by clicking
in the register control window.
5.- Open or create a category template to record the actions of the generated video.
To create a category template, click
To open a category template, click
Nacsport Pro Plus
.
.
wwww.nacsport.com 38
6.- To start the video capture, click
.
Then click on the categories (buttons) created for that purpose as they arise.
To pause the video capture click
.
To order registers History Click
History by creation.
and select
Order registers History by time or Order registers
1- Order registers History by time: last action shown will be the last moment of the video registered.
2- Order registers History by creation: last action shown will be the last moment of the video registered
in the current actions register.
Example: An analyst is reviewing a game for the second time and then he registers new actions in the
middle of that event. With this new tool he will be able to choose how the registers are listed in the register
control: whether the last one shown in the list is the last of the event or the last one clicked. The purpose
of this feature is so that you can easily check the last registers created regardless of where they appear
chronologically in the video.
Options for descriptors: Click
and select Last descriptor sets the end time for the category.
With this option, if a user registers a descriptor beyond the time set for a category, this category will
change its final time to include this descriptor within the time of the category.
Nacsport Pro Plus
wwww.nacsport.com 39
To draw onto the image in the current video, click
. This drawing will be saved in you database.
To add an independent text note press the Ctrl key ( see annex 8.2 part 1.2)
Click
and the register control window will be minimized.
To quickly modify buttons, right-button click the button you want and choose what you want to modify on
the drop-down menu.
Categories' menu :
Descriptors' menu:
To add a descriptor to an already registered category, click the register in the box on the left of the
register control window and click the descriptor you want to add.
Now the category contains the descriptors Good and Visitor player 2.
To add note to an already registered category, right click in the register in the box on the left of the
register control window and add note. By default, notes are equal to the descriptors of the category.
To save the note click
.
To play, compare, classify or change the recorded actions, click
environment (Timeline).
Nacsport Pro Plus
to open the record editing
wwww.nacsport.com 40
4.3 Registering without Video Source
Actions from a sport event can be registered without a video opened or a capture device connected to the
computer. For example: one person is recording a sport event and the other one can be on the other side
of the pitch registering actions.
Once the event is over, database can be linked and synchronized with the registered actions on the
respective video.
1- Click on Register without Video Source.
2.-Choose the name of the file to generate and click
.
3.- Open or create a category template to record the actions of the generated video.
To create a category template, click
To open a category template, click
.
.
4.- To register actions.
Click
Click
to start registering.
Then click categories (buttons) created for that purpose as they arise.
Nacsport Pro Plus
wwww.nacsport.com 41
To order registers History Click
History by creation.
and select
Order registers History by time or Order registers
1- Order registers History by time: last action shown will be the last moment of the video registered.
2- Order registers History by creation: last action shown will be the last moment of the video registered
in the current actions register.Example: An analyst is reviewing a game for the second time and then he
registers new actions in the middle of that event. With this new tool he will be able to choose how the
registers are listed in the register control: whether the last one shown in the list is the last of the event or
the last one clicked. The purpose of this feature is so that you can easily check the last registers created
regardless of where they appear chronologically in the video.
Options for descriptors: Click
and select Last descriptor sets the end time for the category.
With this option, if a user registers a descriptor beyond the time set for a category, this category will
change its final time to include this descriptor within the time of the category.
To add an independent text note press the Ctrl key ( see annex 8.2 part 1.2)
Click
and the register control window will be minimized.
To stop registering the event click
.
To quickly modify buttons, right click to the button you want and select what you want to modify on the
drop-down menu.
Categories' menu :
Nacsport Pro Plus
Descriptors' menu:
wwww.nacsport.com 42
To add a descriptor to an already registered category click the register in the box on the left of the register
control window and click the descriptor you want to add.
Now the category contains the descriptors
Good and Visitor Player 2.
To add a note to an already registered category, right-click the register in the box on the left of the
register control window and add the note. By default, notes are equal to the category descriptors.
To save the note click
.
5.- Link a database with a video
When an event had been registered without video source it is necessary to link the created database with
a video in order to get access to the Timeline, to do this click on My analysis.
Select database you want to link (it will be shown in red because it has no video linked ).
Nacsport Pro Plus
wwww.nacsport.com 43
Double click on database and click
Choose the video and click Open.
To play, compare, classify or change the recorded actions, click
Nacsport Pro Plus
wwww.nacsport.com 44
5. Timeline
This environment contains all the registered action shown by categories (rows) in an intuitive Timeline in
which you can modify you register, change its duration, add notes or drawings, etc. You can also make
presentations or video to show your registers. Now all the Timeline options will be explained:
5.1 Timeline icons
5.2 Timeline Tools
Nacsport Pro Plus
wwww.nacsport.com 45
5.1 Timeline icons
Show and hide all records (actions) in selected category.
Show the window to make lists of actions (presentations).
Show the window to make a video with the selected category or actions.
Show the window which generates a sequence of frames of the selected action.
Show the window to compare selected actions (8 maximum).
Show the ‘Viewing and recording actions’ environment.
Show the window to adjust the length or time interval of the records.
Open the window to draw the actual frame of the video.
Delete the selected register/s from the Timeline.
Open the properties window of the selected register in the Timeline.
Open the window which shows all categories and descriptors (Data Matrix).
Show the first frame of each category and all the drawings.
Timeline options.
Open exportation options.
Open the dashboards
Nacsport Pro Plus
wwww.nacsport.com 46
5.2 Timeline tools
a. Show/hide register list
b. Presentations
c. Make a video
d. Frame maker
e. Compare actions
f. Synchronize Timeline
g. Drawing tool
h. Register properties window
i. Data matrix
j. Timeline options
k. Export
l. Dashboards
Nacsport Pro Plus
wwww.nacsport.com 47
5.2.1 Show/hide register list
This tool shows/hides the list of registers the Timeline contains in a clear and easy way.
Registers can be shown by categories or chronological order.
Nacsport Pro Plus
wwww.nacsport.com 48
5.2.2 Presentations
With this tool you can make a list with registers in order to create a presentation and then show them o
make a video with them. In this version of the program you can use up to 5 different videos (databases)
5.2.2.1 To make a presentation
To make a presentation, click
Make a new list by clicking
from the Timeline and then Make a new presentation.
. You can change the name of the list by double clicking it.
Select register you want and press the key number 3 to add them to the list.
You can select registers on the left of Timeline or from the data Matrix.
To delete a list click
.
You can also make a presentation with all the registers in the timeline by clicking
"Make a presentation with the contents of the timeline" option.
Nacsport Pro Plus
and then choosing
wwww.nacsport.com 49
To edit registers from the presentation:
To edit a register from the presentation, double click it or click
.
In this window, you can add notes, pictures and drawings. You can also change the duration of the
register.
To change the length of a register, click on the start/end of a register and when the icon
just drag the register to the moment that you want.
turns up,
To add a drawing, click
at the moment of the video you want to It will be saved in your database so
it will be shown in the presentation.
To add a picture, click
at the moment of the video you want to. It will be saved in your database so
it will be shown in the presentation.
With these options, you can modify an already added drawing or picture.
You can add a note by typing what you want on the proper text box.
To go to the next register, click
.
To edit the presentation:
You can organize the presentation in some different ways:
a) Lists: each list contains a kind of action.
Nacsport Pro Plus
wwww.nacsport.com 50
b) Using front pages to split between a bunch of actions and another
To create a front page click
Click
or
to undo/redo the last changes
Click on
to see the list of already created front pages, select creation order and the front pages will
be ordered by creation date (newest or oldest first).
Modify the time while the front pages are shown selecting it on
You can also order you registers in different ways, by clicking
an then choosing one of these options
:
Name:
Nacsport Pro Plus
Time:
Colour:
wwww.nacsport.com 51
To add an external audio file to the presentation click on
And then click
and choose the file you want
Set list structure as favourite
With these options, users will be able to save a list structure to be used in future presentations.
To do this, right click the mouse over a list and select Save the list structure as favourite.
To load a list in the new presentation, right click the mouse and select Load favourite lists
If you want that your favourite list structure is loaded automatically select Auto-load favourite lists for
new presentations
Import images as front pages into a presentation.
There are 2 options:
A) Select the image/images you want to import and drag them into the presentation window
.
B) Click on
, select import image and then select the image/images you want to import.
Note: Each image you import will be added as a new front page in the presentation.
Copy, cut and paste registers in the presentation.
A) Select the register you want in a list, right mouse button click and choose copy or cut. Select
the list where you want to paste the registers, right mouse button click and choose the paste
option.
B) Select the register you want in a list, drag them into another list to copy them. rag them into
another list while keeping pressed the Ctrl key to cut them.
Nacsport Pro Plus
wwww.nacsport.com 52
5.2.2.2 Show a presentation
To show a presentation, click
.
In this window, the presentation that you choose will be shown.
To show notes and descriptors of a presentation, click
.
To reproduce a register after another with stopping the video, click
You can show the previous or next register by clicking
To show the video on full screen, click
.
or by pressing keys 1 and 2.
.
5.2.2.3 To produce a presentation
To produce a video with the selected presentation, click
drop-down menu
and select one of the options in the
.
You can select the output video format in the video production window.
Click
to start the production.
Type the name of the file that will be produced and click on Save.
Nacsport Pro Plus
wwww.nacsport.com 53
5.2.3 Make a video
With this tool you can make a video with the selected registers.
1-To make a video select the register you want in it an then click
2- Select output format and quality you want and click
By clicking
.
.
, a drop-down menu will appear showing more options for video quality.
To show notes in the video, click
and choose the option you want.
To add audio to the video click Process audio and choose the option you want.
To add an external audio file to the video click
And then click
and choose the file you want
3- Type the name on the file you are going to produce a click on Save.
Nacsport Pro Plus
wwww.nacsport.com 54
5.2.4 Frame maker
With this tool you can split a video into separate images.
1- Select a register and click on
.
2- Select the amount of frames you want to extract from the video
.
Cl¡ck
to draw in current frame.
Click
to save the actual image a .jpg file.
Click
to save all images as .jpg files.
Click
to play all the images.
Click
to produce a video with all the extracted images.
Nacsport Pro Plus
wwww.nacsport.com 55
5.2.5 Compare actions
With this tool you can compare up to 8 different videos (registers).
1- To compare registers just select them in the grid on the left of Timeline by keeping pressed Control key
and clicking
.
You can draw by clicking
.
To synchronize the beginning of one of the videos, click
the process with other videos.
To play all the videos at the same time, click
To see the videos on full screen, click
Nacsport Pro Plus
and
until the moment you desire. Then, repeat
.
.
wwww.nacsport.com 56
5.2.6 Synchronize Timeline
With this tool you can modify the time of you registers in an quick and easy way. This is useful for situation
when the video is wrong synchronized so the registers do not show actions properly.
To open the tool, click
.
Look in the box for the category you wan to modify if you want to modify all the registers of a single
category.
Look for
all the registers of you database.
Select what you want to modify (beginning or end of a register, or moving the time of a register) and then
select how much time
in positive to move to the right in negative to move to the left.
5.2.7 Drawing tool
With this tool you can add a draw onto an exact moment of the video.
To make a draw click
.
To undo or redo a draw click
or
To save the draw as a .jpg file click
respectively.
.
If you want you drawing to appear in presentation and videos, click Save in the database. Drawing will
be shown for 5 seconds by default.
Nacsport Pro Plus
wwww.nacsport.com 57
5.2.8 Open a database in the Timeline
With this tool you can work with as many databases as you want in a single timeline. This allows to make
presentations and videos of several events.
To add a database, click
.
Select a database. Double click it and click Go to the Timeline, or select several databases and click
To change from a database to another one, click the tab you want.
To create a presentation with registers from several databases, make a new presentation and add the
registers you want. Then, select another already opened database in the timeline and add the registers to
the opened presentation.
Nacsport Pro Plus
wwww.nacsport.com 58
5.2.9 Register properties window
In this window, you can modify timing and drawing of your registers, but also add notes and descriptors.
To open the registers' properties window, click
To modify a drawing, click
or double click a register.
.
To add a picture to the register, click on
.
You can add a note by typing what you want on the proper text box.
To add a descriptor, select one in the descriptor list and click
.
To modify the time of the register, drag the beginning or the end of the register to the moment you want.
To go to the next register click
Nacsport Pro Plus
. To go to the previous register, click
.
wwww.nacsport.com 59
5.2.10 Data matrix
In this window you can see in a clear and quick way all the categories and descriptors. You can consult
numerically all the actions registered and see them immediately.
To access to the data matrix, click
.
To add a selected register in the data matrix to a presentation, click
is already opened.
or press key 3 if the presentation
To produce a video with the register selected in the data matrix, click
.
To open the register properties window, double click a register or click
.
To export the data matrix, click
and choose one of these options
.
Multiple matrix
To make a multiple data matrix, you have to have a second database opened in the Timeline ( See section
5.2.9)
Click " Make a multiple data matrix with all the opened databases " and choose the databases you wan to
see in the matrix
Click
Nacsport Pro Plus
wwww.nacsport.com 60
Simple data matrix:
Multiple data matrix:
Data matrix from presentation's list
You can also make a data matrix that only shows the register you have in a list:
Open a presentation
Select a list and click
Nacsport Pro Plus
wwww.nacsport.com 61
5.2.11 Timeline options
Zoom
: you can maximise or minimise the Timeline. To show the entire Timeline, click
Change the start or end of a record: position the cursor on the left (start) or right (end) of the record
and when it changes to
. Left click and drag it in one of the two possible directions.
Temporary displacement of record (without affecting its length):place the cursor in the centre of the
record and when it changes to
. Left click and drag it in one of the two possible directions.
Add category : Right click the name of a category (row) and select Add row.Then enter a name and
click on Ok. Timeline can have a maximum of 50 categories or rows (depending on the number of
categories previously created in the buttons template).
Edit category name (row): Right click the name of the category to be edited. Select Edit category
name and click
.
Delete category (row): Right click the name of the category to be deleted. Select Delete row and click
Yes.
Duplicate category (row): Right click the name of the category to be duplicated and select Duplicate
row.
Order the Timeline: Right button click on any category and choose "Order the Timeline by...". You can
order the Timeline by colour, name, number of registers o customized.
Make a new register in a category: select the category in which the register will be made, place the
vertical position marker at the moment you want, right button click on the selected category and click
Make a new register in this category or press the "C" key.
Show/hide a category: Select the category you want and click
category option.
the Hide category or Show
Show/hide total sum of registers: Right button click on the Timeline and select the Show/hide total
sum of registers
Add databases of the same video: This option mixes all databases of a same video in a single
database. This feature is useful in case two or more people are working in the same action registering
from two or more computers
Follow these steps:
1- Click
icon and select Add database (from the same video).
2- Select a database and click Open.
previously opened database.
Registers from this database will be automatically added to
Hide/show TimeLine: From the Timeline’s options menu, select Hide Timeline.
Note: whilst the TimeLine is hidden, registers can be only viewed by categories and not in
chronological order.
Merge overlapped registers: with this option the register that are overlapped will became a single
register
Note: once the registers have been merged, this change cannot be undone.
Nacsport Pro Plus
wwww.nacsport.com 62
5.2.12 Export
With this tool you can export you database in some different ways:
- As .XLS file showing the registers in chronological order.
- As .XLS file showing the percentage of categories.
- As. XML file in order to work with other programs.
- As .XLS file.
To export, click
and select desired option
Nacsport Pro Plus
.
wwww.nacsport.com 63
5.2.13 Dashboards
Charts
The charts will allow you to see a graphical representation of the actions happened in the event, making
easier to understand what happened during the event
To create a dashboard click
on and select "make a new chart"
Choose the kind of chart you want to make and then click on the categories and descriptors you want to
show. The pie and donut charts can only contain a single category in the case of adding descriptors, the
lines chart can contain only categories or only descriptors
To change the colour of any element in the chart click on it and choose the color you want. To add the
same color to all the elements you are adding to the chart clic on "Same colour for each series"
To show the amount of time during an action took place instead of the amount of action happened click on
Amount of actions happened:
Amount of time during the actions took place:
To create a chart relative to a group select any of the pie or donut charts and click on the categories or
descriptors you want to see, then click on "Relative to a group" and choose the group which contains the
categories or descriptors you selected before. Now the chart show the value of the action selected in
relation to the total amount of the group
Example:
If you select a player relative to a group which contains the total amount of player you can see
participation of a player in relation the participation of the rest. To do this select the player you want,
select "Relative to a group" and select the group which contains all the players.
Nacsport Pro Plus
wwww.nacsport.com 64
To create a chart which works as a filter click on the category you want, then on the descriptors you want
and lastly on "Filtered mode", when this option is active you will only see the categories which contains all
the descriptors selected at the same time
Example:
To see all the shot on the right in the area select the category shots, the descriptor right and the descriptor
in the area. Select "Filtered mode". No you will only see in the chart the shot which contains the
descriptors right and the descriptor in the area at the same time
Labels
Labels will able you to see a numerical representation of actions happened in a event, making easier to
understand what happened during the event
You can make 3 different kinds of labels, the simple label, the time label and the data label
To make a simple label click on
and set a name for the label, to change the colour of the label click
this label shows only text and can be use to organize the dashboard
To make a time label click on
and set a name for the label, to change the colour of the label click
, this label shows a timer which is the time of the actual video .
To make a time label click on
and select the categories and descriptors you want to show.
Example:
To make a label which show the total amount of actions made by a player on the right of the field click on
the name of the player and on the descriptor right
To change the colour of the label click
Nacsport Pro Plus
wwww.nacsport.com 65
To set a nickname for a label type the nickname on the corresponding box and select
the label will you the text you set for it
Label without nickname:
now
Label with nickname:
To hide the text of a label and only show the numeric value of it click on
To show the amount of time during an action took place instead of the amount of action happened click on
Amount of actions happened:
Amount of time during the actions took place:
To create a label relative to a group select the categories or descriptors you want to see, then click on
"Relative to a group" and choose the group which contains the categories or descriptors you selected
before. Now the label show the value of the action selected in relation to the total amount of the group as
a percentage, to see it as a absolute value click on
Percentage
Absolute value
To make a label which behaves as a sum of elements click on the category you want, then on the
descriptor you want and lastly on " behave as sum" , when this option is active the label will show the total
amount of the categories containing one of the descriptor summed to the total amount of categories
containing the other descriptor.
Example:
To show all the shots on the right and all the shots in the area select the category shot, the descriptor right
and the descriptor in the area. Select "behave as sum". Now you will see all the shot on the right and all
the shots in the area as a single value.
To set an alarm set the value the label must reach to activate the alarm.
Example:
To set an alarm by goals make a label, select the category goals, set the value you want for each alarm
level, for example 1,3,5. Now when the label reaches the value 1 the first alarm will activate, when the
label reaches the value 3 the second alarm will activate and when it reaches value 5 the last alarm will
activate.
Alarm 1:
Nacsport Pro Plus
Alarm 2:
Alarm 3:
wwww.nacsport.com 66
6. My analysis
In this environment you can consult all the databases created or imported by the user.
To access to presentation, timeline or registering environment, double click the name of any green
database you want and choose want you want to do.
If the databases is shown in red colour, this means that there is no video linked to that database due it is
in a different place, it was deleted or it has another name. If the video was not deleted, you can link it with
by double clicking the name of the database a looking for the video.
Nacsport Pro Plus
wwww.nacsport.com 67
You can also:
Make subfolders: Click any folder and then click
.
Delete folders (and the databases in it) or delete databases: Click any folder (or database) and
then click
.
Assign a favorite folder: Click any folder you want and then click
Choose folders' path: Click
.
and then select the path.
Open several databases at the same time: Choose the databases you want and click open
selected databases these databases will be opened at once in the Timeline
Open databases folder: Click
Nacsport Pro Plus
icon.
wwww.nacsport.com 68
7. Tools
7.1 Merge and convert video files
7.2 Import/Export
.XML Files
7.3 Import databases from Tag&Go
7.4 Import OPTA databases
Nacsport Pro Plus
wwww.nacsport.com 69
7.1 Merge and convert video files
With this tool you can convert multiple video files into one video file in .AVI format. Input formats
supported by Nacsport are: .AVI, .WMV, .MOV, .MPEG, .MPG, .MOD, .M2V, .MTS, .M2TS, .VOB, .MP4 and
.AVS.
To use this tool, follow these steps:
1- In the Nacsport main menu, click on Tools.
2- Click on Convert MPEG-2 to .AVI.
3- Click
.
4- Select the video(s) you want to convert to .AVI and click on Open.
5- Click
.
6- Enter a name and select a location for the video that will be generated.
Nacsport Pro Plus
wwww.nacsport.com 70
7.2 Import/Export .XML Files
* To import a .XML folder:
a) At the main menu of the program, click on Tools.
b) Select Import.
c) Select Import .XML of Gamebraker and SportsCode.
d) Click
.
e) Look for the .XML folder and double click it.
f) Select name and destination for the .NAC Database and click on Save.
g) In the section 3, click
.
h) Select the video which you want to link with the .NAC Database and double click it.
i) Click on Open the Timeline.
* To export a .XML folder:
a) Once the Timeline is opened with the folder to export, click
.
b) Select Export .XML.
c) Select name and destination. Then, click Save.
Nacsport Pro Plus
wwww.nacsport.com 71
7.3 Import databases from Tag&Go
In Main Menu,in the tools section, select Import/Import from Tag&go
Click
and select database to import.
Nacsport Pro Plus
wwww.nacsport.com 72
7.4 Import OPTA databases
In Main Menu, select Import/Import F24 Opta
Click
and select file to be imported
Click
and select video to be linked
Click
Nacsport Pro Plus
wwww.nacsport.com 73
8. Annex
8.1 Import and export databases
8.2 Real time streaming
8.3 Nacsport on the web
8.4 Update 2.200
Nacsport Pro Plus
wwww.nacsport.com 74
8.1 Import and export databases
Import and export Nacsport databases is as easy as copy the database you want and paste it in another
PC.
Export:
You can use 2 different methods:
1.- From My documents folder
1-Go to My documents folder.
2- Open NAC SPORT DATA folder
3- Open Databases Nac folder
4- Copy the .NAC files you want from this folder
2.- From Nacsport databases
1- From Nacsport main menu click Nacsport databases.
2- Select the database you want to export.
3- Right click the database and click Copy.
Import:
You can use 2 different methods:
1.- From My documents folder
1- Go to My documents folder.
2- Open NAC SPORT DATA folder.
3- Open Databases Nac folder.
4- Paste .NAC files you want from this folder.
2.- From Nacsport databases
1- From Nacsport main menu, click Nacsport databases.
2- Right click any folder and click Paste to import an already copied file.
Nacsport Pro Plus
wwww.nacsport.com 75
8.2 Real time streaming
This tool allows you to stream in real time all the data you get while registering an event through a local
network and into any device in that same network
Streaming from registering environment:
To do this click on
in the registers control window in the registering environment.
To stream a dashboard click on
select the dashboard you want to open and clic on
Set in any internet browser in any device your computer's IP. You can find you IP in the upper-left corner
of you window
To change the streaming settings click on
To change the time interval in which the data is streamed to the devices click on the drop-drown list of the
option you want to change
To choose the refresh time of the data in the device which receives the streaming click on the drop-drown
list of the option you want to change
To automatically begin the streaming of a dashboard when you open it click on
To see the streamed data type the IP of you PC in any internet browser in any device connected to the
same local network your PC is connected to.
Nacsport Pro Plus
wwww.nacsport.com 76
To see a dashboard in real time click/tap on "Live dashboard"
In this environment you will see the actual view of the dashboard which is showing in the registering data
PC
To see an historical record of the dashboards though an event click/tap on "Dashboard history"
In this environment you can see the evolution of an event though the dashboards generated during that
event
Nacsport Pro Plus
wwww.nacsport.com 77
8.3 Nacsport on the web
E-mail: [email protected]
www.Nacsport.com
Facebook
Twitter
LinkedIn
Nacsport Pro Plus
wwww.nacsport.com 78
8.4 Update 2.200
1 CATEGORY TEMPLATES/ REGISTER OF ACTIONS
1.1 Dashboards
Charts
The charts will allow you to see a graphical representation of the actions happened in the event, making
easier to understand what happened during the event
To create a dashboard click
on and select "make a new chart"
Choose the kind of chart you want to make and then click on the categories and descriptors you want to
show. The pie and donut charts can only contain a single category in the case of adding descriptors, the
lines chart can contain only categories or only descriptors
To change the colour of any element in the chart click on it and choose the color you want. To add the
same color to all the elements you are adding to the chart click on "Same colour for each series"
To show the amount of time during an action took place instead of the amount of action happened click on
Amount of actions happened:
Amount of time during the actions took place:
To create a chart relative to a group select any of the pie or donut charts and click on the categories or
descriptors you want to see, then click on "Relative to a group" and choose the group which contains the
categories or descriptors you selected before. Now the chart show the value of the action selected in
relation to the total amount of the group
Example:
If you select a player relative to a group which contains the total amount of players you can see
participation of a player in relation the participation of the rest. To do this select the player you want,
select "Relative to a group" and select the group which contains all the players.
Nacsport Pro Plus
wwww.nacsport.com 79
To create a chart which works as a filter click on the category you want, then on the descriptors you want
and lastly on "Filtered mode", when this option is active you will only see the categories which contains all
the descriptors selected
Example:
To see all the shot on the right in the area select the category shots, the descriptor right and the descriptor
in the area. Select "Filtered mode". Now you will only see in the chart the shot which contains both the
descriptors right and the descriptor in the area
Labels
Labels will able you to see a numerical representation of actions happened in a event, making easier to
understand what happened during the event
You can make 3 different kinds of labels, the simple label, the time label and the data label
To make a simple label click on
and set a name for the label, to change the colour of the label click
this label shows only text and can be use to organize the dashboard
To make a time label click on
and set a name for the label, to change the colour of the label click
, this label shows a timer which is the time of the actual video .
To make a data label click on
and select the categories and descriptors you want to show.
Example:
To make a label which show the total amount of actions made by a player on the right of the field click on
the name of the player and on the descriptor right
To change the colour of the label click
Nacsport Pro Plus
wwww.nacsport.com 80
To set a nickname for a label type the nickname on the corresponding box and select
the label will you the text you set for it
Label without nickname:
now
Label with nickname:
To hide the text of a label and only show the numeric value of it click on
To show the amount of time during an action took place instead of the amount of action happened click on
Amount of actions happened:
Amount of time during the actions took place:
To create a label relative to a group select the categories or descriptors you want to see, then click on
"Relative to a group" and choose the group which contains the categories or descriptors you selected
before. Now the label show the value of the action selected in relation to the total amount of the group as
a percentage, to see it as a absolute value click on
Percentage
Absolute value
To make a label which behaves as a sum of elements click on the category you want, then on the
descriptor you want and lastly on " behave as sum" , when this option is active the label will show the total
amount of the categories containing one of the descriptor summed to the total amount of categories
containing the other descriptor.
Example:
To show all the shots on the right and all the shots in the area select the category shot, the descriptor right
and the descriptor in the area. Select "behave as sum". Now you will see all the shot on the right and all
the shots in the area as a single value.
To set an alarm set the value the label must reach to activate the alarm.
Example:
To set an alarm by goals make a label, select the category goals, set the value you want for each alarm
level, for example 1,3,5. Now when the label reaches the value 1 the first alarm will activate, when the
label reaches the value 3 the second alarm will activate and when it reaches value 5 the last alarm will
activate.
Alarm 1:
Nacsport Pro Plus
Alarm 2:
Alarm 3:
wwww.nacsport.com 81
2 REGISTER OF ACTIONS
2.1 Real time streaming
This tool allows you to stream in real time all the data you get while registering an event through a local
network and into any device in that same network
Streaming from registering environment:
To do this click on
in the registers control window in the registering environment.
To stream a dashboard click on
select the dashboard you want to open and clic on
Set in any internet browser in any device your computer's IP. You can find you IP in the upper-left corner
of you window
To change the streaming settings click on
To change the time interval in which the data is streamed to the devices click on the drop-drown list of the
option you want to change
To choose the refresh time of the data in the device which receives the streaming click on the drop-drown
list of the option you want to change
To start the data streaming automatically each time you start a new registering clic on
To not stream the plays in real time click on
To automatically begin the streaming of a dashboard when you open it click on
To see the streamed data type the IP of you PC in any internet browser in any device connected to the
same local network your PC is connected to.
Nacsport Pro Plus
wwww.nacsport.com 82
To see a dashboard in real time click/tap on "Live dashboard"
In this environment you will see the actual view of the dashboard which is showing in the registering data
PC
To see an historical record of the dashboards though an event click/tap on "Dashboard history"
In this environment you can see the evolution of an event though the dashboards generated during that
event
Nacsport Pro Plus
wwww.nacsport.com 83
Nacsport Pro Plus
wwww.nacsport.com 84