1
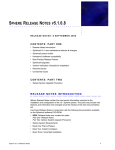
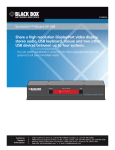
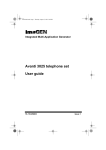
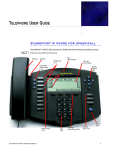
...................................
Sphericall
TM
Sphericall Desktop
User Manual
...................................
Sphericall Desktop
User Manual
H T T P : / / W W W . S P H E R E C O M . C O M
P A R T
N U M B E R
V E R S I O N
6 1 0 - 3 2 0 R 2
3 . 1
Notices
NOTICES
....................................................
Sphericall, Sphericall Manager, Sphericall Softswitch, Sphericall Desktop,
PhoneHub, PhonePort, PhoneNic, COHub, BranchHub, VIM, ATM Direct,
and the Sphere logo are trademarks of Sphere Communications Inc.
Windows, Windows 95, Windows 98, Windows NT, Windows 2000 and
Outlook/Exchange are trademarks or registered trademarks of Microsoft
Corporation. Other products mentioned in this document are also subject to
copyright, trademark, and intellectual property protection as applicable by
law.
Written permission is required prior to reproduction of any of the work
covered here by copyright.
Sphere Communications Inc. is continually upgrading and developing the
products described in this publication. The information contained herein is
specifically designed for Sphericall v3.0+ releases. The information in this
document is subject to change without notice.
For warranty information, see the License Agreement on the Sphericall
Softswitch software CD-ROM.
©2001 Sphere Communications Inc. All Rights Reserved.
Printed in USA.
iv
P/N 610-320r2
Sphericall Desktop User Manual
.....
Contact Sphere Communications
CONTACT SPHERE COMMUNICATIONS
....................................................
MAILING ADDRESS
Sphere Communications Inc.
Two Energy Drive
Lake Bluff, IL 60044 USA
1-847-247-8200 Phone
1-847-247-8290 Fax
Sphericall Desktop User Manual
P/N 610-320r2
v
Contact Sphere Communications
vi
P/N 610-320r2
Sphericall Desktop User Manual
U S IN G
THE
T E LE P H O N E
.....
...................................
1
We welcome you as a new user of the Sphericall Desktop. As a Sphericall
Desktop phone user, you must learn a few basics to get started with the
Sphericall Desktop.
This manual is designed with you in mind. If you follow each of the steps,
you can answer, transfer, place, receive, or conference calls with the
Sphericall Desktop. Refer to your voice mail vendor’s user manual for any
questions regarding voice mail system functionality.
Note: Some of the Sphericall Desktop features are dependent upon what
your system administrator has enabled for your particular phone.
Please ask your system administrator for details about your
organization’s Sphericall system.
SPHERICALL DESKTOP PHONE
FEATURES
....................................................
Distinctive Ringing
If a call comes to your phone from within your organization’s Sphericall
system, you will hear two short rings. If a call comes to your phone from
outside your organization’s Sphericall system, you will hear one long ring.
Caller ID
If your Sphericall system has Caller ID enabled, the caller’s information will
appear on your display phone. If the caller does not have Caller ID, no
information will be displayed. If your Sphericall system has not been
enabled for external Caller ID, you will only receive Caller ID information on
internal calls.
Sphericall Desktop User Manual
1-1
U S I N G T H E TE L E P H O N E
1
Placing Calls from the Telephone
Call Waiting
If your phoneset has been enabled for call waiting, a tone sounds in your
handset when another call is coming in while you are on the current call.
Press the FLASH/LINK key on your telephone to access the second call.
Message Waiting
If your telephone is equipped with a message waiting light and the
administrator has enabled this feature, the light flashes when a message is
waiting in your voice mailbox. A stutter dial tone may also sound to indicate
you have a message when you pick up the handset.
PLACING CALLS FROM THE
TELEPHONE
....................................................
How do I place a normal call?
T o p lace an extern al call
1
Pick up the handset.
2
Dial the outside service number (typically 9).
Outside service your Sphericall system uses: _______
3
Dial the number you wish to call.
T o p lace an in tern al call
1
Pick up the handset.
2
Dial the extension.
PROGRAMMABLE PHONES
Programmable phones can be used in your Sphericall system. Program
each number by first inputting the outside service then the desired number
(for example, 97777777).
1-2
Sphericall Desktop User Manual
Answering Calls from the Telephone
.....
U S I N G T H E TE L E P H O N E
ANSWERING CALLS FROM THE
TELEPHONE
....................................................
The phone associated with the Sphericall Desktop operates just like any
other phone: if it rings, you answer it!
To answer a call
The phone rings...
1
Pick up the handset.
The Sphericall Desktop supports distinctive ringing, Caller ID, and call
waiting.
PLACING A CALL ON HOLD
If your telephone has no HOLD button, use the following procedure:
T o p lace a call o n h o ld u sin g F LA S H /L IN K
1
Press FLASH/LINK on the telephone to place the call on hold.
2
Press FLASH/LINK on the telephone again to retrieve the call from hold.
The only way a caller hears music on hold, if your organization
incorporates music on hold into its Sphericall system, is if you press the
FLASH/LINK button on the telephone. If you place the caller on hold using
the HOLD button, the caller will not hear music on hold.
TRANSFERRING CALLS FROM THE
TELEPHONE
....................................................
Once I have answered a call, how do I transfer it to another extension?
Sphericall Desktop User Manual
1-3
U S I N G T H E TE L E P H O N E
1
Conferencing Calls Using the Telephone
Blind Transfer
Immediate transfer to other extension.
Attended Transfer
Allows you to announce the call prior to the transfer.
When using attended transfer, the caller being transferred
does not hear you announce the call. If your system has
music on hold, the caller hears music during the transfer.
Note: A blind transfer can be completed by using star codes. This option
may be preferred when used with a programmable phone. Refer to
the Star Code table for further information.
T o co m p lete a call (a b lin d tran sfer)
1
Press FLASH/LINK on the telephone.
You will hear dial tone.
2
Dial the extension.
The transfer is complete when you hear dial tone.
3
Hang up the handset.
Your phone is set by default to blind transfer. You can change this setting
with your Sphericall Desktop.
T o co m p lete a call (an attend ed tran sfer)
1
Press FLASH/LINK on the telephone.
2
Dial the extension.
3
Announce the call.
4
Hang up the handset to complete the transfer.
CONFERENCING CALLS USING THE
TELEPHONE
....................................................
Now that I am talking to someone, how do I conference another person into
our call?
1-4
Sphericall Desktop User Manual
Sphericall PhoneSet Star Code Commands
.....
U S I N G T H E TE L E P H O N E
T o p lace a co n feren ce call
With one call already connected:
1
Press FLASH/LINK on the telephone to place the current call on hold.
2
Dial the extension number or an outside number (outside service plus the
desired number).
3
Press FLASH/LINK to place the new call on hold.
4
Dial *95.
The conference call is now in progress.
• You may conference yourself plus five other callers in a conference call
depending on available resources.
SPHERICALL PHONESET STAR CODE
COMMANDS
....................................................
The Sphericall Desktop is enabled with several star code commands that
you can use directly from the phoneset. Use the following star code
commands to set features and perform functions from any telephone.
Table 1.1
Star Codes
Code
Action
Explanation
Authorization PIN
*99 + PIN + # + number
to be dialed
Allows you to apply permissions from your user profile to
another line and make calls from a phone.
Blind Transfer
FLASH/LINK + *96 +
Extension
Complete a blind transfer to another extension.
Sphericall Desktop User Manual
1-5
1
U S I N G T H E TE L E P H O N E
Sphericall PhoneSet Star Code Commands
Code
Action
+ # (optional)
Activates the station number to which all your calls will be
forwarded.
• The number can be an extension or outside service +
local telephone number (example: 9 + 555-1234).
• If the number is not already on the forwarded list, it will be
added and enabled.
• Only a single handset-entered forwarding number is
entered at a time; though calls may be forwarded to multiple numbers (example: *72 + extension, hangup. Then,
*72 + another extension).
Call Forwarding
Deactivation
*73
Clears the phone’s pre-existing call forwarding setup.
Conferencing
With a call connected:
Press FLASH/LINK
Dial extension or number
Press FLASH/LINK
Dial *95
FLASH/LINK and star code allows user to conference
parties.
Do Not Disturb
Activation
*78
Activates Do Not Disturb for all calls bound for this phone
extension. When Do Not Disturb is activated, the station is
not alerted to any calls. Forwarding and/or Coverage
behaves as usual.
Do Not Disturb
Deactivation
*79
Deactivates Do Not Disturb for all calls bound for this
phone line.
Pickup
*93 + Extension
Retrieves a ringing call or an on-hold call at the entered
extension.
Group Pickup
*92
Retrieves a ringing call from anywhere within the
predefined Group Pickup area.
Park
FLASH/LINK + *8 + the
number of park zone as
announced (by operator)
Places a call into the "virtual" park zone (a "hold" parking
lot where calls can be retrieved from any phone on the
system).
Unpark
*91 + park zone as
announced (by operator)
Retrieves a call from the park zone extension entered. If
there is more than one call in the zone, it will take the oldest
call in the zone.
Paging
Number determined by
your Sphericall system
administrator.
Contact your administrator for the extension of your
system’s paging access.
Call Forwarding Setup
1-6
*72 + number
Explanation
Sphericall Desktop User Manual
Flash Codes For Telephone Functionality
.....
U S I N G T H E TE L E P H O N E
FLASH CODES FOR TELEPHONE
FUNCTIONALITY
....................................................
The Sphericall system uses the FLASH/LINK function on the telephone set
to enable a single-line phone to function as a multi-line phone.
Pressing the FLASH/LINK key on the phone set allows you to “toggle” or
cycle between calls to transfer or make consultative calls.
Flash/Link function table
Table 1.2
Action
Flash Explanation
Making a call
• Pick up your phone receiver
• Dial the number you wish to call
N/A
Placing a call on/off Hold
• Press Hold on the phoneset (no music on hold).
or
• Press FLASH/LINK (music on hold, if available).
Dialing an Outside Number
___________ (outside service provided by administrator)
Answering an incoming call while the phone is
already off-hook
(A call waiting tone will be generated)
Press FLASH/LINK.
Placing a call on Hold to make a second, third,
fourth, etc. call
(The maximum number of calls allowed is determined
by your system administrator.)
Press FLASH/LINK, wait for dial tone, dial another
number.
Retrieving a second, third, fourth, etc. call on Hold
Press FLASH/LINK until the desired party is connected.
• Continue to press FLASH/LINK to cycle through the
calls as they were presented to you.
• Pressing FLASH/LINK will provide dial tone to allow
you to manage the last connected party (i.e. for transfer, conference, call parking, etc.). If upon call waiting,
you will press flash and receive a call immediately without the dial tone.
Transferring the connected party (Attended Transfer)
Press FLASH/LINK, dial the extension, announce the call,
hang up.
• A hold reminder, a very brief ring, will notify you if you
have left another call on hold. Pick up the phone to connect to the next person on hold.
Sphericall Desktop User Manual
1-7
1
U S I N G T H E TE L E P H O N E
Authorization PINs and the Phoneset
Action
Flash Explanation
Transferring the connected party (Blind Transfer)
Press FLASH/LINK, dial the extension, hang up.
• A hold reminder, a very brief ring, will notify you if you
have left another call on hold. Pick up the phone to connect to the next person on hold.
AUTHORIZATION PINS AND THE
PHONESET
....................................................
AUTHORIZATION PIN OVERVIEW
Authorization PINs allow you to apply permissions from your assigned user
profile to initiate calls from a restricted phone.
To use your dialing permissions from a restricted phone, dial *99 + PIN + #
(the # key). The dialing privileges that correspond to your PIN (your user
profile) will apply to the current call. After the call is complete, the phoneset
permissions return to their normal privileges associated with the line.
If you are dialing out from the Sphericall Desktop on your computer, you
will already have permission to make calls. As long as you are logged into
your computer and the Sphericall Desktop is open, you will have your
dialing permissions.
Table 1.3
PIN Code Sequence
Dial:
1-8
*99
Begins dialing permissions.
PIN + # (the # key)
Enters your security access.
Number
Dials a phone number (local or long distance).
Sphericall Desktop User Manual
.....
U S I N G T H E TE L E P H O N E
Authorization PINs and the Phoneset
Note: Your system administrator will supply you with your Authorization
PIN if this feature is active on your system. If you lose your PIN,
your administrator must assign you a new PIN.
Sphericall Desktop User Manual
1-9
1
1-10
U S I N G T H E TE L E P H O N E
Authorization PINs and the Phoneset
Sphericall Desktop User Manual
2
S P H E R IC A LL D E S K TO P S O F TW A R E
.....
...................................
How do I use my telephone in conjunction with the Sphericall Desktop?
Use this chapter if your Sphericall system administrator has integrated your
telephone with the Sphericall Desktop. The following is an overview of the
features you have access to on your computer.
Note: Even if your computer is not turned on, you have access to the
telephone and can receive and place calls from your phoneset.
T o start th e S p h ericall D eskto p ap p licatio n
From the Start menu:
1
Click Start\Programs\Sphericall\Desktop.
The Sphericall Desktop opens and integrates with your phoneset.
Figure 2.1
Sphericall Desktop window
Menu
Toolbar
Active Call Pane
Calls
Phonebook
Recent Calls
Extensions
Folders
Status
Sphericall Desktop User Manual
2-11
SPHERICALL DESKTOP SOFTWARE
2
Extensions List
2
Review the following major areas of the window:
Menus
Drop-down menus contain commands and tasks.
Toolbar
Button commands and tasks.
Folders
Stored number information.
Active Call pane
Live information as calls are in process.
Phonebook, Recent
Calls, Extensions pane
Phonebooks and organization number directories.
Calls
The active call icon which can be dragged to transfer,
right-clicked for more tasks and options, etc.
EXTENSIONS LIST
....................................................
Clicking the Extensions tab of the Sphericall Desktop window allows you to
view all the extensions listed for your organization.
2-12
Sphericall Desktop User Manual
Using the Sphericall Desktop
Figure 2.2
.....
SPHERICALL DESKTOP SOFTWARE
Sphericall window
T o p lace a call u sin g the S ph ericall D eskto p w in d ow
From Phonebook or Extensions tab:
•
Double-click any name or number.
USING THE SPHERICALL DESKTOP
....................................................
ANSWERING CALLS
In the Calls window, new calls will appear when the telephone rings.
• New calls have a yellow bell ringing.
Sphericall Desktop User Manual
2-13
SPHERICALL DESKTOP SOFTWARE
2
Using the Sphericall Desktop
Figure 2.3
Ringing Bell image
• Connected calls have a red handset indicating a call is active.
Figure 2.4
Call Connected image
TRANSFERRING CALLS
T o tran sfer calls u sin g th e S p h ericall D esktop
1
Place the call on hold by clicking the hand icon on the Sphericall Desktop.
2
Double-click the number in the Extensions tab.
or
Drag and drop an active call to a number in the Extensions tab.
Users who transfer calls frequently can also click once in the Extensions
tab then type the first letter of the person’s last name to whom they wish to
transfer the call. This will automatically jump the Extensions list to that
alphabetical section. Double-clicking the appropriate name will complete
the transfer.
Note: If you have attended transfer set in Configure\Options, you must
click Complete Transfer to complete the transfer of a call made from
the Sphericall Desktop. This is not necessary for blind transfers.
3
Hang up the handset.
or
Click the number in the Extensions tab.
4
Press Enter.
5
Hang up the handset.
The call will be transferred.
T o sp eed transfer calls (for O perato rs)
Users who transfer calls frequently will find it helpful to “jump” to the
alphabetical letter of the person to whom they wish to transfer calls.
2-14
Sphericall Desktop User Manual
Using the Sphericall Desktop
1
.....
SPHERICALL DESKTOP SOFTWARE
Click once in the “white space” of the Extensions tab.
On the keyboard:
2
Type the first letter of the last name of the person to whom you are
transferring a call.
This will automatically jump the extensions list to that alphabetical section.
3
Double-click the appropriate name to complete the transfer.
CONFERENCING CALLS
Conferencing calls with the Sphericall Desktop is very easy to do.
T o p lace a co n feren ce call
1
Answer or initiate a call.
2
Place the call on hold.
3
Ring the new extension.
4
Drag either call onto the other call in the Calls pane.
The conference call will be connected.
Figure 2.5
Conference Call image
T o save a co n feren ce call
Once you have a conference call active:
1
Click File\Save Conference.
T o lo ad a con feren ce call
1
Click File\Load Conference.
2
Select a previously-saved conference call.
This will load the phone numbers.
or
3
Double-click the number to call the party and initiate the conference call.
Sphericall Desktop User Manual
2-15
SPHERICALL DESKTOP SOFTWARE
2
Using the Sphericall Desktop
T o tran sfer a call to a user’s vo ice m ailb ox
1
Answer a call.
2
Right-click the extension for the intended transfer.
3
Click “Transfer to this user’s Voice Mailbox.”
The call you transferred will proceed to the voice mailbox.
Note: You must have a third-party voice mail system installed on your
Sphericall system in order to use this function.
T o tran sfer a call to yo u r o w n vo ice m ailb o x
1
Answer a call.
2
Right-click your own extension in the Extensions tab.
3
Click “Transfer to this user’s Voice Mailbox.”
The call you transferred will go to your voice mailbox.
Note: You must have a third-party voice mail system installed on your
Sphericall system in order to use this function.
A NOTE ON OPERATORS
Operators have the ability to monitor more than their own line. Using the
Sphericall Desktop, an operator can place the mouse pointer over
extensions and view user call information. This information includes the
caller’s name, if the call is inbound or outbound, Caller ID (if available), and
call length.
2-16
Sphericall Desktop User Manual
Using the Sphericall Desktop
.....
SPHERICALL DESKTOP SOFTWARE
TITLE BAR BUTTONS
Hide button - Click to hide the Sphericall Desktop.
Minimize button - Click to reduce the Sphericall Desktop image size.
Maximize button - Click to restore the Sphericall Desktop to full image
size.
Exit button - Click to exit the Sphericall Desktop.
The title bar buttons are located at the upper right of the Sphericall
Desktop.
TASKBAR STATUS AREA ICONS
Status Area Shortcut - Opens the Sphericall Desktop
window.
Status Area Call Indicator - Indicates call(s) received.
Do Not Disturb - Silences phone.
Forwarding - Indicates that forwarding is enabled.
Message Waiting - Indicates that a message has been left
on your third-party voice mailbox (where available).
Sphericall Desktop User Manual
2-17
2
SPHERICALL DESKTOP SOFTWARE
Using the Sphericall Desktop
Taskbar status area icons are located in the lower right of the Sphericall
Desktop.
2-18
Sphericall Desktop User Manual
S P H E R IC A LL D E S K TO P O P TIO N S
.....
...................................
3
One of the first things you will need to do with the Sphericall Desktop is to
set the Configuration Options.
THE OPTIONS WINDOW
....................................................
GENERAL TAB
T o set gen eral o p tio n s
From the Sphericall Desktop window:
1
Click Configure\Options.
The Options window appears.
Sphericall Desktop User Manual
3-19
SPHERICALL DESKTOP OPTIONS
3
The Options Window
Figure 3.1
2
Options window, General
tab
Set your own options for the following:
Toolbar Style
Select Small, Large, or Show text under button.
Default Type of Transfer Select Attended Transfer (allows you to announce
transferred calls) or Blind Transfer (immediate
transfer).
3
3-20
Keypad Layout
Select Standard or Numeric for the dial pad layout.
Personal Details
Type your name in the Name field.
Show splash screen
when starting
When the Sphericall Desktop starts, you can enable or
disable the Sphericall logo splash.
Click the Calls tab.
Sphericall Desktop User Manual
The Options Window
Figure 3.2
4
5
.....
SPHERICALL DESKTOP OPTIONS
Options window, Calls tab
Set your own options for the following:
Incoming Calls
Configure Popup and sound options.
Outgoing Calls
Configure Popup options for outbound calls.
General
Close window and monitor options.
Click the Phonebook tab.
Sphericall Desktop User Manual
3-21
SPHERICALL DESKTOP OPTIONS
3
The Options Window
Figure 3.3
6
7
3-22
Options window,
Phonebook tab
Set your own options for the following:
Default Tree Entries
Select how you wish to view calls in the Phonebook.
Number Entries
Select how you wish to sort the calls by first or last
name.
Click the Recent Calls tab.
Sphericall Desktop User Manual
The Options Window
Figure 3.4
8
9
.....
SPHERICALL DESKTOP OPTIONS
Options window, Recent
Calls tab
Set your own options for the following:
Unanswered incoming
calls
Choose which calls appear in Recent Calls list and
the list display color.
Answered incoming calls
Choose which calls appear in Recent Calls list and
the list display color.
Unanswered outgoing
calls
Choose which calls appear in Recent Calls list and
the list display color.
Answered outgoing calls
Choose which calls appear in Recent Calls list and
the list display color.
Recent calls list
Select to bring recent calls list to front when a call is
missed.
Number of entries in list
Choose the number of entries for the Recent Calls
list.
Click the Extensions tab.
Sphericall Desktop User Manual
3-23
SPHERICALL DESKTOP OPTIONS
3
The Options Window
Figure 3.5
10
Options window, Extensions
tab
Set your own options for the following:
Sorting
Set your sorting option by selecting one of the following:
• Phone Number
• Last Name
• First Name
Display
Set your Display option by selecting one of the following:
• Display last name first
• Show the entry's number
• Show an icon next to the entry
Mouse Action
When an entry in the Extensions list is double-clicked, how
do you want the Sphericall Desktop to respond?
• Always dial the entry
• Transfer to this entry if a transfer is possible, otherwise dial
the entry (preferred method for operator functionality)
3-24
Sphericall Desktop User Manual
Integration with Outlook Dialer
.....
SPHERICALL DESKTOP OPTIONS
A NOTE ON THE OUTLOOK TAB
Microsoft Outlook is only used with systems which are integrated with
Microsoft Exchange Server. If your system is integrated with Microsoft
Outlook, you can click the Outlook tab on the Sphericall Desktop to select
and set your preferences for importing Outlook Contacts, Journaling, etc.
INTEGRATION WITH OUTLOOK DIALER
....................................................
In order to fully integrate with Microsoft Outlook’s dialer, you must perform
the following configurations:
T o co nfig u re a P C fo r S p h ericall an d M icro soft O u tlo ok in teg ratio n
On a Microsoft Windows 9x or NT Workstation:
Step
Action
1
Open Control Panel\Telephony\Telephony Drivers.
2
Select Sphericall Service Provider.
3
Click Configure.
4
Click OK to confirm that TAPI service provider has been configured.
5
Under the My Locations tab, type the outside service (i.e. 9, 8, etc.)
required to place calls to the PSTN.
6
Close the Control Panel window.
On a Microsoft Windows 2000 Professional workstation:
Step
Sphericall Desktop User Manual
Action
1
Open Control Panel\Phone\Modem Options\Advanced.
2
Select Sphericall Service Provider.
3-25
SPHERICALL DESKTOP OPTIONS
3
Integration with Outlook Dialer
Step
Action
3
Click Configure.
4
Click OK to confirm that TAPI service provider has been configured.
5
Under Dialing Rule, click edit.
6
Type the outside service (i.e. 9, 8, etc.) required to place calls to the
PSTN.
7
Close the Control Panel window.
Then, on any Microsoft Windows 9x, NT, or 2000 Professional workstation:
1
Open the Microsoft Outlook client.
2
Click Contacts.
From the Toolbar:
3
Figure 3.6
Click Dialer.
Outlook Dialer Button
4
Select New Call.
5
Click Dialing Options.
Under Connect using line:
6
Scroll down to select the appropriate name from the drop-down list box.
7
Click Dialing Properties.
8
Verify that the outside service line is set for local and long distance calls.
9
Click OK
10
Click OK.
11
Click Close.
This desktop is now ready to integrate Sphericall and Microsoft Outlook
dialing. To test, select a contact and click Dial in Microsoft Outlook. This
action invokes the Sphericall Desktop and initiates a call.
3-26
Sphericall Desktop User Manual
Forwarding And Coverage
.....
SPHERICALL DESKTOP OPTIONS
There is additional information on Microsoft Outlook in the Online
Handbook.
FORWARDING AND COVERAGE
....................................................
Forwarding and coverage options must be set for each user. If you have
the Sphericall Desktop, you can establish the settings for forwarding and
coverage yourself.
FORWARDING
Forwarding, or the temporary "follow me" feature of the Sphericall Desktop,
rings both your extension and the other internal extension where the call is
forwarded.
Sphericall Desktop User Manual
3-27
SPHERICALL DESKTOP OPTIONS
3
Forwarding And Coverage
T o set fo rw ard in g co n d itio n s
Figure 3.7
1
Forwarding and Coverage
window
Select Configure\Forwarding.
The Forwarding and Coverage window appears.
2
Select the name and extension for whom you are configuring forwarding
conditions from the drop-down list box.
In the Forwarding group box
3
Select the Enable Forwarding check box to enable forwarding.
4
Click Add.
The New Forwarding Number window appears.
3-28
Sphericall Desktop User Manual
Forwarding And Coverage
Figure 3.8
5
.....
SPHERICALL DESKTOP OPTIONS
New Forwarding Number
window
Select the extension or outside number to which you wish to forward calls
from the drop-down list box.
• If your phone is set to forward to an outside number, it will not ring at
your desk phone and the outside number. It will only ring at the number
where you have forwarded the call.
• Once you have enabled either forwarding or coverage to an outside
number, the call will not follow any other forwarding or coverage
conditions.
6
Click OK.
COVERAGE
Coverage has the added capability of "cascading" call coverage to several
different destinations prior to going to your voice mail. Set your coverage
for all the options you need:
• Voice mail
• Coverage group (of any kind, depending on your role, job, or duties)
• Cellular phone (if necessary)
• Other individuals within your department
Sphericall Desktop User Manual
3-29
SPHERICALL DESKTOP OPTIONS
3
Forwarding And Coverage
VOICE MAIL SETTINGS
Verify that your coverage settings are set to send your calls to voice mail if
you do not answer your phone. Your Sphericall system administrator will
inform you of your system’s voice mail extension number.
T o ad d vo ice m ail settin g s
From the Rings drop-down list box:
1
Set the number of rings that the phone will ring prior to the call being covered
to voice mail.
ADD COVERAGE SETTINGS
To add coverage settings
1
Click Add to add another coverage setting.
The New Coverage Number window displays:
Figure 3.9
New Coverage window
2
Select the extension from the drop-down list box.
3
Click OK to return to the Forwarding and Coverage window.
Note: Your Sphericall system Administrator must give you permission to
forward to an outside number.
3-30
Sphericall Desktop User Manual
Forwarding And Coverage
.....
SPHERICALL DESKTOP OPTIONS
COVERAGE TO OUTSIDE PHONE NUMBERS
When selecting coverage to an outside phone number, observe the
following:
• Type any logical name that makes sense in the Name field.
• Type the number without the outside service (use the default outside
service as listed in the Service field above) in the Number field. If your
Sphericall system has more than one outside service (i.e. one for longdistance calls, one for local calls, etc.), be sure to select the appropriate
outside service.
Example:
Figure 3.10 Outside number option
Typically
Numbers entered here
can be entered as local
or long-distance.
No outside line access
number needed.
CASCADING COVERAGE
Cascading your coverage to different destinations prior to the call(s) going
to your voice mail assists you in managing your calls.
Sphericall Desktop User Manual
3-31
3
Figure 3.11
SPHERICALL DESKTOP OPTIONS
Forwarding And Coverage
Forwarding and Coverage
window
RINGS:
First at your desk: 3 rings
To Ext. 297: 1 more rings
To Ext. 284: 2 more rings
To voice mail at: 6 total
ADD DESTINATIONS TO YOUR COVERAGE
Once all destinations are added, set the rings for each destination so that
each destination has a unique number of rings.
Example:
• Calls ring first to your phone: 3 rings.
• Then to any other covered number(s): 1 more ring for ext. 297; 2 more
rings for ext. 284.
• The call moves to voice mail after the total number of rings listed in voice
mail: 6 total rings.
• If you do not have voice mail coverage set, a call ringing your phone will
continue to ring; or, the phone will ring the designated number of rings
then ring to any coverage numbers listed. The call will ring the final
coverage number (highest number of rings) until it is answered.
3-32
Sphericall Desktop User Manual
Forwarding And Coverage
.....
SPHERICALL DESKTOP OPTIONS
CALL ORIGIN
Calls can also be sorted for coverage based on the origin of the call. If a
direct call to your phone set has an EXTERNAL origin and you prefer that
those calls get covered differently from INTERNAL calls, set up your
coverage to account for internal or external origin calls.
T o set co verag e fo r o rig in calls
1
Select the appropriate origin from the Call Origin drop-down list box.
MULTIPLE EXTENSIONS WITH FORWARDING
AND COVERAGE
At the top of the Forwarding and Coverage window is a drop-down list box
with your name in the user field.
T o set m u ltip le exten sio n s
If you have been given "ownership" of more than one extension or group
extension:
1
Click the drop-down list box with your name in the user field to view each of
the lines of which you have ownership.
For example, it is common for one user in a Sales or Support group to have
ownership of the Sales or Support number; this person can set its
forwarding and coverage options.
2
Set the forwarding and coverage options for that extension.
3
Click OK to return to the main Sphericall Desktop window.
Note: Forwarding is a temporary setting whereas coverage is permanent.
DO NOT DISTURB
The Do Not Disturb button on the toolbar of the Sphericall Desktop window
allows you to "silence" your phone: the phone will not ring at your desk. All
calls go directly to your forwarding and coverage options.
CAUTION!
Sphericall Desktop User Manual
IT IS EASY TO FORGET THAT YOU HAVE DO NOT
DISTURB ACTIVATED. REMEMBER TO DEACTIVATE IT TO
RESUME NORMAL CALL ACTIVITY.
3-33
SPHERICALL DESKTOP OPTIONS
3
Phonebook Entries and Folders
PHONEBOOK ENTRIES AND FOLDERS
....................................................
THE PHONEBOOK PANE
The Phonebook pane on the Sphericall Desktop window is used for your
personal extensions. By default, extensions on your organization’s
Sphericall system will be listed in a "tree" format. If you expand the tree,
you will see all of the users on your system divided by groups.
This allows you to set up your personal folders on your Sphericall Desktop.
All you need to do to place a call is double-click in the Folders pane. The
information in Phonebook folders is stored on your local PC. If you want to
transfer those numbers to a new PC, you must contact your Sphericall
system administrator.
To add a personal folder
3-34
1
Click the Phonebook tab.
2
Highlight the Phonebook directory.
Sphericall Desktop User Manual
Phonebook Entries and Folders
.....
SPHERICALL DESKTOP OPTIONS
Figure 3.12 Sphericall Desktop window,
Phonebook tab
3
Right-click the Personal folder.
4
Select New Entry.
The Phonebook Entry window displays.
Sphericall Desktop User Manual
3-35
SPHERICALL DESKTOP OPTIONS
3
Phonebook Entries and Folders
Figure 3.13 Phonebook Entry window
5
6
3-36
Enter the following options:
First Name
Type the first name.
Last Name
Type the last name. If only using one word, type the word
here (i.e. Home).
Company
Optional field.
Image
Optional field. If you have a bitmap image of someone, select
that check box, then browse to find the image. This image
appears in the Active Call pane.
Number
Type the number. You do not need to add the service number
(i.e. 9 for outside service). You will need to enter the full area
code if this is a long distance number.
Click OK.
Sphericall Desktop User Manual
Park Zones
.....
SPHERICALL DESKTOP OPTIONS
You will now see this new entry in the folder you have created. Whenever
you call or receive a call from this number, you will see this image in the
Active Calls pane.
PARK ZONES
....................................................
The Sphericall system has a number of park zones to aid in placing calls on
hold and retrieving them from another phone. Instead of placing a call on
hold, you can click Park. This allows you to summon another person to
unpark the call by using the Sphericall Desktop or the Star Code *91 plus
the park zone number.
T o p lace calls in to a p ark zo n e
1
Right-click the call in progress.
2
Select Park.
or
Click Park Zone.
Figure 3.14 Park Zones progress image
T o retrieve calls fro m th e P ark Z o ne
1
Select the call on Park (identified by Park icon).
2
Highlight a call in a park zone.
3
Right-click the call.
4
Click Unpark.
or
Click Park.
Calls are unparked by first call in, first call out. The person holding the
longest in the park zone will be the first caller unparked from a single zone.
Sphericall Desktop User Manual
3-37
SPHERICALL DESKTOP OPTIONS
3
Pickup
PICKUP
....................................................
The Pickup feature of Sphericall Desktop allows you to answer a ringing
phone at someone else’s desk. If you hear a ringing phone, follow this
procedure.
T o p icku p a call usin g th e Sp h ericall D eskto p
Figure 3.15 Pickup icon
1
Click Pickup to open the “Pickup a ringing call” window.
2
Click Pickup immediately.
or
Switch to another Pickup Group “area” by clicking the arrow next to the list
box.
3
Select the ringing extension from the drop-down list box.
Note: You may also choose an extension to pick up by clicking
Extensions.
You should now be connected to the person dialing the other person’s
desk.
or
4
Right-click the extension that you wish to pick up.
5
Select Pickup.
You should now be connected to the person dialing the other person’s
desk.
T o p icku p a call usin g th e ph o n e set
1
Dial *92 from your telephone keypad.
This retrieves a call that is ringing within your geographical Group Pickup
area.
T o p icku p a call ring in g at a p articu lar exten sion
1
3-38
Dial *93 then the extension.
Sphericall Desktop User Manual
F IR S T D A Y S E TU P C H E C K LIS T
.....
...................................
4
Use the following checklist to review and set up your Sphericall Desktop
options.
Open Sphericall Desktop on the computer:
Start\Programs\Sphericall\Desktop.
Define your personal details: Configure\Options\General
Tab, Details. (This should be done immediately.)
• Type your name
Set up General tab options: Configure\Options\General Tab.
• Tool Bar Style
• Default Type of Transfer (Review Attended Transfer/Blind Transfer)
• Keyboard Layout
• Personal Details
• Show splash screen (when opening Sphericall Desktop) if desired
Set up Calls tab options: Configure\Options\Calls Tab.
Set your preferences for:
• Incoming Calls
• Outgoing Calls
• General Options
Set up Phonebook tab options:
Configure\Options\Phonebook Tab.
Set your preferences for:
• Default Tree Entries
• Number Entries
Set up Recent Calls tab options: Configure\Options\Recent
Calls Tab.
• Select the appropriate options
Sphericall Desktop User Manual
4-39
4
FIRST DAY SETUP CHECKLIST
Set up Extensions tab options:
Configure\Options\Extensions Tab.
Set up preferences for:
• Sorting
• Display
• Mouse Action
Set up Outlook tab options: Configure\Options\Outlook Tab.
Set up preferences for:
• Incoming Calls
• Outgoing Calls
• Journal
• Contact Groups
Set up Forwarding: Configure\Forwarding.
• Forwarding - Temporary Forwarding
• Coverage - For your work group
• Fallback Coverage - After X number of rings, Enable to go to Voice
Mail, set number of rings
• Click Help to print the Help information from this window if necessary
Practice Minimizing, Closing, and Exiting the Sphericall
Desktop.
Review Sphericall Desktop sections:
•
•
•
•
•
•
•
•
•
•
•
4-40
Calls and the Call icon
Hold
Help
Phonebook
Extensions
Drag and Drop Transfer or Double- click Transfer
Pickup
Folders
Recent Callers
Do Not Disturb
Conference
Sphericall Desktop User Manual
H E LP
AND
O N LIN E H A N D B O O K
.....
...................................
A
ONLINE HELP
Think of your Help files for the Sphericall Desktop as the online handbook.
Help is always available from the Help menu or from Help buttons located
on some of the command windows.
Figure A.1
Help menu
The Help files allow you to answer your own questions on using Sphericall
Desktop. Refer to the Sphericall Desktop Phone Keypad Tips card for
further instructions on phone set commands. Refer to your voice mail
vendor reference guide for voice mail instructions.
Sphericall Desktop User Manual
A-1
A
A-2
HELP AND ONLINE HANDBOOK
Sphericall Desktop User Manual
IN D E X
.....
...................................
A
Add an Image 36
Add Coverage Settings 30
Answering Calls 13
Authorization PINs 8
Forwarding & Coverage 27
Forwarding Setup 27
G
General Options 19
C
H
Call Origin 33
Call Waiting 2
Caller ID 1
Calls Options 21
Cascading Coverage 31
Complete Transfer button 14
Conferencing Calls with the
Sphericall Screen Pop 15
Coverage Setup 29
Coverage to Outside Phone
Numbers 31
Help A-1
D
Default Tree Entries 22
Default Type of Transfer 20
Dialing permissions 8
Distinctive Ringing 1
Do Not Disturb 33
E
Extensions 12
Extensions List on the Screen
Pop 12
F
Flash Codes 7
FLASH/LINK key 7
Sphericall Desktop User Manual
K
Keypad Layout 20
L
Load Conference 15
M
Make An External Call 2
Make An Internal Call 2
Making Calls 13
Message Waiting 2
Multiple Extensions with Forwarding
& Coverage 33
P
Park Zones 37
Personal Details 20
Phone set star codes 5
Phonebook Entries & Folders 34
Phonebook Options 22
Pickup 38
PINs 8
dialing permissions 8
PIN code Sequence 8
place an external call 2
Placing Calls from the Phoneset 2
Programmable Phones 2
S
Save Conference 15
Show splash screen when
starting 20
speed transfe 14
Sphericall Desktop
configuring for Outlook
integration 25
integration with Outlook 25
Star Code Commands 5
N
Number Entries 22
T
O
Telephone set star codes 5
Toolbar Style 20
Transferring Calls 14
online A-1
Operators 14
Options 19
Outlook Dialer 25
Outlook Options 25
Index
V
Voice Mail Settings Setup 30
I-1
INDEX
I-2
Index
Sphericall Desktop User Manual
Sphere Communications Inc.
Two Energy Drive
Lake Bluff IL 60044
© 2000 Sphere Communications Inc.
All rights reserved
Printed in the USA